文章目录
- 一、Pinia API与Vuex s4 有很大不同
- 二、使用步骤
- 1.安装
- 2.使用
- 3、组件中应用
- 案例

官网:https://pinia.web3doc.top/
一、Pinia API与Vuex s4 有很大不同
- 没有 mutations。mutations 被认为是非常几长的。最初带来了 devtools 集成,但这不再是问题
- 不再有模块的嵌套结构您仍然可以通过在另一个 store 中导入和使用 store 来隐式嵌套 store,但 Pinia 通过设计提供扁平结构,同时仍然支持 store 之间的交叉组合方式。您甚至可以拥有 store 的循环依赖关系。
- 更好 typescript 支持。无需创建自定义的复杂包装器来支持 TpeScript,所有内容都是类型化的,并且 AP 的设计方式尽可能地利用 TS 类型推断。
- 不再需要注入、导入函数、调用它们,享受自动补全!
- 无需动态添加 stores,默认情况下它们都是动态的,您甚至不会注意到。请注意,您仍然可以随时手动使用 store 来注册它,但因为它是自动的,所以您无需担心。
- 没有命名空间模块。鉴于 store 的扁平架构,"命名空间"stre 是其定义方式所固有的,您可以说所有 stores 都是命名空间的.
Pinia 就是更好的 Vuex,建议在你的项目中可以直接使用它了,尤其是使用了TypeScript 的项目。
二、使用步骤
1.安装
yarn add pinia
// 或者使用 npm
npm install pinia
2.使用
在main.ts里面映入
import { createApp ] from 'vue'
import App from './App.vue'
import { createPinia } from 'pinia'
// 创建
const pinia = createpinia()
const app = createApp(App)
// 挂载到 Vue 根实例
app.use(pinia)
app.mount('#app')
新建store文件夹。在文件夹下面新建index.ts。
import { defineStore } from 'pinia'
// 1.定义并导出容器
// 参数1: 容器的 ID,必须唯一,将来 Pinia 会把所以的容器挂载到根容器
// 参数2: 选项对象
export const useMainStore = defineStore( 'main',{
    // 类似于组件的 data,用来存储全局状态的
    // 1、state必须是函数: 这样是为了在服务端染的时避免交叉请求导致的数据状态污染
    // 2、必须是箭头函数,这是为了更好的 TS 类型推导
	state: ()一{
		return {};
	},
	// 类似于组件的 computed,用来封装计算属性,有缓存的功能
	getters: {
		count10 (state) {  // state可选参数
			console.log('count10 调用了')
			return state.count + 10
		}
	},
	// 类似于组件的 methods,封装业务逻辑,修改 state
	actions: {
		changestate (num:number) {
			this.count+=num
		}
	}
})
// 2.使用容器中的 state
// 3.修改 state
// 4.容器中的 action 的使用
3、组件中应用
<template>
	<div> {{mainStore.count }} </div>
	<div> {{count }} </div>
	<button @click="handleChangeState">修改数据</button>

	<div>{{ mainStore.count10 }}</div>
	<div>{{ mainStore.count10 }}</div>
</template>
<script lang="ts" setup>
	import {useMainStore } from ' .. /store'
	import { storeToRefs } from 'pinia'
	const mainStore = useMainStore( )
	console.log(mainStore.count )
	const { count] = storeToRefs(mainStore)
	//修改数据
	const handleChangestate = ()=>  {
		//  方式一: 最简单的方式就是这样
		mainStore.count++;
		// 方式二: 如果需要修改多个数据,建议使用 $patch 批量更新
		mainStore.$patch({
			count: mainStore.count + 1,
		})
		// 方式三:使用$patch 传递一个函数,也是批量更新
		mainStore.$patch( state=>{
			state.count++;
		})
		// 方式四: 逻辑比较多的时候可以封装到 actions 做处理
		 mainStore.changeState(10)
	}
</script>
如果在组件中把mainStore数据解构出来,那么数据不是响应式的了,需要使用storeToRefs 去解构。实质是将解构出来的数据做ref代理处理。
多个数据批量修改有利于性能优化,因为一个一个改数据会触发一次又一次的视图更新,批量修改只会触发一个视图更新。
注意:不能使用箭头函数定义 action,因为箭头函数绑定外部 this
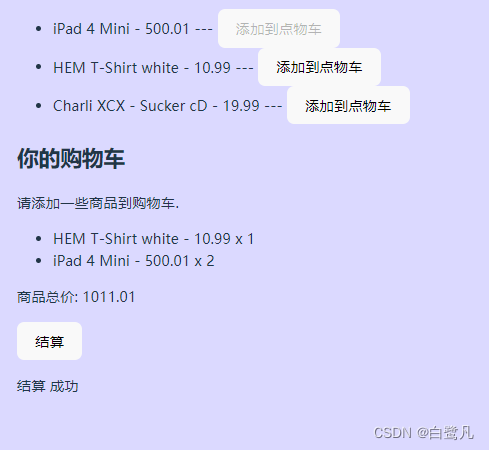
案例
商品列表
。展示商品列表、添加到购物车
购物车
。展示购物车商品列表、展示总价格、订单结算、展示结算状态。
效果如下图:
新建商品组件 ProductList.vue
<template>
    <ul>
        <li v-for="item in productsStore.all">
            {{ item.title }} - {{ item.price }}
            ---
            <button :disabled="item.inventory <= 0" @click="cartStore.addProductToCart(item)">添加到点物车</button>
        </li>


    </ul>
</template>

<script setup lang="ts">
import { useCartStore } from '../store/cart';
import { useProductsStore } from '../store/products';
const productsStore = useProductsStore()
const cartStore = useCartStore()

// 加载数据
productsStore.loadAllProducts()
</script>
新建购物车 Shoppingcart.vue
<template>
    <div class="cart">
        <h2>你的购物车</h2>
        <p>
            <i>请添加一些商品到购物车.</i>
        </p>
        <ul>
            <li v-for="item in cartStore.cartProducts">{{ item.title }} - {{ item.price }} x {{ item.quantity }}</li>

        </ul>
        <p>商品总价: {{ cartStore.totalPrice }}</p>
        <p>
            <button @click="cartStore.checkout()">结算</button>
        </p>
        <p v-show="cartStore.checkStatus">结算 {{ cartStore.checkStatus }}</p>
    </div>
</template>
<script setup Tang="ts">
import { useCartStore } from '../store/cart';
const cartStore = useCartStore()
</script>
在api文件下 新建 shops.ts 文件,用于模拟调用数据接口
export interface IProduct {
    id: number
    title: string
    price: number
    inventory: number // 库存
}
const _products: IProduct[] = [
    { id: 1, title: 'iPad 4 Mini', price: 500.01, inventory: 2 },
    { id: 2, title: 'HEM T-Shirt white', price: 10.99, inventory: 10 },
    { id: 3, title: 'Charli XCX - Sucker cD', price: 19.99, inventory: 5 },
]

export const getproducts = async () => {
    await wait(100)
    return _products

}

export const buyProducts = async () => {
    await wait(100)
    return Math.random() > 0.5
}
async function wait(delay: number) {
    return new Promise((resolve) => setTimeout(resolve, delay))
}
在src目录下新建store 文件,下面新建cart.ts和 products.ts
products.ts 代码如下:
import { defineStore } from 'pinia'
import {getproducts,IProduct} from "../test/api/shops"
export const useProductsStore = defineStore('products', {
    state: () => {
        return {
            all:[] as IProduct[] // 所以商品列表
        }
    },

    getters: {},
    actions: {
        async loadAllProducts () {
            const ret = await getproducts()
            this.all = ret
        },
        // 减库存
        decrementProduct(product:IProduct){
           const ret = this.all.find(item=> item.id === product.id)
           if(ret){
            ret.inventory--
           }
        }
    }
})
cart.ts 代码如下:
import { defineStore } from "pinia";
import { IProduct, buyProducts } from "../test/api/shops";
import { useProductsStore } from "./products"
type CartProduct = {
    quantity: number
} & Omit<IProduct, "inventory"> // 合并IProduct类型数据,Omit 合并IProduct的时候,去除inventory库存这个属性
// IProduct

export const useCartStore = defineStore("cart", {
    state: () => {
        return {
            cartProducts: [] as CartProduct[],   // 购物车商品列表
            checkStatus: null as null | string,
        }
    },
    getters: {
        totalPrice(state) { // 计算总价
            return state.cartProducts.reduce((total, item) => {
                return total + item.price * item.quantity
            }, 0) // 初始为0
        }
    },
    actions: {

        addProductToCart(product: IProduct) {
            console.log(product)
            // 看商品有没有库存
            if (product.inventory < 1) {
                return
            }
            // 检查购物车中是否已有该商品
            const cartItem = this.cartProducts.find(item => item.id === product.id)
            // 如果有则让商品的数量 + 1
            if (cartItem) {
                cartItem.quantity++
            } else {
                // 如果没有则添加到购物车列表中
                this.cartProducts.push({
                    id: product.id,
                    title: product.title,
                    price: product.price,
                    quantity: 1 // 第一次添加数量是1
                })
            }
            // 更新库存
            const prostore = useProductsStore()
            prostore.decrementProduct(product)
        },

        async checkout() {
            const res = await buyProducts()
            this.checkStatus = res ? '成功' : '失败'
        }

    }
})
