🛴🛴前言:
该 Demo 基于 OBS推流 + Nginx + Vue 3.0 + Nplayer.js + hls.js ,目的只是实现流媒体播放,以及简易推拉流直播。
文章目录
- 前端组件 NPlayer.js
- 安装 nplayer.js
- 流视频播放
- 页面元素
- 初始化播放器
- 清晰度控件样式
- 效果如下
- 直播推拉流
- Nginx 安装 rmtp 模块
- Linux 环境可以通过重新编译 nginx 加入 rtmp 模块
- Window 安装 rmtp 模块
- Nginx 配置 hls 服务器
- 配置服务器
- 启动nginx
- OBS推流
- 下载OBS
- 简单配置一下
- 开启直播
- hls.js 拉流 + NPlayer 播放
- 引入 hls.js
- 切换视频流来源
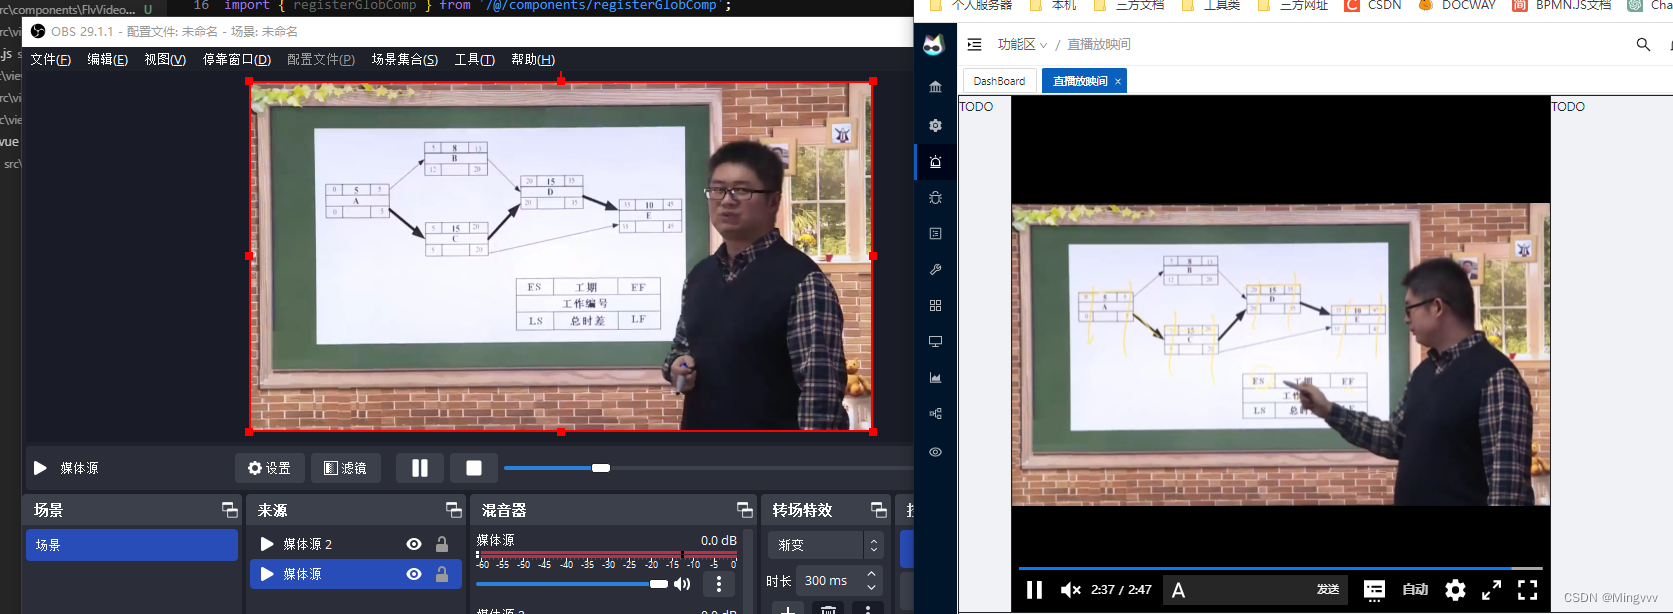
- 查看直播
前端组件 NPlayer.js
一个比较简单自定义的视频流播放组件,可以自定义控件元素等,自带弹幕组件,具体使用文档可访问 https://nplayer.js.org/
安装 nplayer.js
npm i -S nplayer
或者
yarn add nplayer
根据官网描述,需要创建根组件
在main.ts中添加
import App from './App.vue';
import { createApp } from 'vue';
import NPlayer from '@nplayer/vue'; //加上这一行
async function bootstrap() {
  const app = createApp(App);
  ... ...
  app.use(NPlayer); //加上这一行
  app.mount('#app');
}

bootstrap();
流视频播放
页面元素
<template>
  <div class="broad">
    <div class="left_adv"> TODO </div>
    <div ref="centerPlayer" class="center_player">
    </div>
    <div class="right_chat"> TODO </div>
  </div>
  <div class="bottom"> </div>
</template>
初始化播放器
设置播放器,并增加弹幕发送、清晰度调整,修改播放速排序等。
<script lang="ts">
  import { ref } from 'vue';
  import NPlayer, { Popover } from 'nplayer';
  import Danmaku from '@nplayer/danmaku';
  import Hls from 'hls.js';
  import './style.less';
  export default {
    components: {},
    setup() {
      let player = null;
      const centerPlayer = ref(null);

      // 右键菜单增加截图
      const Screenshot = {
        html: '截图',
        click(player) {
          const canvas = document.createElement('canvas');
          canvas.width = player.video.videoWidth;
          canvas.height = player.video.videoHeight;
          canvas.getContext('2d').drawImage(player.video, 0, 0, canvas.width, canvas.height);
          canvas.toBlob((blob) => {
            let dataURL = URL.createObjectURL(blob);
            const link = document.createElement('a');
            link.href = dataURL;
            link.download = 'NPlayer.png';
            link.style.display = 'none';
            document.body.appendChild(link);
            link.click();
            document.body.removeChild(link);
            URL.revokeObjectURL(dataURL);
          });
        },
      };

      // 插件设置
      // 速度设置
      const speedSettingItem = (): SettingItem => ({
        id: 'speed',
        html: '播放速度',
        type: 'select',
        value: 1,
        options: [
          { value: 2, html: '2' },
          { value: 1.5, html: '1.5' },
          { value: 1, html: '正常' },
          { value: 0.5, html: '0.5' },
          { value: 0.25, html: '0.25' },
        ],
        init(player) {
          player.playbackRate = 1;
        },
        change(value, player) {
          this.value = player.playbackRate = value;
        },
      });
      // 1. 首先创建一个清晰度控制条项
      const Quantity = {
        el: document.createElement('div'),
        init() {
          this.btn = document.createElement('div');
          this.btn.textContent = '画质';

          this.el.appendChild(this.btn);
          this.popover = new Popover(this.el);
          this.btn.addEventListener('click', () => this.popover.show());
          // 点击按钮的时候展示 popover
          // 默认隐藏
          this.el.style.display = 'none';
          this.el.classList.add('quantity');
          this.btn.classList.add('quantity_btn');
        },
      };
      const newPlugin = {
        apply(player) {
          player.registerSettingItem(speedSettingItem(), 'speed');
        },
      };

      // 弹幕设置
      const danmakuOptions = {
        items: [{ time: 1, text: '前方弹幕来袭~' }],
      };

      //初始化播放器
      const initPlayer = () => {
        // 设置视频
        const video = document.createElement('video');
        player = new NPlayer({
          seekStep: 10,
          volumeStep: 0.1,
          video: video,
          videoProps: { autoplay: 'true' },
          contextMenus: [Screenshot, 'loop', 'pip'],
          contextMenuToggle: true,
          controls: [
            [
              'play',
              'volume',
              'time',
              'spacer',
              Quantity,
              'airplay',
              'settings',
              'web-fullscreen',
              'fullscreen',
            ],
            ['progress'],
          ],
          bpControls: {},
          plugins: [new Danmaku(danmakuOptions), newPlugin],
        });

        // 绑定流
        const hls = new Hls();
        hls.on(Hls.Events.MEDIA_ATTACHED, function () {
          hls.on(Hls.Events.MANIFEST_PARSED, function () {
            // 4. 给清晰度排序,清晰度越高的排在最前面
            hls.levels.sort((a, b) => b.height - a.height);
            const frag = document.createDocumentFragment();
            // 5. 给与清晰度对应的元素添加,点击切换清晰度功能
            const listener = (i) => (init) => {
              const last = Quantity.itemElements[Quantity.itemElements.length - 1];
              const prev = Quantity.itemElements[Quantity.value] || last;
              const el = Quantity.itemElements[i] || last;
              prev.classList.remove('quantity_item-active');
              el.classList.add('quantity_item-active');
              Quantity.btn.textContent = el.textContent;
              if (init !== true && !player.paused) setTimeout(() => player.play());
              // 因为 HLS 切换清晰度会使正在播放的视频暂停,我们这里让它再自动恢复播放
              Quantity.value = hls.currentLevel = hls.loadLevel = i;
              Quantity.popover.hide();
            };
            // 6. 添加清晰度对应元素
            Quantity.itemElements = hls.levels.map((l, i) => {
              const el = document.createElement('div');
              el.textContent = l.name + 'P';
              if (l.height === 1080) el.textContent += ' 超清';
              if (l.height === 720) el.textContent += ' 高清';
              if (l.height === 480) el.textContent += ' 清晰';
              el.classList.add('quantity_item');
              el.addEventListener('click', listener(i));
              frag.appendChild(el);
              return el;
            });

            const el = document.createElement('div');
            el.classList.add('quantity_item');
            el.textContent = '自动';
            el.addEventListener('click', listener(-1));
            frag.appendChild(el);
            Quantity.itemElements.push(el);
            // 这里再添加一个 `自动` 选项,HLS 默认是根据网速自动切换清晰度
            Quantity.popover.panelEl.appendChild(frag);
            Quantity.el.style.display = 'block';
            listener(hls.currentLevel)(true);
            // 初始化当前清晰度
          });

          // 绑定 video 元素成功的时候,去加载视频
          hls.loadSource('https://test-streams.mux.dev/x36xhzz/x36xhzz.m3u8');
        });
        hls.attachMedia(video);
        player.mount(centerPlayer.value);
      };
      return {
        player,
        initPlayer,
        centerPlayer,
        setPlayer: (p) => (player = p),
      };
    },
    mounted() {
      this.initPlayer();
      console.log(this.player);
    },
  };
</script>
<style lang="less" scoped>
  .tab-header {
    background: white;
    padding-left: 1%;
    padding-right: 1%;
  }
  .broad {
    display: flex;
    width: 100%;
    height: 80%;
  }
  .left_adv {
    width: 60px;
    border: #222222 2px solid;
  }
  .center_player {
    flex: 1;
    border: #222222 2px solid;
    border-left: 0px;
    border-right: 0px;
  }
  .right_chat {
    width: 400px;
    border: #222222 2px solid;
  }
  .bottom {
    width: 100%;
    height: 20%;
    border: #222222 2px solid;
    border-top: 0px;
  }
</style>
清晰度控件样式
清晰度设置的样式在一个单独的样式文件中 ./style.less ,因为我们的清晰度设置控件是在代码中动态生成的,但是当前文件为了防止样式渗透影响到其他页面或公共组件的样式,所以加上了 scoped 属性,这就导致动态生成的元素获取不到当前文件中定义的样式。

所以我们将清晰度样式单独存放
.quantity_btn {
  font-family: sans-serif;
  color: rgb(255, 255, 255);
}
.quantity {
  position: relative;
  padding: 0 8px;
  cursor: pointer;
  font-size: 14px;
  font-weight: bold;
  white-space: nowrap;
  opacity: 0.8;
}
.quantity:hover {
  opacity: 1;
}
.quantity_item {
  height: 30px;
  width: 100px;
  padding: 5px;
  font-weight: normal;
}
.quantity_item:hover {
  background: rgba(255, 255, 255, 0.3);
}
.quantity_item-active {
  height: 30px;
  width: 100px;
  padding: 5px;
  color: var(--theme-color);
}
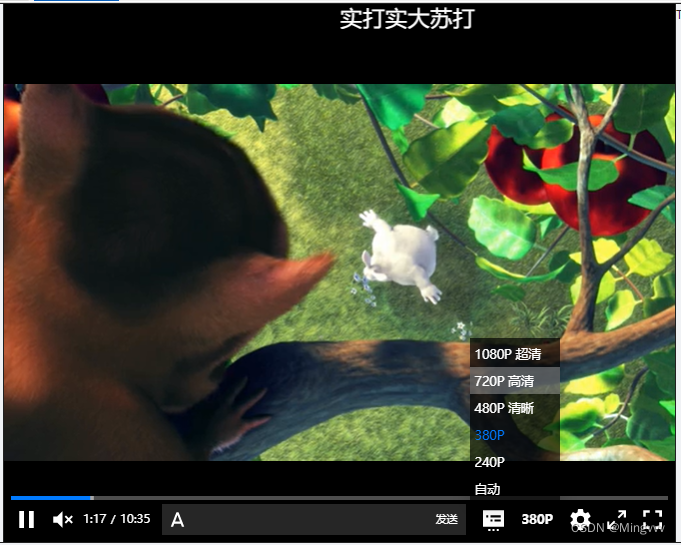
效果如下
直播推拉流
为实现直播间的推拉流,使用 nginx-rtmp-module 模块扩展 Nginx 功能,借助 Nginx 的 Rtmp 模块搭建一个流服务器
Nginx 安装 rmtp 模块
Linux 环境可以通过重新编译 nginx 加入 rtmp 模块
- 先安装 nginx 必要的库
sudo apt-get install build-essential libpcre3 libpcre3-dev libssl-dev - 下载 nginx
wget http://nginx.org/download/nginx-1.20.2.tar.gz - 下载 nginx-rtmp-module 模块
wget https://github.com/arut/nginx-rtmp-module/archive/master.zip - 解压下载的文件并进入 nginx 文件夹
tar -zxvf nginx-1.20.2.tar.gz unzip nginx-rtmp-module-master.zip cd nginx-1.20.2 - 重新编译nginx
./configure --with-http_ssl_module --add-module=../nginx-rtmp-module-master
make
make install
Window 安装 rmtp 模块
官方网站 windows 版本的 nginx 并未提供 rtmp 模块,我们可以从以下网站下载,亲测可用
http://nginx-win.ecsds.eu/download/
版本为
nginx 1.7.11.3 Gryphon.zip
Nginx 配置 hls 服务器
使用 nginx 做一个 hls 的服务器,hls协议可以跨平台,而且码率切换快,基本不会被防火墙屏蔽。
配置服务器
修改 nginx.conf
rtmp {
    server {
        listen 1935;
        chunk_size 4096;
		application hls {
			live on;
			hls on;
			hls_path F:/,,,SpringCloudEnv/nginxrtmpvideo/;#视频流存放地址
			hls_fragment 5s;
			hls_playlist_length 10s;
			hls_continuous on; #连续模式。
			hls_cleanup off;    #对多余的切片进行删除。默认会自动删除,如果想要保留直播内容需要加上这一行
			hls_nested on;     #嵌套模式。
		}
    }
}

http {
    include       mime.types;
    default_type  application/octet-stream;

    sendfile        on;

    keepalive_timeout  65;
    server {
        listen       81;
        server_name  localhost;

        location / {
            root   html;
            index  index.html index.htm;
        }
		# 前端请求的时候需要请求这里的直播文件
		location /hls {
			types {
				application/vnd.apple.mpegurl m3u8;
				video/mp2t ts;
			}
			#访问权限开启,否则访问这个地址会报403
			autoindex on;
			alias F:/,,,SpringCloudEnv/nginxrtmpvideo/;#视频流存放地址,与上面的hls_path相对应,这里root和alias的区别可自行百度
			expires -1;
			add_header Cache-Control no-cache;
			#防止跨域问题
			add_header 'Access-Control-Allow-Origin' '*';
			add_header 'Access-Control-Allow-Credentials' 'true';
			add_header 'Access-Control-Allow-Methods' 'GET, POST, OPTIONS';
			add_header 'Access-Control-Allow-Headers' 'DNT,X-CustomHeader,Keep-Alive,User-Agent,X-Requested-With,If-Modified-Since,Cache-Control,Content-Type';
		}

        error_page   500 502 503 504  /50x.html;
        location = /50x.html {
            root   html;
        }
    }
}
启动nginx
查看是否正常启动nginx
OBS推流
下载OBS
https://obs.yjjxx.cn/index.html?bd_vid=8452749110375400746
简单配置一下

要注意 这里设置的推流码,会在nginx对应存储直播流的文件夹中创建一个同名文件夹 test1,在开启直播后会在 test1 文件中生成一个 m3u8 索引文件,和一系列媒体文件。如下

开启直播
可以使用摄像头、或者使用现存的视频设置媒体源
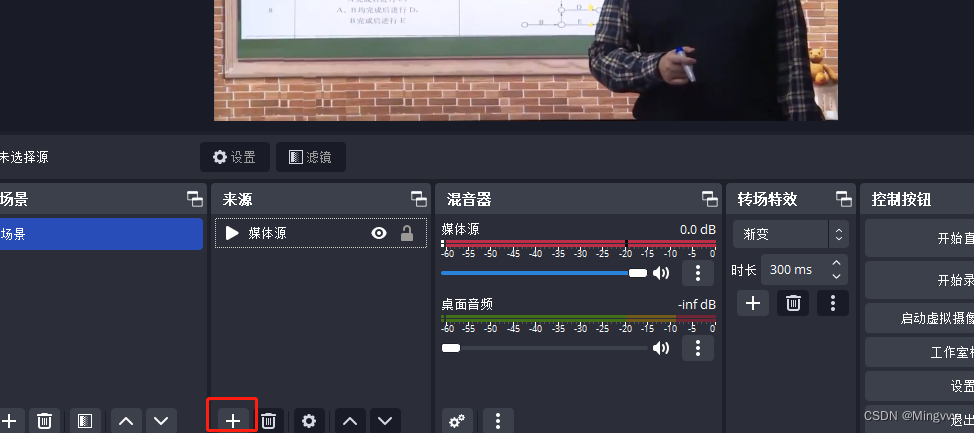
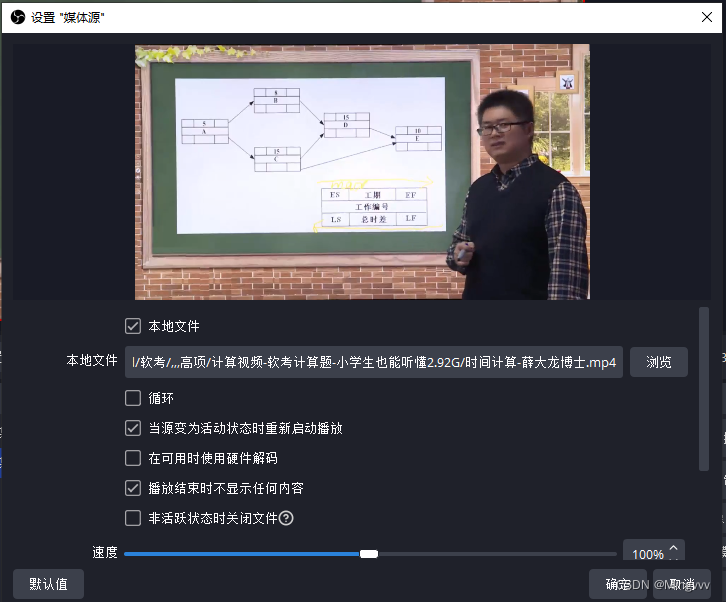
设置好媒体源后,点击开始直播,nginx 文件夹中就有媒体文件不断生成了
hls.js 拉流 + NPlayer 播放
引入 hls.js
npm install hls.js -S
或者
yarn add hls.js
上面的代码中已经使用了 hls.js ,所以不用再做修改。我们只需要把视频流来源切换一下。
切换视频流来源

查看直播
直播开了延迟
