需要源码和数据集请点赞关注收藏后评论区留言~~~
下面我们将使用循环神经网络训练来自18种起源于不同语言的数千种姓氏,并根据拼写方式预测名称的来源。
一、数据准备和预处理
总共有18个txt文件,并且对它们进行预处理,输出如下

部分预处理代码如下
from __future__ import unicode_literals, print_function, division
from io import open
import glob
import os

def findFiles(path): return glob.glob(path)

print(findFiles('data/names/*.txt'))

import unicodedata
import string

all_letters = string.ascii_letters + " .,;'"
n_letters = len(all_letters)

    return ''.join(
        c for c in unicodedata.normalize('NFD', s)
        if unicodedata.category(c) != 'Mn'
        and c in all_letters
    )


for filename in findFiles('data/names/*.txt'):
    category = os.path.splitext(os.path.basename(filename))[0]
    all_categories.append(category)
    lines = readLines(filename)
    category_lines[category] = lines

n_categories = len(all_categories)
二、将名字转换为张量
现在已经整理好了所有数据集种的名字,这里需要将它们转换为张量以使用它们,为了表示单个字母,这里使用独热编码的方法

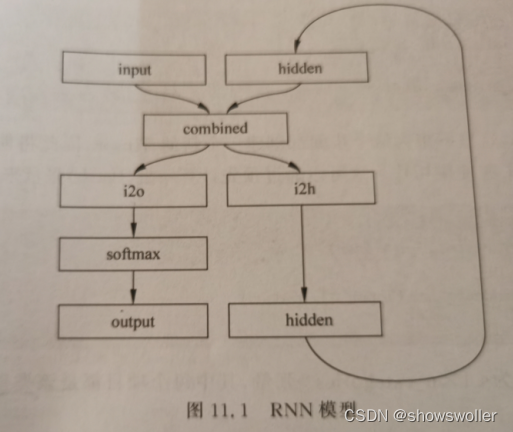
三、构建神经网络
在PyTorch种构建循环神经网络涉及在多个时间步长上克隆多个RNN层 的参数,RNN层保留了Hidden State和梯度,这些状态完全由PyTorch的计算图来自动完成维护,这意味我们只需要关心前馈网络而不需要关注反向传播
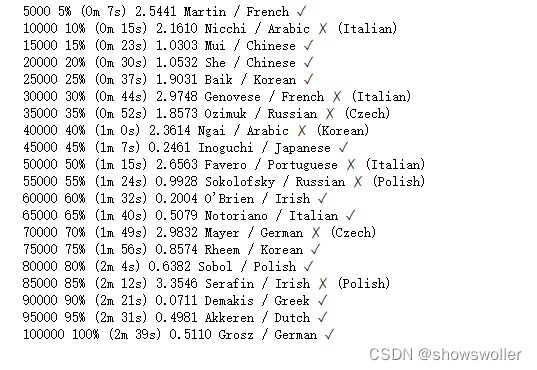
四、训练RNN网络
训练该网络所需要做的是向他输入大量的数据,令其进行预测,然后告诉它是否有错误
每个训练的循环包含下面七个步骤
1:创建输入和目标Tensor
2:创建归零的初始Hidden State
3:输入一个字母
4:传递Hidden State给下一个字母输入
5:比较最终输出和目标
6:反向传播
7:返回输出和损失
平均损失如下
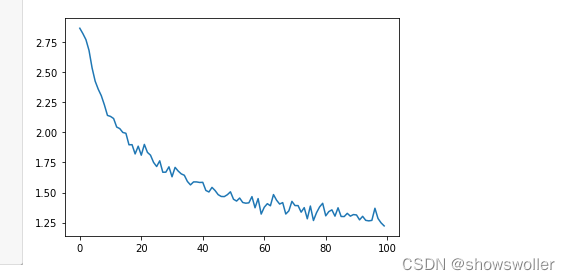
五、绘制损失变化图像
绘制网络的历史损失变化,以显示网络学习情况
可见随着训练次数的增加损失逐渐 梯度下降
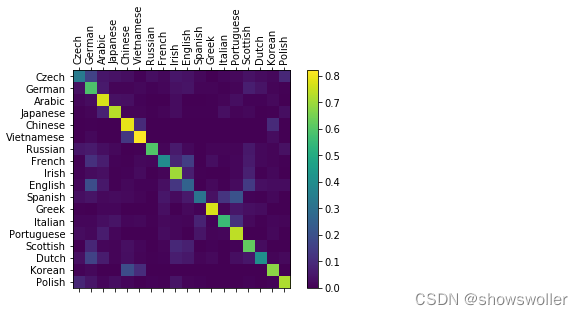
六、预测结果
为了了解网络在不同类别上的表现如何,这里将创建一个混淆矩阵,为每种实际语言指示网络猜测那种语言,结果如下图,可以从主轴上挑出一些亮点,以显示它猜错了哪些语言
可见中文/朝鲜语 西班牙语/意大利语会有混淆,网络预测希腊语名字十分准确,但是英语名字预测的很糟糕
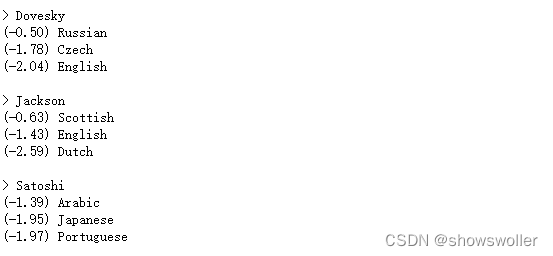
七、预测用户输入
大家可以输入任何希望预测的名字到模型中,网络会给出几个名字最有可能的语言类型
八、代码
需要全部源码请点赞关注收藏后评论区留言~~~
from __future__ import unicode_literals, print_function, division


from io import open
import glob
import os

def findFiles(path): return glob.glob(path)

print(findFiles('data/names/*.txt'))

import unicodedata
import string

all_letters = string.ascii_letters + " .,;'"
n_letters = len(all_letters)

# Turn a Unicode string to plain ASCII, thanks to https://stackoverflow.com/a/518232/2809427
def unicodeToAscii(s):
    return ''.join(
        c for c in unicodedata.normalize('NFD', s)
        if unicodedata.category(c) != 'Mn'
        and c in all_letters
    )

print(unicodeToAscii('Ślusàrski'))

# Build the category_lines dictionary, a list of names per language
category_lines = {}
all_categories = []

# Read a file and split into lines
def readLines(filename):
    lines = open(filename, encoding='utf-8').read().strip().split('\n')
    return [unicodeToAscii(line) for line in lines]

for filename in findFiles('data/names/*.txt'):
    category = os.path.splitext(os.path.basename(filename))[0]
    all_categories.append(category)
    lines = readLines(filename)
    category_lines[category] = lines

n_categories = len(all_categories)


#
#

# In[33]:


#print(category_lines['Italian'][:5])


# Turning Names into Tensors

#

# In[34]:


import torch

# Find letter index from all_letters, e.g. "a" = 0
def letterToIndex(letter):
    return all_letters.find(letter)

# Just for demonstration, turn a letter into a <1 x n_letters> Tensor
def letterToTensor(letter):
    tensor = torch.zeros(1, n_letters)
    tensor[0][letterToIndex(letter)] = 1
    return tensor

# Turn a line into a <line_length x 1 x n_letters>,
# or an array of one-hot letter vectors
def lineToTensor(line):
    tensor = torch.zeros(len(line), 1, n_letters)
    for li, letter in enumerate(line):
        tensor[li][0][letterToIndex(letter)] = 1
    return tensor

print(letterToTensor('J'))

print(lineToTensor('Jones').size())


# This RNN module (mostly copied from `the PyTorch for Torch users
# tutorial <https://pytorch.org/tutorials/beginner/former_torchies/
# nn_tutorial.html#example-2-recurrent-net>`__)
# is just 2 linear layers which operate on an input and hidden state, with
# a LogSoftmax layer after the output.
#
# .. figure:: https://i.imgur.com/Z2xbySO.png
#    :alt:
#
#
#
#

# In[35]:


i
        self.i2h = nn.Linear(input_size + hidden_size, hidden_size)
        self.i2o = nn.Linear(input_size + hidden_size, output_size)
        self.softmax = nn.LogSoftmax(dim=1)

    def forward(self, input, hidden):
        combined = torch.cat((input, hidden), 1)
        hidden = self.i2h(combined)
        output = self.i2o(combined)
        output = self.softmax(output)
        return output, hidden

    def initHidden(self):
        return torch.zeros(1, self.hidden_size)

n_hidden = 128
rnn = RNN(n_letters, n_hidden, n_categories)


# To run a step of this network we need to pass an input (in our case, the
# Tensor for the current letter) and a previous hidden state (which we
# initialize as zeros at first). We'll get back the output (probability of
# each language) and a next hidden state (which we keep for the next
# step).
#
#
#

# In[36]:


inp

# For the sake of efficiency we don't want to be creating a new Tensor for
# every step, so we will use ``lineToTensor`` instead of
# ``letterToTensor`` and use slices. This could be further optimized by
# pre-computing batches of Tensors.
#
#
#

# In[37]:


input = lineToTensor('Albert')
hidden = torch.zeros(1, n_hidden)

output, next_hidden = rnn(input[0], hidden)
print(output)


# As you can see the output is a ``<1 x n_categories>`` Tensor, where
# every item is the likelihood of that category (higher is more likely).
#
#
#

# Training
# ========
# Preparing for Training
# ----------------------
#
# Before going into training we should make a few helper functions. The
# first is to interpret the output of the network, which we know to be a
# likelihood of each category. We can use ``Tensor.topk`` to get the index
# of the greatest value:
#
#
#

# In[38]:


def categoryFromOutput(output):
    top_n, top_i = output.topk(1)
    category_i = top_i[0].item()
    return all_categories[category_i], category_i

#print(categoryFromOutput(output))


# We will also want a quick way to get a training example (a name and its
# language):
#
#
#

# In[39]:


import random

def randomChoice(l):
    return l[random.randint(0, len(l) - 1)]

def randomTrainingExample():
    category = randomChoice(all_categories)
    line = randomChoice(category_lines[category])
    category_tensor = torch.tensor([all_categories.index(category)], dtype=torch.long)
    line_tensor = lineToTensor(line)
    return category, line, category_tensor, line_tensor

for i in range(10):
    category, line, category_tensor, line_tensor = randomTrainingExample()
    print('category =', category, '/ line =', line)


# Training the Network
# --------------------
#
# Now all it takes to train this network is show it a bunch of examples,
# have it make guesses, and tell it if it's wrong.
#
# For the loss function ``nn.NLLLoss`` is appropriate, since the last
# layer of the RNN is ``nn.LogSoftmax``.
#
#
#

# In[40]:


criterion = nn.NLLLoss()

#
#    -  Keep hidden state for next letter
#
# -  Compare final output to target
# -  Back-propagate
# -  Return the output and loss
#
#
#

# In[41]:


learning_rate = 0.005 # If you set this too high, it might explode. If too low, it might not learn

def train(category_tensor, line_tensor):
    hidden = rnn.initHidden()

    rnn.zero_grad()

    for i in range(line_tensor.size()[0]):
        output, hidden = rnn(line_tensor[i], hidden)

    loss = criterion(output, category_tensor)
    loss.backward()

    # Add parameters' gradients to their values, multiplied by learning rate
    for p in rnn.parameters():
        p.data.add_(p.grad.data, alpha=-learning_rate)

    return output, loss.item()


# Now we just have to run that with a bunch of examples. Since the
# ``train`` function returns both the output and loss we can print its
# guesses and also keep track of loss for plotting. Since there are 1000s
# of examples we print only every ``print_every`` examples, and take an
# average of the loss.
#
#
#

    m = math.floor(s / 60)
    s -= m * 60
    return '%dm %ds' % (m, s)

start = time.time()

for iter in range(1, n_iters + 1):
    category, line, category_tensor, line_tensor = randomTrainingExample()
    output, loss = train(category_tensor, line_tensor)
    current_loss += loss

    # Print iter number, loss, name and guess
    if iter % print_every == 0:
        guess, guess_i = categoryFromOutput(output)
        correct = '✓' if guess == category else '✗ (%s)' % category
        print('%d %d%% (%s) %.4f %s / %s %s' % (iter, iter / n_iters * 100, timeSince(start), loss, line, guess, correct))

    # Add current loss avg to list of losses
    if iter % plot_every == 0:
        all_losses.append(current_loss / plot_every)
        current_loss = 0


# Plotting the Results
# --------------------
#
# Plotting the historical loss from ``all_losses`` shows the network
# learning:
#
#
#

# In[22]:


plt.figure()
plt.plot(all_losses)


# Evaluating the Results
# ======================
#
# To see how well the network performs on different categories, we will
# create a confusion matrix, indicating for every actual language (rows)
# which language the network guesses (columns). To calculate the confusion
# matrix a bunch of samples are run through the network with
# ``evaluate()``, which is the same as ``train()`` minus the backprop.
#
#
#

# In[46]:


# Keep track of correct guesses in a confusion matrix
confusion = torch.zeros(n_categories, n_categories)
n_confusion = 10000

# Just return an output given a line
def evaluate(line_tensor):
    hidde
# Go through a bunch of examples and record which are correctly guessed
for i in range(n_confusion):
    category, line, category_tensor, line_tensor = randomTrainingExample()
    output = evaluate(line_tensor)
    guess, guess_i = categoryFromOutput(output)
    category_i = all_categories.index(category)
    confusion[category_i][guess_i] += 1

# Normalize by dividing every row by its sum
for i in range(n_categories):
    confusion[i] = confusion[i] / confusion[i].sum()

# Set up plot
fig = plt.figure()
ax = fig.add_subplot(111)
cax = ax.matshow(confusion.numpy())
fig.colorbar(cax)

# Set up axes
ax.set_xticklabels([''] + all_categories, rotation=90)
ax.set_yticklabels([''] + all_categories)

# Force label at every tick
ax.xaxis.set_major_locator(ticker.MultipleLocator(1))
ax.yaxis.set_major_locator(ticker.MultipleLocator(1))


# You can pick out bright spots off the main axis that show which
# languages it guesses incorrectly, e.g. Chinese for Korean, and Spanish
# for Italian. It seems to do very well with Greek, and very poorly with
# English (perhaps because of overlap with other languages).
#
#
#

# Running on User Input
# ---------------------
#
#
#

# In[47]:


def predict(input_line, n_predictions=3):
    print('\n> %s' % input_line)
    with t evaluate(lineToTensor(input_line))
 = []

        for i in range(n_predictions):
            value = topv[0][i].item()
            category_index = topi[0][i].item()
            print('(%.2f) %s' % (value, all_categories[category_index]))
            predictions.append([value, all_categories[category_index]])

predict('Dovesky')
predict('Jackson')
predict('Satoshi')


# The final versions of the scripts `in the Practical PyTorch
# repo <https://github.com/spro/practical-pytorch/tree/master/char-rnn-classification>`__
# split the above code into a few files:
#
# -  ``data.py`` (loads files)
# -  ``model.py`` (defines the RNN)
# -  ``train.py`` (runs training)
# -  ``predict.py`` (runs ``predict()`` with command line arguments)
# -  ``server.py`` (serve prediction as a JSON API with bottle.py)
#
# Run ``train.py`` to train and save the network.
#
# Run ``predict.py`` with a name to view predictions:
#
# ::
#
#     $ python predict.py Hazaki
#     (-0.42) Japanese
#     (-1.39) Polish
irst name -> gender
#    -  Character name -> writer
#    -  Page title -> blog or subreddit
#
# -  Get better results with a bigger and/or better shaped network
#
#    -  Add more linear layers
#    -  Try the ``nn.LSTM`` and ``nn.GRU`` layers
#    -  Combine multiple of these RNNs as a higher level network
#
#
#
创作不易 觉得有帮助请点赞关注收藏~~~