最近由于工作的需要,初步研究了uboot中的fastboot实现方式。研究fastboot不可避免的需要了解磁盘分区的相关知识点,在linux下可以使用fdisk命令实现磁盘的分区。好了,下面步入正题。
1. 查看帮助信息(fdisk --help)
linux@linux-System-Product-Name:~$ fdisk --help

Usage:
 fdisk [options] <disk>      change partition table
 fdisk [options] -l [<disk>] list partition table(s)

Display or manipulate a disk partition table.

Options:
 -b, --sector-size <size>      physical and logical sector size
 -B, --protect-boot            don't erase bootbits when creating a new label
 -c, --compatibility[=<mode>]  mode is 'dos' or 'nondos' (default)
 -L, --color[=<when>]          colorize output (auto, always or never)
                                 colors are enabled by default
 -l, --list                    display partitions and exit
 -o, --output <list>           output columns
 -t, --type <type>             recognize specified partition table type only
......
2. 查看磁盘分区
通过命令 sudo fdisk -l可以查看磁盘的详细分区情况,如下所示,我电脑目前存在两个磁盘:分别为sda和sdb(其中sda即为240G的固态硬盘,为系统盘,而sdb则为一个容量为16G的SD卡)。
linux@linux-System-Product-Name:~$ sudo fdisk -l
[sudo] password for linux:
Disk /dev/sda: 232.9 GiB, 250059350016 bytes, 488397168 sectors
Units: sectors of 1 * 512 = 512 bytes
Sector size (logical/physical): 512 bytes / 4096 bytes
I/O size (minimum/optimal): 4096 bytes / 4096 bytes
Disklabel type: gpt
Disk identifier: DE19ADF1-DDE6-4899-BC1B-C6B608AD5C31

Device       Start       End   Sectors   Size Type
/dev/sda1     2048   1050623   1048576   512M EFI System
/dev/sda2  1050624 488396799 487346176 232.4G Linux filesystem

Disk /dev/sdb: 14.6 GiB, 15646851072 bytes, 30560256 sectors
Units: sectors of 1 * 512 = 512 bytes
Sector size (logical/physical): 512 bytes / 512 bytes
I/O size (minimum/optimal): 512 bytes / 512 bytes
Disklabel type: dos
Disk identifier: 0x9b9208de

Device     Boot Start     End Sectors Size Id Type
/dev/sdb1        2048 2099199 2097152   1G 83 Linux
linux@linux-System-Product-Name:~$
以sdb为例进行详细的说明如下:
- 磁盘容量为14.6GiB, 合计共15646851072 字节,每个“扇区”的大小为512字节,总共30560256个扇区;
- 扇区的大小(物理 / 逻辑):512字节 / 512字节
- I / O大小(最小值 / 典型值):512字节 / 512字节
- 磁盘标签类型:dos (sda的磁盘标签类型为gpt)
- 磁盘标识符:0x9b9208de
- 该磁盘共分了一个“分区”,分区名称为sdb1, 该分区的起始扇区号为2048, 结束扇区号为2099199,共2097152个扇区(sector),大小为1GiB, 分区ID为0x83(linux native分区),类型为Linux
3. 磁盘分区
需求举例:
- 将sdb磁盘分为4个区,其中1,2,3分区为主分区,4分区为扩展分区;
- 分区1的大小为512M字节, 分区2的大小为2G字节,分区3的大小为4G字节,分区4的大小为剩余的磁盘空间;
- 创建DOS类型的分区表(MBR)
步骤1:执行命令 sudo fdisk /dev/sdb,输入 m 获取帮助信息,如下:
linux@linux-System-Product-Name:~$ sudo fdisk /dev/sdb

Welcome to fdisk (util-linux 2.31.1).
Changes will remain in memory only, until you decide to write them.
Be careful before using the write command.

Command (m for help): m

Help:

  DOS (MBR)
   a   toggle a bootable flag
   b   edit nested BSD disklabel
   c   toggle the dos compatibility flag

  Generic
   d   delete a partition
   F   list free unpartitioned space
   l   list known partition types
   n   add a new partition
   p   print the partition table
   t   change a partition type
   v   verify the partition table
   i   print information about a partition

  Misc
   m   print this menu
   u   change display/entry units
   x   extra functionality (experts only)

  Script
   I   load disk layout from sfdisk script file
   O   dump disk layout to sfdisk script file

  Save & Exit
   w   write table to disk and exit
   q   quit without saving changes

  Create a new label
   g   create a new empty GPT partition table
   G   create a new empty SGI (IRIX) partition table
   o   create a new empty DOS partition table
   s   create a new empty Sun partition table


Command (m for help):
步骤2:输入 p,查看磁盘当前的分区表
Command (m for help): p
Disk /dev/sdb: 14.6 GiB, 15646851072 bytes, 30560256 sectors
Units: sectors of 1 * 512 = 512 bytes
Sector size (logical/physical): 512 bytes / 512 bytes
I/O size (minimum/optimal): 512 bytes / 512 bytes
Disklabel type: dos
Disk identifier: 0x9b9208de

Device     Boot Start     End Sectors Size Id Type
/dev/sdb1        2048 2099199 2097152   1G 83 Linux
当前磁盘共分了一个“分区”,分区名称为sdb1, 该分区的起始扇区号为2048, 结束扇区号为2099199,共2097152个扇区(sector),大小为1GiB, 分区ID为0x83(linux native分区),类型为Linux
步骤3:输入 o,创建一个新的GPT分区表
Command (m for help): o

Created a new DOS disklabel with disk identifier 0x6ade9f76.
The old dos signature will be removed by a write command.
步骤4:输入 n,添加一个新的分区(添加我们的第1个分区,大小为512M)
Command (m for help): n
Partition type
   p   primary (0 primary, 0 extended, 4 free)
   e   extended (container for logical partitions)
Select (default p): p   // 主分区
Partition number (1-4, default 1):	// 分区号为1,直接按“回车”即可
First sector (2048-30560255, default 2048): // 直接按“回车”即可
Last sector, +sectors or +size{K,M,G,T,P} (2048-30560255, default 30560255): +512M // 分配的空间大小为512M

Created a new partition 1 of type 'Linux' and of size 512 MiB.

Command (m for help): p // 查询分区表
Disk /dev/sdb: 14.6 GiB, 15646851072 bytes, 30560256 sectors
Units: sectors of 1 * 512 = 512 bytes
Sector size (logical/physical): 512 bytes / 512 bytes
I/O size (minimum/optimal): 512 bytes / 512 bytes
Disklabel type: dos
Disk identifier: 0x6ade9f76

Device     Boot Start     End Sectors  Size Id Type
/dev/sdb1        2048 1050623 1048576  512M 83 Linux
步骤5:输入 n,依次添加2,3,4分区
Command (m for help): n
Partition type
   p   primary (1 primary, 0 extended, 3 free)
   e   extended (container for logical partitions)
Select (default p): p
Partition number (2-4, default 2):	// 创建第2个分区
First sector (1050624-30560255, default 1050624):
Last sector, +sectors or +size{K,M,G,T,P} (1050624-30560255, default 30560255): +2G // 分区大小为2G

Created a new partition 2 of type 'Linux' and of size 2 GiB.

Command (m for help): n
Partition type
   p   primary (2 primary, 0 extended, 2 free)
   e   extended (container for logical partitions)
Select (default p): p
Partition number (3,4, default 3): // 创建第3个分区
First sector (5244928-30560255, default 5244928):
Last sector, +sectors or +size{K,M,G,T,P} (5244928-30560255, default 30560255): +4G // 分区大小为4G

Created a new partition 3 of type 'Linux' and of size 4 GiB.

Command (m for help): n
Partition type
   p   primary (3 primary, 0 extended, 1 free)
   e   extended (container for logical partitions)
Select (default e): e // 创建扩展分区

Selected partition 4	// 创建第3个分区,MBR最多只能创建4个分区
First sector (13633536-30560255, default 13633536):
Last sector, +sectors or +size{K,M,G,T,P} (13633536-30560255, default 30560255):

Created a new partition 4 of type 'Extended' and of size 8.1 GiB. // 分区大小为“磁盘剩余空间”

Command (m for help): p
Disk /dev/sdb: 14.6 GiB, 15646851072 bytes, 30560256 sectors
Units: sectors of 1 * 512 = 512 bytes
Sector size (logical/physical): 512 bytes / 512 bytes
I/O size (minimum/optimal): 512 bytes / 512 bytes
Disklabel type: dos
Disk identifier: 0x6ade9f76

Device     Boot    Start      End  Sectors  Size Id Type
/dev/sdb1           2048  1050623  1048576  512M 83 Linux
/dev/sdb2        1050624  5244927  4194304    2G 83 Linux
/dev/sdb3        5244928 13633535  8388608    4G 83 Linux
/dev/sdb4       13633536 30560255 16926720  8.1G  5 Extended
步骤6:输入 w,将分区表写入磁盘,至此磁盘分区完成。
Command (m for help): w
The partition table has been altered.
Calling ioctl() to re-read partition table.
Syncing disks.
linux@linux-System-Product-Name:~$  // 退出了磁盘的命令模式
步骤7:再次确认“磁盘分区表”是否真正的写入磁盘
linux@linux-System-Product-Name:~$ sudo fdisk /dev/sdb
[sudo] password for linux:

Welcome to fdisk (util-linux 2.31.1).
Changes will remain in memory only, until you decide to write them.
Be careful before using the write command.


Command (m for help): p
Disk /dev/sdb: 14.6 GiB, 15646851072 bytes, 30560256 sectors
Units: sectors of 1 * 512 = 512 bytes
Sector size (logical/physical): 512 bytes / 512 bytes
I/O size (minimum/optimal): 512 bytes / 512 bytes
Disklabel type: dos
Disk identifier: 0x6ade9f76

Device     Boot    Start      End  Sectors  Size Id Type
/dev/sdb1           2048  1050623  1048576  512M 83 Linux
/dev/sdb2        1050624  5244927  4194304    2G 83 Linux
/dev/sdb3        5244928 13633535  8388608    4G 83 Linux
/dev/sdb4       13633536 30560255 16926720  8.1G  5 Extended

Command (m for help):
如上,与我们预期的是一致的,磁盘分区成功。
4. 其它命令
首先执行命令:
sudo fdisk /dev/sdb
4.1 更改分区类型
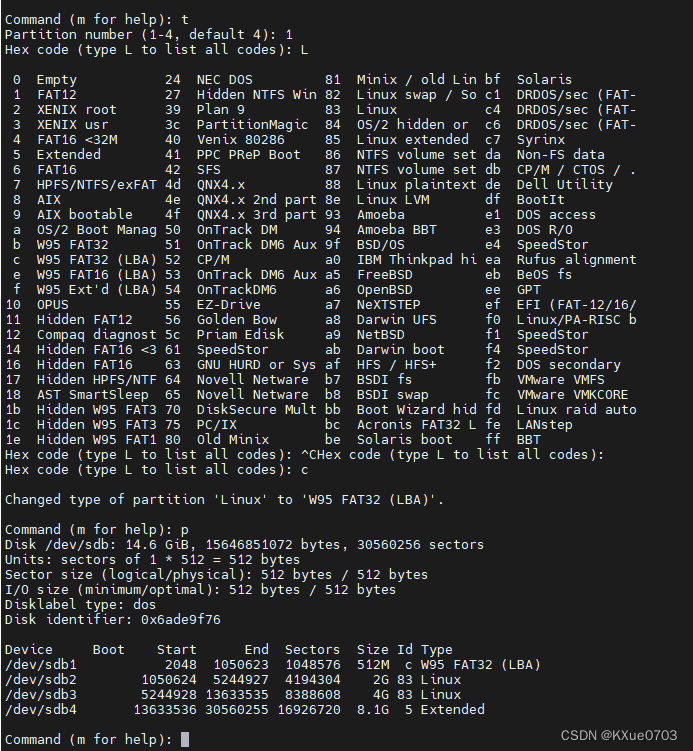
将分区1的类型由“Linux”改为“W95 FAT32 (LBA)”。
