🎉🎉🎉点进来你就是我的人了
博主主页:🙈🙈🙈戳一戳,欢迎大佬指点!欢迎志同道合的朋友一起加油喔🤺🤺🤺
目录
一、页面介绍
二、预期效果
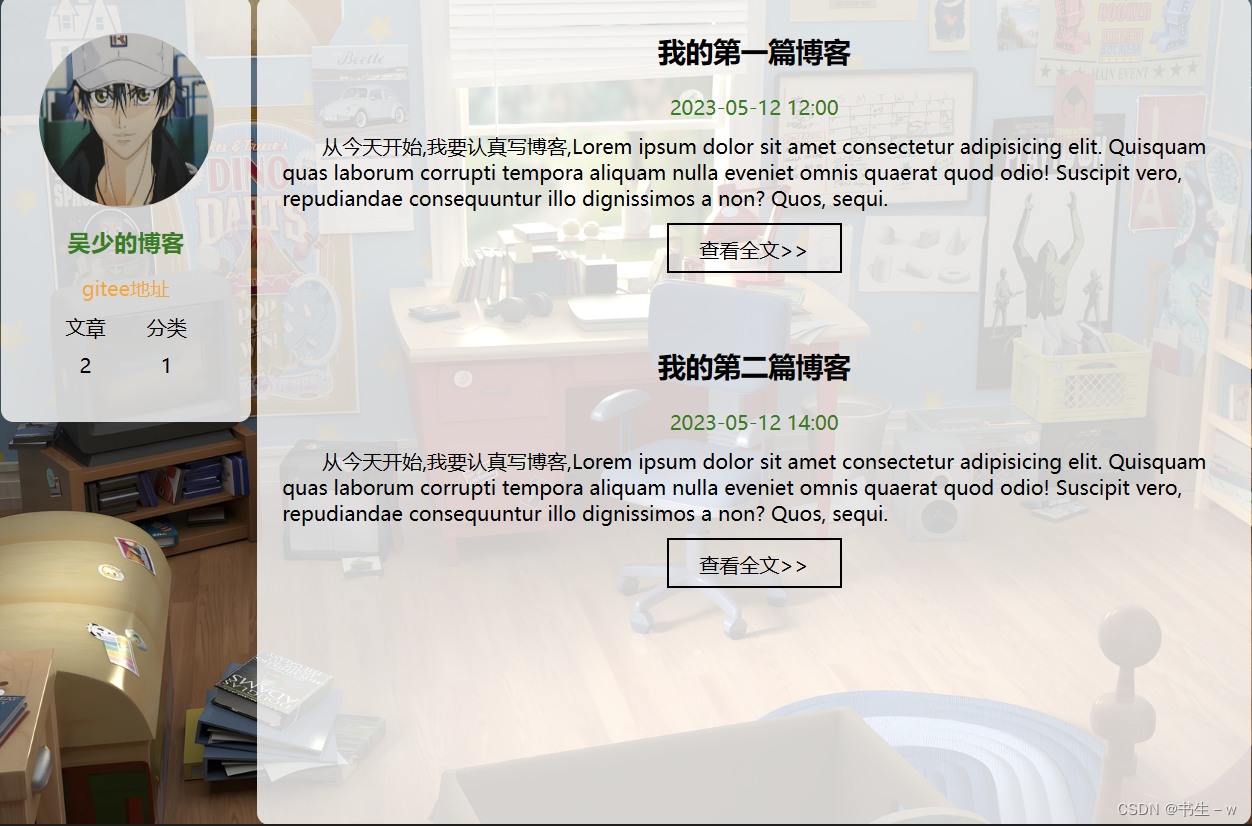
1、博客列表页效果:编辑
2、博客详情页效果:编辑
3、博客登录页效果:编辑
4、博客编辑页效果:编辑
三、预备知识点回顾
四、代码
1、博客列表页(blog_list.html)
1.1、公共样式
1.2、博客列表——样式
2、博客详情页
2.1、样式变形:
2.2、博客详情页——样式
3、博客登录页
3.1、博客登录页——样式
4、博客编辑页
4.1、引入 editor.md:
4.2、博客编辑页——样式
一、页面介绍
博客列表页:显示了当前系统中都有哪些发布出来的博客
- 导航栏:logo,标题,主页,写博客,注销
- 左侧:当前用户信息,用户的头像+名字+其他的简单信息
- 右侧:博客列表
列表中的每一项,包含了,博客标题,发布时间,摘要信息,查看全文按钮
博客详情页:显示了当前博客,详细正文
- 导航栏:和博客列表页相同
- 左侧:显示的是当前文章的作者信息
- 右侧:显示当前文章的详细内容了
登录页面:包含了一个登录框,输入用户名,密码,登录按钮
博客登录页 :登录博客的界面
- 输入用户名
- 输入密码
- 确认登录
博客编辑页:点击 “写博客" 进入的页面
- 导航栏:和前面一样
- 输入框,输入博客的标题
- markdown 编辑器,按照 markdown 的语法来编辑博客内容,用第三方的组件
二、预期效果
1、博客列表页效果: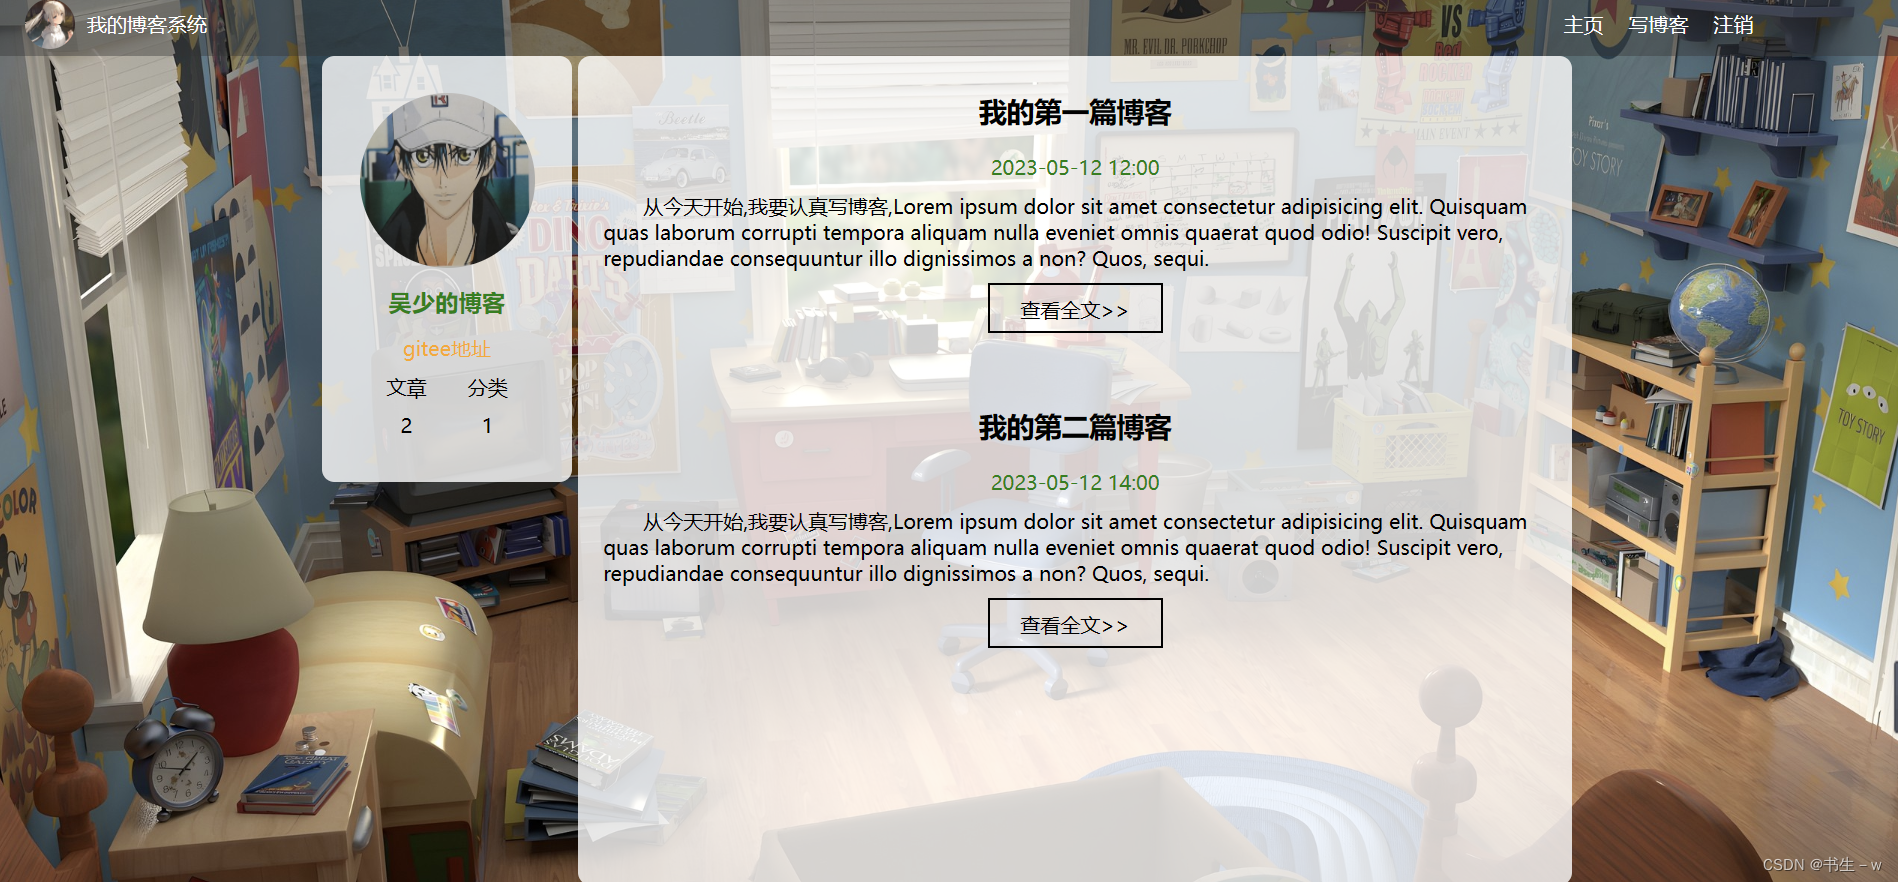
2、博客详情页效果: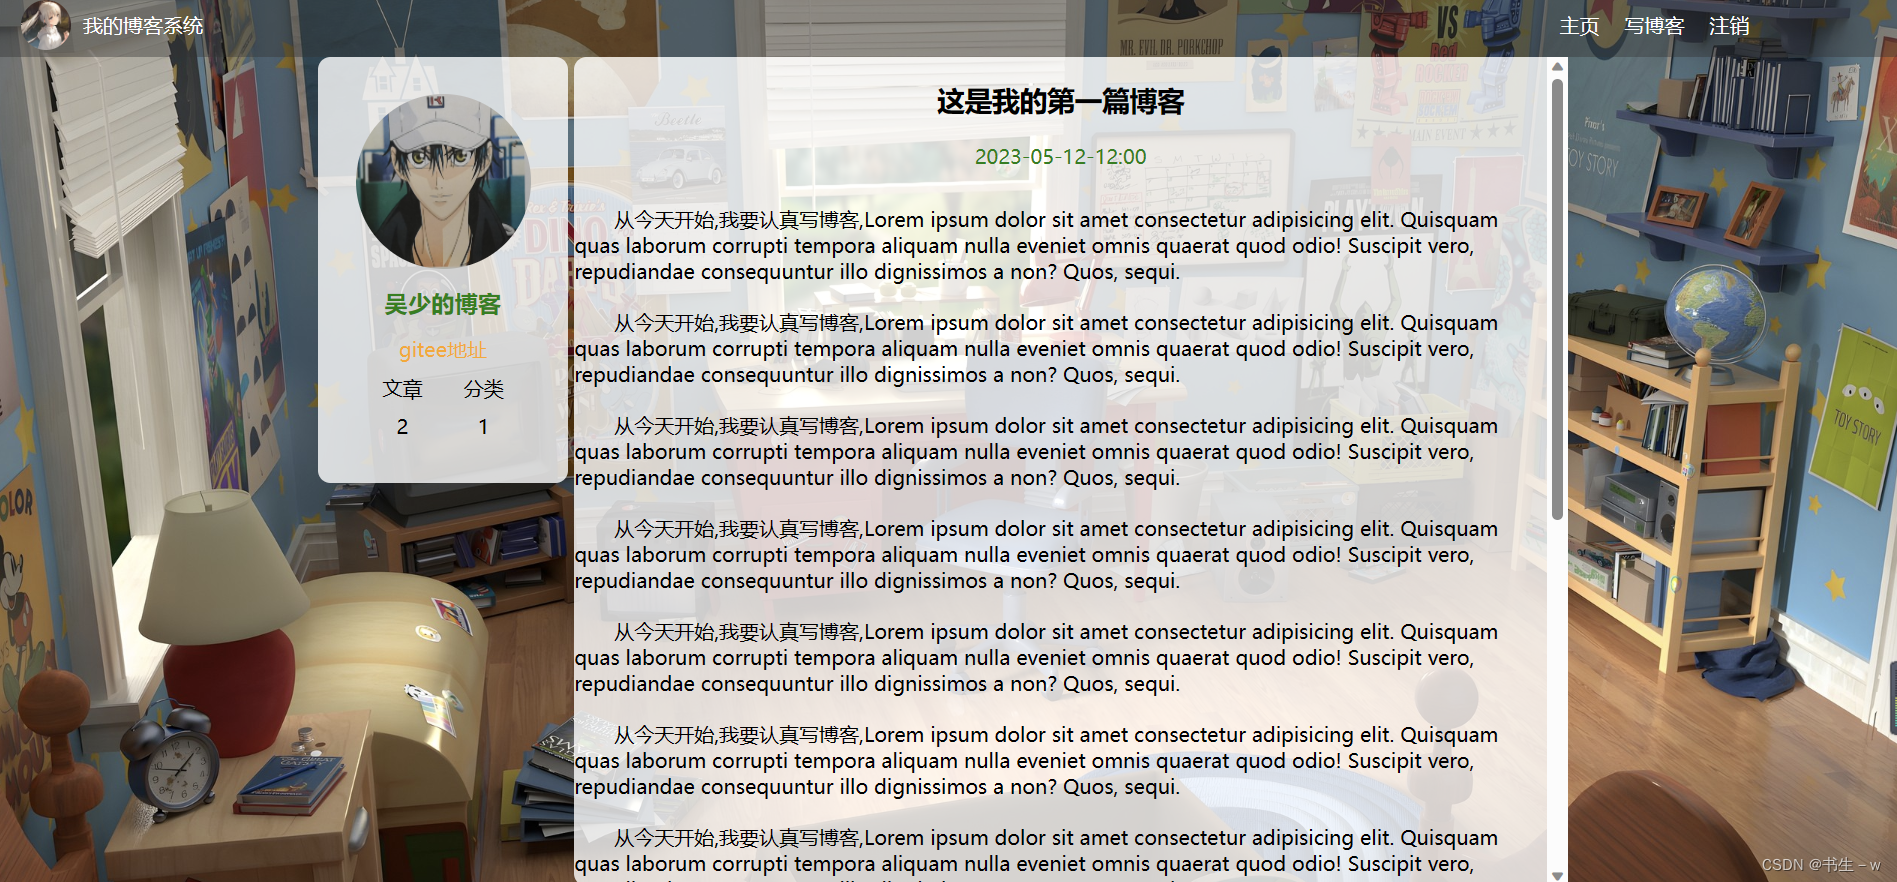
3、博客登录页效果: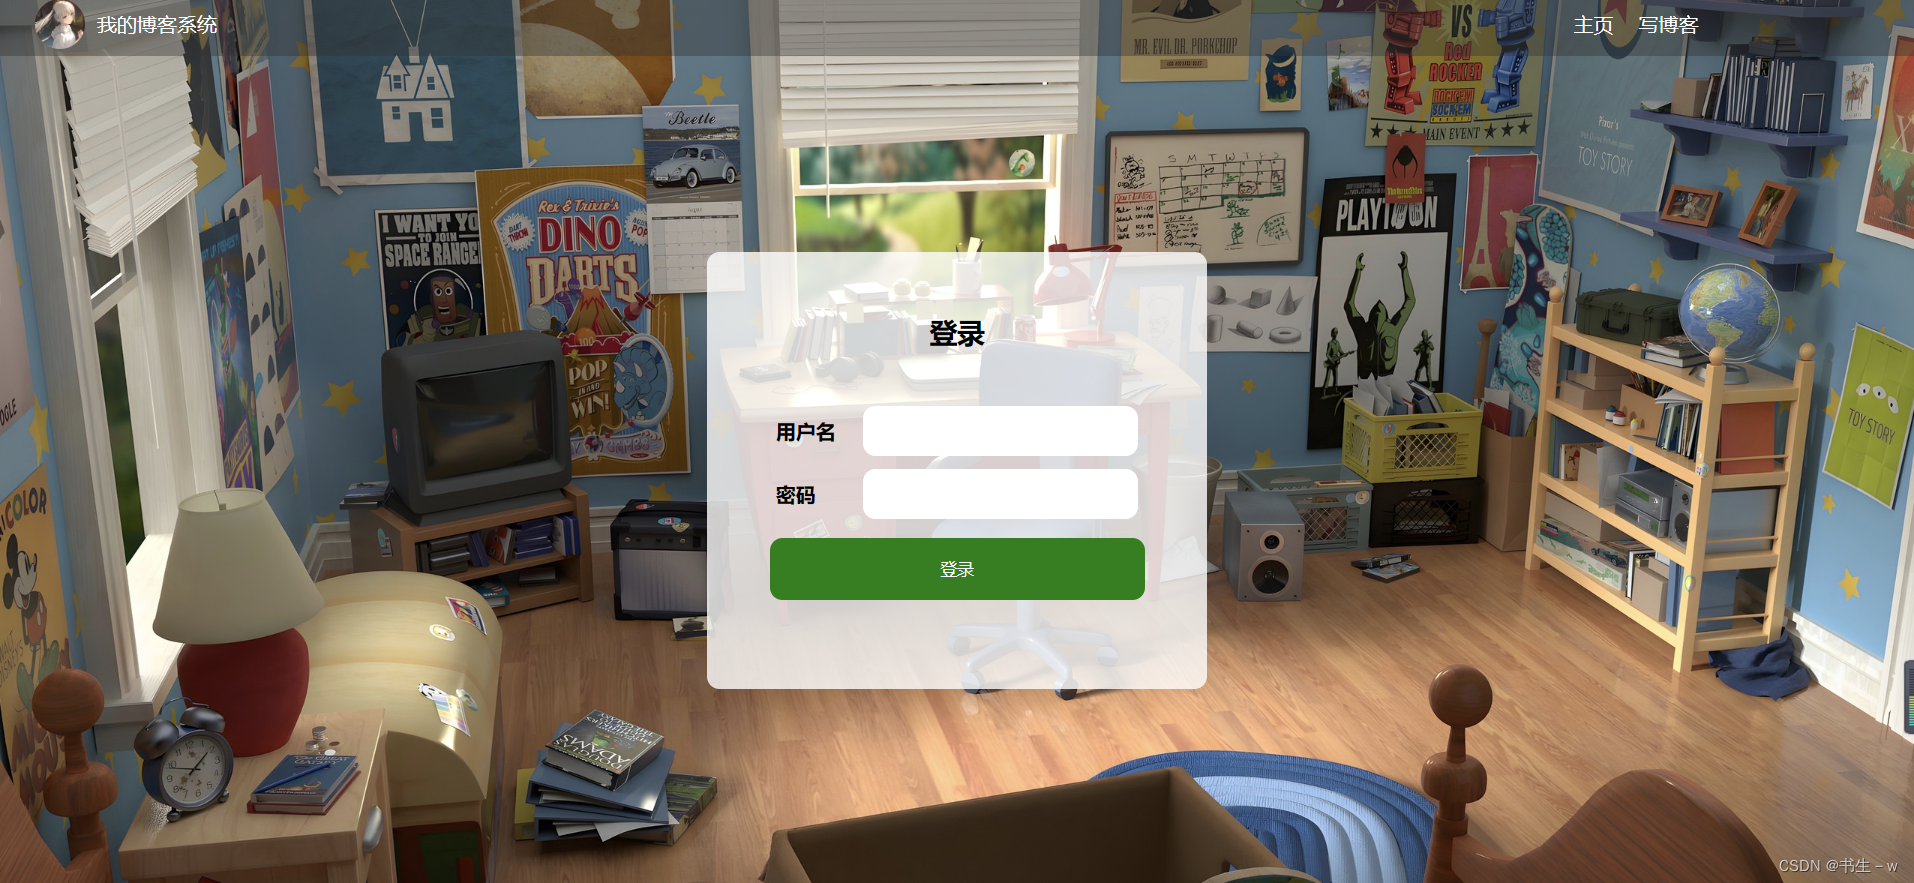
4、博客编辑页效果: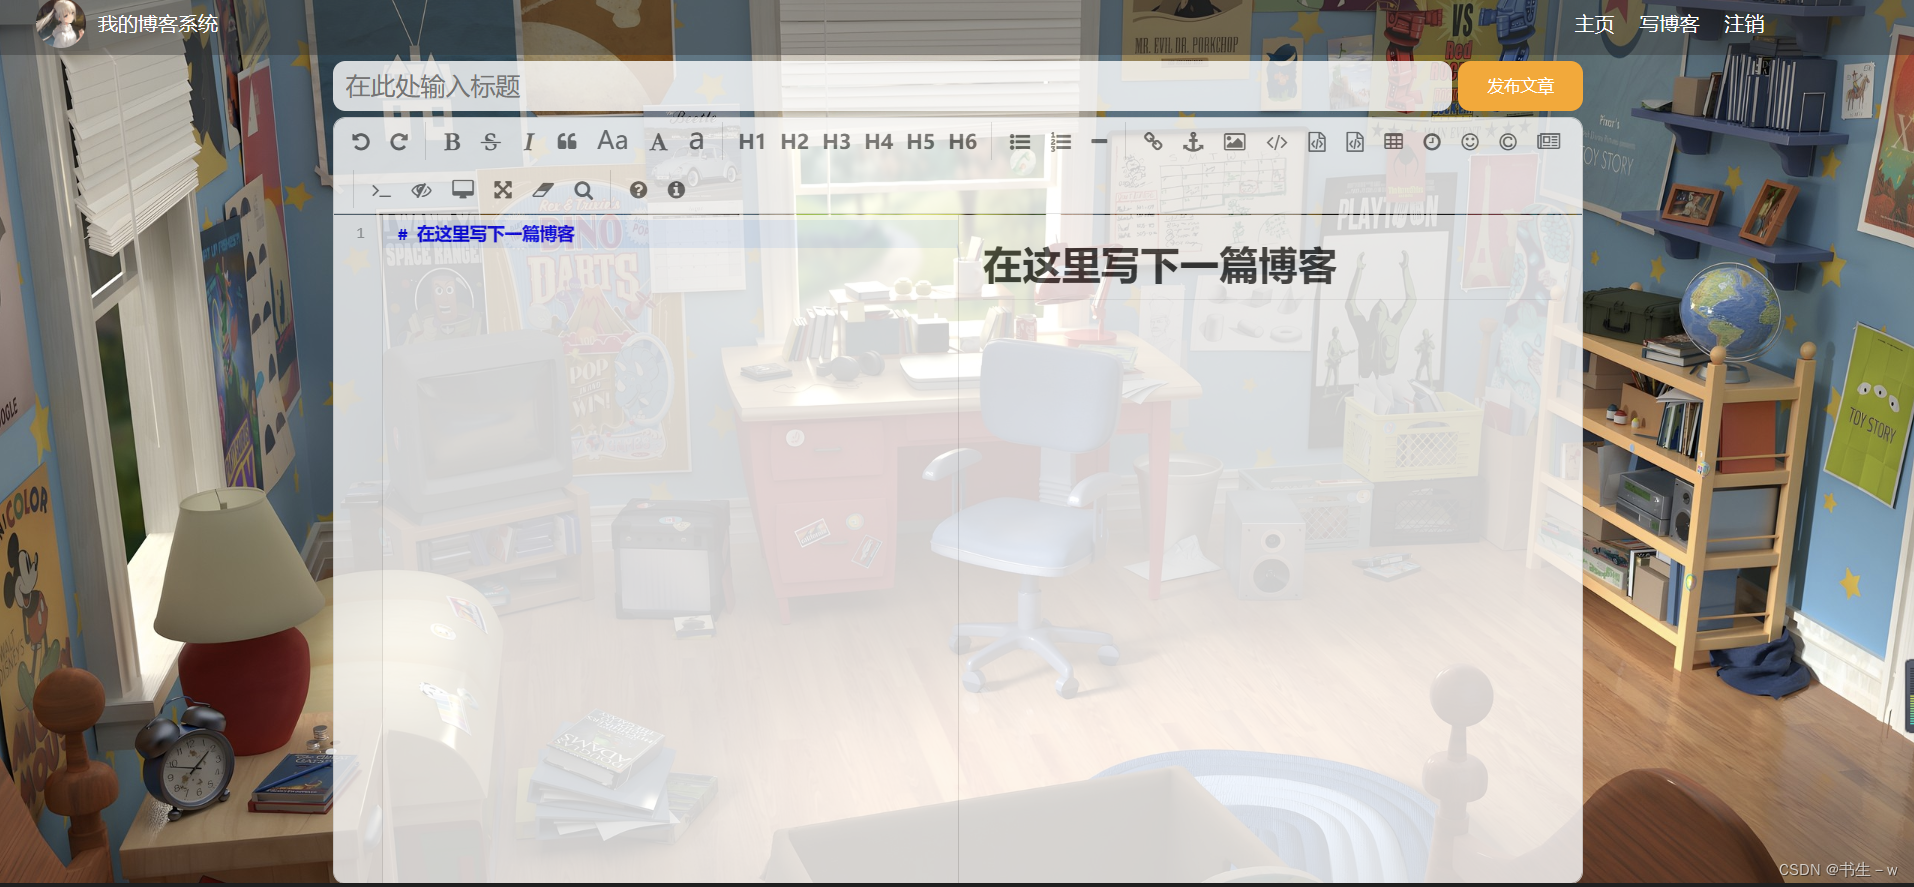
三、预备知识点回顾
1.css文件:
① 一般写浏览器 要先清楚浏览器的默认样式
② 导航栏高度普遍都是50px
③ 写样式css的时候务必要参考着html的内容
④ 设置圆形:半径设置为尺寸的一半!!
⑤ 在布局页面时,元素之间的间隙既可以使用[内边距](https://so.csdn.net/so/search?q=内边距&spm=1001.2101.3001.7020)也可以使用外边距,很多时候两者皆可,并没有具体限制、统一标准。
⑥ 使用内边距的特点:可以让元素的有效区域更大一些!!
2.【回顾】:弹性布局 display:flex; // 开启弹性布局
加上这个属性的元素的子元素就会按照弹性布局来排列:
① 子元素就不再按照“块级元素”“行内元素”这样的规则来工作,统一都会排列成一个横行(补充:div独占一行,span不独占一行)
② 子元素可以使用 justify-content 来控制在水平方向如何排列 (可选属性看我上一篇css)
③ 子元素可以使用align-items来控制在垂直方向如何排列
(布局是加在父元素上的,子元素自身没有布局)
(布局特指的是位置的排列(放在哪里),是一种特殊的样式)
(如果记不住CSS样式,就使用 mdn+搜索的关键词 去查一下)
3.如果想要给整个页面设置背景,就需要给body标签设置背景!那么就需要让body标签先撑满浏览器窗口!
- 块级元素默认宽度就是100%和父亲一样宽,而html、body、div都是块级元素
- 高度默认是把内容进行包裹的
但凡是左右排列成一行的都可以使用弹性布局
/* 100% 表示父元素高度 */
/* calc是库函数,用于计算的 */
/* 减号两侧务必有空格!! :
 因为CSS中广泛使用脊柱命名法,所以为了进行区分就务必加上空格*/
    height: calc(100% - 50px);
4.注:内边距是设置内容和边框之间的距离; 外边距是设置元素和元素之间的距离!!
5.会发现设置文字居中没有用,是因为a是行内元素,默认尺寸就是和内容是一样的,所以文字居中没有效果。 需要先转成块级元素
display: block;
注:行内元素无法设置尺寸,无法设置外边距,内边距左右能设置,上下不能设置!
display:flex;  弹性布局:是对子元素起作用,
display:block; 块级元素:只对自己有用。
6.由于html标签中包含了很多的>和<,因此如果正文中包含了>和<,就需要使用转义字符,否则浏览器可能会解析出错
注意:
① 不直接使用>,而是使用转义字符形式 > => ⼤于号: >
② 不直接使用<,而是使用转义字符形式 < => ⼩于号: <
7.写样式CSS时尽量多使用后代选择器/子选择器,慎重直接使用类名,因为类名很有可能会重复
8.注意水平居中差别:
① 文字: text-align: center;
② 元素:margin: 0 auto; (每个html都可以称为一个元素)
9.相关属性
/* 文字垂直居中 :行高和元素高度一样!!*/
    line-height: 40px;

/* 加上背景渐变效果:过渡属性 */
    transition: all 2s;
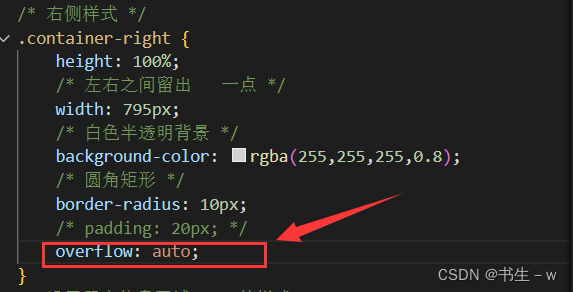
10.当博客过多的时候会溢出设计好的页面,那此时怎么办呢?
让滚动条出现在右侧内容区!
四、代码
1、博客列表页(blog_list.html)
实现导航栏
- 导航栏中包含logo(此处使用的是我的头像)、标题、以及一些跳转链接。
- 为了实现左右排列,在logo和链接之间加一个spacer作为占位器。
实现版心
- container 作为版心,实现居中对齐的效果
- 左侧放用户信息
- 右侧放博客列表
实现个人信息
- 把个人信息放到一个.card div 中
- 个人信息中包含头像、用户名、用户的gitee,用户的文章数量和分类数量
实现博客列表
- 每个博客使用 div.blog 来表示
- 每个博客中包含标题、发布时间、描述、查看全文按钮
首先创建 blog_list.html, 编写博客列表页.
<!-- 博客列表页 -->
<!DOCTYPE html>
<html lang="en">
<head>
<meta charset="UTF-8">
<meta http-equiv="X-UA-Compatible" content="IE=edge">
<meta name="viewport" content="width=device-width, initial-scale=1.0">
<title>博客列表页</title>
<!-- ../来到上一级目录 -->
<link rel="stylesheet" href="../css/common.css">
<link rel="stylesheet" href="../css/blog_list.css">
</head>
<body>
<!-- 导航栏 -->
<div class="nav">
<img src="../imgs/demo4.jpg" alt="盈宝">
<span>我的博客系统</span>
<!-- 只是空白元素,用来将后面的超链接文本挤到右边去 -->
<div class="spacer"></div>
<a href="blog_list.html">主页</a>
<a href="blog_edit.html">写博客</a>
<a href="">注销</a>
</div>
<!-- 页面的主体部分 -->
<!-- .container 作为页面的版心 -->
<!-- 这个部分是在页面中 水平居中对齐的 左右两侧会留出一定的边距 这个东西很多网站都有 称为"版心" -->
<div class="container">
<!-- 左侧个人信息 -->
<div class="container-left">
<!-- 整个用户信息区 -->
<div class="card">
<!-- 用户的头像 -->
<img src="../imgs/demo1.png" alt="越前龙马">
<!-- 用户名 -->
<h3>吴少的博客</h3>
<!-- gitee地址 -->
<a href="https://gitee.com/spongebob_2_0">gitee地址</a>
<!-- 统计信息 -->
<div class="counter">
<span>文章</span>
<span>分类</span>
</div>
<div class="counter">
<!-- 两篇文章,一个分类 -->
<span>2</span>
<span>1</span>
</div>
</div>
</div>
<!-- 右侧内容详情 -->
<div class="container-right">
<!-- blog对应一个博客 -->
<div class="blog">
<!-- 博客标题 -->
<div class="title">我的第一篇博客</div>
<!-- 博客发布时间 -->
<div class="date">2023-05-12 12:00</div>
<!-- 博客摘要 -->
<div class="desc">
<!-- lorem测试 -->
从今天开始,我要认真写博客,Lorem ipsum dolor sit amet consectetur adipisicing elit. Quisquam quas laborum corrupti tempora aliquam nulla eveniet omnis quaerat quod odio! Suscipit vero, repudiandae consequuntur illo dignissimos a non? Quos, sequi.
</div>
<!-- ">>" 转义 -->
<a href="blog_detail.html?blogId=1">查看全文>> </a>
</div>
<div class="blog">
<!-- 博客标题 -->
<div class="title">我的第二篇博客</div>
<!-- 博客发布时间 -->
<div class="date">2023-05-12 14:00</div>
<!-- 博客摘要 -->
<div class="desc">
<!-- lorem测试 -->
从今天开始,我要认真写博客,Lorem ipsum dolor sit amet consectetur adipisicing elit. Quisquam quas laborum corrupti tempora aliquam nulla eveniet omnis quaerat quod odio! Suscipit vero, repudiandae consequuntur illo dignissimos a non? Quos, sequi.
</div>
<!-- 不能直接写大于号,因为大于号会被当做标签的一部分 ,写出转义字符> -->
<a href="blog_detail.html?blogId=2">查看全文>> </a>
</div>
</div>
</div>
</body>
</html>1.1、公共样式
对于导航栏来说, 每个页面都需要, 因此把样式提取出来,写到一个 common.css 中,供后续的多个页面来引用
- 先清除浏览器默认样式
- 准备一个 喜欢的图片 作为背景图.
- 需要把 html 和 body 高度都设为 100%, 使背景的高度和浏览器窗口高度一样.
- 导航栏 nav 内部使用 flex 布局, 用来排列 logo 和一些按钮.
/* 博客导航栏通用样式 */
/* 去除浏览器页面的默认样式 */
* {
    /* 设置盒子模型,使边框不再撑大盒子 */
    box-sizing: border-box;
    /* 内外边距设置为0 */
    padding: 0;
    margin: 0;
}
/* 给整个页面加背景图 */
html,body {
    /* 当前 html 的父元素,就是浏览器窗口,此处的 100% 意思是 html 元素的高度和浏览器窗口一样高
    当前 body 的父元素,就是 html,此处的 100% 意思就是 html 多高,body,就多高 */
    height: 100%;
}
body {
    /* 插入背景图片 */
    background-image: url(../imgs/demo2.png);
    /* 背景照片不平铺 */
    background-repeat:no-repeat ;
    /* 背景照片垂直水平居中 */
    background-position:center center ;
    /* 背景照片尽可能填满整个屏幕 */
    background-size:cover ;
}
/* 导航栏设置 */
.nav {
    /* 导航栏高度一般都是50px */
    /* 宽度不设置也是默认100% */
    width: 100%;
    height: 50px;
    /* 背景色 */
    background-color: rgba(51,51,51,0.4);
    /* 导航栏里面的文本颜色 */
    color: white;
    /* 使用 flex 进行弹性布局,让导航栏里面的内容进行水平排列 */
    display: flex;
    /* 实现导航栏内容垂直居中 */
    align-items: center;

}
/* 导航栏照片设置 */
.nav img {
    width: 40px;
    height: 40px;
    /* 照片的圆角矩形,设置为正方形边长的一半即为圆形 */
    border-radius: 20px;
     /* 照片的左右外边距 */
    margin-left: 30px;
    margin-right: 10px;
}
/* 让博客系统后面的文字空出70的空间,保证后面的文字被挤到最右边 */
.spacer {
    width: 70%;
}
/* 将a标签里面的属性设置一下 */
.nav a {
    /* 超链接的文本颜色 */
    color: white;
    /* 去掉文字下面的下划线 */
    text-decoration: none;
    /* 设置文字的左右内边距,设置外边距也行 */
    /* 但是内边距能扩大点击范围,效果更好 */
    padding: 0 10px;
}
/* 这里是版心相关的样式 */
.container {
    /* 版心不是和窗口一样宽的 */
    width: 1000px;
    /* 这个写法中 左右两侧必须有空格 不能没有(如果没有 可能无法被浏览器识别)
    这个 calc 是 CSS3 里面提供的一个内置的函数,平时看到的大部分的 CSS 都是 CSS2 这个标准中规定的,但是 CSS3
    对 2 进行了一定的扩充,CSS3 现在也存在了很多年,主流的浏览器也都支持 */
    height: calc(100% - 50px);
    /* 内边距 水平居中 */
    margin: 0 auto;
    /* 对于 div 这样的块级元素 默认独占一行 如果需要让多个 div 在一行内排列 就需要使用弹性布局 */
    display: flex;
    /* 让元素中间有一些等分的间隔 就是右边留的 5px */
    justify-content: space-between;
    /* background-color: gray; */

}

/* 左侧样式 */
.container-left {
    height: 100%;
    width: 200px;
    /* background-color: orange; */
}
/* 右侧样式 */
.container-right {
    height: 100%;
    /* 左右之间留出   一点 */
    width: 795px;
    /* 白色半透明背景 */
    background-color: rgba(255,255,255,0.8);
    /* 圆角矩形 */
    border-radius: 10px;
    /* padding: 20px; */
}
/* 设置用户信息区域 card的样式 */
.card {
    /* 白色半透明 */
    background-color: rgba(255,255,255,0.8);
    border-radius: 10px;
    /* 让头像居中 设置四个方向的内边距都是 30px */
    padding: 30px;
}

/* card中照片的样式 */
.card img {
    /* 整个.card的宽度是200px, .card设置了四个方向的内边距30px */
    /* 剩下能放图片的空间就是140px */
    width: 140px;
    height: 140px;
    /* 设置边长的一半为圆形照片 */
    border-radius: 50%;
}
/* 用户名样式 */
.card h3 {
    /* 设置居中对齐 */
    text-align: center;
    /* 这里使用内边距把用户名和头像撑开一个距离 */
    padding: 10px;
    color: green;
}
/* 设置gitee地址的样式 */
.card a {
    /* a 默认是行内元素 很多边距不生效 简单起见 直接设为块级元素 */
    display: block;
    /* 居中 */
    text-align: center;
    /* 设置下划线 */
    text-decoration: none;
    color: orange;
    padding: 5px;
}
.card .counter {
    /* 开启弹性布局 */
    display: flex;
    justify-content: space-around;
    padding: 5px;
    /* color: blue; */
}
下面调整样式,因为这部分的内容其他页面中不再显示,故我们不再放到 common.css 中,而是单独放到一个新的 css 文件中。
1.2、博客列表——样式
创建 blog_list.css
- 使用伪类选择器 .blog .detail:hover,实现光标悬停时修改样式的功能
- 给.blog .detail 中加上过渡效果 transition:all 0.3s;使悬停的样式改变更逼真
/* 博客列表页专用样式 */
.blog {
    /* 高度不设置 让其取决于里面的内容高度综合 */
    width: 100%;
    padding: 20px;
}
/* 博客标题 */
.blog .title {
    /* 设置文字居中 */
    text-align: center;
    /* 文字大小 */
    font-size: 22px;
    /* 设置文字加粗 */
    font-weight: bold;
    /* 设置上下内边距为10 */
    padding: 10px 0;
}
/* 发布时间 */
.blog .date {
    /* 文字居中 */
    text-align: center;
    /* 文字颜色 */
    color: rgb(0,128,0);
    /* 设置上下内边距为10 */
    padding: 10px 0;
}
/* 博客的摘要的缩进 */
.blog .desc {
    /* 2缩进 */
    text-indent: 2em;
}
/* a标签的样式设置 */
.blog a {
    /* 设置成块级元素,方便设置尺寸和边距 */
    display: block;
    width: 140px;
    height: 40px;
    /* 设置上下内边距10px 整个a标签内容水平居中 */
    margin: 10px auto;
    /* 加一个边框 */
    border: 2px black solid;
    /* 设置文字颜色*/
    color: black;
    /* 当文字的行高和元素高度一样的时候,文字恰好是垂直居中 */
    line-height: 40px;
    /* 设置文字水平居中 */
    text-align: center;
    /* 去除下划线 */
    text-decoration: none;
    /* border-radius: 10px; */

    /* 让悬停的变化过程柔和一些,加上过渡效果 */
    transition: all 0.3s;
}
/* 伪类选择器 - 鼠标悬停的效果*/
.blog a:hover {
    /* 当鼠标停在整个元素的位置,颜色会变成黑色,同时文字颜色变成白色 */
    background-color: #333;
    color: white;
}
2、博客详情页
首先创建一个 blog_content.html
引入导航栏、版心和个人信息,这部分代码和blog_list.html 中相同,因此我们直接复制即可。
<!-- 博客详情页 -->
<!DOCTYPE html>
<html lang="en">
<head>
    <meta charset="UTF-8">
    <meta http-equiv="X-UA-Compatible" content="IE=edge">
    <meta name="viewport" content="width=device-width, initial-scale=1.0">
    <title>博客详情页</title>
    <!-- ../来到上一级目录 -->
    <link rel="stylesheet" href="../css/common.css">
</head>
<body>
    <!-- 导航栏 -->
    <div class="nav">
        <img src="../imgs/demo4.jpg" alt="盈宝">
        <span>我的博客系统</span>
        <!-- 只是空白元素,用来将后面的超链接文本挤到右边去 -->
        <div class="spacer"></div>
        <a href="blog_list.html">主页</a>
        <a href="blog_edit.html">写博客</a>
        <a href="">注销</a>
    </div>

    <!-- 页面的主体部分 -->
    <!-- .container 作为页面的版心 -->
    <!-- 这个部分是在页面中 水平居中对齐的 左右两侧会留出一定的边距 这个东西很多网站都有 称为"版心" -->
    <div class="container">
        <!-- 左侧个人信息 -->
        <div class="container-left">
            <!-- 整个用户信息区 -->
            <div class="card">
                <!-- 用户的头像 -->
                <img src="../imgs/demo1.png" alt="越前龙马">
                <!-- 用户名 -->
                <h3>吴少的博客</h3>
                <!-- gitee地址 -->
                <a href="https://gitee.com/spongebob_2_0">gitee地址</a>
                <!-- 统计信息 -->
                <div class="counter">
                    <span>文章</span>
                    <span>分类</span>
                </div>
                <div class="counter">
                    <!-- 两篇文章,一个分类 -->
                    <span>2</span>
                    <span>1</span>
                </div>
            </div>
        </div>

        <!-- 右侧内容详情 -->
        <div class="container-right">
            <!-- 包裹整个博客的内容详情 -->
            <div class="content">
                <!-- 博客标题 -->
                <h3>这是我的第一篇博客</h3>
                <!-- 博客日期 -->
                <div class="date">2023-05-12-12:00</div>
                <!-- 正文 -->
                <p>从今天开始,我要认真写博客,Lorem ipsum dolor sit amet consectetur adipisicing elit. Quisquam quas laborum corrupti tempora aliquam nulla eveniet omnis quaerat quod odio! Suscipit vero, repudiandae consequuntur illo dignissimos a non? Quos, sequi.</p>
                <p>从今天开始,我要认真写博客,Lorem ipsum dolor sit amet consectetur adipisicing elit. Quisquam quas laborum corrupti tempora aliquam nulla eveniet omnis quaerat quod odio! Suscipit vero, repudiandae consequuntur illo dignissimos a non? Quos, sequi.</p>
                <p>从今天开始,我要认真写博客,Lorem ipsum dolor sit amet consectetur adipisicing elit. Quisquam quas laborum corrupti tempora aliquam nulla eveniet omnis quaerat quod odio! Suscipit vero, repudiandae consequuntur illo dignissimos a non? Quos, sequi.</p>
                <p>从今天开始,我要认真写博客,Lorem ipsum dolor sit amet consectetur adipisicing elit. Quisquam quas laborum corrupti tempora aliquam nulla eveniet omnis quaerat quod odio! Suscipit vero, repudiandae consequuntur illo dignissimos a non? Quos, sequi.</p>
                <p>从今天开始,我要认真写博客,Lorem ipsum dolor sit amet consectetur adipisicing elit. Quisquam quas laborum corrupti tempora aliquam nulla eveniet omnis quaerat quod odio! Suscipit vero, repudiandae consequuntur illo dignissimos a non? Quos, sequi.</p>
                <p>从今天开始,我要认真写博客,Lorem ipsum dolor sit amet consectetur adipisicing elit. Quisquam quas laborum corrupti tempora aliquam nulla eveniet omnis quaerat quod odio! Suscipit vero, repudiandae consequuntur illo dignissimos a non? Quos, sequi.</p>
                <p>从今天开始,我要认真写博客,Lorem ipsum dolor sit amet consectetur adipisicing elit. Quisquam quas laborum corrupti tempora aliquam nulla eveniet omnis quaerat quod odio! Suscipit vero, repudiandae consequuntur illo dignissimos a non? Quos, sequi.</p>
                <p>从今天开始,我要认真写博客,Lorem ipsum dolor sit amet consectetur adipisicing elit. Quisquam quas laborum corrupti tempora aliquam nulla eveniet omnis quaerat quod odio! Suscipit vero, repudiandae consequuntur illo dignissimos a non? Quos, sequi.</p>
                <p>从今天开始,我要认真写博客,Lorem ipsum dolor sit amet consectetur adipisicing elit. Quisquam quas laborum corrupti tempora aliquam nulla eveniet omnis quaerat quod odio! Suscipit vero, repudiandae consequuntur illo dignissimos a non? Quos, sequi.</p>
                <p>从今天开始,我要认真写博客,Lorem ipsum dolor sit amet consectetur adipisicing elit. Quisquam quas laborum corrupti tempora aliquam nulla eveniet omnis quaerat quod odio! Suscipit vero, repudiandae consequuntur illo dignissimos a non? Quos, sequi.</p>
                <p>从今天开始,我要认真写博客,Lorem ipsum dolor sit amet consectetur adipisicing elit. Quisquam quas laborum corrupti tempora aliquam nulla eveniet omnis quaerat quod odio! Suscipit vero, repudiandae consequuntur illo dignissimos a non? Quos, sequi.</p>
                <p>从今天开始,我要认真写博客,Lorem ipsum dolor sit amet consectetur adipisicing elit. Quisquam quas laborum corrupti tempora aliquam nulla eveniet omnis quaerat quod odio! Suscipit vero, repudiandae consequuntur illo dignissimos a non? Quos, sequi.</p>
                <p>从今天开始,我要认真写博客,Lorem ipsum dolor sit amet consectetur adipisicing elit. Quisquam quas laborum corrupti tempora aliquam nulla eveniet omnis quaerat quod odio! Suscipit vero, repudiandae consequuntur illo dignissimos a non? Quos, sequi.</p>
                <p>从今天开始,我要认真写博客,Lorem ipsum dolor sit amet consectetur adipisicing elit. Quisquam quas laborum corrupti tempora aliquam nulla eveniet omnis quaerat quod odio! Suscipit vero, repudiandae consequuntur illo dignissimos a non? Quos, sequi.</p>
                <p>从今天开始,我要认真写博客,Lorem ipsum dolor sit amet consectetur adipisicing elit. Quisquam quas laborum corrupti tempora aliquam nulla eveniet omnis quaerat quod odio! Suscipit vero, repudiandae consequuntur illo dignissimos a non? Quos, sequi.</p>

            </div>
        </div>
    </div>
</body>
</html>
2.1、样式变形:
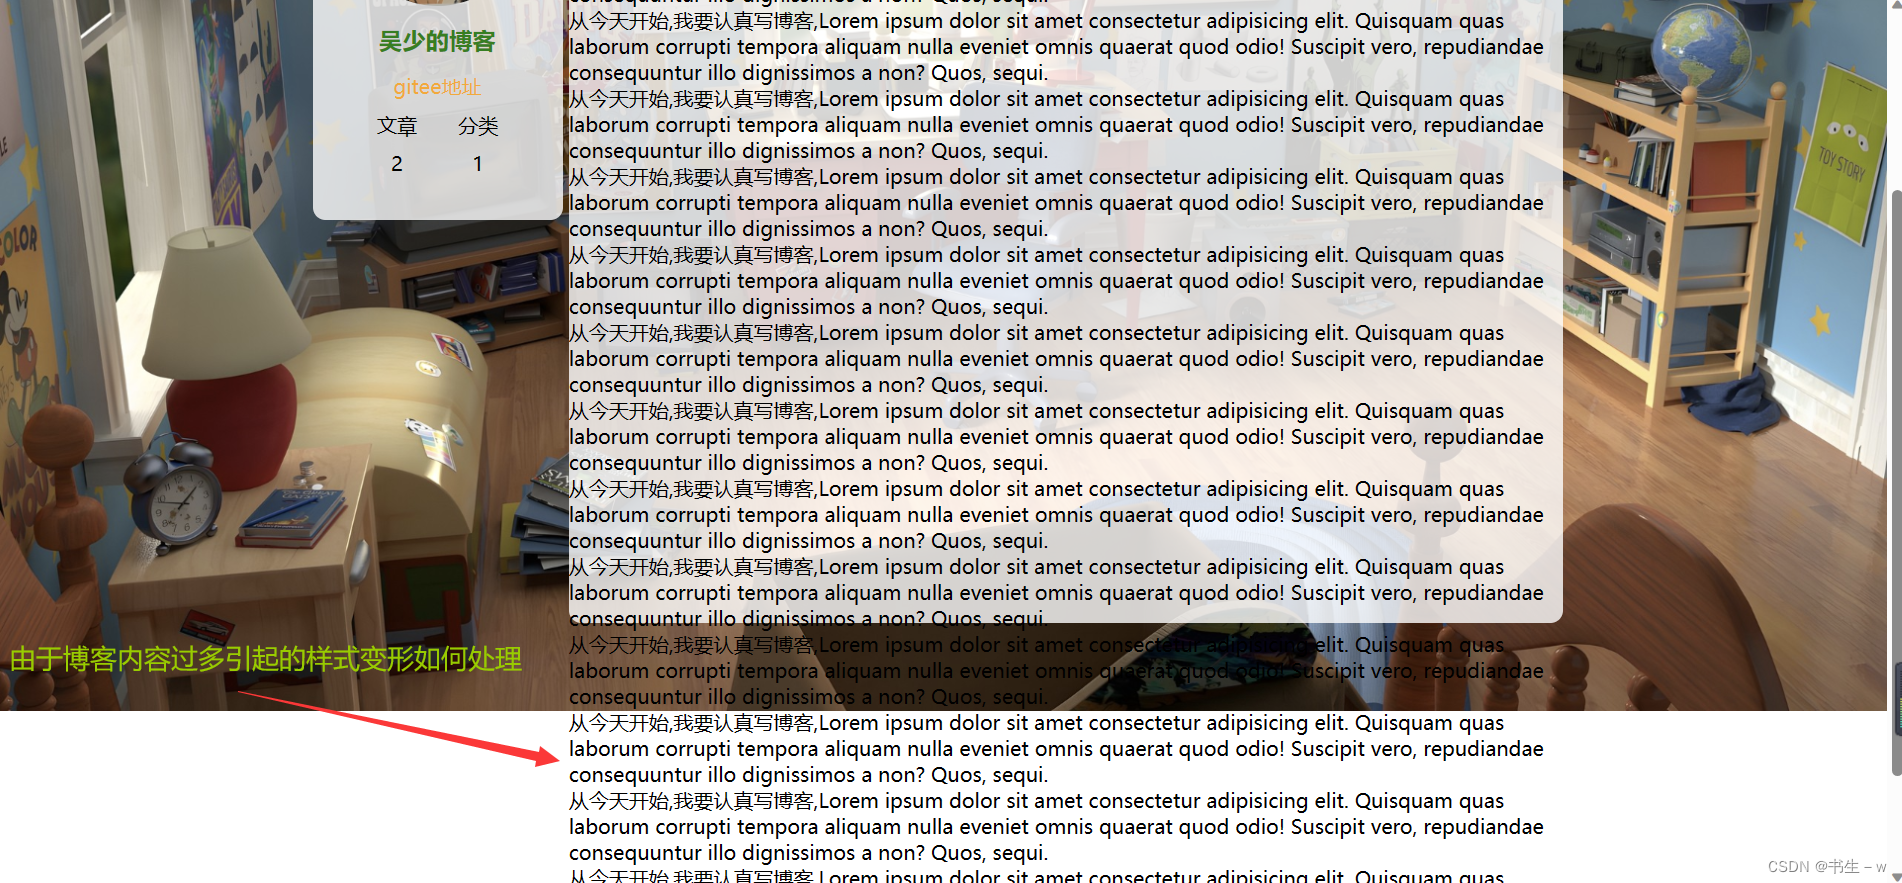
如何固定背景?? 很容易!!
当前咱们的滚动条是出现在浏览器窗口上的,这就导致拖动滚动条,是整个页面都在滚动,能否把滚动条,给放到某个元素上,让它在里面滚?? => 页面不动,元素里的内容滚动
需要给公共样式的.right加上一个 CSS 属性:overflow: auto即可
auto 指的是,如果内容没满,就不加滚动条,如果满了,就自动添加滚动条
效果如下:
2.2、博客详情页——样式
首先创建 创建 blog_detail.html
/* 博客详情页专用样式 */
.blog-content {
    padding: 30;
}
/* 设置标题样式 */
.blog-content h3 {
    /* 标题水平居中 */
    text-align: center;
    /* 标题字体大小 */
    font-size: 22px;
    /* 标题加粗 */
    font-weight: bold;
    /* 按上右下左顺时针设置内边距 */
    padding: 20px 10px 0 10px;
}
/* 设置时间样式 */
.blog-content .date {
    /* 水平居中 */
    text-align: center;
    /* 设置颜色 */
    color: rgb(0,128,0);
    /* 时间四个方向的内边距都为20px */
    padding: 20px;
}
/* 设置段落样式 */
.blog-content p {
    /* 每段首行缩进2字符 */
    text-indent: 2em;
    /* 设置上下内边距为10px,左右为0 */
    padding: 10px 0;
}
3、博客登录页
引入导航栏,同时不要忘记引入公共样式 common.css 噢
首先创建一个login.html
- 登陆框整体放到 div.login-dialog 中.
- 内部包含三个行, 使用 div.row 表示.
- 每个行里分别包含, 用户名输入框, 密码输入框, 提交按钮.
<!-- 博客登录页 -->
<!DOCTYPE html>
<html lang="en">
<head>
    <meta charset="UTF-8">
    <meta http-equiv="X-UA-Compatible" content="IE=edge">
    <meta name="viewport" content="width=device-width, initial-scale=1.0">
    <title>博客登录页</title>
    <link rel="stylesheet" href="../css/common.css">
    <link rel="stylesheet" href="../css/login.css">
</head>
<body>
    <!-- 导航栏 -->
    <div class="nav">
        <img src="../imgs/demo4.jpg" alt="盈宝">
        <span>我的博客系统</span>
        <!-- 只是空白元素,用来将后面的超链接文本挤到右边去 -->
        <div class="spacer"></div>
        <a href="blog_list.html">主页</a>
        <a href="blog_edit.html">写博客</a>
    </div>

    <!-- 登录页面的版心 -->
    <div class="login-container">
        <!-- 使用from包裹下列内容,便于后续给服务器提交数据 -->
        <form action="">
            <!-- 登录对话框 -->
        <div class="login-dialog">
            <h3>登录</h3>
            <div class="row">
                <span>用户名</span>
                <input type="text" id="username">
            </div>
            <div class="row">
                <span>密码</span>
                <input type="password" id="password">
            </div>
            <div class="row">
                <button>登录</button>
            </div>
        </div>
        </form>
    </div>
</body>
</html>
3.1、博客登录页——样式
创建 login.css 文件
- 使用 flex 使登陆对话框能够在页面中水平垂直居中。
- 使用 #submit:active 伪类选择器, 实现点击按钮时样式切换的效果.
/* 博客登录页面专用样式 */
/* 设置版心 */
.login-container {
    /* 设置宽度 */
    width: 100%;
    /* 设置成浏览器窗口一样高再减去导航栏部分 */
    height: calc(100% - 50px);

    /* 为了让子元素login-dialog能实现垂直居中 */
    /* 用flex开启弹性布局 */
    display: flex;
    /* 实现子元素垂直居中 */
    align-items: center;
    /* 实现子元素水平居中*/
    justify-content: center;
    /* padding-top: 30px; */
}
/* 设置对话框 */
.login-dialog {
    width: 400px;
    height: 350px;
    /* 背景颜色 */
    background-color: rgba(255,255,255,0.8);
    border-radius: 10px;
}
/* 设置标题样式 */
.login-dialog h3 {
    font-size: 22px;
    font-weight: bold;
    text-align: center;
    padding: 50px 0 40px 0;
}
/* 设置row包裹的元素部分 */
.login-dialog .row {
    height: 50px;
    width: 100%;
    /* 开启弹性布局 */
    display: flex;
    /* 子元素垂直居中 */
    align-items: center;
    /* 子元素水平居中 */
    justify-content: center;
    padding: 0px 10x 40px 10px;
}
/* 设置span标签的内容 */
.login-dialog .row span {
    /* span转块级元素,方便设置尺寸 */
    display: block;
    width: 100px;
    font-weight: 700;
    /* 左内边距让用户名和密码有右边靠一点 */
    padding-left:30px ;
}
/* 设置输入框 */
#username,#password {
    width: 220px;
    height: 40px;
    font-size: 20px;
    line-height: 40px;
    /* 输出文字时左侧不紧贴边框 */
    padding-left: 10px;
    padding-right: 10px;
    /* 去边框 */
    border: none;
    /* 去输入时的轮廓线 */
    outline: none;
    /* 让设置边框变成圆角 */
    border-radius: 10px;
    /* 右外边距让输入框往左边靠一点 */
    margin-right:30px ;
}
/* 设置登录按键 */
.row button {
    width: 300px;
    height: 50px;
    border-radius: 10px;
    color: white;
    background-color: rgb(0,128,0);
    /* 去掉默认边框 */
    border: none;
    margin-top: 20px;
    /* 设置文字垂直居中 */
    line-height: 50px;
}
 /* 伪类选择器 - 鼠标按下的效果 */
.row button:active {
    background-color: #666;
}
4、博客编辑页
创建 blog_edit.html
- 整个编辑区放到 div.blog-edit-container 中.
- 里面包含一个标题编辑区, 和内容编辑区.
- 标题编辑区, 包含一个 input, 用来填写标题, 以及一个 button 按钮用于提交.
- 内容编辑区先创建一个 div#editor, 后面将使用 editor.md 进行初始化.
<!-- 博客编辑页 -->
<!DOCTYPE html>
<html lang="en">
<head>
    <meta charset="UTF-8">
    <meta http-equiv="X-UA-Compatible" content="IE=edge">
    <meta name="viewport" content="width=device-width, initial-scale=1.0">
    <title>博客编辑页</title>
    <link rel="stylesheet" href="../css/common.css">
    <link rel="stylesheet" href="../css/blog_edit.css">
    <!-- 引入 editor.md 的依赖 -->
    <link rel="stylesheet" href="../editor.md/css/editormd.min.css">
    <script src="../js/jquery.min.js"></script>
    <script src="../editor.md/lib/marked.min.js"></script>
    <script src="../editor.md/lib/prettify.min.js"></script>
    <script src="../editor.md/editormd.js"></script>
</head>
<body>
    <!-- 导航栏 -->
    <div class="nav">
        <img src="../imgs/demo4.jpg" alt="盈宝">
        <span>我的博客系统</span>
        <!-- 只是空白元素,用来将后面的超链接文本挤到右边去 -->
        <div class="spacer"></div>
        <a href="blog_list.html">主页</a>
        <a href="blog_edit.html">写博客</a>
        <a href="">注销</a>
    </div>
    <!-- 博客编辑页的版心 -->
    <div class="blog-edit-container">
        <!-- 标题编辑区 -->
        <div class="title">
            <input type="text" placeholder="在此处输入标题">
            <button>发布文章</button>
        </div>
        <!-- 博客编辑器 -->
        <!-- 把md编辑器放到这个div中 -->
        <!-- 博客编辑器, 这里用 id 是为了和 markdown 编辑器对接 -->
        <div id="editor">

        </div>
    </div>

    <script>
        // 初始化编辑器
        let editor = editormd("editor", {
            // 这里的尺寸必须在这里设置. 设置样式会被 editormd 自动覆盖掉.
            width: "100%",
            // 设定编辑器高度
            height: "calc(100% - 50px)", /* 减 titile 的高度 */
            // 编辑器中的初始内容
            markdown: "# 在这里写下一篇博客",
            // 指定 editor.md 依赖的插件路径
            path: "../editor.md/lib/"
        });
    </script>
</body>
</html>
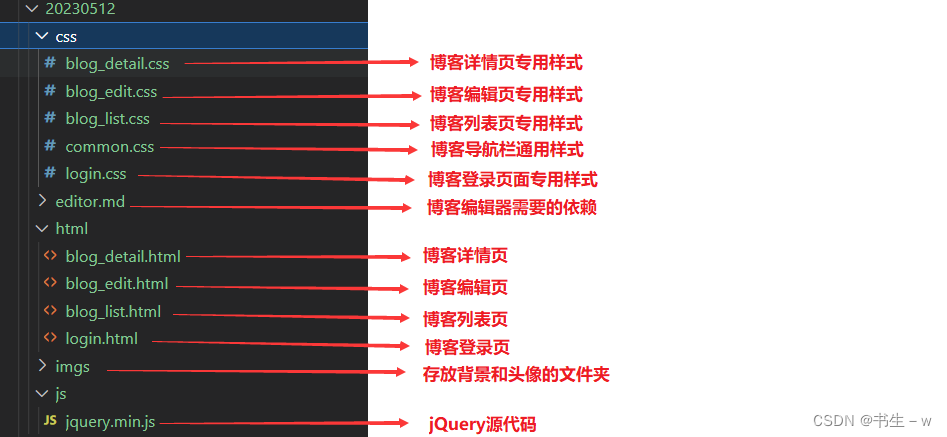
4.1、引入 editor.md:
官网: Editor.md - 开源在线 Markdown 编辑器
editor.md 是一个开源的页面 markdown 编辑器组件.
<!-- 引入 editor.md 的依赖 -->
    <link rel="stylesheet" href="../editor.md/css/editormd.min.css">
    <script src="../js/jquery.min.js"></script>
    <script src="../editor.md/lib/marked.min.js"></script>
    <script src="../editor.md/lib/prettify.min.js"></script>
    <script src="../editor.md/editormd.js"></script>
(注意修改名称,名称与代码需要匹配才能引入成功)

jquery 不是 editor.md 的一部分. 而是 editor.md 的依赖的库~~jquery 可以说是 JS 世界中,最知名的第三方库(没有之一)放在十年前, jquery在JS中的地位,就相当于Spring在 Java中的地位~~正因为 jquery非常非常火,所以很多第三方库,也要依赖 jquery.就需要通过其他手段来安裝引入 jquery ~~
创建 js 目录,创建一个文件 jquery.min.js ,此处需要额外安装一下 jquery 这个库,去网上搜 “jquery cdn” jQuery CDN
选择此版本:
JS 是需要通过网络来加载的,期望内容尽量短,从而节省带宽
minified版本就是属于被压缩过的 (去掉空格换行之类的,把变量名替换成 a b c d 这种)
打开网址,打开 jquery 的源码文件,直接复制粘贴到 vscode 中,保存到 jquery.min.js 这个文件中即可
(虽然专业的前端开发不会用这种方式来下载安装 jquery,确实有更好的办法,但是当前对于咱们来说,这就是最简单的办法),也可以直接把 https://code.jquery.com/jquery-3.6.0.min.js 给写到 script 的 src 中
但是这里有个小问题,就是 https://code.jquery.com/jquery-3.6.0.min.js 不稳定,有时候访问不了,为了避免麻烦,直接还是复制到本地了
初始化 editormd 参考官方的例子
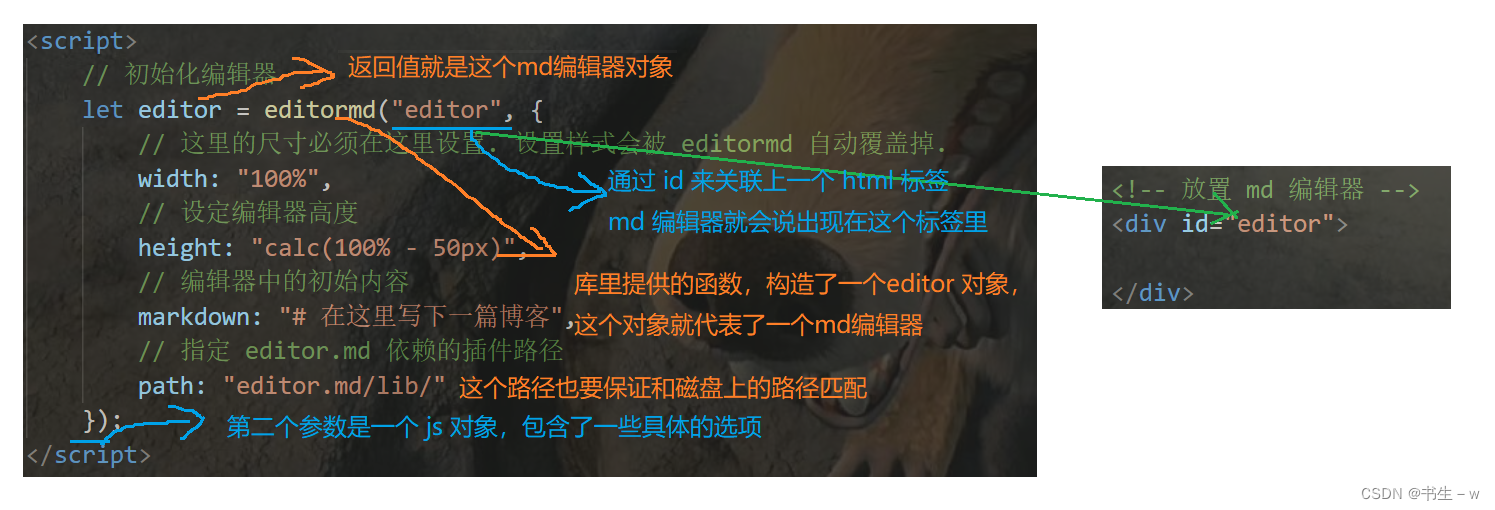
4.2、博客编辑页——样式
/* 博客编辑页专用样式 */
/* 设置版心样式 */
.blog-edit-container {
    /* 设置宽度 */
    width: 1000px;
    /* 设置高度 */
    height: calc(100% - 50px);
    /* 元素水平居中 */
    margin: 0 auto;
}
/* 使用后代选择器,防止和导航栏中的标题冲突 */
/* 设置标题样式 */
.blog-edit-container .title {
    width: 100%;
    height: 50px;
    /* 开启弹性布局 */
    display: flex;
    align-items: center;
    justify-content: space-between;
}
/* 设置标题的输入框 */
.blog-edit-container .title input {
    /* 设置宽度 */
    width: 895px;
    /* 设置高度 */
    height: 40px;
    /* 设置圆角矩形 */
    border-radius: 10px;
    /* 去除边框 */
    border: none;
    /* 去除输入时的轮廓线 */
    outline: none;

    /* 设置文字大小 */
    font-size: 20px;
    /* 设置文字垂直居中 */
    line-height: 40px;
    /* 设置文字内边距,防止和边框离得太近 */
    padding: 10px;
    /* 设置背景色 */
    background-color: rgba(255, 255, 255, 0.8);
}
/* 设置提交按钮的样式 */
.blog-edit-container .title button {
    width: 100px;
    height: 40px;
    /* 设置圆角矩形 */
    border-radius: 10px;

    color: white;
    background-color: orange;
    /* 去除边框 */
    border: none;
    /* 去除输入时的轮廓线 */
    outline: none;
}
 /* 伪类选择器 - 鼠标按下的效果 */
.blog-edit-container .title button:active {
    background-color: #666;
}

#editor {
    border-radius: 10px;

    /* background-color: rgba(255, 255, 255, 0.8); */
    /* 半透明的纸 盖在桌子上 如果纸上已经被涂写了很多内容 这个时候半透明相当于也就失效 */
    /* background-color 只是针对当前元素进行设置 不会影响到子元素
       opacity 会影响到子元素 给最外面的父元素设置了半透明 里面的元素也会一起半透明 */
    opacity: 80%;
}

