为自己开发的 Node REST API 生成文档,基本有两种方法:
1 极简版
此方法就是自己写一个文件,记录 API,不需要安装额外的 package,然后 app.js 增加一个 route 然后从浏览器查看这个文件就可以。
步骤如下:
1.1 在工程目录下新建文件 ./docs/apiDocs.json
此文件是自己手写的文件,记录了后端的各种 route,例如可以像下面这样写:
{
  "/": "api docs",
  "/signup": "sign up",
  "/signin": "sign in",
  "/signout": "sign out",
  "/users": "get all users",
  "/user/:userId": "get/update/delete user",

  "/posts": "get all posts",
  "/post/new/:userId": "create new post",
  "/post/by/:userId": "get posts by user",
  "/post/:postId": "update/delete post"
}
1.2 app.js 增加如下代码:
// for api docs
app.get("/api", (req, res) => {
  fs.readFile("docs/apiDocs.json", (err, data) => {
    if (err) {
      res.status(400).json({
        error: err,
      });
    }
    const docs = JSON.parse(data);
    res.json(docs);
  });
});
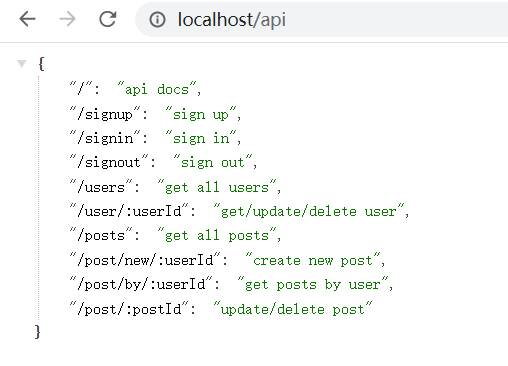
假定 server 在 80 端口监听,然后打开浏览器 localhost/api,可以看到如下界面,这就是 API 文档,就是前面的 apiDocs.json:
2 详尽版,使用 Swagger
使用 Swagger 生成的 API 文档内容更丰富,界面也十分美观,还可以实现 postman 的功能测试 API,但步骤也更繁琐。
2.1 单独使用 swagger-ui-express
代码示例:
const express = require('express');
const app = express();
const swaggerUi = require('swagger-ui-express');
const swaggerDocument = require('./swagger.json');

app.use('/api-docs', swaggerUi.serve, swaggerUi.setup(swaggerDocument));
其中的 swagger.json 就相当于极简版中的 apiDocs.json, 内容和格式参照 Swagger 文档中的 Basic Structure,然后根据自己的 Node 项目内容修改,以下是从别处copy来的两份 sample swagger.json:
2.1.1 swagger.json 例 1
{
  "swagger": "2.0",
  "info": {
    "description": "This is a sample video tutorial",
    "version": "1.0.0",
    "title": "Tutorial",
    "termsOfService": "http://swagger.io/terms/",
    "contact": {
      "email": "tutorial@gmail.com"
    },
    "license": {
      "name": "Apache 2.0",
      "url": "http://www.apache.org/licenses/LICENSE-2.0.html"
    }
  },
  "host": "127.0.0.1:8000",
  "basePath": "/user",
  "tags": [
    {
      "name": "Login",
      "description": "Everything about your Login",
      "externalDocs": {
        "description": "Find out more",
        "url": "http://swagger.io"
      }
    },
    {
      "name": "Record",
      "description": "Operations about record",
      "externalDocs": {
        "description": "Find out more about our store",
        "url": "http://swagger.io"
      }
    }
  ],
  "schemes": ["https", "http"],
  "paths": {
    "/login": {
      "post": {
        "tags": ["Login"],
        "summary": "Create login",
        "description": "This can only be done by the logged in user.",
        "operationId": "createLogin",
        "produces": ["application/json"],
        "parameters": [
          {
            "in": "body",
            "name": "body",
            "description": "Created user object",
            "required": true,
            "schema": {
              "$ref": "#/definitions/Login"
            }
          }
        ],
        "responses": {
          "default": {
            "description": "successful operation"
          }
        }
      }
    },
    "/addRecord": {
      "post": {
        "security": [
          {
            "Bearer": []
          }
        ],
        "tags": ["Record"],
        "summary": "Create record",
        "description": "This can only be done by the logged in user.",
        "operationId": "createrRecord",
        "produces": ["application/json"],
        "parameters": [
          {
            "in": "body",
            "name": "body",
            "description": "Created user Record",
            "required": true,
            "schema": {
              "$ref": "#/definitions/createRecord"
            }
          }
        ],
        "responses": {
          "default": {
            "description": "successful operation"
          }
        }
      }
    },
    "/getRecord": {
      "get": {
        "security": [
          {
            "Bearer": []
          }
        ],
        "tags": ["Record"],
        "summary": "Get record",
        "description": "This can only be done by the logged in user.",
        "operationId": "getRecord",
        "produces": ["application/json"],
        "responses": {
          "default": {
            "description": "successful operation"
          }
        }
      }
    },
    "/updateRecord/{id}": {
      "put": {
        "security": [
          {
            "Bearer": []
          }
        ],
        "tags": ["Record"],
        "summary": "Update record",
        "description": "This can only be done by the logged in user.",
        "operationId": "updateRecord",
        "produces": ["application/json"],
        "parameters": [
          {
            "in": "path",
            "name": "id",
            "description": "ID of body",
            "required": true,
            "type": "string"
          },
          {
            "in": "body",
            "name": "body",
            "description": "Created user Record",
            "required": true,
            "schema": {
              "$ref": "#/definitions/updateRecord"
            }
          }
        ],
        "responses": {
          "default": {
            "description": "successful operation"
          }
        }
      }
    }
  },
  "securityDefinitions": {
    "Bearer": {
      "type": "apiKey",
      "name": "Authorization",
      "in": "header"
    }
  },
  "definitions": {
    "Login": {
      "type": "object",
      "properties": {
        "name": {
          "type": "string"
        },
        "password": {
          "type": "string"
        }
      },
      "xml": {
        "name": "User"
      }
    },
    "createRecord": {
      "type": "object",
      "properties": {
        "name": {
          "type": "string"
        },
        "email": {
          "type": "string"
        },
        "city": {
          "type": "string"
        }
      },
      "xml": {
        "name": "User"
      }
    },
    "updateRecord": {
      "type": "object",
      "properties": {
        "name": {
          "type": "string"
        },
        "email": {
          "type": "string"
        },
        "city": {
          "type": "string"
        }
      },
      "xml": {
        "name": "User"
      }
    }
  },
  "externalDocs": {
    "description": "Find out more about Swagger",
    "url": "http://swagger.io"
  }
}
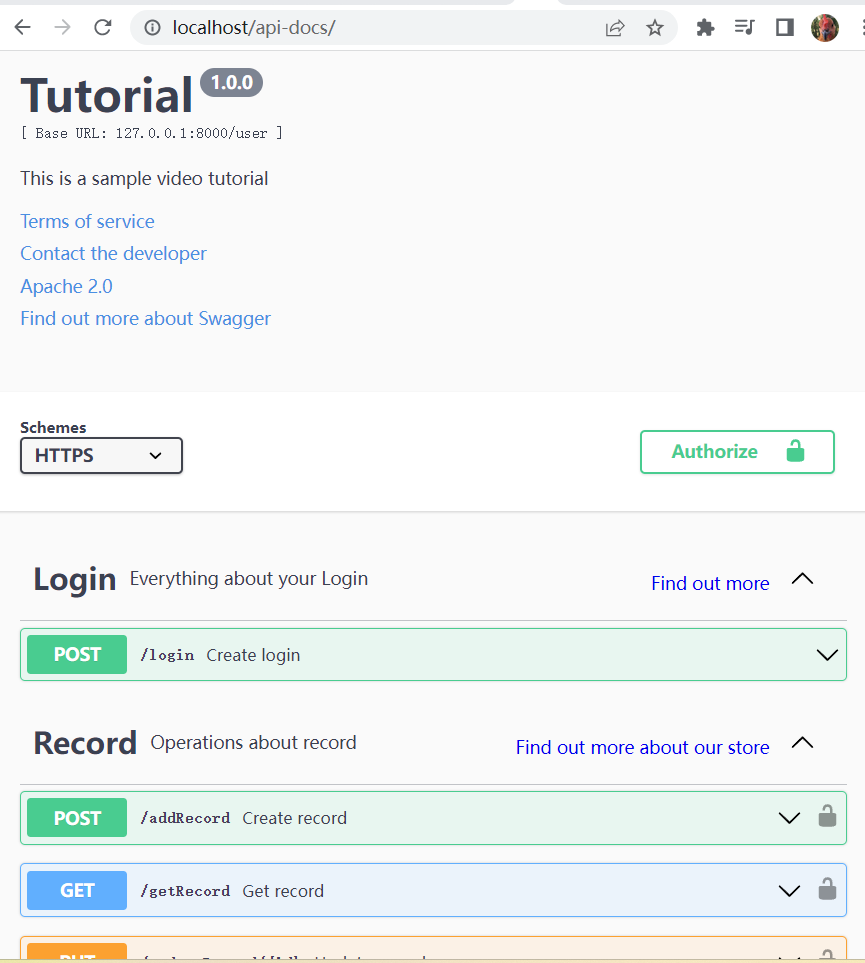
如果使用这份文件,假定 node 使用80端口,打开浏览器 localhost/api-docs 可以看到生成的文档界面如下:
2.2.2 swagger.json 例 2
( 但是这个文件实际格式为 yaml,文件名是 api.yaml)
openapi: 3.0.0
info:
  title: Code Improve API
  description: Optional multiline or single-line description in [CommonMark](http://commonmark.org/help/) or HTML.
  version: 1.0
servers:
  - url: http://localhost:8081/
    description:  Local server
  - url: https://prod.com/
    description:  Pre Production server
  - url: https://test.com/
    description:  Production server
components:
  securitySchemes:
    ApiTokenss:        # arbitrary name for the security scheme

      type: http
      scheme: bearer

    ApiKey:        # arbitrary name for the security scheme
      type: apiKey
      in: header       # can be "header", "query" or "cookie"
      name: apikey

paths:
  /users/detail/{userId}:
    get:
      security:
       - ApiTokenss: []
       - ApiKey: []
      summary: Returns a user details by ID.
      parameters:
        - name: userId
          in: path
          required: true
          description: Parameter description in CommonMark or HTML.
          schema:
            # type : integer
            # format: int64
            type: string
            example: "Users String"
            minimum: 1
      responses:
        '200':
          description: OK


  paths:
  /users/list:
    post:
      tags:
        - User List API
      summary: Returns a user list.
      description: <b> Request :- </b> <br /> <br />
              <b> page_no* </b>  is required <br />
              <b> status* </b>  is required <br />
              <b> type* </b>  is required <br />

      parameters:
        - in: query
          name: month_year
          schema:
            #type: integer
            example: 2022-10
      post:
      requestBody:
        required: true
        content:
          multipart/form-data:
           #application/json:
            schema:
              type: object
              properties:
                page_no:
                  type: integer
                  example: 1
                type:
                  type: string
                  example: "A"
                status:
                  type: integer
                  example: 0
                fileName:
                  type: string
                  format: binary

      responses:
        '200':
          description: A user object.
        '400':
          description: The specified user ID is invalid (not a number).
        '404':
          description: A user with the specified ID was not found.
        default:
          description: Unexpected error
因为此文件是 YAML 格式,需要安装 package: npm i yamljs 让 Swagger 读取, app.js 修改如下:
const YAML = require("yamljs");
const swaggerJSDocs = YAML.load("./api.yaml");
const swaggerUi = require("swagger-ui-express");
app.use("/api-docs", swaggerUi.serve, swaggerUi.setup(swaggerJSDocs));
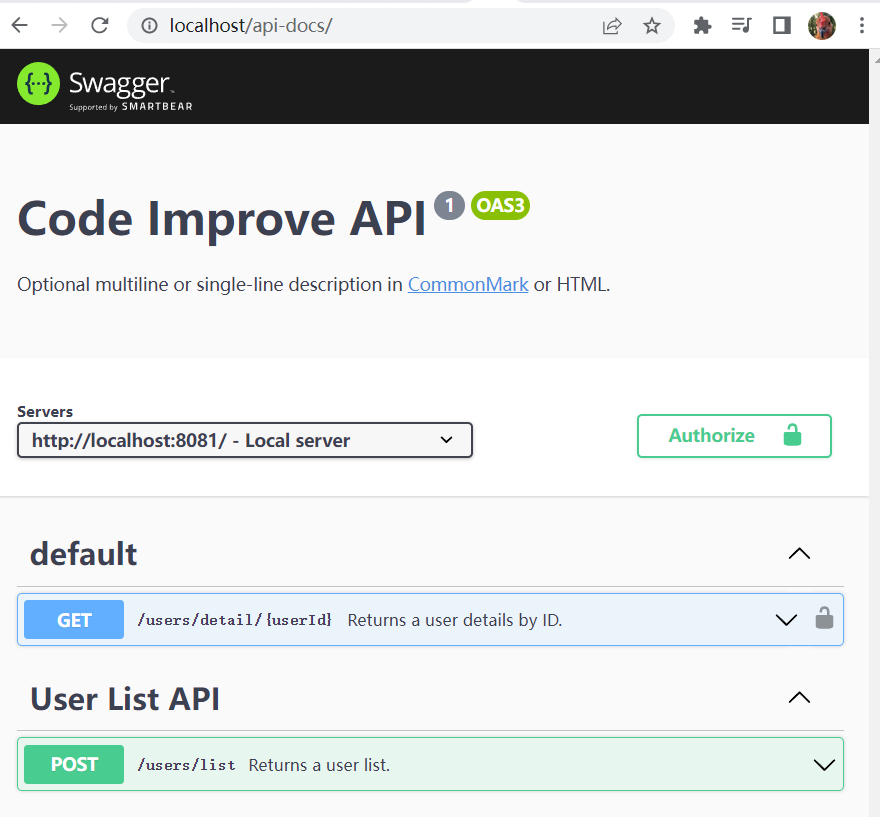
与之对应的浏览器 localhost/api-docs 界面:
2.2 使用 swagger-ui-express + swagger-jsdoc
此方法不需要 wagger.json 文件,但是代码里每个route 前面都需要加如下格式的注释,让 swagger 提取以生成文档。
/**
*@swagger
* /books
* something.............
**/
