YOLOv7测距+碰撞检测
- 1. 相关配置
- 2. 测距原理
- 3. 标定和测距
- 4. 碰撞检测
- 4.1 相关代码
- 4.2 主代码
- 5. 实验效果
相关链接
1. YOLOV5 + 单目测距(python)
2. YOLOV7 + 单目测距(python)
3. 具体实现效果已在Bilibili发布,点击跳转
本篇博文工程源码下载见文章末尾
1. 相关配置
系统:win 10
YOLO版本:yolov7
拍摄视频设备:安卓手机
电脑显卡:NVIDIA 2080Ti(CPU也可以跑,GPU只是起到加速推理效果)
2. 测距原理
单目测距原理相较于双目十分简单,无需进行立体匹配,仅需利用下边公式线性转换即可:
D = (F*W)/P
其中D是目标到摄像机的距离, F是摄像机焦距(焦距需要自己进行标定获取), W是目标的宽度或者高度(行人检测一般以人的身高为基准), P是指目标在图像中所占据的像素
了解基本原理后,下边就进行实操阶段
3. 标定和测距
具体方法步骤在 YOLOV7 + 单目测距(python)这篇文章已经写过,大家可以移步此文
4. 碰撞检测
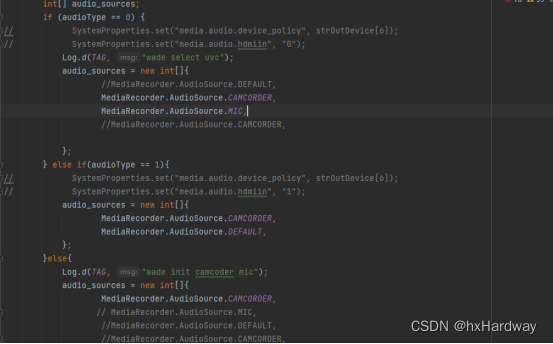
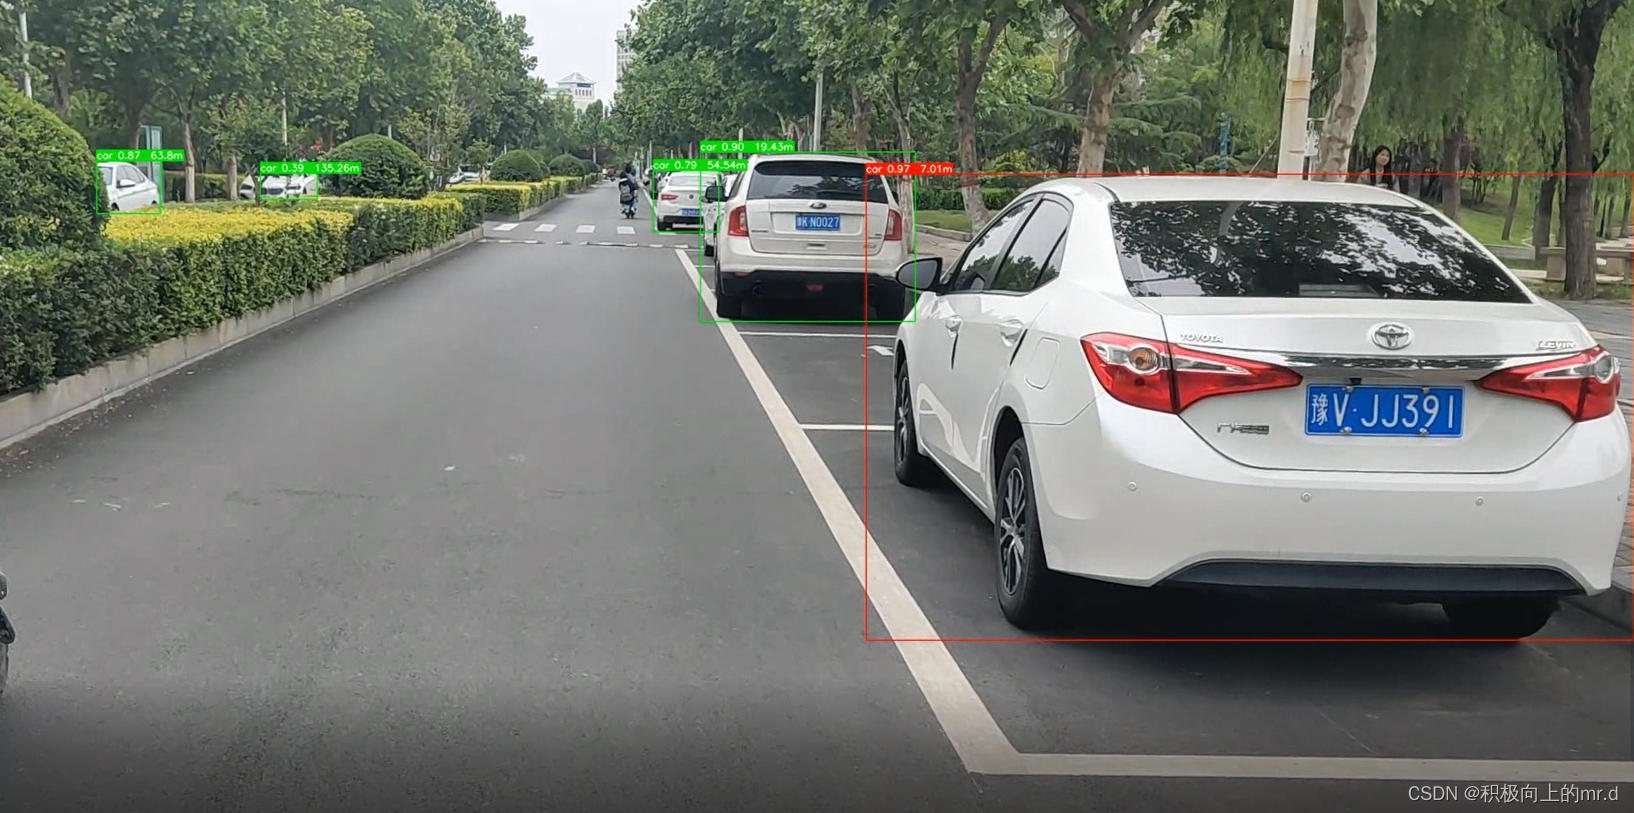
碰撞检测也可换成风险检测,无非是设置距离阈值,当距离在一定范围为安全距离,小于阈值为高风险或者碰撞
4.1 相关代码
代码中设置距离 dis_m<8 为高风险,系统显示红框,反之显示绿框
if save_img or view_img:  # Add bbox to image
      x1 = int(xyxy[0])  # 获取四个边框坐标
      y1 = int(xyxy[1])
      x2 = int(xyxy[2])
      y2 = int(xyxy[3])
      h = y2 - y1
      label = f'{names[int(cls)]} {conf:.2f}'
      if label is not None:
          if (label.split())[0] == 'car':
              dis_m = person_distance(h)  # 调用函数,计算行人实际高度
              label += f'  {dis_m}m'  # 将行人距离显示写在标签后
              if dis_m < 8:
                  plot_one_box(xyxy, im0, label=label, color=(0, 0, 255), line_thickness=1)
              else:
                  plot_one_box(xyxy, im0, label=label, color=(0, 255, 0), line_thickness=1)
4.2 主代码
import argparse
import time
from pathlib import Path
import cv2
import torch
import torch.backends.cudnn as cudnn
from numpy import random
from models.experimental import attempt_load
from utils.datasets import LoadStreams, LoadImages
from utils.general import check_img_size, check_requirements, check_imshow, non_max_suppression, apply_classifier, \
    scale_coords, xyxy2xywh, strip_optimizer, set_logging, increment_path
from utils.plots import plot_one_box
from utils.torch_utils import select_device, load_classifier, time_synchronized, TracedModel
from distance import person_distance,car_distance

def detect(save_img=False):
    source, weights, view_img, save_txt, imgsz, trace = opt.source, opt.weights, opt.view_img, opt.save_txt, opt.img_size, not opt.no_trace
    save_img = not opt.nosave and not source.endswith('.txt')  # save inference images
    webcam = source.isnumeric() or source.endswith('.txt') or source.lower().startswith(
        ('rtsp://', 'rtmp://', 'http://', 'https://'))

    # Directories
    save_dir = Path(increment_path(Path(opt.project) / opt.name, exist_ok=opt.exist_ok))  # increment run
    (save_dir / 'labels' if save_txt else save_dir).mkdir(parents=True, exist_ok=True)  # make dir

    # Initialize
    set_logging()
    device = select_device(opt.device)
    half = device.type != 'cpu'  # half precision only supported on CUDA

    # Load model
    model = attempt_load(weights, map_location=device)  # load FP32 model
    stride = int(model.stride.max())  # model stride
    imgsz = check_img_size(imgsz, s=stride)  # check img_size

    if trace:
        model = TracedModel(model, device, opt.img_size)

    if half:
        model.half()  # to FP16

    # Second-stage classifier
    classify = False
    if classify:
        modelc = load_classifier(name='resnet101', n=2)  # initialize
        modelc.load_state_dict(torch.load('weights/resnet101.pt', map_location=device)['model']).to(device).eval()

    # Set Dataloader
    vid_path, vid_writer = None, None
    if webcam:
        view_img = check_imshow()
        cudnn.benchmark = True  # set True to speed up constant image size inference
        dataset = LoadStreams(source, img_size=imgsz, stride=stride)
    else:
        dataset = LoadImages(source, img_size=imgsz, stride=stride)

    # Get names and colors
    names = model.module.names if hasattr(model, 'module') else model.names
    colors = [[random.randint(0, 255) for _ in range(3)] for _ in names]

    # Run inference
    if device.type != 'cpu':
        model(torch.zeros(1, 3, imgsz, imgsz).to(device).type_as(next(model.parameters())))  # run once
    old_img_w = old_img_h = imgsz
    old_img_b = 1

    t0 = time.time()
    for path, img, im0s, vid_cap in dataset:
        img = torch.from_numpy(img).to(device)
        img = img.half() if half else img.float()  # uint8 to fp16/32
        img /= 255.0  # 0 - 255 to 0.0 - 1.0
        if img.ndimension() == 3:
            img = img.unsqueeze(0)

        # Warmup
        if device.type != 'cpu' and (old_img_b != img.shape[0] or old_img_h != img.shape[2] or old_img_w != img.shape[3]):
            old_img_b = img.shape[0]
            old_img_h = img.shape[2]
            old_img_w = img.shape[3]
            for i in range(3):
                model(img, augment=opt.augment)[0]

        # Inference
        t1 = time_synchronized()
        with torch.no_grad():   # Calculating gradients would cause a GPU memory leak
            pred = model(img, augment=opt.augment)[0]
        t2 = time_synchronized()

        # Apply NMS
        pred = non_max_suppression(pred, opt.conf_thres, opt.iou_thres, classes=opt.classes, agnostic=opt.agnostic_nms)
        t3 = time_synchronized()

        # Apply Classifier
        if classify:
            pred = apply_classifier(pred, modelc, img, im0s)

        # Process detections
        for i, det in enumerate(pred):  # detections per image
            if webcam:  # batch_size >= 1
                p, s, im0, frame = path[i], '%g: ' % i, im0s[i].copy(), dataset.count
            else:
                p, s, im0, frame = path, '', im0s, getattr(dataset, 'frame', 0)

            p = Path(p)  # to Path
            save_path = str(save_dir / p.name)  # img.jpg
            txt_path = str(save_dir / 'labels' / p.stem) + ('' if dataset.mode == 'image' else f'_{frame}')  # img.txt
            gn = torch.tensor(im0.shape)[[1, 0, 1, 0]]  # normalization gain whwh
            if len(det):
                # Rescale boxes from img_size to im0 size
                det[:, :4] = scale_coords(img.shape[2:], det[:, :4], im0.shape).round()

                # Print results
                for c in det[:, -1].unique():
                    n = (det[:, -1] == c).sum()  # detections per class
                    s += f"{n} {names[int(c)]}{'s' * (n > 1)}, "  # add to string

                # Write results
                for *xyxy, conf, cls in reversed(det):
                    if save_txt:  # Write to file
                        xywh = (xyxy2xywh(torch.tensor(xyxy).view(1, 4)) / gn).view(-1).tolist()  # normalized xywh
                        line = (cls, *xywh, conf) if opt.save_conf else (cls, *xywh)  # label format
                        with open(txt_path + '.txt', 'a') as f:
                            f.write(('%g ' * len(line)).rstrip() % line + '\n')

                    if save_img or view_img:  # Add bbox to image
                        x1 = int(xyxy[0])  # 获取四个边框坐标
                        y1 = int(xyxy[1])
                        x2 = int(xyxy[2])
                        y2 = int(xyxy[3])
                        h = y2 - y1
                        label = f'{names[int(cls)]} {conf:.2f}'
                        if label is not None:
                            if (label.split())[0] == 'car':
                                dis_m = person_distance(h)  # 调用函数,计算行人实际高度
                                label += f'  {dis_m}m'  # 将行人距离显示写在标签后
                                if dis_m < 8:
                                    plot_one_box(xyxy, im0, label=label, color=(0, 0, 255), line_thickness=1)
                                else:
                                    plot_one_box(xyxy, im0, label=label, color=(0, 255, 0), line_thickness=1)

            # Print time (inference + NMS)
            print(f'{s}Done. ({(1E3 * (t2 - t1)):.1f}ms) Inference, ({(1E3 * (t3 - t2)):.1f}ms) NMS')

            # Stream results
            if view_img:
                cv2.imshow(str(p), im0)
                cv2.waitKey(1)  # 1 millisecond

            # Save results (image with detections)
            if save_img:
                if dataset.mode == 'image':
                    cv2.imwrite(save_path, im0)
                    print(f" The image with the result is saved in: {save_path}")
                else:  # 'video' or 'stream'
                    if vid_path != save_path:  # new video
                        vid_path = save_path
                        if isinstance(vid_writer, cv2.VideoWriter):
                            vid_writer.release()  # release previous video writer
                        if vid_cap:  # video
                            fps = vid_cap.get(cv2.CAP_PROP_FPS)
                            w = int(vid_cap.get(cv2.CAP_PROP_FRAME_WIDTH))
                            h = int(vid_cap.get(cv2.CAP_PROP_FRAME_HEIGHT))
                        else:  # stream
                            fps, w, h = 30, im0.shape[1], im0.shape[0]
                            save_path += '.mp4'
                        vid_writer = cv2.VideoWriter(save_path, cv2.VideoWriter_fourcc(*'mp4v'), fps, (w, h))
                    vid_writer.write(im0)

    if save_txt or save_img:
        s = f"\n{len(list(save_dir.glob('labels/*.txt')))} labels saved to {save_dir / 'labels'}" if save_txt else ''
        #print(f"Results saved to {save_dir}{s}")

    print(f'Done. ({time.time() - t0:.3f}s)')


if __name__ == '__main__':
    parser = argparse.ArgumentParser()
    parser.add_argument('--weights', nargs='+', type=str, default='yolov7.pt', help='model.pt path(s)')
    parser.add_argument('--source', type=str, default='inference/images', help='source')  # file/folder, 0 for webcam
    parser.add_argument('--img-size', type=int, default=640, help='inference size (pixels)')
    parser.add_argument('--conf-thres', type=float, default=0.25, help='object confidence threshold')
    parser.add_argument('--iou-thres', type=float, default=0.45, help='IOU threshold for NMS')
    parser.add_argument('--device', default='', help='cuda device, i.e. 0 or 0,1,2,3 or cpu')
    parser.add_argument('--view-img', action='store_true', help='display results')
    parser.add_argument('--save-txt', action='store_true', help='save results to *.txt')
    parser.add_argument('--save-conf', action='store_true', help='save confidences in --save-txt labels')
    parser.add_argument('--nosave', action='store_true', help='do not save images/videos')
    parser.add_argument('--classes', nargs='+', type=int, help='filter by class: --class 0, or --class 0 2 3')
    parser.add_argument('--agnostic-nms', action='store_true', help='class-agnostic NMS')
    parser.add_argument('--augment', action='store_true', help='augmented inference')
    parser.add_argument('--update', action='store_true', help='update all models')
    parser.add_argument('--project', default='runs/detect', help='save results to project/name')
    parser.add_argument('--name', default='exp', help='save results to project/name')
    parser.add_argument('--exist-ok', action='store_true', help='existing project/name ok, do not increment')
    parser.add_argument('--no-trace', action='store_true', help='don`t trace model')
    opt = parser.parse_args()
    print(opt)
    #check_requirements(exclude=('pycocotools', 'thop'))

    with torch.no_grad():
        if opt.update:  # update all models (to fix SourceChangeWarning)
            for opt.weights in ['yolov7.pt']:
                detect()
                strip_optimizer(opt.weights)
        else:
            detect()
5. 实验效果
实验效果如下,如果把相机架在车上,效果会更好
YOLOv7测距+碰撞检测
工程源码下载链接:https://github.com/up-up-up-up/yolov7_Monocular_security_testing
更多测距代码见博客主页