今日任务
● 链表理论基础
● 203.移除链表元素
● 707.设计链表
● 206.反转链表
链表理论基础
建议:了解一下链接基础,以及链表和数组的区别
文章链接:https://programmercarl.com/%E9%93%BE%E8%A1%A8%E7%90%86%E8%AE%BA%E5%9F%BA%E7%A1%80.html
203.移除链表元素
建议: 本题最关键是要理解 虚拟头结点的使用技巧,这个对链表题目很重要。
题目链接/文章讲解/视频讲解::https://programmercarl.com/0203.%E7%A7%BB%E9%99%A4%E9%93%BE%E8%A1%A8%E5%85%83%E7%B4%A0.html
707.设计链表
建议: 这是一道考察 链表综合操作的题目,不算容易,可以练一练 使用虚拟头结点
题目链接/文章讲解/视频讲解:https://programmercarl.com/0707.%E8%AE%BE%E8%AE%A1%E9%93%BE%E8%A1%A8.html
206.反转链表
建议先看我的视频讲解,视频讲解中对 反转链表需要注意的点讲的很清晰了,看完之后大家的疑惑基本都解决了。
题目链接/文章讲解/视频讲解:https://programmercarl.com/0206.%E7%BF%BB%E8%BD%AC%E9%93%BE%E8%A1%A8.html
DeleteNode链表 leetcode
链接
https://leetcode.com/problems/remove-linked-list-elements/
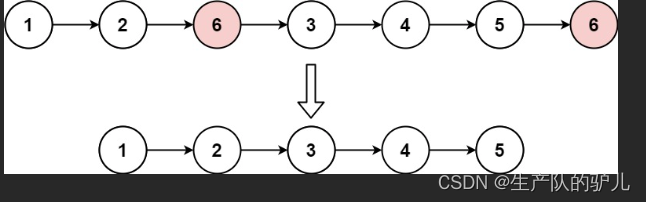
题目表示
Given the head of a linked list and an integer val, remove all the nodes of the linked list that has Node.val == val, and return the new head.
思路
use one poiner cur to iterate thorough the whole linkedlist
whne the cur.val == val
remove this element
犯错点
处理头结点为目标值的情况,要用while循环处理
In the case of processing the head node as the target value,
it should be processed in a while loop.
处理完之后,判断head是否为空
After processing, determine if the head is empty
在循环删除 val 时,要使用一个pre变量表示 cur前的一个节点
When iteratively deleting val, use a pre variable to represent a node before cur
在处理 cur.val = val 时, prev.next = cur.next;
另外一种情况是, pre = cur; 更新 pre的位置
这两种情况都需要 移动 cur
cur = cur.next;
代码
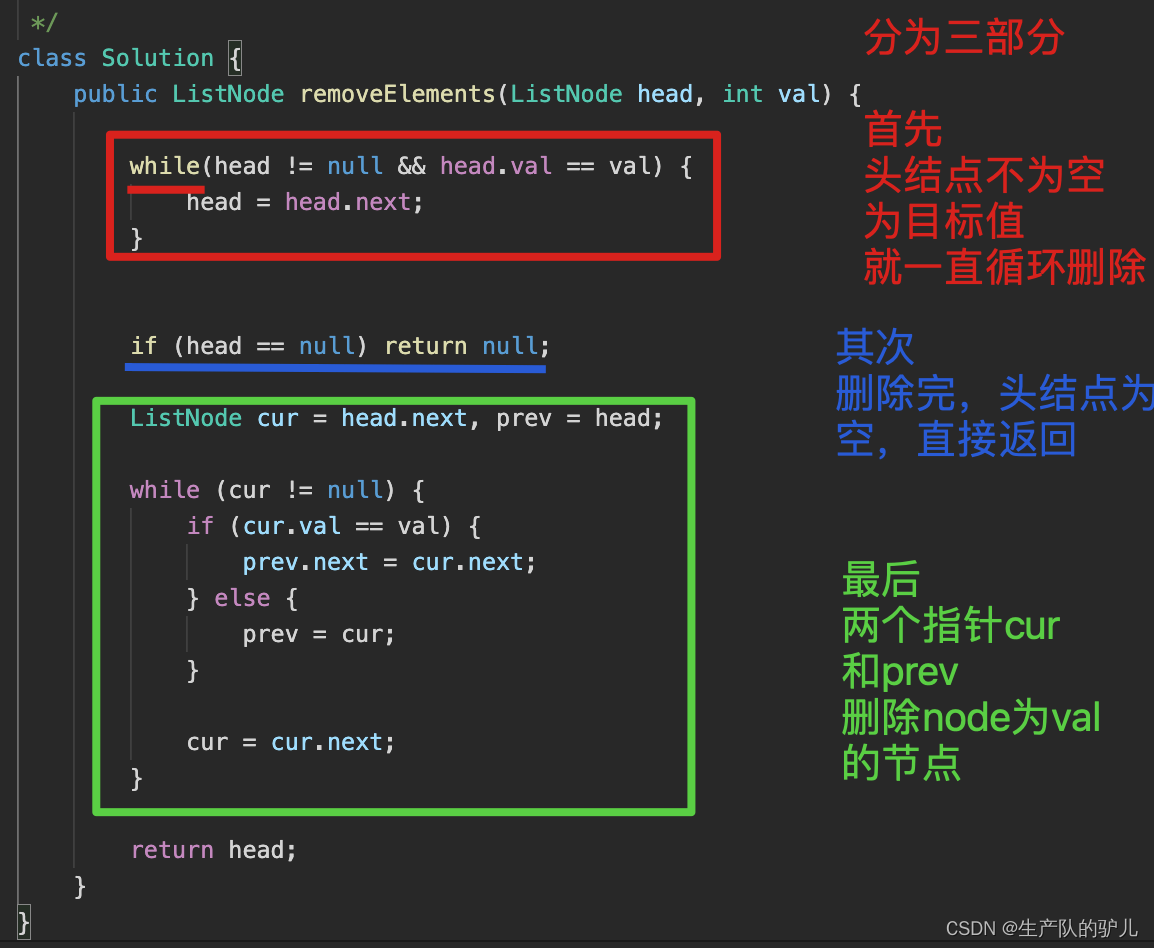
class Solution {
    public ListNode removeElements(ListNode head, int val) {
        while (head != null && head.val == val) {
            head = head.next;
        }

        if(head == null) {
            return null;
        }

        ListNode pre = head;
        ListNode cur = head.next;

        while (cur != null) {
            if (cur.val == val) {
                pre.next = cur.next;
            } else {
                pre = cur;
            }

            cur = cur.next;
        }

        return head;
    }
}
思路简化
通过创建 一个dummyNode 在 head前面
避免对于 head.val == val的特殊情况的处理
By creating a dummyNode in front of the head
to Avoid handling special cases of head.val == val
class Solution {
    public ListNode removeElements(ListNode head, int val) {
        ListNode dummy = new ListNode(0);
        dummy.next = head;

        ListNode cur = dummy;

        while (cur != null && cur.next != null) {
            if (cur.next.val == val) {
                cur.next = cur.next.next;
            } else {
                cur = cur.next;
            }
        }

        return dummy.next;
    }
}
Design链表 leetcode 707
链接
https://leetcode.com/problems/design-linked-list/
题目描述
Design your implementation of the linked list. You can choose to use a singly or doubly linked list.
A node in a singly linked list should have two attributes: val and next. val is the value of the current node, and next is a pointer/reference to the next node.
If you want to use the doubly linked list, you will need one more attribute prev to indicate the previous node in the linked list. Assume all nodes in the linked list are 0-indexed.
Implement the MyLinkedList class:
MyLinkedList() Initializes the MyLinkedList object.
int get(int index) Get the value of the indexth node in the linked list. If the index is invalid, return -1.
void addAtHead(int val) Add a node of value val before the first element of the linked list. After the insertion, the new node will be the first node of the linked list.
void addAtTail(int val) Append a node of value val as the last element of the linked list.
void addAtIndex(int index, int val) Add a node of value val before the indexth node in the linked list. If index equals the length of the linked list, the node will be appended to the end of the linked list. If index is greater than the length, the node will not be inserted.
void deleteAtIndex(int index) Delete the indexth node in the linked list, if the index is valid.
代码
class MyLinkedList {
    Node head;
    Node tail;
    int cap;

    public MyLinkedList() {
        this.head = new Node(-1);
        this.tail = new Node(-1);
        this.cap = 0;

        this.head.next = tail;
        this.tail.prev = head;

    }

    public Node getNode(int index) {

        Node cur = head.next;
        for (int i = 0; i < index; i++) {
            cur = cur.next;
        }

        return cur;
    }

    public int get(int index) {

        if(index < 0 || index >= cap) {
            return -1;
        }

        Node cur = getNode(index);

        return cur.val;

    }


    public void addAtHead(int val) {
        Node x = new Node(val);

        x.prev = this.head;
        x.next = head.next;

        head.next.prev = x;
        head.next = x;

        this.cap++;
    }

    public void addAtTail(int val) {
        Node x = new Node(val);

        x.prev = tail.prev;
        x.next = this.tail;

        tail.prev.next = x;
        tail.prev = x;

        this.cap++;
    }

    public void addAtIndex(int index, int val) {

        if (index > this.cap || index < 0) return;

        Node x = new Node(val);

        Node cur = getNode(index);

        Node p1 = cur.prev;
        Node p2 = cur;

        p1.next = x;
        p2.prev = x;

        x.prev = p1;
        x.next = p2;

        this.cap++;
    }

    public void deleteAtIndex(int index) {

        if (index >= this.cap || index < 0) return;

         Node cur = getNode(index);

        Node p1 = cur.prev;
        Node p2 = cur.next;

        p1.next = p2;
        p2.prev = p1;

        cur.next = cur.prev = null;

        this.cap--;
    }
}

class Node{
    int val;
    Node prev;
    Node next;

    public Node(int val) {
        this.val = val;
    }
}

/**
 * Your MyLinkedList object will be instantiated and called as such:
 * MyLinkedList obj = new MyLinkedList();
 * int param_1 = obj.get(index);
 * obj.addAtHead(val);
 * obj.addAtTail(val);
 * obj.addAtIndex(index,val);
 * obj.deleteAtIndex(index);
 */
思路
设计一个linkedlist
Design a linkedlist
实现增删插改
Realize addition, deletion, insertion and modification
create Node class first
suggest use doubleNode
own three attribution
val
prev
next
create DoubleLinkedList
head
tail
size
don’t forget to update size,
when each time you implentent the insert, add, remove function
犯错点
对于get,insert, remove等方法
开始要进行index的检查
For get, insert, remove and other methods
need index check.
get 和 remove 检查 index是否 0 - size - 1内
Get and remove check whether the index is 0 - size - 1
insert 检查 index是否 0 - size内
Insert to check if the index is within 0- size
使用cur = head.next
for (i =0 ;i<index;i++ ) cur = cur.next;
就可以找到该节点位置
可以单独创建getNode方法使用
因为要经常使用这个
You can create the getNode method separately to use
Because we need to use this frequently
通过 getNode找到cur点之后
先处理 x 和 prev 和 cur关系
链表反转 Reverse LinkedList
思路
- consider the spcial case
- use two pointer
cur and prev to reverse the linkedlist
代码
指针
class Solution {

    public ListNode reverseList(ListNode head) {
        if (head == null || head.next == null) return head;

        ListNode cur = head, prev = null;

        while (cur != null) {
            ListNode next = cur.next;
            cur.next = prev;
            prev = cur;
            cur = next;
        }

        return prev;
    }
}
递归
这里定义的 reverseList
输入为 head
输出为 反转 head开头的链表
last = reverseList(head.next)
反转 head.next 开头的链表
head.next 是 head下一个指针
head.next.next = head 让head下一个指针指向 head
head.next = null 让head指向null节点
class Solution {

    public ListNode reverseList(ListNode head) {
        if (head == null || head.next == null) return head;

        ListNode last = reverseList(head.next);
        head.next.next = head;
        head.next = null;

        return last;
    }
}
指针变得递归
class Solution {

    public ListNode reverseList(ListNode head) {
        return reverse(null, head);
    }

    ListNode reverse(ListNode prev, ListNode cur) {
        if (cur == null) return prev;

        ListNode next = cur.next;
        cur.next = prev;

        return reverse(cur, next);
    }
}