目录
- 1 ClickHouse准备操作
- 2 使用jdbc方式操作ClickHouse
- 3 SpringBoot的整合ClickHouse
1 ClickHouse准备操作

使用的JDBC方式操作clickhouseclickhouse与springboot的整合使用
提前创建一张表,并为该表插入一些实验数据
create table t_order01(
 id UInt32,
 sku_id String,
 total_amount Decimal(16,2),
 create_time Datetime
) engine =MergeTree
 partition by toYYYYMMDD(create_time)
 primary key (id)
 order by (id,sku_id);

insert into t_order01 values
(101,'sku_001',1000.00,'2021-12-01 12:00:00'),
(102,'sku_002',2000.00,'2021-12-01 11:00:00'),
(102,'sku_004',2500.00,'2021-12-01 12:00:00'),
(102,'sku_002',2000.00,'2021-12-01 13:00:00'),
(102,'sku_002',12000.00,'2021-12-01 13:00:00'),
(102,'sku_002',600.00,'2020-06-12 12:00:00');
2 使用jdbc方式操作ClickHouse
1、引入clickhouse的jdbc依赖
<dependency>
    <groupId>ru.yandex.clickhouse</groupId>
    <artifactId>clickhouse-jdbc</artifactId>
    <version>0.1.52</version>
</dependency>
2、实例代码
实大部分的操作和我们使用jdbc操作mysql的步骤类似,下面直接贴出代码,可以结合注释进行参考使用
import oldlu.clickhouse.ClickHouseConnection;
import oldlu.clickhouse.ClickHouseDataSource;
import oldlu.clickhouse.settings.ClickHouseProperties;

import java.sql.*;
import java.util.ArrayList;
import java.util.HashMap;
import java.util.List;
import java.util.Map;

public class CreateTableTest {

    private static String username = "default";
    private static String password = "你的连接密码";
    private static String address = "jdbc:clickhouse://clickhouse的连接IP地址:8123";
    private static String db = "连接数据库名称(默认数据库:default)";
    private static int socketTimeout = 600000;

    public static void main(String[] args) throws Exception {
        //getConn();
        //queryTable();
        //createTable("");
        //insertOne();
        //dropTable();
        deleteById();
        //updateById();
    }

    /**
     * 查询数据
     */
    public static void queryTable(){
        List<Map<String, Object>> list = new ArrayList<>();
        String sql = "select * from user_info";
        Connection connection = getConn();
        try {
            Statement statement = connection.createStatement();
            ResultSet rs  = statement.executeQuery(sql);
            ResultSetMetaData rsmd = rs.getMetaData();
            while(rs.next()){
                Map<String, Object> row = new HashMap<>();
                for(int i = 1; i <= rsmd.getColumnCount(); i++){
                    row.put(rsmd.getColumnName(i), rs.getObject(rsmd.getColumnName(i)));
                }
                list.add(row);
            }
        } catch (SQLException e) {
            e.printStackTrace();
        }

        //在此可以根据实际需求将解析的数据封装到对象中
        list.stream().forEach(item ->{
            Map<String, Object> rowData = item;
            System.out.println(rowData);
        });
        //System.out.println(list);
    }

    /**
     * 创建表
     * @throws Exception
     */
    public static void createTable(String tableSql) throws Exception{
        /*tableSql = "create table t_order02(\n" +
                " id UInt32,\n" +
                " sku_id String,\n" +
                " total_amount Decimal(16,2),\n" +
                " create_time Datetime\n" +
                ") engine =MergeTree\n" +
                " partition by toYYYYMMDD(create_time)\n" +
                " primary key (id)\n" +
                " order by (id,sku_id);";*/
        Connection connection = getConn();
        Statement statement = connection.createStatement();
        boolean execute = statement.execute(tableSql);
        if(execute){
            System.out.println(execute);
            System.out.println("创建表成功");
        }
    }

    /**
     * 删除表
     * @throws Exception
     */
    public static void dropTable() throws Exception{
        Connection connection = getConn();
        Statement statement = connection.createStatement();
        statement.execute("drop table t_order01;");
        System.out.println("删除表成功");
    }

    /**
     * 插入数据
     * 实际使用时候,插入的语句里面的参数从外部传入进去
     * @throws Exception
     */
    public static void insertOne() throws Exception{
        Connection connection = getConn();
        PreparedStatement pstmt = connection.prepareStatement("insert into t_order01 values('103', 'sku_004', '2500.00','2021-06-01 12:00:00')");
        pstmt.execute();
        System.out.println("insert success");
    }

    /**
     * 删除数据
     * 实际使用时候,删除的语句里面的参数从外部传入进去
     */
    public static void deleteById() throws Exception{
        Connection connection = getConn();
        //sku_id ='sku_001'
        PreparedStatement pstmt = connection.prepareStatement("alter table t_order01 delete where sku_id = 'sku_002';");
        pstmt.execute();
        System.out.println("delete success");
    }

    /**
     * 修改数据
     * 实际使用时候,修改的语句里面的参数从外部传入进去
     */
    public static void updateById() throws Exception{
        Connection connection = getConn();
        PreparedStatement pstmt = connection.prepareStatement("alter table t_order01 update total_amount=toDecimal32(2000.00,2) where id = '102'");
        pstmt.execute();
        System.out.println("update success");
    }

    public static Connection getConn() {
        ClickHouseProperties properties = new ClickHouseProperties();
        properties.setUser(username);
        properties.setPassword(password);
        properties.setDatabase(db);
        properties.setSocketTimeout(socketTimeout);
        ClickHouseDataSource clickHouseDataSource = new ClickHouseDataSource(address, properties);
        ClickHouseConnection conn = null;
        try {
            conn = clickHouseDataSource.getConnection();
            System.out.println(conn);
            System.out.println("连接成功");
            return conn;
        } catch (SQLException e) {
            e.printStackTrace();
        }
        return null;
    }
}
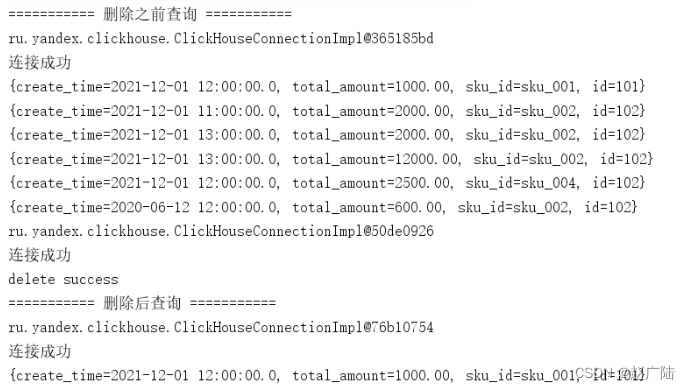
3、测试,选择查询和删除一条数据为例做测试
查询功能测试结果,见下面的控制台数据打印

删除功能测试结果,删除 "sku_id = sku_002 "的数据, 执行方法之后,见下面的控制台数据打印
3 SpringBoot的整合ClickHouse
在实际开发过程中,更多是与框架整合在一起进行使用,比如很多项目中都使用springboot进行开发,下面演示如何在springboot中使用clickhouse
前置准备
确保clickhouse服务正常可用
1、准备一张表,以及表中插入一些实验数据
CREATE TABLE user_info (
  `id` UInt64,
  `user_name` String,
  `pass_word` String,
  `phone` String,
  `create_day` Date DEFAULT CAST(now(),'Date')
)ENGINE = MergeTree
primary key (id)
order by (id);


INSERT INTO user_info
  (id,user_name,pass_word,phone)
VALUES
  (1,'xiaowang','123456','13325511231'),
  (2,'xiaoma','123456','13825511231'),
  (3,'xiaozhao','123456','18925511231');
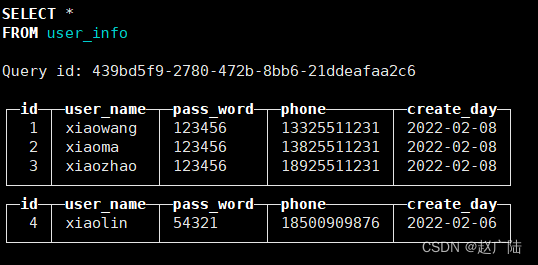
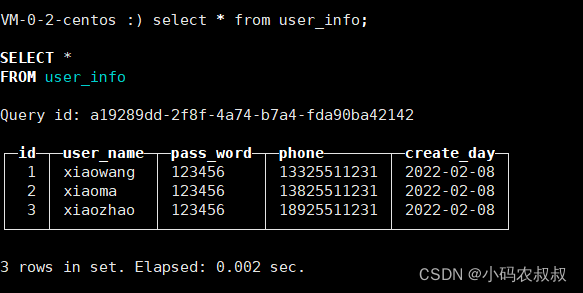
2、执行完毕上面的建表后,查询下表数据
1、导入完整依赖
<dependencies>

    <dependency>
        <groupId>org.springframework.boot</groupId>
        <artifactId>spring-boot-starter-web</artifactId>
    </dependency>

    <dependency>
        <groupId>org.springframework.boot</groupId>
        <artifactId>spring-boot-starter-aop</artifactId>
    </dependency>

    <dependency>
        <groupId>org.springframework.boot</groupId>
        <artifactId>spring-boot-starter-test</artifactId>
    </dependency>

    <dependency>
        <groupId>org.mybatis.spring.boot</groupId>
        <artifactId>mybatis-spring-boot-starter</artifactId>
        <version>1.3.2</version>
    </dependency>
    <dependency>
        <groupId>mysql</groupId>
        <artifactId>mysql-connector-java</artifactId>
        <version>5.1.38</version>
    </dependency>

    <dependency>
        <groupId>com.alibaba</groupId>
        <artifactId>druid-spring-boot-starter</artifactId>
        <version>1.1.13</version>
    </dependency>

    <dependency>
        <groupId>commons-lang</groupId>
        <artifactId>commons-lang</artifactId>
        <version>2.6</version>
    </dependency>

    <!-- clickHouse数据库 -->
    <dependency>
        <groupId>ru.yandex.clickhouse</groupId>
        <artifactId>clickhouse-jdbc</artifactId>
        <version>0.1.53</version>
    </dependency>

</dependencies>
2、基础配置文件
server:
  port: 7010

  # mybatis 配置
mybatis:
  type-aliases-package: com.congge.entity
  mapper-locations: classpath:/mapper/*.xml

spring:
  datasource:
    type: com.alibaba.druid.pool.DruidDataSource
    click:
      driverClassName: ru.yandex.clickhouse.ClickHouseDriver
      url: jdbc:clickhouse://IP地址:8123/default
      username: default
      password: 123456
      initialSize: 10
      maxActive: 100
      minIdle: 10
      maxWait: 6000
3、使用一个配置类,关联第二步中的click配置属性
import org.springframework.boot.context.properties.ConfigurationProperties;
import org.springframework.stereotype.Component;

@Component
@ConfigurationProperties(prefix = "spring.datasource.click")
public class ConnectionParamConfig {

    private String driverClassName ;
    private String url ;
    private Integer initialSize ;
    private Integer maxActive ;
    private Integer minIdle ;
    private Integer maxWait ;

    private String username;
    private String password;

    public String getDriverClassName() {
        return driverClassName;
    }
    public void setDriverClassName(String driverClassName) {
        this.driverClassName = driverClassName;
    }
    public String getUrl() {
        return url;
    }
    public void setUrl(String url) {
        this.url = url;
    }
    public Integer getInitialSize() {
        return initialSize;
    }
    public void setInitialSize(Integer initialSize) {
        this.initialSize = initialSize;
    }
    public Integer getMaxActive() {
        return maxActive;
    }
    public void setMaxActive(Integer maxActive) {
        this.maxActive = maxActive;
    }
    public Integer getMinIdle() {
        return minIdle;
    }
    public void setMinIdle(Integer minIdle) {
        this.minIdle = minIdle;
    }
    public Integer getMaxWait() {
        return maxWait;
    }
    public void setMaxWait(Integer maxWait) {
        this.maxWait = maxWait;
    }

    public String getUsername() {
        return username;
    }

    public void setUsername(String username) {
        this.username = username;
    }

    public String getPassword() {
        return password;
    }

    public void setPassword(String password) {
        this.password = password;
    }
}
4、重写datasource的配置,使用自定义的clickhouse的属性配置
import javax.annotation.Resource;

import com.alibaba.druid.pool.DruidDataSource;
import org.springframework.context.annotation.Bean;
import org.springframework.context.annotation.Configuration;

import javax.sql.DataSource;

@Configuration
public class DruidConfig {

    @Resource
    private ConnectionParamConfig jdbcParamConfig;

    /**
     * 重写 DataSource
     * @return
     */
    @Bean
    public DataSource dataSource() {
        DruidDataSource datasource = new DruidDataSource();
        datasource.setUrl(jdbcParamConfig.getUrl());
        datasource.setDriverClassName(jdbcParamConfig.getDriverClassName());
        datasource.setInitialSize(jdbcParamConfig.getInitialSize());
        datasource.setMinIdle(jdbcParamConfig.getMinIdle());
        datasource.setMaxActive(jdbcParamConfig.getMaxActive());
        datasource.setMaxWait(jdbcParamConfig.getMaxWait());
        datasource.setUsername(jdbcParamConfig.getUsername());
        datasource.setPassword(jdbcParamConfig.getPassword());
        return datasource;
    }

}
5、提供一个接口和mybatis的查询xml文件
public interface UserInfoMapper {
    void saveData (UserInfo userInfo) ;
    UserInfo selectById (@Param("id") Integer id) ;
    List<UserInfo> selectList () ;
}

<?xml version="1.0" encoding="UTF-8"?>
<!DOCTYPE mapper PUBLIC "-//mybatis.org//DTD Mapper 3.0//EN" "http://mybatis.org/dtd/mybatis-3-mapper.dtd">
<mapper namespace="com.congge.mapper.UserInfoMapper">
    <resultMap id="BaseResultMap" type="com.congge.entity.UserInfo">
        <id column="id" jdbcType="INTEGER" property="id" />
        <result column="user_name" jdbcType="VARCHAR" property="userName" />
        <result column="pass_word" jdbcType="VARCHAR" property="passWord" />
        <result column="phone" jdbcType="VARCHAR" property="phone" />
        <result column="create_day" jdbcType="VARCHAR" property="createDay" />
    </resultMap>

    <sql id="Base_Column_List">
        id,user_name,pass_word,phone,create_day
    </sql>

    <insert id="saveData" parameterType="com.congge.entity.UserInfo" >
        INSERT INTO user_info
        (id,user_name,pass_word,phone,create_day)
        VALUES
        (#{id,jdbcType=INTEGER},#{userName,jdbcType=VARCHAR},#{passWord,jdbcType=VARCHAR},
        #{phone,jdbcType=VARCHAR},#{createDay,jdbcType=VARCHAR})
    </insert>

    <select id="selectById" parameterType="java.lang.Integer" resultMap="BaseResultMap">
        select
        <include refid="Base_Column_List" />
        from user_info
        where id = #{id,jdbcType=INTEGER}
    </select>

    <select id="selectList" resultMap="BaseResultMap" >
        select
        <include refid="Base_Column_List" />
        from user_info
    </select>

</mapper>
6、Service
@Service
public class UserInfoService {

    @Resource
    private UserInfoMapper userInfoMapper ;

    public void saveData(UserInfo userInfo) {
        userInfoMapper.saveData(userInfo);
    }

    public UserInfo selectById(Integer id) {
        return userInfoMapper.selectById(id);
    }

    public List<UserInfo> selectList() {
        return userInfoMapper.selectList();
    }

}
7、Controller
@RestController
public class UserInfoController {

    @Resource
    private UserInfoService userInfoService ;

    //localhost:7010/saveData
    @GetMapping("/saveData")
    public String saveData (){
        UserInfo userInfo = new UserInfo () ;
        userInfo.setId(4);
        userInfo.setUserName("xiaolin");
        userInfo.setPassWord("54321");
        userInfo.setPhone("18500909876");
        userInfo.setCreateDay("2022-02-06");
        userInfoService.saveData(userInfo);
        return "success";
    }

    //localhost:7010/getById?id=1
    @GetMapping("/getById")
    public UserInfo getById (int id) {
        return userInfoService.selectById(id) ;
    }

    @GetMapping("/getList")
    public List<UserInfo> getList () {
        return userInfoService.selectList() ;
    }

}
8、启动类
@SpringBootApplication
@MapperScan(basePackages = {"com.congge.mapper"})
public class App {

    public static void main(String[] args) {
        SpringApplication.run(App.class,args);
    }

}
9、功能接口测试
查询测试,调用接口:localhost:7010/getById?id=1

插入数据测试,调用接口:localhost:7010/saveData

然后再去clickhouse表中查询下数据
