之前搞 oauth 登录一直没有搞好,客户端、授权服务端、资源端一起搞对于我刚接触的小菜鸡来说,难度有点大。
然后就先搞了个 Client 端对接 Github 登录。 网上关于 Github 登录的资料有很多,而且框架对 Github 集成的也很好,配置起来并不麻烦。
对接Github登录
首先在 Github 上申请注册一个 oauth application,填写 callback url得到 client ID和 secret
默认的callback url 格式:{baseUrl}/login/oauth2/code/{registrationId}
在这里对接 GIthub 的默认重定向的地址就是http://xxxx/api/login/oauth2/code/github
如果对接其他的第三方就将 registrationId 改成 和我们配置文件中的一致即可
1、作为 Client 端只需要引入依赖
implementation 'org.springframework.boot:spring-boot-starter-oauth2-client'
2、然后在applicatiom.yml中进行相关配置
spring:
  security:
    oauth2:
      client:
        registration:
          github:
            clientId: 56ca77ae71xxxxxxx
            clientSecret: e1aa08298c5d0f5f9c35414355666b81xxxxxxx
            scope:
              - user:email
              - read:user
3、Create OAuth2User and OAuth2UserService Classes
主要用来定义 授权用户 的数据结构 和 加载 授权用户的相关数据
3.1、创建一个实体类去实现 OAuth2User 重写里面的方法
例如:
import java.util.Collection;
import java.util.Map;
import org.springframework.security.core.GrantedAuthority;
import org.springframework.security.oauth2.core.user.OAuth2User;

public class GitHubCustomOauth2User implements OAuth2User {

  private OAuth2User user;

  public GitHubCustomOauth2User(OAuth2User user) {
    this.user = user;
  }

  @Override
  public Map<String, Object> getAttributes() {
    return user.getAttributes();
  }

  @Override
  public Collection<? extends GrantedAuthority> getAuthorities() {
    return user.getAuthorities();
  }

  @Override
  public String getName() {
    return user.getAttribute("name");
  }

  public String getLogin() {
    return user.getAttribute("login");
  }

  public String getEmail() {
    return user.getAttribute("email");
  }
}
⚠️注意:对于对接不同的授权端是getName() 方法返回的值的名称发生变化
3.2 创建一个service 去继承 DefaultOAuth2UserService
里面实现加载授权用户数据的功能,根据不同授权端转变为不同的 OAuth2User
例如:
package com.openbayes.application.oauth;

import com.openbayes.domain.oauth.GitHubCustomOauth2User;
import com.openbayes.domain.oauth.SiomCustomOauth2User;
import java.util.Map;
import lombok.extern.slf4j.Slf4j;
import org.springframework.security.oauth2.client.registration.ClientRegistration;
import org.springframework.security.oauth2.client.userinfo.DefaultOAuth2UserService;
import org.springframework.security.oauth2.client.userinfo.OAuth2UserRequest;
import org.springframework.security.oauth2.core.OAuth2AccessToken;
import org.springframework.security.oauth2.core.OAuth2AuthenticationException;
import org.springframework.security.oauth2.core.user.OAuth2User;
import org.springframework.stereotype.Service;

@Service
@Slf4j
public class CustomOauth2UserService extends DefaultOAuth2UserService {

  @Override
  public OAuth2User loadUser(OAuth2UserRequest userRequest) throws OAuth2AuthenticationException {
    OAuth2AccessToken accessToken = userRequest.getAccessToken();
    String tokenValue = accessToken.getTokenValue();
    log.info("accessToken value: {}", tokenValue);

    ClientRegistration clientRegistration = userRequest.getClientRegistration();
    ClientRegistration.ProviderDetails providerDetails = clientRegistration.getProviderDetails();
    log.info("clientRegistration 为:{}", clientRegistration);
    log.info("clientRegistration providerDetails 为:{}", providerDetails);

    String attributeName =
        userRequest
            .getClientRegistration()
            .getProviderDetails()
            .getUserInfoEndpoint()
            .getUserNameAttributeName();
    log.info("attributeName 为:{}", attributeName);

    Map<String, Object> additionalParameters = userRequest.getAdditionalParameters();
    log.info("additionalParameters 为:{}", additionalParameters);

    OAuth2User oAuth2User = super.loadUser(userRequest);
    log.info("User information response: {}", oAuth2User.getAttributes());

    if (clientRegistration.getRegistrationId().equals("github")) {
      GitHubCustomOauth2User gitHubCustomOauth2User = new GitHubCustomOauth2User(oAuth2User);
      log.info("gitHubCustomOauth2User 的 Attributes 为:{}", gitHubCustomOauth2User.getAttributes());
      return gitHubCustomOauth2User;
    } else {
      xxxCustomOauth2User xxCustomOauth2User = new xxCustomOauth2User(oAuth2User);
      log.info("xxxCustomOauth2User 的 Attributes 为:{}", xxxxCustomOauth2User.getAttributes());
      return siomCustomOauth2User;
    }
  }
}
4、Configure Spring Security for OAuth2 Login
配置 OAuth Login 的配置
例如
   @Autowired private OAuth2AuthorizedClientService authorizedClientService;
    @Autowired private OAuth2AuthorizedClientRepository oAuth2AuthorizedClientRepository;
    @Autowired private CustomOauth2UserService customOauth2UserService;
    @Autowired private Oauth2LoginSuccessHandler oauth2LoginSuccessHandler;
    @Autowired private Oauth2LoginFailedHandler oauth2LoginFailedHandler;
    @Autowired private Oauth2LoginOutSuccessHandler oauth2LoginOutSuccessHandler;

   http.oauth2Login()
              .loginPage("/login")
              .authorizedClientService(authorizedClientService)
              .authorizedClientRepository(oAuth2AuthorizedClientRepository)
              .userInfoEndpoint().userService(customOauth2UserService)
              .and()
              .successHandler(oauth2LoginSuccessHandler)
              .failureHandler(oauth2LoginFailedHandler);
这里面的配置包含了 OAuth 集群下的一些配置(下面讲到),加载用户信息的服务为刚才我们定义的 Service ,以及用户登录成功 和登录失败的 handler
5、extends SimpleUrlAuthenticationSuccessHandler
这个里面主要用来处理授权成功之后的逻辑,是注册用户还是直接登录等业务逻辑
一张图来解释
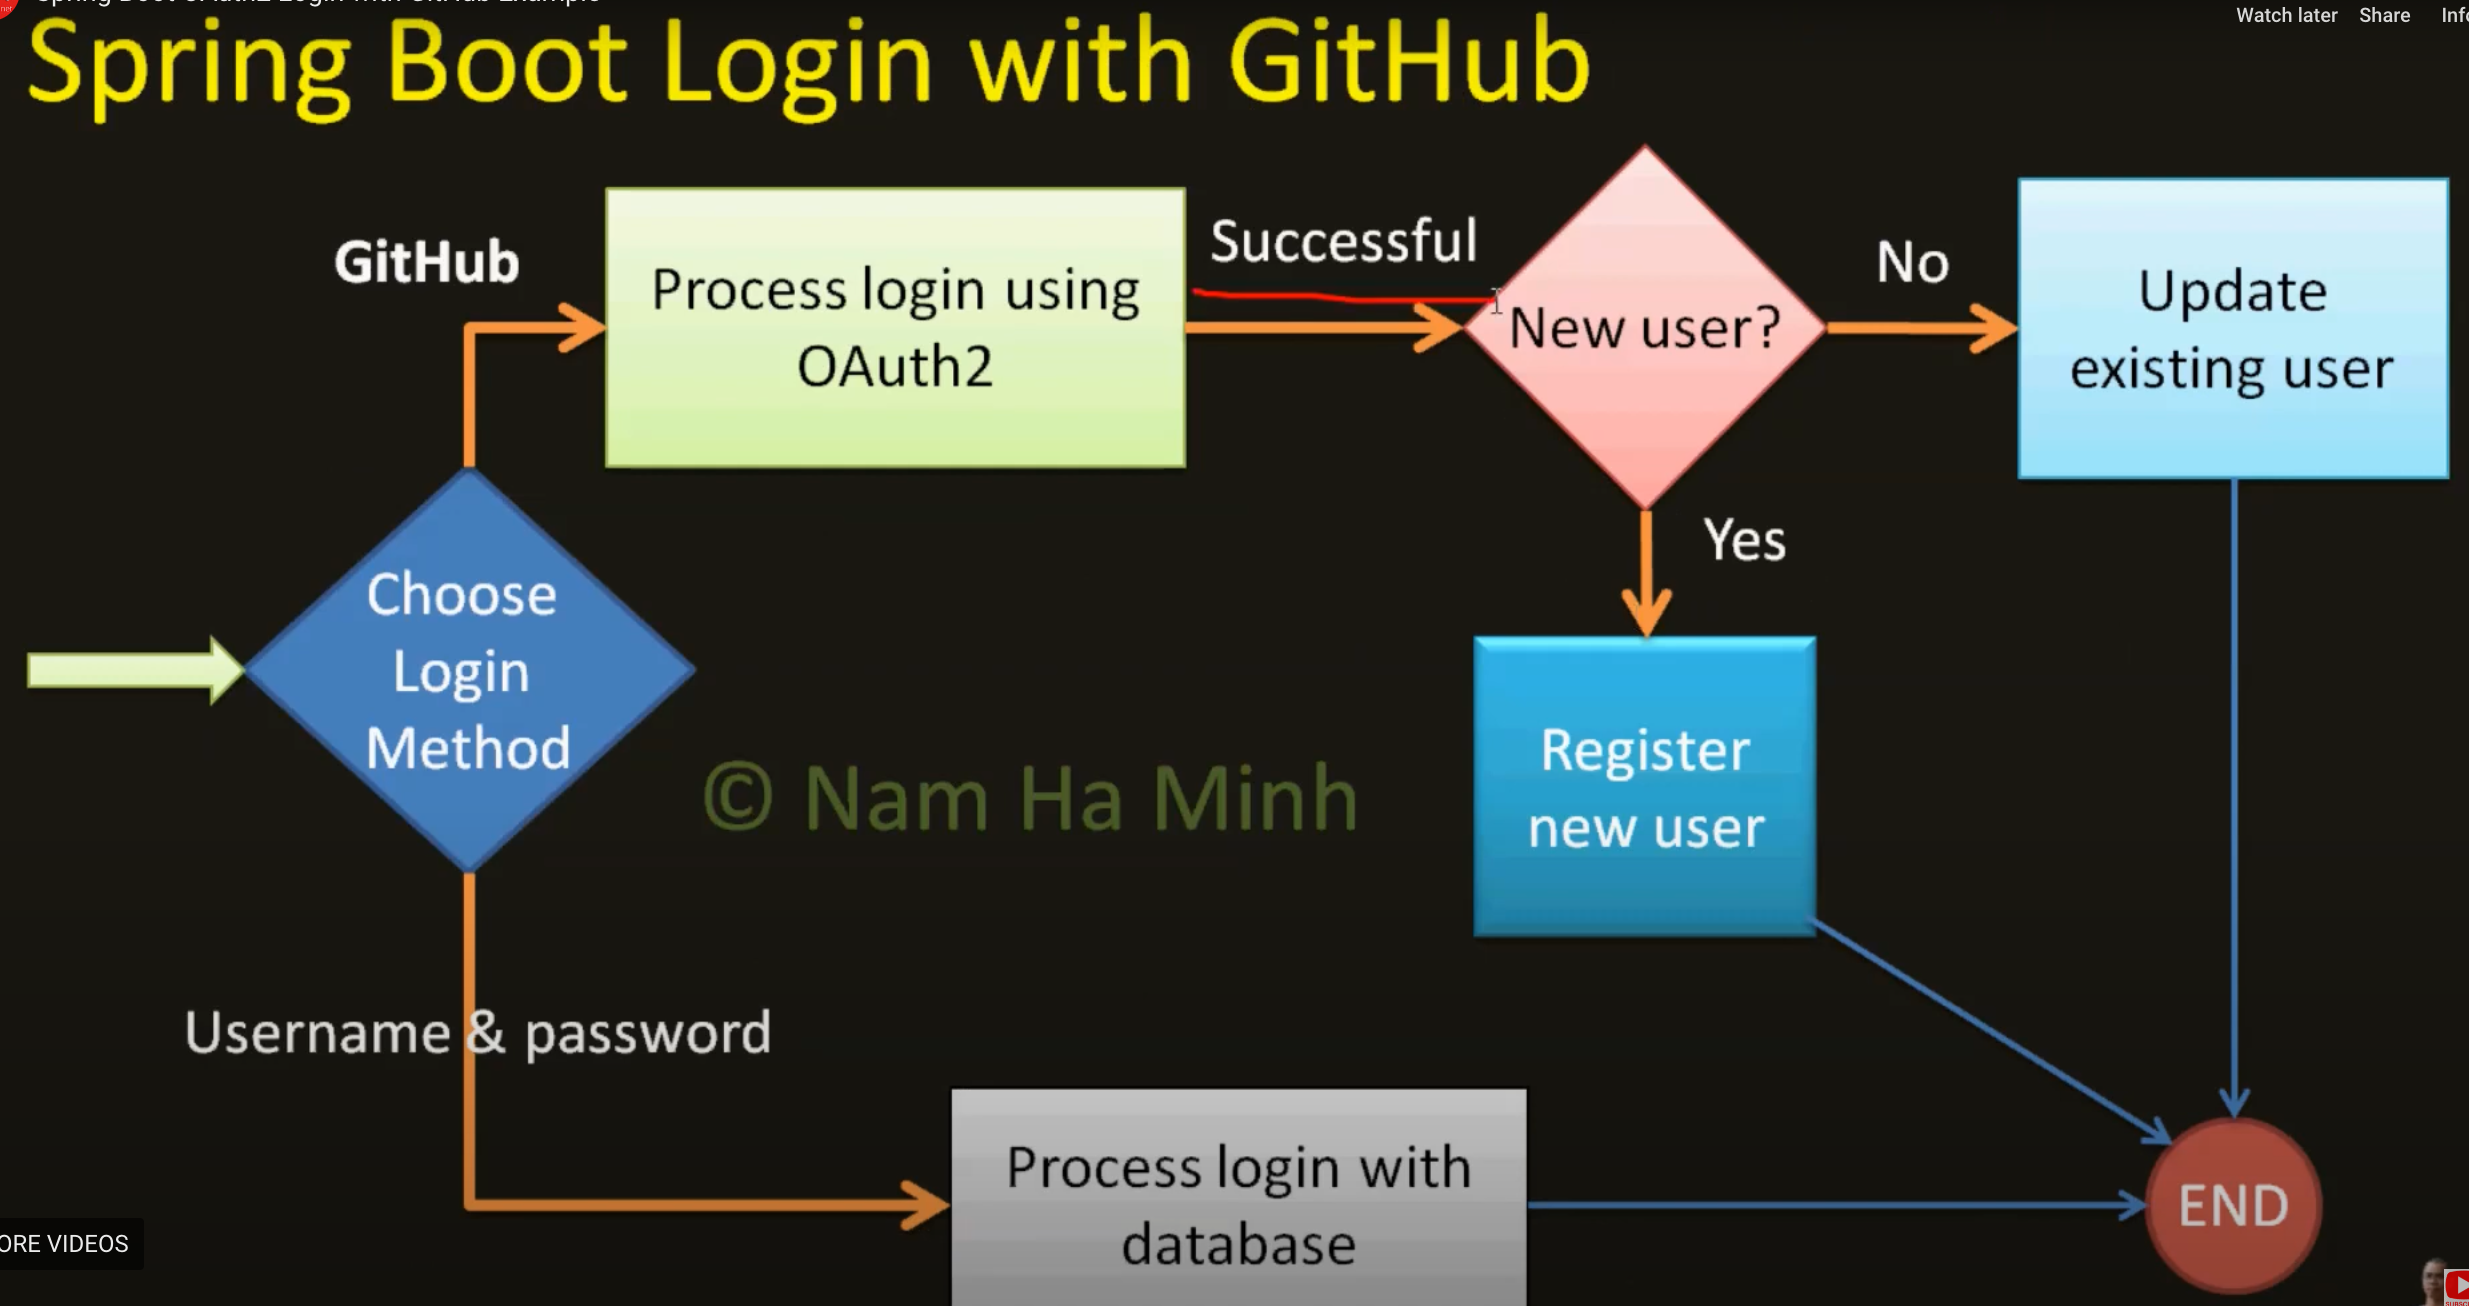
例子
@Component
@Slf4j
public class Oauth2LoginSuccessHandler extends SimpleUrlAuthenticationSuccessHandler {

  @Autowired private CustomOauth2UserService customOauth2UserService;

  @Autowired private UserRepository userRepository;

  @Autowired private UserApplicationService userApplicationService;

  @Autowired private TokenService tokenService;

  @Override
  public void onAuthenticationSuccess(
      HttpServletRequest request, HttpServletResponse response, Authentication authentication)
      throws IOException, ServletException {

    if (authentication instanceof OAuth2AuthenticationToken) {
      OAuth2AuthenticationToken oauth2Token = (OAuth2AuthenticationToken) authentication;
      String authorizedProvider = oauth2Token.getAuthorizedClientRegistrationId();
      log.info("authorizedProvider为{}", authorizedProvider);
      String redirectUrl = null;

      if (authorizedProvider.equals("github")) {

        GitHubCustomOauth2User oauth2User = (GitHubCustomOauth2User) authentication.getPrincipal();

          是注册呢?还是直接返回 token呢? 根据相关业务逻辑来判断

      } else if (authorizedProvider.equals("siom")) {
        SiomCustomOauth2User siomCustomOauth2User =
            (SiomCustomOauth2User) authentication.getPrincipal();

            和上面同理

    }
  }
}
6、extends SimpleUrlAuthenticationFailureHandler
这里主要为了登录失败的情况,主要做一些打印日志,以及给前端返回错误信息。这样前端可以根据返回的结果判断授权登录是成功还是失败,做不一样的操作以及跳转到不同的页面
到这里, 在单节点上使用 Github 登录就已经结束了
OAuth Logout
其实还可以引入登出的逻辑,登出的 handler 里面就是清理 session 的工作
- 首先要进行 logout 的配置
例如
 http.logout()
              .logoutUrl("/auth/logout")
              .logoutSuccessHandler(oauth2LoginOutSuccessHandler)
              .invalidateHttpSession(true)
              .clearAuthentication(true)
              .deleteCookies("JSESSIONID");
上面的配置就是,等你调用接口 /auth/logout 登出的时候,会对seeion 以及 cookie进行处理,oauth2LoginOutSuccessHandler 也会做相应的操作(打印日志,返回信息给前端)
例如
@Component
@Slf4j
public class Oauth2LoginOutSuccessHandler extends SimpleUrlLogoutSuccessHandler {

  @Override
  public void onLogoutSuccess(
      HttpServletRequest request, HttpServletResponse response, Authentication authentication)
      throws IOException, ServletException {
    HttpSession session = request.getSession(false);
    if (session != null) {
      session.invalidate();
    }

    log.info("User logged out at {}", new Date());
    response.setStatus(HttpStatus.UNAUTHORIZED.value());
    response.setContentType(MediaType.APPLICATION_JSON_VALUE);
    response.getWriter().write("{\"message\": \"Logout successful\"}");
    response.getWriter().flush();
  }
}
对接其他作为Client登录
如果我们还想引入其他第三方的登录,和上面的流程一下的。 我们这次增加一个和框架没有集成的第三方(像github和谷歌等因为集成的很好,我们的配置就会很好,流程也会比较顺利)
1、首先就是client 的配置
security:
    oauth2:
      client:
        registration:
          github:
            clientId: 56ca77ae71cxxxxxx
            clientSecret: e1aa08298c5d0f5f9c35414355666b8xxxxxxxxx
            scope:
              - user:email
              - read:user
          aaaa:
            client-id: 6b91bc5axxxxxx
            client-secret: 97eabe644084f6442a58bxxxxxx
            authorization-grant-type: authorization_code
            redirect-uri: "http://xxxxxxx/api/login/oauth2/code/aaaa"
            client-name: SIOM
        provider:
          aaaa:
            authorization-uri: xxxxxxx
            token-uri: xxxxxx
            user-info-uri: xxxxxxx
            user-name-attribute: id
这里的配置就是看官方文档进行配置。学习网址:OAuth2
2、创建新的实体类去实现 OAuth2User
例如
import java.util.Collection;
import java.util.Map;
import org.springframework.security.core.GrantedAuthority;
import org.springframework.security.oauth2.core.user.OAuth2User;

public class xxxxCustomOauth2User implements OAuth2User {

  private OAuth2User user;

  public xxxxCustomOauth2User(OAuth2User user) {
    this.user = user;
  }

  @Override
  public Map<String, Object> getAttributes() {
    return user.getAttributes();
  }

  @Override
  public Collection<? extends GrantedAuthority> getAuthorities() {
    return user.getAuthorities();
  }

  @Override
  public String getName() {
    return user.getAttribute("id");
  }

  public String getAccountNo() {
    return (String)
        ((Map<String, Object>) user.getAttributes().get("attributes")).get("account_no");
  }

  public String getUserId() {
    return (String) ((Map<String, Object>) user.getAttributes().get("attributes")).get("user_uid");
  }

  public String getEmail() {
    return (String) ((Map<String, Object>) user.getAttributes().get("attributes")).get("email");
  }

  public String getMobilePhone() {
    return (String) ((Map<String, Object>) user.getAttributes().get("attributes")).get("mobile");
  }
}
⚠️注意:这里重写的 getName() 就是根据返回的授权用户的 id
3、在 extends DefaultOAuth2UserService 的Service 中增加判断,授权用户最终转变为那个授权实体类进行返回
上面的例子上已经有所展示
4、在 loginSuccessHandler 里面增加判断是那个 AuthorizedClientRegistrationId ,进行不同的登录或者创建用户操作
在这里单节点下两个不同的第三方的 OAuth Client 的整体流程就已经结束了,但是在集群环境下就会出现新的问题
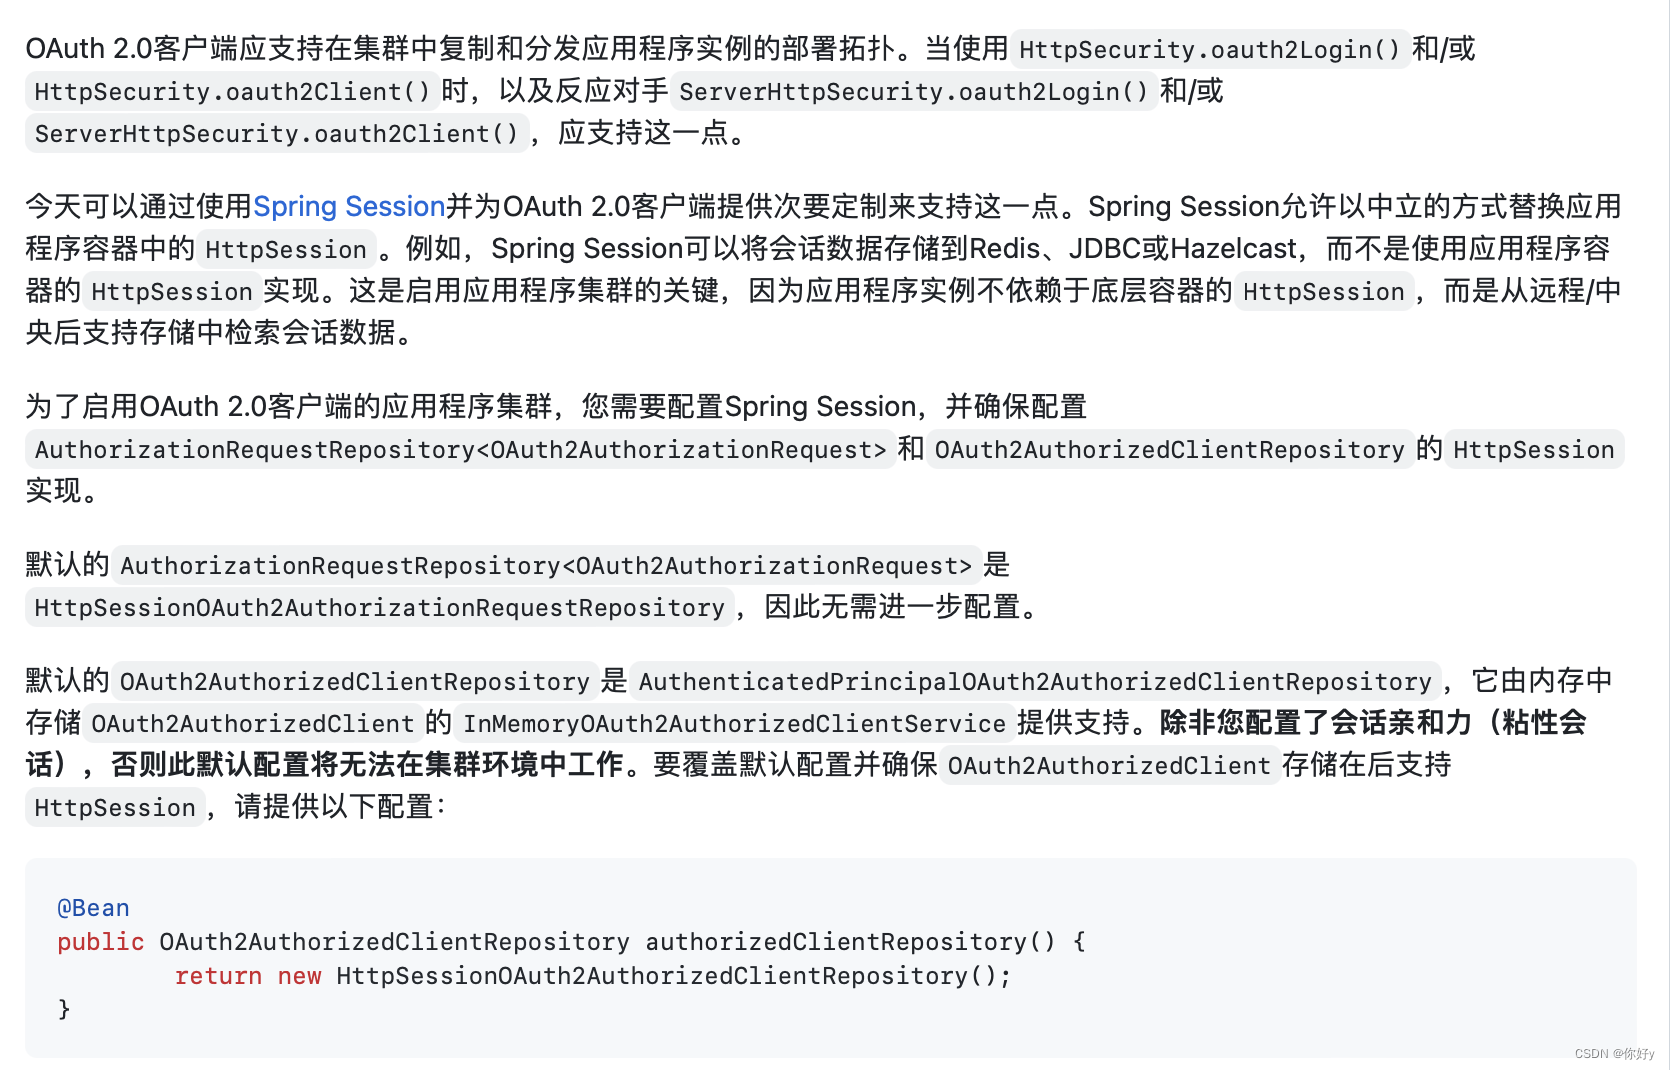
1、 OAuth Client 集群环境下的会话丢失问题
解决方式
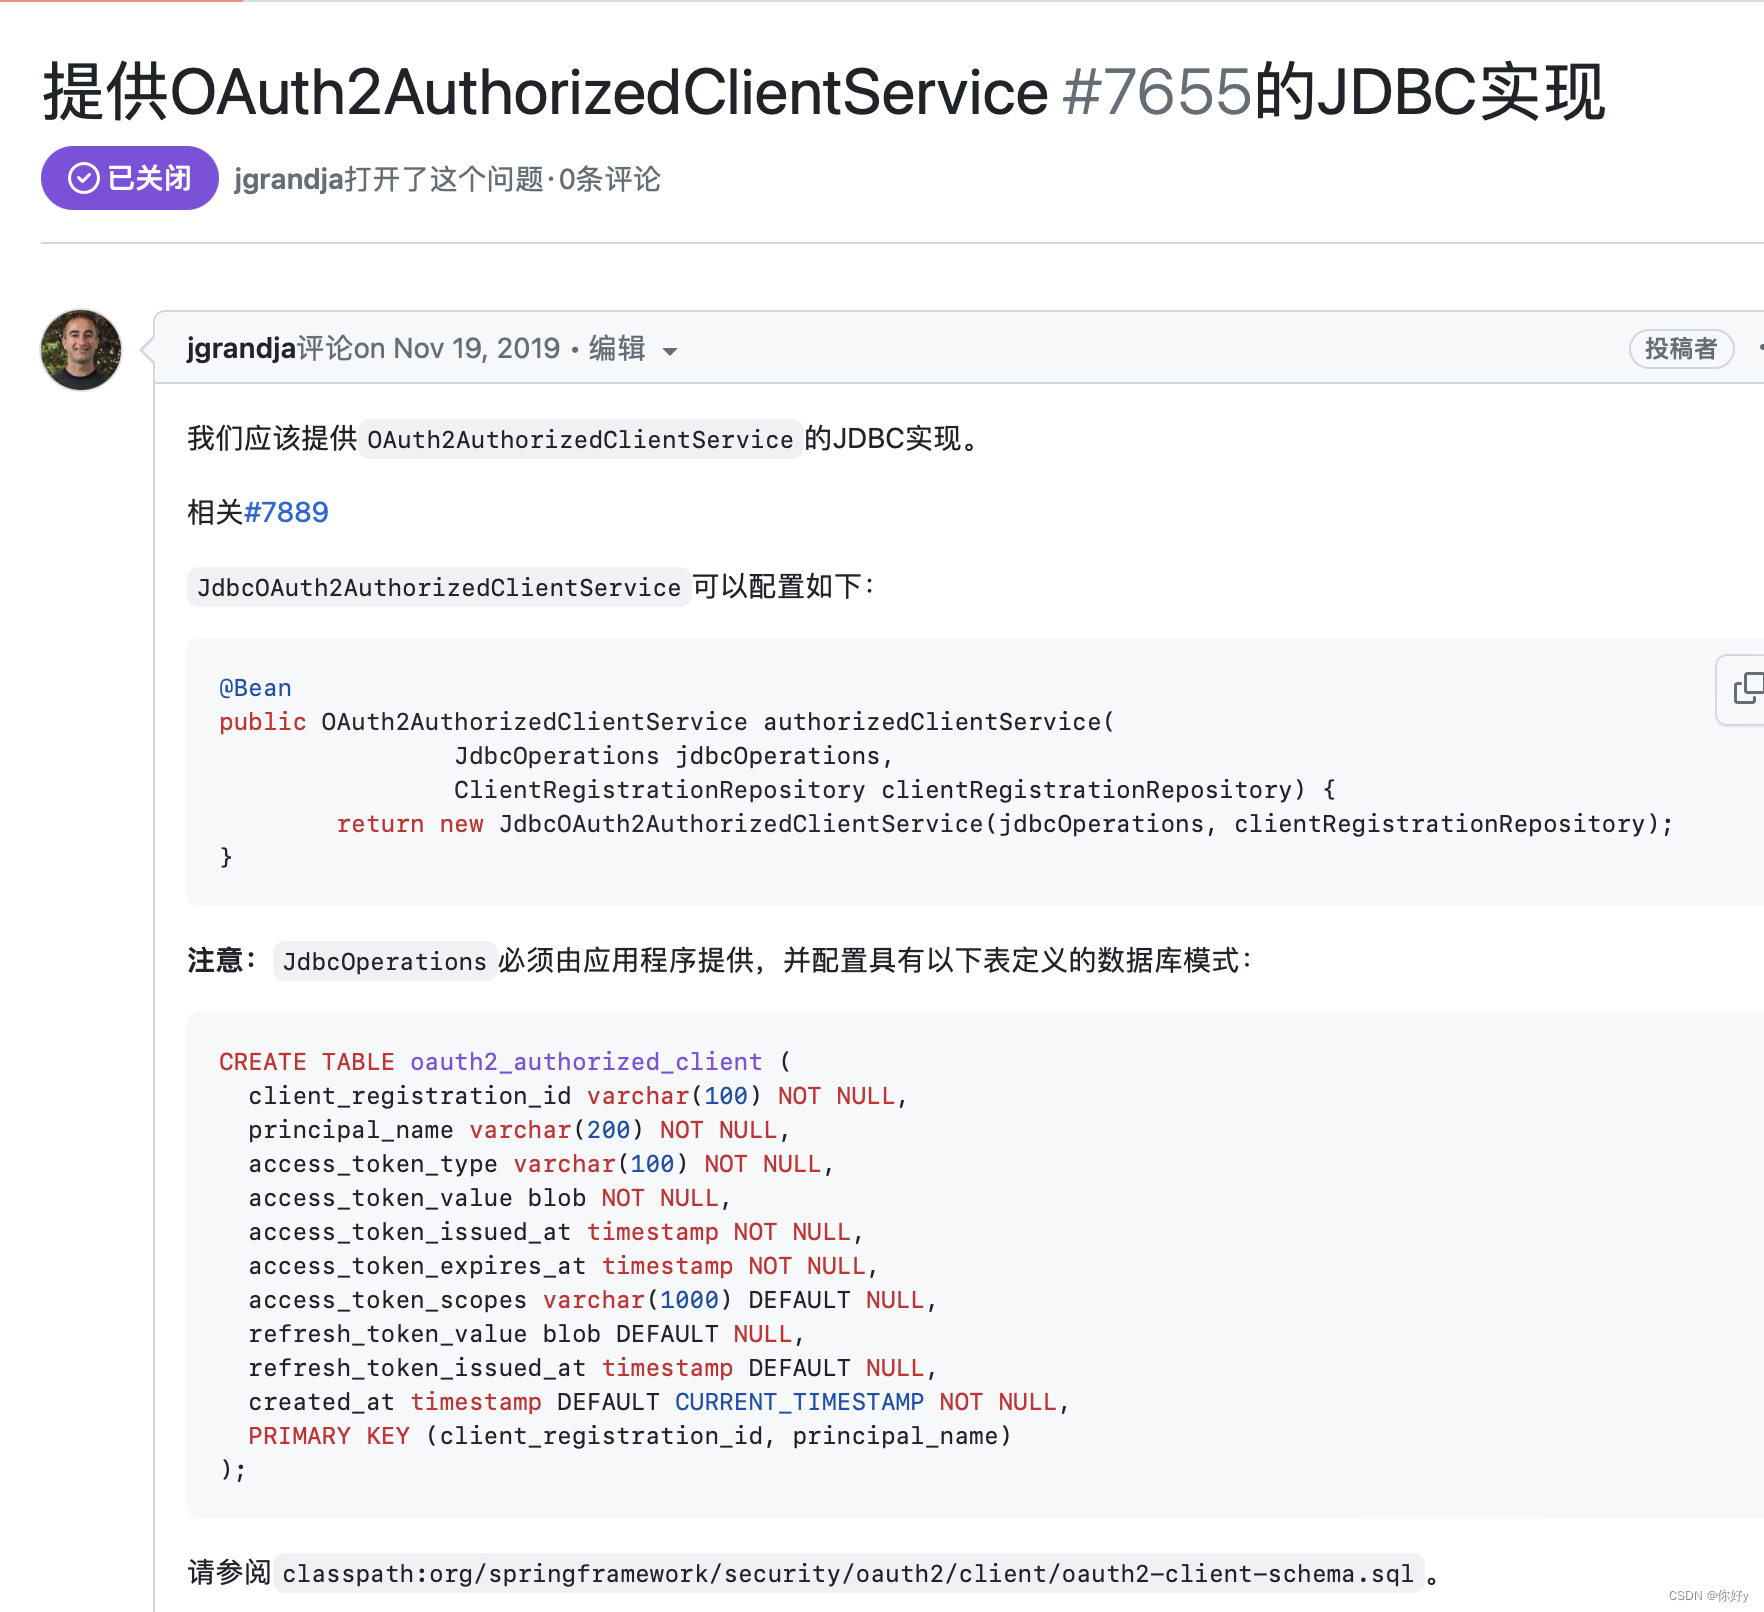
关于 JDBC Session的配置
1、引入 spring-session-jdbc 进行会话存储
application.yml
 spring:
  session:
    store-type: jdbc
    jdbc:
      initialize-schema: always
关于 OAuth Client 的配置
@Configuration
public class OAuth2AuthorizedClientConfig {

  @Bean
  public OAuth2AuthorizedClientRepository authorizedClientRepository() {
    return new HttpSessionOAuth2AuthorizedClientRepository();
  }

  @Bean
  public OAuth2AuthorizedClientService authorizedClientService(
      JdbcOperations jdbcOperations, ClientRegistrationRepository clientRegistrationRepository) {
    return new JdbcOAuth2AuthorizedClientService(jdbcOperations, clientRegistrationRepository);
  }
}
WebSecurity
   http.oauth2Login()
              .loginPage("/login")
              .authorizedClientService(authorizedClientService)
              .authorizedClientRepository(oAuth2AuthorizedClientRepository)
              .userInfoEndpoint().userService(customOauth2UserService)
              .and()
              .successHandler(oauth2LoginSuccessHandler)
              .failureHandler(oauth2LoginFailedHandler);
OAuth 2.0 Client supports application clustering
上面链接的摘录
2、authorization_request_not_fund
情况:在第一次成功登录后,客户端和授权端都登出,客户端再发起第三方登录的请求会出现这个问题。(不一定,需要看授权端的登出操作是否彻底请求用户的session及cookie)
无关集群环境,只是纯属工作中的坑。
解决:授权服务器在登出的时候要彻底清除用户的seesion 和 cookie信息