Nest 附带一个默认的内部日志记录器实现,它在实例化过程中以及在一些不同的情况下使用,比如发生异常等等(例如系统记录)。这由 @nestjs/common 包中的 Logger 类实现。你可以全面控制如下的日志系统的行为:
- 完全禁用日志
- 指定日志系统详细水平(例如,展示错误,警告,调试信息等)
- 覆盖默认日志记录器的时间戳(例如使用 ISO8601 标准作为日期格式)
- 完全覆盖默认日志记录器
- 通过扩展自定义默认日志记录器
- 使用依赖注入来简化编写和测试你的应用
- 你也可以使用内置日志记录器,或者创建你自己的应用来记录你自己应用水平的事件和消息。
更多高级的日志功能,可以使用任何 Node.js 日志包,比如Winston,来生成一个完全自定义的生产环境水平的日志系统。
重点目录
- 常见日志及获取(记录)方式
- 第三方日志方案:winston(勤快的人)、pino(推荐懒人)
- 通用业务系统日志系统配置(学习定时任务)
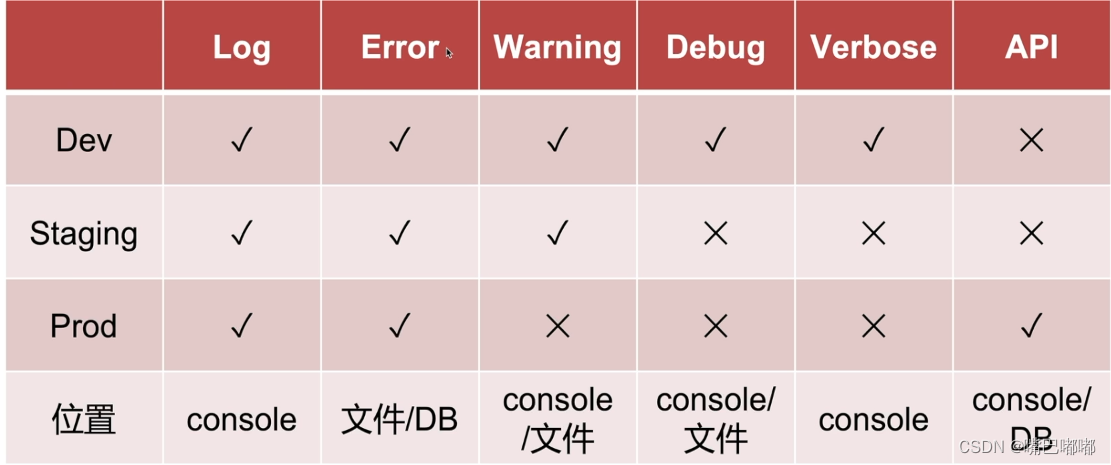
日志等级
- Log : 通用日志,按需进行记录(打印)
- Warning:警告日志,比如: 尝试多次进行数据库操作
- Error:产重日志,比如:数据库异常
- Debug: 调试日志,比如:加载数据日志
- Verbose:详细日志,所有的操作与详细信息(非必要不打印)
功能分类日子
- 错误日志->方便定位问题,给用户友好的提示
- 调试日志->方便开发
- 请求日志->记录敏感行为
日志记录位置
- 控制台日志->方便监看(调试用)
- 文件日志->方便回溯与追踪(24小时滚动)
- 数据库日志->敏感操作、敏感数据记录
Nestjs 中记录日志
接下来我们实操一下日志功能。
基础自定义
要禁用日志,在(可选的)Nest 应用选项对象中向 NestFactory.create() 传递第二个参数设置 logger 属性为 false 。
app.module.ts
const app = await NestFactory.create(ApplicationModule, {
  logger: false,
});
await app.listen(3000);
根据级别显示
// 层次类型
export type LogLevel = 'log' | 'error' | 'warn' | 'debug' | 'verbose';

// 创建app时使用配置 logger 层次
const app = await NestFactory.create(ApplicationModule, {
  logger: ['error', 'warn'],
});
await app.listen(3000);
自定Logger
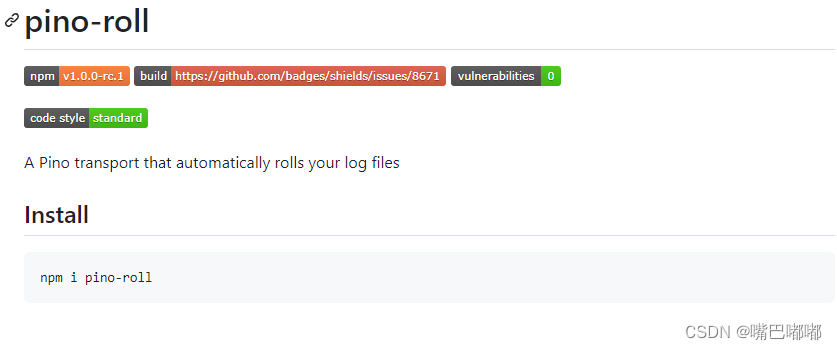
Pino、日志滚动pino-roll
git地址
安装
pnpm install nestjs-pino
使用
user.module.ts注册
import { Module } from '@nestjs/common';
import { UserController } from './user.controller';
import { UserService } from './user.service';
import { TypeOrmModule } from '@nestjs/typeorm';
import { User } from './user.entity';
import { Logs } from '../logs/logs.entity';
import { LoggerModule } from 'nestjs-pino';

@Module({
  imports: [TypeOrmModule.forFeature([User, Logs]), LoggerModule.forRoot()],
  controllers: [UserController],
  providers: [UserService],
})
export class UserModule {}
user.controller.ts中使用
import { Controller, Delete, Get, Patch, Post } from '@nestjs/common';
import { UserService } from './user.service';
import { ConfigService } from '@nestjs/config';
import { User } from './user.entity';
import { Logger } from 'nestjs-pino';

@Controller('user')
export class UserController {
  // private logger = new Logger(UserController.name);

  constructor(
    private userService: UserService,
    private configService: ConfigService,
    private logger: Logger,
  ) {
    this.logger.log('UserController init');
  }

  @Get()
  getUsers(): any {
    // this.logger.log(`请求getUsers成功`);
    return this.userService.findAll();
    // return this.userService.getUsers();
  }

}
结果


注意 因为pino是懒人必备,所以默认打印出来的样式比较丑,那么我们还需要另外一个插件pnpm i pino-pretty 。安装完毕我们需要在app.modules.ts 做如下配置
import { Module } from '@nestjs/common';
import { UserController } from './user.controller';
import { UserService } from './user.service';
import { TypeOrmModule } from '@nestjs/typeorm';
import { User } from './user.entity';
import { Logs } from '../logs/logs.entity';
import { LoggerModule } from 'nestjs-pino';

@Module({
  imports: [
    TypeOrmModule.forFeature([User, Logs]),
    LoggerModule.forRoot({
      pinoHttp: {
        transport: {
          target: 'pino-pretty',
          options: {
            colorize: true,
          },
        },
      },
    }),
  ],
  controllers: [UserController],
  providers: [UserService],
})
export class UserModule {}
重启项目 日志如下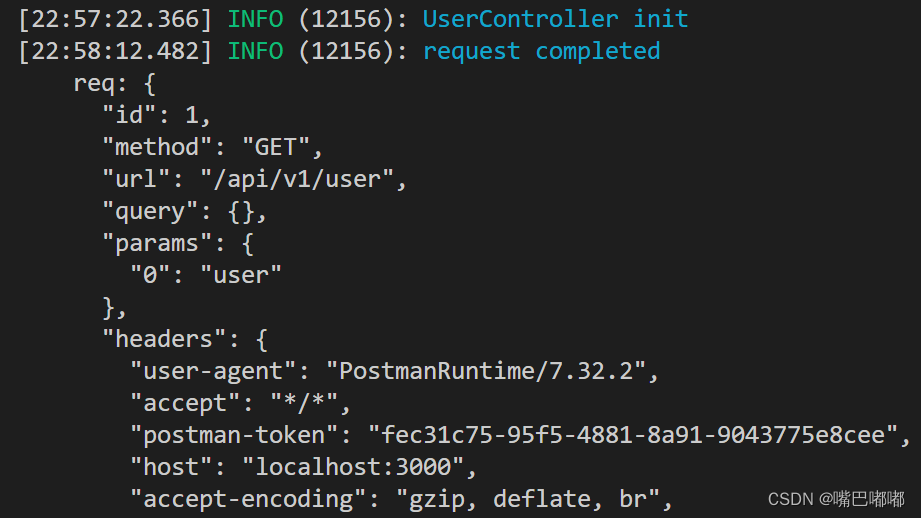
注意 代码我们还需要改一下,因为我们在生产环境是不需要这样打印。
import { Module } from '@nestjs/common';
import { UserController } from './user.controller';
import { UserService } from './user.service';
import { TypeOrmModule } from '@nestjs/typeorm';
import { User } from './user.entity';
import { Logs } from '../logs/logs.entity';
import { LoggerModule } from 'nestjs-pino';

@Module({
  imports: [
    TypeOrmModule.forFeature([User, Logs]),
    LoggerModule.forRoot({
      pinoHttp: {
        transport:
          process.env.NODE_ENV === 'development'
            ? {
                target: 'pino-pretty',
                options: {
                  colorize: true,
                },
              }
            : {
                target: 'pino-roll',
                options: {
                  file: 'log.txt',
                  // 周期
                  frequency: 'daily',
                  mkdir: true,
                },
              },
      },
    }),
  ],
  controllers: [UserController],
  providers: [UserService],
})
export class UserModule {}
当然为了测试方便 我们可以这样写:
import { Module } from '@nestjs/common';
import { UserController } from './user.controller';
import { UserService } from './user.service';
import { TypeOrmModule } from '@nestjs/typeorm';
import { User } from './user.entity';
import { Logs } from '../logs/logs.entity';
import { LoggerModule } from 'nestjs-pino';
import { join } from 'path';

@Module({
  imports: [
    TypeOrmModule.forFeature([User, Logs]),
    LoggerModule.forRoot({
      pinoHttp: {
        transport: {
          targets: [
            {
              level: 'info',
              target: 'pino-pretty',
              options: {
                colorize: true,
              },
            },
            {
              level: 'info',
              target: 'pino-roll',
              options: {
                file: join('logs', 'log.txt'),
                frequency: 'daily',
                mkdir: true,
              },
            },
          ],
        },
      },
      // pinoHttp: {
      //   transport:
      //     process.env.NODE_ENV === 'development'
      //       ? {
      //           target: 'pino-pretty',
      //           options: {
      //             colorize: true,
      //           },
      //         }
      //       : {
      //           target: 'pino-roll',
      //           options: {
      //             file: 'log.txt',
      //             // 周期
      //             frequency: 'daily',
      //             mkdir: true,
      //           },
      //         },
      // },
    }),
  ],
  controllers: [UserController],
  providers: [UserService],
})
export class UserModule {}
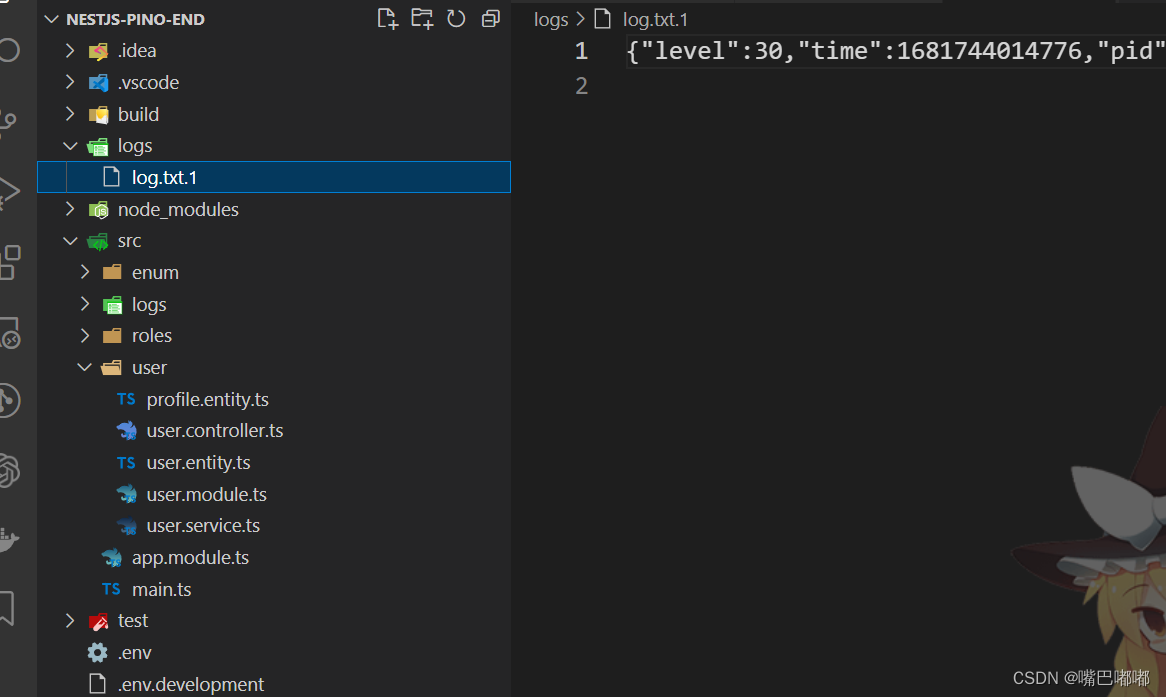
当然 我们也可以放在app.modules.ts中使用
import { Module } from '@nestjs/common';
import { UserModule } from './user/user.module';
import { ConfigModule, ConfigService } from '@nestjs/config';
import * as dotenv from 'dotenv';
import * as Joi from 'joi';
import { TypeOrmModule, TypeOrmModuleOptions } from '@nestjs/typeorm';
import { LoggerModule } from 'nestjs-pino';
import { join } from 'path';

import { ConfigEnum } from './enum/config.enum';

import { User } from './user/user.entity';
import { Profile } from './user/profile.entity';
import { Logs } from './logs/logs.entity';
import { Roles } from './roles/roles.entity';

const envFilePath = `.env.${process.env.NODE_ENV || `development`}`;

@Module({
  imports: [
    ConfigModule.forRoot({
      isGlobal: true,
      envFilePath,
      load: [() => dotenv.config({ path: '.env' })],
      validationSchema: Joi.object({
        NODE_ENV: Joi.string()
          .valid('development', 'production')
          .default('development'),
        DB_PORT: Joi.number().default(3306),
        DB_HOST: Joi.string().ip(),
        DB_TYPE: Joi.string().valid('mysql', 'postgres'),
        DB_DATABASE: Joi.string().required(),
        DB_USERNAME: Joi.string().required(),
        DB_PASSWORD: Joi.string().required(),
        DB_SYNC: Joi.boolean().default(false),
      }),
    }),
    TypeOrmModule.forRootAsync({
      imports: [ConfigModule],
      inject: [ConfigService],
      useFactory: (configService: ConfigService) =>
        ({
          type: configService.get(ConfigEnum.DB_TYPE),
          host: configService.get(ConfigEnum.DB_HOST),
          port: configService.get(ConfigEnum.DB_PORT),
          username: configService.get(ConfigEnum.DB_USERNAME),
          password: configService.get(ConfigEnum.DB_PASSWORD),
          database: configService.get(ConfigEnum.DB_DATABASE),
          entities: [User, Profile, Logs, Roles],
          // 同步本地的schema与数据库 -> 初始化的时候去使用
          synchronize: configService.get(ConfigEnum.DB_SYNC),
          // logging: process.env.NODE_ENV === 'development',
          logging: false,
        } as TypeOrmModuleOptions),
    }),
    LoggerModule.forRoot({
      pinoHttp: {
        transport: {
          targets: [
            process.env.NODE_ENV === 'development'
              ? {
                  level: 'info',
                  target: 'pino-pretty',
                  options: {
                    colorize: true,
                  },
                }
              : {
                  level: 'info',
                  target: 'pino-roll',
                  options: {
                    file: join('logs', 'log.txt'),
                    frequency: 'daily', // hourly
                    size: '10m',
                    mkdir: true,
                  },
                },
          ],
        },
    UserModule,
  ],
  controllers: [],
  providers: [],
})
export class AppModule {}
winston
Winston 是强大、灵活的 Node.js 开源日志库之一,理论上, Winston 是一个可以记录所有信息的记录器。这是一个高度直观的工具,易于定制。可以通过更改几行代码来调整其背后的逻辑。它使对数据库或文件等持久存储位置的日志记录变得简单容易。
Winston 提供以下功能:
集中控制日志记录的方式和时间:在一个地方更改代码即可
控制日志发送的位置:将日志同步保存到多个目的地(如Elasticsearch、MongoDB、Postgres等)。
自定义日志格式:带有时间戳、颜色日志级别、JSON格式等前缀。
winston实践
这里我们使用的nestjs项目所以我们需要下载的是 nest-wnston 官方实例
npm install --save nest-winston winston
Replacing the Nest logger
该模块还提供了WinstonLogger类(LoggerService接口的自定义实现),供Nest用于系统日志记录。这将确保Nest系统日志和你的应用程序事件/消息日志的行为和格式的一致性。
来到我们的代码中main.ts
// import { Logger } from '@nestjs/common';
import { NestFactory } from '@nestjs/core';
import { createLogger } from 'winston';
import { AppModule } from './app.module';
import * as winston from 'winston';

async function bootstrap() {
  // const logger = new Logger();
  // createLogger of Winston
  const instance = createLogger({
    // options of Winston
    transports: [
      new winston.transports.Console({
        level: 'info',
        // 字符串拼接
        format: winston.format.combine(
          winston.format.timestamp(),
          utilities.format.nestLike(),
        ),
      }),
    ],
  });
  const app = await NestFactory.create(AppModule, {
    // 关闭整个nestjs日志
    // logger: false,
    // logger: ['error', 'warn'],
    // bufferLogs: true,
    logger: WinstonModule.createLogger({
      instance,
    }),
  });
  app.setGlobalPrefix('api/v1');

  const port = 3000;
  await app.listen(port);

  // logger.log(`App 运行在:${port}`);
  // logger.warn(`App 运行在:${port}`);
  // logger.error(`App 运行在:${port}`);
}
bootstrap();
在来到app.module.ts文件中
// 全局注册
@Global()
@Module({
// 依赖注入
  providers: [Logger],
  // 官方文档中没有这个,有可能在按照官方实例会报错,通过官方的issues 可以看到这个问题,根据官方实例即可获得答案
  exports: [Logger],
  })
export class AppModule {}
exports 使用导出 全局都可以使用
user.controll.ts 使用
import { Controller, Delete, Get, Patch, Post, Logger } from '@nestjs/common';
import { UserService } from './user.service';
import { ConfigService } from '@nestjs/config';
import { User } from './user.entity';

@Controller('user')
export class UserController {
  // private logger = new Logger(UserController.name);

  constructor(
    private userService: UserService,
    private configService: ConfigService,
    private readonly logger: Logger,
  ) {
    this.logger.log('UserController init');
  }

  @Get()
  getUsers(): any {
    this.logger.log(`请求getUsers成功`);
    this.logger.warn(`请求getUsers成功`);
    this.logger.error(`请求getUsers成功`);
    return this.userService.findAll();
    // return this.userService.getUsers();
  }

  @Post()
  addUser(): any {
    // todo 解析Body参数
    const user = { username: 'toimc', password: '123456' } as User;
    // return this.userService.addUser();
    return this.userService.create(user);
  }
  @Patch()
  updateUser(): any {
    // todo 传递参数id
    // todo 异常处理
    const user = { username: 'newname' } as User;
    return this.userService.update(1, user);
  }

  @Delete()
  deleteUser(): any {
    // todo 传递参数id
    return this.userService.remove(1);
  }

  @Get('/profile')
  getUserProfile(): any {
    return this.userService.findProfile(2);
  }

  @Get('/logs')
  getUserLogs(): any {
    return this.userService.findUserLogs(2);
  }

  @Get('/logsByGroup')
  async getLogsByGroup(): Promise<any> {
    const res = await this.userService.findLogsByGroup(2);
    // return res.map((o) => ({
    //   result: o.result,
    //   count: o.count,
    // }));
    return res;
  }
}
打印结果:

滚动打印日志:
main.ts 中 使用import 'winston-daily-rotate-file';
// import { Logger } from '@nestjs/common';
import { NestFactory } from '@nestjs/core';
import { createLogger } from 'winston';
import { AppModule } from './app.module';
import * as winston from 'winston';
import { utilities, WinstonModule } from 'nest-winston';
import 'winston-daily-rotate-file';

async function bootstrap() {
  // const logger = new Logger();
  // createLogger of Winston
  const instance = createLogger({
    // options of Winston
    transports: [
      new winston.transports.Console({
        level: 'info',
        format: winston.format.combine(
          winston.format.timestamp(),
          utilities.format.nestLike(),
        ),
      }),
      // events - archive rotate
      new winston.transports.DailyRotateFile({
        level: 'warn',
        dirname: 'logs',
        filename: 'application-%DATE%.log',
        datePattern: 'YYYY-MM-DD-HH',
        zippedArchive: true,
        maxSize: '20m',
        maxFiles: '14d',
        format: winston.format.combine(
          winston.format.timestamp(),
          winston.format.simple(),
        ),
      }),
      new winston.transports.DailyRotateFile({
        level: 'info',

        dirname: 'logs',
        filename: 'info-%DATE%.log',
        datePattern: 'YYYY-MM-DD-HH',
        zippedArchive: true,
        // 文件大小
        maxSize: '20m',
        // 最多14 天
        maxFiles: '14d',
        format: winston.format.combine(
          winston.format.timestamp(),
          winston.format.simple(),
        ),
      }),
    ],
  });
  const app = await NestFactory.create(AppModule, {
    // 关闭整个nestjs日志
    // logger: false,
    // logger: ['error', 'warn'],
    // bufferLogs: true,
    logger: WinstonModule.createLogger({
      instance,
    }),
  });
  app.setGlobalPrefix('api/v1');

  const port = 3000;
  await app.listen(port);

  // logger.log(`App 运行在:${port}`);
  // logger.warn(`App 运行在:${port}`);
  // logger.error(`App 运行在:${port}`);
}
bootstrap();
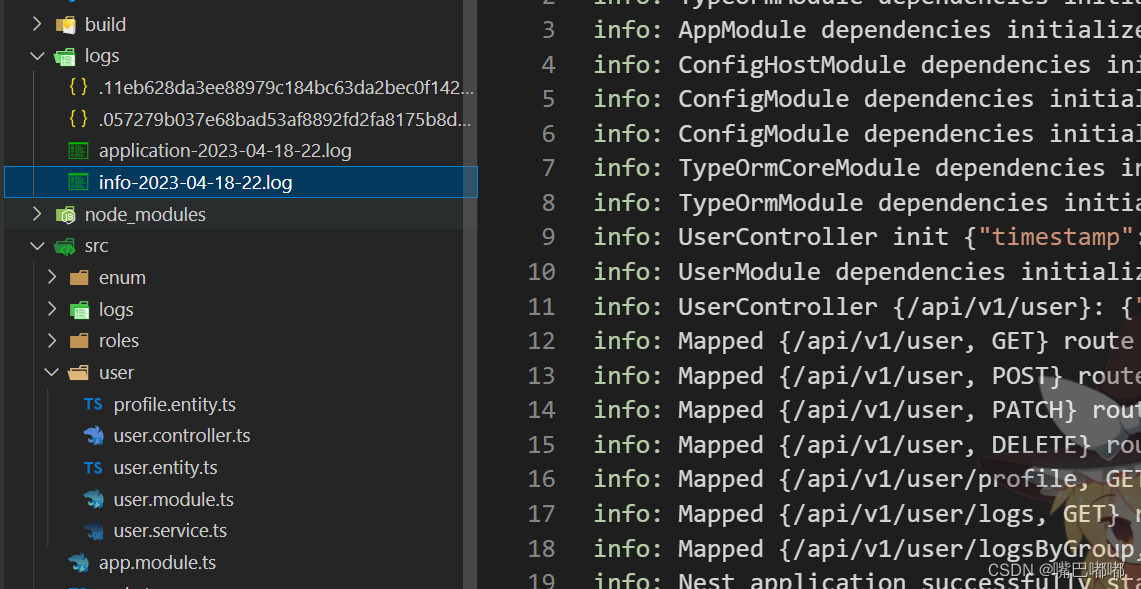
到这里我们就完成了 日志配置的三种方式:官方、 pion、winston,个人还是喜欢winston,这个还是根据项目来做决定。接下来是这篇文章的加餐课,如需要的了解更多的小伙伴可以多学习一下。
配置winston记录日志(全局异常过滤器)
场景:我们开发了很多接口,项目中我们会使用try…catch ,但是每个路由都加上的话会很麻烦,我们需要全局处理 try… catch… ,nestj 自带会帮我们处理。
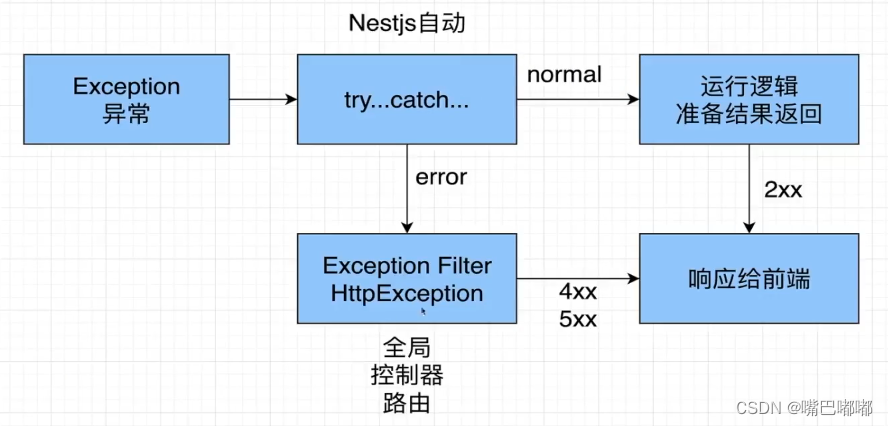
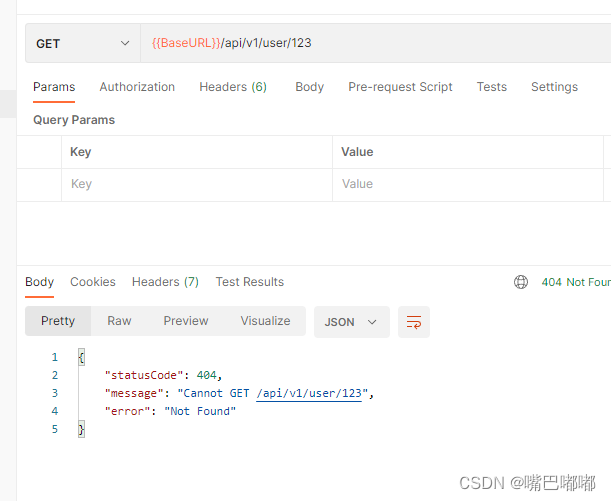
postmen 测试一下,路由不存在的情况:
异常过滤器
内置的异常层负责处理整个应用程序中的所有抛出的异常。当捕获到未处理的异常时,最终用户将收到友好的响应。
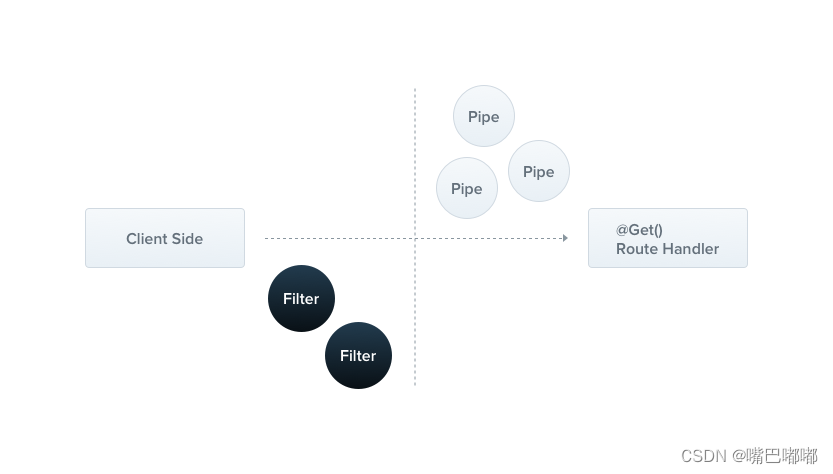
开箱即用,此操作由内置的全局异常过滤器执行,该过滤器处理类型 HttpException(及其子类)的异常。每个发生的异常都由全局异常过滤器处理, 当这个异常无法被识别时 (既不是 HttpException 也不是继承的类 HttpException ) , 用户将收到以下 JSON 响应:
{
    "statusCode": 500,
    "message": "Internal server error"
}
项目中使用:
app.control.ts
@Get()
  getUsers(): any {
    const user = { isAdmin: false };
    if (!user.isAdmin) {
      throw new HttpException('Forbidden', HttpStatus.FORBIDDEN);
    }
    return this.userService.findAll();
    // return this.userService.getUsers();
  }
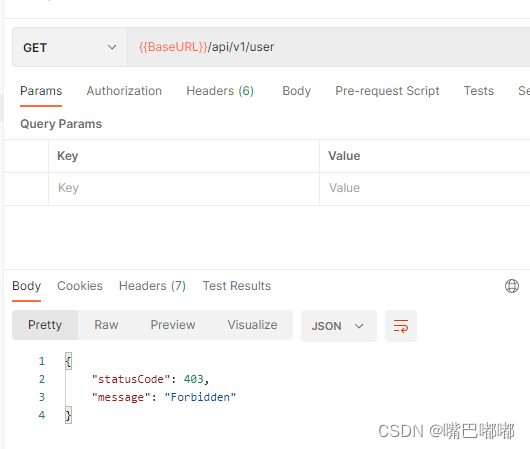
常见的状态码:
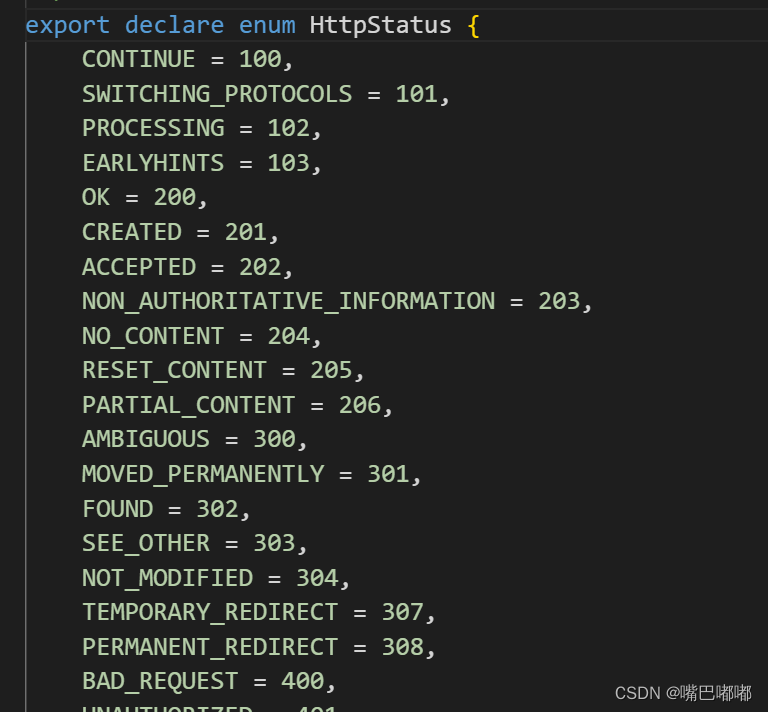
HttpException 构造函数有两个必要的参数来决定响应:
-
response 参数定义 JSON 响应体。它可以是 string 或 object,如下所述。
-
status参数定义HTTP状态代码。
默认情况下,JSON 响应主体包含两个属性:
-
statusCode:默认为 status 参数中提供的 HTTP 状态代码
-
message:基于状态的 HTTP 错误的简短描述
仅覆盖 JSON 响应主体的消息部分,请在 response参数中提供一个 string。
要覆盖整个 JSON 响应主体,请在response 参数中传递一个object。 Nest将序列化对象,并将其作为JSON 响应返回。
第二个构造函数参数-status-是有效的 HTTP 状态代码。 最佳实践是使用从@nestjs/common导入的 HttpStatus枚举。
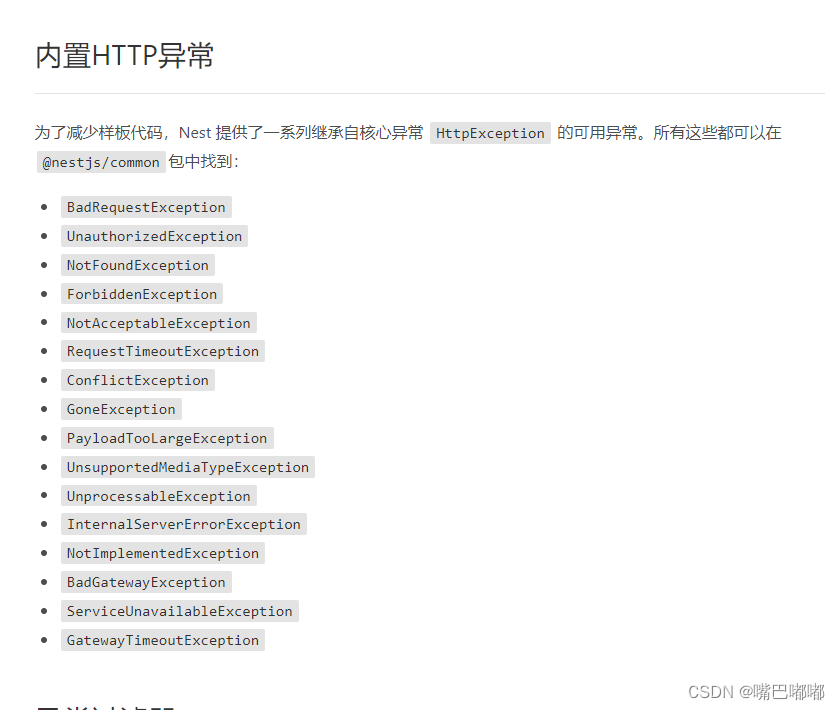
基础案列演示完毕,我们开始捕获全局http协议:
新建文件夹,src\filters\http-exception.filter.ts
import {
  ArgumentsHost,
  Catch,
  ExceptionFilter,
  HttpException,
} from '@nestjs/common';

@Catch(HttpException)
export class HttpExceptionFilter implements ExceptionFilter {
  catch(exception: HttpException, host: ArgumentsHost) {
    // 获取上下文
    const ctx = host.switchToHttp();
    // 响应和请求对象
    const response = ctx.getResponse();
    const request = ctx.getRequest();
    const status = exception.getStatus();
    response.status(status).json({
      code: status,
      timestamp: new Date().toISOString(),
      path: request.url,
      method: request.method,
    });
  }
}
应用过滤器
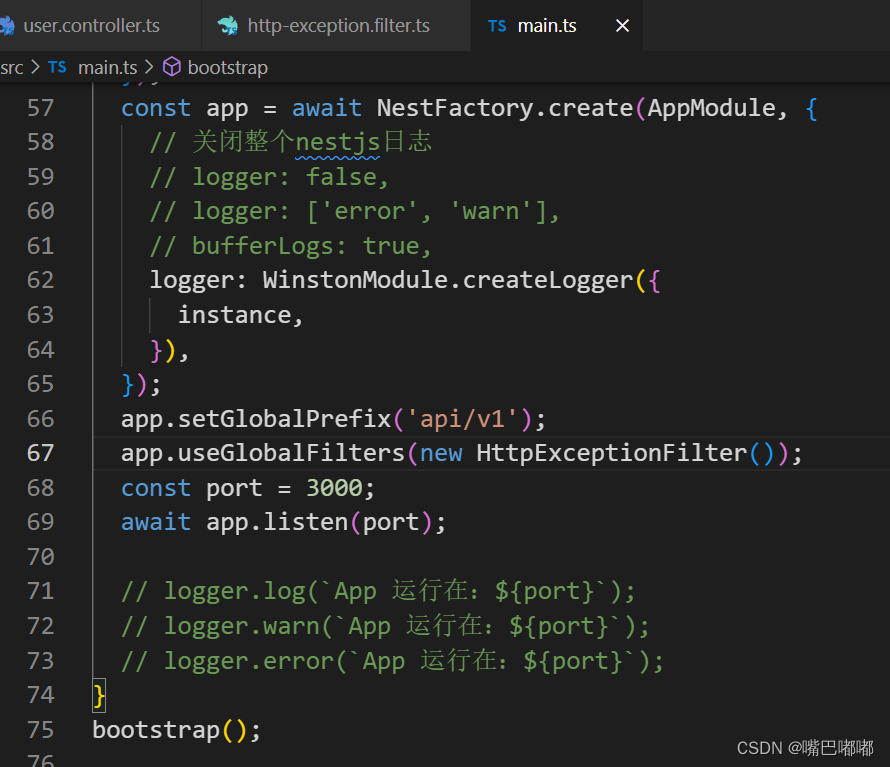
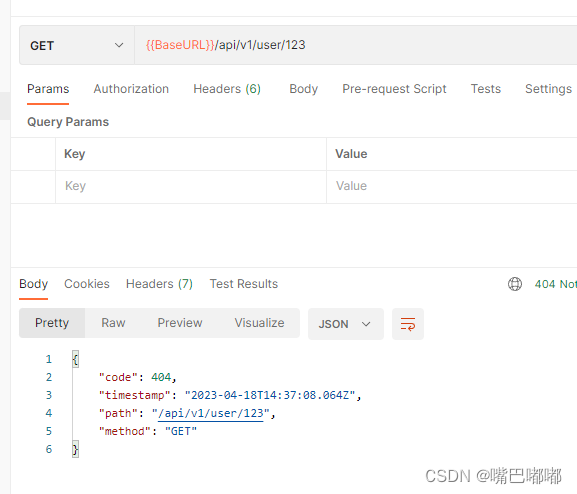
基本过滤器演示结束,我们还需要在因在日志中,需要对 filters文件夹进行改造:
import { LoggerService } from '@nestjs/common';
import {
  ArgumentsHost,
  Catch,
  ExceptionFilter,
  HttpException,
} from '@nestjs/common';

@Catch(HttpException)
export class HttpExceptionFilter implements ExceptionFilter {
  constructor(private logger: LoggerService) {}
  catch(exception: HttpException, host: ArgumentsHost) {
    // 获取上下文
    const ctx = host.switchToHttp();
    // 响应和请求对象
    const response = ctx.getResponse();
    const request = ctx.getRequest();
    const status = exception.getStatus();
    this.logger.error(exception.message, exception.stack);
    response.status(status).json({
      code: status,
      timestamp: new Date().toISOString(),
      method: request.method,
      message: exception.message || exception.name,
    });
  }
}
main.ts 改造:
// import { Logger } from '@nestjs/common';
import { NestFactory } from '@nestjs/core';
import { createLogger } from 'winston';
import { AppModule } from './app.module';
import * as winston from 'winston';
import { utilities, WinstonModule } from 'nest-winston';
import 'winston-daily-rotate-file';
import { HttpExceptionFilter } from './filters/http-exception.filter';

async function bootstrap() {
  // const logger = new Logger();
  // createLogger of Winston
  const instance = createLogger({
    // options of Winston
    transports: [
      new winston.transports.Console({
        level: 'info',
        format: winston.format.combine(
          winston.format.timestamp(),
          utilities.format.nestLike(),
        ),
      }),
      // events - archive rotate
      new winston.transports.DailyRotateFile({
        level: 'warn',
        dirname: 'logs',
        filename: 'application-%DATE%.log',
        datePattern: 'YYYY-MM-DD-HH',
        zippedArchive: true,
        maxSize: '20m',
        maxFiles: '14d',
        format: winston.format.combine(
          winston.format.timestamp(),
          winston.format.simple(),
        ),
      }),
      new winston.transports.DailyRotateFile({
        level: 'info',
        dirname: 'logs',
        filename: 'info-%DATE%.log',
        datePattern: 'YYYY-MM-DD-HH',
        zippedArchive: true,
        maxSize: '20m',
        maxFiles: '14d',
        format: winston.format.combine(
          winston.format.timestamp(),
          winston.format.simple(),
        ),
      }),
    ],
  });
  const logger = WinstonModule.createLogger({
    instance,
  });
  const app = await NestFactory.create(AppModule, {
    logger,
  });
  app.setGlobalPrefix('api/v1');
  app.useGlobalFilters(new HttpExceptionFilter(logger));
  const port = 3000;
  await app.listen(port);

}
bootstrap();
拓展:全局所有异常捕获
import {
  ExceptionFilter,
  HttpAdapterHost,
  HttpException,
  HttpStatus,
  LoggerService,
} from '@nestjs/common';
import { ArgumentsHost, Catch } from '@nestjs/common';

import * as requestIp from 'request-ip';

// 捕获所有异常
@Catch()
export class AllExceptionFilter implements ExceptionFilter {
  constructor(
    private readonly logger: LoggerService,
    private readonly httpAdapterHost: HttpAdapterHost,
  ) {}
  catch(exception: unknown, host: ArgumentsHost) {
    const { httpAdapter } = this.httpAdapterHost;
    const ctx = host.switchToHttp();
    const request = ctx.getRequest();
    const response = ctx.getResponse();

    const httpStatus =
      exception instanceof HttpException
        ? exception.getStatus()
        : HttpStatus.INTERNAL_SERVER_ERROR;

    const responseBody = {
      headers: request.headers,
      query: request.query,
      body: request.body,
      params: request.params,
      timestamp: new Date().toISOString(),
      // 还可以加入一些用户信息
      // IP信息
      ip: requestIp.getClientIp(request),
      exceptioin: exception['name'],
      error: exception['response'] || 'Internal Server Error',
    };

    this.logger.error('[toimc]', responseBody);
    httpAdapter.reply(response, responseBody, httpStatus);
  }
}
main.ts
const httpAdapter = app.get(HttpAdapterHost);
  app.useGlobalFilters(new AllExceptionFilter(logger, httpAdapter));
ok,这是一篇长篇文章,能看到的结束的小伙伴也是很厉害的。我也是要写吐了
写着写着就多了,可能太想和大家分享知识了。 已经学明白的同学可以 看我的下一篇文章 【NestJs】日志模块重构 这篇文章纯代码,然后使用了 开发规范创建的日志模块。







![[NOIP1999 普及组] Cantor 表](https://img-blog.csdnimg.cn/2b6f01e012f2409ea18a7505f214950c.png)
