java后端+前端使用WebSocket实现消息推送(流程+详细代码)
- 创建WebSocket的简单实例操作流程
- 1.引入Websocket依赖
- 2.创建配置类WebSocketConfig
- 3.创建WebSocketServer
- 4.websocket调用
- 前端WebSocket连接
- OK,下课!!!
在项目的开发时,遇到实现服务器主动发送数据到前端页面的功能的需求。实现该功能不外乎使用轮询和websocket技术,但在考虑到实时性和资源损耗后,最后决定使用websocket。现在就记录一下用Java实现Websocket技术吧~
Java实现Websocket通常有两种方式:1、创建WebSocketServer类,里面包含open、close、message、error等方法;2、利用Springboot提供的webSocketHandler类,创建其子类并重写方法。我们项目虽然使用Springboot框架,不过仍采用了第一种方法实现。
创建WebSocket的简单实例操作流程
1.引入Websocket依赖
<!-- https://mvnrepository.com/artifact/org.springframework.boot/spring-boot-starter-websocket -->
        <dependency>
            <groupId>org.springframework.boot</groupId>
            <artifactId>spring-boot-starter-websocket</artifactId>
            <version>2.7.0</version>
        </dependency>
2.创建配置类WebSocketConfig
import org.springframework.context.annotation.Bean;
import org.springframework.context.annotation.Configuration;
import org.springframework.web.socket.server.standard.ServerEndpointExporter;

/**
 * 开启WebSocket支持
 */
@Configuration
public class WebSocketConfig {
    @Bean
    public ServerEndpointExporter serverEndpointExporter() {
        return new ServerEndpointExporter();
    }
}
3.创建WebSocketServer
在websocket协议下,后端服务器相当于ws里面的客户端,需要用@ServerEndpoint指定访问路径,并使用@Component注入容器
@ServerEndpoint:当ServerEndpointExporter类通过Spring配置进行声明并被使用,它将会去扫描带有@ServerEndpoint注解的类。被注解的类将被注册成为一个WebSocket端点。所有的配置项都在这个注解的属性中
( 如:@ServerEndpoint(“/ws”) )
下面的栗子中@ServerEndpoint指定访问路径中包含sid,这个是用于区分每个页面
import com.alibaba.fastjson.JSONObject;
import lombok.extern.slf4j.Slf4j;
import org.springframework.stereotype.Component;
import org.springframework.util.StringUtils;
import javax.websocket.*;
import javax.websocket.server.PathParam;
import javax.websocket.server.ServerEndpoint;
import java.io.IOException;
import java.net.Socket;
import java.util.*;
import java.util.concurrent.ConcurrentHashMap;

/**
 * @ServerEndpoint 注解是一个类层次的注解,它的功能主要是将目前的类定义成一个websocket服务器端,
 * 注解的值将被用于监听用户连接的终端访问URL地址,客户端可以通过这个URL来连接到WebSocket服务器端
 */
@ServerEndpoint("/notice/{userId}")
@Component
@Slf4j
public class NoticeWebsocket {

    //记录连接的客户端
    public static Map<String, Session> clients = new ConcurrentHashMap<>();

    /**
     * userId关联sid(解决同一用户id,在多个web端连接的问题)
     */
    public static Map<String, Set<String>> conns = new ConcurrentHashMap<>();

    private String sid = null;

    private String userId;


    /**
     * 连接成功后调用的方法
     * @param session
     * @param userId
     */
    @OnOpen
    public void onOpen(Session session, @PathParam("userId") String userId) {
        this.sid = UUID.randomUUID().toString();
        this.userId = userId;
        clients.put(this.sid, session);

        Set<String> clientSet = conns.get(userId);
        if (clientSet==null){
            clientSet = new HashSet<>();
            conns.put(userId,clientSet);
        }
        clientSet.add(this.sid);
        log.info(this.sid + "连接开启!");
    }

    /**
     * 连接关闭调用的方法
     */
    @OnClose
    public void onClose() {
        log.info(this.sid + "连接断开!");
        clients.remove(this.sid);
    }

    /**
     * 判断是否连接的方法
     * @return
     */
    public static boolean isServerClose() {
        if (NoticeWebsocket.clients.values().size() == 0) {
            log.info("已断开");
            return true;
        }else {
            log.info("已连接");
            return false;
        }
    }

    /**
     * 发送给所有用户
     * @param noticeType
     */
    public static void sendMessage(String noticeType){
        NoticeWebsocketResp noticeWebsocketResp = new NoticeWebsocketResp();
        noticeWebsocketResp.setNoticeType(noticeType);
        sendMessage(noticeWebsocketResp);
    }


    /**
     * 发送给所有用户
     * @param noticeWebsocketResp
     */
    public static void sendMessage(NoticeWebsocketResp noticeWebsocketResp){
        String message = JSONObject.toJSONString(noticeWebsocketResp);
        for (Session session1 : NoticeWebsocket.clients.values()) {
            try {
                session1.getBasicRemote().sendText(message);
            } catch (IOException e) {
                e.printStackTrace();
            }
        }
    }

    /**
     * 根据用户id发送给某一个用户
     * **/
    public static void sendMessageByUserId(String userId, NoticeWebsocketResp noticeWebsocketResp) {
        if (!StringUtils.isEmpty(userId)) {
            String message = JSONObject.toJSONString(noticeWebsocketResp);
            Set<String> clientSet = conns.get(userId);
            if (clientSet != null) {
                Iterator<String> iterator = clientSet.iterator();
                while (iterator.hasNext()) {
                    String sid = iterator.next();
                    Session session = clients.get(sid);
                    if (session != null) {
                        try {
                            session.getBasicRemote().sendText(message);
                        } catch (IOException e) {
                            e.printStackTrace();
                        }
                    }
                }
            }
        }
    }

    /**
     * 收到客户端消息后调用的方法
     * @param message
     * @param session
     */
    @OnMessage
    public void onMessage(String message, Session session) {
        log.info("收到来自窗口"+this.userId+"的信息:"+message);
    }

    /**
     * 发生错误时的回调函数
     * @param error
     */
    @OnError
    public void onError(Throwable error) {
        log.info("错误");
        error.printStackTrace();
    }

}
封装了一个发送消息的对象可以直接使用
import io.swagger.annotations.ApiModel;
import io.swagger.annotations.ApiModelProperty;
import lombok.Data;

@Data
@ApiModel("ws通知返回对象")
public class NoticeWebsocketResp<T> {

    @ApiModelProperty(value = "通知类型")
    private String noticeType;

    @ApiModelProperty(value = "通知内容")
    private T noticeInfo;

}
4.websocket调用
一个用户调用接口,主动将信息发给后端,后端接收后再主动推送给指定/全部用户
@RestController
@RequestMapping("/order")
public class OrderController {
	@GetMapping("/test")
    public R test() {
    	NoticeWebsocket.sendMessage("你好,WebSocket");
        return R.ok();
    }
}
前端WebSocket连接
<!DOCTYPE html>
<html lang="en">
<head>
    <meta charset="UTF-8">
    <title>SseEmitter</title>
</head>
<body>
<div id="message"></div>
</body>
<script>
var limitConnect = 0;
init();
function init() {
var ws = new WebSocket('ws://192.168.2.88:9060/notice/1');
// 获取连接状态
console.log('ws连接状态:' + ws.readyState);
//监听是否连接成功
ws.onopen = function () {
    console.log('ws连接状态:' + ws.readyState);
    limitConnect = 0;
    //连接成功则发送一个数据
    ws.send('我们建立连接啦');
}
// 接听服务器发回的信息并处理展示
ws.onmessage = function (data) {
    console.log('接收到来自服务器的消息:');
    console.log(data);
    //完成通信后关闭WebSocket连接
    // ws.close();
}
// 监听连接关闭事件
ws.onclose = function () {
    // 监听整个过程中websocket的状态
    console.log('ws连接状态:' + ws.readyState);
reconnect();

}
// 监听并处理error事件
ws.onerror = function (error) {
    console.log(error);
}
}
function reconnect() {
    limitConnect ++;
    console.log("重连第" + limitConnect + "次");
    setTimeout(function(){
        init();
    },2000);

}
</script>
</html>
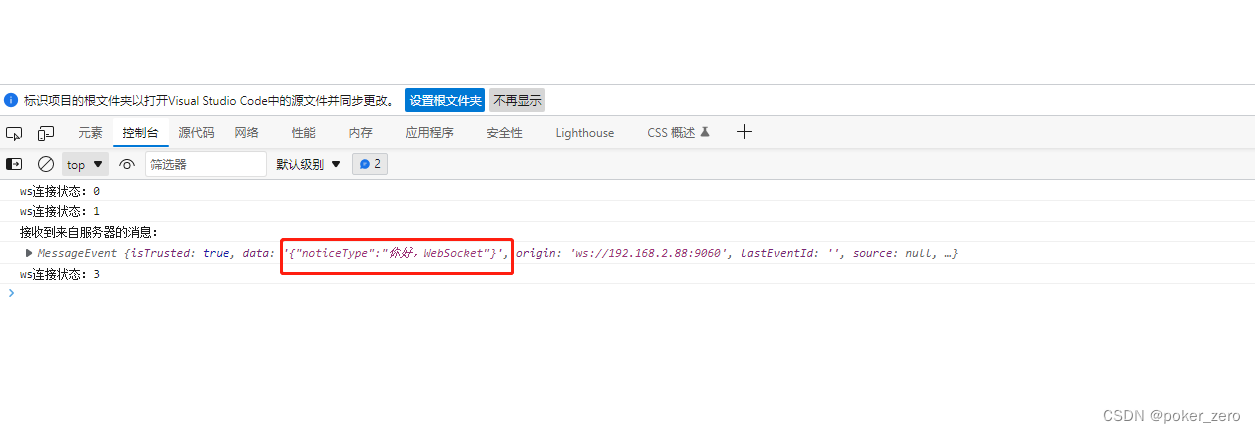
项目启动,打开页面后控制台打印连接信息

调用order/test方法后前端打印推送消息内容
这样,就可以接口或者ws调用网址的方式进行websocket的通信啦~
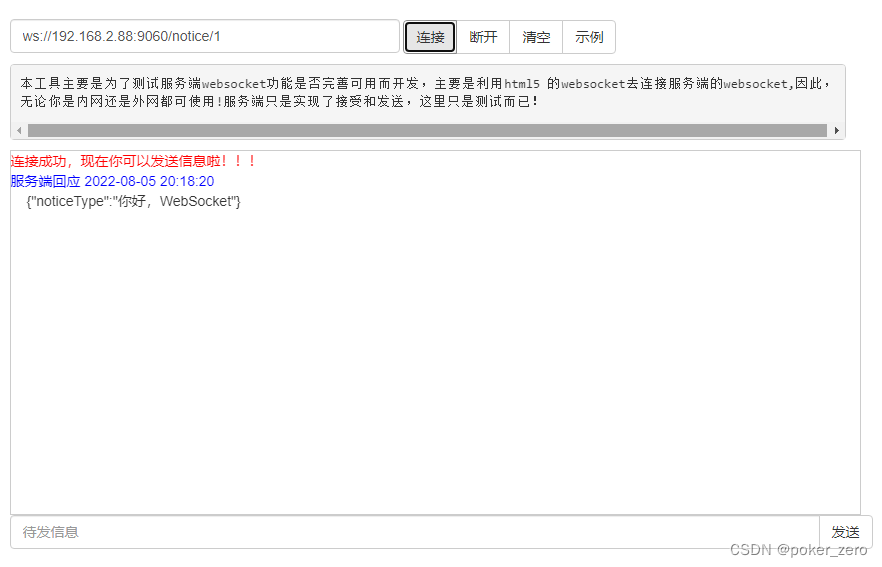
如果没有前端页面也可以使用在线WebSocket测试


![[Node.js]如何在IDEA中配置Node.js](https://img-blog.csdnimg.cn/629dc1d0df8742f4924509ecc0fa473b.png)