RK3566添加一款温湿度传感器gxht3x.挂在i2c总线下。驱动部分就不多做解析。大致流程硬件接好i2c线以及vcc gnd。后看数据手册。初始化寄存器,然后要读数据的话读那个寄存器,读出来的数据要做一个转化,然后实现open read write ioctl函数就行了。本文主要讲解hal层 。直接贴驱动代码。
/* drivers/input/sensors/temperature/tmp_ms5607.c
 *
 * Copyright (C) 2012-2015 ROCKCHIP.
 * Author: luowei <lw@rock-chips.com>
 *
 * This software is licensed under the terms of the GNU General Public
 * License version 2, as published by the Free Software Foundation, and
 * may be copied, distributed, and modified under those terms.
 *
 * This program is distributed in the hope that it will be useful,
 * but WITHOUT ANY WARRANTY; without even the implied warranty of
 * MERCHANTABILITY or FITNESS FOR A PARTICULAR PURPOSE.  See the
 * GNU General Public License for more details.
 *
 */
#include <linux/init.h>
#include <linux/module.h>
#include <linux/input.h>
#include <linux/interrupt.h>
#include <linux/slab.h>
#include <linux/of.h>
#include <linux/of_irq.h>
#include <linux/of_gpio.h>
#include <linux/i2c.h>
#include <asm/io.h>
#include <asm/uaccess.h>

#include <linux/miscdevice.h>
#include <linux/gpio.h>
#include <linux/uaccess.h>
#include <asm/atomic.h>
#include <linux/delay.h>
#include <linux/freezer.h>
#ifdef CONFIG_HAS_EARLYSUSPEND
#include <linux/earlysuspend.h>
#endif
#include <linux/sensor-dev.h>


static int sensor_active(struct i2c_client *client, int enable, int rate)
{
	int result = 0;
	return result;
}


static int sensor_init(struct i2c_client *client)
{
	int result = 0;
	return result;
}


static int sensor_i2c_write(struct i2c_client *client,
			    unsigned int len, unsigned char const *data)
{
	struct i2c_msg msgs[1];
	int res;

	msgs[0].addr = 0x44;
	msgs[0].flags = 0;	/* write */
	msgs[0].buf = (unsigned char *)data;
	msgs[0].len = len;

	res = i2c_transfer(client->adapter, msgs, 1);
	printk("wzf---i2c_transfer count = %d\n", res);
	return res;

}

static int senosr_i2c_read(struct i2c_client *client,
			   unsigned int len, unsigned char *data)
{
	struct i2c_msg msgs[1];
	int res;
	printk("wzf:-----addr = %x-----\n",(int)client->addr);
	msgs[0].addr = 0x44;
	msgs[0].flags = I2C_M_RD;
	msgs[0].buf = data;
	msgs[0].len = len;

	res = i2c_transfer(client->adapter, msgs, 1);
	printk("wzf---i2c_transfer count = %d\n", res);
	return res;

}

static int humidity_report_value(struct input_dev *input, int data)
{
	//get temperature, high and temperature from register data
	printk("ms5607-----hum report data= %d\n",data);
	input_report_abs(input, ABS_VOLUME, data);
	input_sync(input);
	msleep(100);
	return 0;
}

static int sensor_report_value(struct i2c_client *client)
{

    int ret = 0;
	unsigned int tem = 0,hum = 0;
	int Temperature=0,Humidity=0;

	char recvbuffer[6];
	char sendbuffer[2] = {0x2C,0x10};
	struct sensor_private_data *sensor =
	    (struct sensor_private_data *) i2c_get_clientdata(client);
	printk("wzf:--------%s---------\n",__func__);

	memset(recvbuffer, 0, 6);
	ret = sensor_i2c_write(client, 2, sendbuffer);
	if (!ret){
		printk("sensor_i2c_read failed!\n");
		//return -1;
	}
	msleep(2);
	ret = senosr_i2c_read(client, 6, recvbuffer);
	if (!ret){
		printk("sensor_i2c_read failed!\n");
		//return -1;
	}
	printk("read recvbuffer= %s-----\n",recvbuffer);
	tem = ((recvbuffer[0]<<8) | recvbuffer[1]);//温度拼接
	hum = ((recvbuffer[3]<<8) | recvbuffer[4]);//湿度拼接
	printk("wzf:ms5607 hum =%d\n",hum);
	printk("wzf:ms5607 temp =%d\n",tem);
	/*转换实际温度*/
	Temperature= (175* tem/65535-45) ;// T = -45 + 175 * tem / (2^16-1)
	//Temperature =(315*tem/65535-49);
	Humidity= (100* hum/65535);// RH = hum*100 / (2^16-1)
	printk("---Temp : %d  Hum: %d ----\n",Temperature,Humidity);
	//Humidity=950;
	if(!Humidity)
		return 0;
	ret = humidity_report_value(sensor->input_dev, Humidity);
	return 0;
}


struct sensor_operate humidity_gxht3x_ops = {
	.name				= "hum_gxht3x",
	.type				= SENSOR_TYPE_HUMIDITY,	//sensor type and it should be correct
	.id_i2c				= HUMIDITY_ID_GXHT3X,	//i2c id number
	.read_reg			= SENSOR_UNKNOW_DATA,	//read data
	.read_len			= 2,			//data length
	.id_reg				= SENSOR_UNKNOW_DATA,	//read device id from this register
	.id_data 			= SENSOR_UNKNOW_DATA,	//device id
	.precision			= 16,		//8 bits
	.ctrl_reg 			= SENSOR_UNKNOW_DATA,	//enable or disable
	.int_status_reg 		= SENSOR_UNKNOW_DATA,	//intterupt status register
	.range				= {0,65535},		//range
	.trig				= IRQF_TRIGGER_LOW | IRQF_ONESHOT | IRQF_SHARED,
	.active				= sensor_active,
	.init				= sensor_init,
	.report				= sensor_report_value,
};

/****************operate according to sensor chip:end************/
static int humidity_gxht3x_probe(struct i2c_client *client, const struct i2c_device_id *devid)
{
	printk("wzf:----%s----\n",__func__);
	return sensor_register_device(client, NULL, devid, &humidity_gxht3x_ops);
}

static int humidity_gxht3x_remove(struct i2c_client *client)
{
	return sensor_unregister_device(client, NULL, &humidity_gxht3x_ops);
}

static const struct i2c_device_id humidity_gxht3x_id[] = {
	{"hum_gxht3x", HUMIDITY_ID_GXHT3X},
	{}
};

static struct i2c_driver humidity_ms5607_driver = {
	.probe = humidity_gxht3x_probe,
	.remove = humidity_gxht3x_remove,
	.shutdown = sensor_shutdown,
	.id_table = humidity_gxht3x_id,
	.driver = {
		.name = "humidity_gxht3x",
	#ifdef CONFIG_PM
		.pm = &sensor_pm_ops,
	#endif
	},
};

module_i2c_driver(humidity_ms5607_driver);

MODULE_AUTHOR("luowei <lw@rock-chips.com>");
MODULE_DESCRIPTION("ms5607 temperature driver");
MODULE_LICENSE("GPL");
接下来对hal层进行浅析hal对于驱动来说还是要会的。我也不会,在网上找资料找出来的如有错误希望各位大佬能指出。
以上资料来自博主~未来可期点击看大佬的文章
总结一下:
对于我们的湿度传感器来说:(kernel 层驱动通过i2c读取寄存器拿到湿度数据) —fileoperation---->(hardware层通过open节点,以及ioctl获取到数据,填充这些结构体.hw_device_t 填充模块ID 名称 描述 版本等信息。hw_moule_ts实现功能函数。等jni层获取到该结构体指针的时候可以调用这些功能函数)------jni-------->(framewark层注册java native interface.java本地接口,以便上层调用)------->apk.
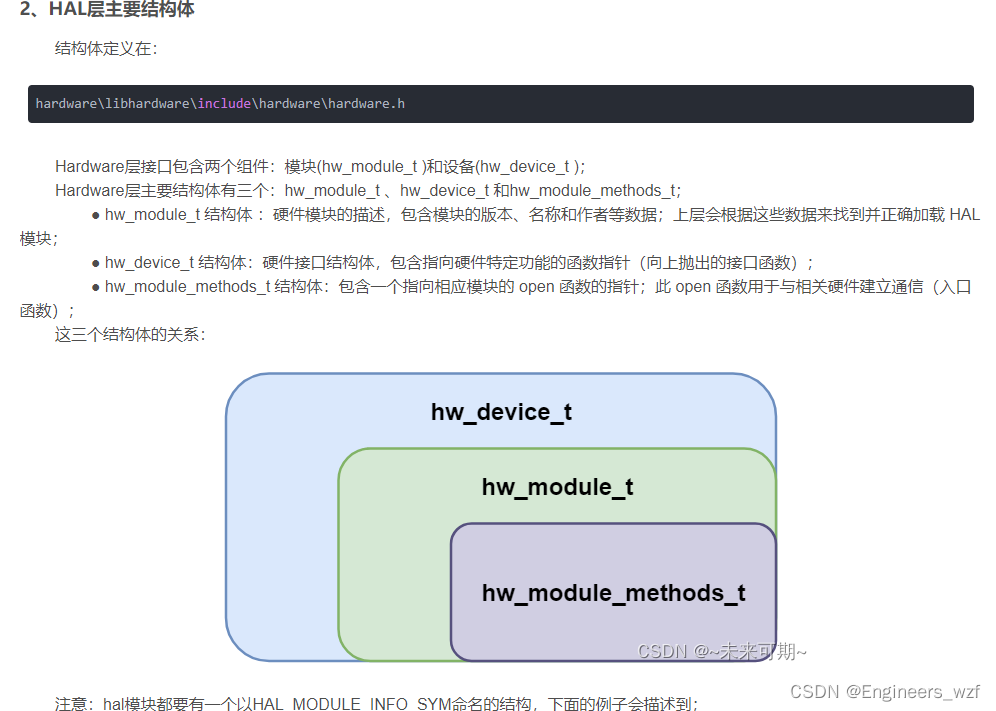
那我们看hal层代码就先从这三个结构体入手。
hardware\libhardware\include\hardware\hardware.h
struct hw_module_t;
struct hw_module_methods_t;
struct hw_device_t;

/**
 * Every hardware module must have a data structure named HAL_MODULE_INFO_SYM
 * and the fields of this data structure must begin with hw_module_t
 * followed by module specific information.
 */
typedef struct hw_module_t {
    /** tag must be initialized to HARDWARE_MODULE_TAG */
    uint32_t tag;

    /**
     * The API version of the implemented module. The module owner is
     * responsible for updating the version when a module interface has
     * changed.
     *
     * The derived modules such as gralloc and audio own and manage this field.
     * The module user must interpret the version field to decide whether or
     * not to inter-operate with the supplied module implementation.
     * For example, SurfaceFlinger is responsible for making sure that
     * it knows how to manage different versions of the gralloc-module API,
     * and AudioFlinger must know how to do the same for audio-module API.
     *
     * The module API version should include a major and a minor component.
     * For example, version 1.0 could be represented as 0x0100. This format
     * implies that versions 0x0100-0x01ff are all API-compatible.
     *
     * In the future, libhardware will expose a hw_get_module_version()
     * (or equivalent) function that will take minimum/maximum supported
     * versions as arguments and would be able to reject modules with
     * versions outside of the supplied range.
     */
    uint16_t module_api_version;
#define version_major module_api_version
    /**
     * version_major/version_minor defines are supplied here for temporary
     * source code compatibility. They will be removed in the next version.
     * ALL clients must convert to the new version format.
     */

    /**
     * The API version of the HAL module interface. This is meant to
     * version the hw_module_t, hw_module_methods_t, and hw_device_t
     * structures and definitions.
     *
     * The HAL interface owns this field. Module users/implementations
     * must NOT rely on this value for version information.
     *
     * Presently, 0 is the only valid value.
     */
    uint16_t hal_api_version;
#define version_minor hal_api_version

    /** Identifier of module */
    const char *id;

    /** Name of this module */
    const char *name;

    /** Author/owner/implementor of the module */
    const char *author;

    /** Modules methods */
    struct hw_module_methods_t* methods;

    /** module's dso */
    void* dso;

#ifdef __LP64__
    uint64_t reserved[32-7];
#else
    /** padding to 128 bytes, reserved for future use */
    uint32_t reserved[32-7];
#endif

} hw_module_t;

typedef struct hw_module_methods_t {
    /** Open a specific device */
    int (*open)(const struct hw_module_t* module, const char* id,
            struct hw_device_t** device);

} hw_module_methods_t;

/**
 * Every device data structure must begin with hw_device_t
 * followed by module specific public methods and attributes.
 */
typedef struct hw_device_t {
    /** tag must be initialized to HARDWARE_DEVICE_TAG */
    uint32_t tag;

    /**
     * Version of the module-specific device API. This value is used by
     * the derived-module user to manage different device implementations.
     *
     * The module user is responsible for checking the module_api_version
     * and device version fields to ensure that the user is capable of
     * communicating with the specific module implementation.
     *
     * One module can support multiple devices with different versions. This
     * can be useful when a device interface changes in an incompatible way
     * but it is still necessary to support older implementations at the same
     * time. One such example is the Camera 2.0 API.
     *
     * This field is interpreted by the module user and is ignored by the
     * HAL interface itself.
     */
    uint32_t version;

    /** reference to the module this device belongs to */
    struct hw_module_t* module;

    /** padding reserved for future use */
#ifdef __LP64__
    uint64_t reserved[12];
#else
    uint32_t reserved[12];
#endif

    /** Close this device */
    int (*close)(struct hw_device_t* device);

} hw_device_t;
然后我们在看sensor中定义的结构体
\hardware\libhardware\include\hardware\sensors.h
/**
 * Every hardware module must have a data structure named HAL_MODULE_INFO_SYM
 * and the fields of this data structure must begin with hw_module_t
 * followed by module specific information.
 */
struct sensors_module_t {
    struct hw_module_t common;

    /**
     * Enumerate all available sensors. The list is returned in "list".
     * return number of sensors in the list
     */
    int (*get_sensors_list)(struct sensors_module_t* module,
            struct sensor_t const** list);

    /**
     *  Place the module in a specific mode. The following modes are defined
     *
     *  0 - Normal operation. Default state of the module.
     *  1 - Loopback mode. Data is injected for the supported
     *      sensors by the sensor service in this mode.
     * return 0 on success
     *         -EINVAL if requested mode is not supported
     *         -EPERM if operation is not allowed
     */
    int (*set_operation_mode)(unsigned int mode);
};

/*
 * sensors_poll_device_t is used with SENSORS_DEVICE_API_VERSION_0_1
 * and is present for backward binary and source compatibility.
 * See the Sensors HAL interface section for complete descriptions of the
 * following functions:
 * http://source.android.com/devices/sensors/index.html#hal
 */
struct sensors_poll_device_t {
    struct hw_device_t common;
    int (*activate)(struct sensors_poll_device_t *dev,
            int sensor_handle, int enabled);
    int (*setDelay)(struct sensors_poll_device_t *dev,
            int sensor_handle, int64_t sampling_period_ns);
    int (*poll)(struct sensors_poll_device_t *dev,
            sensors_event_t* data, int count);
};
这里主要定义了俩个结构体 :struct sensors_module_t , 里面包含了 hw_module_t ; 那hw_module_t我们之前说是填充模块信息的包括ID 名称等等。但是它里面还包含了俩个函数 get_sensors_list 这个函数将返回所有可以的传感器列表。set_operation_mode:将模块设置特定模式:0 正常模式 1回环模式。第二个结构体:struct sensors_poll_device_t ,里面包含了struct hw_device_t;struct hw_device_t里面是特定的实现函数,但是我们还要增加我们自己的功能函数activate ,setDelay ,poll。
ok,我查看在libhardware下的头文件定义。接下来看具体的实现。
hardware\rockchip\sensor\st\sensors.c
/*  sensors_module_t 填充hw_module_t的 模块描述 */
 struct sensors_module_t HAL_MODULE_INFO_SYM = {
    .common = {
        .tag = HARDWARE_MODULE_TAG,
        .version_major = 1,
        .version_minor = 0,
        .id = SENSORS_HARDWARE_MODULE_ID,
        .name = "Rockchip Sensors Module",
        .author = "The RKdroid Project",
        .methods = &sensors_module_methods,
    },
    .get_sensors_list = sensors__get_sensors_list
};
/* hw_module_methods_t 实现open函数  */
static struct hw_module_methods_t sensors_module_methods = {
    .open = open_sensors
};
/* 实现sensor.h中 sensors_module_t结构体中 get_sensors_list函数  */
static int sensors__get_sensors_list(struct sensors_module_t* module,
        struct sensor_t const** list)
{
    *list = sSensorList;
    return ARRAY_SIZE(sSensorList);
}
那么sensors_poll_device_t的几个函数的实现都没有写???这个要看具体设备再具体实现。
直接看湿度传感器hal层结构体定义。
hardware\rockchip\sensor\st\HumiditySensor.h
class HumiditySensor : public SensorBase {
    int mEnabled;
    InputEventCircularReader mInputReader;
    sensors_event_t mPendingEvent;
    bool mHasPendingEvent;


    int setInitialState();

public:
            HumiditySensor();
    virtual ~HumiditySensor();

    virtual int setDelay(int32_t handle, int64_t ns);
    virtual int enable(int32_t handle, int enabled);
    virtual int readEvents(sensors_event_t* data, int count);
    virtual bool hasPendingEvents() const;
    virtual int isActivated(int handle);
    void processEvent(int code, int value);
};

/*****************************************************************************/

#define HUMIDITY_IOCTL_MAGIC			'h'
#define HUMIDITY_IOCTL_GET_ENABLED	_IOR(HUMIDITY_IOCTL_MAGIC, 1, int *)
#define HUMIDITY_IOCTL_ENABLE			_IOW(HUMIDITY_IOCTL_MAGIC, 2, int *)
#define HUMIDITY_IOCTL_DISABLE		_IOW(HUMIDITY_IOCTL_MAGIC, 3, int *)
#define HUMIDITY_IOCTL_SET_DELAY		_IOW(HUMIDITY_IOCTL_MAGIC, 4, int *)
class HumiditySensor : public SensorBase ; 可以看出class HumiditySensor 继承了SensorBase,那我们看一下class SensorBase
struct sensors_event_t;

class SensorBase {
protected:
    const char* dev_name;
    const char* data_name;
    int         dev_fd;
    int         data_fd;

    static int openInput(const char* inputName);
    static int64_t getTimestamp();
    static int64_t timevalToNano(timeval const& t) {
        return t.tv_sec*1000000000LL + t.tv_usec*1000;
    }

    int open_device();
    int close_device();

public:
            SensorBase(
                    const char* dev_name,
                    const char* data_name);

    virtual ~SensorBase();

    virtual int readEvents(sensors_event_t* data, int count) = 0;
    virtual bool hasPendingEvents() const;
    virtual int getFd() const;
    virtual int setDelay(int32_t handle, int64_t ns);
    virtual int enable(int32_t handle, int enabled) = 0;
    virtual int isActivated(int handle);
};
这里的setdelay isActivated readEvents不就是sensors_poll_device_t里面的功能实现函数。同时在HumiditySensor类里面也实现了这几个函数。查看class HumiditySensor里面成员的实现。
/*
 * Copyright (C) 2010 Motorola, Inc.
 * Copyright (C) 2008 The Android Open Source Project
 *
 * Licensed under the Apache License, Version 2.0 (the "License");
 * you may not use this file except in compliance with the License.
 * You may obtain a copy of the License at
 *
 *      http://www.apache.org/licenses/LICENSE-2.0
 *
 * Unless required by applicable law or agreed to in writing, software
 * distributed under the License is distributed on an "AS IS" BASIS,
 * WITHOUT WARRANTIES OR CONDITIONS OF ANY KIND, either express or implied.
 * See the License for the specific language governing permissions and
 * limitations under the License.
 */

#include <fcntl.h>
#include <errno.h>
#include <math.h>
#include <poll.h>
#include <unistd.h>
#include <dirent.h>
#include <sys/select.h>

#include "HumiditySensor.h"

/*****************************************************************************/

HumiditySensor::HumiditySensor()
    : SensorBase(HUM_DEVICE_NAME, "humidity"),
      mEnabled(0),
      mInputReader(32),
      mHasPendingEvent(false)
{
	LOGD("new class humidity");
    mPendingEvent.version = sizeof(sensors_event_t);
    mPendingEvent.sensor = ID_HUM;
    mPendingEvent.type = SENSOR_TYPE_RELATIVE_HUMIDITY;
    memset(mPendingEvent.data, 0, sizeof(mPendingEvent.data));

     open_device();

    int flags = 0;
    if ((dev_fd > 0) && (!ioctl(dev_fd, HUMIDITY_IOCTL_GET_ENABLED, &flags))) {
        if (flags) {
            mEnabled = 1;
            setInitialState();
        }
    }
}

HumiditySensor::~HumiditySensor() {
	LOGD("delete class humidity");
    if (dev_fd > 0) {
        close(dev_fd);
        dev_fd = -1;
    }
}

int HumiditySensor::setInitialState() {
    struct input_absinfo absinfo;
    if ((data_fd > 0) && !ioctl(data_fd, EVIOCGABS(EVENT_TYPE_HUMIDITY), &absinfo)) {
        mHasPendingEvent = true;
        mPendingEvent.relative_humidity = CONVERT_B * absinfo.value;
    }
    return 0;
}

int HumiditySensor::enable(int32_t, int en) {
    int flags = en ? 1 : 0;
    int err = 0;
    if (flags != mEnabled) {
        if (dev_fd < 0) {
            open_device();
        }
        err = ioctl(dev_fd, HUMIDITY_IOCTL_ENABLE, &flags);
        err = err<0 ? -errno : 0;
        LOGE_IF(err, "HUMIDITY_IOCTL_ENABLE failed (%s)", strerror(-err));
        if (!err) {
            mEnabled = en ? 1 : 0;
            if (en) {
                setInitialState();
            }
        }
    }
    return err;
}

bool HumiditySensor::hasPendingEvents() const {
    return mHasPendingEvent;
}


int HumiditySensor::setDelay(int32_t handle, int64_t ns)
{
    if (ns < 0)
        return -EINVAL;

    if (dev_fd < 0) {
        open_device();
    }

    int delay = ns / 1000000;
    if (ioctl(dev_fd, HUMIDITY_IOCTL_SET_DELAY, &delay)) {
        return -errno;
    }
    return 0;
}

int HumiditySensor::isActivated(int /* handle */)
{
    return mEnabled;
}

int HumiditySensor::readEvents(sensors_event_t* data, int count)
{
    if (count < 1)
        return -EINVAL;

    if (mHasPendingEvent) {
        mHasPendingEvent = false;
        mPendingEvent.timestamp = getTimestamp();
        *data = mPendingEvent;
        return mEnabled ? 1 : 0;
    }

    ssize_t n = mInputReader.fill(data_fd);
    if (n < 0)
        return n;
    int numEventReceived = 0;
    input_event const* event;

    while (count && mInputReader.readEvent(&event)) {
        int type = event->type;
        if (type == EV_ABS) {
            processEvent(event->code, event->value);
        } else if (type == EV_SYN) {
            int64_t time = timevalToNano(event->time);
            mPendingEvent.timestamp = time;
            if (mEnabled) {
                *data++ = mPendingEvent;
                count--;
                numEventReceived++;
            }
        } else {
            ALOGE("HumiditySensor: unknown event (type=%d, code=%d)",
                    type, event->code);
        }
        mInputReader.next();
    }

    return numEventReceived;
}

void HumiditySensor::processEvent(int code, int value)
{
    if (code == EVENT_TYPE_HUMIDITY) {
            //mPendingEvent.relative_humidity = value * CONVERT_B ;
			mPendingEvent.relative_humidity = value;
			LOGD("HUM---%s:value=%d\n",__FUNCTION__, value);
			LOGD("HUM---%s:value * CONVERT_B = %f\n",__FUNCTION__, mPendingEvent.relative_humidity);
    }
}
里面的核心函数就是open 然后ioctl发送不同的魔数去获取到数据。那么我们的hal层拿到数据只是完成了启下作用,即从内核驱动中获取数据。那么我们还要把数据给到JNI。由于hal层和farmware层都是运行在用户空间,jni也是由C/C++编写。并且hal层是以.so的动态库文件的形式存在。那么我们只要在jni包含该库文件就可以。调用到我们的功能函数。

![[学习笔记]Rocket.Chat业务数据备份](https://img-blog.csdnimg.cn/05667788aec6465fbe8379ee7227c161.png)