C++和QML混合编程_QML发送信号到C++端(信号和槽绑定)
前言:
下面是之前讲解过的三种方法
1、使用Q_INVOKABLE声明一下普通函数,在QML端可以直接调用
2、使用Connections绑定QML的信号和C++端的槽函数
3、使用connect绑定QML的信号和C++端的槽函数(个人感觉最方便的,不用管传入的参数)
下面再讲一种实战中更常用的,更加便捷的:(QML端)信号和(C++)槽的绑定
演示效果:
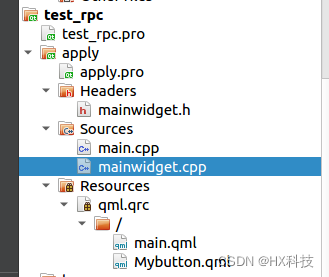
工程的代码目录结构:
mainwidget.h
#ifndef MAINWIDGET_H
#define MAINWIDGET_H

#include <QObject>
#include <QWidget>
#include <QQmlComponent>
#include <QQmlApplicationEngine>
#include <QQuickItem>

class MainWidget : public QObject
{
    Q_OBJECT
public:
    MainWidget();

protected slots:
    void onClickPageNo(bool enable);

private:
    QQuickItem *m_applyItem = nullptr;
    QObject *m_applyObject = nullptr;
};

#endif // MAINWIDGET_H
mainwidget.cpp
#include "mainwidget.h"
#include "qdebug.h"

MainWidget::MainWidget()
{
    QQmlApplicationEngine *m_pEngine = new QQmlApplicationEngine;
    QQmlComponent component(m_pEngine, QUrl(QStringLiteral("qrc:/main.qml")));
    QObject *mainObject = component.create();
    if (mainObject == nullptr) {
        qDebug() << "mainObject fail";
        return;
    }

    QList<QObject *> objectList = mainObject->findChildren<QObject *>("mybutton");
    if (objectList.isEmpty()) {
        qDebug() << "mybutton failed\n";
        return;
    }
    m_applyObject = objectList.last();
    connect(m_applyObject, SIGNAL(start_interface(bool)), this, SLOT(onClickPageNo(bool)));
}

void MainWidget::onClickPageNo(bool enable)
{
    qDebug() << "open layer successfull";
}
main.cpp
#include <QGuiApplication>
#include <QQmlApplicationEngine>
#include "mainwidget.h"
#include "qdebug.h"

int main(int argc, char *argv[])
{
    QCoreApplication::setAttribute(Qt::AA_EnableHighDpiScaling);

    QGuiApplication app(argc, argv);

//    QQmlApplicationEngine engine;
//    const QUrl url(QStringLiteral("qrc:/main.qml"));
//    QObject::connect(&engine, &QQmlApplicationEngine::objectCreated,
//    &app, [url](QObject * obj, const QUrl & objUrl) {
//        if (!obj && url == objUrl) {
//            QCoreApplication::exit(-1);
//        }
//    }, Qt::QueuedConnection);
//    engine.load(url);

    MainWidget mainwidget;

    qDebug() << "apply start successfull";

    return app.exec();
}
main.qml
import QtQuick 2.12
import QtQuick.Window 2.12
import QtQuick.Controls 2.12

Window {
    visible: true
    width: 640
    height: 480
    objectName: "apply_window"
    title: qsTr("Hello apply")

    Mybutton{

    }
}
Mybutton.qml
import QtQuick 2.0
import QtQuick.Controls 2.12

Item {
    objectName: "mybutton"

    signal start_interface(bool enable)

    Column{
        spacing: 10
        Button{
            objectName: "button"
            width: 140
            height: 50

            text: "apply+"
        }
        Button{
            width: 140
            height: 50

            text: "apply-"
        }
        Button{
            width: 140
            height: 50

            text: "启动layer"
            onClicked: {
                start_interface(true)
            }
        }
    }
}
上面例程演示完毕,下面再讲一点拓展的东西
假如主窗口(main.qml)中想发射一个信号到C++端,使用上面的例子就需要变通一下,因为下面这两句就直接获取到main.qml的对象了,不像使用Mybutton.qml里面的对象还要再深入一层(使用:QList<QObject *> objectList = mainObject->findChildren<QObject *>(“mybutton”);)
QQmlComponent component(m_pEngine, QUrl(QStringLiteral("qrc:/main.qml")));
QObject *mainObject = component.create();
演示效果:

mainwidget.h
#ifndef MAINWIDGET_H
#define MAINWIDGET_H

#include <QObject>
#include <QWidget>
#include <QQmlComponent>
#include <QQmlApplicationEngine>
#include <QQuickItem>

class MainWidget : public QObject
{
    Q_OBJECT
public:
    MainWidget();

protected slots:
    void onClickPageNo(bool enable);

private:
    QQuickItem *m_applyItem = nullptr;
    QObject *m_applyObject = nullptr;
};

#endif // MAINWIDGET_H
mainwidget.cpp
#include "mainwidget.h"
#include "qdebug.h"

MainWidget::MainWidget()
{
    QQmlApplicationEngine *m_pEngine = new QQmlApplicationEngine;
    QQmlComponent component(m_pEngine, QUrl(QStringLiteral("qrc:/main.qml")));
    QObject *mainObject = component.create();
    if (mainObject == nullptr) {
        qDebug() << "mainObject fail";
        return;
    }

    QList<QObject *> objectList = mainObject->findChildren<QObject *>("mybutton");
    if (objectList.isEmpty()) {
        qDebug() << "mybutton failed\n";
        return;
    }
    m_applyObject = objectList.last();

    connect(m_applyObject, SIGNAL(start_interface(bool)), this, SLOT(onClickPageNo(bool)));
    connect(mainObject, SIGNAL(window_interface(bool)), this, SLOT(onClickPageNo(bool)));
}

void MainWidget::onClickPageNo(bool enable)
{
    qDebug() << "open layer successfull";
}
main.cpp
#include <QGuiApplication>
#include <QQmlApplicationEngine>
#include "mainwidget.h"
#include "qdebug.h"

int main(int argc, char *argv[])
{
    QCoreApplication::setAttribute(Qt::AA_EnableHighDpiScaling);

    QGuiApplication app(argc, argv);

//    QQmlApplicationEngine engine;
//    const QUrl url(QStringLiteral("qrc:/main.qml"));
//    QObject::connect(&engine, &QQmlApplicationEngine::objectCreated,
//    &app, [url](QObject * obj, const QUrl & objUrl) {
//        if (!obj && url == objUrl) {
//            QCoreApplication::exit(-1);
//        }
//    }, Qt::QueuedConnection);
//    engine.load(url);

    MainWidget mainwidget;

    qDebug() << "apply start successfull";

    return app.exec();
}
main.qml
import QtQuick 2.12
import QtQuick.Window 2.12
import QtQuick.Controls 2.12

Window {
    visible: true
    width: 640
    height: 480
    objectName: "apply_window"
    title: qsTr("Hello apply")

    signal window_interface(bool enable)

    Column{
        anchors.fill: parent
        spacing: 20
        Button{
            width: 140
            height: 50

            text: "window"
            onClicked: {
                window_interface(true)
            }
        }
        Mybutton{
            width: 140
            height: 300
        }
    }
}
Mybutton.qml
import QtQuick 2.0
import QtQuick.Controls 2.12

Item {
    objectName: "mybutton"

    signal start_interface(bool enable)

    Column{
        spacing: 10
        Button{
            objectName: "button"
            width: 140
            height: 50

            text: "apply+"
        }
        Button{
            width: 140
            height: 50

            text: "apply-"
        }
        Button{
            width: 140
            height: 50

            text: "启动layer"
            onClicked: {
                start_interface(true)
            }
        }
    }
}



![[数据治理-02]一个例子搞懂元数据、参考数据、主数据、交易数据...的关系](https://img-blog.csdnimg.cn/55c87d470e554b788612e35af10b8e52.png)



![buu [WUSTCTF2020]大数计算 1](https://img-blog.csdnimg.cn/71d00d95e95c4156b87853a9e47b113e.png)
