Jenkins SVN GItlab
- 3.1 Jenkins+SVN
- 3.1.1 搭建SVN服务器
- 1. 安装svn server
- 2. 查看svn安装位置
- 3. 创建版本库目录
- 4. 创建svn版本库
- 5. 配置修改
- 6. 防火墙开启3690端口
- 7. 启动SVN-server
- 8. 客户端访问svn服务器
- 3.1.2 测试脚本提交
- 3.1.3 jenkins下载代码配置
- 1. 安装Subversion插件
- 2. 创建工程
- 3. 配置
- 3.1.4 构建
- 3.1.5 改为自动构建
- 1. 构建触发器
- 2. 执行结果
- 3. 轮询日志
- 3.2 Jenkins+Gitlab
- 3.2.1 搭建gitlab服务器(使用官方镜像搭建)
- 1. 安装docker及下载镜像
- 2. 编写docker-compose.yml
- 3. 启动容器
- 4. 查看管理员密码
- 5. 登录gitlab
- 6. docker搭建
- 3.2.2 搭建gitlab服务器(使用beginor镜像搭建)
- 1. 下载镜像
- 2. 启动容器
- 3. 登录gitlab
- 3.2.3 设置gitlab
- 1. 新建用户
- 2. 创建项目
- 3. 项目添加用户
- 4. 添加密钥
- 5. 下载代码
- 6. 上传代码
- 7. 无法上传
- 3.2.4 Jenkins配置gitlab
- 1. 配置hello-world2
- 2. 节点机安装git
- 3. 构建任务
- 3.2.5 自动触发构建
- 1. 创建触发器
- 2. 添加webhook
- 3. 修改Outbound requests
- 4. Jenkins 远程触发 403 No valid crumb was included in the request
- 5. 再测试钩子
目前大部分公司的代码都是由SVN或者GIT管理,下面我们将介绍,如何通过jenkins链接到SVN/Gitlab实现自动编译代码
3.1 Jenkins+SVN
我们先搭建个SVN服务器
3.1.1 搭建SVN服务器
1. 安装svn server
yum -y install subversion
2. 查看svn安装位置
[root@dbc-server-554 ~]# rpm -ql subversion
/etc/subversion
/etc/sysconfig/svnserve
/run/svnserve
/usr/bin/svn
/usr/bin/svnadmin
/usr/bin/svndumpfilter
/usr/bin/svnlook
/usr/bin/svnrdump
/usr/bin/svnserve
/usr/bin/svnsync
/usr/bin/svnversion
...
3. 创建版本库目录
此仅为目录,为后面创建版本库提供存放位置。选择在var路径下创建版本库,当前处于根目录下,一次性创建如下:
[root@dbc-server-554 ~]# cd /usr/local/share/;mkdir -p svn/svnrepos
4. 创建svn版本库
创建版本库srclib,命令如下:
[root@dbc-server-554 svnrepos]# /usr/bin/svnadmin create srclib
[root@dbc-server-554 svnrepos]# ls
srclib
[root@dbc-server-554 srclib]# ll
total 8
drwxr-xr-x 2 root root  54 Feb  7 16:34 conf
drwxr-sr-x 6 root root 233 Feb  7 16:34 db
-r--r--r-- 1 root root   2 Feb  7 16:34 format
drwxr-xr-x 2 root root 231 Feb  7 16:34 hooks
drwxr-xr-x 2 root root  41 Feb  7 16:34 locks
-rw-r--r-- 1 root root 229 Feb  7 16:34 README.txt
5. 配置修改
[root@dbc-server-554 srclib]# cd conf/
[root@dbc-server-554 conf]# ll
total 12
-rw-r--r-- 1 root root 1080 Feb  7 16:34 authz	#负责账号权限的管理,控制账号是否读写权限
-rw-r--r-- 1 root root  309 Feb  7 16:34 passwd	#负责账号和密码的用户名单管理
-rw-r--r-- 1 root root 3090 Feb  7 16:34 svnserve.conf	#svn服务器配置文件
添加权限信息
- [/] 表示根目录,即 /var/svnrepos
- yurq = rw 表示用户yurq对根目录具有读写权限。
[root@dbc-server-554 conf]# cat authz
...
# @harry_and_sally = rw
# * = r

[/]
yurq=rw
添加用户密码
[root@dbc-server-554 conf]# cat passwd
### This file is an example password file for svnserve.
### Its format is similar to that of svnserve.conf. As shown in the
### example below it contains one section labelled [users].
### The name and password for each user follow, one account per line.

[users]
# harry = harryssecret
# sally = sallyssecret
root=123456
yurq=123456
修改svnserver.conf
[general]
anon-access = none # 匿名用户不可读写,也可设置为只读
readauth-access = write # 授权用户可写
password-db = passwd # 密码文件路径,相对于当前目录
realm = /usr/local/share/svn/svnrepos # 认证命名空间,会在认证提示界面显示,并作为凭证缓存的关键字,可以写仓库名称比如svnrepos
#authz-db = authz # 访问控制文件,这条一定不要放开,否在远程连接不会弹出叫你输入用户密码的,然后一直显示认证失败!
[root@dbc-server-554 conf]# cat svnserve.conf
...
[general]
...
# anon-access = read
# auth-access = write
...
password-db = passwd
...
# authz-db = authz
...
realm = /usr/local/share/svn/svnrepos
...
# force-username-case = none

[sasl]
...
# use-sasl = true
...
# min-encryption = 0
# max-encryption = 256
6. 防火墙开启3690端口
firewall-cmd --zone=public --add-port=3690/tcp --permanentfirewall-cmd --reload
7. 启动SVN-server
[root@dbc-server-554 svnrepos]# /usr/bin/svnserve -d -r .
[root@dbc-server-554 svnrepos]# ps -ef |grep svn
root     27993     1  0 16:58 ?        00:00:00 /usr/bin/svnserve -d -r .
root     27996 26901  0 16:58 pts/0    00:00:00 grep --color=auto svn
8. 客户端访问svn服务器
在windows客户端,输入地址:svn://ip地址:3690/xxxx (iP地址为你linux的ip,xxxx为前文创建的版本库名称,3690为svn默认端口),弹出输入用户名和密码,输入即可访问

在linux服务器输入命令测试:
[root@dbc-server-554 svn]# svn co svn://192.168.5.54:3690/srclib
Checked out revision 0.
[root@dbc-server-554 svn]# ll
total 0
drwxr-xr-x 3 root root 18 Feb  7 17:02 srclib
到这里SVN搭建完成
3.1.2 测试脚本提交
我们写个测试脚本,提交到svn

打印hello world及次号
3.1.3 jenkins下载代码配置
1. 安装Subversion插件
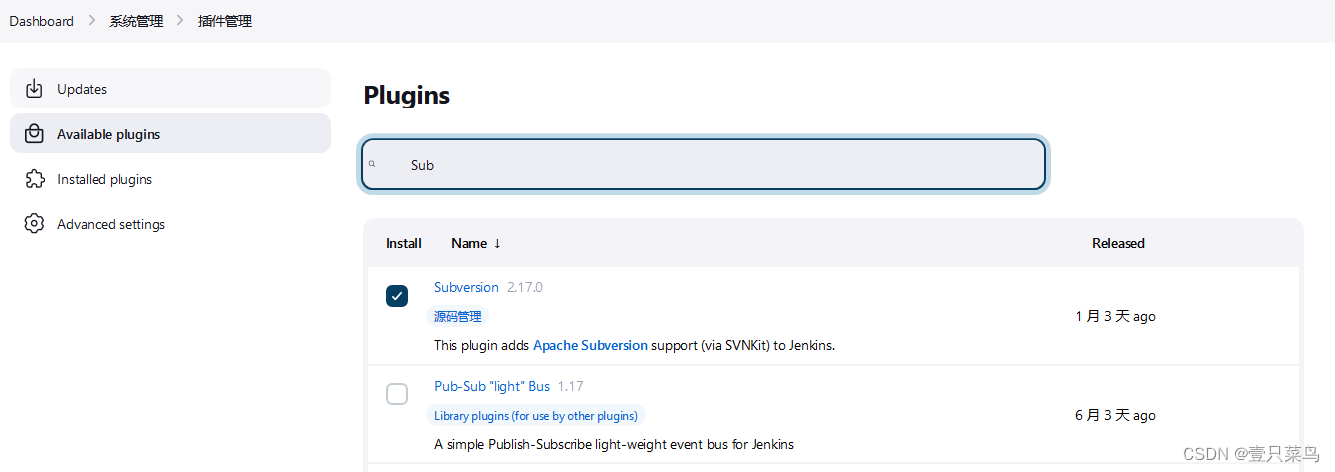
进入jenkins插件管理页面,在有效插件页面搜索Subversion Plug-in插件,下载并安装。
2. 创建工程
选择自由风格,创建hello-world,限制运行节点为Node-1

3. 配置
配置源码管理中的svn
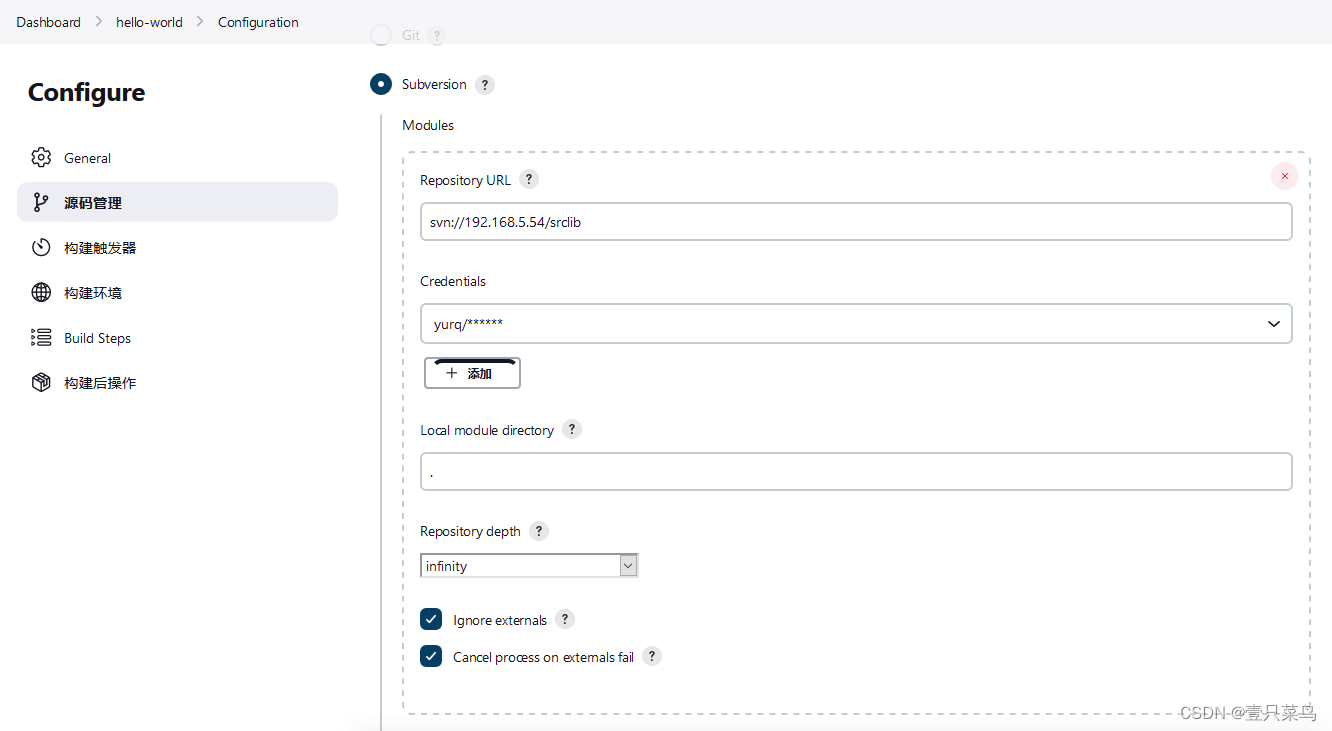
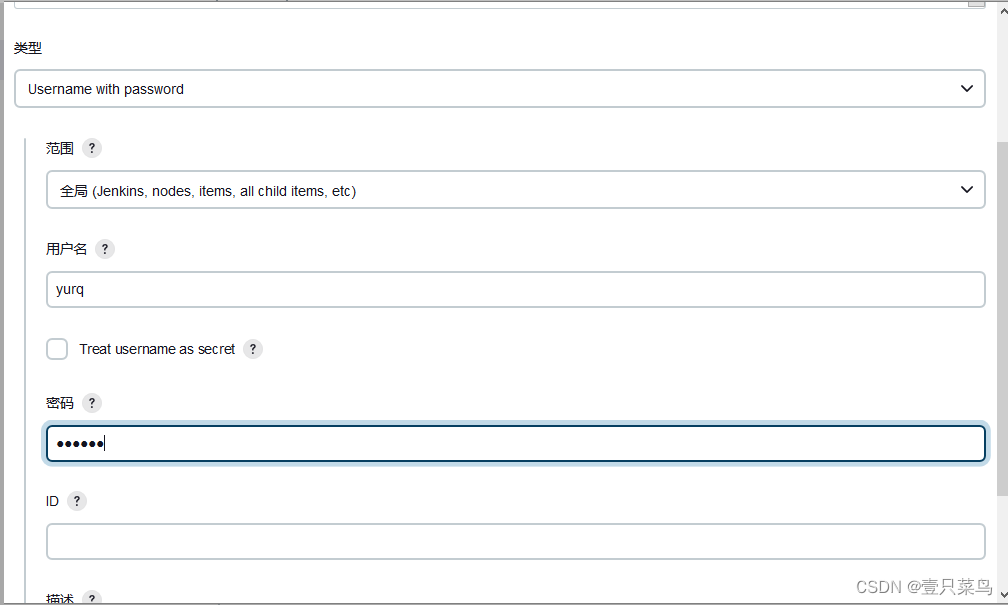
添加svn凭据
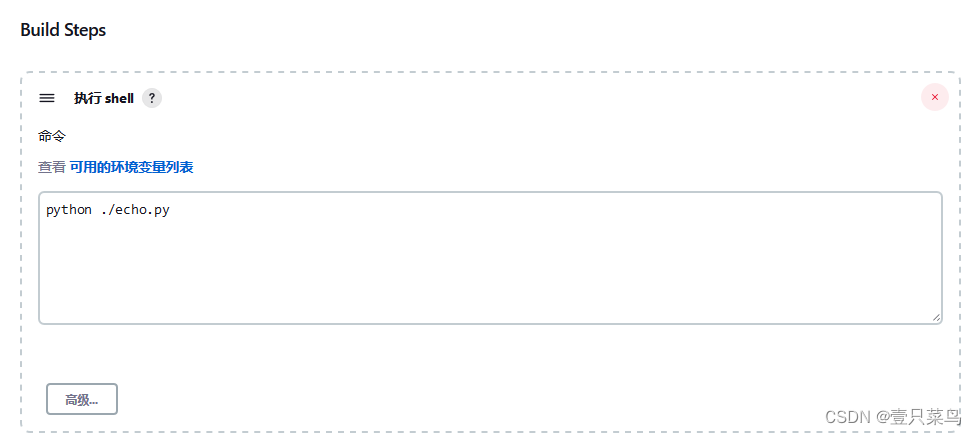
编写执行语句
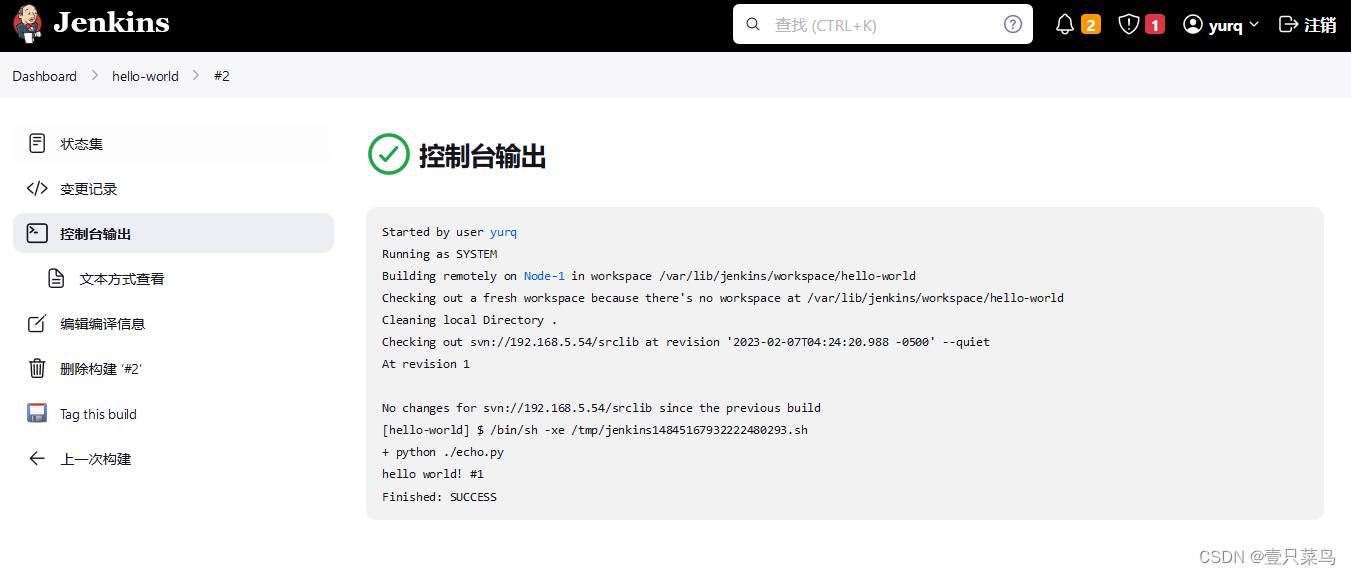
3.1.4 构建
点击立即构建,查看运行结果
3.1.5 改为自动构建
我们复制hello-world工程,并修改代码
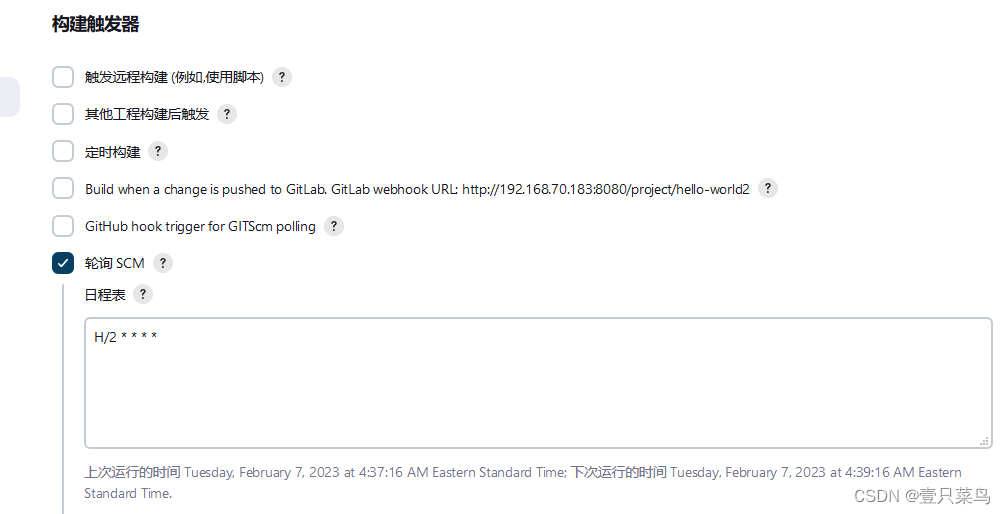
1. 构建触发器
构建触发器分两种:
- 定时构建Build periodically,例如,每天18点准时触发;
- 定时检查源码Poll SCM构建,若有变更,则拉取代码进行构建两种触发方式。
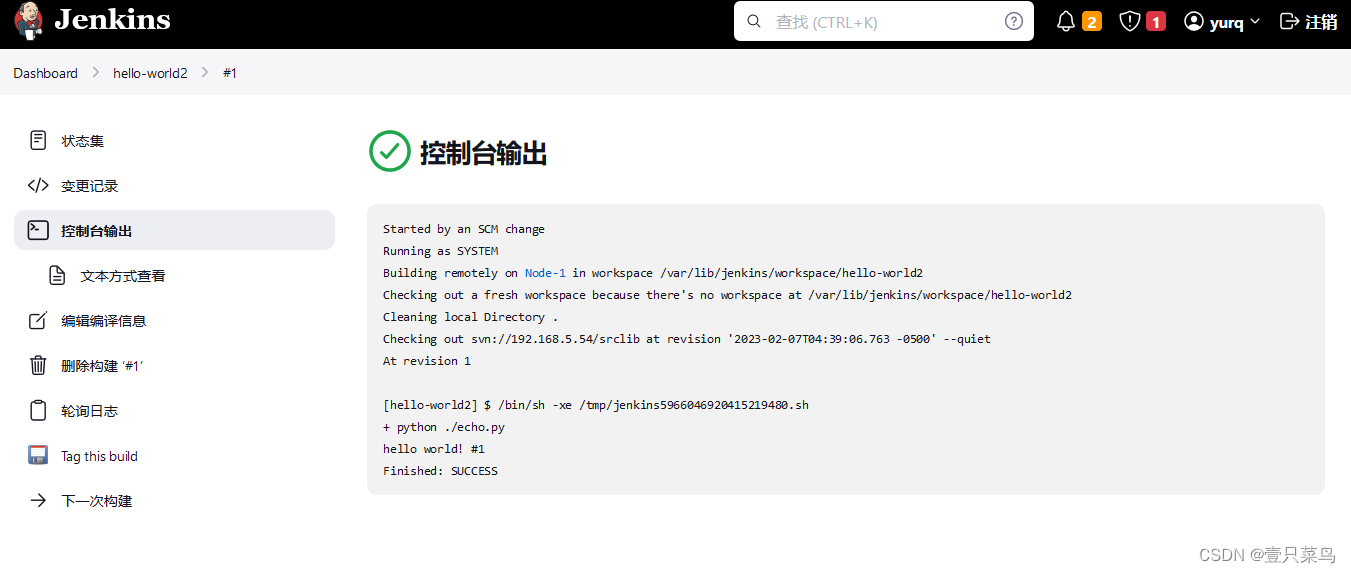
这里我们使用定时检查源码轮询构建,两分钟轮询一次
2. 执行结果
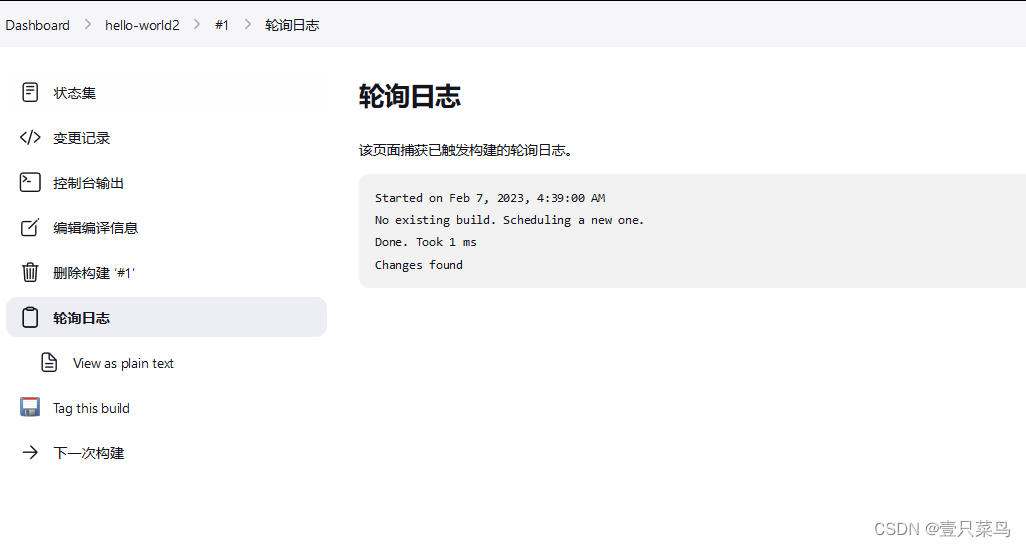
3. 轮询日志
3.2 Jenkins+Gitlab
我们使用docker compose搭建gitlab,顺便巩固下前段时间的知识
3.2.1 搭建gitlab服务器(使用官方镜像搭建)
使用官方镜像搭建
1. 安装docker及下载镜像
由于我们使用docker compose搭建gitlab,所以需要安装docker和docker compose,安装方法
docker安装
docker compose安装
安装完成后,查看版本
[root@dbc-server-554 gitlab]# docker -v
Docker version 23.0.0, build e92dd87
[root@dbc-server-554 gitlab]# docker-compose -v
Docker Compose version v2.15.1
下载镜像
[root@dbc-server-554 gitlab]# docker search gitlab/gitlab-ce
NAME                  DESCRIPTION                                     STARS     OFFICIAL   AUTOMATED
gitlab/gitlab-ce      GitLab Community Edition docker image based …   3804                 [OK]
gitlab/gitlab-ce-qa   GitLab QA has a test suite that allows end-t…   9
[root@dbc-server-554 gitlab]# docker pull gitlab/gitlab-ce
2. 编写docker-compose.yml
[root@dbc-server-554 gitlab]# cat docker-compose.yml
version: '3.6'
services:
  web:
    image: 'gitlab/gitlab-ce:latest'
    restart: always
    hostname: '192.168.5.54'
    environment:
      GITLAB_OMNIBUS_CONFIG: |
        external_url 'http://192.168.5.54:8929'
        gitlab_rails['gitlab_shell_ssh_port'] = 2224
    ports:
      - '8929:8929'
      - '2224:22'
    volumes:
      - '$GITLAB_HOME/config:/etc/gitlab'
      - '$GITLAB_HOME/logs:/var/log/gitlab'
      - '$GITLAB_HOME/data:/var/opt/gitlab'
    shm_size: '256m'
3. 启动容器
[root@dbc-server-554 gitlab]# docker-compose up -d
WARN[0000] The "GITLAB_HOME" variable is not set. Defaulting to a blank string.
WARN[0000] The "GITLAB_HOME" variable is not set. Defaulting to a blank string.
WARN[0000] The "GITLAB_HOME" variable is not set. Defaulting to a blank string.
[+] Running 1/1
 ⠿ Container gitlab-web-1  Started                                                                                                   1.2s
[root@dbc-server-554 gitlab]# docker ps
CONTAINER ID   IMAGE                     COMMAND             CREATED        STATUS                            PORTS                                                                                               NAMES
17255ad00ec0   gitlab/gitlab-ce:latest   "/assets/wrapper"   19 hours ago   Up 4 seconds (health: starting)   80/tcp, 443/tcp, 0.0.0.0:8929->8929/tcp, :::8929->8929/tcp, 0.0.0.0:2224->22/tcp, :::2224->22/tcp   gitlab-web-1
4. 查看管理员密码
默认管理员账号为root,密码如下获取
[root@dbc-server-554 ~]# docker exec -it 01 grep 'Password:' /etc/gitlab/initial_root_password
Password: wqJ14qc4Om783V/pedOkPz/BSEhN8FywX3PybdSjKKw=
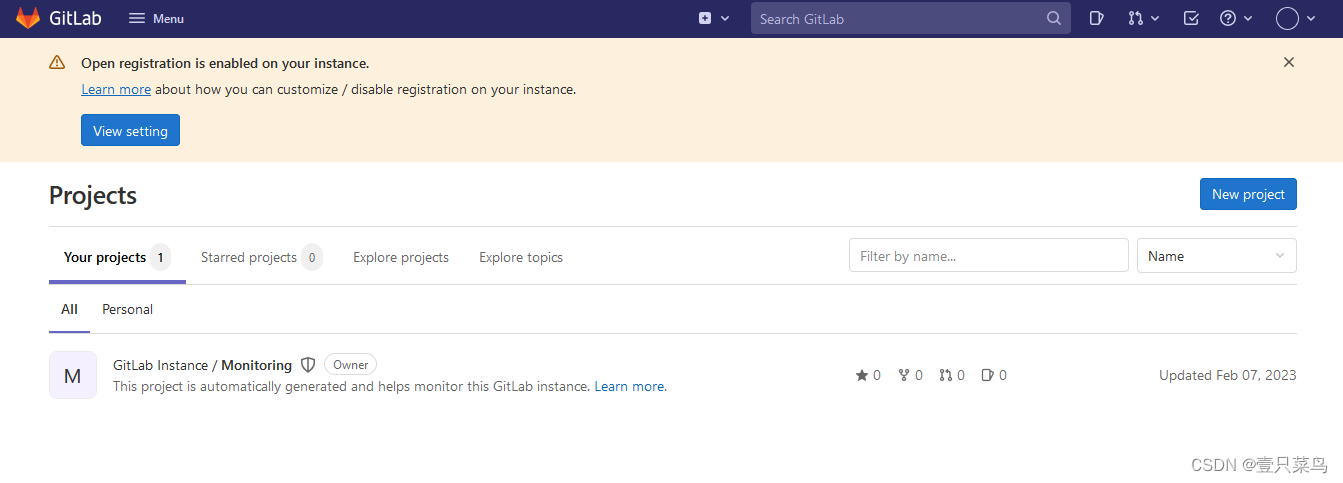
5. 登录gitlab
访问:http://192.168.5.54:8929
6. docker搭建
也可以使用docker 启动容器
# 启动容器
docker run  -itd  -p 9980:80  -p 9922:22  -v /home/gitlab/etc:/etc/gitlab   -v /home/gitlab/log:/var/log/gitlab  -v /home/gitlab/opt:/var/opt/gitlab  --restart always  --privileged=true  --name gitlab  gitlab/gitlab-ce
使用官方镜像搭建,严重卡顿,修改缓存等,仍未解决,由于此处主要介绍jenkins+gitlab,所以还是以jenkins为主。
3.2.2 搭建gitlab服务器(使用beginor镜像搭建)
1. 下载镜像
docker pull beginor/gitlab-ce
2. 启动容器
docker run --detach --publish 8443:443 --publish 8080:80 --name gitlab --restart unless-stopped --volume /home/gitlab/etc:/etc/gitlab --volume /home/gitlab/log:/var/log/gitlab --volume /home/gitlab/data:/var/opt/gitlab beginor/gitlab-ce:latest
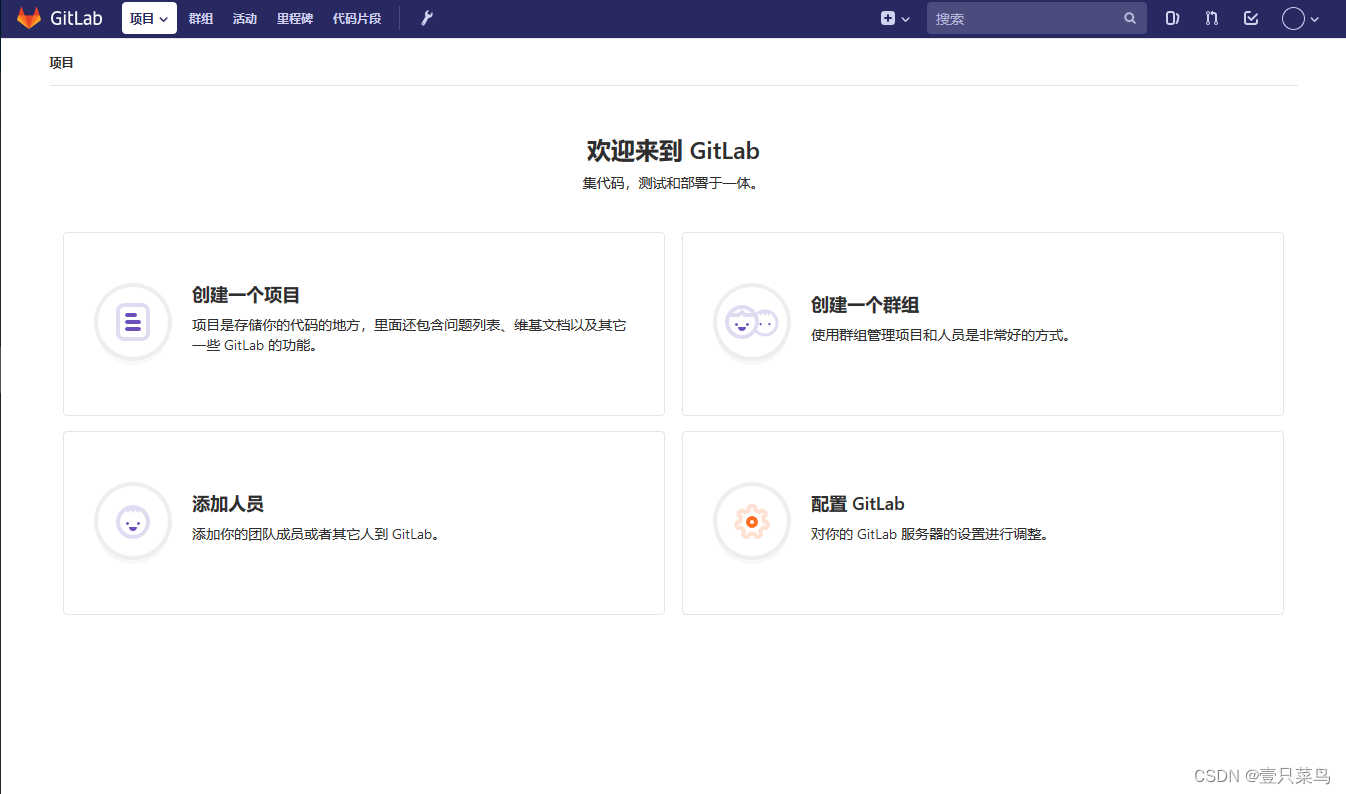
3. 登录gitlab
这个版本的gitlab,第一次登录需要设置密码,账号为root
3.2.3 设置gitlab
1. 新建用户
建议在生产环境中新建用户并设置好权限管理,请谨慎使用。
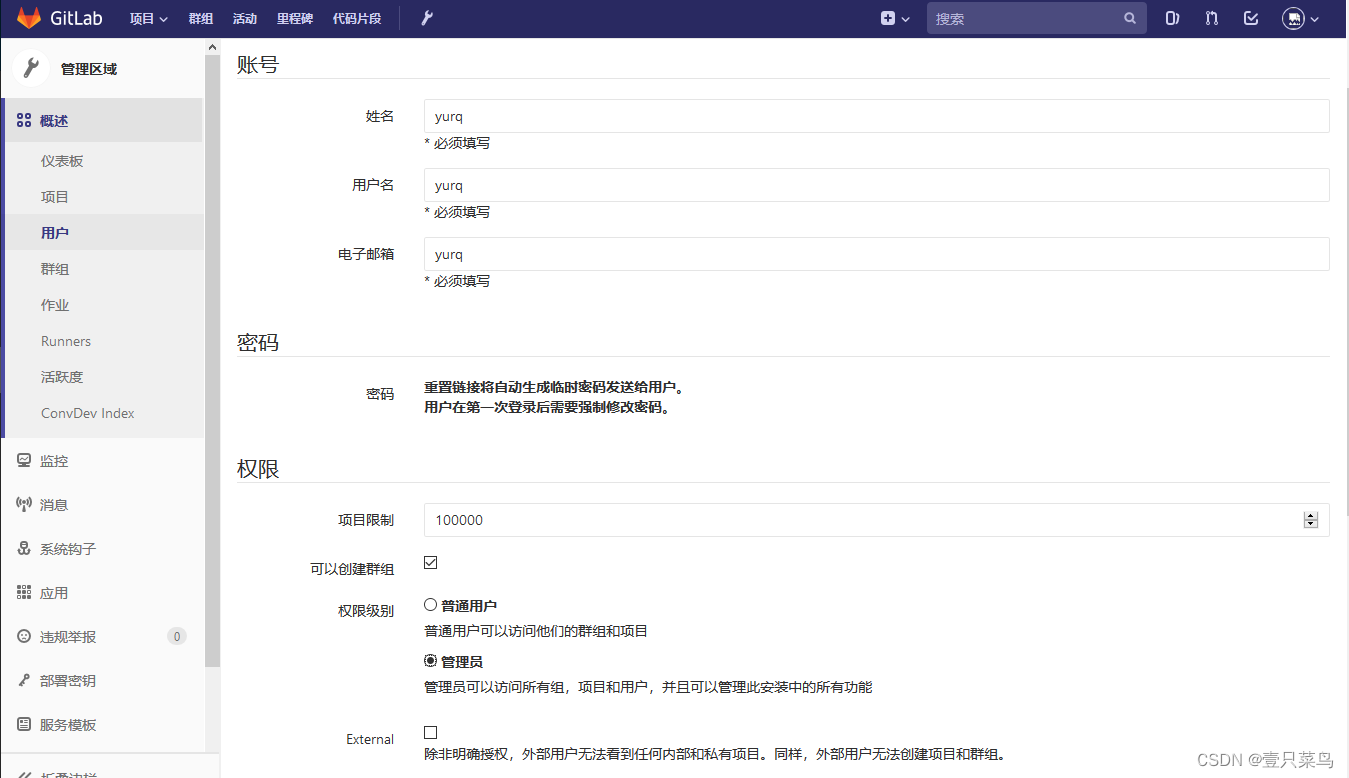
保存后刷新页面,给用户添加密码
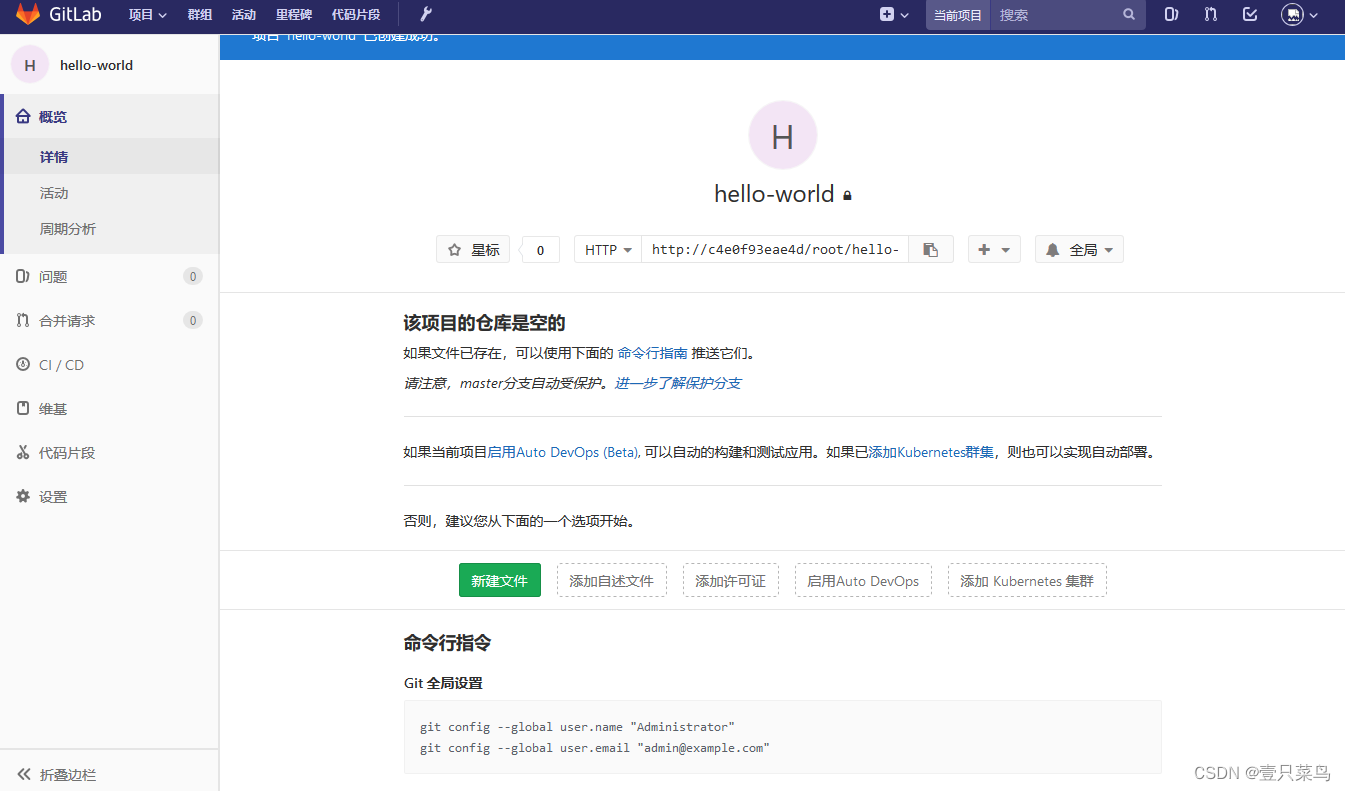
2. 创建项目
3. 项目添加用户
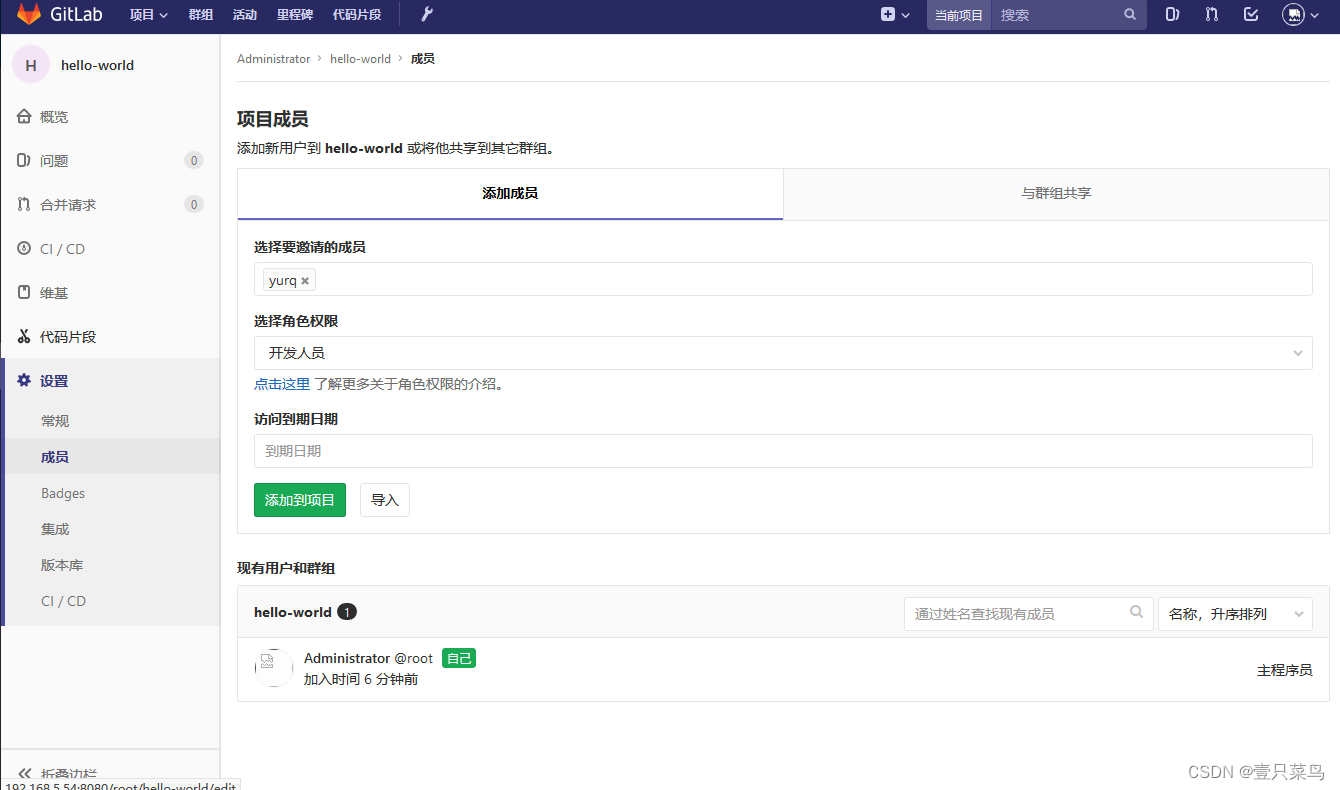
4. 添加密钥
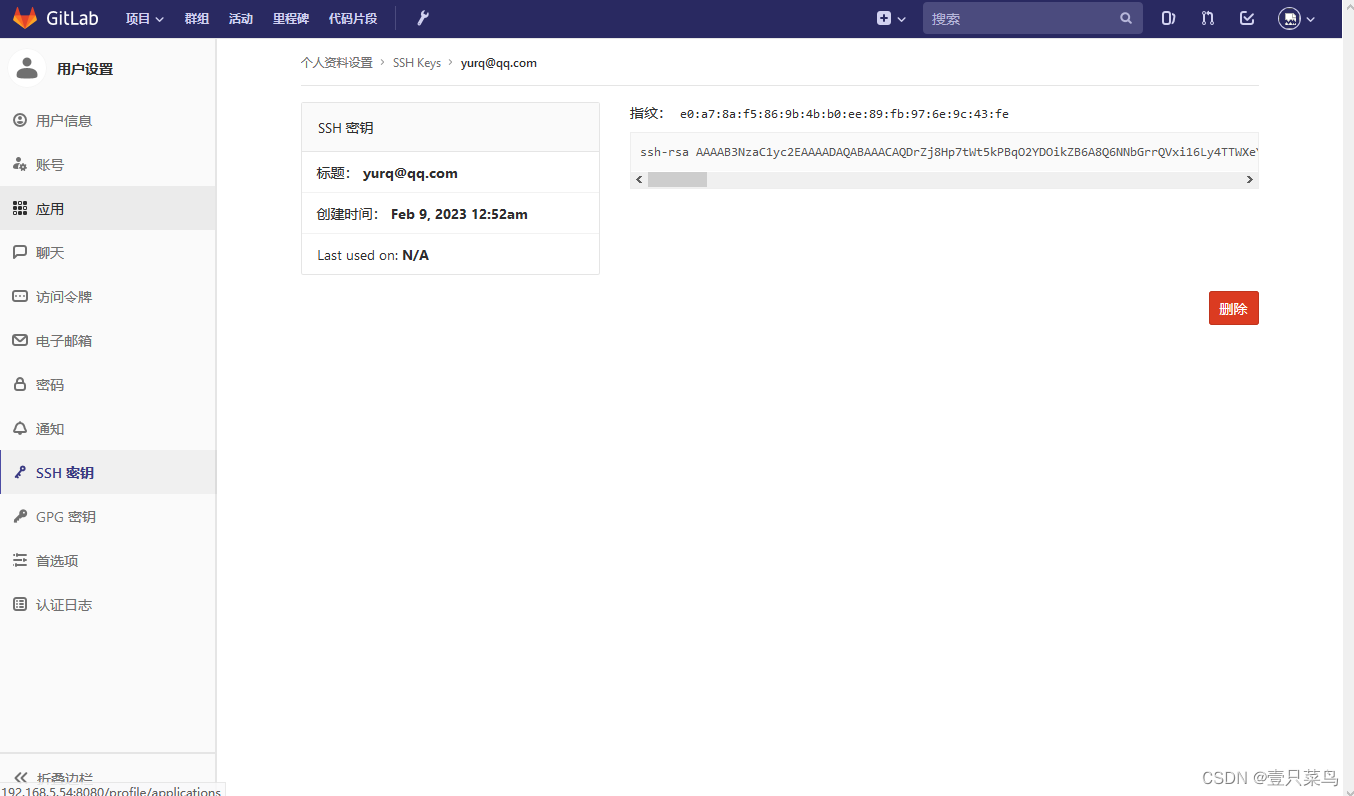
我们需要把公钥配置到git,配置之后才能使用该账号下载代码
为账号yurq添加SSH-key
[root@k8s-node-02 ~]# ssh-keygen -t rsa -C "yurq@qq.com" -b 4096
Generating public/private rsa key pair.
Enter file in which to save the key (/root/.ssh/id_rsa):
/root/.ssh/id_rsa already exists.
Overwrite (y/n)? y
Enter passphrase (empty for no passphrase):
Enter same passphrase again:
Your identification has been saved in /root/.ssh/id_rsa.
Your public key has been saved in /root/.ssh/id_rsa.pub.
The key fingerprint is:
SHA256:+K5r/hzhqTD660uc2bUeQ7T+nZ0yKSW2xTDvRf75swg yurq@qq.com
The key's randomart image is:
+---[RSA 4096]----+
|                 |
|                 |
|        .        |
|       o .o   .  |
|      . S  = o   |
|   . + * +o = o  |
|    B . X. E o ..|
|   o o.= =o.*o.+.|
|  .o===+= ..o+o.=|
+----[SHA256]-----+
[root@k8s-node-02 ~]# cat /root/.ssh/id_rsa.pub
ssh-rsa AAAAB3NzaC1yc2EAAAADAQABAAACAQDrZj8Hp7tWt5kPBqO2YDOikZB6A8Q6NNbGrrQVxi16Ly4TTWXeYQRBH/7NTMmXv1G51LpZiTfKxy1CLBBOtJeoBxbXr6f2zHVIjGHos7NNVSGq/xPFMjubghi8ow0s8SQFmypIm25hG/bX9L1ul7uAWy6Tvy3Qsq4d/PBEMG+iTtpvy4nL2BANEgyOQ0+vxPrmALh3G/qL99Jq+72mhdxCOdW/fqJ6nMj1k44gNvn/FStDeqFA3FZEkARo+bynZSWUNWhAEyGhiS1HqYZMwq2jkZiZPJdK1GA3bigsi76l+rVwK8AgmzAOrDRItwTRmhn+32tmObbsWFWyHLd0Qwhlss5dkhkwH5FdRI+TGdn9aoVBINODhPaPYp7b2xwDIC3uqG6BHjbV9VHxCFyQxCme0oTIBZHdL6lDtn4kaPXuFAL41FNUaK7yuMg4W/cuXmrBNl6N8Sc+cuW3Syul/wph+ZBW9aCxvDdArv+/b8dEdK1Gk5Oiu7iFxsoqfPTwsS/YE3damqMEcMLj+KP6xyZRB3WV3EIu9WHGErgy3yBim1uB42oK/Gah+FzCXtzbKH2bH6kno8K418Dqh2rh3qIBsDaSPqzjoWA76HIji/7URUYVtLZMGT5B3cMI9xh/ELplZjBmWUzeOc25HTioHJ7j+o3QnQ7+PFYGHC+XoVq7Ew== yurq@qq.com
5. 下载代码
由于我们的gitlab是由容器启动,所以url显示的主机地址是容器id,此处我们需要修改为启动容器的服务器socket
把空目录下载到本地,然后编辑代码,上传,笔者使用TortoiseGit,遇到"git did not exit cleanly (exit code 128)"问题,参考网上设置反复修改,包括改凭据,改ssh.exe,添加putty key等等方法,仍不能解决
后来索性在命令行执行(windows服务器)
F:\workspace\yurq\tmp\gitlab>git clone http://192.168.5.54:8080/root/hello-world.git
Cloning into 'hello-world'...
remote: Counting objects: 3, done.
remote: Total 3 (delta 0), reused 0 (delta 0)
Unpacking objects: 100% (3/3), done.
终于将目录下载到本地
6. 上传代码
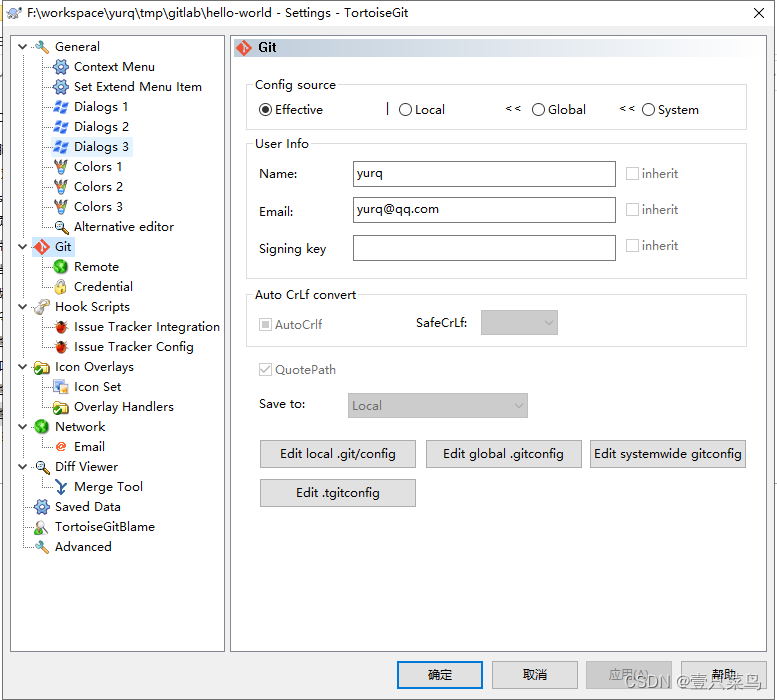
上传代码也遇到提示数据账号、邮箱等信息,在TortoiseGit进行简单设置就可以解决
以上问题,可能由于设置的项目为私有项目造成的
7. 无法上传
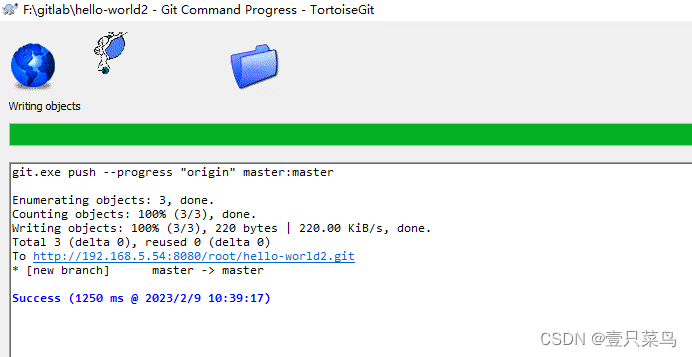
如果遇到实在无法解决的情况,可以重新创建公共项目,包括添加用户等
再解决不了,可以看下git免密登录等
3.2.4 Jenkins配置gitlab
曲曲折折终于回到了Jenkins配置
1. 配置hello-world2
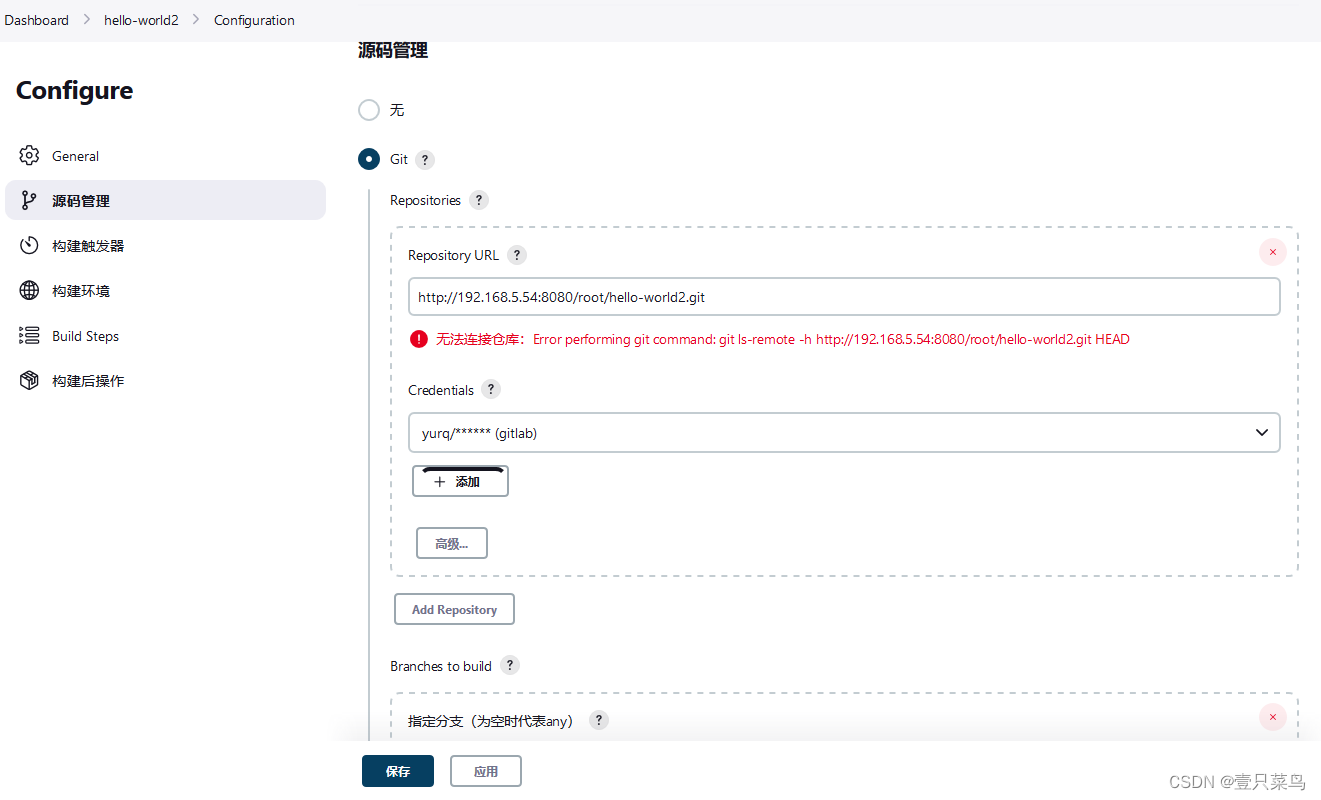
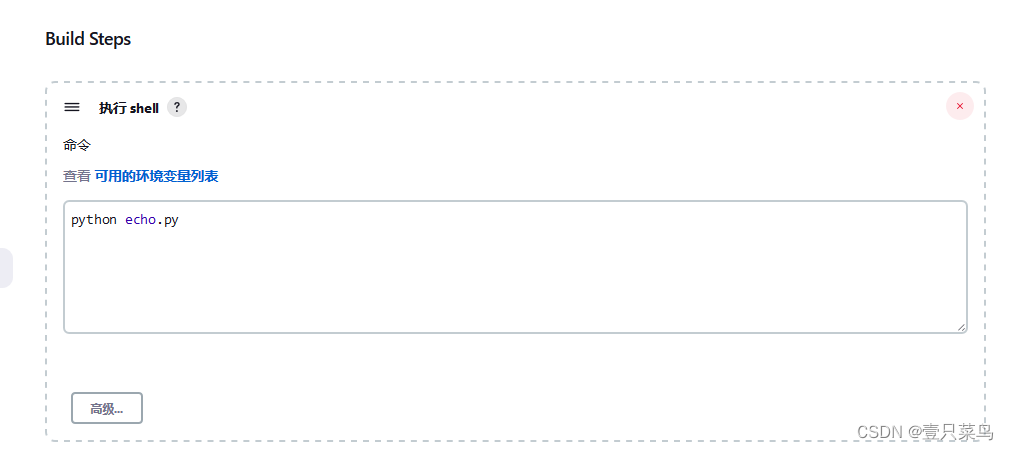
新建任务hello-world2,节点还是选择Node-1,源码管理处选择git,并进行配置。
2. 节点机安装git
需要在节点机安装git
[root@k8s-node-02 ~]# yum install git
Repository base is listed more than once in the configuration
Repository updates is listed more than once in the configuration
Repository extras is listed more than once in the configuration
Repository centosplus is listed more than once in the configuration
base                                                                                                  | 3.6 kB  00:00:00
...
3. 构建任务
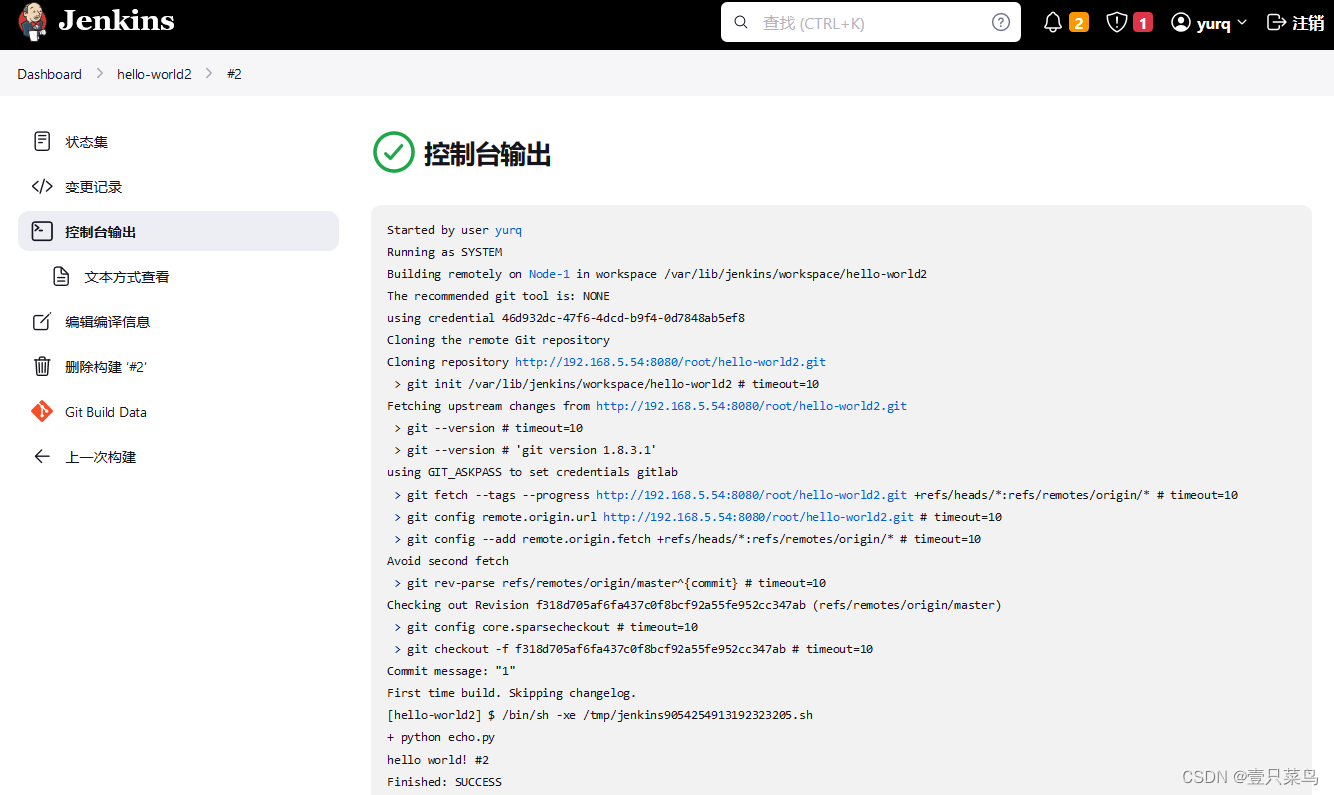
笔者也是第二次构建才成功,第一次失败是因为没有在节点安装git
3.2.5 自动触发构建
1. 创建触发器
jenkins:复制hello-world2项目,并命名为hello-world-webhook,打开项目
选择Build when a change is pushed to GitLab. GitLab webhook URL: http://192.168.70.183:8080/project/hello-world-webhook
记录URL
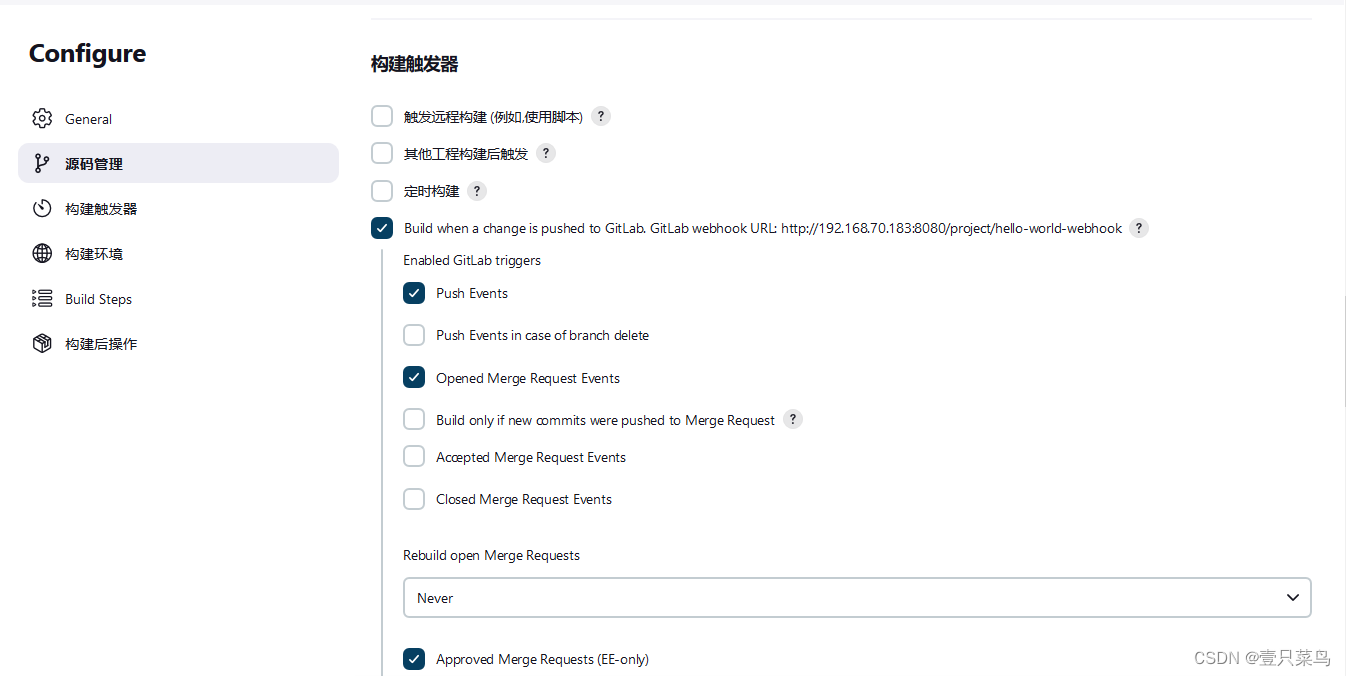
Secret token:点击Generate,记录Secret token,配置gitlab webhook需要使用
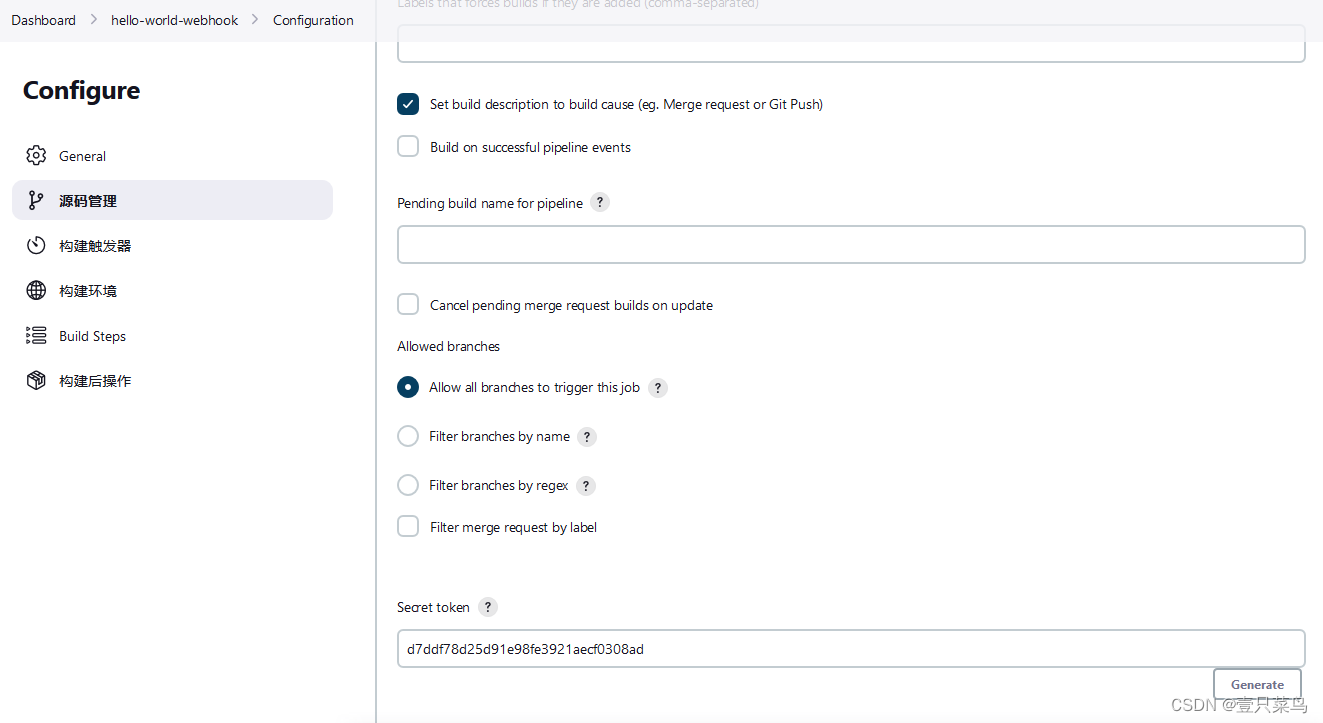
2. 添加webhook
gitlab:在hello-world2项目,设置,集成创建webhook
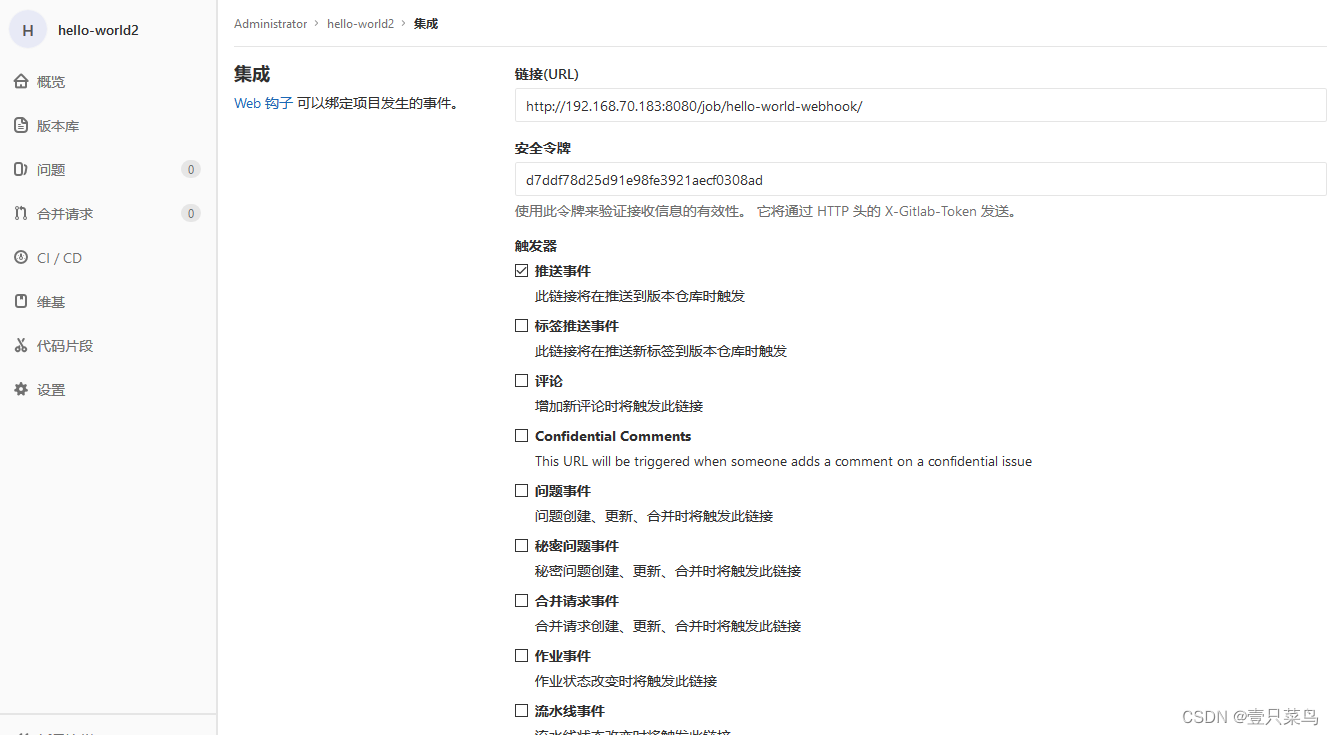
3. 修改Outbound requests
gitlab配置修改:如果不允许钩子…,则会出现访问500问题
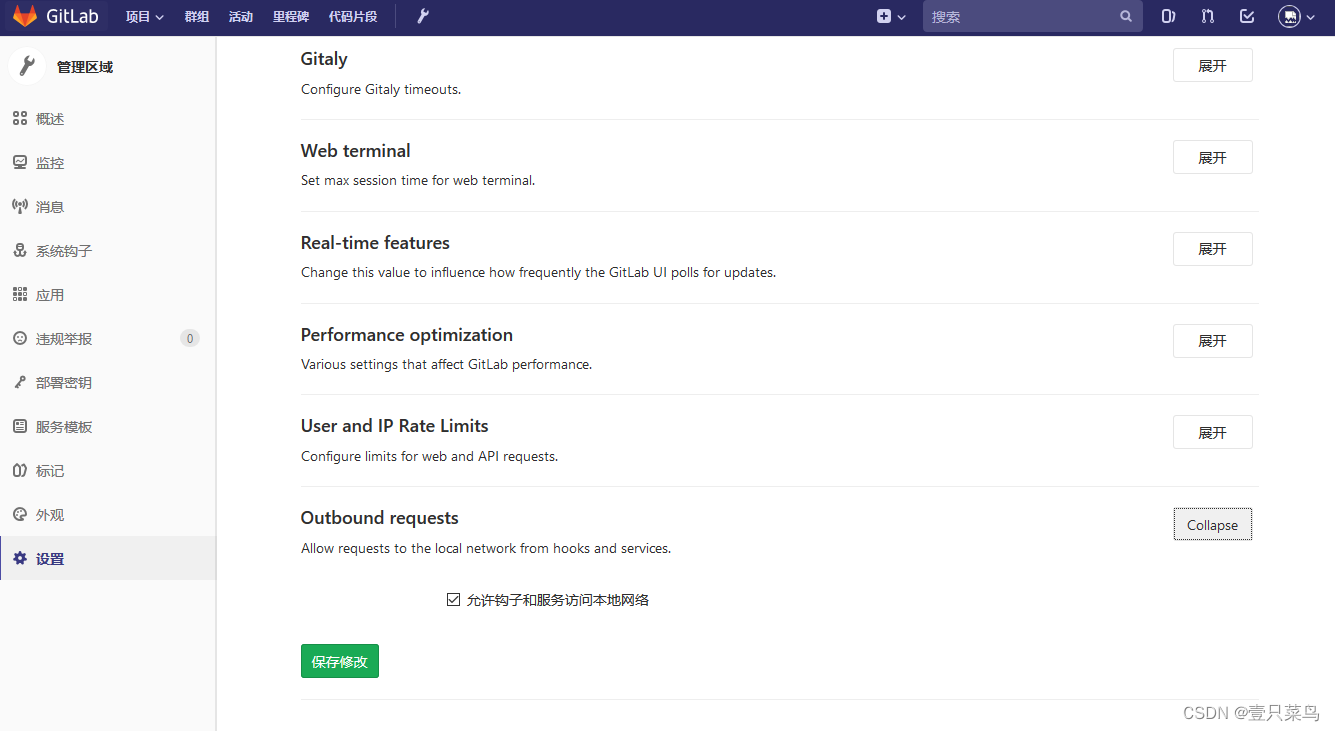
4. Jenkins 远程触发 403 No valid crumb was included in the request
创建完钩子,进行test,发现出现403 No valid crumb was included in the request,原因:
大部分是由跨站请求伪造保护开启导致,高版本jenkins如果要关闭,使用以下方法:
在脚本命令行运行:hudson.security.csrf.GlobalCrumbIssuerConfiguration.DISABLE_CSRF_PROTECTION = true
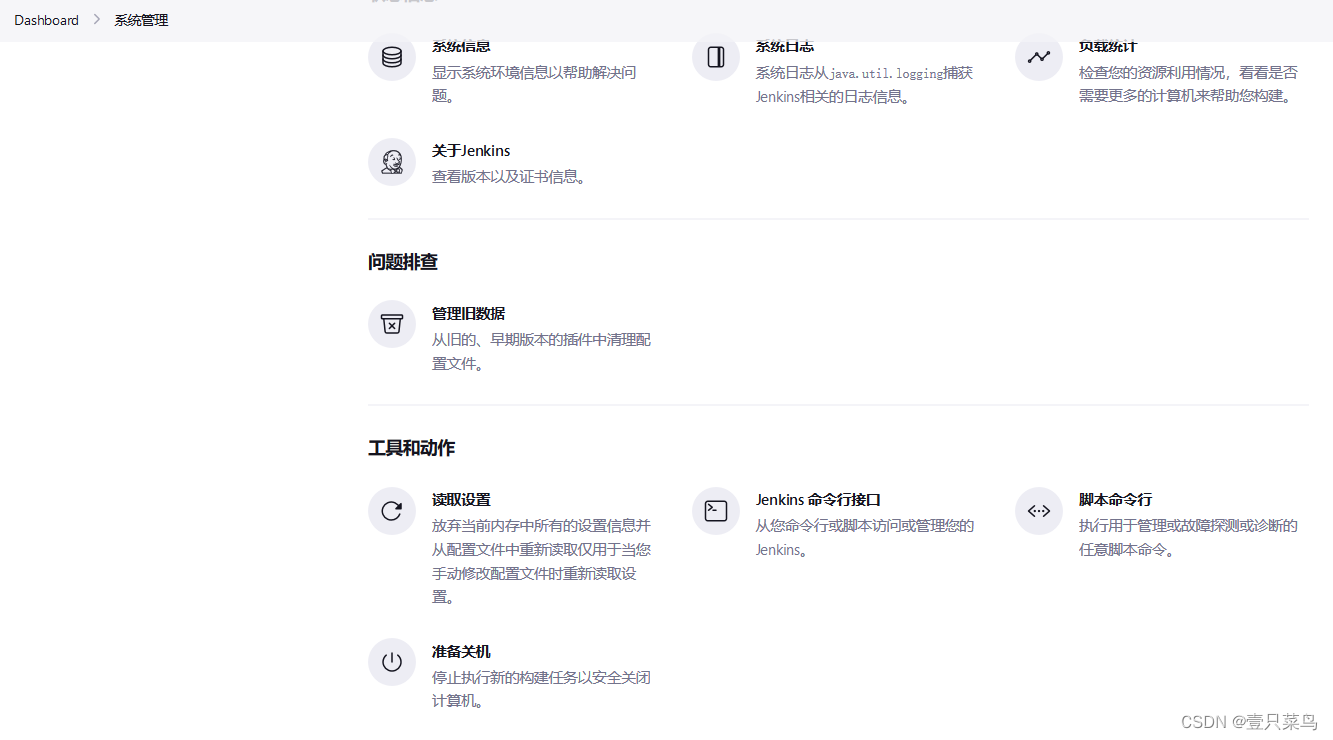
出现如下界面则表示成功

5. 再测试钩子
可以看到已经成功了

然后编辑代码,提交,推送
很遗憾,笔者这里自动构建设置未能成功,但是方法是没问题的,此处后续再进行改善,等问题解决了,再更新本文章




![xpath注入[NPUCTF2020]ezlogin](https://img-blog.csdnimg.cn/b882e291727543a0accd5f7a96398f89.png)

