前提:jenkins,docker,nexus都已经搭建完毕
一. 开启docker远程访问
1.修改docker.service文件
Docker 安装成功之后,首先需要修改 Docker 配置来开启允许远程访问 Docker 的功能。
文件位置:/lib/systemd/system/docker.service
修改内容:在加入如下内容:
DOCKER_OPTS=“-H tcp://0.0.0.0:2375 -H unix:///var/run/docker.sock”

2.添加http访问
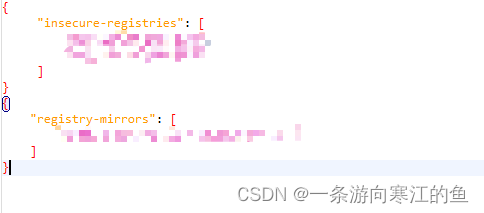
由于我们私库使用的时http而不是https ,故需要在启动参数文件中设置。
文件地址:/etc/docker/daemon.json(如果该路径下没有daemon.json文件需要自己创建一个)
添加内容:docker hosted类型仓库地址 ip:端口号
{
	"insecure-registries": [
    	    "ip:端口号"
    	]
}
开放2375端口
firewall-cmd --zone=public --add-port=2375/tcp --permanent
systemctl restart firewalld
重启docker
systemctl daemon-reload
systemctl restart docker
登录验证
docker login -u登录私库的用户名 -p密码 ip:端口号
在登录需要输入登录用户名及密码,即为你的nexus3的登录用户名及密码
输出Login Succeeded即登录成功

上传镜像
可以尝试将自己服务器上的镜像上传的nexus
标记要上传的镜像为私有仓库镜像;
docker tag 镜像名称:版本号(这里也可以是镜像id) 私库ip:端口号/镜像名称:版本号
例如:
docker tag mongo:latest 192.168.0.xx:8083/mongo:latest
上传镜像
docker push 192.168.0.xx:8083/mongo:latest
登录nexus网页查看上传镜像:
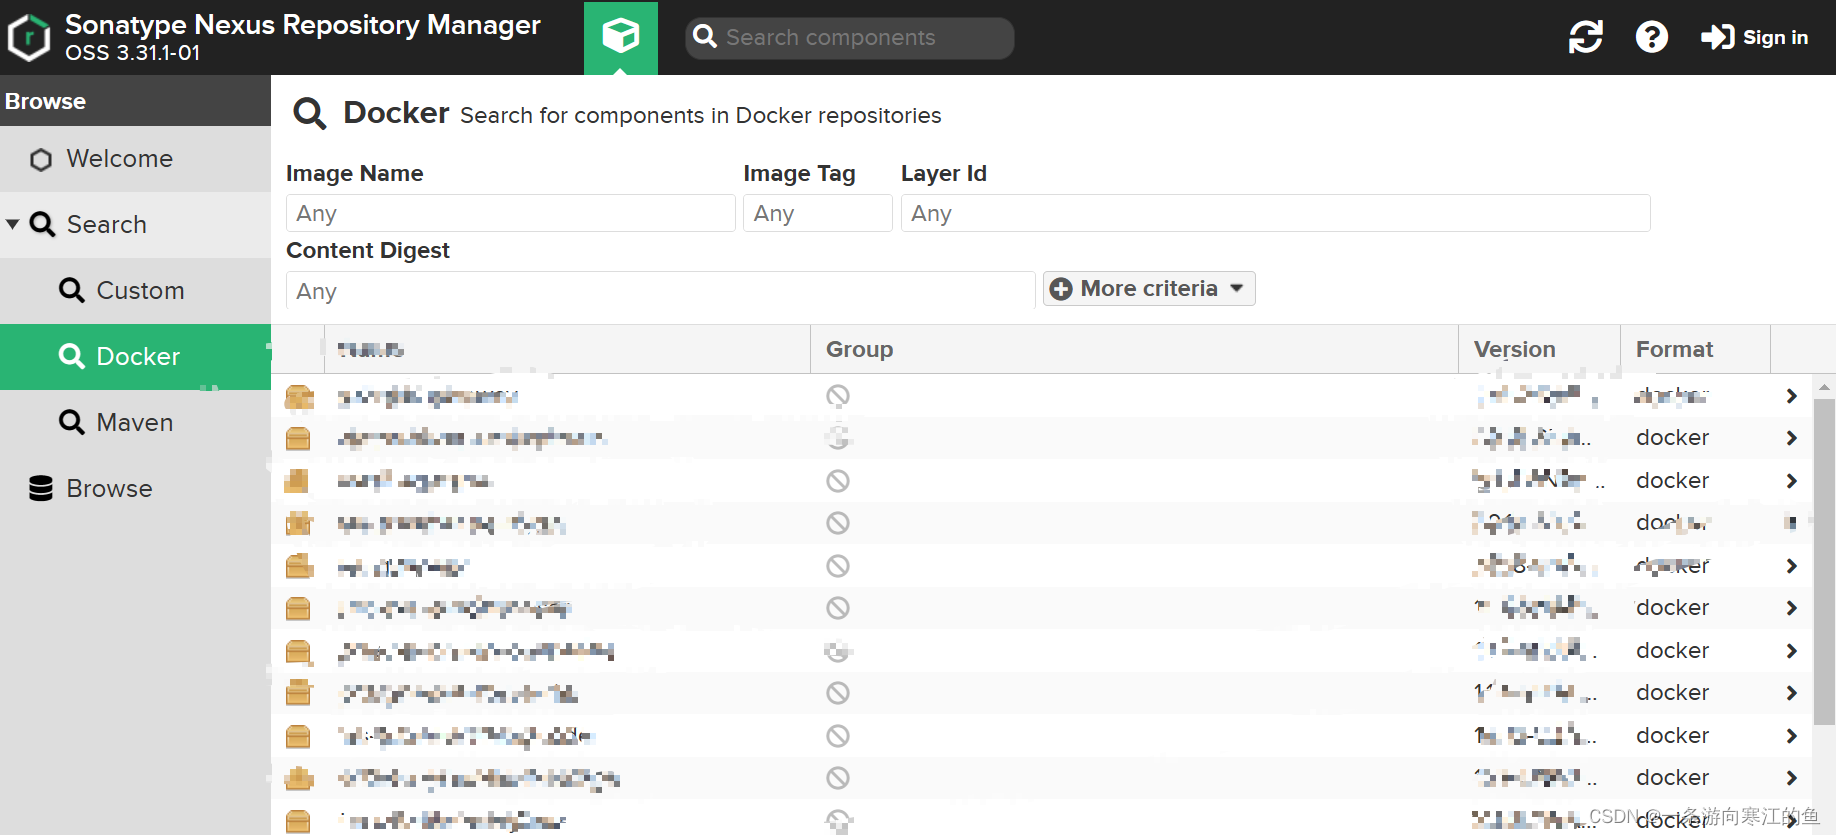
仓库类型说明:
group:这是一个仓库聚合的概念,用户仓库地址选择 Group 的地址,即可访问 Group 中配置的,用于方便开发人员自己设定的仓库。
maven-public 就是一个 Group 类型的仓库,内部设置了多个仓库,访问顺序取决于配置顺序,3.x 默认为 Releases、Snapshots、Central,当然你也可以自己设置。
hosted:私有仓库,内部项目的发布仓库,专门用来存储我们自己生成的 jar 文件
snapshots:本地项目的快照仓库
releases: 本地项目发布的正式版本
proxy:代理类型,从远程中央仓库中寻找数据的仓库(可以点击对应的仓库的 Configuration 页签下, Remote Storage 属性的值即被代理的远程仓库的路径),如可配置阿里云 maven 仓库
central:中央仓库
二. 项目配置
1.写dockerfile文件
在跟resources文件下添加Dockerfile文件(不是必须在resources下)
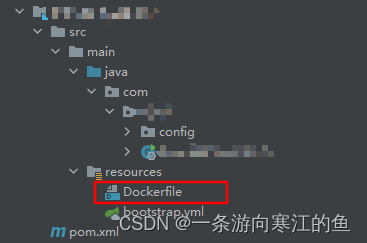
Dockerfile文件内容
FROM openjdk:11
MAINTAINER xxx

# 在主机 /var/lib/docker目录下创建一个临时文件,并链接到容器的 /tmp
VOLUME /tmp
#
# 将jar包添加到容器中,并命名为 test.jar
ADD test-1.0.jar test.jar
# 指定nacos的命名空间和运行环境
ENV SPRING_CLOUD_NACOS_CONFIG_NAMESPACE='xxx'
ENV SPRING_PROFILES_ACTIVE='xxx'
# 运行jar包
ENTRYPOINT java -Xms128m -Xmx128m -Dspring.cloud.nacos.config.server-addr=xxx:8848  -Dspring.cloud.nacos.config.namespace=${SPRING_CLOUD_NACOS_CONFIG_NAMESPACE}  -Dspring.cloud.nacos.config.username=xxx -Dspring.cloud.nacos.config.password=xxx -Dspring.cloud.nacos.config.file-extension=yaml -Dspring.profiles.active=${SPRING_PROFILES_ACTIVE} -jar test.jar
# 设置时区
RUN /bin/cp /usr/share/zoneinfo/Asia/Shanghai /etc/localtime && echo 'Asia/Shanghai' >/etc/timezone

# SpringBoot项目配置的端口号为9999,需要将9999暴露出去
EXPOSE 9999
dockerfile文件关键字介绍
| 关键字 | 作用 | 备注 |
|---|---|---|
| FROM | 指定父镜像 | 指定dockerfile基于那个image构建 |
| MAINTAINER | 作者信息 | 用来标明这个dockerfile谁写的 |
| LABEL | 标签 | 用来标明dockerfile的标签 可以使用Label代替Maintainer 最终都是在docker image基本信息中可以查看 |
| RUN | 执行命令 | 执行一段命令 默认是/bin/sh 格式: RUN command 或者 RUN [“command” , “param1”,“param2”] |
| CMD | 容器启动命令 | 提供启动容器时候的默认命令 和ENTRYPOINT配合使用.格式 CMD command param1 param2 或者 CMD [“command” , “param1”,“param2”] |
| ENTRYPOINT | 入口 | 一般在制作一些执行就关闭的容器中会使用 |
| COPY | 复制文件 | build的时候复制文件到image中 |
| ADD | 添加文件 | build的时候添加文件到image中 不仅仅局限于当前build上下文 可以来源于远程服务 |
| ENV | 环境变量 | 指定build时候的环境变量 可以在启动的容器的时候 通过-e覆盖 格式ENV name=value |
| ARG | 构建参数 | 构建参数 只在构建的时候使用的参数 如果有ENV 那么ENV的相同名字的值始终覆盖arg的参数 |
| VOLUME | 定义外部可以挂载的数据卷 | 指定build的image那些目录可以启动的时候挂载到文件系统中 启动容器的时候使用 -v 绑定 格式 VOLUME [“目录”] |
| EXPOSE | 暴露端口 | 定义容器运行的时候监听的端口 启动容器的使用-p来绑定暴露端口 格式: EXPOSE 8080 或者 EXPOSE 8080/udp |
| WORKDIR | 工作目录 | 指定容器内部的工作目录 如果没有创建则自动创建 如果指定/ 使用的是绝对地址 如果不是/开头那么是在上一条workdir的路径的相对路径 |
| USER | 指定执行用户 | 指定build或者启动的时候 用户 在RUN CMD ENTRYPONT执行的时候的用户 |
| HEALTHCHECK | 健康检查 | 指定监测当前容器的健康监测的命令 基本上没用 因为很多时候 应用本身有健康监测机制 |
| ONBUILD | 触发器 | 当存在ONBUILD关键字的镜像作为基础镜像的时候 当执行FROM完成之后 会执行 ONBUILD的命令 但是不影响当前镜像 用处也不怎么大 |
| STOPSIGNAL | 发送信号量到宿主机 | 该STOPSIGNAL指令设置将发送到容器的系统调用信号以退出。 |
| SHELL | 指定执行脚本的shell | 指定RUN CMD ENTRYPOINT 执行命令的时候 使用的shell |
2.配置不同环境的服务器
在父pom中设置不同环境服务器
 <?xml version="1.0" encoding="UTF-8"?>
<project xmlns="http://maven.apache.org/POM/4.0.0" xmlns:xsi="http://www.w3.org/2001/XMLSchema-instance"
         xsi:schemaLocation="http://maven.apache.org/POM/4.0.0 https://maven.apache.org/xsd/maven-4.0.0.xsd">
    <profiles>
        <profile>
            <!--不同环境Profile的唯一id-->
            <id>dev</id>
            <properties>
                <!--profiles.active是自定义的字段(名字随便起),自定义字段可以有多个-->
                <profiles.active>dev</profiles.active>
            </properties>
        </profile>
        <profile>
            <id>prod</id>
            <properties>
                <profiles.active>prod</profiles.active>
                <docker-url>http://生产服务器ip:2375</docker-url>
            </properties>
        </profile>
        <profile>
            <id>test</id>
            <properties>
                <profiles.active>test</profiles.active>
                <docker-url>http://测试服务器ip:2375</docker-url>
            </properties>
            <!--设置默认为测试环境-->
            <activation>
                <activeByDefault>true</activeByDefault>
            </activation>
        </profile>
    </profiles>
 </project>
在子pom.xml中进行详细的配置
<?xml version="1.0" encoding="UTF-8"?>
<project xmlns="http://maven.apache.org/POM/4.0.0"
         xmlns:xsi="http://www.w3.org/2001/XMLSchema-instance"
         xsi:schemaLocation="http://maven.apache.org/POM/4.0.0 http://maven.apache.org/xsd/maven-4.0.0.xsd">
    <parent>
        <artifactId>test</artifactId>
        <groupId>com.xxx</groupId>
        <version>1.0</version>
    </parent>
    <modelVersion>4.0.0</modelVersion>

    <artifactId>prosper-provider-user</artifactId>

    <properties>
        <maven.compiler.source>11</maven.compiler.source>
        <maven.compiler.target>11</maven.compiler.target>
        <prosper-common.version>1.1.4-SNAPSHOT</prosper-common.version>
        <!--nexus3 hosted 仓库地址-->
        <registry-url>nexus服务器地址:8083</registry-url>
    </properties>

    <dependencies>
    </dependencies>
    <build>
        <finalName>${project.artifactId}-${project.parent.version}</finalName>
        <plugins>
            <plugin>
                <groupId>org.springframework.boot</groupId>
                <artifactId>spring-boot-maven-plugin</artifactId>
            </plugin>
            <plugin>
                <groupId>com.spotify</groupId>
                <artifactId>docker-maven-plugin</artifactId>
                <version>1.2.2</version>
                <configuration>
                    <dockerHost>${docker-url}</dockerHost>
                    <imageName>${registry-url}/${project.artifactId}:${project.version}</imageName>
                    <!--nexus3 hosted 仓库地址-->
                    <registryUrl>${registry-url}</registryUrl>
                    <!-- 在生成图像后将其推入的标志。默认为false -->
                    <pushImage>true</pushImage>
                    <imageTags>
                        <!-- 指定镜像标签,可以排至多个标签 -->
                        <imageTag>${project.version}</imageTag>
                    </imageTags>
                    <!--是否强制覆盖已有镜像-->
                    <forceTags>true</forceTags>
                    <!--方式一:1、指定Dockerfile文件所在目录,通过文件执行打包上传nexus私服-->
                    <dockerDirectory>src/main/resources</dockerDirectory>
                    <!-- 指定docker镜像打包参数,即dockerfile中使用的参数,通过${参数名}取值 -->
                    <buildArgs>
                        <JAR_FILE>${project.build.finalName}.jar</JAR_FILE>
                    </buildArgs>
                    <resources>
                        <resource>
                            <targetPath>/</targetPath>
                            <!--指定需要复制的根目录,${project.build.directory}表示target目录-->
                            <directory>${project.build.directory}</directory>
                            <!--用于指定需要复制的文件,${project.build.finalName}.jar表示打包后的jar包文件-->
                            <include>${project.build.finalName}.jar</include>
                        </resource>
                    </resources>
                    <!--登录nexus私库的用户,具体可看第三步maven settings文件的配置-->
                    <serverId>docker-local</serverId>
                </configuration>
            </plugin>
        </plugins>
    </build>

</project>
3.修改maven settings.xml文件的配置
添加service和pluginGroups
<?xml version="1.0" encoding="UTF-8"?>
<settings xmlns="http://maven.apache.org/SETTINGS/1.2.0"
		  xmlns:xsi="http://www.w3.org/2001/XMLSchema-instance"
		  xsi:schemaLocation="http://maven.apache.org/SETTINGS/1.2.0 https://maven.apache.org/xsd/settings-1.2.0.xsd">

	<!-- 本地仓库地址 -->
	<localRepository>D:\project\maven\repository</localRepository>

    <!--当插件的组织Id(groupId)没有显式提供时,供搜寻插件组织Id(groupId)的列表。该元素包含一个pluginGroup元素列表,每个子元素包含了一个组织Id(groupId)。当我们使用某个插件,并且没有在命令行为其提供组织Id(groupId)的时候,Maven就会使用该列表。默认情况下该列表包含了org.apache.maven.plugins和org.codehaus.mojo -->
	<pluginGroups>
		<pluginGroup>com.spotify</pluginGroup>
	</pluginGroups>

	<proxies>
	</proxies>
	<servers>
		<server>

    		<!--这是server的id(注意不是用户登陆的id),该id与distributionManagement中repository元素的id相匹配。-->
			<id>docker-local</id>
			 <!--鉴权用户名。鉴权用户名和鉴权密码表示服务器认证所需要的登录名和密码。 -->
			<username>用户名</username>
			<!--鉴权密码 。鉴权用户名和鉴权密码表示服务器认证所需要的登录名和密码。密码加密功能已被添加到2.1.0 +。详情请访问密码加密页面-->
		    <password>密码</password>
	    </server>
	</servers>
	<mirrors>
		<!--阿里云镜像 -->
		<!--     <mirror>
            <id>alimaven</id>
            <mirrorOf>central</mirrorOf>
              <name>aliyun maven</name>
              <url>http://maven.aliyun.com/nexus/content/groups/public/</url>
          </mirror> -->
	</mirrors>
	<profiles>
		<!--版本设置 -->
		<profile>
			<id>jdk-11</id>
			<activation>
				<activeByDefault>true</activeByDefault>
				<jdk>11</jdk>
			</activation>
			<properties>
				<maven.compiler.source>11</maven.compiler.source>
				<maven.compiler.target>11</maven.compiler.target>
				<maven.compiler.compilerVersion>11</maven.compiler.compilerVersion>
			</properties>
		</profile>
	</profiles>
</settings>
4.运行命令
#不指定环境参数 默认是test
mvn clean package docker:build
#用-P指定环境参数
mvn clean package docker:build -Pprod
在指定地址和的服务器上查看镜像是否存在
docker images
在nexus的仓库中查看是否已经存在相应的镜像

ensp;在服务器上写容器启动命令
docker run -d --name 容器名 -p 端口号:端口号 --network=host -e SPRING_CLOUD_NACOS_CONFIG_NAMESPACE='xxx' -e SPRING_PROFILES_ACTIVE='xxx' -v /home/admin/logs:/logs --restart=always nexus服务器ip:端口号/镜像名称:镜像版本号
容器启动命令常用参数
● --name:为容器指定一个名称
● -d:后台运行容器并返回容器ID,也即启动守护式容器
● -i:以交互模式(interactive)运行容器,通常与-t同时使用
● -t:为容器重新分配一个伪输入终端(tty),通常与-i同时使用。也即启动交互式容器(前台有伪终端,等待交互)
● -e:为容器添加环境变量
● -P:随机端口映射。将容器内暴露的所有端口映射到宿主机随机端口
● -p:指定端口映射
● --network:指定docker容器的网络
● --restart=always:docker服务启动时容器自启动
容器启动后查看正在运行的容器
docker ps
常用参数:
● -a:列出当前所有正在运行的容器+历史上运行过的容器
● -l:显示最近创建的容器
● -n:显示最近n个创建的容器
● -q:静默模式,只显示容器编号
三. jenkins配置
1.新建maven项目
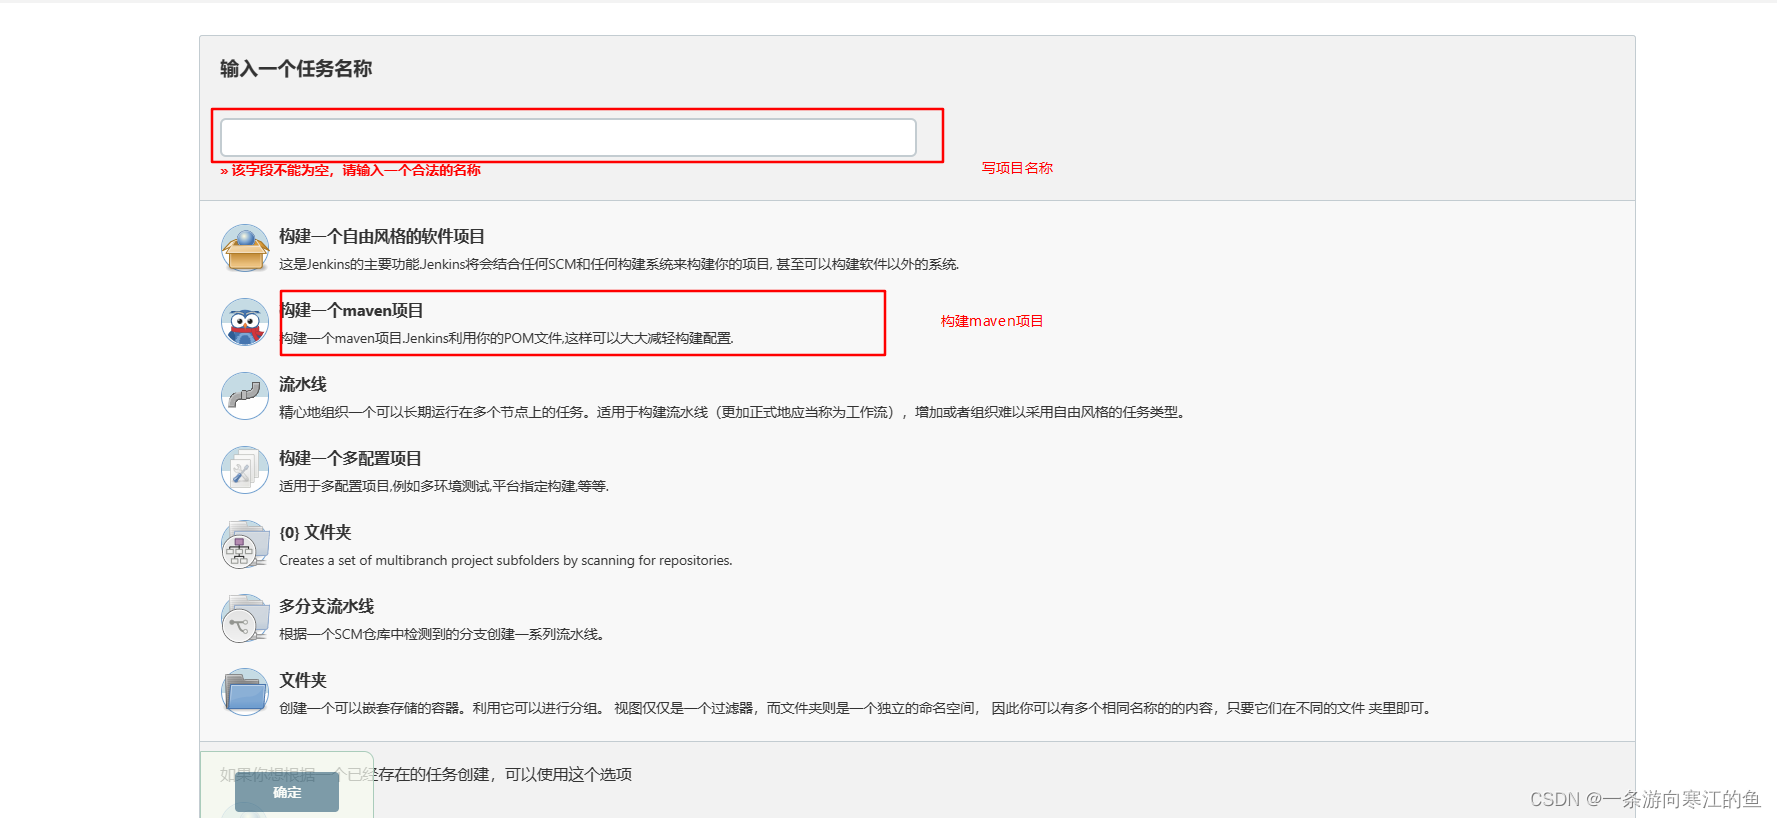
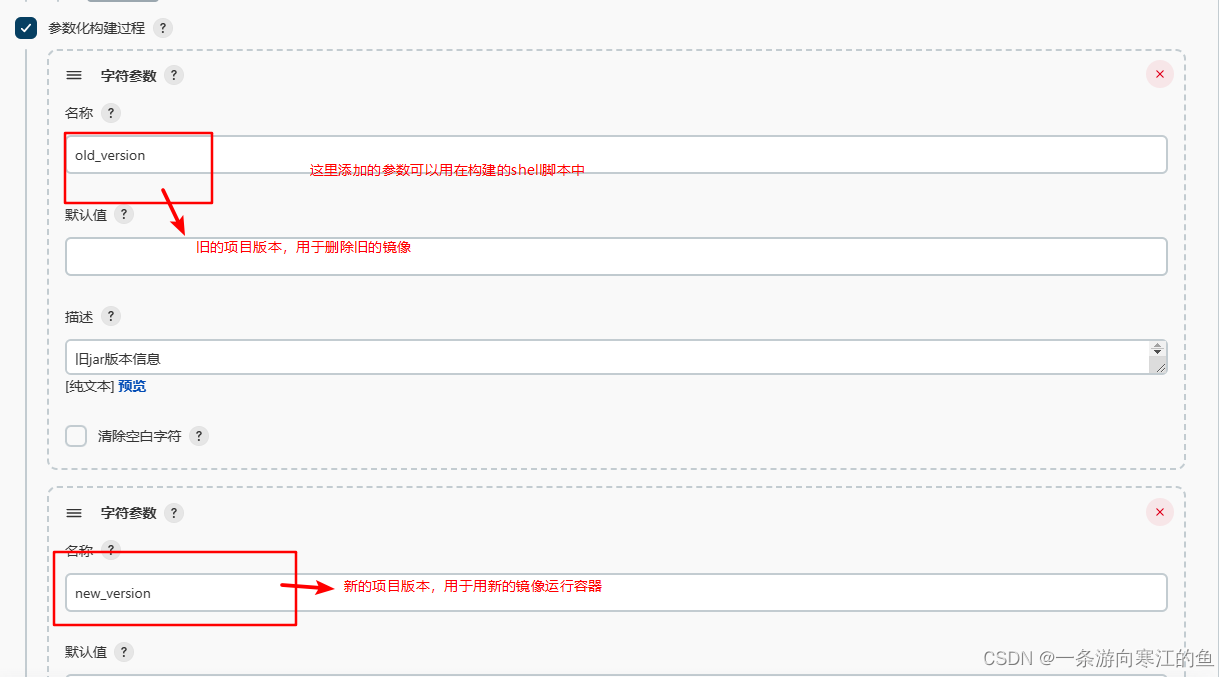
2.添加参数构建项目
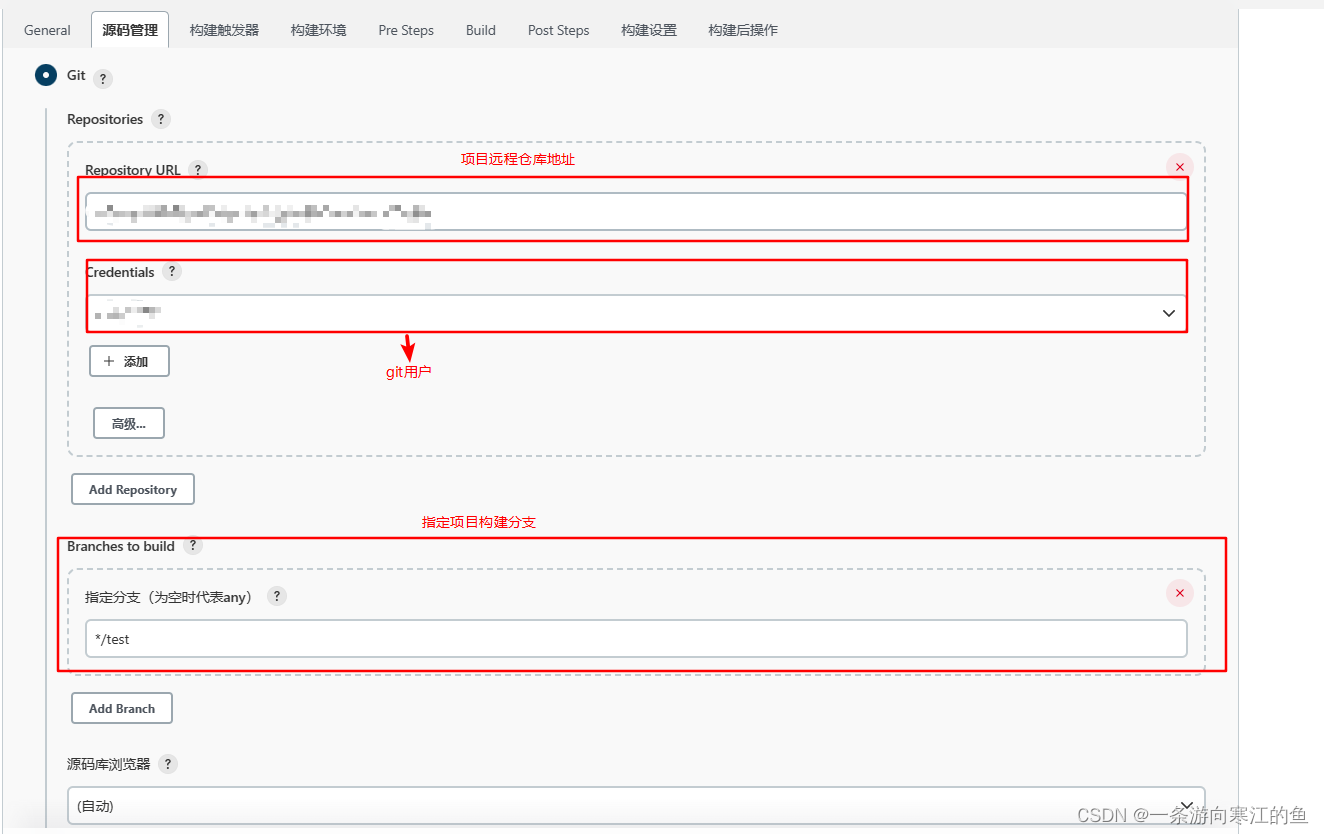
3.配置git,从git仓库拉取选定分支的代码
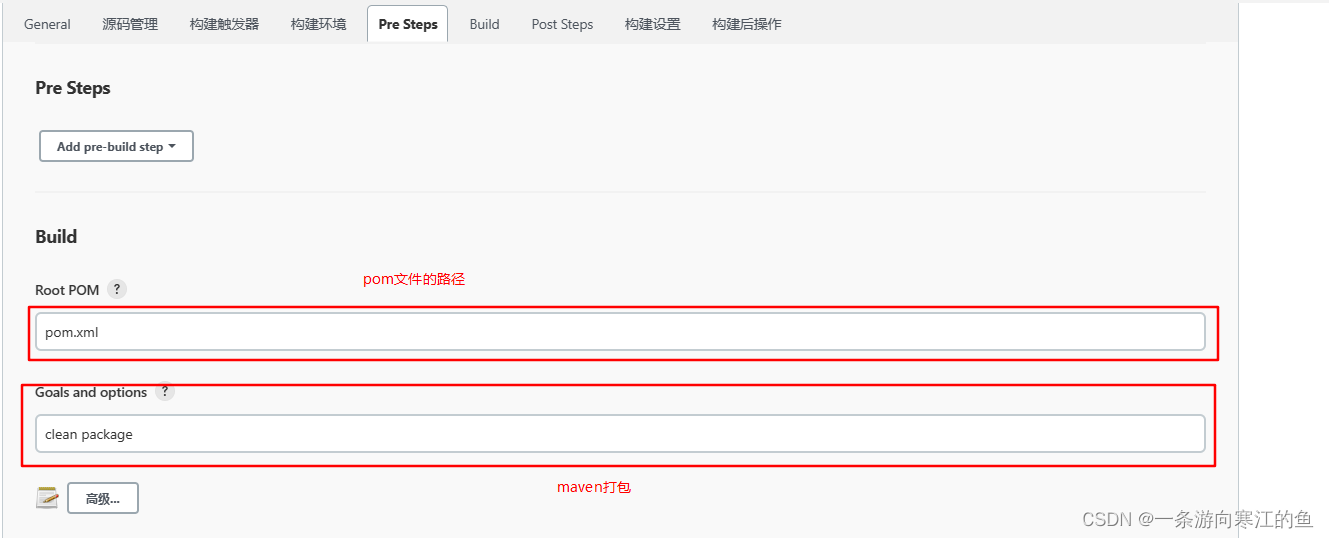
4.配置maven
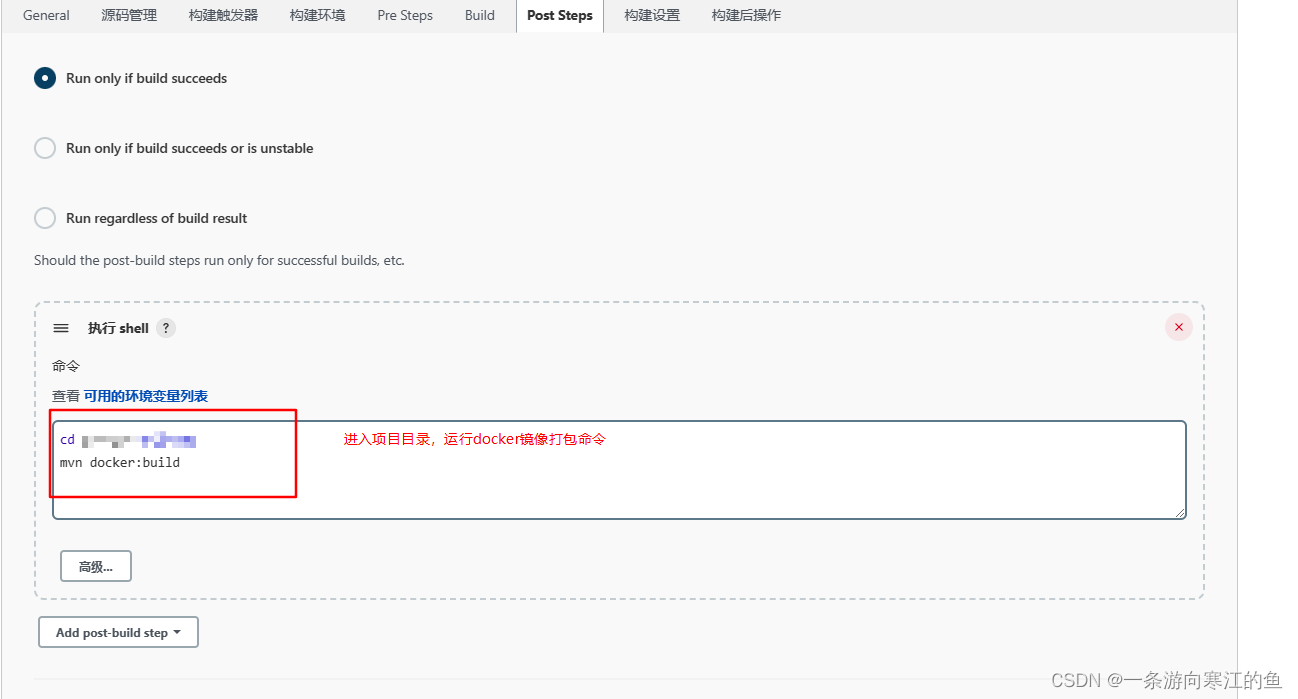
5.配置maven打包docker镜像的命令
5.构建后在指定的服务器上运行shell脚本
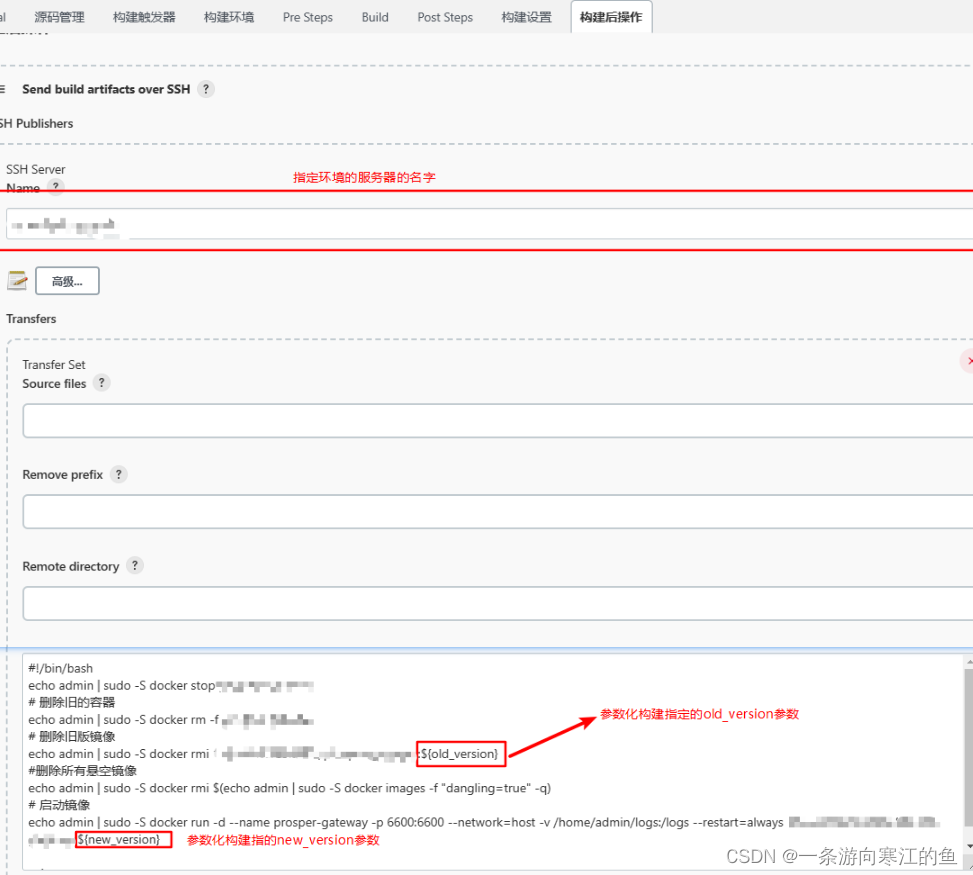
shell命令内容
#!/bin/bash
echo admin | sudo -S docker stop 容器名字
# 删除旧的容器
echo admin | sudo -S docker rm -f 容器名字
# 删除旧版镜像
echo admin | sudo -S docker rmi nexus私库ip:端口号/镜像名称:${old_version}
#删除所有悬空镜像
echo admin | sudo -S docker rmi $(echo admin | sudo -S docker images -f "dangling=true" -q)
# 启动镜像
echo admin | sudo -S docker run -d --name 容器名字 -p 6600:6600 --network=host -v /home/admin/logs:/logs --restart=always nexus私库ip:端口号/镜像名称:${new_version}
保存配置
6.构建任务

6.构建任务

构建成功后,可在服务器上查看镜像和容器的情况

