什么是MCP
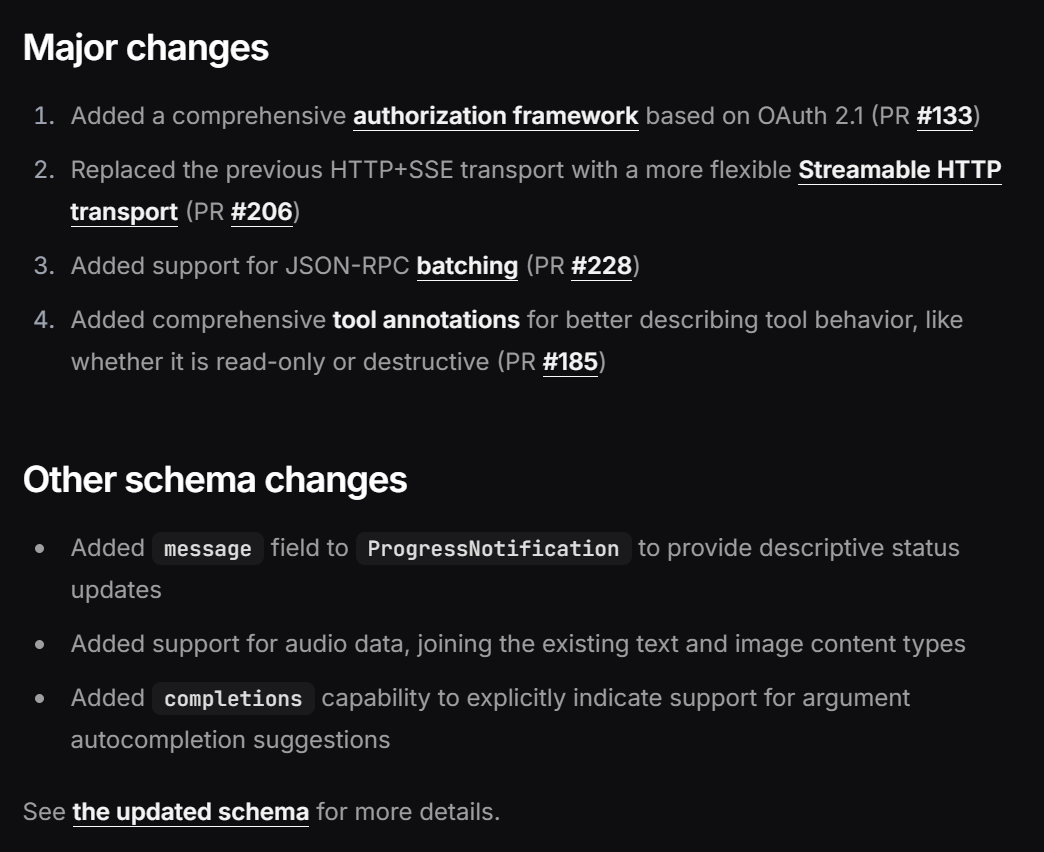
Model Control Protocol(MCP)是由AI研究机构Anthropic在2023年第二季度首次提出的新型协议规范,旨在解决大语言模型LLM应用中的上下文管理难题。作为LLM交互领域的创新标准,MCP协议在发布后短短一年内已进行了多次更新,最近一次更新是在2025-03-26(Key Changes - Model Context Protocol),包含 添加了一个基于 OAuth 2.1 的全面的授权框架 等内容变更:
协议定义与核心价值
MCP是一套开放式的通信协议,它通过标准化:
- 上下文结构化表示(JSON Schema)
- 多轮对话状态跟踪机制
- 模型控制指令集
使开发者能够精准控制LLM的上下文窗口,解决传统对话系统中存在的:
- 上下文丢失(Context Bleeding)
- 指令冲突
- 长文本处理低效等痛点
成熟度
目前MCP已被Claude系列模型原生支持,并在Llama 3、Mistral等开源模型中实现兼容。行业分析显示,超过43%的企业级LLM应用已开始采用MCP作为首选上下文管理方案(数据来源:2024 ML Stack调查报告)。
MCP的目标对象
刚开始接触MCP的开发者可能会进入一个误区,以为有了MCP后,LLM是不是可以直接调用MCP Server的能力(API)了,其实并不是,LLM实际上是无法感知MCP的存在的。
MCP(Model Control Protocol)的核心目标对象是LLM应用开发者,而不是LLM(大语言模型)本身。要理解这一点,我们需要明确LLM和LLM应用的区别:
1. LLM vs. LLM应用
- LLM(大语言模型):指底层的大模型(如GPT-4、Claude、Llama等),它们负责接收输入并生成文本输出,但本身不具备复杂的状态管理或上下文控制能力。
- LLM应用:指基于LLM构建的完整系统,如聊天机器人、AI助手、代码生成工具等。这些应用需要管理多轮对话、维护上下文、处理用户指令,并可能集成外部数据或API。
2. 为什么LLM不能直接使用MCP
LLM本身是“无状态”的——它们仅对当前输入做出响应,而不会自动记住之前的交互。MCP的作用是让LLM应用能更高效地管理上下文,例如:
- 维护对话历史(避免超出模型的上下文窗口限制)
- 动态调整提示词(prompt),确保LLM获得正确的背景信息
- 控制模型行为(如切换模式、调整生成参数)
MCP协议定义了一套标准化的接口,让LLM应用能以结构化的方式与LLM交互,而不是让LLM自己去解析或执行这些逻辑。
MCP作为外部协议而非模型内置机制,还有两大更关键原因:
-
训练成本问题:若MCP逻辑固化到LLM中,协议每次更新都需重新训练模型,带来极高的计算和迭代成本;
-
安全与权限挑战:若LLM直接通过MCP调用三方应用,权限管理(如数据访问、API鉴权)将难以控制,增加滥用风险。
因此,MCP设计为应用层协议,由外部系统管理上下文和资源,既保持LLM的通用性,又避免强耦合带来的运维负担。
3. MCP的目标用户
MCP主要面向:
- LLM应用开发者:需要构建复杂对话系统或AI代理的工程师
- AI平台架构师:设计LLM基础设施,优化上下文管理和推理效率
- 企业级AI解决方案:需要稳定、可扩展的LLM交互协议
简而言之,MCP不是让LLM自己“学会”管理上下文,而是为LLM应用提供一套标准化的控制机制,使开发者能更高效地构建可靠的AI系统。
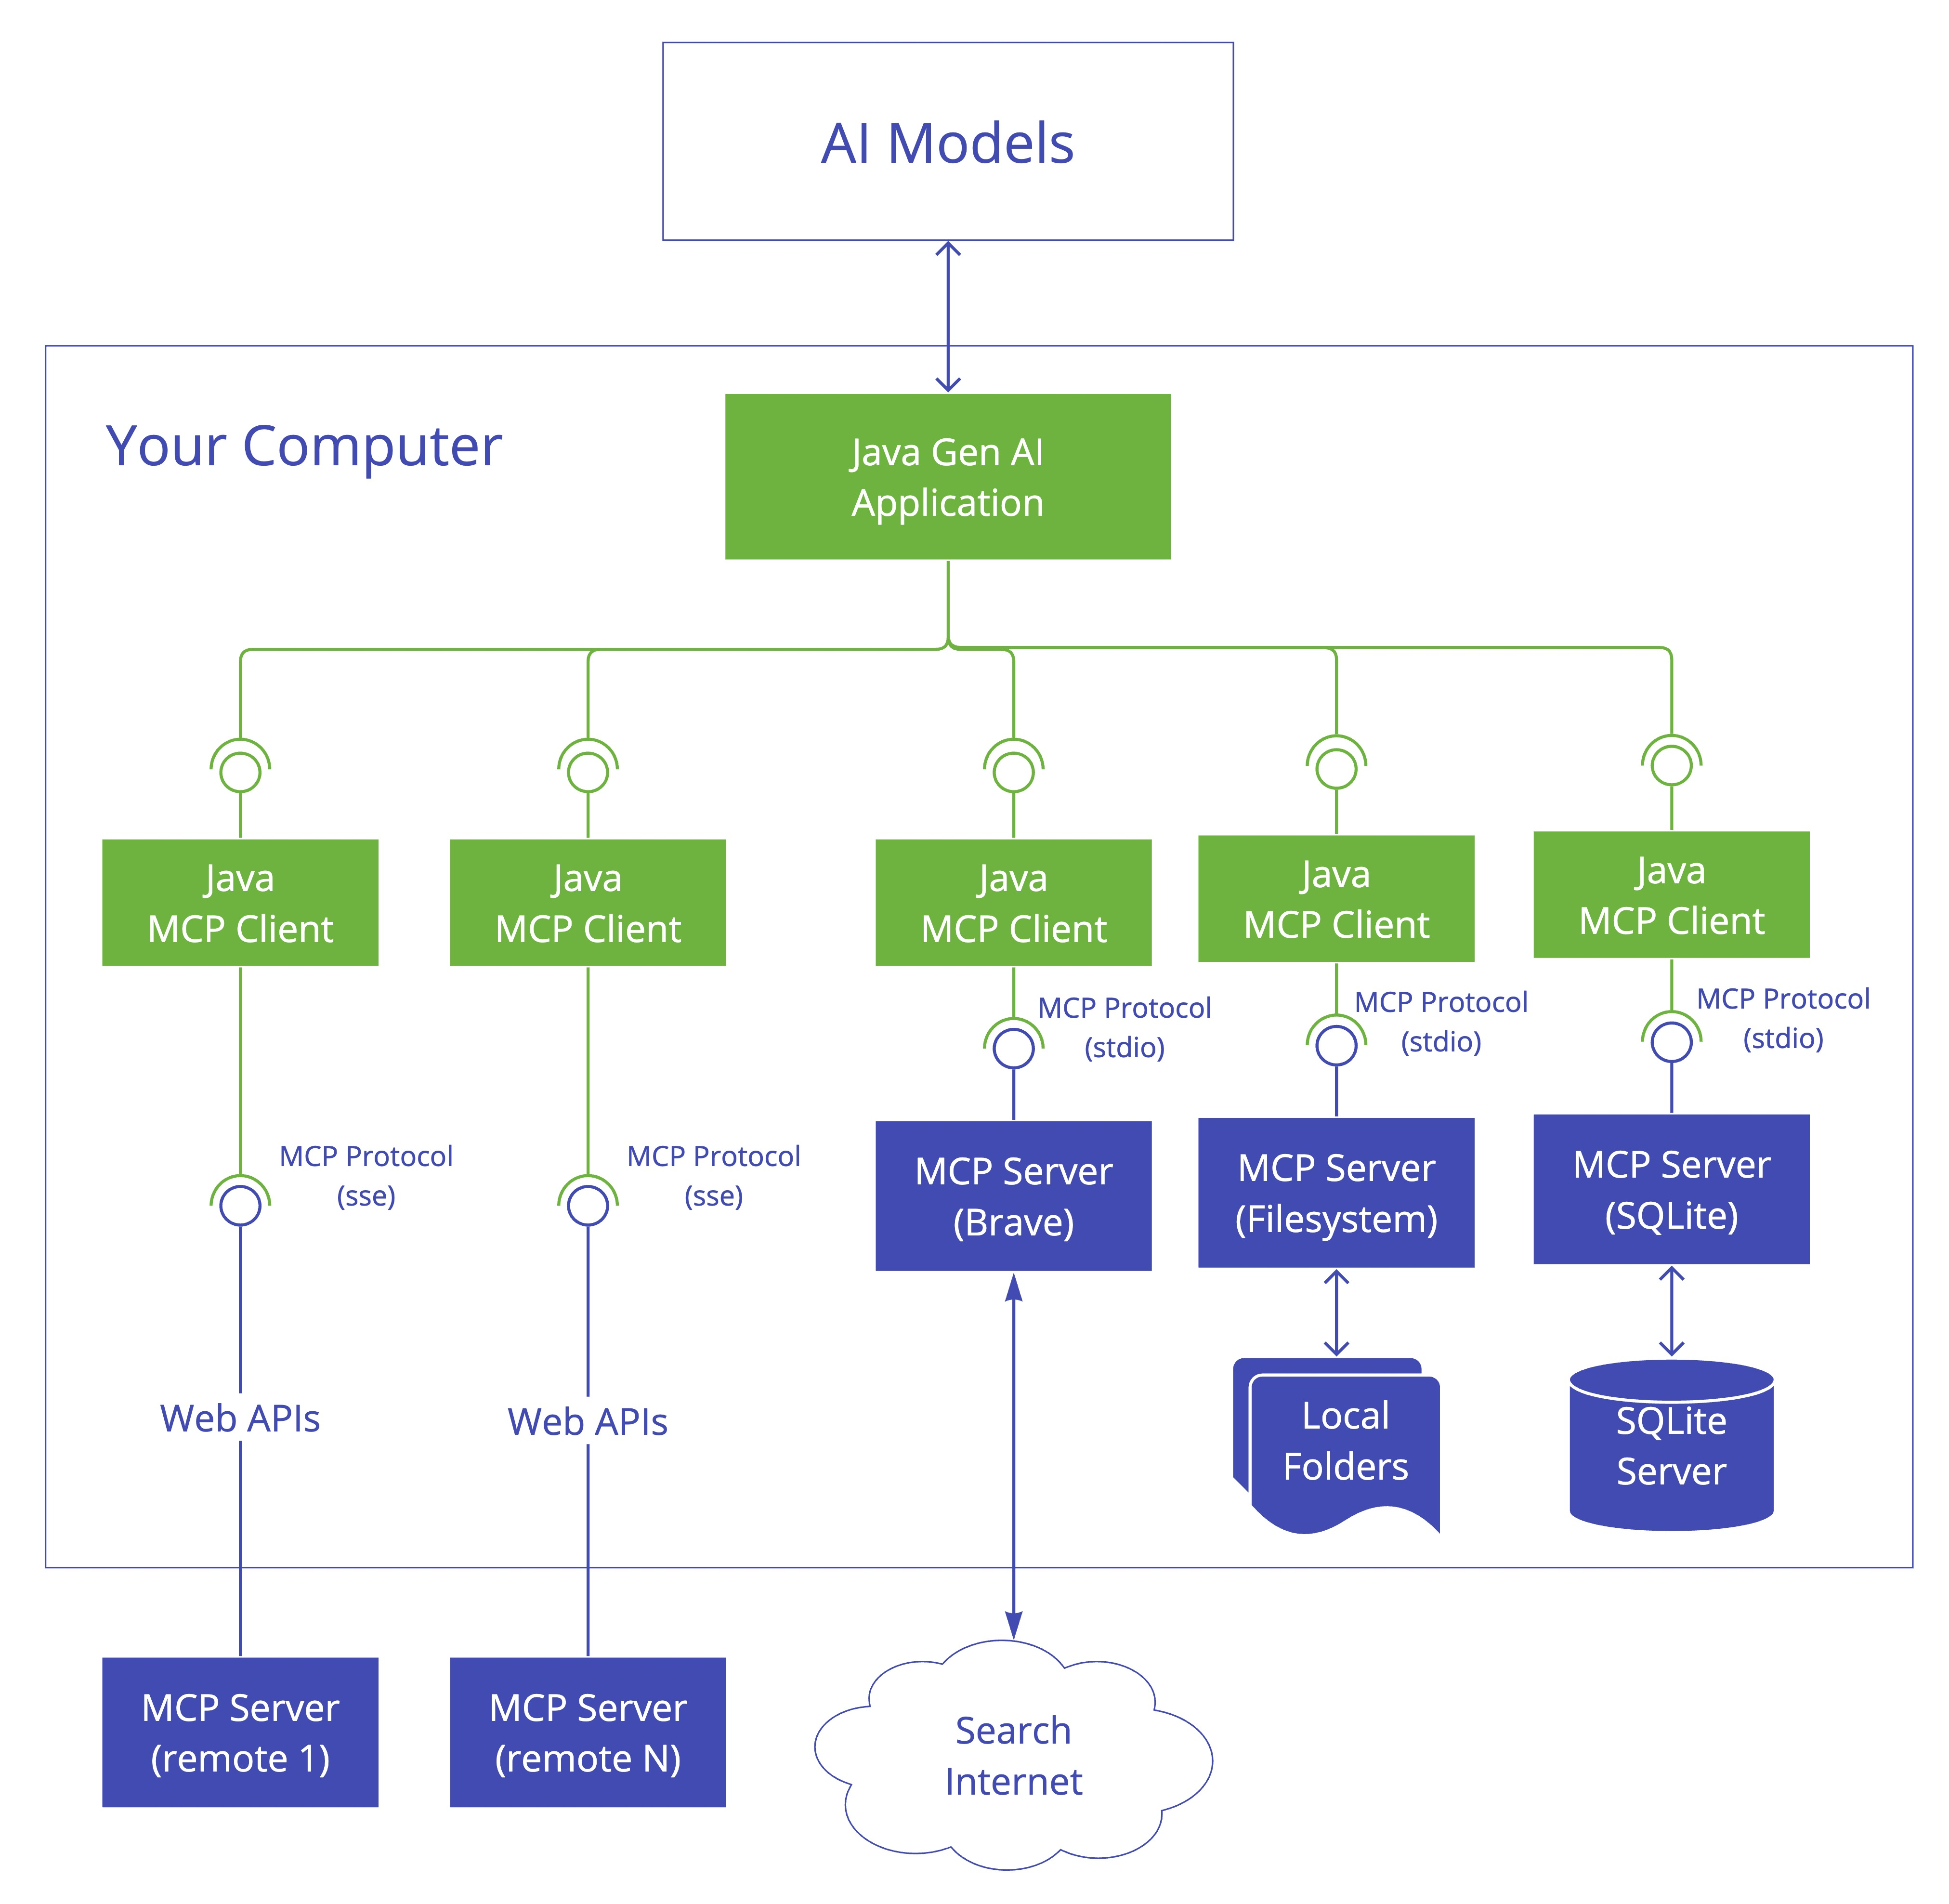
MCP的主要角色和架构
MCP最核心的两个角色就是MCP客户端和MCP服务端。参见:Model Context Protocol (MCP) :: Spring AI Reference
MCP Client
MCP 客户端是模型上下文协议 (MCP) 架构中的关键组件,负责建立和管理与 MCP 服务器的连接。对,你没听错,MCP体系中,客户端才是最复杂的,而且通常这个客户端也是由服务端应用(也就是前面说的LLM应用)来“使用”。
它实现了协议的客户端功能,处理以下操作:
- 协议版本协商以确保与服务器的兼容性
- 能力协商以确定可用功能
- 消息传输和 JSON-RPC 通信
- 工具发现和执行
- 资源访问和管理
- 提示系统交互
- 可选功能:
- 根部管理
- 采样支持
- 同步和异步操作
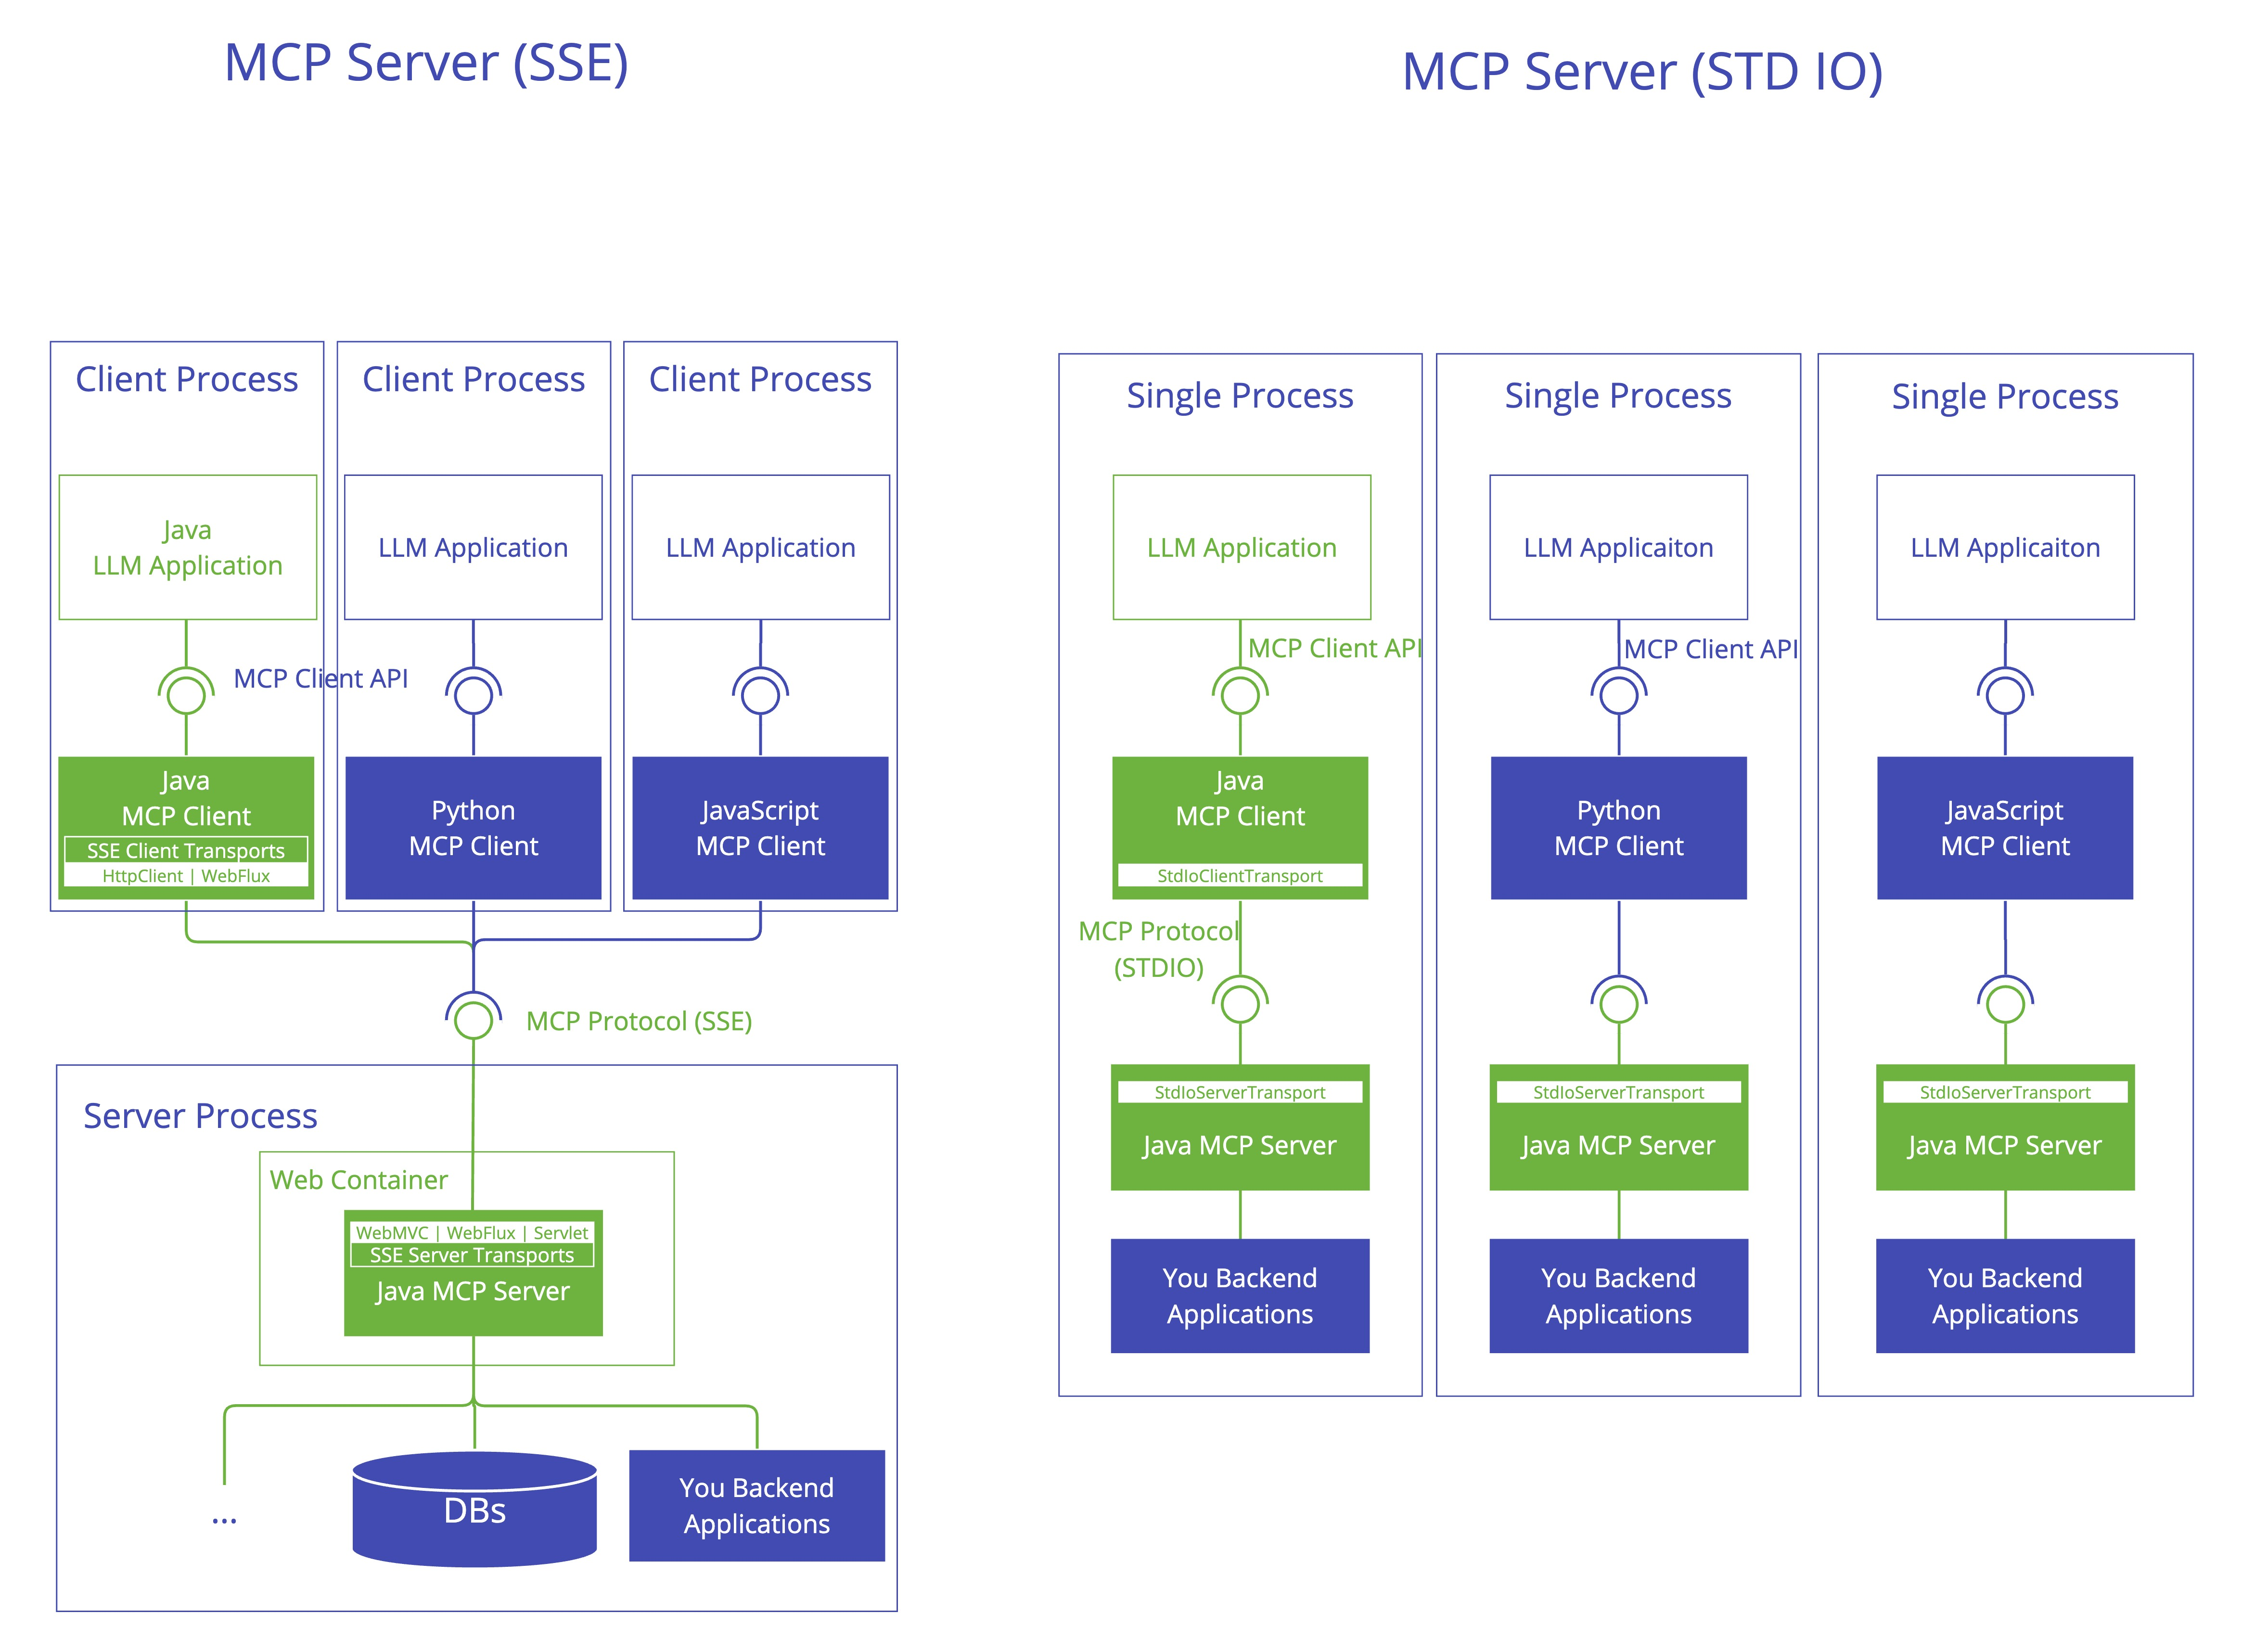
- 通信选择:
- 基于 Stdio 的传输,用于基于进程的通信
- 基于 SSE 客户端传输
你可以看到,通常是MCP客户端在“调用” LLM 和 MCP服务端 。
MCP Server
MCP 服务器是模型上下文协议 (MCP) 架构中的基础组件,为客户端提供:
- 资源:上下文和数据,供用户或 AI 模型使用。它们通常是 只读的,AI 模型可以读取资源数据,但不会直接修改或执行它们,所以一般是指数据库查询。
- 提示:为用户提供模板化的消息和工作流程
- 工具:AI模型执行的功能。它们通常是 动态的、有副作用的(如修改数据、发送消息、触发操作),所以一般是指AI调用。
它实现了协议的服务器端,负责:
-
服务器端协议操作实现
-
工具曝光和发现
-
基于 URI 访问的资源管理
-
及时提供和处理模板
-
与客户进行能力谈判
-
结构化日志记录和通知
-
-
并发客户端连接管理
-
同步和异步 API 支持
-
通信实施:
-
基于 Stdio 的传输,用于基于进程的通信
-
基于 SSE 服务器传输
-
通常来说MCP服务器是不直接使用LLM的(当然,如果你这个MCP服务器也是另一些MCP服务器的MCP客户端时也有可能需要直接使用LLM),它通常是我们常见的一个个业务系统。
这里需要特殊说明的是如果MCP客户端和MCP服务器是部署在一起的,那么可以使用Stdio( Standard Input/Output(标准输入/输出) 的缩写,指计算机程序与外部环境(如终端、文件或其他程序)进行数据交互的标准方式。它是操作系统提供的基础通信机制,几乎所有编程语言都支持 stdio 操作)的方式来进行通信。
一言以蔽之
通过MCP的角色、架构分析,大家应该有所感知,MCP就是通过定义一套标准协议,同时标准化通过LLM来使用应用能力来解决我们之前直接使用LLM去编排Function Call难度大、复杂度高以及效率低的问题。
实战:构建MCP客户端和服务器(for Java)
说的再多都是虚的,得眼见为实,这里我们通过构建两个Spring应用来演示如何在本地来使用MCP。Spring框架早已提供对调用LLM能力的封装:Spring AI API :: Spring AI Reference,这里我们就使用Spring框架来构建MCP客户端和MCP服务器。
构建MCP服务器
MCP服务器相对比较简单,它负责把业务功能封装成一个个原子能力,供MCP客户端来使用,新建一个Maven项目mcp-server,pom.xml如下:
<?xml version="1.0" encoding="UTF-8"?>
<project xmlns="http://maven.apache.org/POM/4.0.0" xmlns:xsi="http://www.w3.org/2001/XMLSchema-instance"
         xsi:schemaLocation="http://maven.apache.org/POM/4.0.0 https://maven.apache.org/xsd/maven-4.0.0.xsd">
    <modelVersion>4.0.0</modelVersion>
    <parent>
        <groupId>com.manzhizhen.mcp</groupId>
        <artifactId>mcp-study</artifactId>
        <version>0.0.1-SNAPSHOT</version>
    </parent>

    <artifactId>mcp-server</artifactId>
    <version>0.0.1-SNAPSHOT</version>
    <packaging>jar</packaging>
    <name>mcp-server</name>
    <description>Demo project for mcp</description>

    <properties>
        <java.version>21</java.version>
        <spring-ai.version>1.0.0-M7</spring-ai.version>
    </properties>
    <dependencies>
        <dependency>
            <groupId>org.springframework.ai</groupId>
            <artifactId>spring-ai-starter-mcp-server-webmvc</artifactId>
        </dependency>
        <dependency>
            <groupId>org.projectlombok</groupId>
            <artifactId>lombok</artifactId>
            <optional>true</optional>
        </dependency>
        <dependency>
            <groupId>ch.qos.logback</groupId>
            <artifactId>logback-classic</artifactId>
        </dependency>
        <dependency>
            <groupId>org.springframework.boot</groupId>
            <artifactId>spring-boot-starter-test</artifactId>
            <scope>test</scope>
        </dependency>
    </dependencies>

</project>
这里和常规的Spring Boot项目不同的是加了spring-ai的依赖,而且我们计划使用SSE来进行通信(Stdio方式生产不常用):
        <dependency>
            <groupId>org.springframework.ai</groupId>
            <artifactId>spring-ai-starter-mcp-server-webmvc</artifactId>
        </dependency>
接着,我们Copy官方的天气预报例子,构建一个通过经纬度查询天气预报(getWeatherForecastByLocation),另一个通过美国州代码来查询天气预报的接口(getAlerts),注意,这属于上面提到的MCP服务器提供的“工具Tool”类型。
我们先通过 org.springframework.ai.tool.annotation.Tool 注解完成工具的定义(参考 https://github.com/spring-projects/spring-ai-examples/tree/main/model-context-protocol/weather/starter-webmvc-server/src/main/java/org/springframework/ai/mcp/sample/server):
import com.fasterxml.jackson.annotation.JsonIgnoreProperties;
import com.fasterxml.jackson.annotation.JsonProperty;
import lombok.extern.slf4j.Slf4j;
import org.springframework.ai.tool.annotation.Tool;
import org.springframework.ai.tool.annotation.ToolParam;
import org.springframework.stereotype.Service;
import org.springframework.web.client.RestClient;
import org.springframework.web.client.RestClientException;

import java.util.List;
import java.util.Map;
import java.util.stream.Collectors;

@Slf4j
@Service
public class WeatherService {

    private final RestClient restClient;

    public WeatherService() {
        this.restClient = RestClient.builder()
                .baseUrl("https://api.weather.gov")
                .defaultHeader("Accept", "application/geo+json")
                .defaultHeader("User-Agent", "WeatherApiClient/1.0 (835576511@qq.com)")
                .build();
    }

    /**
     * Get forecast for a specific latitude/longitude
     * @param latitude Latitude
     * @param longitude Longitude
     * @return The forecast for the given location
     * @throws RestClientException if the request fails
     */
    @Tool(description = "Get weather forecast for a specific latitude/longitude")
    public String getWeatherForecastByLocation(
            double latitude,   // Latitude coordinate
            double longitude   // Longitude coordinate
    ) {
        log.info("Fetching forecast for coordinates: {}, {}", latitude, longitude);
        var points = restClient.get()
                .uri("/points/{latitude},{longitude}", latitude, longitude)
                .retrieve()
                .body(Points.class);

        var forecast = restClient.get().uri(points.properties().forecast()).retrieve().body(Forecast.class);

        String forecastText = forecast.properties().periods().stream().map(p -> {
            return String.format("""
                            %s:
                            Temperature: %s %s
                            Wind: %s %s
                            Forecast: %s
                            """, p.name(), p.temperature(), p.temperatureUnit(), p.windSpeed(), p.windDirection(),
                    p.detailedForecast());
        }).collect(Collectors.joining());

        return forecastText;
    }

    /**
     * Get alerts for a specific area
     * @param state Area code. Two-letter US state code (e.g. CA, NY)
     * @return Human readable alert information
     * @throws RestClientException if the request fails
     */
    @Tool(description = "Get weather alerts for a US state")
    public String getAlerts(
            @ToolParam(description = "Two-letter US state code (e.g. CA, NY)") String state) {

        log.info("Fetching alerts for state: {}", state);

        Alert alert = restClient.get().uri("/alerts/active/area/{state}", state).retrieve().body(Alert.class);

        return alert.features()
                .stream()
                .map(f -> String.format("""
					Event: %s
					Area: %s
					Severity: %s
					Description: %s
					Instructions: %s
					""", f.properties().event(), f.properties.areaDesc(), f.properties.severity(),
                        f.properties.description(), f.properties.instruction()))
                .collect(Collectors.joining("\n"));
    }


    @JsonIgnoreProperties(ignoreUnknown = true)
    public record Points(@JsonProperty("properties") Props properties) {
        @JsonIgnoreProperties(ignoreUnknown = true)
        public record Props(@JsonProperty("forecast") String forecast) {
        }
    }

    @JsonIgnoreProperties(ignoreUnknown = true)
    public record Forecast(@JsonProperty("properties") Props properties) {
        @JsonIgnoreProperties(ignoreUnknown = true)
        public record Props(@JsonProperty("periods") List<Period> periods) {
        }

        @JsonIgnoreProperties(ignoreUnknown = true)
        public record Period(@JsonProperty("number") Integer number, @JsonProperty("name") String name,
                             @JsonProperty("startTime") String startTime, @JsonProperty("endTime") String endTime,
                             @JsonProperty("isDaytime") Boolean isDayTime,
                             @JsonProperty("temperature") Integer temperature,
                             @JsonProperty("temperatureUnit") String temperatureUnit,
                             @JsonProperty("temperatureTrend") String temperatureTrend,
                             @JsonProperty("probabilityOfPrecipitation") Map probabilityOfPrecipitation,
                             @JsonProperty("windSpeed") String windSpeed,
                             @JsonProperty("windDirection") String windDirection,
                             @JsonProperty("icon") String icon, @JsonProperty("shortForecast") String shortForecast,
                             @JsonProperty("detailedForecast") String detailedForecast) {
        }
    }

    @JsonIgnoreProperties(ignoreUnknown = true)
    public record Alert(@JsonProperty("features") List<Feature> features) {

        @JsonIgnoreProperties(ignoreUnknown = true)
        public record Feature(@JsonProperty("properties") Properties properties) {
        }

        @JsonIgnoreProperties(ignoreUnknown = true)
        public record Properties(@JsonProperty("event") String event, @JsonProperty("areaDesc") String areaDesc,
                                 @JsonProperty("severity") String severity,
                                 @JsonProperty("description") String description,
                                 @JsonProperty("instruction") String instruction) {
        }
    }
}
@Tool是 Spring AI 项目中的一个注解,用于将 Java 方法标记为可由 AI 模型(如 OpenAI、Azure OpenAI 或其他支持的 AI 服务)调用的工具(Tool)。它的主要作用是将你的方法暴露给 MCP客户端,使它够动态调用这些方法来完成特定任务。其中 @Tool 完成方法整体的功能描述,而@ToolParam 可以进一步完成参数的说明,如果你参数名足够清晰,也可以不用加@ToolParam。
同时在我们的Spring Boot启动类中增加ToolCallbackProvider,这样才能真正把Tool暴露出去给MCP Client调用:
import lombok.extern.slf4j.Slf4j;
import org.springframework.ai.tool.ToolCallbackProvider;
import org.springframework.ai.tool.method.MethodToolCallbackProvider;
import org.springframework.boot.SpringApplication;
import org.springframework.boot.autoconfigure.SpringBootApplication;
import org.springframework.context.annotation.Bean;

@Slf4j
@SpringBootApplication
public class McpServerApplication {

	public static void main(String[] args) {
		log.info("McpServerApplication 启动啦");
		SpringApplication.run(McpServerApplication.class, args);
	}

	/**
	 * Tools
	 * Allows servers to expose tools that can be invoked by language models.
	 * The auto-configuration will automatically register the tool callbacks as MCP tools.
	 * You can have multiple beans producing ToolCallbacks. The auto-configuration will merge them.
	 * @param weatherService
	 * @return
	 */
	@Bean
	public ToolCallbackProvider weatherTools(WeatherService weatherService) {
		return  MethodToolCallbackProvider.builder().toolObjects(weatherService).build();
	}
}
细心的朋友会发现,前面不是说有Stdio和SSE两种方式来暴露吗?目前看代码上没有体现?其实前面在pom.xml中我们依赖的spring-ai-starter-mcp-server-webmvc里面就依赖了:
        <dependency>
            <groupId>org.springframework.boot</groupId>
            <artifactId>spring-boot-starter-web</artifactId>
        </dependency>
这里面就支持了SSE的实现,我们只需要在application.yml配置文件中配置一下即可:
server:
  port: 8090

spring:
  application:
    name: mcp-server
  main:
    banner-mode: off
  ai:
    mcp:
      server:
        name: mcp-server
        version: 1.0.0
        type: SYNC
        sse-message-endpoint: /mcp/messages
这里的 sse-message-endpoint 就是配置SSE的path。注意这里暴露的是8090端口。到这里,一个简单的MCP Server就构建完成了。
构建MCP客户端
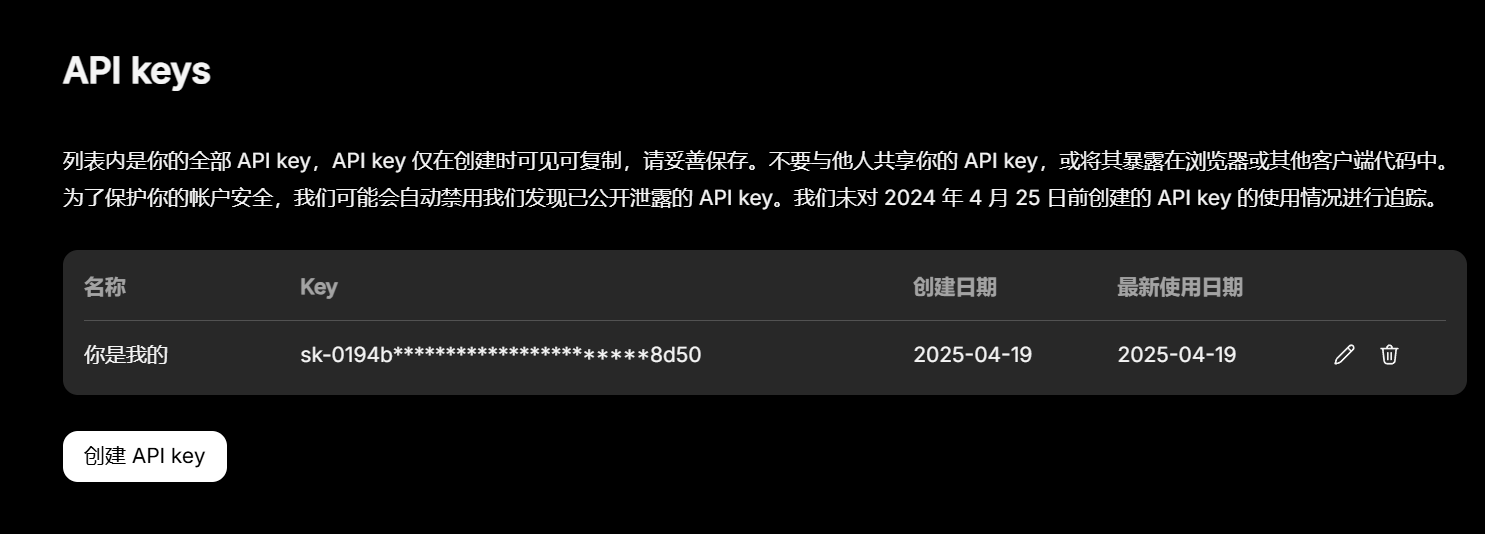
前面说过通常MCP客户端是需要使用LLM的,这里我们首选DeepSeek,然后在DeepSeek开放平台官网创建Api Keys 再充10块钱,这样你就有了可用DeepSeek Api Key了:
同样,我们建一个Maven项目叫做mcp-client,pom.xml配置如下:
<project xmlns="http://maven.apache.org/POM/4.0.0" xmlns:xsi="http://www.w3.org/2001/XMLSchema-instance"
         xsi:schemaLocation="http://maven.apache.org/POM/4.0.0 http://maven.apache.org/xsd/maven-4.0.0.xsd">
    <modelVersion>4.0.0</modelVersion>
    <parent>
        <groupId>com.manzhizhen.mcp</groupId>
        <artifactId>mcp-study</artifactId>
        <version>0.0.1-SNAPSHOT</version>
    </parent>

    <artifactId>mcp-client</artifactId>
    <version>0.0.1-SNAPSHOT</version>
    <packaging>jar</packaging>

    <name>mcp-client</name>

    <properties>
        <project.build.sourceEncoding>UTF-8</project.build.sourceEncoding>
        <java.version>22</java.version>
    </properties>

    <dependencies>
        <dependency>
            <groupId>org.springframework.ai</groupId>
            <artifactId>spring-ai-starter-mcp-client</artifactId>
        </dependency>
        <dependency>
            <groupId>org.springframework.boot</groupId>
            <artifactId>spring-boot-starter-web</artifactId>
        </dependency>
        <dependency>
            <groupId>org.springframework.ai</groupId>
            <artifactId>spring-ai-starter-model-openai</artifactId>
        </dependency>
        <dependency>
            <groupId>org.projectlombok</groupId>
            <artifactId>lombok</artifactId>
            <optional>true</optional>
        </dependency>
        <dependency>
            <groupId>ch.qos.logback</groupId>
            <artifactId>logback-classic</artifactId>
        </dependency>
        <dependency>
            <groupId>junit</groupId>
            <artifactId>junit</artifactId>
            <version>3.8.1</version>
            <scope>test</scope>
        </dependency>
        <dependency>
            <groupId>com.google.guava</groupId>
            <artifactId>guava</artifactId>
            <version>33.3.1-jre</version>
            <scope>compile</scope>
        </dependency>
    </dependencies>
</project>
其中和其他项目不同的是我们依赖了:
        <dependency>
            <groupId>org.springframework.ai</groupId>
            <artifactId>spring-ai-starter-mcp-client</artifactId>
        </dependency>
        <dependency>
            <groupId>org.springframework.ai</groupId>
            <artifactId>spring-ai-starter-model-openai</artifactId>
        </dependency>
一个是为了支持mcp-client,一个是为了支持我们调用DeepSeek。由于只是做一个简单的演示,我们决定使用IDEA的控制台作为输入,来当做一个天气预报咨询平台。我们只需要修改启动类即可:
import io.modelcontextprotocol.client.McpSyncClient;
import lombok.extern.slf4j.Slf4j;
import org.springframework.ai.chat.client.ChatClient;
import org.springframework.ai.tool.ToolCallbackProvider;
import org.springframework.boot.CommandLineRunner;
import org.springframework.boot.SpringApplication;
import org.springframework.boot.autoconfigure.SpringBootApplication;
import org.springframework.context.ConfigurableApplicationContext;
import org.springframework.context.annotation.Bean;

import java.util.List;
import java.util.Scanner;


@Slf4j
@SpringBootApplication
public class McpClientSseApplication {

	public static void main(String[] args) {
		SpringApplication.run(McpClientSseApplication.class, args);
	}


	@Bean
	public CommandLineRunner interactiveChatRunner(
			ChatClient.Builder chatClientBuilder,
			ToolCallbackProvider tools,
			ConfigurableApplicationContext context
	) {
		return args -> {
			var chatClient = chatClientBuilder
					.defaultTools(tools)
					.build();

			Scanner scanner = new Scanner(System.in); // 用于读取控制台输入

			System.out.println("=== 聊天模式已启动(输入 'exit' 退出) ===");

			while (true) {
				System.out.print("\n>>> 你的问题: ");
				String userInput = scanner.nextLine().trim();

				// 输入 "exit" 退出聊天
				if ("exit".equalsIgnoreCase(userInput)) {
					System.out.println(">>> 聊天结束,程序退出。");
					break;
				}

				// 空输入则跳过
				if (userInput.isEmpty()) {
					continue;
				}

				// 调用 AI 并打印回复
				System.out.println("\n>>> AI 回复: " + chatClient.prompt(userInput).call().content());
			}

			context.close(); // 关闭 Spring 上下文
		};
	}
}
可以看到,为了能不断的在控制台提问,我们写了一个while循环,当你输入exit才退出。
这里有一个关键,就是不管我们mcp-client连接了多少个mcp-server以及使用了多少个mcp-server的能力(例如Tool),我们都不需要去太关心细节,一行代码“chatClient.prompt(userInput).call().content()”就搞定,mcp内置的库类会去调用AI来根据你的问题“合理”的使用mcp-server提供的一个或者多个能力来完成任务,之前用Function Call可没有这么丝滑。
对,mcp-client修改这一个类即可,接下来我们配置下application.yml:
spring:
  application:
    name: mcp-client
  ai:
    mcp:
      client:
        toolcallback:
          enabled: true
        enabled: true
        name: my-mcp-client
        version: 1.0.0
        request-timeout: 30s
        type: SYNC  # or ASYNC for reactive applications
        sse:
          connections:
            server1:
              url: http://localhost:8090

    openai:
      api-key: 这里填写你的DeepSeek api key
      base-url: https://api.deepseek.com
      chat:
        options:
          model: deepseek-chat
          temperature: 0.7
      embedding:
        enabled: false
可以看到,我们最重要的是要配置mcp-server的地址(这里由于mcp-server和mcp-client部署在一起,所以用的是localhost)以及我们的openai的类型和对于的api key。到这里,整个mcp-client示例我们也写完了。
看看效果
先运行mcp-server,再运行mcp-client,如果启动都没问题,那么我们在mcp-client的控制台可以进行天气预报咨询了:
>>> 你的问题: 帮我查下 纬度 (lat): 40.7128,经度 (lon): -74.0060 的天气

>>> AI 回复: 以下是纬度 40.7128,经度 -74.0060 的天气预报:

### 今天
- **温度**: 80°F
- **风速**: 10 到 23 mph,西南风
- **预报**: 上午8点前可能有零星小雨,随后可能有零星阵雨和雷暴。部分晴天,最高气温接近80°F。西南风10至23 mph,阵风高达39 mph。降水概率20%。

### 今晚
- **温度**: 57°F
- **风速**: 15 到 22 mph,西风
- **预报**: 凌晨2点前可能有零星阵雨和雷暴。大部分多云,最低气温约57°F,夜间气温升至62°F左右。西风15至22 mph,阵风高达38 mph。降水概率20%。

### 周日
- **温度**: 63°F
- **风速**: 15 到 20 mph,西北风
- **预报**: 大部分晴天,最高气温接近63°F。西北风15至20 mph。

...
可以看到我的问题携带了经纬度,所以最终是mcp-server的WeatherService#getWeatherForecastByLocation 被调用了。
>>> 你的问题: 美国 WA 州 天气预报

>>> AI 回复: 以下是美国华盛顿州(WA)的天气预报:

### 今晚
- **温度**: 44°F
- **风速**: 9 mph 西北风
- **预报**: 多云,最低气温约44°F。西北风约9 mph,阵风高达22 mph。

### 周六
- **温度**: 54°F
- **风速**: 9至13 mph 西北风
- **预报**: 大部分晴天,最高气温约54°F,下午气温降至约52°F。西北风9至13 mph,阵风高达29 mph。

### 周六晚
- **温度**: 38°F
- **风速**: 10 mph 西北风
- **预报**: 部分多云,最低气温约38°F。西北风约10 mph,阵风高达28 mph。

...
这个问题很明显想引导mcp-client去使用mcp-server的WeatherService#getAlerts,但由于getAlerts没有查到华盛顿州的数据,所以mcp-client最终通过DeepSeek拿到华盛顿州的经纬度47.7511, -120.7401 去调用了getWeatherForecastByLocation方法,真聪明!!!
总结
欢迎加作者WX sugarmq 一起来探讨技术话题。