NodeBB写入方案
前言
最近在整理以前记录的碎片笔记,想把它们汇总到NodeBB中,方便管理和浏览。但是笔记内容有点多,并且用发帖的形式写到NodeBB中会丢失时间信息,因此整理了一套NodeBB写入方案,大致流程如下:
- 建立标准笔记格式
- 导出原始笔记,并编写脚本将笔记内容转换为标准格式
- 本地搭建NodeBB,修改时间戳相关字段,使得可以进行时间戳写入
- 在本地NodeBB写入标准笔记内容
- 将本地笔记内容导出,并在云端进行恢复
注:本帖仅适用于纯文本的笔记带时间写入NodeBB
1、标准笔记格式
关键API字段(NodeBB开发文档)
create a new topic/post:https://try.nodebb.org/api/v3/topics/{tid}
get a topic/get:https://try.nodebb.org/api/v3/topics/{tid}
reply to a topic/post:https://try.nodebb.org/api/v3/topics/{tid}
get a post/get:https://try.nodebb.org/api/v3/posts/{pid}
edit a post/put:https://try.nodebb.org/api/v3/posts/{pid}
关键字段及生成规则
标题(title):帖子标题,可为空
正文(content):帖子正文内容,笔记的核心部分,不可为空
时间(time):帖子的创建时间,格式为2025-04-08 15:32:00,拼接已知时间和当前时间,为空时默认当前时间,避免时间戳重复
时间戳(timestamp):帖子创建时间的时间戳,格式为1744097860750毫秒级时间戳,根据time字段自动生成
标签(tags):帖子标签,格式为标签1,标签2,...,中间使用英文逗号分隔,可为空
话题(topic):帖子所属话题,自定义生成,可为空
分类(category):话题所属类别,自定义生成,可为空
{
"title": "...",
"content": "...",
"raw_content": "...",
"time": "2021-07-13 04:27:59",
"timestamp": 1626121679512,
"tags": "..., ..., ...",
"topic": "...",
"category": "..."
}
2、笔记导出及格式标准化
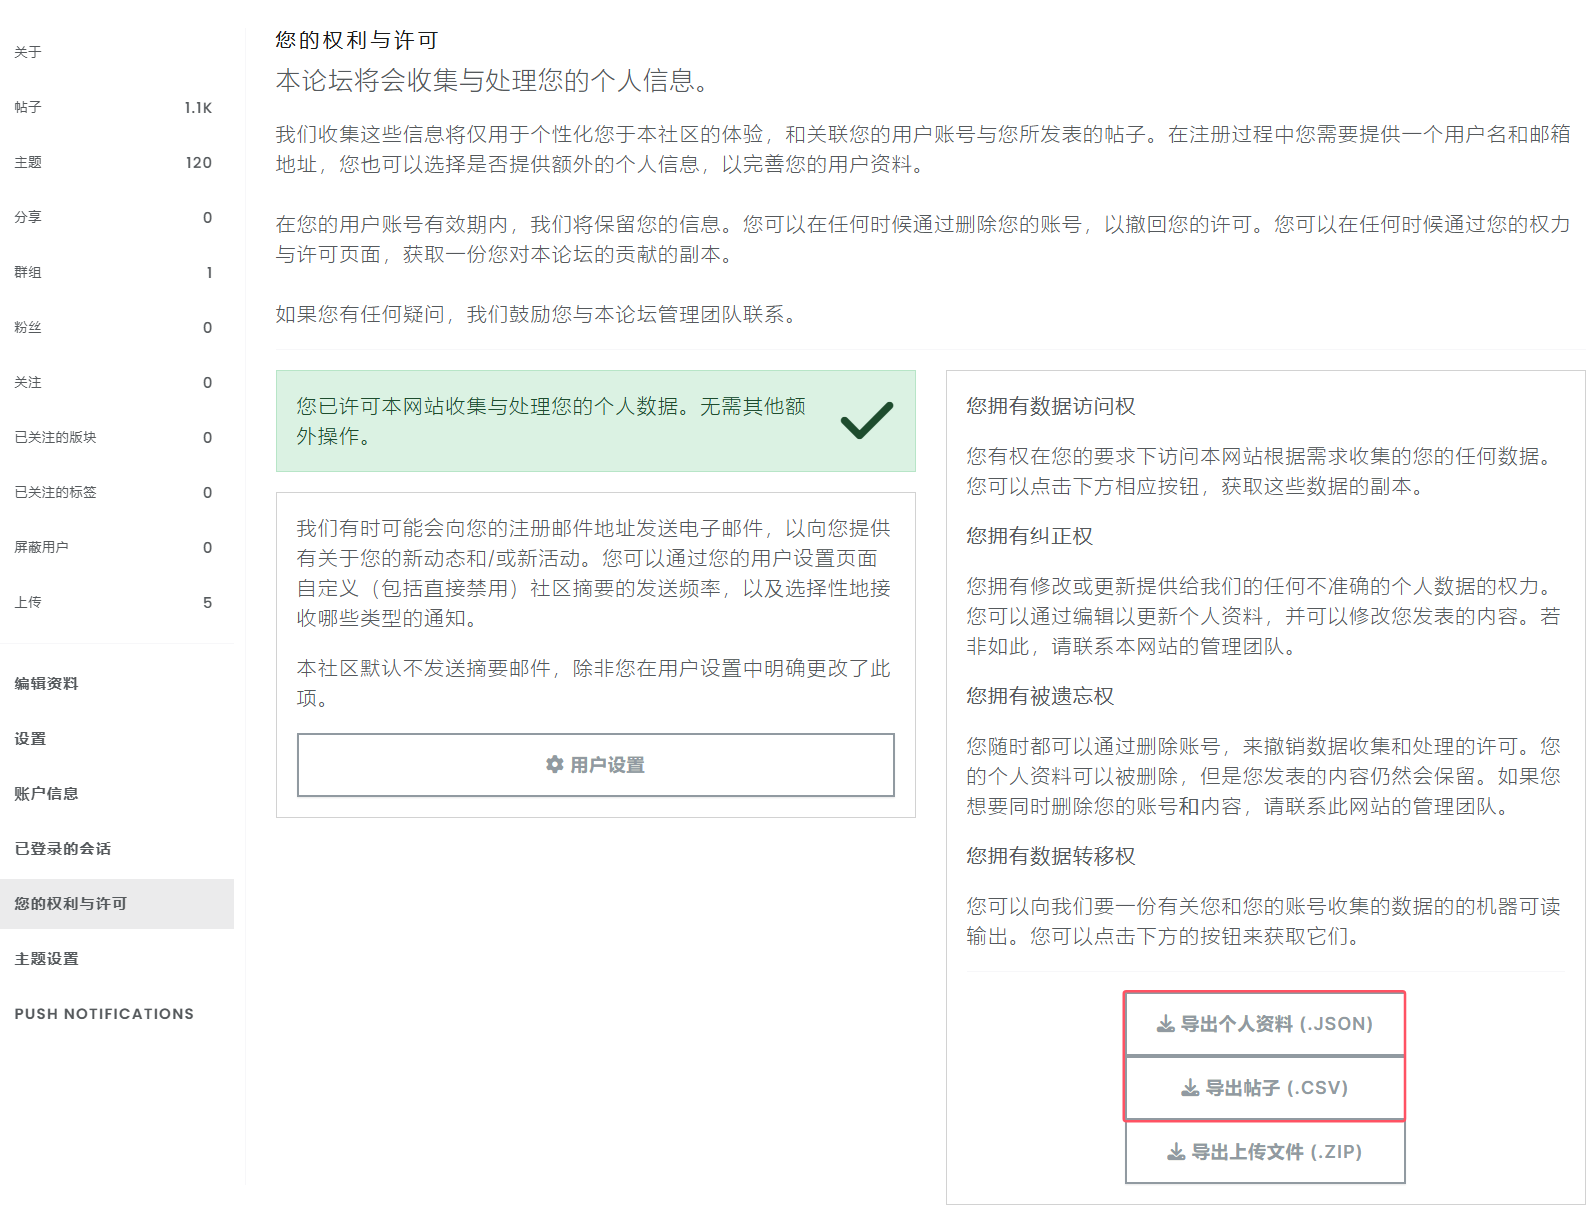
在NodeBB中的权利与许可界面,导出个人资料(包含tid和title),帖子(包含帖子正文)
编写脚本将碎片笔记转换为标准格式
在原始笔记内容中,大部分只有正文内容(content)、话题(topic)、时间(time)字段,其他字段都是缺失的,自己一条条添加比较费劲,这里就直接调用本地部署的Deepseek生成一下了,完整的脚本如下。
# !/usr/bin/env python
# -*- coding: UTF-8 -*-
"""
@FileName: transmat.py
@Author: zhifeix
@Email: kforum@163.com
@Description: Stream processing and saving with resume capability
@Date: 2025/4/8 16:28
"""
import csv
import json
import requests
import re
from datetime import datetime
import os

# 日志文件,用于记录处理的序号
LOG_FILE = "processing_log.txt"

def parse_timestamp(timestamp_str):
    now = datetime.now()
    # 如果传入空字符串,直接返回当前时间
    if not timestamp_str or not isinstance(timestamp_str, str):
        return now.strftime("%Y-%m-%d %H:%M:%S"), int(now.timestamp() * 1000)

    # 清理时间字符串
    time_str = timestamp_str.replace("T", " ").replace("Z", "").strip()

    # 定义支持的格式及其解析方式
    formats = [
        (r"\d{4}-\d{2}-\d{2}\s+\d{2}:\d{2}:\d{2}", "%Y-%m-%d %H:%M:%S"),  # 年月日时分秒
        (r"\d{4}-\d{2}-\d{2}\s+\d{2}:\d{2}", "%Y-%m-%d %H:%M"),  # 年月日时分
        (r"\d{4}-\d{2}-\d{2}", "%Y-%m-%d"),  # 年月日
        (r"\d{4}-\d{2}", "%Y-%m"),  # 年月
        (r"\d{4}", "%Y"),  # 年
        (r"\d{4}/\d{2}/\d{2}\s+\d{2}:\d{2}:\d{2}", "%Y/%m/%d %H:%M:%S"),  # 年/月/日 时:分:秒
        (r"\d{4}/\d{2}/\d{2}\s+\d{2}:\d{2}", "%Y/%m/%d %H:%M"),  # 年/月/日 时:分
        (r"\d{4}/\d{2}/\d{2}", "%Y/%m/%d"),  # 年/月/日
        (r"\d{6}", lambda s: datetime.strptime(f"20{s[:2]}-{s[2:4]}-{s[4:]}", "%Y-%m-%d")),  # YYMMDD
        (r"\d{4}-\d{2}-\d{2}\s+\d{2}:\d{2}:\d{2}\.\d+", "%Y-%m-%d %H:%M:%S.%f"),  # ISO 带微秒
    ]

    # 尝试每种格式
    for pattern, fmt in formats:
        try:
            match = re.search(pattern, time_str)
            if match:
                matched_str = match.group(0)
                # 如果是特殊格式(例如 YYMMDD),使用 lambda 函数处理
                if callable(fmt):
                    dt = fmt(matched_str)
                else:
                    dt = datetime.strptime(matched_str, fmt)

                # 补全缺失的字段
                if "%H" not in fmt:
                    dt = dt.replace(hour=now.hour, minute=now.minute, second=now.second)
                elif "%M" not in fmt:
                    dt = dt.replace(minute=now.minute, second=now.second)
                elif "%S" not in fmt:
                    dt = dt.replace(second=now.second)

                return dt.strftime("%Y-%m-%d %H:%M:%S"), int(dt.timestamp() * 1000)
        except ValueError:
            continue  # 当前格式解析失败,继续尝试下一种

    # 如果所有格式都无法解析,使用当前时间
    return now.strftime("%Y-%m-%d %H:%M:%S"), int(now.timestamp() * 1000)

def generate_fields_with_model(content):
    data = {
        "model": "deepseek-r1:14b",
        "prompt": f'根据以下内容生成笔记的标题、标签、分类和清理后的正文内容'
                  f'(请注意,尽可能保持原文所有内容,不要做任何修改,包括正文、格式等,换行符之类的都不要修改)。'
                  f'请严格遵循以下规则:\n'
                  f'输入内容:\n'
                  f'{content}\n'
                  f'规则:\n'
                  f'1. **优先提取**:\n'
                  f'   - **标题 (title)**:\n'
                  f'     - 智能判断内容中可能的标题(通常是第一行或显著的短语),若无明确标题则生成。\n'
                  f'     - 示例:若第一行是“【例子】”,可提取“【例子】写作历程反思”;若无明显标题,则根据正文生成。\n'
                  f'   - **时间 (time)**:\n'
                  f'     - 从正文或元数据中提取任何形似时间的信息,优先级如下:\n'
                  f'       1. 显式标注的时间字段(如“创建时间:2023/9/2 21:21”、“更新时间:2023/9/2 22:15”),优先取最早的“创建时间”,若无则取最新的更新时间。 \n'
                  f'       2. 正文中形似时间的字符串(如“241026”、“2023年7月6日”、“2022-01-01”)。\n'
                  f'       3. 若无明确时间,则不输出该字段(注意:若提取不到时间,则留空,不要使用当前时间)。\n'
                  f'     - 支持的时间格式示例:\n'
                  f'       - "YYYY-MM-DD HH:MM:SS"(如 "2023-09-02 21:21")\n'
                  f'       - "YYYY/MM/DD HH:MM"(如 "2023/9/2 21:21")\n'
                  f'       - "YYYY-MM-DD"(如 "2023-09-02")\n'
                  f'       - "YYYYMMDD"(如 "241026",应解析为 "2024-10-26")\n'
                  f'       - "YYYY年MM月DD日"(如 "2023年7月6日")\n'
                  f'     - 输出时,将提取的时间转换为 "YYYY-MM-DD HH:MM:SS" 格式,缺少的部分直接空出来不写,后面我会手动进行解析。\n'
                  f'   - **标签 (tags)**:\n'
                  f'     - 从正文中提取 2-5 个关键词(如“【例子】”、“【例子】”),根据语义判断。\n'
                  f'     - 若无法提取,生成 3 个相关标签。\n'
                  f'     - 每个标签不超过 10 个字符,用逗号分隔。\n'
                  f'   - **分类 (category)**:\n'
                  f'     - 根据内容语义推导通用分类(如“【例子】”、“【例子】”),若无明确分类则生成。\n'
                  f'   - 若提取到上述字段,移除这些元数据后输出清理后的正文 (cleaned_content)。(注意,提取到才移除,假如是生成的则不移除)\n\n'
                  f'2. **生成**:\n'
                  f'   - 若无法提取以下字段,则根据正文内容生成:\n'
                  f'     - **标题 (title)**:生成一个简洁且符合主题的标题,长度不超过 20 个字符。\n'
                  f'     - **标签 (tags)**:生成 3 个相关标签,最多不超过 5 个,每个不超过 10 个字符,用逗号分隔。\n'
                  f'     - **分类 (category)**:生成一个通用分类名称,长度不超过 15 个字符。\n'
                  f'   - 若生成字段,则正文保持不变,作为 cleaned_content 输出。\n\n'
                  f'   - 注意:若无法提取时间,则 time 字段留空,不生成默认时间。\n\n'
                  f'3. **输出格式**:\n'
                  f'   - 以 JSON 格式返回,包含字段:title、time(若提取到)、tags、category、cleaned_content。\n'
                  f'   - 示例(提取成功):\n'
                  f'     ```json\n'
                  f'     {{\n'
                  f'       "title": "...",\n'
                  f'       "time": "2023/7/6 10:21",\n'
                  f'       "tags": ".., .., ..",\n'
                  f'       "category": "....",\n'
                  f'       "cleaned_content": "..."\n'
                  f'     }}\n'
                  f'     ```\n'
                  f'请根据以上规则处理输入内容并返回结果。',
        "max_tokens": 500,
        "temperature": 0.7,
        "top_p": 0.9,
        "top_k": 40
    }
    response = requests.post("http://localhost:11434/api/generate", json=data, stream=True)
    if response.status_code == 200:
        full_response = ""
        for line in response.iter_lines():
            if line:
                json_line = json.loads(line.decode("utf-8"))
                if "response" in json_line:
                    full_response += json_line["response"]

        json_start = full_response.find("```json")
        json_end = full_response.rfind("```")
        try:
            if json_start != -1 and json_end != -1:
                json_str = full_response[json_start + 7:json_end].strip()
                return json.loads(json_str)
        except:
            print("未找到有效的 JSON 部分")
            return {"title": "未命名", "tags": "", "category": "未分类", "cleaned_content": content}
    else:
        print(f"模型请求失败,状态码:{response.status_code}")
        return {"title": "未命名", "tags": "", "category": "未分类", "cleaned_content": content}

def read_last_processed_index():
    """读取上次处理的最后序号"""
    if os.path.exists(LOG_FILE):
        with open(LOG_FILE, 'r', encoding='utf-8') as f:
            return int(f.read().strip())
    return 0

def save_last_processed_index(index):
    """保存当前处理的序号"""
    with open(LOG_FILE, 'w', encoding='utf-8') as f:
        f.write(str(index))

def append_to_json(data, output_file):
    """追加数据到 JSON 文件"""
    if not os.path.exists(output_file):
        with open(output_file, 'w', encoding='utf-8') as f:
            json.dump([], f)  # 初始化为空列表

    with open(output_file, 'r+', encoding='utf-8') as f:
        existing_data = json.load(f)
        existing_data.append(data)
        f.seek(0)
        json.dump(existing_data, f, ensure_ascii=False, indent=4)


def json_to_csv(json_file, csv_file):
    """将 JSON 文件转换为 CSV 文件。"""
    # 检查 JSON 文件是否存在
    if not os.path.exists(json_file):
        print(f"错误:输入文件 {json_file} 不存在")
        return

    # 读取 JSON 数据
    with open(json_file, 'r', encoding='utf-8') as f:
        data = json.load(f)

    # 如果 JSON 数据为空或不是列表,直接返回
    if not data or not isinstance(data, list):
        print(f"警告:{json_file} 为空或格式不正确,无法转换为 CSV")
        return

    # 获取所有可能的字段名(从第一个记录开始,动态扩展)
    fieldnames = set()
    for item in data:
        fieldnames.update(item.keys())
    fieldnames = list(fieldnames)  # 转换为列表以固定顺序

    # 写入 CSV 文件
    with open(csv_file, 'w', encoding='utf-8', newline='') as f:
        writer = csv.DictWriter(f, fieldnames=fieldnames)
        writer.writeheader()  # 写入表头
        for item in data:
            writer.writerow(item)

    print(f"转换完成,结果已保存至 {csv_file}")
def process_and_save_stream(csv_file, json_file, output_json, output_csv):
    last_index = read_last_processed_index()
    print(f"从序号 {last_index} 开始处理")

    with open(csv_file, 'r', encoding='utf-8') as f:
        reader = csv.DictReader(f)
        rows = list(reader)  # 将 CSV 转为列表以支持索引
        json_data = json.load(open(json_file, 'r', encoding='utf-8')) if json_file and os.path.exists(
            json_file) else None

        for i, row in enumerate(rows):
            if i < last_index:
                continue  # 跳过已处理的行

            content = row["content"].strip('"""')
            timestamp_iso = row.get("timestampISO", "")
            tid = row.get("tid", "")

            # 从 JSON 提取 topic
            topic = ""
            if json_data and tid:
                watched_topics = json_data.get("watchedTopics", [])
                for t in watched_topics:
                    if str(t["tid"]) == str(tid):
                        topic = t["title"]
                        break

            # 使用模型生成字段和清理后的内容
            model_result = generate_fields_with_model(content)
            title = model_result["title"]
            tags = model_result["tags"]
            category = model_result["category"]
            cleaned_content = model_result["cleaned_content"]
            extracted_time = model_result.get("time", None)

            # 处理时间
            time_str, timestamp = parse_timestamp(extracted_time) if extracted_time else parse_timestamp(timestamp_iso)

            note = {
                "title": title,
                "content": cleaned_content,
                "raw_content": content,
                "time": time_str,
                "timestamp": timestamp,
                "tags": tags,
                "topic": topic if topic else "",
                "category": category
            }

            # 立即保存当前记录
            # append_to_csv(note, output_csv)
            append_to_json(note, output_json)
            save_last_processed_index(i)
            print(f"已处理并保存序号 {i}")

    # 将最终的json文件转换为csv文件
    json_to_csv(output_json, output_csv)


def main():
    # 输入文件路径
    csv_file = "2_posts.csv"
    json_file = "2_profile.json"
    output_json = "standard_notes.json"
    output_csv = "standard_notes.csv"

    # 检查文件是否存在
    if not os.path.exists(csv_file):
        print(f"错误:输入文件 {csv_file} 不存在")
        return
    if not os.path.exists(json_file):
        print(f"错误:输入文件 {json_file} 不存在")
        return

    # 流式处理并保存
    process_and_save_stream(csv_file, json_file, output_json, output_csv)
    print(f"处理完成,结果已保存至 {output_json} 和 {output_csv}")


if __name__ == "__main__":
    main()
3、NodeBB本地搭建
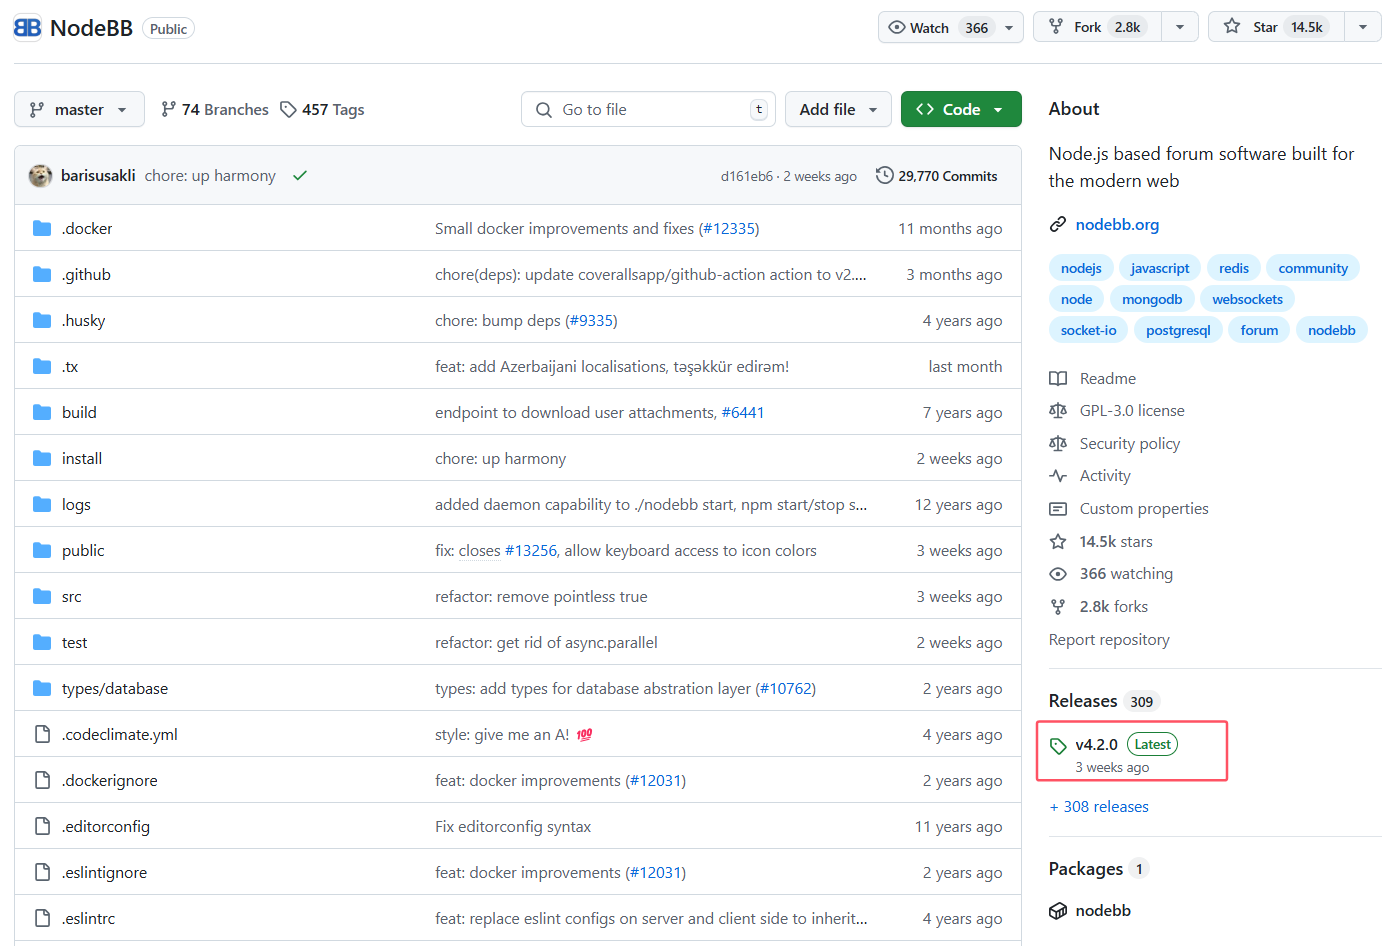
在Github下载NodeBB项目源码
NodeBB项目地址:NodeBB/NodeBB: Node.js based forum software built for the modern web
下载并部署MongoDB数据库
MongoDB Sever下载地址:Download MongoDB Community Server | MongoDB
MongoDB Shell下载地址:MongoDB Shell Download | MongoDB
下载完成后直接安装就行,安装过程可参考下面这篇帖子:
Win10下新版MongoDB的安装部署(保姆级)_win10安装mongodb-CSDN博客
启动项目并进行相关配置
- 解压NodeBB压缩包,并进入项目目录,打开cmd命令行启动项目。
.\nodebb start
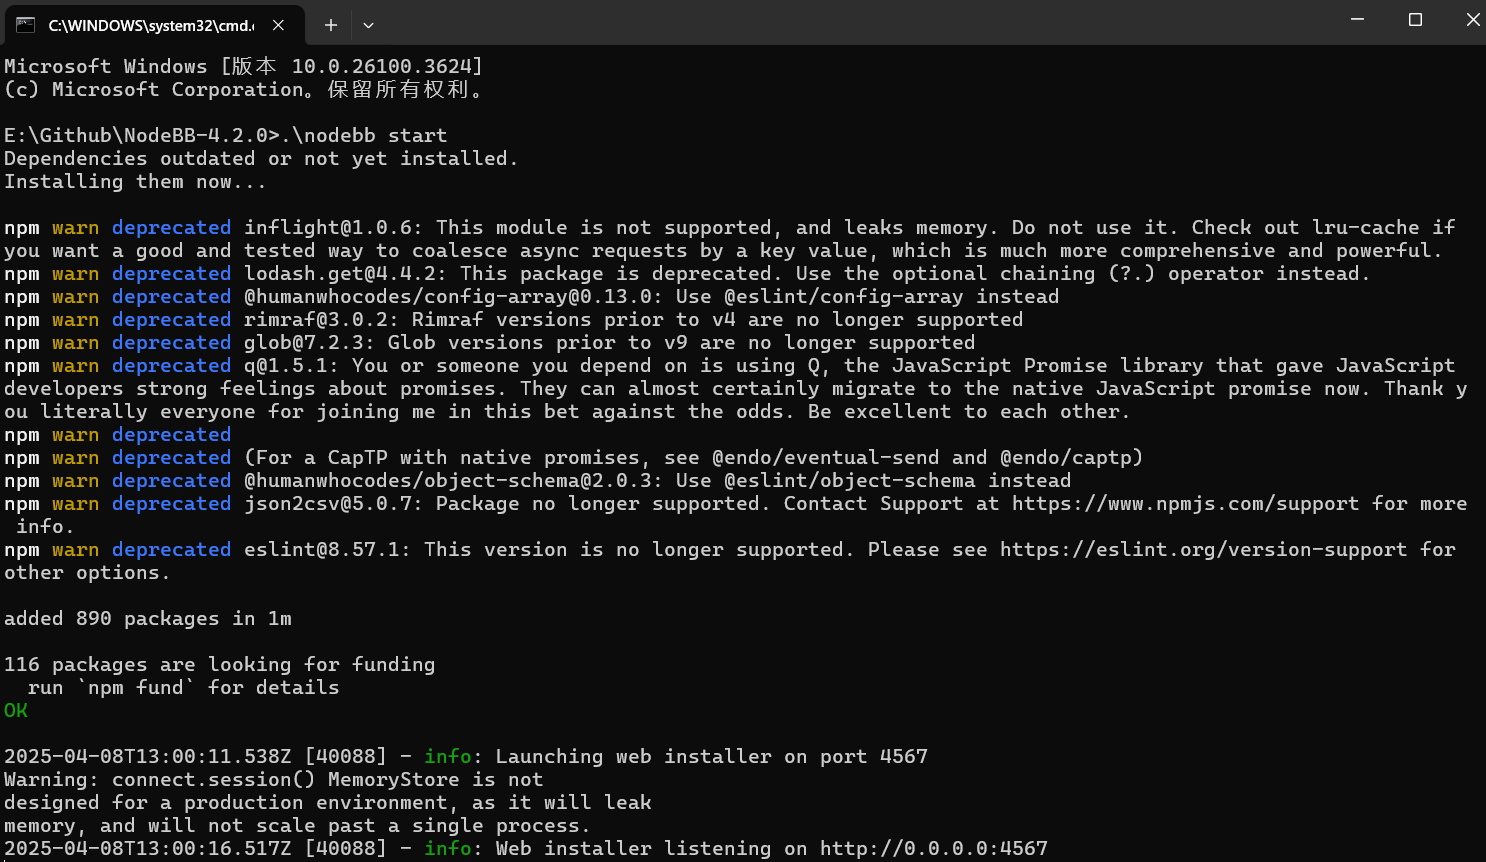
- 进入http://localhost:4567/,配置基础信息
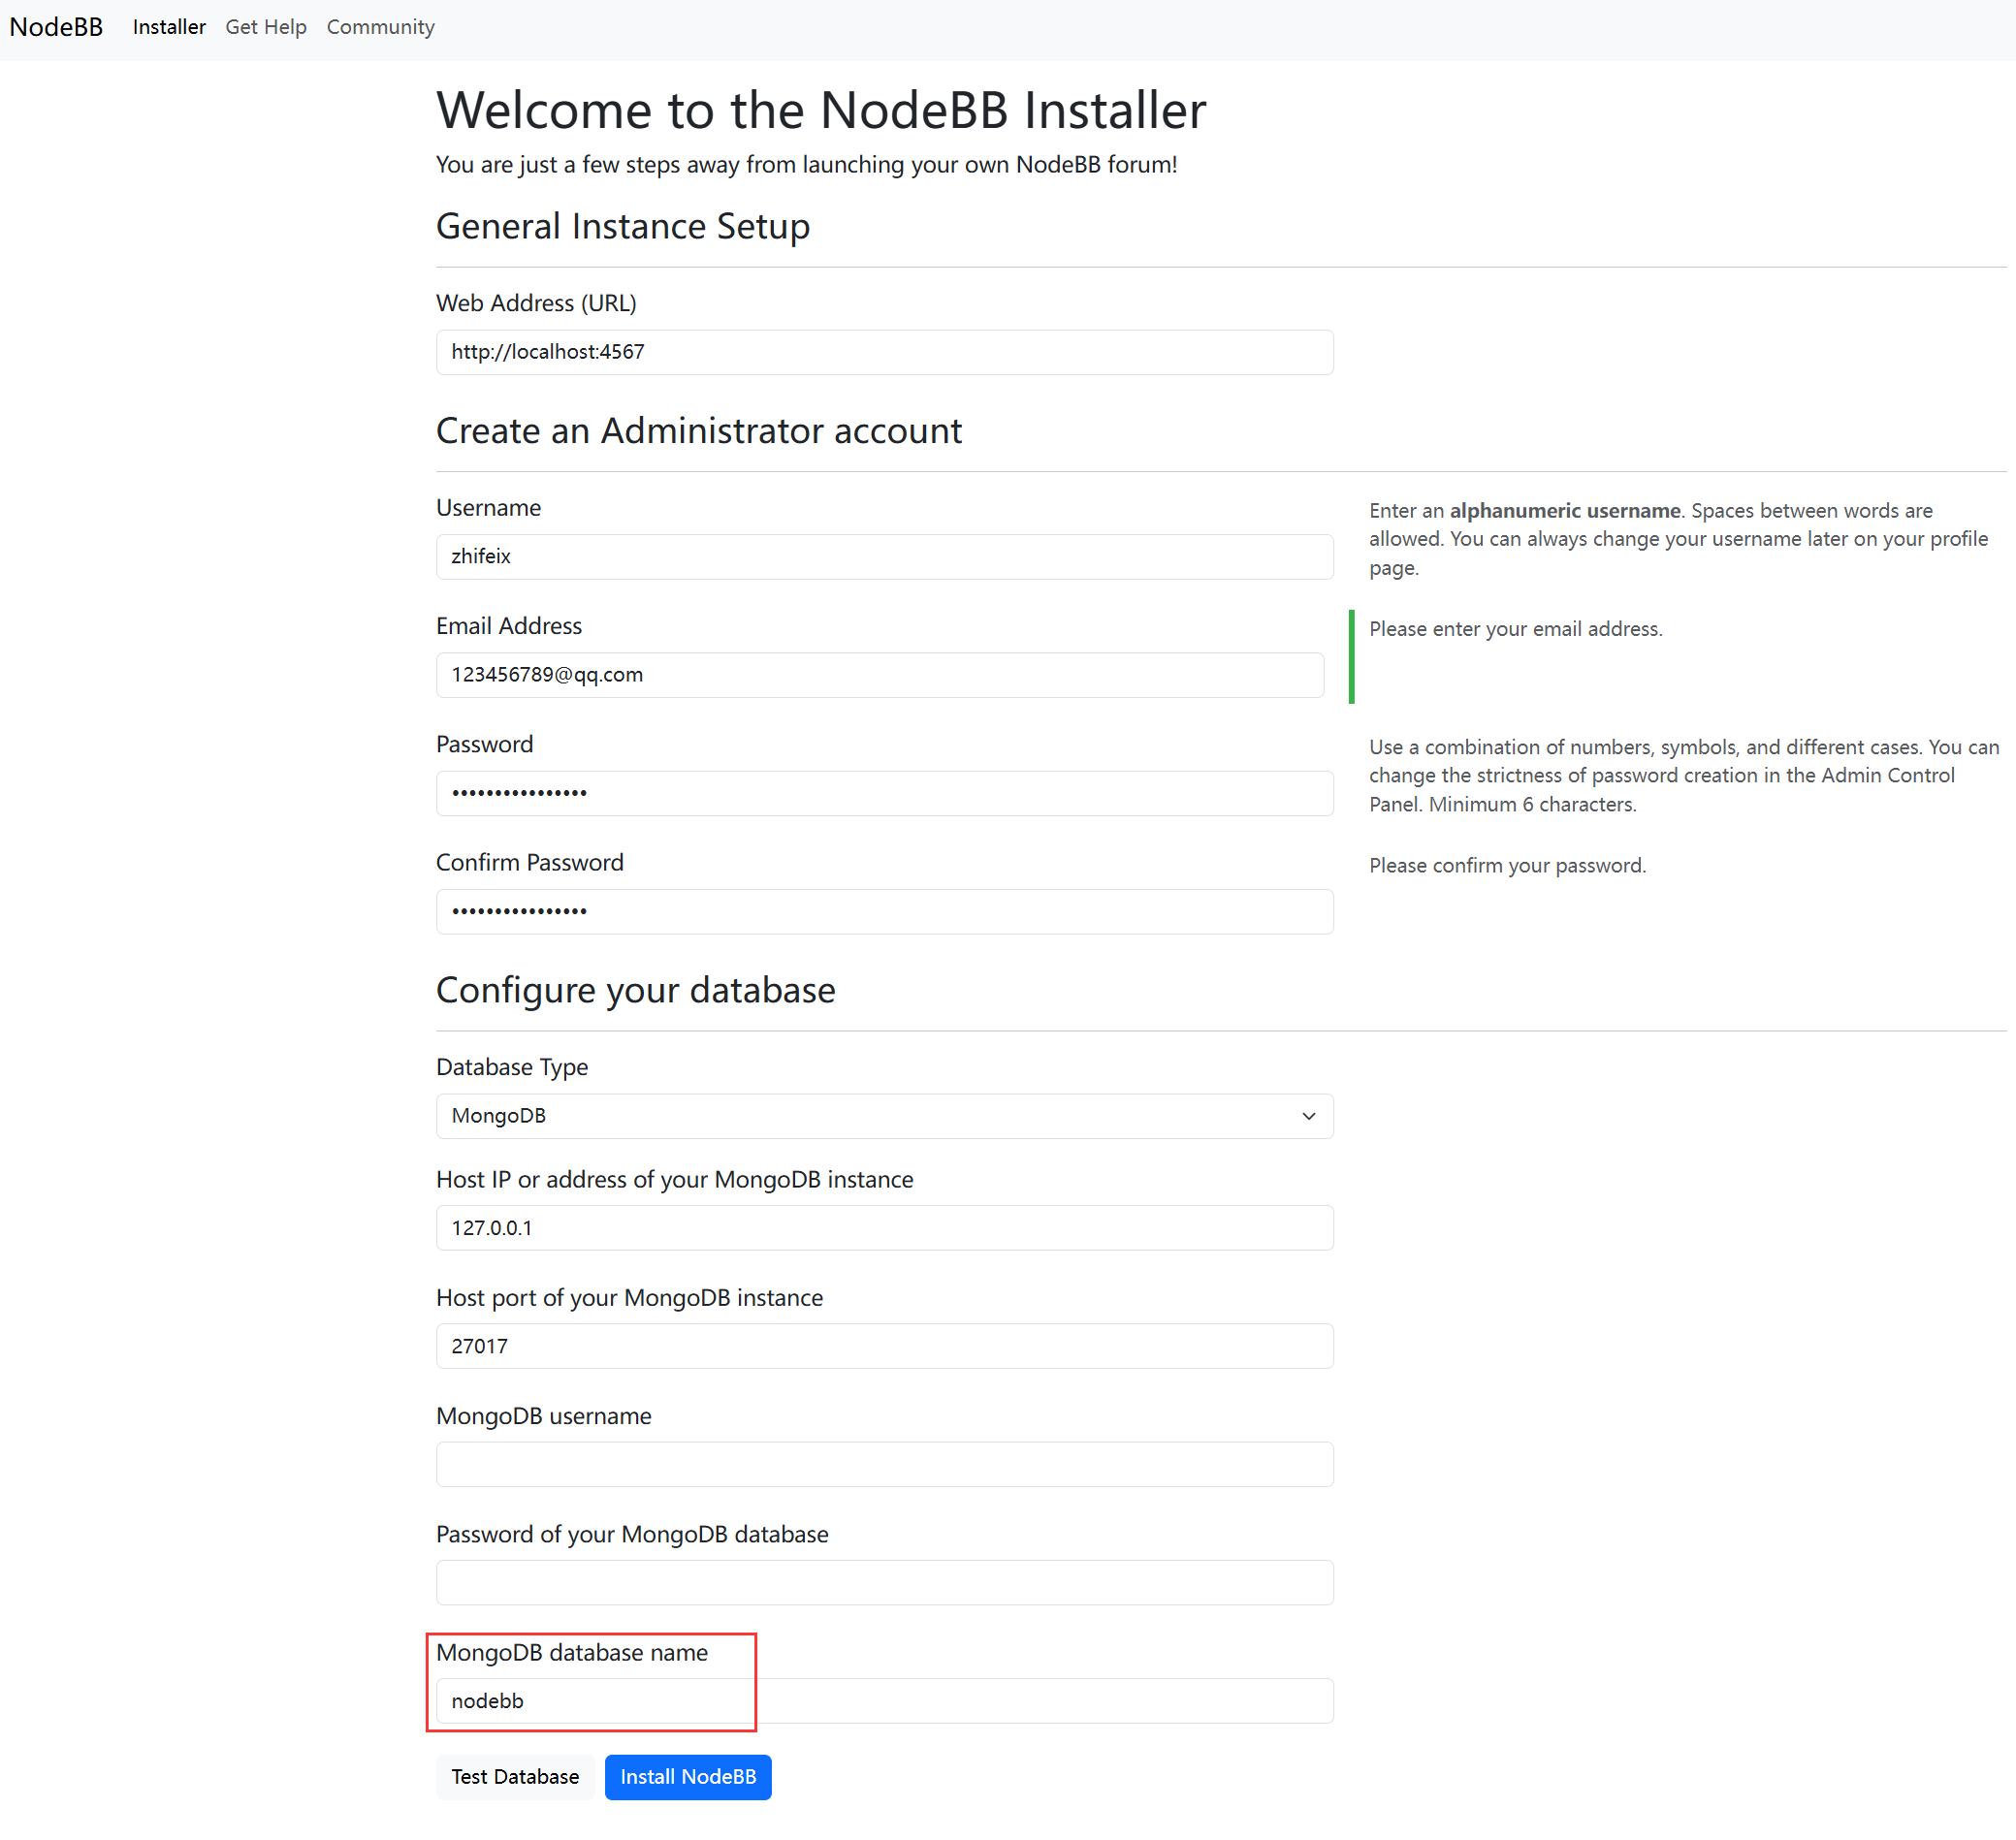
配置完成后,点击Install NodeBB进行安装,安装完成后会自动跳转到登录界面,点击登录即可
4、源码修改及笔记写入
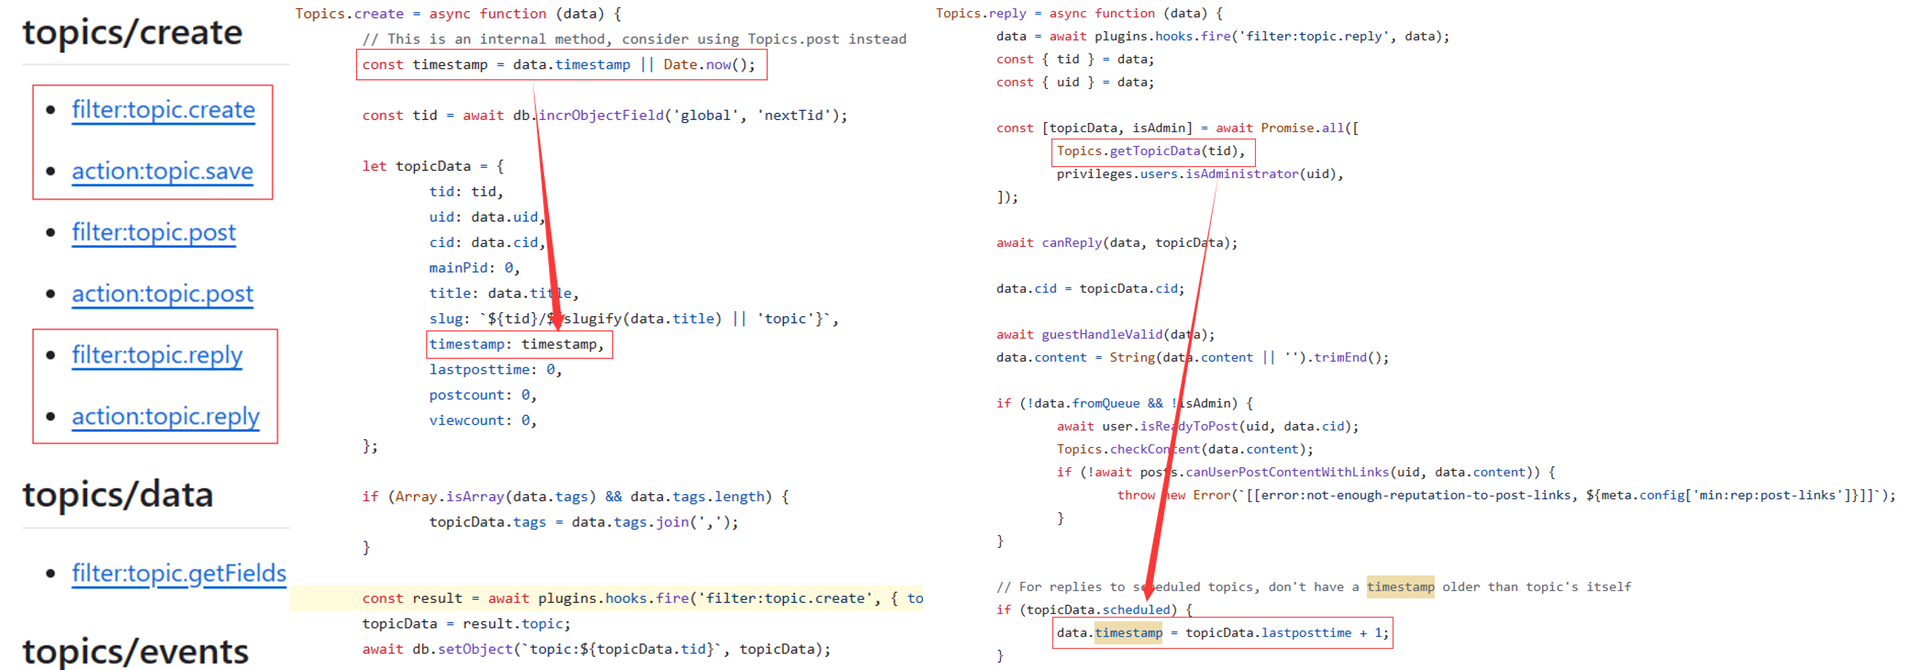
Nodebb提供了一些API接口,可以满足建帖和发帖的需求,但是这些接口不支持修改帖子的时间戳,因此要修改一下相应的源码,使得笔记的创建时间得以保存,(参考:Hooks · NodeBB/NodeBB Wiki (github.com))。
发帖接口测试
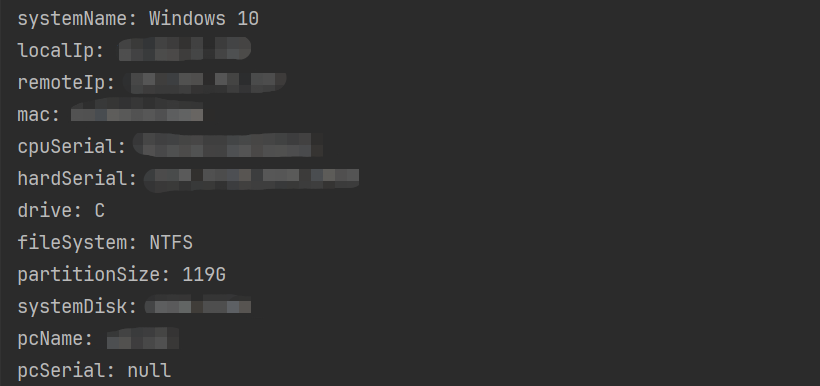
要将标准笔记内容写入到NodeBB,首先要分析一下发帖的接口是如何调用的,然后找到对应代码进行修改。在主界面发送一条测试帖子,然后捕获相应的请求信息。
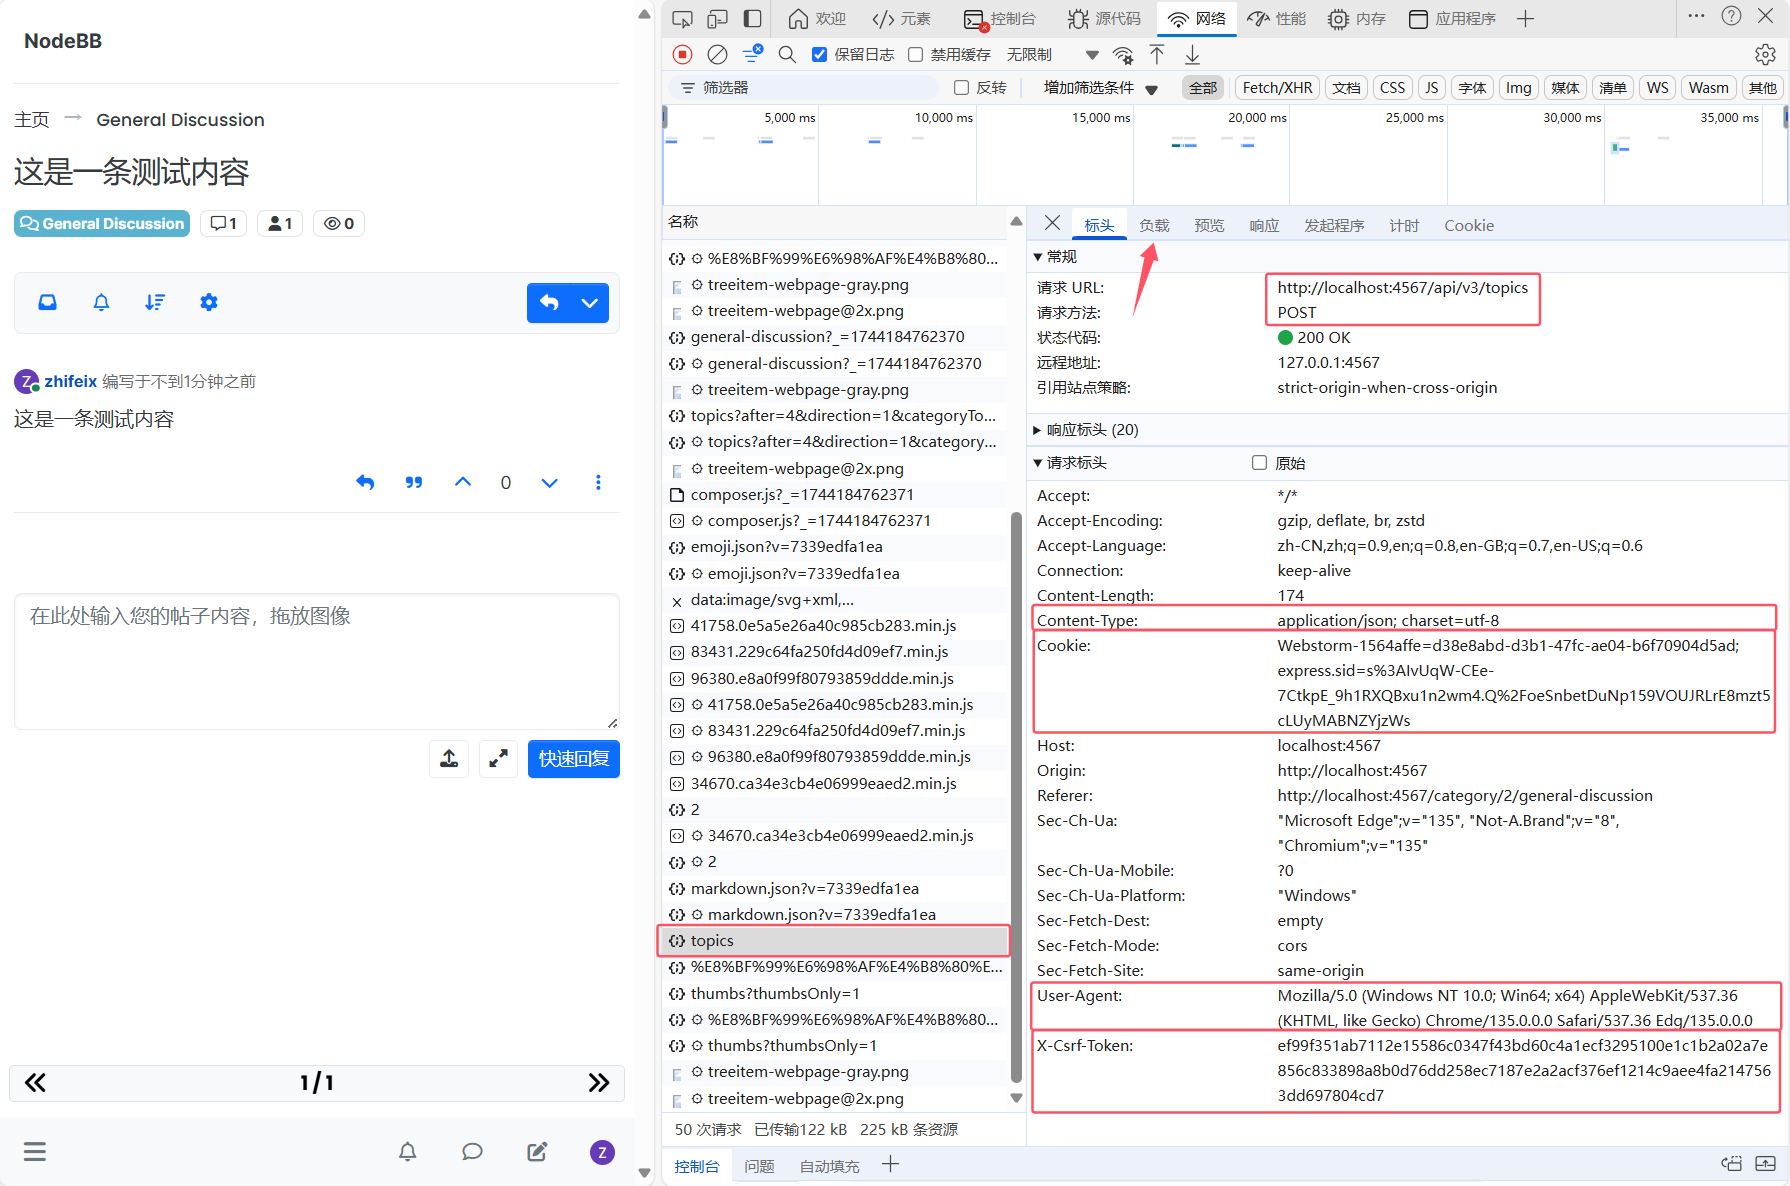
(注:除了图上的信息外,还需要在负载里面获取一下uuid)
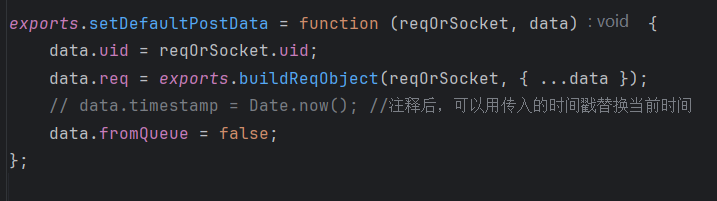
修改时间戳生成代码
经过仔细且严密的分析,只需要修改下面的代码就可以了(具体分析过程参考这篇帖子【Nodebb系列】Nodebb搭建笔记系统-CSDN博客)
笔记写入脚本
接下来编写脚本,将笔记写入到本地NodeBB数据库中,这里只关注正文内容content和时间戳timestamp,其他内容仅作存档。
#!/usr/bin/env python
# -*- coding: UTF-8 -*-
"""
@FileName: uploads.py
@Author: zhifeix
@Email: kforum@163.com
@Description:
@Date: 2025/4/9 15:14
"""
import json
import requests
from datetime import datetime


# 创建新主题
def createtopic(headers, data):
    # 从传入的时间戳生成 datetime 对象
    dt = datetime.fromtimestamp(data['timestamp'] / 1000)
    # 将日期设置为当月第一天,时间清零
    dt = dt.replace(day=1, hour=0, minute=0, second=0, microsecond=0)
    # 将 dt 转换回毫秒级时间戳
    adjusted_timestamp = int(dt.timestamp() * 1000)

    payload = {
        "uuid": data['uuid'],
        "title": data['title'],
        "content": "此处记录{}期间的内容".format(data['title']),
        "cid": data['cid'],
        "tags": [],
        "timestamp": adjusted_timestamp,  # 使用调整后的时间戳
    }
    response = session.post(f"{url}", headers=headers, json=payload)
    if response.status_code == 200:
        tid = json.loads(response.text)['response']['tid']
        tid_dic[data['title']] = tid
        print(f"创建主题成功:{data['title']},tid={tid}")
        return tid
    else:
        print(f"创建主题失败:{response.status_code} - {response.text}")
        return None

# 回复主题
def replytopic(headers, data):
    payload = {
        "uuid": data['uuid'],
        "tid": data['tid'],
        "handle": "",
        "content": data['content'],
        "timestamp": data['timestamp']
    }
    response = session.post(f"{url}/{data['tid']}", headers=headers,
                            json=payload)
    if response.status_code == 200:
        print(f"回复主题成功:tid={data['tid']}")
    else:
        print(f"回复主题失败:tid={data['tid']},状态码={response.status_code} - {response.text}")

# 上传笔记
def uploadnotes(note):

    # 从笔记中提取时间戳和内容
    timestamp = note['timestamp']
    content = note['content']

    # 将毫秒级时间戳转换为 datetime 对象
    datetime_obj = datetime.fromtimestamp(timestamp / 1000)
    # 提取年份和月份
    year = datetime_obj.year
    month = datetime_obj.month
    title = "【{}年{}月】".format(year, str(month).zfill(2))

    # 构造上传数据
    data = {
        'uuid': uuid,
        'title': title,
        'content': content,
        'cid': cid,
        'timestamp': timestamp
    }

    # 检查是否需要创建新主题
    if title not in tid_dic:
        tid = createtopic(headers, data)
        if tid is None:
            return  # 创建失败,直接返回
    else:
        data['tid'] = tid_dic[title]

    # 回复主题
    data['tid'] = tid_dic[title]
    replytopic(headers, data)

# 全局参数设置
url = "http://localhost:4567/api/v3/topics"
headers = {
    'Content-Type': 'application/json; charset=utf-8',
    'Cookie': 'Webstorm-1564affe=d38e8abd-d3b1-47fc-ae04-b6f70904d5ad; express.sid=s%3AIvUqW-CEe-7CtkpE_9h1RXQBxu1n2wm4.Q%2FoeSnbetDuNp159VOUJRLrE8mzt5cLUyMABNZYjzWs',
    'User-Agent': 'Mozilla/5.0 (Windows NT 10.0; Win64; x64) AppleWebKit/537.36 (KHTML, like Gecko) Chrome/135.0.0.0 Safari/537.36 Edg/135.0.0.0',
    'X-Csrf-Token': 'ef99f351ab7112e15586c0347f43bd60c4a1ecf3295100e1c1b2a02a7e856c833898a8b0d76dd258ec7187e2a2acf376ef1214c9aee4fa2147563dd697804cd7'
}

cid = 2  # 目录id
uuid = "d0bc48a6-4170-4362-a3e9-1ef696c27d0a"
tid_dic = {}  # 创建tid全局索引
session = requests.Session()

def main():
    # 读取 standard_notes.json 文件
    json_file = "standard_notes.json"
    try:
        with open(json_file, 'r', encoding='utf-8') as f:
            notes = json.load(f)
    except FileNotFoundError:
        print(f"错误:文件 {json_file} 不存在")
        return
    except json.JSONDecodeError:
        print(f"错误:文件 {json_file} 格式不正确")
        return

    if not notes:
        print("警告:笔记数据为空")
        return

    # 遍历并上传每条笔记
    for note in notes:
        uploadnotes(note)

    print("所有笔记上传完成")

if __name__ == '__main__':
    main()
5、数据导出及云端恢复
下载并部署MongoDB工具
MongoDB Tools下载地址:Download MongoDB Command Line Database Tools | MongoDB
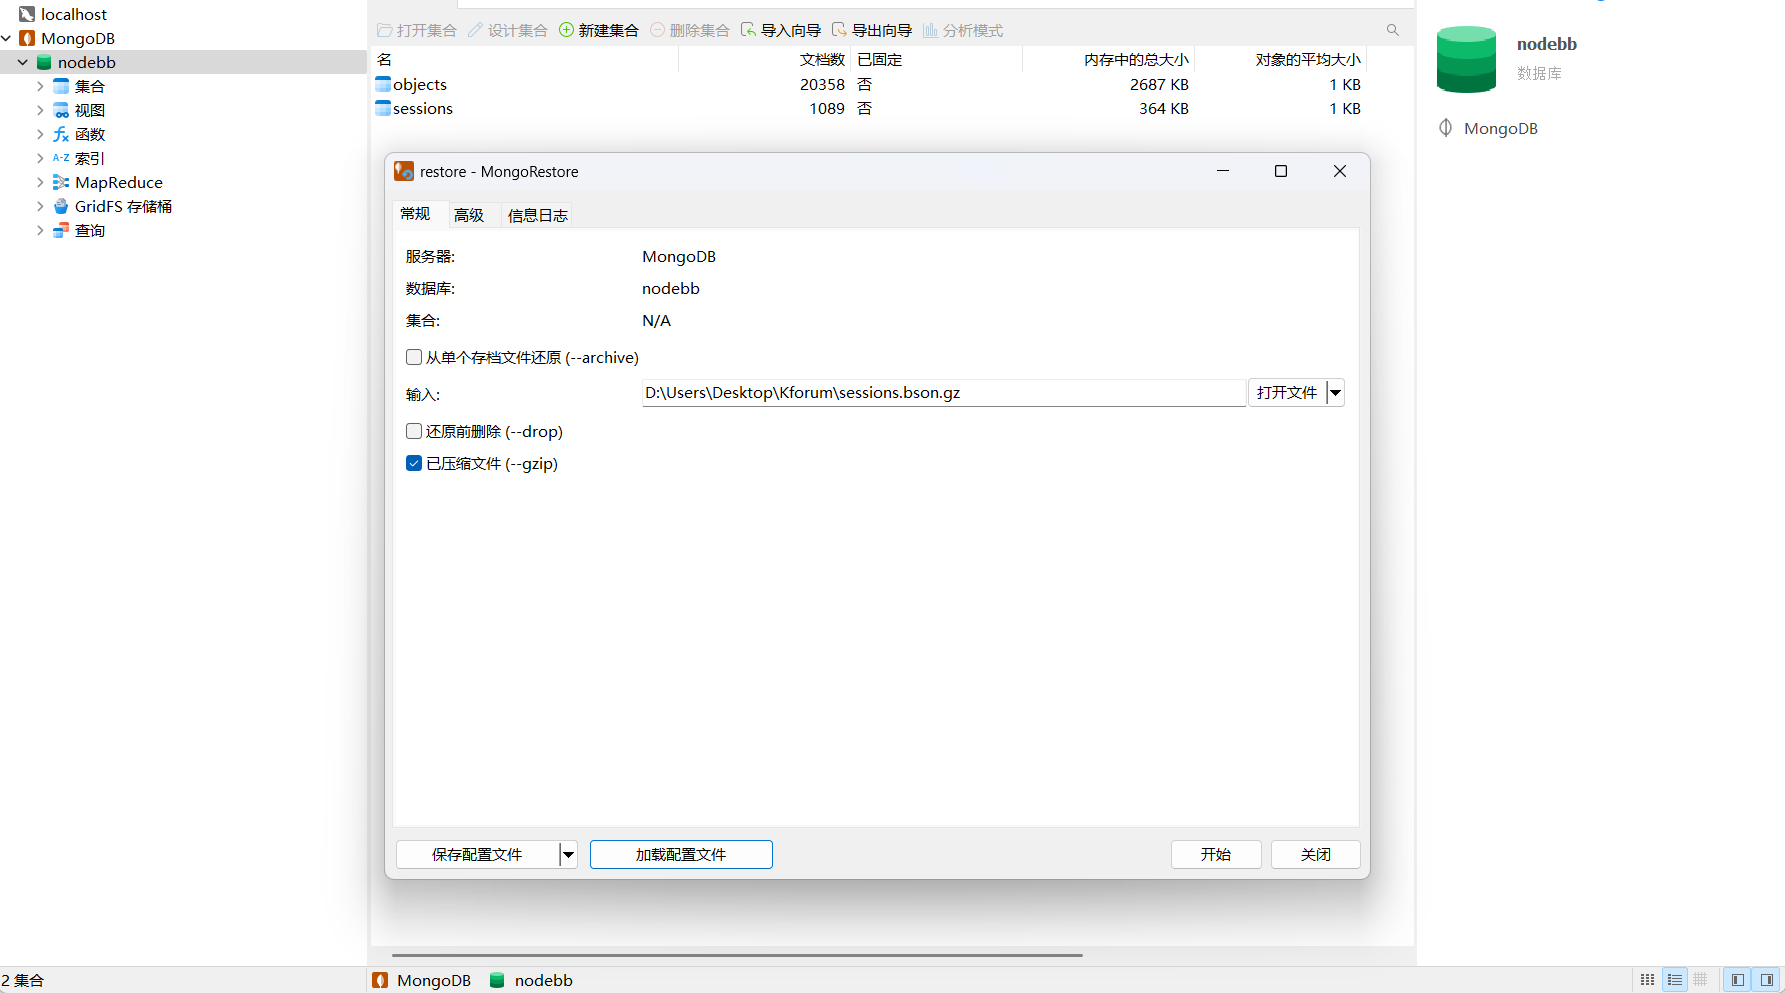
在Navicat中连接云端MongoDB数据库,并将处理好的数据restore到云端数据库,这样就可以把写入的笔记同步到云端了。
6、另一种方法
除了通过数据库进行迁移外,还可以修改云端系统的源码,然后直接调用脚本将笔记内容通过发帖形式上传到线上的NodeBB即可。
进入nodebb的bash命令行
docker exec -it nodebb bash
修改helpers.js相应代码
vim src/api/helpers.js
修改的部分参考第4部分的内容。接着配置好写入脚本,就可以将笔记带时间戳传到线上NodeBB了。
小结
经过漫长的折腾,终于整理出一套比较完整的笔记转移方案,主要是借助NodeBB发帖的形式,统一管理自己记的碎片笔记,中间使用了Deepseek帮助整理碎片笔记中缺失的一些字段,最核心的还是保留笔记时间戳信息,以便梳理思路的变化。笔记整理就先告一段落了,有类似需求的小伙伴可以参考一下上面的内容,希望会有所帮助。