前言:进入学习Python开发上位机界面的第二阶段,学习如何开发自定义控件,从常用的控件入手学习,本期主要学习如何使用PyQt5绘制水波浪形的柱状显示流量。但是最后我放弃了,因为水波的效果达不到我想要的。
1. 明确想要实现的控件效果
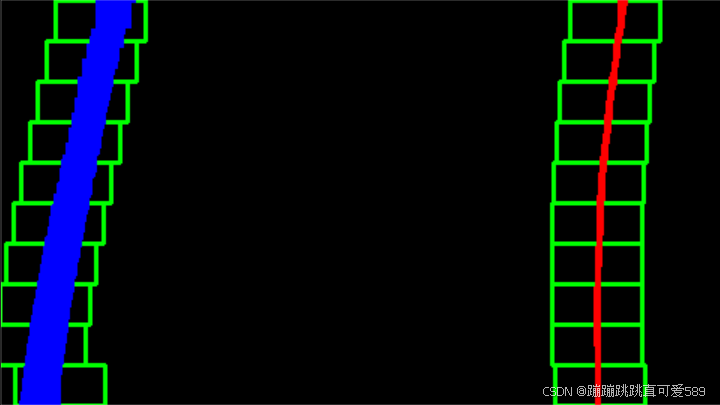
我想实现的效果是制作一个水波浪形的柱状控件用于显示流量。
要想实现的效果如下:

先来拆解需求:
明确水波浪形的柱状图需要具备的属性:
(1)用户设置流量数值,柱状图的水波能够到达相应的水平线;
(2)显示流量的水波柱的背景颜色应该允许用户设置;
(3)显示流量的水波柱的波浪浮动应该是两个波浪浮动曲线组成的,并且可以通过颜色的深浅看出是两个水波浪浮动,下层水波浪颜色深些;
2. 搬运代码
一个漂亮的水波浪动画效果:

附上可以直接运行的Python代码:
import sys
import math
from PyQt5.QtWidgets import QApplication, QWidget
from PyQt5.QtGui import QPainter, QColor, QPen
from PyQt5.QtCore import Qt, QRect, QTimer


class WaterWaveWidget(QWidget):
    def __init__(self):
        super().__init__()
        self.setGeometry(100, 100, 800, 400)
        self.setWindowTitle("Water Wave Flow Meter")

        self.wave1_amplitude = 50  # Amplitude for the first wave
        self.wave2_amplitude = 30  # Amplitude for the second wave
        self.wave_length = 200  # Length of one wave cycle
        self.phase_shift = 0  # Phase shift between the two waves
        self.offset_x = 0  # Horizontal offset for animation

        self.timer = QTimer(self)
        self.timer.timeout.connect(self.update_wave)
        self.timer.start(100)  # Update every 100 milliseconds

    def update_wave(self):
        self.offset_x += 5  # Move the wave horizontally
        if self.offset_x > self.wave_length:
            self.offset_x = 0
        self.update()

    def paintEvent(self, event):
        painter = QPainter(self)
        rect = self.rect()

        # Draw background
        painter.fillRect(rect, QColor(200, 200, 200))

        # Draw the two waves
        pen1 = QPen(QColor(0, 100, 200), 2)  # Deep blue for the lower wave
        pen2 = QPen(QColor(173, 216, 230), 2)  # Light blue for the upper wave
        painter.setPen(pen1)

        for x in range(rect.left(), rect.right(), 10):
            y1 = rect.bottom() - int(
                self.wave1_amplitude
                * math.sin((x - self.offset_x) / self.wave_length * 2 * math.pi)
            )
            y2 = rect.left() + x
            painter.drawLine(y2, rect.bottom(), y2, y1)

        painter.setPen(pen2)
        for x in range(rect.left(), rect.right(), 10):
            y1 = rect.bottom() - int(
                self.wave2_amplitude
                * math.sin(
                    ((x - self.offset_x) / self.wave_length + self.phase_shift)
                    * 2
                    * math.pi
                )
            )
            y2 = rect.left() + x
            painter.drawLine(
                y2,
                y1 if y1 > rect.top() else rect.top(),
                y2,
                rect.bottom() if y1 < rect.bottom() else y1,
            )

        painter.end()


if __name__ == "__main__":
    app = QApplication(sys.argv)
    widget = WaterWaveWidget()
    widget.show()
    sys.exit(app.exec_())
3. 学到的知识点
3.1 QTimer定时器
参考文章:Qt 定时器 (QTimer)的几种使用方法
使用QTimer定时器类(这种方法普遍使用)
- 首先创建一个定时器类的对象
- QTimer *timer = new QTimer(this);
- timer 超时后会发出timeout()信号,所以在创建好定时器对象后给其建立信号与槽
- connect(timer, SIGNAL(timeout()), this, SLOT(onTimeout()));
- 在需要开启定时器的地方调用
-
void QTimer::start ( int msec );
-
这个start函数参数也是毫秒级别;
-
timer->start(msec );
 self.timer = QTimer(self)
 self.timer.timeout.connect(self.update_wave)
 self.timer.start(50)  # 每50毫秒更新一次
3.2 QPainterPath绘制路径
参考文章:QPainter和QPainterPath理解
QPainterPath 类(绘图路径)提供了一个容器,用于绘图操作,可以创建和重用图形形状。
绘图路径是由许多图形化的构建块组成的对象,例如:矩形、椭圆、直线和曲线。构建块可以加入在封闭的子路径中,例如:矩形或椭圆。封闭的路径的起点和终点是一致的,或者他们可以作为未封闭的子路径独立存在,如:直线和曲线。
QPainterPath 可以被填充、描绘轮廓、裁剪。要为一个指定的绘图路径生成可填充的轮廓,可以使用 QPainterPathStroker 类。与正常绘图相比,QPainterPath 的主要优点在于:复杂的图形只需创建一次,然后只需调用 QPainter::drawPath() 函数即可绘制多次。
QPainterPath 提供了一组函数,可用于获取绘图路径及其元素的信息。除了可以使用 toReversed() 函数来改变元素的顺序外,还有几个函数将 QPainterPath 对象转换成一个多边形表示。
moveTo()
void moveTo(const QPointF &point)
void moveTo(qreal x, qreal y)
把起始点移动到(x,y)
lineTo()
绘制直线
void QPainterPath::lineTo(qreal x, qreal y)
从当前点画一条直线到(x,y)点
closeSubpath()
void closeSubpath()
通过在子路径的开始处画一条线来关闭当前子路径,并自动启动一个新路径。新路径的当前点为(0,0)。如果子路径不包含任何元素,则此函数不执行任何操作。