一:安装Liunx(CentOS-6-x86_64)
安装Liunx(CentOS-6-x86_64)
二:下载MySql(5.6.50)
MySql下载官网

二:安装MySql
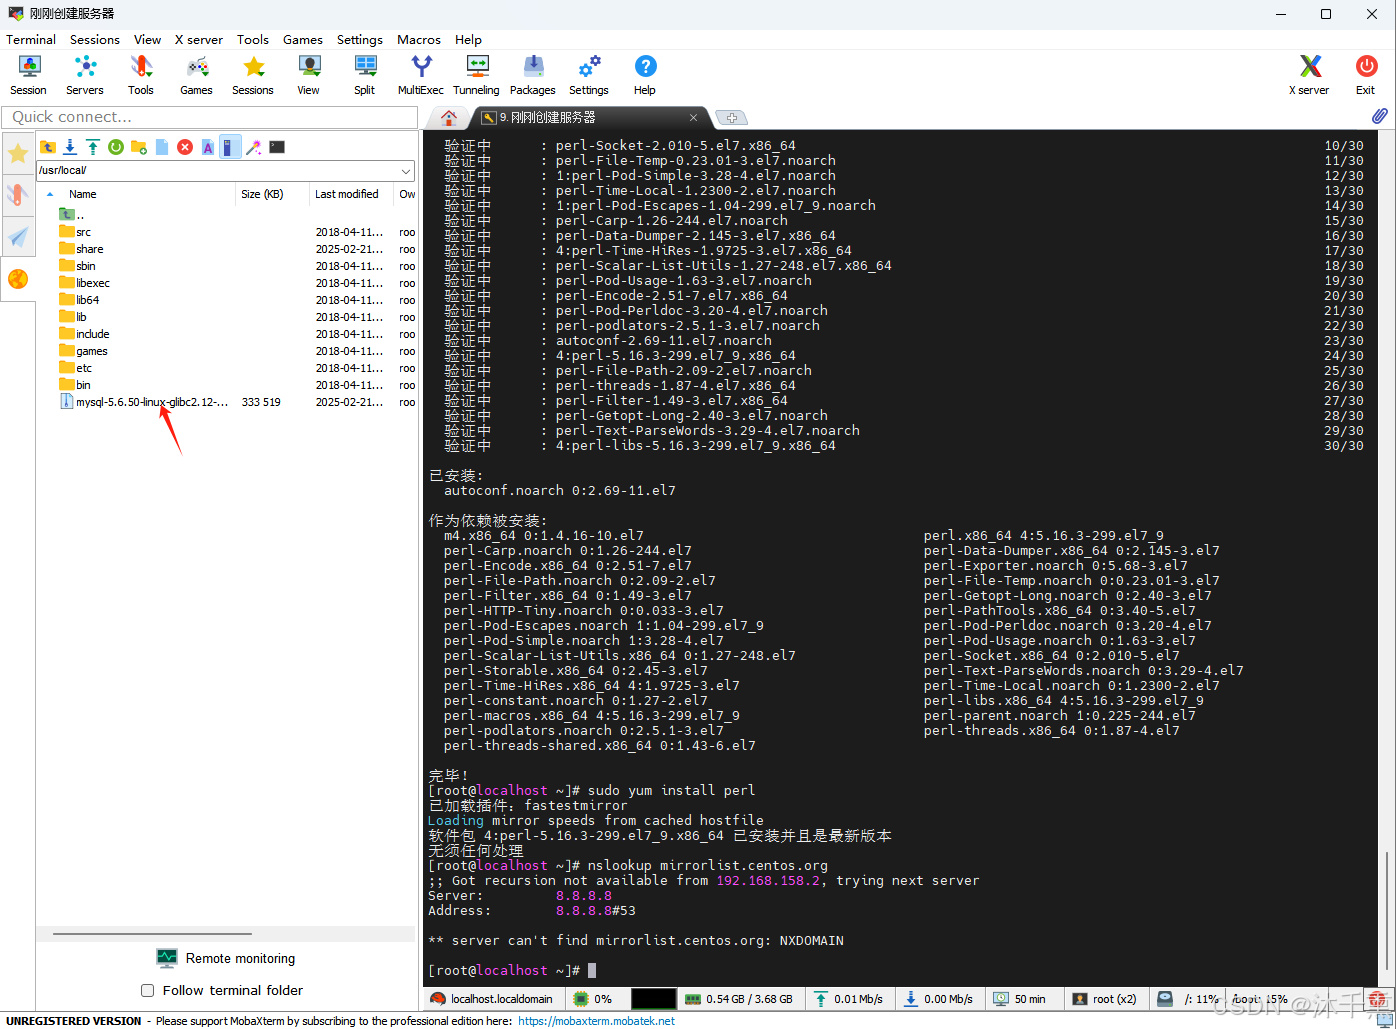
2.1 将mysql上传到Liunx
文件地址 /usr/local/
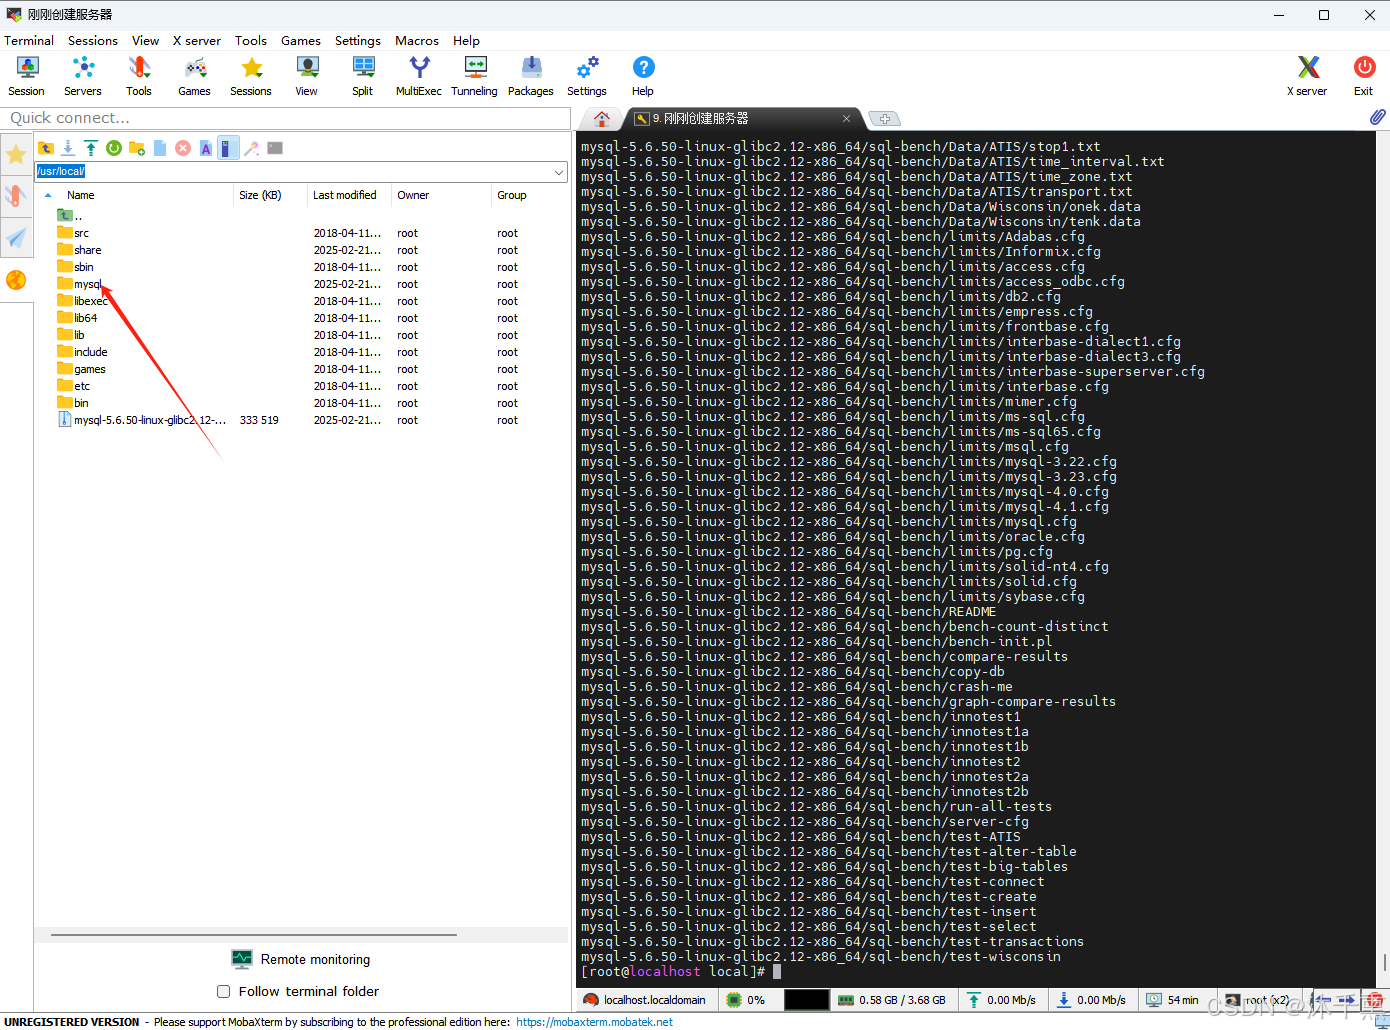
2.2 解压安装MySql
cd /usr/local/
tar zxvf mysql-5.6.50-linux-glibc2.12-x86_64.tar.gz -C /usr/local

2.3 修改解压后包的名称(方便后续的使用)
2.4 配置my.cnf文件的文件
vim /etc/my.cnf
my.cnf文件内容全部替换成下面的
[mysqld]
# 设置3306端口
port=3306
# 设置mysql的安装目录
basedir=/usr/local/mysql
# 设置mysql数据库的数据的存放目录
datadir=/usr/local/mysql/data
# 允许最大连接数
max_connections=200
# 允许连接失败的次数。
max_connect_errors=10
# 服务端使用的字符集默认为utf8mb4
character-set-server=utf8mb4
# 创建新表时将使用的默认存储引擎
default-storage-engine=INNODB
# 默认使用“mysql_native_password”插件认证
#mysql_native_password
default_authentication_plugin=mysql_native_password
[mysql]
# 设置mysql客户端默认字符集
default-character-set=utf8mb4
[client]
# 设置mysql客户端连接服务端时默认使用的端口
port=3306
default-character-set=utf8mb4
2.4 创建MySQL用户组
groupadd mysql
	创建MySQL用户组
useradd -r -g mysql mysql
	添加MySQL用户并添加到MySQL用户组
chown mysql:mysql -R /usr/local/mysql/data/
	赋予权限
2.5 将 MySQL 的 bin 目录添加到 PATH
export PATH=/usr/local/mysql/bin:$PATH
source ~/.bashrc
2.6 将初始化 MySQL
cd /usr/local/mysql/scripts/
./mysql_install_db --user=mysql --basedir=/usr/local/mysql --datadir=/usr/local/mysql/data
初始化成功的打印内容,其中打印内容中会有初始密码记得保存记录
里面的打印的初始密码
  /usr/local/mysql/bin/mysqladmin -u root password 'new-password'
  /usr/local/mysql/bin/mysqladmin -u root -h localhost.localdomain password 'new-password'
Installing MySQL system tables...2025-02-21 16:51:26 0 [Warning] TIMESTAMP with implicit DEFAULT va                                                                 lue is deprecated. Please use --explicit_defaults_for_timestamp server option (see documentation fo                                                                 r more details).
2025-02-21 16:51:26 0 [Note] Ignoring --secure-file-priv value as server is running with --bootstra                                                                 p.
2025-02-21 16:51:26 0 [Note] /usr/local/mysql/bin/mysqld (mysqld 5.6.50) starting as process 31405                                                                  ...
2025-02-21 16:51:26 31405 [Note] InnoDB: Using atomics to ref count buffer pool pages
2025-02-21 16:51:26 31405 [Note] InnoDB: The InnoDB memory heap is disabled
2025-02-21 16:51:26 31405 [Note] InnoDB: Mutexes and rw_locks use GCC atomic builtins
2025-02-21 16:51:26 31405 [Note] InnoDB: Memory barrier is not used
2025-02-21 16:51:26 31405 [Note] InnoDB: Compressed tables use zlib 1.2.11
2025-02-21 16:51:26 31405 [Note] InnoDB: Using Linux native AIO
2025-02-21 16:51:26 31405 [Note] InnoDB: Using CPU crc32 instructions
2025-02-21 16:51:26 31405 [Note] InnoDB: Initializing buffer pool, size = 128.0M
2025-02-21 16:51:26 31405 [Note] InnoDB: Completed initialization of buffer pool
2025-02-21 16:51:26 31405 [Note] InnoDB: The first specified data file ./ibdata1 did not exist: a n                                                                 ew database to be created!
2025-02-21 16:51:26 31405 [Note] InnoDB: Setting file ./ibdata1 size to 12 MB
2025-02-21 16:51:26 31405 [Note] InnoDB: Database physically writes the file full: wait...
2025-02-21 16:51:26 31405 [Note] InnoDB: Setting log file ./ib_logfile101 size to 48 MB
2025-02-21 16:51:26 31405 [Note] InnoDB: Setting log file ./ib_logfile1 size to 48 MB
2025-02-21 16:51:27 31405 [Note] InnoDB: Renaming log file ./ib_logfile101 to ./ib_logfile0
2025-02-21 16:51:27 31405 [Warning] InnoDB: New log files created, LSN=45781
2025-02-21 16:51:27 31405 [Note] InnoDB: Doublewrite buffer not found: creating new
2025-02-21 16:51:27 31405 [Note] InnoDB: Doublewrite buffer created
2025-02-21 16:51:27 31405 [Note] InnoDB: 128 rollback segment(s) are active.
2025-02-21 16:51:27 31405 [Warning] InnoDB: Creating foreign key constraint system tables.
2025-02-21 16:51:27 31405 [Note] InnoDB: Foreign key constraint system tables created
2025-02-21 16:51:27 31405 [Note] InnoDB: Creating tablespace and datafile system tables.
2025-02-21 16:51:27 31405 [Note] InnoDB: Tablespace and datafile system tables created.
2025-02-21 16:51:27 31405 [Note] InnoDB: Waiting for purge to start
2025-02-21 16:51:27 31405 [Note] InnoDB: 5.6.50 started; log sequence number 0
2025-02-21 16:51:27 31405 [Note] RSA private key file not found: /usr/local/mysql/data//private_key                                                                 .pem. Some authentication plugins will not work.
2025-02-21 16:51:27 31405 [Note] RSA public key file not found: /usr/local/mysql/data//public_key.p                                                                 em. Some authentication plugins will not work.
2025-02-21 16:51:27 31405 [Note] Binlog end
2025-02-21 16:51:27 31405 [Note] InnoDB: FTS optimize thread exiting.
2025-02-21 16:51:27 31405 [Note] InnoDB: Starting shutdown...
2025-02-21 16:51:29 31405 [Note] InnoDB: Shutdown completed; log sequence number 1625977
OK

Filling help tables...2025-02-21 16:51:29 0 [Warning] TIMESTAMP with implicit DEFAULT value is depr                                                                 ecated. Please use --explicit_defaults_for_timestamp server option (see documentation for more deta                                                                 ils).
2025-02-21 16:51:29 0 [Note] Ignoring --secure-file-priv value as server is running with --bootstra                                                                 p.
2025-02-21 16:51:29 0 [Note] /usr/local/mysql/bin/mysqld (mysqld 5.6.50) starting as process 31443                                                                  ...
2025-02-21 16:51:29 31443 [Note] InnoDB: Using atomics to ref count buffer pool pages
2025-02-21 16:51:29 31443 [Note] InnoDB: The InnoDB memory heap is disabled
2025-02-21 16:51:29 31443 [Note] InnoDB: Mutexes and rw_locks use GCC atomic builtins
2025-02-21 16:51:29 31443 [Note] InnoDB: Memory barrier is not used
2025-02-21 16:51:29 31443 [Note] InnoDB: Compressed tables use zlib 1.2.11
2025-02-21 16:51:29 31443 [Note] InnoDB: Using Linux native AIO
2025-02-21 16:51:29 31443 [Note] InnoDB: Using CPU crc32 instructions
2025-02-21 16:51:29 31443 [Note] InnoDB: Initializing buffer pool, size = 128.0M
2025-02-21 16:51:29 31443 [Note] InnoDB: Completed initialization of buffer pool
2025-02-21 16:51:29 31443 [Note] InnoDB: Highest supported file format is Barracuda.
2025-02-21 16:51:29 31443 [Note] InnoDB: 128 rollback segment(s) are active.
2025-02-21 16:51:29 31443 [Note] InnoDB: Waiting for purge to start
2025-02-21 16:51:29 31443 [Note] InnoDB: 5.6.50 started; log sequence number 1625977
2025-02-21 16:51:29 31443 [Note] RSA private key file not found: /usr/local/mysql/data//private_key                                                                 .pem. Some authentication plugins will not work.
2025-02-21 16:51:29 31443 [Note] RSA public key file not found: /usr/local/mysql/data//public_key.p                                                                 em. Some authentication plugins will not work.
2025-02-21 16:51:29 31443 [Note] Binlog end
2025-02-21 16:51:29 31443 [Note] InnoDB: FTS optimize thread exiting.
2025-02-21 16:51:29 31443 [Note] InnoDB: Starting shutdown...
2025-02-21 16:51:30 31443 [Note] InnoDB: Shutdown completed; log sequence number 1625987
OK

To start mysqld at boot time you have to copy
support-files/mysql.server to the right place for your system

PLEASE REMEMBER TO SET A PASSWORD FOR THE MySQL root USER !
To do so, start the server, then issue the following commands:

  /usr/local/mysql/bin/mysqladmin -u root password 'new-password'
  /usr/local/mysql/bin/mysqladmin -u root -h localhost.localdomain password 'new-password'

Alternatively you can run:

  /usr/local/mysql/bin/mysql_secure_installation

which will also give you the option of removing the test
databases and anonymous user created by default.  This is
strongly recommended for production servers.

See the manual for more instructions.

You can start the MySQL daemon with:

  cd . ; /usr/local/mysql/bin/mysqld_safe &

You can test the MySQL daemon with mysql-test-run.pl

  cd mysql-test ; perl mysql-test-run.pl

Please report any problems at http://bugs.mysql.com/

The latest information about MySQL is available on the web at

  http://www.mysql.com

Support MySQL by buying support/licenses at http://shop.mysql.com

New default config file was created as /usr/local/mysql/my.cnf and
will be used by default by the server when you start it.
You may edit this file to change server settings

WARNING: Default config file /etc/my.cnf exists on the system
This file will be read by default by the MySQL server
If you do not want to use this, either remove it, or use the
--defaults-file argument to mysqld_safe when starting the server
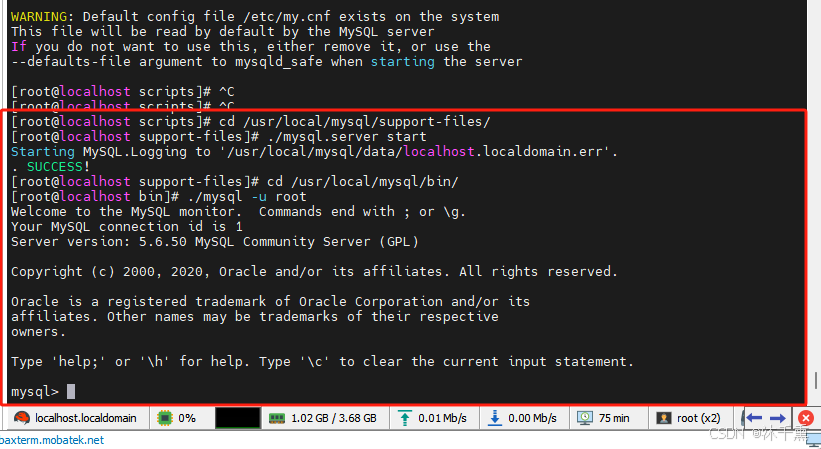
三:启动MySql
cd /usr/local/mysql/support-files/
./mysql.server start
启动成功的打印内容
[root@localhost scripts]# cd /usr/local/mysql/support-files/
[root@localhost support-files]# ./mysql.server start
Starting MySQL.Logging to '/usr/local/mysql/data/localhost.localdomain.err'.
. SUCCESS!
[root@localhost support-files]#

四:登录配置MySql
4.1:登录MySQL
cd /usr/local/mysql/bin/
./mysql -u root
使用sql验证一下
SELECT VERSION();

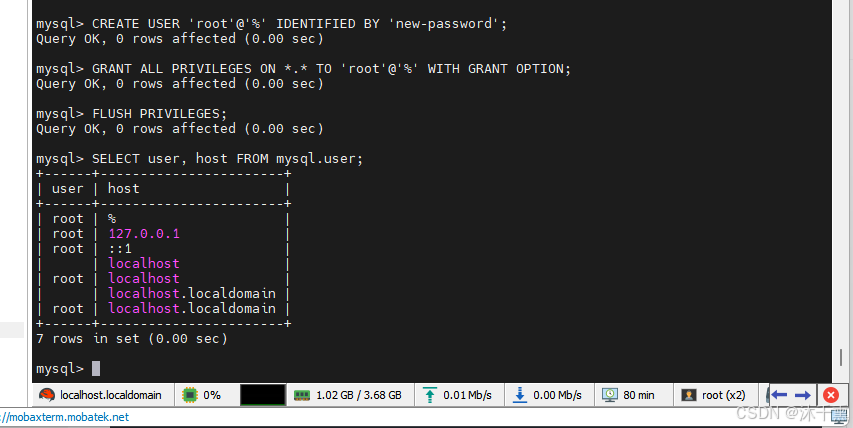
4.2:检查 root 用户的权限:确保 root 用户的主机是 localhost 或 %(允许远程登录)。
SELECT user, host FROM mysql.user;
其中没有%(远程登录链接的权限)

4.3:创建新用户并授予权限(远程链接的权限)
FLUSH PRIVILEGES; 是刷新权限
CREATE USER 'root'@'%' IDENTIFIED BY 'new-password';
GRANT ALL PRIVILEGES ON *.* TO 'root'@'%' WITH GRANT OPTION;
FLUSH PRIVILEGES;
五:设置MySql开机自启动
复制 MySQL 提供的启动脚本到系统目录:
cp /usr/local/mysql/support-files/mysql.server /etc/init.d/mysqld
赋予脚本可执行权限:
chmod +x /etc/init.d/mysqld
添加到开机启动
chkconfig --add mysqld
chkconfig mysqld on

六:开启3306端口防火墙,远程链接数据库
6.1:开启3306端口防火墙
添加3306端口规则
firewall-cmd --zone=public --add-port=3306/tcp --permanent
重新加载防火墙规则
firewall-cmd --reload
验证规则是否生效,如果返回 yes,说明端口已开放
firewall-cmd --zone=public --query-port=3306/tcp
最好打印yes就是将3306端口开放了

6.2:远程链接数据库


七:报错
7.1:使用 sudo yum install 进行下载插件的错误
http://mirrorlist.centos.org/?release=7&arch=x86_64&repo=os&infra=stock error was 14: curl 注意:
原因
如果报下面的报错信息是因为 没有配置仓库
解决方法
在 Liunx教程中。3.配置仓库(用于yum下载)这个节点操作一遍
报错信息
已加载插件:fastestmirror
Loading mirror speeds from cached hostfile
Could not retrieve mirrorlist http://mirrorlist.centos.org/?release=7&arch=x86_64&repo=os&infra=stock error was
14: curl#6 - "Could not resolve host: mirrorlist.centos.org; 未知的错误"


 One of the configured repositories failed (未知),
 and yum doesn't have enough cached data to continue. At this point the only
 safe thing yum can do is fail. There are a few ways to work "fix" this:

     1. Contact the upstream for the repository and get them to fix the problem.

     2. Reconfigure the baseurl/etc. for the repository, to point to a working
        upstream. This is most often useful if you are using a newer
        distribution release than is supported by the repository (and the
        packages for the previous distribution release still work).

     3. Run the command with the repository temporarily disabled
            yum --disablerepo=<repoid> ...

     4. Disable the repository permanently, so yum won't use it by default. Yum
        will then just ignore the repository until you permanently enable it
        again or use --enablerepo for temporary usage:

            yum-config-manager --disable <repoid>
        or
            subscription-manager repos --disable=<repoid>

     5. Configure the failing repository to be skipped, if it is unavailable.
        Note that yum will try to contact the repo. when it runs most commands,
        so will have to try and fail each time (and thus. yum will be be much
        slower). If it is a very temporary problem though, this is often a nice
        compromise:

            yum-config-manager --save --setopt=<repoid>.skip_if_unavailable=true

Cannot find a valid baseurl for repo: base/7/x86_64
7.2 ./mysql_install_db 命令报错
错误信息
FATAL ERROR: please install the following Perl modules before executing ./mysql_install_db:
Data::Dumper
解决方式 安装 autoconf
yum -y install autoconf
7.3 mysql_install_db 失败 报 Table ‘mysql.plugin’ doesn’t exist,
解决方式
重新初始化数据目录。
7.4 忘记 root 密码
停止 MySQL 服务,然后以跳过权限检查的方式启动:
mysqld_safe --skip-grant-tables &
登录 MySQL 并重置密码:
UPDATE mysql.user SET Password=PASSWORD('new_password') WHERE User='root';
FLUSH PRIVILEGES;
7.5 -bash: ./mysql_install_db: /usr/bin/perl: 坏的解释器: 没有那个文件或目录
问题原因
mysql_install_db 是一个 Perl 脚本,需要 Perl 解释器来运行。
解决方法
安装 Perl
sudo yum install perl
7.6 nslookup mirrorlist.centos.org 这个命令无法使用,显示没有这个命令
解决方法
安装 bind-utils
sudo yum install bind-utils