一、Spring的概述
(一)什么是Spring?
Spring是针对bean对象的生命周期进行管理的轻量级容器。提供了功能强大IOC、AOP及Web MVC等功能。Spring框架主要由七部分组成:分别是 Spring Core、 Spring AOP、 Spring ORM、 Spring DAO、Spring Context、 Spring Web和 Spring Web MVC。
官网:https://spring.io/
(二)Spring核心功能
Spring框架可以和任意框架进行整合。
IOC——控制反转
DI——依赖注入
AOP——面向切面
(三)Spring的好处
高内聚低耦合
高内聚:让方法责任更加单一,更加纯粹,最大程度的保证内聚以及责任单一
低耦合:减少代码之间的关联,即一个类对另外一个类的依赖程度,极可能让类与类之间的关联降到最低
原则:
责任单一原则:需要用整个编程生涯来贯彻
最少知道原则:禁止跨级调用;让一个类认识/调用最少的类
简化事务:仅仅使用一个注解,就能让事务生效
集成了Junit,方便测试
简化了开发
方便集成各种框架:使用Spring去管理所有的框架
二、IOC(控制反转)
(一)IOC的概念
控制权从应用程序代码转移到外部容器,由容器负责管理对象的创建和依赖关系。
(二)创建Spring项目
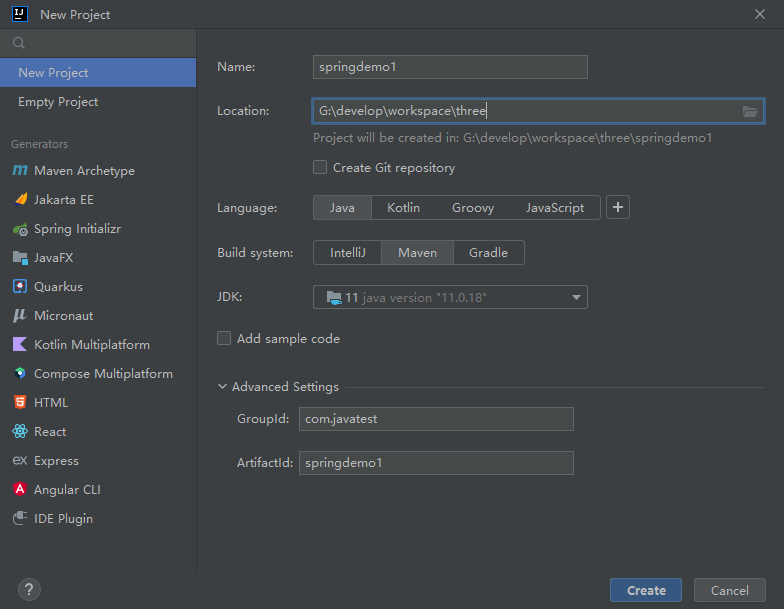
添加依赖
<dependencies>
  <dependency>
    <groupId>org.springframework</groupId>
    <artifactId>spring-context</artifactId>
    <version>5.1.9.RELEASE</version>
  </dependency>

  <dependency>
    <groupId>org.projectlombok</groupId>
    <artifactId>lombok</artifactId>
    <version>1.18.30</version>
    <scope>provided</scope>
  </dependency>
 </dependencies>
创建spring配置文件:spring1.xml
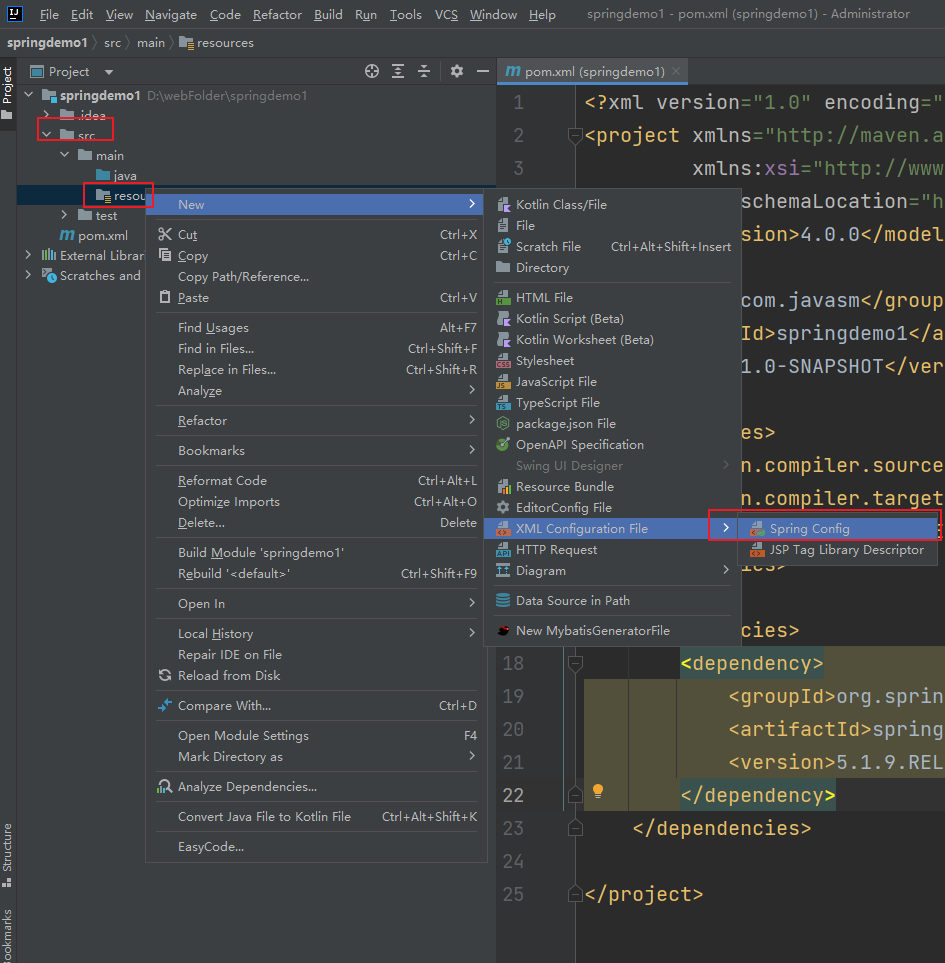
编辑spring.xml来管理bean
<?xml version="1.0" encoding="UTF-8"?>
<beans xmlns="http://www.springframework.org/schema/beans"
       xmlns:xsi="http://www.w3.org/2001/XMLSchema-instance"
       xsi:schemaLocation="http://www.springframework.org/schema/beans
       http://www.springframework.org/schema/beans/spring-beans.xsd">

    <!--当前的Student类交给了Spring容器去创建-->
    <bean id="stu" class="com.javatest.demo.Student"/>
</beans>
创建Student类
@Getter
@Setter
public class Student {
    private Integer id;
    private String name;
    private Integer age;
}
测试类
private static void test1() {
    // 从类加载路径中,加载配置文件spring1.xml
    // 读取配置文件中的内容
    // 解析xml标签
    // 创建一个bean的集合,new一个对象,存入bean的集合等待调用
    // applicationContext 实际上就是Spring容器对象
    // 不论是否调用bean对象,在Spring容器初始化的时候,都会创建bean对象
    ClassPathXmlApplicationContext applicationContext =
        new ClassPathXmlApplicationContext("spring1.xml");
    // 从Spring容器中,寻找id=stu的bean对象
    Student stu= (Student) applicationContext.getBean("stu");
    // 赋值
    stu.setId(100);
    stu.setName("张三");
    stu.setAge(11);
    System.out.println(stu);
}
运行结果:
----------Student创建了-------------
Student(id=100, name=张三, age=11)(三)Spring的启动原理
程序启动 → 读取xml文件 → 解析xml配置文件 → 读取了bean标签的内容 → 通过反射,初始化bean对象(new对象) → bean对象 存入Spring容器,等待调用。
代码实现:
public static void main(String[] args) throws Exception {
    test4();
}
private static void test4() throws ClassNotFoundException, NoSuchMethodException, InvocationTargetException, InstantiationException, IllegalAccessException {
    Student student = (Student) test3("stu");
    student.setId(10);
    student.setName("张三");
    student.setAge(30);
    System.out.println(student);
    // Student(id=10, name=张三, age=30)
}
private static Object test3(String id) throws ClassNotFoundException, NoSuchMethodException, InvocationTargetException, InstantiationException, IllegalAccessException {
    Map<String, Object> map = test2();
    Object o = map.get(id);
    return o;
}
private static Map<String, Object> test2() throws ClassNotFoundException, NoSuchMethodException, InvocationTargetException, InstantiationException, IllegalAccessException {
    String id = "stu";
    String className = "com.javatest.demo.Student";
    Class<?> aClass = Class.forName(className);
    Object o = aClass.getConstructor().newInstance();
    Map<String, Object> springApplication = new ConcurrentHashMap<>();
    springApplication.put(id, o);
    return springApplication;
}
运行结果:
---------------Student对象被创建了---------------
Student(id=10, name=张三, age=30)
(四)Spring中获取bean的三种方式
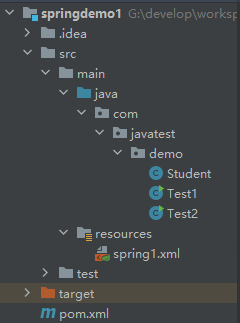
Studen类:
@Getter
@Setter
//@ToString
public class Student {
    private Integer id;
    private String name;
    private Integer age;
    public Student(){
        System.out.println("---------------Student对象被创建了---------------");
    }
}
spring1.xml配置文件:
<?xml version="1.0" encoding="UTF-8"?>
<beans xmlns="http://www.springframework.org/schema/beans"
       xmlns:xsi="http://www.w3.org/2001/XMLSchema-instance"
       xsi:schemaLocation="http://www.springframework.org/schema/beans
       http://www.springframework.org/schema/beans/spring-beans.xsd">

    <!--当前的Student类交给了Spring容器去创建-->
    <bean id="stu" class="com.javasm.demo.Student"/>
</beans>
Spring获取bean的三种方式:
public class Test2 {
    static ClassPathXmlApplicationContext applicationContext =
            new ClassPathXmlApplicationContext("spring1.xml");

    public static void main(String[] args) throws Exception {
        test1();
    }

    /**
     * 获取bean的方式
     */
    private static void test1() {
        // 根据id获取
        Student student = (Student) applicationContext.getBean("stu");
        System.out.println(student);

        // 根据类型获取
        Student student1 = applicationContext.getBean(Student.class);
        System.out.println(student1);

        // 根据id+类型获取
        Student student2 = applicationContext.getBean("stu", Student.class);
        System.out.println(student2);
    }
}
运行结果:
----------Student创建了-------------
com.javatest.demo.Student@6989da5e
com.javatest.demo.Student@6989da5e
com.javatest.demo.Student@6989da5e
(五)bean别名
<!--别名,不常用-->
<alias name="stu" alias="s"/>
Student s = context.getBean("s", Student.class);(六)Spring创建bean的几种方式
1.无参构造(最常用)
<bean id="stu" class="com.javatest.demo.Student"/>2.静态工厂创建bean对象
<bean id="xiaoming" class="com.javatest.demo.StudentStaticFactory" factory-method="getStudent"/>public class StudentStaticFactory {
public static Student getStudent() {
Student student = new Student();
student.setName("小明");
return student;
}
}private static void test3() {
Object xiaoming = applicationContext.getBean("xiaoming");
System.out.println(xiaoming);
// Student(id=null, name=小明, age=null)
}3.实例工厂创建bean对象
<bean id="stuFactory" class="com.javatest.demo.StudentFactory"/>
<bean id="xiaohong" factory-bean="stuFactory" factory-method="getStudent"/>
public class StudentFactory {
public Student getStudent() {
Student student = new Student();
student.setName("小红");
return student;
}
}private static void test4() {
Object xiaohong = applicationContext.getBean("xiaohong");
System.out.println(xiaohong);
// Student(id=null, name=小红, age=null)
}4.Spring工厂创建bean对象
<bean id="huowang" class="com.javatest.demo.StudentSpringFactory"/>public class StudentSpringFactory implements FactoryBean<Student> {
@Override
public Student getObject() throws Exception {
//返回的对象是什么,Spring容器中存什么
Student student = new Student();
student.setName("李火旺");
return student;
}
@Override
public Class<?> getObjectType() {
return Student.class;
}
@Override
public boolean isSingleton() {
//是否是单例
//true:单例
//false:多例
//默认是true
return true;
}
}private static void test5() {
Object huowang = applicationContext.getBean("huowang");
System.out.println(huowang);
Object huowang1 = applicationContext.getBean("huowang");
System.out.println(huowang1);
// com.javatest.demo.Student@489115ef
// com.javatest.demo.Student@489115ef
}(七)单例
Spring的bean对象,在默认情况下,都是单例的
<bean id="teacher" class="com.javasm.demo.Teacher" scope="prototype"/>单例:Spring启动 → 加载解析XML文件 → 创建Bean对象 →bean保存到容器 →随着容器关闭销毁
多例:Spring启动→加载解析XML文件→先把解析的内容记录下来→调用的时候创建bean
(八)懒加载
不使用不创建对象
仅仅对单例生效:
<bean id="teacher1" class="com.javasm.demo.Teacher" lazy-init="true"/>全局配置:
<beans xmlns="http://www.springframework.org/schema/beans"
       xmlns:xsi="http://www.w3.org/2001/XMLSchema-instance"
       xsi:schemaLocation="http://www.springframework.org/schema/beans
       http://www.springframework.org/schema/beans/spring-beans.xsd"
       default-lazy-init="true"
>
(九)初始化&销毁
@Getter
@Setter
public class Teacher {
    private Integer id;
    private String name;

    public Teacher(Integer id, String name) {
        this.id = id;
        this.name = name;
    }

    public Teacher() {
        System.out.println("------------Teacher---------");
    }

    public void test1() {
        System.out.println("我是Test1-----------初始化");
    }

    public void test2() {
        System.out.println("我是Test2=============销毁");
    }
}
<bean id="teacher2" class="com.javatest.demo.Teacher" init-method="test1" destroy-method="test2"/>private static void test7() {
Object teacher2 = applicationContext.getBean("teacher2");
System.out.println(teacher2);
applicationContext.close();
}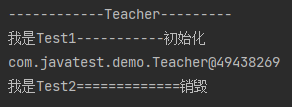
执行顺序:
- 构造方法
- 初始化方法
- 正常调用方法
- ---销毁
- 关闭容器
三、DI(依赖注入)
(一)DI的概念
通过外部容器将依赖的对象传递给类,而不是让类自己创建或查找依赖,从而实现松耦合。
(二)代码实现
1.实体类
@Data
@NoArgsConstructor
@AllArgsConstructor
public class Game {
    private Integer id;
    private String name;
    private Double price;
    //公司
    private Company company;
    //英雄列表
    private String[] heros;
    //关卡
    private List<String> levels;
    //背包
    private Map<Integer, String> items;
    //成就
    private Set<String> achievements;
    //游戏配置
    private Properties gameConfig;

    //玩家列表
    private List<Player> playerList;
}
@Data
public class Company {
private String name;
private String address;
}@Data
public class Player {
private Integer id;
private String nickname;
}2.spring2.xml
<?xml version="1.0" encoding="UTF-8"?>
<beans xmlns="http://www.springframework.org/schema/beans"
       xmlns:xsi="http://www.w3.org/2001/XMLSchema-instance"
       xsi:schemaLocation="http://www.springframework.org/schema/beans
       http://www.springframework.org/schema/beans/spring-beans.xsd">

    <bean id="game" class="com.javatest.demo2.Game">
        <property name="id" value="1000"/>
        <property name="name" value="黑神话·悟空"/>
        <property name="price" value="648.88"/>
        <!--公司-->
        <property name="company" ref="company"/>

        <!--英雄列表-->
        <property name="heros">
            <array>
                <value>孙悟空</value>
                <value>杨戬</value>
                <value>哪吒</value>
            </array>
        </property>

        <!--关卡列表-->
        <property name="levels">
            <list>
                <value>黑风寨</value>
                <value>黄风岭</value>
                <value>小西天</value>
            </list>
        </property>

        <!--背包列表-->
        <property name="items">
            <map>
                <entry key="1001" value="金箍棒"/>
                <entry key="1002" value="三尖两刃刀"/>
                <entry key="1003" value="定风珠"/>
            </map>
        </property>

        <!--成就列表-->
        <property name="achievements">
            <set>
                <value>借刀杀人</value>
                <value>顺手牵羊</value>
                <value>万箭齐发</value>
            </set>
        </property>

        <!--游戏配置列表-->
        <property name="gameConfig">
            <props>
                <prop key="maxPlayer">100</prop>
                <prop key="maxLevel">120</prop>
            </props>
        </property>

        <!--玩家列表-->
        <property name="playerList">
            <list>
                <bean class="com.javatest.demo2.Player">
                    <property name="id" value="1001"/>
                    <property name="nickname" value="玩家1"/>
                </bean>

                <ref bean="player2"/>
            </list>
        </property>
    </bean>
    <bean id="company" class="com.javatest.demo2.Company">
        <property name="name" value="游戏科学"/>
        <property name="address" value="杭州"/>
    </bean>

    <bean id="player2" class="com.javatest.demo2.Player">
        <property name="id" value="1002"/>
        <property name="nickname" value="玩家2"/>
    </bean>
</beans>
3.测试类
public class Test {
    static ClassPathXmlApplicationContext applicationContext =
            new ClassPathXmlApplicationContext("spring2.xml");

    public static void main(String[] args) {
        test1();
    }

    private static void test1() {
        Game game = applicationContext.getBean("game", Game.class);
        System.out.println(game);
    }
}
4.运行结果
Game(id=1000, name=黑神话·悟空, price=648.88,
company=Company(name=游戏科学, address=杭州),
heros=[孙悟空, 杨戬, 哪吒],
levels=[黑风寨, 黄风岭, 小西天],
items={1001=金箍棒, 1002=三尖两刃刀, 1003=定风珠},
achievements=[借刀杀人, 顺手牵羊, 万箭齐发],
gameConfig={maxLevel=120, maxPlayer=100},
playerList=[Player(id=1001, nickname=玩家1), Player(id=1002, nickname=玩家2)])
(三)自动装配
<!--autowire 自动装配:byType 根据属性的类型,去Spring容器中寻找对应的bean对象,如果找到了,自动赋值给对应的属性-->
<bean id="g2" class="com.javatest.demo2.Game" autowire="byType"/>
<!--autowire 自动装配:byName 根据属性的名字,去寻找id和属性名一样的bean-->
<bean id="g3" class="com.javatest.demo2.Game" autowire="byName"/>
全局配置:
<?xml version="1.0" encoding="UTF-8"?>
<beans xmlns="http://www.springframework.org/schema/beans"
       xmlns:xsi="http://www.w3.org/2001/XMLSchema-instance"
       xsi:schemaLocation="http://www.springframework.org/schema/beans
       http://www.springframework.org/schema/beans/spring-beans.xsd"
    default-autowire="byName"
>
(四)构造方法的注入
Music类:
@Data
public class Music {
    private Integer id;
    private String name;
    private String time;
    private Company company;

    public Music(Integer id, String name, String time, Company company) {
        this.id = id;
        this.name = name;
        this.time = time;
        this.company = company;
    }
}
spring3.xml:
<?xml version="1.0" encoding="UTF-8"?>
<beans xmlns="http://www.springframework.org/schema/beans"
       xmlns:xsi="http://www.w3.org/2001/XMLSchema-instance"
       xsi:schemaLocation="http://www.springframework.org/schema/beans
       http://www.springframework.org/schema/beans/spring-beans.xsd">

    <bean id="company" class="com.javatest.demo2.Company">
        <property name="name" value="酷狗音乐"/>
        <property name="address" value="北京"/>
    </bean>
    <!--
        index:构造方法第几个参数
        name: 构造方法的参数名称
        推荐使用index配置参数
    -->
    <bean id="music" class="com.javatest.demo3.Music">
        <constructor-arg name="id" value="100" type="java.lang.Integer"/>
        <constructor-arg index="1" value="云顶天宫"/>
        <constructor-arg index="2" value="10mins"/>
        <constructor-arg index="3" ref="company"/>
    </bean>
</beans>
四、Spring中常见异常
1.bean的id写错了,没有找到名字是stu1的bean对象

2.根据类型,从Spring容器中获取bean对象,但是容器中有两个bean对象,是相同类型的,所以报错
因为要找1个bean,但是发现了2个
<?xml version="1.0" encoding="UTF-8"?>
<beans xmlns="http://www.springframework.org/schema/beans"
       xmlns:xsi="http://www.w3.org/2001/XMLSchema-instance"
       xsi:schemaLocation="http://www.springframework.org/schema/beans
       http://www.springframework.org/schema/beans/spring-beans.xsd">

    <!--当前的Student类交给了Spring容器去创建-->
    <bean id="stu" class="com.javatest.demo.Student"/>
    <bean id="stu1" class="com.javatest.demo.Student"/>
</beans>
---------------Student对象被创建了---------------
---------------Student对象被创建了---------------
com.javatest.demo.Student@6989da5e
Exception in thread "main" org.springframework.beans.factory.NoUniqueBeanDefinitionException:
No qualifying bean of type 'com.javatest.demo.Student' available:
expected single matching bean but found 2: stu,stu1
	at org.springframework.beans.factory.support.DefaultListableBeanFactory.resolveNamedBean(DefaultListableBeanFactory.java:1144)
	at org.springframework.beans.factory.support.DefaultListableBeanFactory.resolveBean(DefaultListableBeanFactory.java:411)
	at org.springframework.beans.factory.support.DefaultListableBeanFactory.getBean(DefaultListableBeanFactory.java:344)
	at org.springframework.beans.factory.support.DefaultListableBeanFactory.getBean(DefaultListableBeanFactory.java:337)
	at org.springframework.context.support.AbstractApplicationContext.getBean(AbstractApplicationContext.java:1123)
	at com.javatest.demo.Test2.test1(Test2.java:29)
	at com.javatest.demo.Test2.main(Test2.java:18)
3.类中没有无参构造,报错
要养成一个习惯,只要写有参构造,不论是否需要无参构造,都要写一个
12月 20, 2024 9:50:48 下午 org.springframework.context.support.AbstractApplicationContext refresh
警告: Exception encountered during context initialization - cancelling refresh attempt: org.springframework.beans.factory.BeanCreationException: Error creating bean with name 'teacher' defined in class path resource [spring1.xml]: Instantiation of bean failed; nested exception is org.springframework.beans.BeanInstantiationException: Failed to instantiate [com.javatest.demo.Teacher]: No default constructor found; nested exception is java.lang.NoSuchMethodException: com.javatest.demo.Teacher.<init>()
Exception in thread "main" java.lang.ExceptionInInitializerError
Caused by: org.springframework.beans.factory.BeanCreationException: Error creating bean with name 'teacher' defined in class path resource [spring1.xml]: Instantiation of bean failed; nested exception is org.springframework.beans.BeanInstantiationException: Failed to instantiate [com.javatest.demo.Teacher]: No default constructor found; nested exception is java.lang.NoSuchMethodException: com.javatest.demo.Teacher.<init>()
	at org.springframework.beans.factory.support.AbstractAutowireCapableBeanFactory.instantiateBean(AbstractAutowireCapableBeanFactory.java:1303)
	at org.springframework.beans.factory.support.AbstractAutowireCapableBeanFactory.createBeanInstance(AbstractAutowireCapableBeanFactory.java:1197)
	at org.springframework.beans.factory.support.AbstractAutowireCapableBeanFactory.doCreateBean(AbstractAutowireCapableBeanFactory.java:555)
	at org.springframework.beans.factory.support.AbstractAutowireCapableBeanFactory.createBean(AbstractAutowireCapableBeanFactory.java:515)
	at org.springframework.beans.factory.support.AbstractBeanFactory.lambda$doGetBean$0(AbstractBeanFactory.java:320)
	at org.springframework.beans.factory.support.DefaultSingletonBeanRegistry.getSingleton(DefaultSingletonBeanRegistry.java:222)
	at org.springframework.beans.factory.support.AbstractBeanFactory.doGetBean(AbstractBeanFactory.java:318)
	at org.springframework.beans.factory.support.AbstractBeanFactory.getBean(AbstractBeanFactory.java:199)
	at org.springframework.beans.factory.support.DefaultListableBeanFactory.preInstantiateSingletons(DefaultListableBeanFactory.java:845)
	at org.springframework.context.support.AbstractApplicationContext.finishBeanFactoryInitialization(AbstractApplicationContext.java:877)
	at org.springframework.context.support.AbstractApplicationContext.refresh(AbstractApplicationContext.java:549)
	at org.springframework.context.support.ClassPathXmlApplicationContext.<init>(ClassPathXmlApplicationContext.java:144)
	at org.springframework.context.support.ClassPathXmlApplicationContext.<init>(ClassPathXmlApplicationContext.java:85)
	at com.javatest.demo.Test2.<clinit>(Test2.java:14)
Caused by: org.springframework.beans.BeanInstantiationException: Failed to instantiate [com.javatest.demo.Teacher]: No default constructor found; nested exception is java.lang.NoSuchMethodException: com.javatest.demo.Teacher.<init>()
	at org.springframework.beans.factory.support.SimpleInstantiationStrategy.instantiate(SimpleInstantiationStrategy.java:83)
	at org.springframework.beans.factory.support.AbstractAutowireCapableBeanFactory.instantiateBean(AbstractAutowireCapableBeanFactory.java:1295)
	... 13 more
Caused by: java.lang.NoSuchMethodException: com.javatest.demo.Teacher.<init>()
	at java.base/java.lang.Class.getConstructor0(Class.java:3349)
	at java.base/java.lang.Class.getDeclaredConstructor(Class.java:2553)
	at org.springframework.beans.factory.support.SimpleInstantiationStrategy.instantiate(SimpleInstantiationStrategy.java:78)
	... 14 more

Process finished with exit code 1
