✍Qt自定义带图标按钮
📝问题引入
近段时间的工作中,有遇到这样一个需求 📝:一个按钮,有normal、hover、pressed三种状态的样式,并且normal和hover样式下,字体颜色和按钮图标不一样。
分析这个需求,背景色和文字颜色容易实现,复杂的点在于图标和隐藏的一个点——文字和图标的间距以及文字的换行。常规的样式表只能实现背景色、文字颜色,无法设置hover和normal状态下,不同的icon。当然,我们有很多种方式来实现这个需求:例如创建一个继承自QWidget的类,并在里面添加文字label和图标label。但这种方式需要处理按钮的点击事件(毕竟一个按钮不可能光秃秃的放在那里,肯定会有点击操作)。
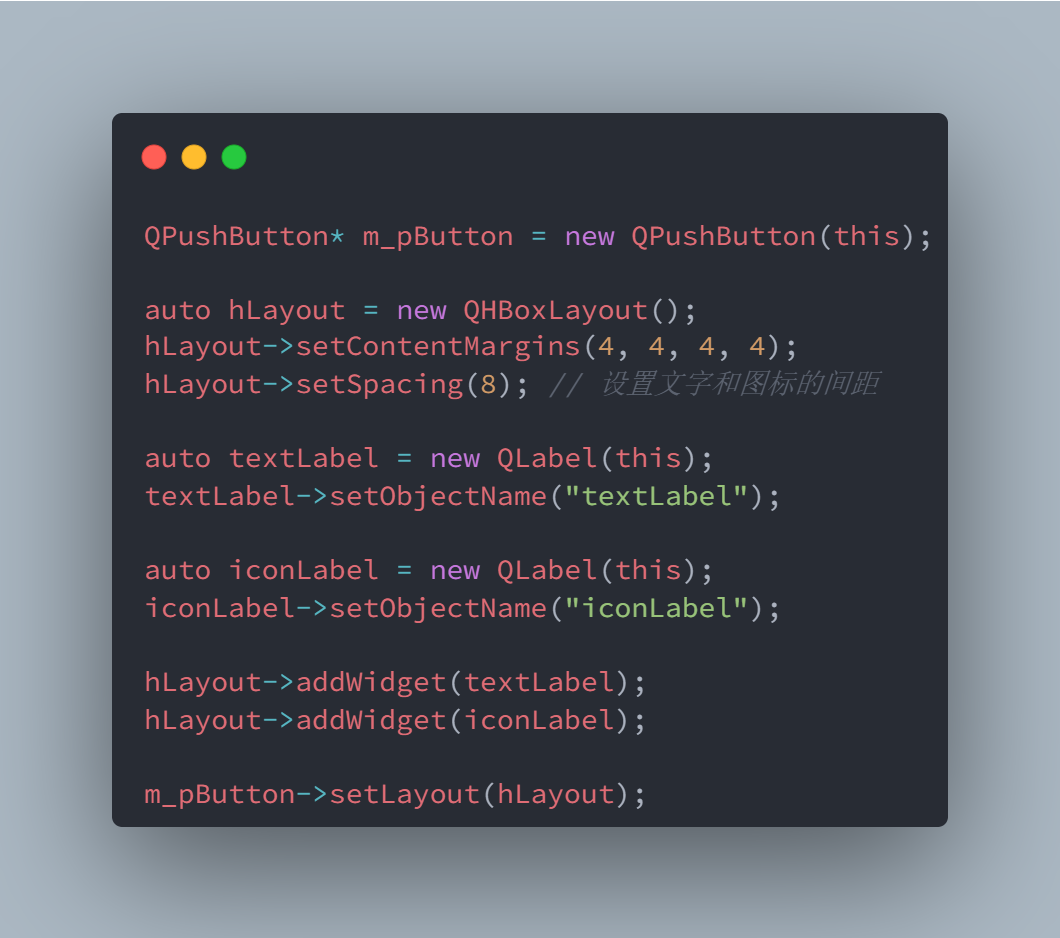
我采用的方案是:创建一个QPushButton,并创建一个布局,在布局里塞入文字label和图标label,最后在将这个布局设置给创建的QPushButton。代码可能如下:

当然,还要处理一下按钮的hover事件:
// ... 假设你为这个按钮安装了事件过滤器
bool eventFilter(QObject* watched, QEvent* e)
{
    if (e->type() == QEvent::HoverEnter) {
        iconLabel->setProperty("LabelStatus", "Hover");
        textLabel->setProperty("LabelStatus", "Hover");
        this->style()->unpolish(iconLabel);
        this->style()->polish(iconLabel);
        this->style()->unpolish(textLabel);
        this->style()->polish(textLabel);

    } else if (e->type() == QEvent::HoverLeave) {
        iconLabel->setProperty("LabelStatus", "Normal");
        textLabel->setProperty("LabelStatus", "Normal");
        this->style()->unpolish(iconLabel);
        this->style()->polish(iconLabel);
        this->style()->unpolish(textLabel);
        this->style()->polish(textLabel);
    }

    return QWidget::eventFilter(watched, e);
}
你可以通过样式表来设置图标和文字样式:
QLabel#iconLabel[LabelStatus=Normal]
{
  border-image: url("xxx");
}

QLabel#iconLabel[LabelStatus=Hover]
{
  border-image: url("xxx_hover");
}

QLabel#textLabel[LabelStatus=Normal]
{
  color: #FFFFFF;
}

QLabel#textLabel[LabelStatus=Hover]
{
  color: #FF0000;
}
这样做一个好处就是你就不需要去单独处理点击事件(虽然都已经处理了HoverEnter和HoverLeave😓),还有一个好处是:在按钮过多时,你可以将按钮加入到QButtonGroup里,统一对按钮的点击事件进行处理。
当然,代码还可以优化,你可以将这些内容封装成类:
class MyButton : public QPushButton
{
    Q_OBJECT

public:
    MyButton(QWidget* parent)
        : QPushButton(parent)
        , m_pIconLabel{nullptr}
        , m_pTextLabel{nullptr}
    {
        auto hLayout = new QHBoxLayout();
        hLayout->setContentMargins(4, 4, 4, 4);
        hLayout->setSpacing(8);	// 设置文字和图标的间距

        m_pTextLabel = new QLabel(this);
        m_pTextLabel->setObjectName("m_pTextLabel");

        m_pIconLabel = new QLabel(this);
        m_pIconLabel->setObjectName("m_pIconLabel");

        hLayout->addWidget(m_pTextLabel);
        hLayout->addWidget(m_pIconLabel);

        this->setLayout(hLayout);
        this->installEventFilter(this);

        this->setStyleSheet(R"(
            QLabel#iconLabel[LabelStatus=Normal]
            {
              border-image: url("xxx");
            }

            QLabel#iconLabel[LabelStatus=Hover]
            {
              border-image: url("xxx_hover");
            }

            QLabel#textLabel[LabelStatus=Normal]
            {
              color: #FFFFFF;
            }

            QLabel#textLabel[LabelStatus=Hover]
            {
              color: #FF0000;
            }
        )");
    }

private:
    bool eventFilter(QObject* watched, QEvent* e) override
    {
        if (e->type() == QEvent::HoverEnter) {
            m_pIconLabel->setProperty("LabelStatus", "Hover");
            m_pTextLabel->setProperty("LabelStatus", "Hover");

            this->style()->unpolish(m_pIconLabel);
            this->style()->polish(m_pIconLabel);
            this->style()->unpolish(m_pTextLabel);
            this->style()->polish(m_pTextLabel);

        } else if (e->type() == QEvent::HoverLeave) {
            m_pIconLabel->setProperty("LabelStatus", "Normal");
            m_pTextLabel->setProperty("LabelStatus", "Normal");

            this->style()->unpolish(m_pIconLabel);
            this->style()->polish(m_pIconLabel);
            this->style()->unpolish(m_pTextLabel);
            this->style()->polish(m_pTextLabel);
        }

        return QPushButton::eventFilter(watched, e);
    }

private:
    QLabel* m_pIconLabel;
    QLabel* m_pTextLabel;
};
但当把这个按钮加到到实际的界面时,问题出现了:
// ...创建界面
auto hLayout = new QHBoxLayout(this);

auto title = new QLabel(this);
title->setText("XXXXXX");

auto btn = new MyButton(this);

hLayout->addWidget(title);
hLayout->addStrect();
hLayout->addWidget(btn);
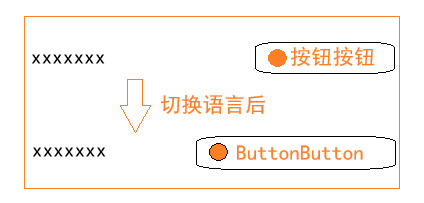
我想要的效果是:
在切换语言后,按钮的宽度能够跟随文字的长度变换而相应变宽或变窄。

但实际情况与预期有所不同😕。即使我将按钮或文字的sizePolicy设置为Expanding,效果依然不理想。而原生的QPushButton是可以根据文字宽度自动调整大小的。这是为什么呢🤔?按理说,我已经把自定义按钮内的文字标签等组件放入了一个水平布局中,它应该能够自动调整宽度,但实际上水平布局并未起作用。这种情况让我很好奇,想要去了解Qt的布局管理系统是如何工作的。
🚀Qt布局探秘
在Qt关于布局管理的[官方文档](https://doc.qt.io/qt-5/layout.html)中,有这样一句话::::success
Adding Widgets to a Layout
When you add widgets to a layout, the layout process works as follows:- All the widgets will initially be allocated an amount of space in accordance with their QWidget::sizePolicy() and QWidget::sizeHint().
:::
大致意思就是:
所有界面的初始大小将根据其尺寸策略(sizePolicy)和尺寸建议(sizeHint)进行设定。
这让我突然有了一个灵感🌟,是不是因为QPushButton的sizeHint中,计算的文字控件与我所显示的文字控件不是同一个呢?而外层布局又是直接调用QPushButton的sizeHint函数来获取宽度的,进而导致按钮的大小不如人意。为了验证我的想法,我决定到QPushButton的源码中一探究竟。
QSize QPushButton::sizeHint() const
{
    Q_D(const QPushButton);
    // ...
    QString s(text());
    bool empty = s.isEmpty();
    if (empty)
        s = QStringLiteral("XXXX");
    QFontMetrics fm = fontMetrics();
    QSize sz = fm.size(Qt::TextShowMnemonic, s);
    if(!empty || !w)
        w += sz.width();
    if(!empty || !h)
        h = qMax(h, sz.height());
    opt.rect.setSize(QSize(w, h)); // PM_MenuButtonIndicator depends on the height

    // ...
    d->sizeHint = (style()->sizeFromContents(QStyle::CT_PushButton, &opt, QSize(w, h), this).
                  expandedTo(QApplication::globalStrut()));
    return d->sizeHint;
}
事实确实是这样,QPushButton中计算的文本是通过text函数来获取的,而这个文本又是通过调用setText来设置的,我们绕过了这一步,那计算的大小就肯定不是我们想要的了。
🛠️问题的解决
看到这里,相信各位同学也都已经知道解决方法了:**实现自己的sizeHint。**最终,我们的按钮类变成了:
class MyButton : public QPushButton
{
    Q_OBJECT

public:
    MyButton(QWidget* parent)
        : QPushButton(parent)
        , m_pIconLabel{nullptr}
        , m_pTextLabel{nullptr}
        , m_pLayout{nullptr}
    {
        m_pLayout = new QHBoxLayout();
        m_pLayout->setContentMargins(4, 4, 4, 4);
        m_pLayout->setSpacing(8);	// 设置文字和图标的间距

        m_pTextLabel = new QLabel(this);
        m_pTextLabel->setObjectName("m_pTextLabel");

        m_pIconLabel = new QLabel(this);
        m_pIconLabel->setObjectName("m_pIconLabel");

        m_pLayout->addWidget(m_pTextLabel);
        m_pLayout->addWidget(m_pIconLabel);

        this->setLayout(m_pLayout);
        this->installEventFilter(this);

        this->setStyleSheet(R"(
            QLabel#iconLabel[LabelStatus=Normal]
            {
              border-image: url("xxx");
            }

            QLabel#iconLabel[LabelStatus=Hover]
            {
              border-image: url("xxx_hover");
            }

            QLabel#textLabel[LabelStatus=Normal]
            {
              color: #FFFFFF;
            }

            QLabel#textLabel[LabelStatus=Hover]
            {
              color: #FF0000;
            }
        )");
    }

    QSize sizeHint()
    {
        return m_pLayout->sizeHint();
    }

private:
    bool eventFilter(QObject* watched, QEvent* e) override
    {
        if (e->type() == QEvent::HoverEnter) {
            m_pIconLabel->setProperty("LabelStatus", "Hover");
            m_pTextLabel->setProperty("LabelStatus", "Hover");

            this->style()->unpolish(m_pIconLabel);
            this->style()->polish(m_pIconLabel);
            this->style()->unpolish(m_pTextLabel);
            this->style()->polish(m_pTextLabel);

        } else if (e->type() == QEvent::HoverLeave) {
            m_pIconLabel->setProperty("LabelStatus", "Normal");
            m_pTextLabel->setProperty("LabelStatus", "Normal");

            this->style()->unpolish(m_pIconLabel);
            this->style()->polish(m_pIconLabel);
            this->style()->unpolish(m_pTextLabel);
            this->style()->polish(m_pTextLabel);
        }

        return QPushButton::eventFilter(watched, e);
    }

private:
    QLabel* m_pIconLabel;
    QLabel* m_pTextLabel;
    QHBoxLayout* m_pLayout;
};
通过返回内部布局的尺寸,来控制按钮在布局中的尺寸。


