遗传算法与深度学习实战(20)——使用进化策略自动超参数优化
- 0. 前言
- 1. 将进化策略应用于超参数优化
- 2. 使用主成分分析扩展维度
- 小结
- 系列链接
0. 前言
我们已经学习了遗传算法 (Genetic Algorithms, GA) 的工作原理,并使用进化策略 (Evolutionary Strategies, ES) 扩展了这些概念。进化策略是遗传算法的一种形式,应用某种策略来改进遗传算子(如突变算子)。在本节中,我们将利用遗传算法和进化策略进行自动超参数优化 (Hyperparameter Optimization, HPO)。
1. 将进化策略应用于超参数优化
在进化策略 (Evolutionary Strategies, ES) 一节中,我们已经学习了如何将进化策略应用为控制突变率和应用突变的附加向量。通过这种方式控制突变,我们可以更好地集中整个种群以更快地获得解决方案。接下来,我们将使用 ES 来执行自动超参数优化 (Hyperparameter Optimization, HPO)。
(1) 导入所需库,并定义问题函数:
import numpy as np
from deap import algorithms
from deap import base
from deap import benchmarks
from deap import creator
from deap import tools
import torch
import torch.nn as nn
from torch.autograd import Variable
import torch.nn.functional as F
import torch.optim as optim
from torch.utils.data import TensorDataset, DataLoader
from matplotlib import pyplot as plt
from matplotlib import cm
from IPython.display import clear_output
import random
import math
import array
import time


def function(x):
  return (2*x + 3*x**2 + 4*x**3 + 5*x**4 + 6*x**5 + 10)

data_min = -5
data_max = 5
data_step = .5
Xi = np.reshape(np.arange(data_min, data_max, data_step), (-1, 1))
yi = function(Xi)
inputs = Xi.shape[1]
yi = yi.reshape(-1, 1)
plt.plot(Xi, yi, 'o', color='black')
plt.plot(Xi,yi, color="red")
(2) 定义网络模型以及超参数类 HyperparametersEC:
class Net(nn.Module):
    def __init__(self, inputs, middle):
        super().__init__()
        self.fc1 = nn.Linear(inputs,middle)
        self.fc2 = nn.Linear(middle,middle)
        self.out = nn.Linear(middle,1)
    def forward(self, x):
        x = F.relu(self.fc1(x))
        x = F.relu(self.fc2(x))
        x = self.out(x)
        return x

class HyperparametersEC(object):
    def __init__(self, **kwargs):
        self.__dict__.update(kwargs)
        self.hparms = [d for d in self.__dict__]

    def __str__(self):
        out = ""
        for d in self.hparms:
            ds = self.__dict__[d]
            out += f"{d} = {ds} "
        return out

    def values(self):
        vals = []
        for d in self.hparms:
            vals.append(self.__dict__[d])
        return vals

    def size(self):
        return len(self.hparms)

    def next(self, individual):
        dict = {}
        #initialize generators
        for i, d in enumerate(self.hparms):
            next(self.__dict__[d])
        for i, d in enumerate(self.hparms):
            dict[d] = self.__dict__[d].send(individual[i])
        return HyperparametersEC(**dict)

def clamp(num, min_value, max_value):
    return max(min(num, max_value), min_value)

def linespace(min,max):
    rnge = max - min
    while True:
        i = yield
        i = (clamp(i, -1.0, 1.0) + 1.0) / 2.0
        yield i * rnge + min

def linespace_int(min,max):
    rnge = max - min
    while True:
        i = yield
        i = (clamp(i, -1.0, 1.0) + 1.0) / 2.0
        yield int(i * rnge) + min

def static(val):
    while True:
        yield val

hp = HyperparametersEC(
    middle_layer = linespace_int(8, 64),
    learning_rate = linespace(3.5e-02,3.5e-01),
    batch_size = static(16),
    epochs = static(200)
)

ind = [-.5, .75, -.1, .8]
print(hp.next(ind))

cuda = True if torch.cuda.is_available() else False
print("Using CUDA" if cuda else "Not using CUDA")
Tensor = torch.cuda.FloatTensor if cuda else torch.Tensor

def generateES(icls, scls, size, imin, imax, smin, smax):
    ind = icls(random.uniform(imin, imax) for _ in range(size))
    ind.strategy = scls(random.uniform(smin, smax) for _ in range(size))
    return ind

def checkStrategy(minstrategy):
    def decorator(func):
        def wrappper(*args, **kargs):
            children = func(*args, **kargs)
            for child in children:
                for i, s in enumerate(child.strategy):
                    if s < minstrategy:
                        child.strategy[i] = minstrategy
            return children
        return wrappper
    return decorator
(3) 定义 ES 超参数。将 IND_SIZE 变量设置为超参数的数量,然后,将 MAX_STRATEGY 设置为 5 以适应更大的搜索空间:
IND_SIZE = hp.size()
NGEN = 10
MIN_VALUE = -1
MAX_VALUE = 1
MIN_STRATEGY = 0.5
MAX_STRATEGY = 5

CXPB = .6
MUTPB = .3
(4) 接下来,设置 toolbox,修改在遗传算子中使用的交叉和突变的概率:
creator.create("FitnessMin", base.Fitness, weights=(-1.0,))
creator.create("Individual", array.array, typecode="d", fitness=creator.FitnessMin, strategy=None)
creator.create("Strategy", array.array, typecode="d")

toolbox = base.Toolbox()
toolbox.register("individual", generateES, creator.Individual, creator.Strategy,
    IND_SIZE, MIN_VALUE, MAX_VALUE, MIN_STRATEGY, MAX_STRATEGY)
toolbox.register("population", tools.initRepeat, list, toolbox.individual)
toolbox.register("mate", tools.cxESBlend, alpha=0.25)
toolbox.register("mutate", tools.mutESLogNormal, c=1.0, indpb=0.06)
toolbox.register("select", tools.selTournament, tournsize=3)

toolbox.decorate("mate", checkStrategy(MIN_STRATEGY))
toolbox.decorate("mutate", checkStrategy(MIN_STRATEGY))
(5) 实现演化过程,以了解种群获得解决方案的过程:
loss_fn = nn.MSELoss()
if cuda:
    loss_fn.cuda()

def train_function(hp):
    X = np.reshape(
        np.arange(
            data_min,
            data_max,
            data_step)
        , (-1, 1))
    y = function(X)
    inputs = X.shape[1]

    tensor_x = torch.Tensor(X) # transform to torch tensor
    tensor_y = torch.Tensor(y)

    dataset = TensorDataset(tensor_x,tensor_y) # create your datset
    dataloader = DataLoader(dataset, batch_size= hp.batch_size, shuffle=True) # create your dataloader

    model = Net(inputs, hp.middle_layer)
    optimizer = optim.Adam(model.parameters(), lr=hp.learning_rate)
    if cuda:
        model.cuda()

    history=[]
    start = time.time()
    for i in range(hp.epochs):
        for X, y in iter(dataloader):
            # wrap the data in variables
            x_batch = Variable(torch.Tensor(X).type(Tensor))
            y_batch = Variable(torch.Tensor(y).type(Tensor))
            # forward pass
            y_pred = model(x_batch)
            # compute and print loss
            loss = loss_fn(y_pred, y_batch)
            ll = loss.data
            history.append(ll.item())
            # reset gradients
            optimizer.zero_grad()
            # backwards pass
            loss.backward()
            # step the optimizer - update the weights
            optimizer.step()
    end = time.time() - start
    return end, history, model, hp

hp_in = hp.next(ind)
span, history, model, hp_out = train_function(hp_in)
plt.plot(history)
print(min(history))

run_history = []

def evaluate(individual):
    hp_in = hp.next(individual)
    span, history, model, hp_out = train_function(hp_in)
    y_ = model(torch.Tensor(Xi).type(Tensor))
    fitness = loss_fn(y_, torch.Tensor(yi).type(Tensor)).data.item()
    run_history.append([fitness,*hp_out.values()])
    return fitness,

# fitness eval
toolbox.register("evaluate", evaluate)

MU, LAMBDA = 10, 25
pop = toolbox.population(n=MU)
hof = tools.HallOfFame(1)
stats = tools.Statistics(lambda ind: ind.fitness.values)
stats.register("avg", np.mean)
stats.register("std", np.std)
stats.register("min", np.min)
stats.register("max", np.max)

best = None
best_hp = None

start = time.time()
for g in range(NGEN):
    pop, logbook = algorithms.eaMuCommaLambda(pop, toolbox, mu=MU, lambda_=LAMBDA,
                cxpb=CXPB, mutpb=MUTPB, ngen=1, stats=stats, halloffame=hof, verbose=False)
    best = hof[0]

    span, history, model, hp_out = train_function(hp.next(best))
    y_ = model(torch.Tensor(Xi).type(Tensor))
    fitness = loss_fn(y_, torch.Tensor(yi).type(Tensor)).data.item()
    run_history.append([fitness,*hp_out.values()])
    best_hp = hp_out

    clear_output()
    fig, (ax1, ax2, ax3) = plt.subplots(1, 3, figsize=(18,6))
    fig.suptitle(f"Best Fitness {best.fitness} \n{best_hp}")
    fig.text(0,0,f"Generation {g+1}/{NGEN} Current Fitness {fitness} \n{hp_out}")
    ax1.plot(history)
    ax1.set_xlabel("iteration")
    ax1.set_ylabel("loss")

    ax2.plot(Xi, yi, 'o', color='black')
    ax2.plot(Xi,y_.detach().cpu().numpy(), 'r')
    ax2.set_xlabel("X")
    ax2.set_ylabel("Y")

    rh = np.array(run_history)
    hexbins = ax3.hexbin(rh[:, 1], rh[:, 2], C=rh[:, 0],
                            bins=50, gridsize=25+g, cmap=cm.get_cmap('gray'))
    ax3.set_xlabel("middle_layer")
    ax3.set_ylabel("learning_rate")

    plt.show()
    time.sleep(1)
下图显示了运行 ES 执行 HPO 的最终输出。在适应度评估图中,显示出更紧密的聚集度,聚集程度比使用粒子群优化 (Particle Swarm Optimization, PSO) 更紧密,但 ES 同样也存在一些相同的问题。

对于 PSO,问题在于,一群粒子会陷于局部最小值/最大值上。虽然与 ES 的问题类似,但其收敛更快且聚集程度更高,增大种群的大小可以提高 ES 识别全局最小值的可能性。
2. 使用主成分分析扩展维度
在我们测试中,仅使用两个超参数——学习率和批大小,以便更容易地在二维中可视化结果。如果我们想在更高的维度中可视化更多的超参数,则需要将维数降低到二维或三维进行可视化,为此,可以应用主成分分析 (Principal Component Analysis, PCA) 技术在二维中可视化高维输出。
PCA 是将多维向量数据从高维降至低维的过程。接下来,我们将四维输出降低为两个维度,以便可视化,可以将该过程视为从高维投影到低维,展示此过程是如何工作并应用于可视化超参数优化 (Hyperparameter Optimization, HPO)的。
(1) 设置 PCA 和在 2D 中绘制多维输出的过程。scikit-learn 提供了 PCA 类,可以将数据转换为更简单的分量输出。在本节中,我们将个体对象从四个维度减少到两个分量:
pop = np.array([[-.5, .75, -.1, .8],
                [-.5, -.3, -.5, .8],
                [-.5, 1, -.5, -.8],
                [ 1, -.3, -.5, .8]])
pca = PCA(n_components=2)
reduced = pca.fit_transform(pop)

t = reduced.transpose()

plt.scatter(t[0], t[1])
plt.show()
下图展示了输出以及 PCA 应用于种群数据的情况。每个轴都是一个组件,代表向量空间中元素之间的距离。PCA 输出是通过测量元素之间的方差或差异来计算的,并生成组件或轴,每个元素都落在其中。

(2) 通过可视化超过两个维度的数据点,我们还可以扩展超参数对象以变化其他输入。将 batch_size 和 epochs 作为要调整的超参数添加到代码中。将这两个额外的超参数添加到网格搜索问题中,假设每个超参数跨越 10 个单元格,则对于 4 个输入,搜索空间等于 10 x 10 x 10 x 10 = 10,000 个单元格:
hp = HyperparametersEC(
    middle_layer = linespace_int(8, 64),
    learning_rate = linespace(3.5e-02,3.5e-01),
    batch_size = linespace_int(4,20),
    epochs = linespace_int(50,400)
)

ind = [-.5, .75, -.1, .8]
print(hp.next(ind))
(3) 修改评估函数 evaluate 输出图,将从运行历史记录中减少超参数输出的相同过程应用到两个组件中。然后,我们使用 hexbins 函数将这些组件的转置绘制到二维空间中:
run_history = []

def evaluate(individual):
    hp_in = hp.next(individual)
    span, history, model, hp_out = train_function(hp_in)
    y_ = model(torch.Tensor(Xi).type(Tensor))
    fitness = loss_fn(y_, torch.Tensor(yi).type(Tensor)).data.item()
    run_history.append([fitness,*hp_out.values()])
    return fitness,

# fitness eval
toolbox.register("evaluate", evaluate)

MU, LAMBDA = 10, 25
pop = toolbox.population(n=MU)
hof = tools.HallOfFame(1)
stats = tools.Statistics(lambda ind: ind.fitness.values)
stats.register("avg", np.mean)
stats.register("std", np.std)
stats.register("min", np.min)
stats.register("max", np.max)

best = None
best_hp = None

start = time.time()
for g in range(NGEN):
    pop, logbook = algorithms.eaMuCommaLambda(pop, toolbox, mu=MU, lambda_=LAMBDA,
                cxpb=CXPB, mutpb=MUTPB, ngen=1, stats=stats, halloffame=hof, verbose=False)
    best = hof[0]

    span, history, model, hp_out = train_function(hp.next(best))
    y_ = model(torch.Tensor(Xi).type(Tensor))
    fitness = loss_fn(y_, torch.Tensor(yi).type(Tensor)).data.item()
    run_history.append([fitness,*hp_out.values()])
    best_hp = hp_out

    clear_output()
    fig, (ax1, ax2, ax3) = plt.subplots(1, 3, figsize=(18,6))
    fig.suptitle(f"Best Fitness {best.fitness} \n{best_hp}")
    fig.text(0,0,f"Generation {g+1}/{NGEN} Current Fitness {fitness} \n{hp_out}")
    ax1.plot(history)
    ax1.set_xlabel("iteration")
    ax1.set_ylabel("loss")

    ax2.plot(Xi, yi, 'o', color='black')
    ax2.plot(Xi,y_.detach().cpu().numpy(), 'r')
    ax2.set_xlabel("X")
    ax2.set_ylabel("Y")

    rh = np.array(run_history)
    M = rh[:,1:IND_SIZE+1]
    reduced = pca.fit_transform(M)
    t = reduced.transpose()
    hexbins = ax3.hexbin(t[0], t[1], C=rh[:, 0],
                            bins=50, gridsize=50, cmap=cm.get_cmap('gray'))
    ax3.set_xlabel("PCA X")
    ax3.set_ylabel("PCA Y")

    plt.show()
    time.sleep(1)
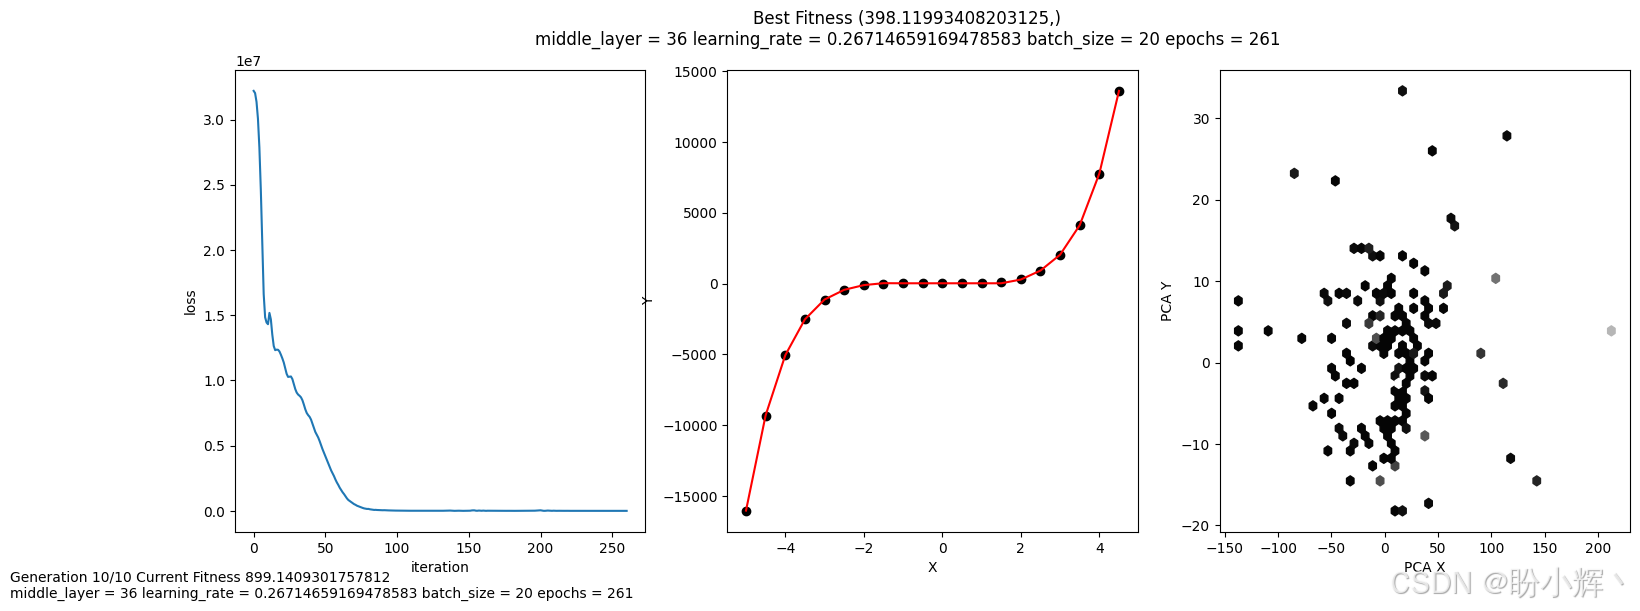
下图显示了将进化策略 (Evolutionary Strategies, ES) 应用于 HPO 时的输出,其中评估图由 PCA 组件组成,能够可视化跨多个维度搜索最佳超参数的过程。我们可以看到在最佳解附近的聚类,但其他点也更加分散。需要注意的是,适应度有多大改进,这可以归因于额外超参数的变化。

当只变化两个超参数时,与使用粒子群优化 (Particle Swarm Optimization, PSO) 方法相比,差异相对较小。通过添加额外的超参数,从而增加搜索空间的维度,可以清楚地看到 ES 与网格搜索之间的性能变化,但,ES 仍然容易陷入局部最小值。
小结
本节中,介绍了如何使用进化策略自动化超参数优化 (Hyperparameter Optimization, HPO),主成分分析 (Principal Component Analysis, PCA) 是一种适用于 HPO 可视化的降维技术,对于复杂的多维超参数优化,可以使用降维技术生成 2D 图形来可视化不同搜索算法之间的差异。
系列链接
遗传算法与深度学习实战(1)——进化深度学习
遗传算法与深度学习实战(2)——生命模拟及其应用
遗传算法与深度学习实战(3)——生命模拟与进化论
遗传算法与深度学习实战(4)——遗传算法(Genetic Algorithm)详解与实现
遗传算法与深度学习实战(5)——遗传算法中常用遗传算子
遗传算法与深度学习实战(6)——遗传算法框架DEAP
遗传算法与深度学习实战(7)——DEAP框架初体验
遗传算法与深度学习实战(8)——使用遗传算法解决N皇后问题
遗传算法与深度学习实战(9)——使用遗传算法解决旅行商问题
遗传算法与深度学习实战(10)——使用遗传算法重建图像
遗传算法与深度学习实战(11)——遗传编程详解与实现
遗传算法与深度学习实战(12)——粒子群优化详解与实现
遗传算法与深度学习实战(13)——协同进化详解与实现
遗传算法与深度学习实战(14)——进化策略详解与实现
遗传算法与深度学习实战(15)——差分进化详解与实现
遗传算法与深度学习实战(16)——神经网络超参数优化
遗传算法与深度学习实战(17)——使用随机搜索自动超参数优化
遗传算法与深度学习实战(18)——使用网格搜索自动超参数优化
遗传算法与深度学习实战(19)——使用粒子群优化自动超参数优化


