文章目录
- LifeCycle
- 使用Lifecycle解耦页面与组件
- 自定义控件实现LifecycleObserver接口
- 注册生命周期监听器
- 使用LifecycleService解耦Service与组件
- 使用ProcessLifecycleOwner监听应用程序生命周期
- ViewModel
- 用法
- 在 Fragment 中使用 ViewModel
- LiveData
- DataBinding
- 导入依赖
- 基本用法
- 在布局文件中生成
- 使用DataBinding的布局文件
- 要绑定的数据类
- 在Activity使用
- 事件绑定
- 定义事件处理类
- 在Activity中设置绑定
- 布局文件
- 使用类方法
- BindingAdapter
- 示例
- 双向绑定
- BaseObservable
- 示例
- ObservableField
LifeCycle
使用Lifecycle解耦页面与组件
自定义控件实现LifecycleObserver接口
这里实现一个自定义的Chronometer,并实现能够响应生命周期事件的功能
public class MyChronometer extends Chronometer implements LifecycleObserver {
    private long elapsedtime;

    public MyChronometer(Context context, AttributeSet attrs) {
        super(context, attrs);
    }

    // 添加注解与生命周期事件关联
    @OnLifecycleEvent(Lifecycle.Event.ON_RESUME)
    private void startMeter() {

        setBase(SystemClock.elapsedRealtime() - elapsedtime);
        start();
    }

    @OnLifecycleEvent(Lifecycle.Event.ON_PAUSE)
    private void stopMeter() {

        elapsedtime = SystemClock.elapsedRealtime() - getBase();
        stop();
    }
}
注册生命周期监听器
在代码中使用自定义组件并为其注册生命周期监听器
public class MainActivity extends AppCompatActivity {
    private MyChronometer chronometer;
    private long elapsedtime;

    @Override
    protected void onCreate(Bundle savedInstanceState) {
        super.onCreate(savedInstanceState);
        setContentView(R.layout.activity_main);

        chronometer = findViewById(R.id.chronometer);
        // 注册生命周期监听器
        getLifecycle().addObserver(chronometer);
    }
}
activity和fragment都是直接实现了LifecycleOwner接口,所以直接调用getLifecycle方法得到LifeCycle对象。addObserver 注册了一个生命周期观察者,当 MainActivity 的生命周期发生变化时,chronometer 会自动响应这些事件。
使用LifecycleService解耦Service与组件
1. 添加依赖
生命周期 | Jetpack | Android Developers (google.cn)
implementation "androidx.lifecycle:lifecycle-extensions:2.2.0"
实现了 LifecycleObserver 接口的类,用于监听 Service 的生命周期事件。
public class MyLocationObserver implements LifecycleObserver {
    private Context mContext;
    private LocationManager locationManager;
    private MyLocationlistener myLocationlistener;

    public MyLocationObserver(Context context) {
        this.mContext = context;
    }

    @OnLifecycleEvent(Lifecycle.Event.ON_CREATE)
    public void startGetLocation() {
        Log.d("TagA", "start位置");
        if (ActivityCompat.checkSelfPermission(mContext, android.Manifest.permission.ACCESS_FINE_LOCATION) != PackageManager.PERMISSION_GRANTED && ActivityCompat.checkSelfPermission(mContext, android.Manifest.permission.ACCESS_COARSE_LOCATION) != PackageManager.PERMISSION_GRANTED) {
            return;
        }
        locationManager = (LocationManager) mContext.getSystemService(Context.LOCATION_SERVICE);
        myLocationlistener = new MyLocationlistener();
        locationManager.requestLocationUpdates(LocationManager.GPS_PROVIDER, 3000, 1, myLocationlistener);
    }

    @OnLifecycleEvent(Lifecycle.Event.ON_DESTROY)
    public void stopGetLocation() {
        Log.d("TagA", "stop位置");
        locationManager.removeUpdates(myLocationlistener);
    }

    static class MyLocationlistener implements LocationListener {
        @Override
        public void onLocationChanged(@NonNull Location location) {
            Log.d("TagA", "位置变了");
        }
    }
}
扩展自 LifecycleService 的服务
public class MyLocationService extends LifecycleService {
    public MyLocationService() {
        Log.d("TagA", "MyLocationService空参构造");
        MyLocationObserver myLocationObserver = new MyLocationObserver(this);
        getLifecycle().addObserver(myLocationObserver);
    }
}
启动服务
public class MainActivity extends AppCompatActivity {

    @Override
    protected void onCreate(Bundle savedInstanceState) {
        super.onCreate(savedInstanceState);
        setContentView(R.layout.activity_main);

        Log.d("TagA", "启动");
        Intent intent = new Intent(this, MyLocationService.class);
        startService(intent);

    }
}
使用ProcessLifecycleOwner监听应用程序生命周期
ProcessLifecycleOwner是 Android Jetpack 中的一个类,用于监听整个应用进程的生命周期事件。与 Activity 和 Fragment 的生命周期不同,ProcessLifecycleOwner关注的是整个应用的前后台状态切换。它实现了LifecycleOwner接口,因此你可以像使用 Activity 或 Fragment 的生命周期一样,监听应用的生命周期事件。
ProcessLifecycleOwner 允许你监听以下两个主要状态:
- 前台:当应用至少有一个 Activity 可见时,进入前台。
- 后台:当所有 Activity 都不可见时,应用进入后台。
public class MyApp extends Application implements LifecycleObserver {

    @Override
    public void onCreate() {
        super.onCreate();

        // 注册观察者来监听应用的生命周期
        ProcessLifecycleOwner.get().getLifecycle().addObserver(this);
    }

    @OnLifecycleEvent(Lifecycle.Event.ON_START)
    public void onEnterForeground() {
        Log.d("AppLifecycle", "应用进入前台");
        // 这里可以添加当应用进入前台时需要执行的操作
    }

    @OnLifecycleEvent(Lifecycle.Event.ON_STOP)
    public void onEnterBackground() {
        Log.d("AppLifecycle", "应用进入后台");
        // 这里可以添加当应用进入后台时需要执行的操作
    }
}
-
继承 Application 类:
创建一个自定义的Application类,并在其中注册生命周期观察者。 -
添加生命周期观察者:
使用ProcessLifecycleOwner.get().getLifecycle().addObserver()来添加生命周期观察者。这样可以监听整个应用的生命周期。 -
处理生命周期事件:
通过@OnLifecycleEvent(Lifecycle.Event.ON_START)和@OnLifecycleEvent(Lifecycle.Event.ON_STOP)监听应用进入前台和后台的事件。在进入前台或后台时,可以执行相应的逻辑,比如暂停或恢复任务、更新UI、数据同步等。
优点:
-
应用级生命周期管理:不再需要逐个监听每个 Activity 或 Fragment 的生命周期事件,
ProcessLifecycleOwner提供了一种应用级别的生命周期事件处理方式。 -
前后台切换检测:可以用来检测应用是否进入后台或回到前台,非常适合在应用进入后台时暂停某些服务,或者在进入前台时恢复。
注意:ProcessLifecycleOwner 只监听应用的前台和后台状态,不会捕捉到具体的 Activity 或 Fragment 的生命周期事件。如果需要监听具体的页面状态,仍然需要使用各自的 LifecycleOwner。
ViewModel
ViewModel是 Android Jetpack 提供的架构组件之一,主要用于存储和管理与 UI 相关的数据,以确保在配置更改(如屏幕旋转)时数据能够持久化并且不会丢失。ViewModel可以帮助我们更好地分离 UI 控制逻辑与数据处理逻辑,增强代码的可维护性。
- 生命周期感知:
ViewModel是生命周期感知的,它的生命周期比Activity和Fragment更长,因此即使 UI 控件销毁重建,数据依然可以保存。 - 持久化数据:它可以避免在配置更改(如屏幕旋转)时重新加载数据。
- UI 与数据逻辑分离:ViewModel 主要处理数据逻辑,使 UI 控制代码和业务逻辑分离,保持代码结构清晰。
用法
- 创建
ViewModel类 - 在
Activity或Fragment中创建ViewModel实例 - 使用
ViewModel提供的数据更新 UI
import androidx.lifecycle.ViewModel;

public class MyViewModel extends ViewModel {
   private int counter = 0;

   // 增加计数
   public void increaseCounter() {
      counter++;
   }

   // 获取当前计数
   public int getCounter() {
      return counter;
   }
}
- 在 Activity 中使用 ViewModel
public class MainActivity extends AppCompatActivity {

    private TextView textView;
    private MyViewModel myViewModel;

    @Override
    protected void onCreate(Bundle savedInstanceState) {
        super.onCreate(savedInstanceState);
        setContentView(R.layout.activity_main);
        textView = (TextView) findViewById(R.id.textView);

        // 通过 ViewModelProvider 获取 MyViewModel 的实例
        myViewModel = new ViewModelProvider(this, new ViewModelProvider.AndroidViewModelFactory(getApplication())).get(MyViewModel.class);
        textView.setText(String.valueOf(myViewModel.getCounter()));
    }
    public void plus(View view) {
        myViewModel.increaseCounter();
        textView.setText(String.valueOf(myViewModel.getCounter()));
    }
}
在 Fragment 中使用 ViewModel
如果是在 Fragment 中使用 ViewModel,方式与 Activity 类似,只需确保使用的是 Fragment 的 ViewModelProvider,代码如下:
myViewModel = new ViewModelProvider(getActivity()).get(MyViewModel.class);
LiveData
ViewModel 通常与 LiveData 结合使用,这样可以让 UI 自动监听数据变化并更新,而不需要手动刷新界面。
示例:
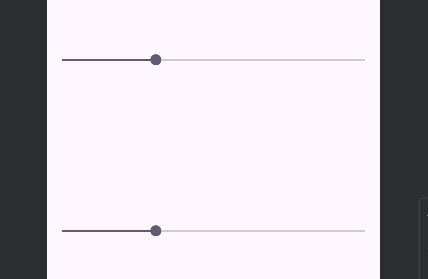
实现两个fragment中的seekbar同步变化
public class MyViewModel3 extends ViewModel {
    private MutableLiveData<Integer> progerss;

    public MutableLiveData<Integer> getProgerss() {
        if (progerss == null) {
            progerss = new MutableLiveData<Integer>();
        }
        return progerss;
    }
}
fragment处理
public class Fragment1 extends Fragment {

    private MyViewModel3 myViewModel3;

    public Fragment1() {
    }

    @Override
    public View onCreateView(LayoutInflater inflater, ViewGroup container,
                             Bundle savedInstanceState) {
        View v = inflater.inflate(R.layout.fragment_1, container, false);
        SeekBar seekBar = v.findViewById(R.id.seekBar);
        myViewModel3 = new ViewModelProvider(getActivity(), new ViewModelProvider.AndroidViewModelFactory()).get(MyViewModel3.class);
        myViewModel3.getProgerss().observe(getActivity(), new Observer<Integer>() {
            @Override
            public void onChanged(Integer integer) {
                seekBar.setProgress(integer);
            }
        });

        seekBar.setOnSeekBarChangeListener(new SeekBar.OnSeekBarChangeListener() {
            @Override
            public void onProgressChanged(SeekBar seekBar, int progress, boolean fromUser) {
                myViewModel3.getProgerss().setValue(progress);
            }

            @Override
            public void onStartTrackingTouch(SeekBar seekBar) {

            }

            @Override
            public void onStopTrackingTouch(SeekBar seekBar) {

            }
        });
        return v;
    }
}
两个fragment中都需要进行修改
实现效果:
DataBinding
导入依赖
android {
    ...
    buildFeatures {
        dataBinding true
    }
}
基本用法
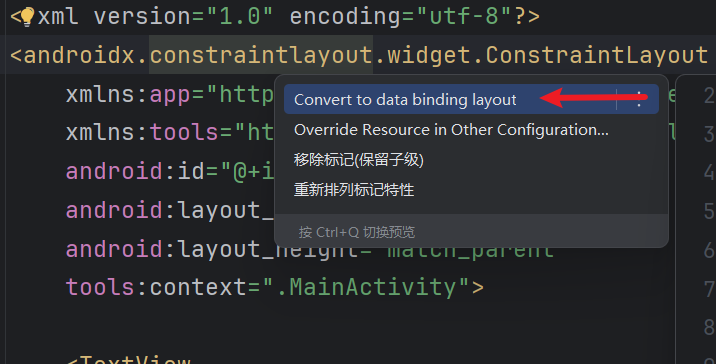
在布局文件中生成
使用DataBinding的布局文件
<?xml version="1.0" encoding="utf-8"?>
<layout xmlns:android="http://schemas.android.com/apk/res/android"
    xmlns:app="http://schemas.android.com/apk/res-auto"
    xmlns:tools="http://schemas.android.com/tools">

    <data>

        <variable
            name="user"
            type="com.example.livedatapractice.User" />
    </data>

    <androidx.constraintlayout.widget.ConstraintLayout
        android:id="@+id/main"
        android:layout_width="match_parent"
        android:layout_height="match_parent"
        tools:context=".MainActivity">


        <TextView
            android:id="@+id/tv_name"
            android:layout_width="wrap_content"
            android:layout_height="wrap_content"
            android:text="@{user.name}"
            android:textSize="50dp"
            app:layout_constraintBottom_toBottomOf="parent"
            app:layout_constraintEnd_toEndOf="parent"
            app:layout_constraintStart_toStartOf="parent"
            app:layout_constraintTop_toTopOf="parent"
            tools:text="name" />

        <TextView
            android:id="@+id/tv_age"
            android:layout_width="wrap_content"
            android:layout_height="wrap_content"
            android:layout_marginTop="67dp"
            android:text="@{String.valueOf(user.age)}"
            android:textSize="50dp"
            app:layout_constraintBottom_toBottomOf="parent"
            app:layout_constraintEnd_toEndOf="parent"
            app:layout_constraintHorizontal_bias="0.498"
            app:layout_constraintStart_toStartOf="parent"
            app:layout_constraintTop_toBottomOf="@+id/tv_name"
            app:layout_constraintVertical_bias="0.0"
            tools:text="age" />

    </androidx.constraintlayout.widget.ConstraintLayout>
</layout>
要绑定的数据类
package com.example.livedatapractice;

public class User {
    private String name;
    private int age;

    public User(String name, int age) {
        this.name = name;
        this.age = age;
    }
}
在Activity使用
public class MainActivity extends AppCompatActivity {
    private ActivityMainBinding activityMainBinding;

    @Override
    protected void onCreate(Bundle savedInstanceState) {
        super.onCreate(savedInstanceState);

        activityMainBinding = DataBindingUtil.setContentView(this, R.layout.activity_main);
        User user = new User("lixaing", 20);
        activityMainBinding.setUser(user);
    }
}
事件绑定
定义事件处理类
public class EventHandleListener {
    private Context context;

    public EventHandleListener(Context context) {
        this.context = context;
    }

    public void buttonOnClick(View view) {
        Toast.makeText(context, "点", Toast.LENGTH_SHORT).show();
    }
}
在Activity中设置绑定
public class MainActivity extends AppCompatActivity {
    private ActivityMainBinding activityMainBinding;

    @Override
    protected void onCreate(Bundle savedInstanceState) {
        super.onCreate(savedInstanceState);

        activityMainBinding = DataBindingUtil.setContentView(this, R.layout.activity_main);
        User user = new User("lixaing", 20);
        activityMainBinding.setUser(user);
        // set
        activityMainBinding.setEventHandle(new EventHandleListener(this));
    }
}
布局文件
<?xml version="1.0" encoding="utf-8"?>
<layout xmlns:android="http://schemas.android.com/apk/res/android"
    xmlns:app="http://schemas.android.com/apk/res-auto"
    xmlns:tools="http://schemas.android.com/tools">

    <data>

        <variable
            name="user"
            type="com.example.livedatapractice.User" />
        <variable
            name="eventHandle"
            type="com.example.livedatapractice.EventHandleListener" />
    </data>

    <androidx.constraintlayout.widget.ConstraintLayout
        android:id="@+id/main"
        android:layout_width="match_parent"
        android:layout_height="match_parent"
        tools:context=".MainActivity">


        <TextView
            android:id="@+id/tv_name"
            android:layout_width="wrap_content"
            android:layout_height="wrap_content"
            android:text="@{user.name}"
            ...
            />

        <TextView
            android:id="@+id/tv_age"
            android:layout_width="wrap_content"
            android:layout_height="wrap_content"
            android:text="@{String.valueOf(user.age)}"
            ...
            />

        <Button
            android:id="@+id/button"
            android:layout_width="wrap_content"
            android:layout_height="wrap_content"
            android:text="Button"
            android:onClick="@{eventHandle.buttonOnClick}"
            ...
            />

    </androidx.constraintlayout.widget.ConstraintLayout>
</layout>
使用类方法
定义工具类
package com.example.databindingpractice2;

public class StringUtils {

    public static String toUpperCase(String str) {
        return str.toUpperCase();
    }
}
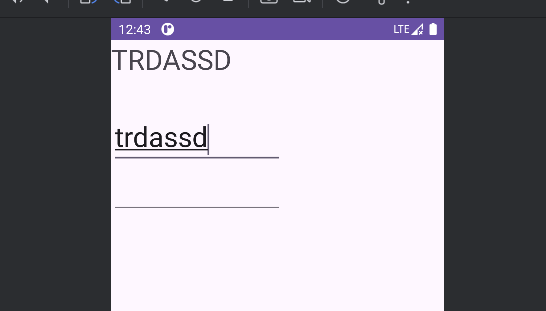
在布局文件中使用
<data>

        <import type="com.example.databindingpractice2.StringUtils" />

        <variable
            name="user"
            type="com.example.databindingpractice2.ObservableUser" />
</data>
		   <TextView
            android:id="@+id/textView1"
            android:layout_width="wrap_content"
            android:layout_height="wrap_content"
            android:text="@{StringUtils.toUpperCase(user.lastName)}" />
BindingAdapter
有很多属性并非遵循了 javaBean 约定,例如 ImageView 可以通过android:src=“@{userViewModel.head}” 来绑定图片源,但是 ImageView 并没有提供 setSrc() 方法,而设置图片的方法是 setImageDrawable()、setImageURI() 等这些方法;但我们却也可以通过绑定,是因为google为我们提供了许多扩展标记行为的注解,帮助我们完成特殊需求下的匹配绑定,例如 @BindingAdapte可以扩展绑定行为,当然还有其他更丰富的的注解可以组合完成任何双向绑定的需求和复杂的中间过程。
示例
- 创建一个
BindingAdapter,将 URL 绑定到ImageView上
public class BindingAdapter {
    @androidx.databinding.BindingAdapter("app:src")
    public static void loadImage(ImageView view, String url) {
        Glide.with(view.getContext())
                .load(url)
                .error(R.drawable.ic_launcher_background)
                .into(view);
    }
}
- 在
ImageView中使用BindingAdapter
<?xml version="1.0" encoding="utf-8"?>
<layout xmlns:android="http://schemas.android.com/apk/res/android"
    xmlns:app="http://schemas.android.com/apk/res-auto"
    xmlns:tools="http://schemas.android.com/tools">

    <data>

        <variable
            name="user"
            type="com.example.livedatapractice.User" />

        <variable
            name="eventHandle"
            type="com.example.livedatapractice.EventHandleListener" />

        <variable
            name="imageUrl"
            type="String" />
    </data>

    <androidx.constraintlayout.widget.ConstraintLayout
        android:id="@+id/main"
        android:layout_width="match_parent"
        android:layout_height="match_parent"
        tools:context=".MainActivity">

        ...

        <ImageView
            android:id="@+id/imageView"
            android:layout_width="wrap_content"
            android:layout_height="wrap_content"
            app:layout_constraintBottom_toBottomOf="parent"
            app:layout_constraintEnd_toEndOf="parent"
            app:layout_constraintHorizontal_bias="0.498"
            app:layout_constraintStart_toStartOf="parent"
            app:layout_constraintTop_toTopOf="parent"
            app:layout_constraintVertical_bias="0.097"
            app:src="@{imageUrl}"
            tools:srcCompat="@tools:sample/avatars" />

    </androidx.constraintlayout.widget.ConstraintLayout>
</layout>
- 在Activity中使用
activityMainBinding.setImageUrl(url);
当 ImageView 控件的 url 属性值发生变化时,dataBinding 就会将 ImageView 实例以及新的 url 值传递给 loadImage() 方法,从而可以在此动态改变 ImageView 的相关属性
双向绑定
BaseObservable
示例
继承BaseObservable类,
get方法使用@Bindable注解,
set方法添加notifyPropertyChanged(BR.firstName)通知绑定的视图(View)数据已经发生了变化,需要更新视图显示的内容
// 被观察者    viewModel
public class ObservableUser extends BaseObservable {
    private String firstName;
    private String lastName;

    public ObservableUser(String firstName, String lastName) {
        this.firstName = firstName;
        this.lastName = lastName;
    }

    @Bindable
    public String getFirstName() {
        return firstName;
    }

    @Bindable
    public String getLastName() {
        return lastName;
    }

    public void setFirstName(String firstName) {
        this.firstName = firstName;
        notifyPropertyChanged(BR.firstName);
    }

    public void setLastName(String lastName) {
        this.lastName = lastName;
        notifyPropertyChanged(BR.lastName);
    }
}
布局文件中采用@=符号,这里允许EditText和user.firstName之间进行双向数据同步。
<?xml version="1.0" encoding="utf-8"?>
<layout xmlns:android="http://schemas.android.com/apk/res/android"
    xmlns:app="http://schemas.android.com/apk/res-auto"
    xmlns:tools="http://schemas.android.com/tools">

    <data>

        <variable
            name="user"
            type="com.example.databindingpractice2.ObservableUser" />
    </data>

    <LinearLayout
        android:id="@+id/main"
        android:layout_width="match_parent"
        android:layout_height="match_parent"
        android:orientation="vertical"
        tools:context=".MainActivity">

        <TextView
            android:id="@+id/textView1"
            android:layout_width="wrap_content"
            android:layout_height="wrap_content"
            android:text="@{user.lastName}"
            android:textSize="30dp" />

        <TextView
            android:id="@+id/textView2"
            android:layout_width="wrap_content"
            android:layout_height="wrap_content"
            android:text="@{user.firstName}"
            android:textSize="30dp" />

        <EditText
            android:id="@+id/et"
            android:layout_width="186dp"
            android:layout_height="54dp"
            android:text="@={user.lastName}"
            android:textSize="30dp" />

        <EditText
            android:id="@+id/et2"
            android:layout_width="186dp"
            android:layout_height="54dp"
            android:text="@={user.firstName}"
            android:textSize="30dp" />
    </LinearLayout>
</layout>
在主活动中将user对象与视图绑定
public class MainActivity extends AppCompatActivity {

    @Override
    protected void onCreate(Bundle savedInstanceState) {
        super.onCreate(savedInstanceState);

        ActivityMainBinding binding = DataBindingUtil.setContentView(this, R.layout.activity_main);
        ObservableUser user = new ObservableUser("Yuyu","Feng");

        binding.setUser(user);
    }
}
ObservableField
与直接继承
Observable类相比,ObservableField更适合简单场景下的单一数据绑定,不需要复杂的通知操作,可以理解为官方对 BaseObservable 中字段的注解和刷新等操作的封装。Android 为常见的基本数据类型(如int、boolean等)提供了对应的ObservableX类型,方便开发者使用。
ObservableBoolean
ObservableByte
ObservableChar
ObservableShort
ObservableInt
ObservableLong
ObservableFloat
ObservableDouble
BaseObservable的示例修改
public class ObservableUser {
    private ObservableField<String> firstName;
    private ObservableField<String>  lastName;

    public ObservableUser(String firstName, String lastName) {
        this.firstName = new ObservableField<>(firstName);
        this.lastName = new ObservableField<>(lastName);
    }

    public ObservableField<String> getFirstName() {
        return firstName;
    }

    public void setFirstName(ObservableField<String> firstName) {
        this.firstName = firstName;
    }

    public ObservableField<String> getLastName() {
        return lastName;
    }

    public void setLastName(ObservableField<String> lastName) {
        this.lastName = lastName;
    }
}
感谢您的阅读
如有错误烦请指正


