🌲 Spring Security 基本原理
🌿 Spring Security简介
Spring Security 是基于Spring框架,提供的一套Web应用安全性的完整解决方案,一般来说,Web应用的安全性包含 用户认证(Authentication)和 用户授权(Authorization).
- 用户认证 指的是验证某个用户是否为系统中的合法主体,也就是说用户是否能够访问该系统,用户认证一般要求用户提供用户名和密码,系统通过校验用户名和密码来完成认证过程。
- 用户授权 指的是验证某个用户是否有权限执行某个操作.在一个系统中,不同用户具有的权限是不同的,比如,对一个文件来说,有的用户只有读取,有的用户可以进行修改.系统会为不同的用户分配不同的角色,而每个角色则对应一系列的权限
Spring Security对于以上业务场景都有很好的支持,在用户认证方面,Spring Security框架支持主流的认证方式,包括HTTP基本认证,HTTP表单验证,HTTP摘要认证, OpenID和LDAP等. 在用户授权方面, Spring Security提供了基于角色的访问控制和访问控制列表(Access Control List),可以对应用中的领域对象进行细粒度的控制。
🌿 Web系统的凭证
Web系统中登录认证(Authentication)的核心就是凭证机制,无论是Session还是JWT,都是在用户成功登录时返回给用户一个凭证,后续用户访问接口需携带凭证来标明自己的身份。
- 登录认证是对用户的身份进行确认
- 权限授权(Authorization)是对用户能否访问某个资源进行确认
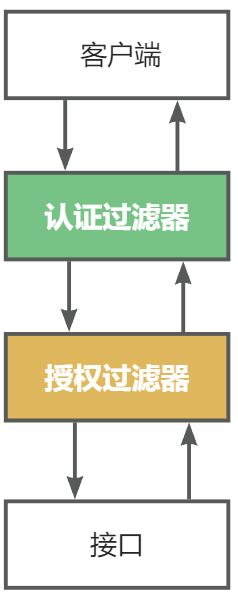
- 假设一个登录请求过来,他可能需要先登录验证
- 中间可能会有多个自定义过滤器,这样就会形成一个过滤器链
- 一层一层没问题后才会执行我们真正的业务逻辑
而Spring Security也是做的同样的事完成了一系列功能,他的本质就是一堆过滤器!
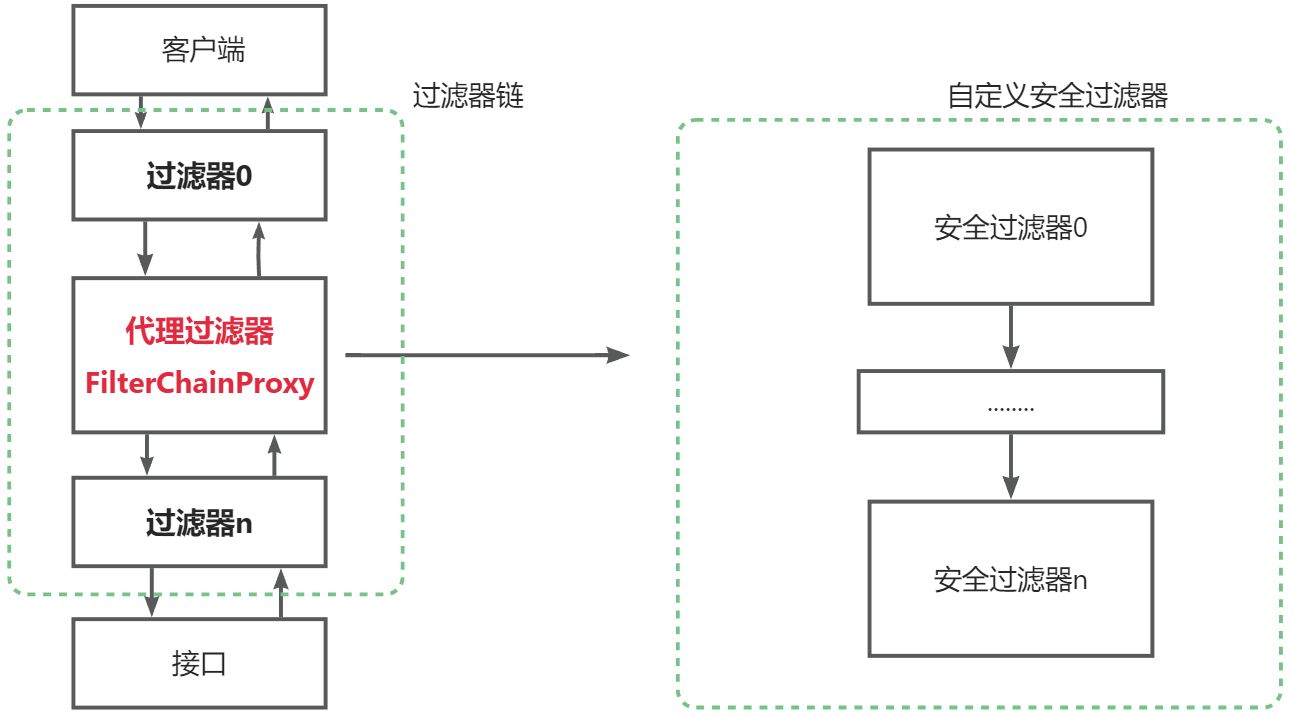
Spring Security向其添加了一个FilterChainProxy过滤器,这个代理过滤器会创建一套Spring Security自定义的过滤器链,然后执行一系列过滤器。我们可以大概看一下FilterChainProxy的大致源码:
@Override
public void doFilter(ServletRequest request, ServletResponse response,
                     FilterChain chain) throws IOException, ServletException {
    ...省略其他代码

    // 获取Spring Security的一套过滤器
    List<Filter> filters = getFilters(request);
    // 将这一套过滤器组成Spring Security自己的过滤链,并开始执行
    VirtualFilterChain vfc = new VirtualFilterChain(fwRequest, chain, filters);
    vfc.doFilter(request, response);

    ...省略其他代码
}
🌿 核心过滤器
🍁 Spring Security 过滤器链

Spring Security默认会启用大约15个过滤器,我们需要重点关注2个核心过滤器:
- UsernamePasswordAuthenticationFilter: 登录认证,负责处理我们在登陆页面填写了用户名密码后的登陆请求
- FilterSecurityInterceptor: 权限授权,负责权限校验的过滤器
- ExceptionTranslationFilter:处理过滤器链中抛出的任何AccessDeniedException和AuthenticationException
Spring Security的核心逻辑全在这一套过滤器中,过滤器里会调用各种组件完成功能,掌握了这些过滤器和组件你就掌握了Spring Security!这个框架的使用方式就是对这些过滤器和组件进行扩展
🍁 SpringSecurity初体验
- 新建一个测试新的module<security_01_basic>
- 在pom.xml中引入security依赖

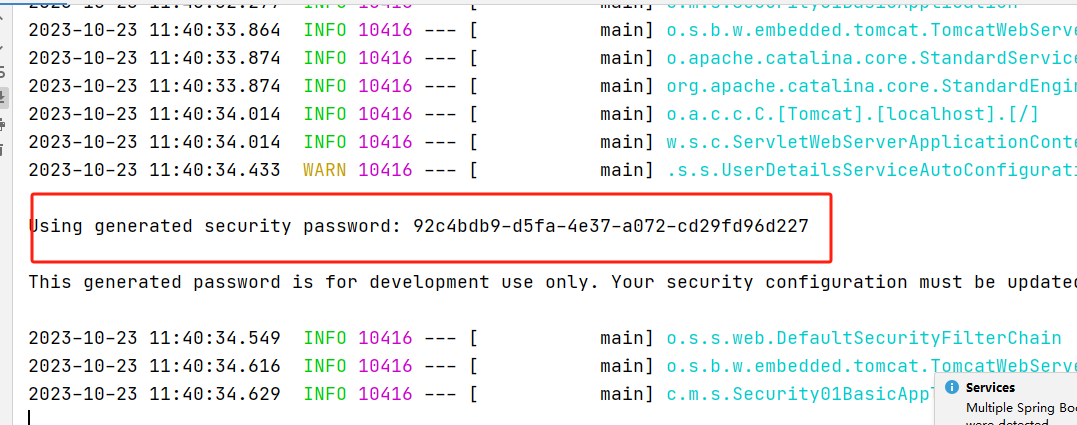
- module建立完毕之后,直接运行,在启动时会看到自定为我们生成的密码:
- 访问项目,输入http://localhost:8080
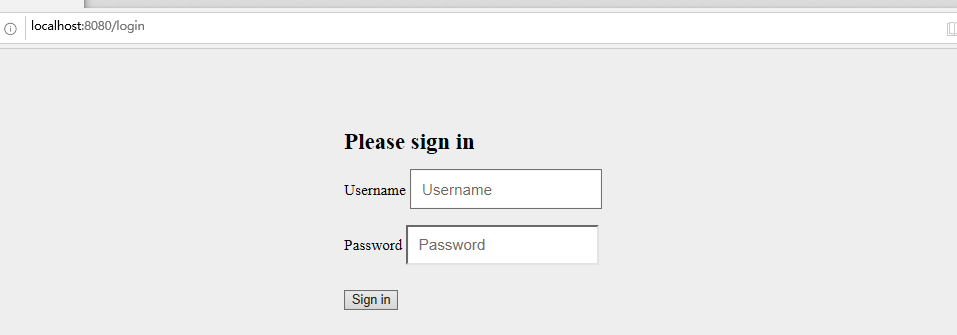
此时会发现打开了一个登录页面,这个实际上就是springsecruity的认证页面。当发送请求时,请求会被SpringSecurity拦截下来,进入到过滤器链过滤。
SpringSecurity这个认证页面默认的username是user,password就是前一步在控制台大家看到的自动生成的密码。将用户名和密码输入之后,点击登录之后,这个时候请求才会到达我们控制器层。

🌲 SpringSecurity认证流程
本章节我们将通过Spring Security结合Session和JWT两种方式来实现登录认证
- 不管是哪种认证方式,核心概念都会在安全框架的各种组件来实现。
- 本章节重点关注认证过滤器UsernamePasswordAuthenticationFilter
🌿 认证流程常见的组件
我们的系统中会有很多用户,确认当前是哪个用户在使用系统是登录认证的最终目的。
SpringSecurity 是通过Authentication来存储认证信息,它代表了当前登录用户。
关键核心代码如下:
/** 这里设计三个组件对象
① SecurityContextHolder:上下文管理对象,用来在程序任何地方获取,
						使用ThreadLocal保证传递同一个对象
② SeucirtyContex: 上下文对象
③ Authentication: 存储了认证信息,代表当前登录用户

**/
Authentication authentication = SecurityContextHolder.getContext().getAuthentication();
组件之间的关系:
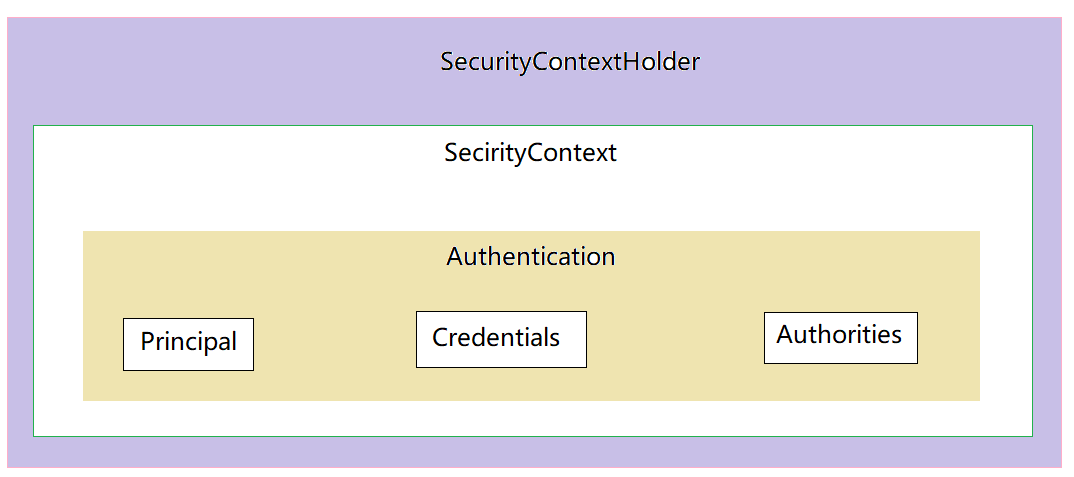
获取方式:
SecurityContextHolder ---> SecurityContext ----> Authentication
- Principal:用户信息,没有认证时一般是用户名,认证后一般是用户对象
- Credentials:用户凭证,一般是密码
- Authorities:用户权限
所有组件:

🌿 AuthenticationManager认证
AuthenticationManager 就是Spring Security用于执行身份验证的组件,只需要调用它的authenticate方法即可完成认证。
Spring Security默认的认证方式就是在UsernamePasswordAuthenticationFilter这个过滤器中调用这个组件,该过滤器负责认证逻辑.
认证流程:
- 用户调用接口进行登录操作,传递账号密码过来 登录接口调用AuthenticationManager
- 根据用户名查询出用户数据 UserDetailService查询出UserDetails(自己继承User)
- 将传递过来的密码和数据库中的密码进行对比校验 PasswordEncoder
- 校验通过则将认证信息存入到上下文中 将UserDetails存入到Authentication,将Authentication存入到SecurityContext
- 如果认证失败则抛出异常 由AuthenticationEntryPoint处理
🍁 以Session 方式实现登录认证
- 在数据库中新建数据表
DROP TABLE IF EXISTS `user`;
CREATE TABLE `user` (
  `id` int NOT NULL AUTO_INCREMENT,
  `username` varchar(255) DEFAULT NULL,
  `password` varchar(255) DEFAULT NULL,
  `email` varchar(255) DEFAULT NULL,
  PRIMARY KEY (`id`)
) ENGINE=InnoDB AUTO_INCREMENT=4 DEFAULT CHARSET=utf8mb3;
- 按需在项目中引入依赖,除了SpringSecurity之外,我们引入一下Mysql、Druid、Mybatis、Mybatis-plus依赖。
<dependencies>
  <dependency>
    <groupId>org.springframework.boot</groupId>
    <artifactId>spring-boot-starter-data-redis</artifactId>
  </dependency>
  <dependency>
    <groupId>org.springframework.boot</groupId>
    <artifactId>spring-boot-starter-security</artifactId>
  </dependency>
  <dependency>
    <groupId>org.springframework.boot</groupId>
    <artifactId>spring-boot-starter-thymeleaf</artifactId>
  </dependency>
  <dependency>
    <groupId>org.springframework.boot</groupId>
    <artifactId>spring-boot-starter-web</artifactId>
  </dependency>
  <dependency>
    <groupId>org.mybatis.spring.boot</groupId>
    <artifactId>mybatis-spring-boot-starter</artifactId>
    <version>2.3.1</version>
  </dependency>
  <dependency>
    <groupId>org.thymeleaf.extras</groupId>
    <artifactId>thymeleaf-extras-springsecurity5</artifactId>
  </dependency>

  <dependency>
    <groupId>org.springframework.boot</groupId>
    <artifactId>spring-boot-devtools</artifactId>
    <scope>runtime</scope>
    <optional>true</optional>
  </dependency>
  <dependency>
    <groupId>com.mysql</groupId>
    <artifactId>mysql-connector-j</artifactId>
    <scope>runtime</scope>
  </dependency>
  <dependency>
    <groupId>org.projectlombok</groupId>
    <artifactId>lombok</artifactId>
    <optional>true</optional>
  </dependency>
  <dependency>
    <groupId>org.springframework.boot</groupId>
    <artifactId>spring-boot-starter-test</artifactId>
    <scope>test</scope>
  </dependency>
  <dependency>
    <groupId>org.mybatis.spring.boot</groupId>
    <artifactId>mybatis-spring-boot-starter-test</artifactId>
    <version>2.3.1</version>
    <scope>test</scope>
  </dependency>
  <dependency>
    <groupId>org.springframework.security</groupId>
    <artifactId>spring-security-test</artifactId>
    <scope>test</scope>
  </dependency>
  <dependency>
    <groupId>com.baomidou</groupId>
    <artifactId>mybatis-plus-boot-starter</artifactId>
    <version>3.4.1</version>
  </dependency>

  <dependency>
    <groupId>com.alibaba</groupId>
    <artifactId>druid-spring-boot-starter</artifactId>
    <version>1.2.16</version>
  </dependency>
</dependencies>- 在application.properties中配置相关插件
spring.datasource.username=root
spring.datasource.driver-class-name=com.mysql.cj.jdbc.Driver
spring.datasource.password=123456
spring.datasource.url=jdbc:mysql://localhost:3306/study?useSSL=false
spring.datasource.type=com.alibaba.druid.pool.DruidDataSource


mybatis-plus.configuration.log-impl=org.apache.ibatis.logging.stdout.StdOutImpl
mybatis-plus.type-aliases-package=commoxuan.boot_security_test.entity
mybatis-plus.mapper-locations=classpath*:mappers/*.xml
#数据库表主键id配置为自增策略(不添加可能会报argument miss match错误)
mybatis-plus.global-config.db-config.id-type=auto- 新建实体类UserEntity(此处类名最好不用User,避免和SpringSecurity中的User产生冲突)
package commoxuan.boot_security_test.entity;

import com.baomidou.mybatisplus.annotation.TableField;
import com.baomidou.mybatisplus.annotation.TableName;
import lombok.AllArgsConstructor;
import lombok.Data;
import lombok.NoArgsConstructor;

import java.sql.Date;

@TableName("user")
@Data
@NoArgsConstructor
@AllArgsConstructor
public class UserEntity {
    private Integer id;
    private String username;
    private String password;
    private String email;

}
- 自定义UserSecurity类,UserEntity类只封装了2个属性,
package commoxuan.boot_security_test.entity;

import lombok.Data;
import org.springframework.security.core.GrantedAuthority;
import org.springframework.security.core.userdetails.User;

import java.util.Collection;

/**
 * 用于封装用户和用户所具备的权限
 * 需要继承secuirty中的User
 */
public class UserSecurity extends User {
    // 用户实体对象
    private UserEntity userEntity;

    /**
     * 添加构造器,其中调用security的封装用户的用户名,密码,以及权限的构造方法
     * @param userEntity
     * @param authorities
     */
    public UserSecurity(UserEntity userEntity, Collection<?extends GrantedAuthority>authorities){
        super(userEntity.getUsername(),userEntity.getPassword(),authorities);
        this.userEntity = userEntity;
    }
}
此处的User是org.springframework.security.core.userdetails.User;他继承了UserDetails类,该类中提供了如下方法:
public interface UserDetails extends Serializable {
   /**
    * 用户权限集合(这个权限对象现在不管它,到权限时我会讲解)
    */
   Collection<? extends GrantedAuthority> getAuthorities();
   /**
    * 用户密码
    */
   String getPassword();
   /**
    * 用户名
    */
   String getUsername();
   /**
    * 用户没过期返回true,反之则false
    */
   boolean isAccountNonExpired();
   /**
    * 用户没锁定返回true,反之则false
    */
   boolean isAccountNonLocked();
   /**
    * 用户凭据(通常为密码)没过期返回true,反之则false
    */
   boolean isCredentialsNonExpired();
   /**
    * 用户是启用状态返回true,反之则false
    */
   boolean isEnabled();
}
- 新建Dao接口,UserMapper接口,用来使用Mybatis-plus操作数据库
package commoxuan.boot_security_test.dao;

import com.baomidou.mybatisplus.core.mapper.BaseMapper;
import commoxuan.boot_security_test.entity.UserEntity;
import org.apache.ibatis.annotations.Mapper;

@Mapper
public interface UserMapper extends BaseMapper<UserEntity> {
}
- 在启动类上添加@MapperScan,添加扫描上面用Mybatis-plus操作数据库的接口
package commoxuan.boot_security_test;

import org.apache.ibatis.annotations.Mapper;
import org.mybatis.spring.annotation.MapperScan;
import org.springframework.boot.SpringApplication;
import org.springframework.boot.autoconfigure.SpringBootApplication;
import org.springframework.context.ConfigurableApplicationContext;

@SpringBootApplication
@MapperScan("commoxuan.boot_security_test.dao")
public class BootSecurityTestApplication {
    public static void main(String[] args) {
        SpringApplication.run(BootSecurityTestApplication.class, args);
    }
}
- 新建UserService接口
package commoxuan.boot_security_test.service;

import commoxuan.boot_security_test.entity.UserEntity;

public interface UserService {
    void save(UserEntity user);
}
- 新建UserServiceImpl实现UserService以及 UserDetailsService,UserDetailsService是Security中封装了对用户操作的业务接口。其中需要实现一个根据用户名去查询用户的方法。loadUserByUsername
package commoxuan.boot_security_test.service.impl;

import com.baomidou.mybatisplus.core.conditions.query.QueryWrapper;
import commoxuan.boot_security_test.dao.UserMapper;
import commoxuan.boot_security_test.entity.UserEntity;
import commoxuan.boot_security_test.entity.UserSecurity;
import commoxuan.boot_security_test.service.UserService;
import org.springframework.beans.factory.annotation.Autowired;
import org.springframework.security.core.userdetails.UserDetails;
import org.springframework.security.core.userdetails.UserDetailsService;
import org.springframework.security.core.userdetails.UsernameNotFoundException;
import org.springframework.stereotype.Service;
import org.springframework.transaction.annotation.Transactional;

import java.util.Collections;

@Service
public class UserServiceImpl implements UserService, UserDetailsService {
    @Autowired
    UserMapper mapper;

    public void save(UserEntity user) {
        System.out.println("user:"+user);
        mapper.insert(user);
    }

    /**
     * 根据用户名查找用户信息
     * @param username
     * @return
     * @throws UsernameNotFoundException
     */
    @Override
    @Transactional
    public UserDetails loadUserByUsername(String username) throws UsernameNotFoundException {
        QueryWrapper<UserEntity> queryWrapper = new QueryWrapper<UserEntity>();
        queryWrapper.lambda().eq(UserEntity::getUsername,username);
        // 从数据库中查询出用户实体对象
        UserEntity user = mapper.selectOne(queryWrapper);
        // 若灭查询到,一定要抛出异常,这样才能被Spring Security的错误处理器处理
        if (user==null){
            throw  new UsernameNotFoundException("用户名为注册");
        }
        // 走到这一步,代表查询到了实体对象,那就返回实体对象,这里权限暂时放一个空集合进去
        return new UserSecurity(user,Collections.emptyList());
    }
}
- 添加认证异常(失败)处理器
package commoxuan.boot_security_test.exception;

import org.springframework.security.core.AuthenticationException;
import org.springframework.security.web.AuthenticationEntryPoint;

import javax.servlet.ServletException;
import javax.servlet.http.HttpServletRequest;
import javax.servlet.http.HttpServletResponse;
import java.io.IOException;
import java.io.PrintWriter;

public class MyEntryPoint implements AuthenticationEntryPoint {
    @Override
    public void commence(HttpServletRequest request, HttpServletResponse response, AuthenticationException authException) throws IOException, ServletException {
        response.setContentType("application/json;charset=utf-8");
        PrintWriter out = response.getWriter();
        // 直接提示前端认证错误
        out.write("认证失败");
        out.flush();
        out.close();
    }
}
- 最后添加认证配置类(注意:SpringBoot2.7x版本后,认证配置发生了比较大的变化,本文以2.7x以后得配置为例,至于2.7x以前的,网上关于Security的教程绝大多数是基于2.7X以前的,比较好找)
package commoxuan.boot_security_test.config;

import commoxuan.boot_security_test.exception.MyEntryPoint;
import commoxuan.boot_security_test.service.impl.UserServiceImpl;
import org.springframework.boot.autoconfigure.condition.ConditionalOnMissingBean;
import org.springframework.boot.autoconfigure.security.SecurityProperties;
import org.springframework.context.annotation.Bean;
import org.springframework.context.annotation.Configuration;
import org.springframework.security.authentication.AuthenticationManager;
import org.springframework.security.authentication.dao.DaoAuthenticationProvider;
import org.springframework.security.config.BeanIds;
import org.springframework.security.config.annotation.authentication.configuration.AuthenticationConfiguration;
import org.springframework.security.config.annotation.method.configuration.EnableGlobalMethodSecurity;
import org.springframework.security.config.annotation.web.builders.HttpSecurity;
import org.springframework.security.config.annotation.web.configuration.EnableWebSecurity;
import org.springframework.security.config.annotation.web.configuration.WebSecurityConfigurerAdapter;
import org.springframework.security.config.annotation.web.configuration.WebSecurityCustomizer;
import org.springframework.security.core.userdetails.UserDetailsService;
import org.springframework.security.crypto.bcrypt.BCryptPasswordEncoder;
import org.springframework.security.crypto.password.PasswordEncoder;
import org.springframework.security.web.SecurityFilterChain;
import org.springframework.web.cors.CorsUtils;

import javax.annotation.Resource;

@Configuration
@EnableWebSecurity
@EnableGlobalMethodSecurity(securedEnabled = true)
public class SecurityConfig  {

    @Resource
    private SecurityProperties securityProperties;

    /**
     * 此处配置业务层实现类
     * @return
     */
    @Bean
    public UserDetailsService userDetailsService(){
        return new UserServiceImpl();
    }

    /**
     * 配置过滤器链(在这里面配置需要放行的资源)
     * @param http
     * @return
     * @throws Exception
     */
    @Bean
    public SecurityFilterChain filterChain(HttpSecurity http) throws Exception {

        // 关闭csrf和frameOptions,如果不关闭会影响前端请求接口(这里不展开细讲了,感兴趣的自行了解)
        http.csrf().disable();
        http.headers().frameOptions().disable();
        // 开启跨域以便前端调用接口
        http.cors();

        // 这是配置的关键,决定哪些接口开启防护,哪些接口绕过防护
        http.authorizeRequests()
                // 注意这里,是允许前端跨域联调的一个必要配置
                .requestMatchers(CorsUtils::isPreFlightRequest).permitAll()
                // 指定某些接口不需要通过验证即可访问。登陆、注册接口肯定是不需要认证的
                .antMatchers("/login", "/register","/static/*","/templates/*").permitAll()
                // 这里意思是其它所有接口需要认证才能访问
                .anyRequest().authenticated()
                // 指定认证错误处理器
                .and().exceptionHandling().authenticationEntryPoint(new MyEntryPoint());

        http.headers().frameOptions().sameOrigin();

        return http.build();

    }


    /**
     * 认证管理器,登录的时候用户名和账号等参数会传给 authenticationManager
     */
    @Bean(name = BeanIds.AUTHENTICATION_MANAGER)
    public AuthenticationManager authenticationManager(AuthenticationConfiguration authenticationConfiguration) throws Exception {

        return authenticationConfiguration.getAuthenticationManager();
    }


    /**
     * 密码加密器
     * @return
     */
    @Bean
    @ConditionalOnMissingBean
    public PasswordEncoder passwordEncoder() {
        return new BCryptPasswordEncoder();
    }

    /**
     * 配置具体处理业务的业务层和密码加密器
     * 这样在登录时,输入的密码会自动进行加密
     * @return
     */
    @Bean
    public DaoAuthenticationProvider authenticationProvider() {
        DaoAuthenticationProvider authProvider = new DaoAuthenticationProvider();

        authProvider.setUserDetailsService(userDetailsService());
        authProvider.setPasswordEncoder(passwordEncoder());

        return authProvider;
    }


}
- 编写测试控制器:
package commoxuan.boot_security_test.Controller;

import commoxuan.boot_security_test.entity.UserEntity;
import commoxuan.boot_security_test.service.UserService;
import org.springframework.beans.factory.annotation.Autowired;
import org.springframework.security.authentication.AuthenticationManager;
import org.springframework.security.authentication.UsernamePasswordAuthenticationToken;
import org.springframework.security.core.Authentication;
import org.springframework.security.core.context.SecurityContext;
import org.springframework.security.core.context.SecurityContextHolder;
import org.springframework.security.crypto.password.PasswordEncoder;
import org.springframework.web.bind.annotation.RequestBody;
import org.springframework.web.bind.annotation.RequestMapping;
import org.springframework.web.bind.annotation.RequestParam;
import org.springframework.web.bind.annotation.RestController;

@RestController
public class LoginController {

    @Autowired
    private AuthenticationManager authenticationManager;
    @Autowired
    private PasswordEncoder passwordEncoder;

    @Autowired
    private UserService userServiceImpl;

    @RequestMapping("/login")
    public String login(String username,String password){
        // 生成一个包含账号密码的认证信息
        Authentication token = new UsernamePasswordAuthenticationToken(username,password);
        // 校验这个认证信息
        Authentication authentication = authenticationManager.authenticate(token);
        // 将返回的认证信息存储到上下文中
        SecurityContextHolder.getContext().setAuthentication(authentication);
        return "login_success";
    }


    @RequestMapping("/register")
    public String register(UserEntity userEntity){
        userEntity.setPassword(passwordEncoder.encode(userEntity.getPassword()));
        userServiceImpl.save(userEntity);
        return "注册成功";
    }
}
- 启动postman进行测试:
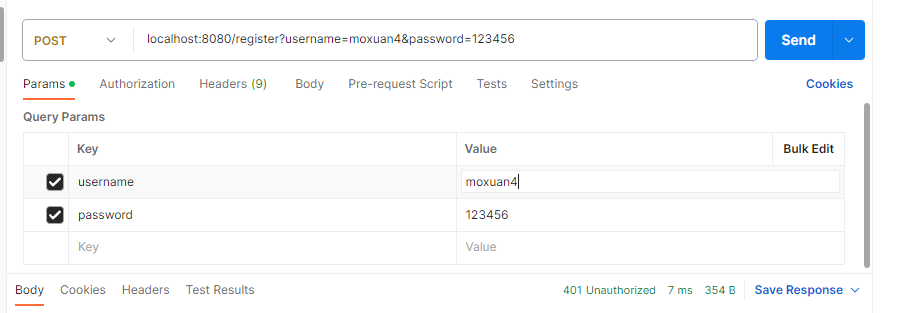
数据库中,查看数据:

- 测试认证:
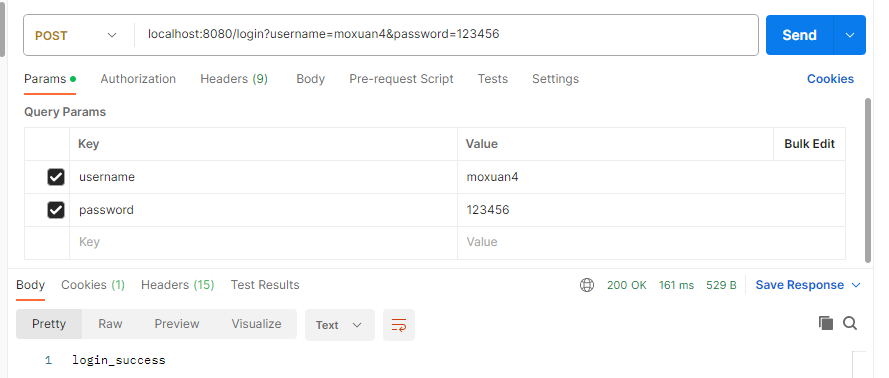
- 更换错误密码重新测试:
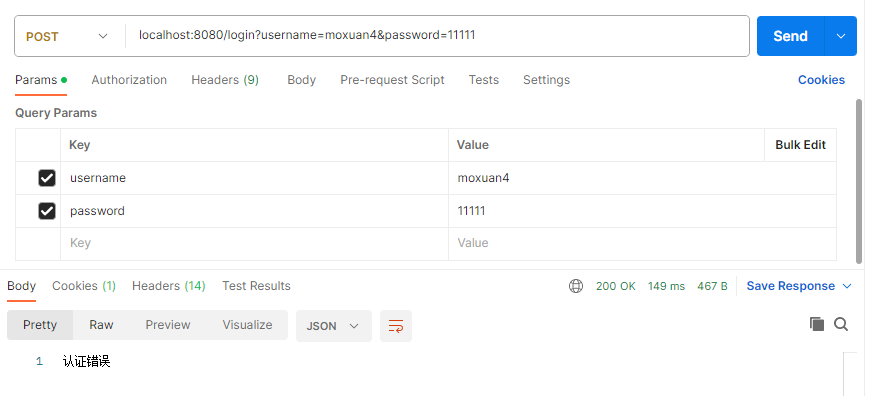
总结和补充:
有人可能会问,用AuthenticationManager认证方式要配置好多东西啊,我就用之前说的那种最简单的方式不行吗?当然是可以的啦,用哪种方式都随便,只要完成功能都行。其实不管哪种方式我们的认证的逻辑代码一样都没少,只不过一个是我们自己业务类全部搞定,一个是可以集成框架的组件。这里也顺带再总结一下流程:
- 用户调进行登录操作,传递账号密码过来👉登录接口调用AuthenticationManager
- 根据用户名查询出用户数据👉UserDetailService查询出UserDetails
- 将传递过来的密码和数据库中的密码进行对比校验👉PasswordEncoder
- 校验通过则将认证信息存入到上下文中👉将UserDetails存入到Authentication,将Authentication存入到SecurityContext
- 如果认证失败则抛出异常👉由AuthenticationEntryPoint处理
刚才我们讲的认证方式都是基于session机制,认证后Spring Security会将包含了认证信息的SecurityContext存入到session中,Key为HttpSessionSecurityContextRepository.SPRING_SECURITY_CONTEXT_KEY。也就是说,你完全可以通过如下方式获取SecurityContext:
SecurityContext securityContext=
	(SecurityContext)session.getAttribute(
        HttpSessionSecurityContextRepository.SPRING_SECURITY_CONTEXT_KEY)
当然,官方还是不推荐这样直接操作的,因为统一通过SecurityContextHolder操作更利于管理!使用SecurityContextHolder除了获取当前用户外,退出登录的操作也是很方便的:
@GetMapping("/logout")
public String logout() {
    SecurityContextHolder.clearContext();
    return "退出成功";
}
🌿JWT 方式实现登录认证
🍁 JWT 简介
无论是session方式还是JWT方式,其核心都是TOKEN机制:
- Session是有状态的
- JWT是无状态的
JWT的加密机制:
JWT,即 JSON Web Token,定义了一种紧凑的、自包含的方式,用于在网络应用环境间以 JSON 对象安全地传输信息。
JWT 传输的信息可以被验证和信任,因为它经过了数字签名。
JWT 一般被用来在身份提供者和服务提供者间传递被认证用户的身份信息,以便于从资源服务器获取资源,也可以增加一些额外的业务逻辑所需的声明信息。
JWT 常用于代替 Session,用于识别用户身份。传统上使用 Session 机制区别用户身份有两个缺点:一是占用服务器的存储资源,二是在集群部署下设计会非常复杂。JWT 完全可以解决 Session 方案存在的问题。
什么时候应该使用 JWT 呢?下列是使用 JSON Web Token 的主要场景:
- 认证授权 (Authorization) :
这是使用 JWT 的最常见场景。一旦用户登录,后续每个请求都将包含 JWT,允许用户访问该 Token 允许的路由、服务和资源。单点登录是现在广泛使用的 JWT 的一个特性,因为它的开销很小,而且可以轻松地跨域使用。
- 信息交换 (Information Exchange) :
对于安全的在各方之间传输信息而言,JSON Web Token 无疑是一种很好的方式。因为 JWT 可以被签名,例如,用公钥/私钥对,你可以确定发送人就是它们所说的那个人。另外,由于签名是使用头和有效负载计算的,您还可以验证内容没有被篡改。
JWT 优点:
- 跨语言:支持主流语言。
- 自包含:包含必要的所有信息,如用户信息和签名等。
- 易传递:很方便通过 HTTP 头部传递。
JWT 默认是不加密,但也是可以加密的。生成原始 Token 以后,可以用密钥再加密一次。JWT 不加密的情况下,不能将秘密数据写入 JWT。
JWT 不仅可以用于认证,也可以用于交换信息。有效使用 JWT,可以降低服务器查询数据库的次数。
JWT 缺点
- 由于服务器不保存 session 状态,因此 JWT 无法在使用过程中废止某个 token,或更改 token 的权限。一旦 JWT 签发,在到期之前就会始终有效,除非服务器部署额外的逻辑。
- JWT 本身包含认证信息,一旦泄露,任何人都可以获得该令牌的所有权限。为了减少盗用,JWT 的有效期应该设置得比较短。对于一些比较重要的权限,使用时应该再次对用户进行认证。
- 为减少盗用,JWT 不应该使用 HTTP 协议明码传输,要使用 HTTPS 协议传输。
JWT和Session方式总结
JWT 和 Session 相同点是,它们都是存储用户信息;然而,Session 是在服务器端的,而 JWT 是在客户端的。
Session 方式存储用户信息的最大问题在于要占用大量服务器内存,增加服务器的开销。
而 JWT 方式将用户状态分散到了客户端中,可以明显减轻服务端的内存压力。
Session 的状态是存储在服务器端,客户端只有 session id;而 Token 的状态是存储在客户端。
JWT 的认证流程
- 登录时,先检测是否能正常登录
- 如果能正常登录,使用JWTManager(自定义工具类),根据秘钥生成token,设置好token有效时间时间。
- 将生成的Token返回给客户端浏览器(只要能返回给客户端,客户端能拿到,任何手段都行)
- 客户端保存token
- 客户端发送其他请求时,携带token消息头(header)到服务器,会进到服务器中的loginFilter(登录认证过滤器)
- 服务器获取token,调用JWTManager中parse方法,去解析token,,获取到用户名
- 根据用户名去查找用户,将查出来的用户数据放入authentication对象中做认证。认证通过后,authentication 有一个Authenticated属性会设置为true,会进入到默认的认证过滤器
- 默认的认证过滤器识别出authentication 的Authenticated属性为true,就会放行。会进入到Controller接口中。
- 认证失败,authentication 的Authenticated属性会设置为False,进入到默认过滤器之后,就会被拦截下来。
🍁 JWT 认证实现案例:
采用JWT的方式进行认证首先做的第一步就是在配置类里禁用掉session:
// 禁用session
http.sessionManagement().sessionCreationPolicy(SessionCreationPolicy.STATELESS);
注意,这里的禁用是指Spring Security不采用session机制了,不代表你禁用掉了整个系统的session功能。
完整代码:
package com.moxuan.security_03_jwt.config;


import com.moxuan.security_03_jwt.exception.MyEntryPoint;
import com.moxuan.security_03_jwt.service.impl.UserServiceImpl;
import org.springframework.beans.factory.annotation.Autowired;
import org.springframework.boot.autoconfigure.condition.ConditionalOnMissingBean;
import org.springframework.context.annotation.Bean;
import org.springframework.context.annotation.Configuration;
import org.springframework.security.authentication.AuthenticationManager;
import org.springframework.security.authentication.dao.DaoAuthenticationProvider;
import org.springframework.security.config.BeanIds;
import org.springframework.security.config.annotation.authentication.configuration.AuthenticationConfiguration;
import org.springframework.security.config.annotation.method.configuration.EnableGlobalMethodSecurity;
import org.springframework.security.config.annotation.web.builders.HttpSecurity;
import org.springframework.security.config.annotation.web.configuration.EnableWebSecurity;
import org.springframework.security.config.http.SessionCreationPolicy;
import org.springframework.security.crypto.bcrypt.BCryptPasswordEncoder;
import org.springframework.security.crypto.password.PasswordEncoder;
import org.springframework.security.web.SecurityFilterChain;
import org.springframework.security.web.authentication.UsernamePasswordAuthenticationFilter;
import org.springframework.web.cors.CorsUtils;

@Configuration
@EnableWebSecurity
@EnableGlobalMethodSecurity(securedEnabled = true)
public class SecurityConfig {

    @Autowired
    private UserServiceImpl userService;

    @Autowired
    private LoginFilter loginFilter;


    /**
     * 配置过滤器链(在这里面配置需要放行的资源)
     * @param http
     * @return
     * @throws Exception
     */
    @Bean
    public SecurityFilterChain filterChain(HttpSecurity http) throws Exception {

        // 关闭csrf和frameOptions,如果不关闭会影响前端请求接口(这里不展开细讲了,感兴趣的自行了解)
        http.csrf().disable();
        http.headers().frameOptions().disable();
        // 开启跨域以便前端调用接口
        http.cors();

        // 这是配置的关键,决定哪些接口开启防护,哪些接口绕过防护
        http.authorizeRequests()
                // 注意这里,是允许前端跨域联调的一个必要配置
                .requestMatchers(CorsUtils::isPreFlightRequest).permitAll()
                // 指定某些接口不需要通过验证即可访问。登陆、注册接口肯定是不需要认证的
                .antMatchers("/login_jwt","/login", "/register","/static/*","/templates/*").permitAll()
                // 这里意思是其它所有接口需要认证才能访问
                .anyRequest().authenticated()
                // 指定认证错误处理器
                .and().exceptionHandling().authenticationEntryPoint(new MyEntryPoint());

        http.headers().frameOptions().sameOrigin();
        //禁用session,使用jwt方式
        http.sessionManagement().sessionCreationPolicy(SessionCreationPolicy.STATELESS);

        return http.build();

    }


    /**
     * 认证管理器,登录的时候用户名和账号等参数会传给 authenticationManager
     */
    @Bean(name = BeanIds.AUTHENTICATION_MANAGER)
    public AuthenticationManager authenticationManager(AuthenticationConfiguration authenticationConfiguration) throws Exception {

        return authenticationConfiguration.getAuthenticationManager();
    }


    /**
     * 密码加密器
     * @return
     */
    @Bean
    @ConditionalOnMissingBean
    public PasswordEncoder passwordEncoder() {
        return new BCryptPasswordEncoder();
    }

    /**
     * 配置具体处理业务的业务层和密码加密器
     * 这样在登录时,输入的密码会自动进行加密
     * @return
     */
    @Bean
    public DaoAuthenticationProvider authenticationProvider() {
        DaoAuthenticationProvider authProvider = new DaoAuthenticationProvider();

        authProvider.setUserDetailsService(userService);
        authProvider.setPasswordEncoder(passwordEncoder());

        return authProvider;
    }


}
然后我们再修改一下登录接口,当用户登录成功的同时,我们需要生成token并返回给前端,这样前端才能访问其他接口时携带token:
//jwt方式登录
// 该请求需要在配置类中放开
@RequestMapping("/login_jwt")
public UserEntity login_jwt(@RequestParam String username, @RequestParam String password) throws Exception {
        return userService.login_jwt(username,password);
}
业务层方法:
@Override
public UserEntity login_jwt(String username, String password) throws Exception {
    // 根据用户名查询出用户实体对象
    QueryWrapper<UserEntity> queryWrapper  = new QueryWrapper<UserEntity>();
    queryWrapper.lambda().eq(UserEntity::getUsername,username);
    // 从数据库中查询出用户实体对象
    UserEntity user = userMapper.selectOne(queryWrapper);
    System.out.println("user:----->"+user);
    // 若没有查到用户 或者 密码校验失败则抛出自定义异常
    if (user == null || !passwordEncoder.matches(password, user.getPassword())) {
        throw new Exception("账号或者密码错误");
    }

    //返回给前端的user对象
    user.setToken(jwtManager.generate(user.getUsername()));
    return user;


}
如果启动的时候报循环依赖的问题,可在application.properties中添加配置:
# 解决启动时报循环依赖的问题
spring.main.allow-circular-references=true
我们执行一下登录操作:
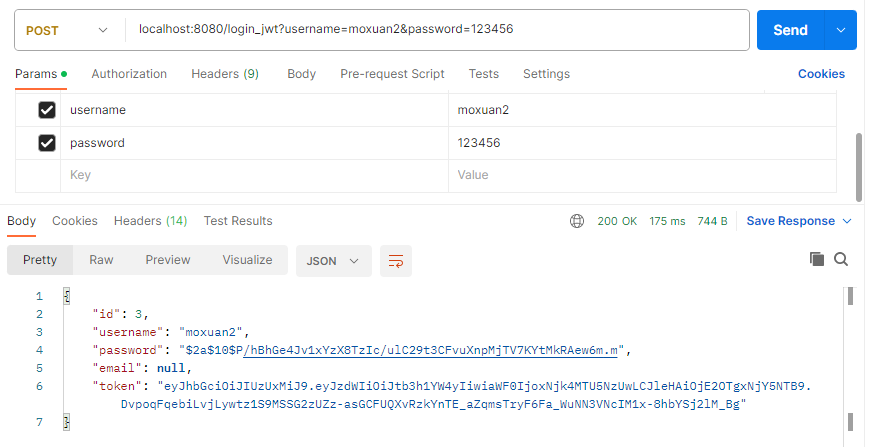
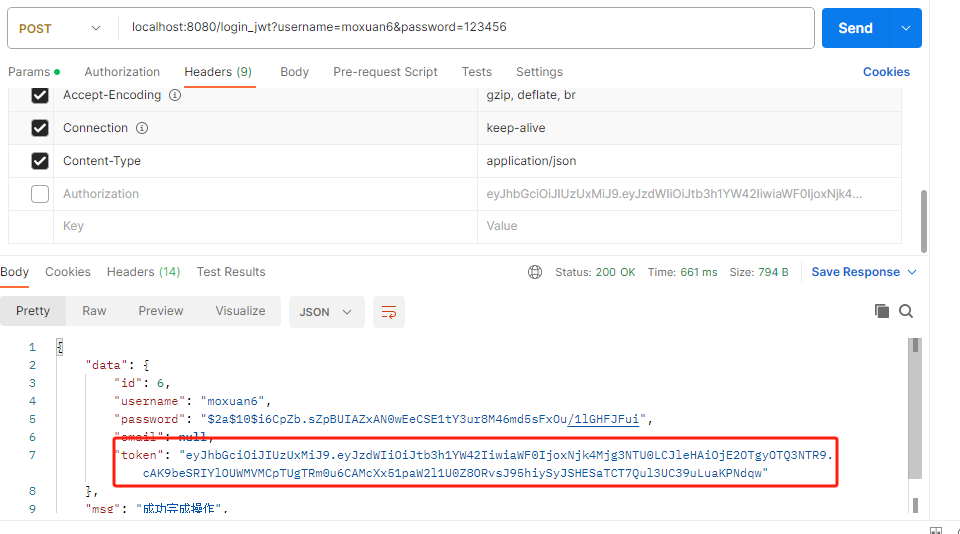
我们可以看到登录成功时接口会返回token,后续我们再访问其它接口时需要将token放到请求头中。这里我们需要自定义一个认证过滤器,来对token进行校验:
package com.moxuan.security_03_jwt.config;

import com.moxuan.security_03_jwt.service.impl.UserServiceImpl;
import com.moxuan.security_03_jwt.util.JwtManager;
import io.jsonwebtoken.Claims;
import org.springframework.beans.factory.annotation.Autowired;
import org.springframework.security.authentication.UsernamePasswordAuthenticationToken;
import org.springframework.security.core.Authentication;
import org.springframework.security.core.context.SecurityContextHolder;
import org.springframework.security.core.userdetails.UserDetails;
import org.springframework.stereotype.Component;
import org.springframework.web.filter.OncePerRequestFilter;

import javax.servlet.FilterChain;
import javax.servlet.ServletException;
import javax.servlet.http.HttpServletRequest;
import javax.servlet.http.HttpServletResponse;
import java.io.IOException;

@Component
public class LoginFilter extends OncePerRequestFilter {
    @Autowired
    private JwtManager jwtManager;
    @Autowired
    private UserServiceImpl userService;

    @Override
    protected void doFilterInternal(HttpServletRequest request, HttpServletResponse response, FilterChain chain) throws ServletException, IOException {
        // 从请求头中获取token字符串并解析
        Claims claims = jwtManager.parse(request.getHeader("Authorization"));

        if (claims != null) {
            // 从`JWT`中提取出之前存储好的用户名
            String username = claims.getSubject();
            // 查询出用户对象
            UserDetails user = userService.loadUserByUsername(username);
            System.out.println("用户对象:"+user);
            // 手动组装一个认证对象
            Authentication authentication = new UsernamePasswordAuthenticationToken(user, user.getPassword(), user.getAuthorities());
            // 将认证对象放到上下文中
            SecurityContextHolder.getContext().setAuthentication(authentication);
        }
        chain.doFilter(request, response);
    }
}
每当一个请求来时我们都会校验JWT进行认证,上下文对象中有了Authentication后续过滤器就会知道该请求已经认证过了。
咱们这个自定义的过滤器需要替换掉Spring Security默认的认证过滤器,这样我们的过滤器才能生效,所以我们需要进行在配置类中添加如下配置:
// 将我们自定义的认证过滤器插入到默认的认证过滤器之前
http.addFilterBefore(loginFilter, UsernamePasswordAuthenticationFilter.class);
携带token访问接口时可以查看效果:
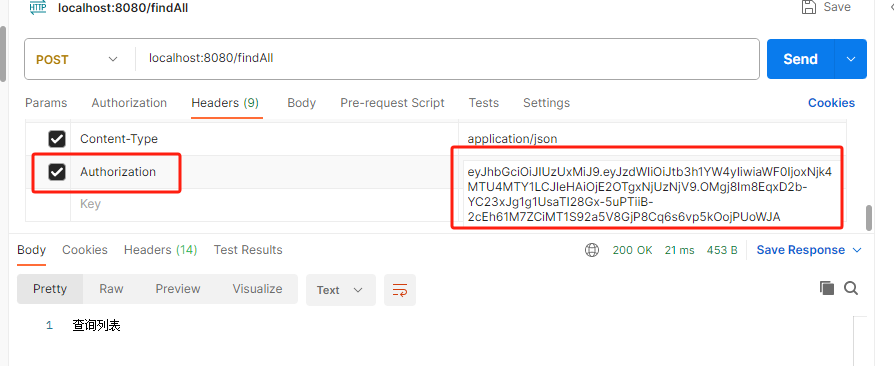
🍁 案例完整代码:
- 针对user 表,创建两个实体类
实体类对象:
package com.moxuan.security_03_jwt.entity;

import com.baomidou.mybatisplus.annotation.TableField;
import com.baomidou.mybatisplus.annotation.TableName;
import lombok.AllArgsConstructor;
import lombok.Data;
import lombok.NoArgsConstructor;

@TableName("user")
@Data
@NoArgsConstructor
@AllArgsConstructor
public class UserEntity {
    private Integer id;
    private String username;
    private String password;
    private String email;
    // 非数据库字段,用来保存生成的token
    @TableField(exist = false)
    private String token;

}
新建UserDetail类,继承security中的user,后续为实体对象分配权限
package com.moxuan.security_03_jwt.entity;

import lombok.Data;
import org.springframework.security.core.GrantedAuthority;
import org.springframework.security.core.userdetails.User;

import java.util.Collection;

/**
 * 继承security中的User
 * 用来后续为实体对象userEntity分配权限
 */
public class UserDetail extends User {
    /**
     * 我们自己的用户实体对象,要调取用户信息时直接获取这个实体对象。
     */
    private UserEntity userEntity;


    public UserDetail(UserEntity userEntity, Collection<? extends GrantedAuthority> authorities) {
        super(userEntity.getUsername(), userEntity.getPassword(), authorities);
        this.userEntity = userEntity;
    }

    public UserEntity getUserEntity() {
        return userEntity;
    }

    public void setUserEntity(UserEntity userEntity) {
        this.userEntity = userEntity;
    }
}
- 编写JWT的工具类JWTUtils类
package com.moxuan.security_03_jwt.util;

import io.jsonwebtoken.Claims;
import io.jsonwebtoken.JwtException;
import io.jsonwebtoken.Jwts;
import io.jsonwebtoken.SignatureAlgorithm;
import org.apache.commons.lang3.StringUtils;
import org.springframework.stereotype.Component;

import java.time.Duration;
import java.util.Date;

@Component
public final class JwtManager {
    /**
     * 这个秘钥是防止JWT被篡改的关键,随便写什么都好,但决不能泄露
     */

    private final static String secretKey = "moxuan";
    /**
     * 过期时间目前设置成2天,这个配置随业务需求而定
     */
    private final static Duration expiration = Duration.ofHours(2);

    /**
     * 生成JWT
     *
     * @param userName 用户名
     * @return JWT
     */
    public static String generate(String userName) {
        // 过期时间
        Date expiryDate = new Date(System.currentTimeMillis() + expiration.toMillis());

        return Jwts.builder()
                .setSubject(userName) // 将userName放进JWT
                .setIssuedAt(new Date()) // 设置JWT签发时间
                .setExpiration(expiryDate)  // 设置过期时间
                .signWith(SignatureAlgorithm.HS512, secretKey) // 设置加密算法和秘钥
                .compact();
    }

    /**
     * 解析JWT
     *
     * @param token JWT字符串
     * @return 解析成功返回Claims对象,解析失败返回null
     */
    public static Claims parse(String token) {
        // 如果是空字符串直接返回null
        if (StringUtils.isEmpty(token)) {
            return null;
        }

        // 这个Claims对象包含了许多属性,比如签发时间、过期时间以及存放的数据等
        Claims claims = null;
        // 解析失败了会抛出异常,所以我们要捕捉一下。token过期、token非法都会导致解析失败
        try {
            claims = Jwts.parser()
                    .setSigningKey(secretKey) // 设置秘钥
                    .parseClaimsJws(token)
                    .getBody();
        } catch (JwtException e) {
            // 这里应该用日志输出,为了演示方便就直接打印了
            System.err.println("解析失败!");
        }
        return claims;
    }
}- 编写Mybatis-plus的Mapper接口文件,注意在启动类上添加@MapperScan注解
package com.moxuan.security_03_jwt.dao;

import com.baomidou.mybatisplus.core.mapper.BaseMapper;
import com.moxuan.security_03_jwt.entity.UserEntity;
import org.apache.ibatis.annotations.Mapper;

@Mapper
public interface UserMapper extends BaseMapper<UserEntity> {
}
- 编写UserService接口和实现类UserServiceImpl,UserServiceImpl需要实现Security中的UserDetailService接口
package com.moxuan.security_03_jwt.service.impl;

import com.baomidou.mybatisplus.core.conditions.query.QueryWrapper;

import com.moxuan.security_03_jwt.dao.UserMapper;
import com.moxuan.security_03_jwt.entity.UserDetail;
import com.moxuan.security_03_jwt.entity.UserEntity;
import com.moxuan.security_03_jwt.service.UserService;
import com.moxuan.security_03_jwt.util.JwtManager;
import org.springframework.beans.factory.annotation.Autowired;
import org.springframework.security.core.userdetails.UserDetails;
import org.springframework.security.core.userdetails.UserDetailsService;
import org.springframework.security.core.userdetails.UsernameNotFoundException;
import org.springframework.security.crypto.password.PasswordEncoder;
import org.springframework.stereotype.Service;

import java.util.Collections;

@Service
public class UserServiceImpl implements UserService, UserDetailsService {
    @Autowired
    private UserMapper userMapper;

    @Autowired
    private PasswordEncoder passwordEncoder;

    @Autowired
    private JwtManager jwtManager;


    @Override
    public void save(UserEntity userEntity) {
        userMapper.insert(userEntity);
    }


    /**
    * 根据用户名查找用户
    */
    @Override
    public UserDetails loadUserByUsername(String username) throws UsernameNotFoundException {
        QueryWrapper<UserEntity> queryWrapper  = new QueryWrapper<UserEntity>();
        queryWrapper.lambda().eq(UserEntity::getUsername,username);
        // 从数据库中查询出用户实体对象
        UserEntity user = userMapper.selectOne(queryWrapper);
        // 若没查询到一定要抛出该异常,这样才能被Spring Security的错误处理器处理
        if (user == null) {
            throw new UsernameNotFoundException("没有找到该用户");
        }
        // 此处我们先暂时不涉及到权限,所以权限集合我们先传一个空集合
        return new UserDetail(user, Collections.emptyList());
    }
    @Override
    public UserEntity login_jwt(String username, String password) throws Exception {
        // 根据用户名查询出用户实体对象
        QueryWrapper<UserEntity> queryWrapper  = new QueryWrapper<UserEntity>();
        queryWrapper.lambda().eq(UserEntity::getUsername,username);
        // 从数据库中查询出用户实体对象
        UserEntity user = userMapper.selectOne(queryWrapper);
        System.out.println("user:----->"+user);
        // 若没有查到用户 或者 密码校验失败则抛出自定义异常
        if (user == null || !passwordEncoder.matches(
                password, user.getPassword())) {
            throw new Exception("账号或者密码错误");
        }
        //返回给前端的vo对象
        user.setToken(jwtManager.generate(user.getUsername()));
        return user;

    }
}
- 添加Security配置类
首先在配置类中需要禁用session模式,注意这里禁用session模式,只是此处session认证模式禁用了,并不是整个应用的session禁用了。
package com.moxuan.security_03_jwt.config;


import com.moxuan.security_03_jwt.exception.MyEntryPoint;
import com.moxuan.security_03_jwt.service.impl.UserServiceImpl;
import org.springframework.beans.factory.annotation.Autowired;
import org.springframework.boot.autoconfigure.condition.ConditionalOnMissingBean;
import org.springframework.context.annotation.Bean;
import org.springframework.context.annotation.Configuration;
import org.springframework.security.authentication.AuthenticationManager;
import org.springframework.security.authentication.dao.DaoAuthenticationProvider;
import org.springframework.security.config.BeanIds;
import org.springframework.security.config.annotation.authentication.configuration.AuthenticationConfiguration;
import org.springframework.security.config.annotation.method.configuration.EnableGlobalMethodSecurity;
import org.springframework.security.config.annotation.web.builders.HttpSecurity;
import org.springframework.security.config.annotation.web.configuration.EnableWebSecurity;
import org.springframework.security.config.http.SessionCreationPolicy;
import org.springframework.security.crypto.bcrypt.BCryptPasswordEncoder;
import org.springframework.security.crypto.password.PasswordEncoder;
import org.springframework.security.web.SecurityFilterChain;
import org.springframework.security.web.authentication.UsernamePasswordAuthenticationFilter;
import org.springframework.web.cors.CorsUtils;

@Configuration
@EnableWebSecurity
@EnableGlobalMethodSecurity(securedEnabled = true)
public class SecurityConfig {


    @Autowired
    private UserServiceImpl userService;

    @Autowired
    private LoginFilter loginFilter;


    /**
     * 配置过滤器链(在这里面配置需要放行的资源)
     * @param http
     * @return
     * @throws Exception
     */
    @Bean
    public SecurityFilterChain filterChain(HttpSecurity http) throws Exception {

        // 关闭csrf和frameOptions,如果不关闭会影响前端请求接口(这里不展开细讲了,感兴趣的自行了解)
        http.csrf().disable();
        http.headers().frameOptions().disable();
        // 开启跨域以便前端调用接口
        http.cors();

        // 这是配置的关键,决定哪些接口开启防护,哪些接口绕过防护
        http.authorizeRequests()
                // 注意这里,是允许前端跨域联调的一个必要配置
                .requestMatchers(CorsUtils::isPreFlightRequest).permitAll()
                // 指定某些接口不需要通过验证即可访问。登陆、注册接口肯定是不需要认证的
                .antMatchers("/login_jwt","/login", "/register","/static/*","/templates/*").permitAll()
                // 这里意思是其它所有接口需要认证才能访问
                .anyRequest().authenticated()
                // 指定认证错误处理器
                .and().exceptionHandling().authenticationEntryPoint(new MyEntryPoint());

        http.headers().frameOptions().sameOrigin();
        //禁用session,使用jwt方式
        http.sessionManagement().
        	sessionCreationPolicy(SessionCreationPolicy.STATELESS);
        //每当一个请求来时我们都会校验JWT进行认证,上下文对象中有了Authentication后续过滤器就会知道该请求已经认证过了
        //自定义的认证过滤器需要插入到默认的认证过滤器之前,
        //这样我们的过滤器才能生效
        http.addFilterBefore(loginFilter,
                    UsernamePasswordAuthenticationFilter.class);

        return http.build();

    }


    /**
     * 认证管理器,登录的时候用户名和账号等参数会传给 authenticationManager
     */
    @Bean(name = BeanIds.AUTHENTICATION_MANAGER)
    public AuthenticationManager authenticationManager(AuthenticationConfiguration authenticationConfiguration) throws Exception {

        return authenticationConfiguration.getAuthenticationManager();
    }


    /**
     * 密码加密器
     * @return
     */
    @Bean
    @ConditionalOnMissingBean
    public PasswordEncoder passwordEncoder() {
        return new BCryptPasswordEncoder();
    }

    /**
     * 配置具体处理业务的业务层和密码加密器
     * 这样在登录时,输入的密码会自动进行加密
     * @return
     */
    @Bean
    public DaoAuthenticationProvider authenticationProvider() {
        DaoAuthenticationProvider authProvider = new DaoAuthenticationProvider();

        authProvider.setUserDetailsService(userService);
        authProvider.setPasswordEncoder(passwordEncoder());

        return authProvider;
    }


}
- 添加过滤器类
package com.moxuan.security_03_jwt.config;

import com.moxuan.security_03_jwt.service.impl.UserServiceImpl;
import com.moxuan.security_03_jwt.util.JwtManager;
import io.jsonwebtoken.Claims;
import org.springframework.beans.factory.annotation.Autowired;
import org.springframework.security.authentication.UsernamePasswordAuthenticationToken;
import org.springframework.security.core.Authentication;
import org.springframework.security.core.context.SecurityContextHolder;
import org.springframework.security.core.userdetails.UserDetails;
import org.springframework.stereotype.Component;
import org.springframework.web.filter.OncePerRequestFilter;

import javax.servlet.FilterChain;
import javax.servlet.ServletException;
import javax.servlet.http.HttpServletRequest;
import javax.servlet.http.HttpServletResponse;
import java.io.IOException;

@Component
public class LoginFilter extends OncePerRequestFilter {
    @Autowired
    private JwtManager jwtManager;
    @Autowired
    private UserServiceImpl userService;

    @Override
    protected void doFilterInternal(HttpServletRequest request, HttpServletResponse response, FilterChain chain) throws ServletException, IOException {
        // 从请求头中获取token字符串并解析
        Claims claims = jwtManager.parse(request.getHeader("Authorization"));

        if (claims != null) {
            // 从`JWT`中提取出之前存储好的用户名
            String username = claims.getSubject();
            // 查询出用户对象
            UserDetails user = userService.loadUserByUsername(username);
            System.out.println("用户对象:"+user);
            // 手动组装一个认证对象
            Authentication authentication = new UsernamePasswordAuthenticationToken(user, user.getPassword(), user.getAuthorities());
            // 将认证对象放到上下文中
            SecurityContextHolder.getContext().setAuthentication(authentication);
        }
        chain.doFilter(request, response);
    }
}
- 添加认证错误处理器类
package com.moxuan.security_03_jwt.exception;

import org.springframework.security.core.AuthenticationException;
import org.springframework.security.web.AuthenticationEntryPoint;

import javax.servlet.ServletException;
import javax.servlet.http.HttpServletRequest;
import javax.servlet.http.HttpServletResponse;
import java.io.IOException;
import java.io.PrintWriter;

public class MyEntryPoint implements AuthenticationEntryPoint {
    @Override
    public void commence(HttpServletRequest request, HttpServletResponse response, AuthenticationException authException) throws IOException, ServletException {
        response.setContentType("application/json;charset=utf-8");
        PrintWriter out = response.getWriter();
        System.out.println(authException.getMessage());
        // 直接提示前端认证错误
        out.write("认证失败");
        out.flush();
        out.close();
    }
}
- 编写控制器类
package com.moxuan.security_03_jwt.controller;


import com.moxuan.security_03_jwt.entity.UserEntity;
import com.moxuan.security_03_jwt.service.impl.UserServiceImpl;
import org.springframework.beans.factory.annotation.Autowired;
import org.springframework.security.authentication.AuthenticationManager;
import org.springframework.security.authentication.UsernamePasswordAuthenticationToken;
import org.springframework.security.core.Authentication;
import org.springframework.security.core.context.SecurityContextHolder;
import org.springframework.security.crypto.password.PasswordEncoder;
import org.springframework.web.bind.annotation.RequestMapping;
import org.springframework.web.bind.annotation.RequestParam;
import org.springframework.web.bind.annotation.RestController;

@RestController
public class LoginController {

    @Autowired
    private AuthenticationManager authenticationManager;

    @Autowired
    private PasswordEncoder passwordEncoder;

    @Autowired
    private UserServiceImpl userService;

    //jwt方式登录
    @RequestMapping("/login_jwt")
    public UserEntity login_jwt(@RequestParam String username, @RequestParam String password) throws Exception {
        return userService.login_jwt(username,password);
    }

    @RequestMapping("/register")
    public String register(@RequestParam String username,@RequestParam String password) {
        UserEntity user = new UserEntity();
        // 调用加密器将前端传递过来的密码进行加密
        user.setUsername(username);
        user.setPassword(passwordEncoder.encode(password));
        // 将用户实体对象添加到数据库
        userService.save(user);
        return "注册成功";
    }

    @RequestMapping("/findAll")
    public String findAll(){
        return "查询列表";
    }

}
测试一:直接访问http://localhost:8080/findAll 没有token的情况下
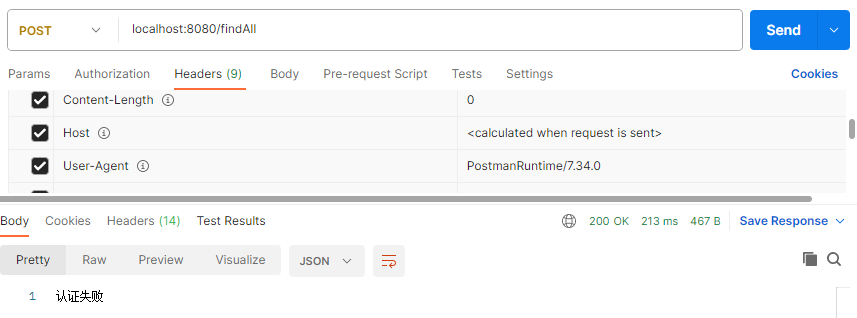
测试二:成功登录,获取token,
http://localhost:8080/login_jwt?username=moxuan2&password=123456
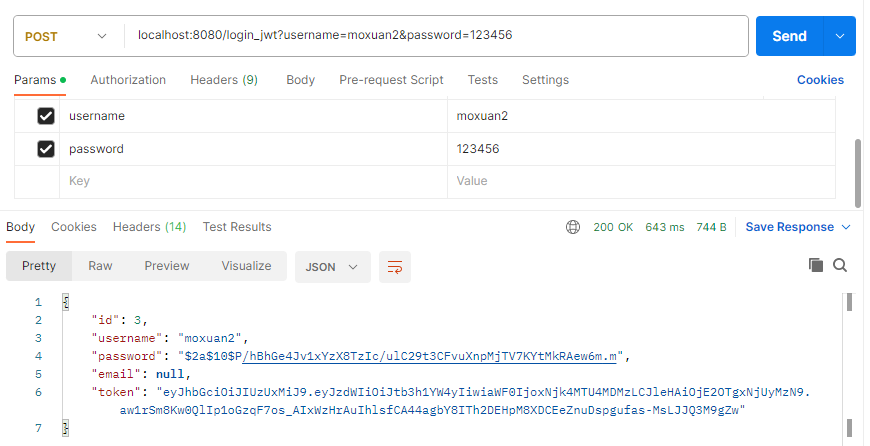
测试三:再次发送http://localhost:8080/findAll,只是这次把登录后的token带到服务器中,此时可以看到可以正常访问功能了。

🌲 权限授权
🌿 授权流程
菜单权限主要是通过前端渲染,数据权限主要靠SQL拦截,和Spring Security没太大耦合,就不多展开了。我们来梳理一下接口权限的授权的流程:
- 当一个请求过来,我们先得知道这个请求的规则,即需要怎样的权限才能访问
- 然后获取当前登录用户所拥有的权限
- 再校验当前用户是否拥有该请求的权限
- 用户拥有这个权限则正常返回数据,没有权限则拒绝请求
🌿 RBAC
RBAC是基于角色的访问控制(Rloe Basee Access Controller),在RBAC中,权限与角色相关联,用户通过成为适当的角色的成员而得到这个角色的权限。这样就极大的简化了权限的管理用户和角色有关联
- 角色(Role)
为了对许多拥有显示权限的用户进行分类管理,定义了角色概念,比如管理员,超级管理员,普通用户
- 权限(Permisson)
具体的操作,比如新增用户操作 修改用户操作 删除操作
- 用户(User)
就是操作的个体,就是人
- 资源(Resource)
具体的内容东西
这四者之间的关系:
- 用户和角色
-
- 多对多(多个用户拥有一个角色,一个用户可以是多个角色)
- 角色和权限
-
- 多对多(多个权限可以拥有一个角色,多个角色可以有同样的权限)
- 权限和资源
-
- 可以一对一,也可以一对多(可以一个权限对应一个资源,也可以一个权限对应多个资源)
🌿 数据库结构
在实际中权限资源可能是比较多的,如果单个权限配置表格,不可能针对部门员工专门设置一个一个添加权限,如果权限海量,工作量会非常大,实际上是某个角色,可能具有多个资源权限
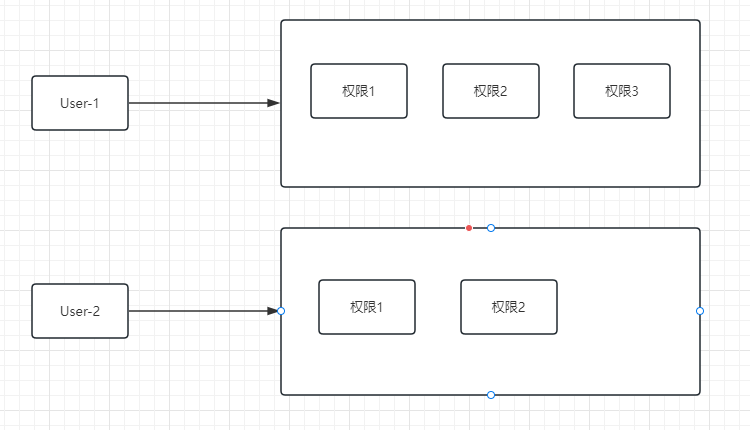
这样的设计就需要优化:--添加中间层->RBAC
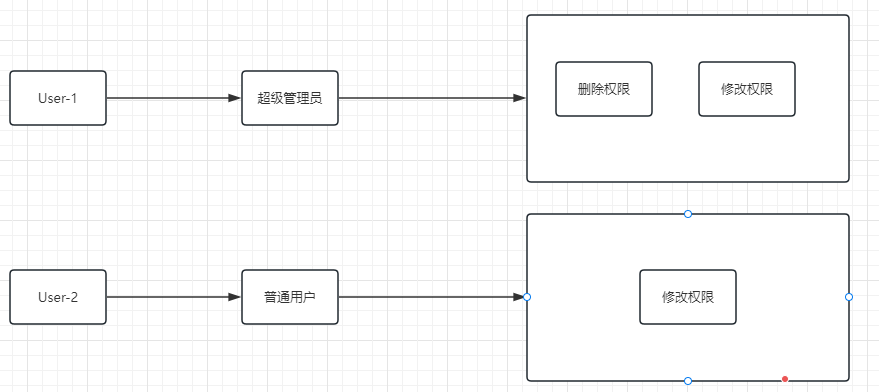
设计表结构如下:

数据库脚本:
CREATE TABLE `user` (
  `id` int NOT NULL AUTO_INCREMENT,
  `username` varchar(255) DEFAULT NULL,
  `password` varchar(255) DEFAULT NULL,
  `email` varchar(255) DEFAULT NULL,
  PRIMARY KEY (`id`)
) ENGINE=InnoDB AUTO_INCREMENT=7 DEFAULT CHARSET=utf8mb3;

-- ----------------------------
-- Records of user
-- ----------------------------
INSERT INTO `user` VALUES ('1', 'moxuan', '$2a$10$545cCrQPs2qiCEyF25khr.4OyzInL9RpPsTdDxshxoTSTg3yEbdSa', null);
INSERT INTO `user` VALUES ('2', 'moxuan1', '123456', null);
INSERT INTO `user` VALUES ('3', 'moxuan2', '$2a$10$P/hBhGe4Jv1xYzX8TzIc/ulC29t3CFvuXnpMjTV7KYtMkRAew6m.m', null);
INSERT INTO `user` VALUES ('4', 'moxuan4', '$2a$10$5Dig0DTIfzFeHD3XlBNDyul2N1.lsRSeoGl4cd5GGJ5r5y6yKoE3K', null);
INSERT INTO `user` VALUES ('5', 'moxuan5', '$2a$10$kBW6MsX5H5c/jTSBdDMbp.doXakJ4Zwk9JK16c858oQeB/oUdIkPG', null);
INSERT INTO `user` VALUES ('6', 'moxuan6', '$2a$10$i6CpZb.sZpBUIAZxAN0wEeCSE1tY3ur8M46md5sFxOu/1lGHFJFui', null);

create table  t_role(
  id int primary key auto_increment,
  name varchar(50)
);
create table  t_res(
  id int primary key auto_increment,
  path varchar(100),
  name varchar(50)
);

create table t_user_role(
  user_id int,
  role_id int,
  constraint  uid foreign key (user_id) references t_user(id),
  constraint  rid foreign key (role_id) references t_role(id)
);

create table t_role_res(
  res_id int,
  role_id int,
  constraint  res_id foreign key (res_id) references t_res(id),
  constraint  role_id foreign key (role_id) references t_role(id)
);
insert into t_role(name) values('超级管理员');
insert into t_role(name) values('数据管理员');
insert into t_res(path, name) VALUE ('GET:/api/findAll','账户管理');
insert into t_res(path, name) VALUE ('DELETE:/api/data','删除操作');

insert into t_user_role(user_id, role_id) VALUES(1,1);
insert into t_user_role(user_id, role_id) VALUES(1,2);
insert into t_user_role(user_id, role_id) VALUES(2,2);
insert into t_user_role(user_id, role_id) VALUES(3,2);

insert into t_role_res(res_id, role_id) VALUE (1,1);
insert into t_role_res(res_id, role_id) VALUE (2,1);
insert into t_role_res(res_id, role_id) VALUE (1,2);
🌿 实现基本流程
Spring Security的授权发生在FilterSecurityInterceptor过滤器中:
- 首先调用的是SecurityMetadataSource,来获取当前请求的鉴权规则
- 然后通过Authentication获取当前登录用户所有权限数据:GrantedAuthority认证对象里存放这权限数据
- 再调用AccessDecisionManager 来校验当前用户是否拥有该权限
- 如果有就放行接口,没有则抛出异常,该异常会被AccessDeniedHandler 处理
🍁 核心接口
我们先了解一下Security跟授权相关的接口源码,方便理解流程原理:
🍁 鉴权规则接口SecurityMetadataSource
public interface SecurityMetadataSource {
	/**
	 * 获取当前请求的鉴权规则

	 * @param object 该参数就是Spring Security封装的FilterInvocation对象,
   *                包含了很多request信息
	 * @return 鉴权规则对象
	 */
	Collection<ConfigAttribute> getAttributes(Object object);

}


/**
 *
 *ConfigAttribute 就是我们所说的鉴权规则,该接口只有一个方法
 */
public interface ConfigAttribute {
	/**
	 * 这个字符串就是规则,它可以是角色名、权限名、表达式等等。
	 * 你完全可以按照自己想法来定义,后面AccessDecisionManager会用这个字符串
	 */
	String getAttribute();
}
授权的实现全是靠着资源id,比如:用户id关联角色id,角色id关联资源id,这样用户就相当于关联了资源,而我们接口资源在数据库中的体现是这样的:

接下来:自定义SecurityMetadataSource类
package com.moxuan.security_03_jwt.config;

import com.moxuan.security_03_jwt.entity.Resource;
import com.moxuan.security_03_jwt.service.ResourceService;
import org.apache.commons.lang3.ArrayUtils;
import org.springframework.beans.factory.annotation.Autowired;
import org.springframework.beans.factory.annotation.Value;
import org.springframework.security.access.ConfigAttribute;
import org.springframework.security.access.SecurityConfig;
import org.springframework.security.access.SecurityMetadataSource;
import org.springframework.security.web.FilterInvocation;
import org.springframework.security.web.util.matcher.AntPathRequestMatcher;
import org.springframework.stereotype.Component;

import javax.servlet.http.HttpServletRequest;
import java.util.*;

@Component
public class MySecurityMetadataSource implements SecurityMetadataSource {
    @Autowired
    private ResourceService resourceService;

    /**
     * 授权检测白名单
     *  配置到白名单的请求可以跳过授权认证
     * **/
    @Value("${sys.whiteUrl}")
    private String[] whiteUrls;

    @Override
    public Collection<ConfigAttribute> getAttributes(Object object) throws IllegalArgumentException {
        //获取全部接口全部资源
        Set<Resource> rs = resourceService.findAllResource();
        //SpringSecurity封装的requests请求信息
        FilterInvocation filterInvocation = (FilterInvocation) object;
        HttpServletRequest request = filterInvocation.getRequest();
        //1.当前请求对象
        String requestURI = request.getRequestURI();
        Collection<ConfigAttribute> collection = new LinkedList<>();
        //白名单放行,不用验证授权
        if(ArrayUtils.contains(whiteUrls, requestURI)){
            return null;
        }
        //遍历资源,和当前请求进行匹配
        //此处在设计的时候关注自己的数据库数据设计: 请求方式:/api/accout/,后期可以自己灵活设计
        for(Resource r:rs){
            //拆分
            String[] message = r.getPath().split(":");
            //验证请求方式和地址
            if(request.getMethod().equals(message[0]) && request.getServletPath().equals(message[1])){
                //返回资源id(一个鉴权规则对象SercurityConfig,其实他是ConfigAttribute的一个实现)
                return Collections.singletonList(new SecurityConfig(r.getId().toString()));
            }
        }
        // 如果查询出来没有权限的话,也就是权限列表为空
        // 需要给一个默认的权限,否则无法触发AccessDecisionManager
        //  切记!!!切记!!!!
        if(collection.size()<1){
            return Collections.singletonList(new SecurityConfig("ROLE_NO_USER"));
        }
        return null;


    }

    @Override
    public Collection<ConfigAttribute> getAllConfigAttributes() {
        return null;
    }

    @Override
    public boolean supports(Class<?> clazz) {
        return true; //!!!
    }
}
在application.properties中配置授权白名单,将登录注册请求加入到白名单中
这样登录和注册可以跳过授权认证
# 配置自定义的授权白名单
sys.whiteUrl=/login_jwt , /register
🍁 用户权限GrantedAuthority
该组件代表用户所拥有的权限,和ConfigAttribute一样也只有一个方法,该方法返回的字符串就是代表着权限
public interface GrantedAuthority extends Serializable {
	String getAuthority();
}
将GrantedAuthority和ConfigAttribute一对比,就知道用户是否拥有某个权限了
Spring Security对GrantedAuthority有一个简单实现SimpleGrantedAuthority,对咱们来说够用了,所以我们额外再新建一个实现。我们要做的就是在UserDetialsService中,获取用户对象的同时也将权限数据查询出来:
/**
     * 根据用户名查找用户
     */
@Override
public UserDetails loadUserByUsername(String username) throws UsernameNotFoundException {
    QueryWrapper<UserEntity> queryWrapper  = new QueryWrapper<UserEntity>();
    queryWrapper.lambda().eq(UserEntity::getUsername,username);
    // 从数据库中查询出用户实体对象
    UserEntity user = userMapper.selectOne(queryWrapper);
    // 若没查询到一定要抛出该异常,这样才能被Spring Security的错误处理器处理
    if (user == null) {
        throw new UsernameNotFoundException("没有找到该用户");
    }
    // 先将该用户所拥有的资源id全部查询出来,再转换成`SimpleGrantedAuthority`权限对象
    Set<SimpleGrantedAuthority> authorities = resourceService.getIdsByUserId(user.getId())
    .stream()
    .map(String::valueOf)
    .map(SimpleGrantedAuthority::new)
    .collect(Collectors.toSet());
    // 将权限列表传入
    return new UserDetail(user, authorities);

}
这样当认证完毕时,Authentication就会拥有用户信息和权限数据了
ResourceServiceImpl代码:
package com.moxuan.security_03_jwt.service.impl;

import com.moxuan.security_03_jwt.dao.ResourceMapper;
import com.moxuan.security_03_jwt.entity.Resource;
import com.moxuan.security_03_jwt.service.ResourceService;
import org.springframework.beans.factory.annotation.Autowired;
import org.springframework.stereotype.Service;

import java.util.Set;

@Service
public class ResourceServiceImpl implements ResourceService {
    @Autowired
    private ResourceMapper resourceMapper;

    @Override
    public Set<Resource> findAllResource() {
        return resourceMapper.findAll();
    }

    @Override
    public Set<Integer> getIdsByUserId(Integer userId) {
        return resourceMapper.getIdsByUserId(userId);
    }
}
ResourceMapper代码
package com.moxuan.security_03_jwt.dao;

import com.baomidou.mybatisplus.core.mapper.BaseMapper;
import com.moxuan.security_03_jwt.entity.Resource;
import org.apache.ibatis.annotations.Mapper;

import java.util.Set;

@Mapper
public interface ResourceMapper extends BaseMapper<Resource> {
    Set<Resource> findAll();

    Set<Integer> getIdsByUserId(Integer userId);
}
ResourceMapper.xml查询语句
<?xml version="1.0" encoding="UTF-8" ?>
<!DOCTYPE mapper
        PUBLIC "-//mybatis.org//DTD Mapper 3.0//EN"
        "http://mybatis.org/dtd/mybatis-3-mapper.dtd">
<mapper namespace="com.moxuan.security_03_jwt.dao.ResourceMapper">

    <select id="getIdsByUserId"  resultType="java.lang.Integer">
        SELECT
            rr.res_id
        FROM
            t_user_role ur
                INNER JOIN t_role_res rr ON ur.role_id = rr.role_id
        WHERE
            ur.user_id = #{userId}
    </select>

    <select id="findAll" resultType="resource">
        select * from t_res
    </select>
</mapper>
🍁 授权管理AccessDecisionManager
终于要来到我们真正的授权组件了,这个组件才最终决定了你有没有某个权限,该接口我们只需关注一个方法:
public interface AccessDecisionManager {

	/**
	 * 授权操作,如果没有权限则抛出异常
	 *
     * @param authentication 当前登录用户,以获取当前用户权限信息
	 * @param object FilterInvocation对象,以获取request信息
	 * @param configAttributes 当前请求鉴权规则
	 */
	void decide(Authentication authentication, Object object, Collection<ConfigAttribute> configAttributes)
			throws AccessDeniedException, InsufficientAuthenticationException;
}
该方法接受了这几个参数后完全能做到权限校验了,我们来实现自己的逻辑:
package com.moxuan.security_03_jwt.config;

import io.jsonwebtoken.lang.Collections;
import org.springframework.security.access.AccessDecisionManager;
import org.springframework.security.access.AccessDeniedException;
import org.springframework.security.access.ConfigAttribute;
import org.springframework.security.authentication.InsufficientAuthenticationException;
import org.springframework.security.core.Authentication;
import org.springframework.security.core.GrantedAuthority;
import org.springframework.stereotype.Component;

import java.util.Collection;
import java.util.Objects;

/**
 * 授权组件
 */
@Component
public class MyDecisionManager implements AccessDecisionManager {

    @Override
    public void decide(Authentication authentication, Object object, Collection<ConfigAttribute> configAttributes) {
        // 如果授权规则为空则代表此URL无需授权就能访问
        if (Collections.isEmpty(configAttributes)) {
            return;
        }
        // 判断授权规则和当前用户所属权限是否匹配
        for (ConfigAttribute ca : configAttributes) {
            for (GrantedAuthority authority : authentication.getAuthorities()) {
                // 如果匹配上了,代表当前登录用户是有该权限的,直接结束方法
                if (Objects.equals(authority.getAuthority(), ca.getAttribute())) {
                    return;
                }
            }
        }

        // 走到这里就代表没有权限,必须要抛出异常,否则错误处理器捕捉不到
        throw new AccessDeniedException("没有相关权限");
    }

    @Override
    public boolean supports(ConfigAttribute attribute) {
        return true;
    }

    @Override
    public boolean supports(Class<?> clazz) {
        return true;
    }
}
🍁授权错误处理器AccessDeniedHandler
该组件和之前的认证异常处理器一样,只有一个方法用来处理异常,只不过这个是用来处理授权异常的。我们直接来实现:
package com.moxuan.security_03_jwt.exception;

import com.alibaba.fastjson.JSON;
import com.moxuan.security_03_jwt.util.Result;
import com.moxuan.security_03_jwt.util.ReturnCode;
import org.springframework.security.access.AccessDeniedException;
import org.springframework.security.web.access.AccessDeniedHandler;

import javax.servlet.ServletException;
import javax.servlet.http.HttpServletRequest;
import javax.servlet.http.HttpServletResponse;
import java.io.IOException;
import java.io.PrintWriter;

public class MyAccessDeniedHandle implements AccessDeniedHandler {
    @Override
    public void handle(HttpServletRequest request, HttpServletResponse response, AccessDeniedException accessDeniedException) throws IOException, ServletException {
        response.setContentType("application/json;charset=utf-8");
        PrintWriter out = response.getWriter();

        String result = JSON.toJSON
        	(Result.sendResult(ReturnCode.ACCESS_FORBIDDEN)).toString();
        out.write(result);
        out.flush();
        out.close();
    }
}
🍁 添加配置
组件都定义好了,那我们接下来就是最后一步咯,就是让这些组件生效。
我们的鉴权规则源组件SecurityMetadataSource和授权管理组件AccessDecisionManager必须通过鉴权过滤器FilterSecurityInterceptor来配置生效,所以我们得自己先写一个过滤器,这个过滤器的核心代码基本按照父类的写就行,主要就是属性的配置:
package com.moxuan.security_03_jwt.config;

import org.springframework.beans.factory.annotation.Autowired;
import org.springframework.security.access.AccessDecisionManager;
import org.springframework.security.access.SecurityMetadataSource;
import org.springframework.security.access.intercept.AbstractSecurityInterceptor;
import org.springframework.security.access.intercept.InterceptorStatusToken;
import org.springframework.security.web.FilterInvocation;
import org.springframework.stereotype.Component;

import javax.servlet.*;
import java.io.IOException;

@Component
public class AuthFilter extends AbstractSecurityInterceptor implements Filter {
    @Autowired
    private MySecurityMetadataSource mySecurityMetadataSource;

    @Override
    public SecurityMetadataSource obtainSecurityMetadataSource() {
        // 将我们自定义的SecurityMetadataSource给返回
        return this.mySecurityMetadataSource;
    }

    @Override
    @Autowired
    public void setAccessDecisionManager(AccessDecisionManager accessDecisionManager) {
        // 将我们自定义的AccessDecisionManager给注入
        super.setAccessDecisionManager(accessDecisionManager);
    }

    @Override
    public void doFilter(ServletRequest request, ServletResponse response, FilterChain chain) throws IOException, ServletException {
        // 下面的就是按照父类写法写的
        FilterInvocation fi = new FilterInvocation(request, response, chain);
        InterceptorStatusToken token = super.beforeInvocation(fi);
        try {
            // 执行下一个拦截器
            fi.getChain().doFilter(fi.getRequest(), fi.getResponse());
        }  finally {
            // 请求之后的处理
            super.afterInvocation(token, null);
        }
    }

    @Override
    public Class<?> getSecureObjectClass() {
        return FilterInvocation.class;
    }

    @Override
    public void init(FilterConfig filterConfig) {}

    @Override
    public void destroy() {}
}
过滤器定义好了,我们回到Spring Security配置类让这个过滤器插入到原有的鉴权过滤器之前就一切都搞定啦:
http.addFilterBefore(authFilter, FilterSecurityInterceptor.class);配置类整体代码:
package com.moxuan.security_03_jwt.config;


import com.moxuan.security_03_jwt.exception.MyAccessDeniedHandle;
import com.moxuan.security_03_jwt.exception.MyEntryPoint;
import com.moxuan.security_03_jwt.service.impl.UserServiceImpl;
import org.springframework.beans.factory.annotation.Autowired;
import org.springframework.boot.autoconfigure.condition.ConditionalOnMissingBean;
import org.springframework.context.annotation.Bean;
import org.springframework.context.annotation.Configuration;
import org.springframework.security.authentication.AuthenticationManager;
import org.springframework.security.authentication.dao.DaoAuthenticationProvider;
import org.springframework.security.config.BeanIds;
import org.springframework.security.config.annotation.authentication.configuration.AuthenticationConfiguration;
import org.springframework.security.config.annotation.method.configuration.EnableGlobalMethodSecurity;
import org.springframework.security.config.annotation.web.builders.HttpSecurity;
import org.springframework.security.config.annotation.web.configuration.EnableWebSecurity;
import org.springframework.security.config.annotation.web.configuration.WebSecurityCustomizer;
import org.springframework.security.config.http.SessionCreationPolicy;
import org.springframework.security.crypto.bcrypt.BCryptPasswordEncoder;
import org.springframework.security.crypto.password.PasswordEncoder;
import org.springframework.security.web.SecurityFilterChain;
import org.springframework.security.web.access.intercept.FilterSecurityInterceptor;
import org.springframework.security.web.authentication.UsernamePasswordAuthenticationFilter;
import org.springframework.web.cors.CorsUtils;

@Configuration
@EnableWebSecurity
@EnableGlobalMethodSecurity(securedEnabled = true)
public class SecurityConfig {

    @Autowired
    private UserServiceImpl userService;

    @Autowired
    private LoginFilter loginFilter;

    @Autowired
    private  AuthFilter authFilter;


    /**
     * 配置过滤器链(在这里面配置需要放行的资源)
     * @param http
     * @return
     * @throws Exception
     */
    @Bean
    public SecurityFilterChain filterChain(HttpSecurity http) throws Exception {

        // 关闭csrf和frameOptions,如果不关闭会影响前端请求接口(这里不展开细讲了,感兴趣的自行了解)
        http.csrf().disable();
        http.headers().frameOptions().disable();
        // 开启跨域以便前端调用接口
        http.cors();

        // 这是配置的关键,决定哪些接口开启防护,哪些接口绕过防护
        http
                .csrf().disable()
                .sessionManagement().sessionCreationPolicy(SessionCreationPolicy.STATELESS)
                .and()
                .authorizeRequests()
                .antMatchers("/login_jwt", "/register","/static/**","/templates/**").permitAll()
                .anyRequest().authenticated()
                // 指定认证错误处理器
                .and().exceptionHandling()
        		.authenticationEntryPoint(new MyEntryPoint())

        .accessDeniedHandler(new MyAccessDeniedHandle());

        http.headers().frameOptions().sameOrigin();
        //禁用session,使用jwt方式
        http.sessionManagement().sessionCreationPolicy(SessionCreationPolicy.STATELESS);
// 将我们自定义的认证过滤器插入到默认的认证过滤器之前
        http.addFilterBefore(loginFilter, UsernamePasswordAuthenticationFilter.class);
        http.addFilterBefore(authFilter,FilterSecurityInterceptor.class);
        return http.build();

    }

    /**
     * 配置全局的某些通用事物,例如静态资源等
     * @return
     */
    @Bean
    public WebSecurityCustomizer securityCustomizer() {
        return (web) -> web.ignoring().antMatchers("/static/**","/templates/**");
    }


    /**
     * 认证管理器,登录的时候用户名和账号等参数会传给 authenticationManager
     */
    @Bean(name = BeanIds.AUTHENTICATION_MANAGER)
    public AuthenticationManager authenticationManager(AuthenticationConfiguration authenticationConfiguration) throws Exception {

        return authenticationConfiguration.getAuthenticationManager();
    }


    /**
     * 密码加密器
     * @return
     */
    @Bean
    @ConditionalOnMissingBean
    public PasswordEncoder passwordEncoder() {
        return new BCryptPasswordEncoder();
    }

    /**
     * 配置具体处理业务的业务层和密码加密器
     * 这样在登录时,输入的密码会自动进行加密
     * @return
     */
    @Bean
    public DaoAuthenticationProvider authenticationProvider() {
        DaoAuthenticationProvider authProvider = new DaoAuthenticationProvider();

        authProvider.setUserDetailsService(userService);
        authProvider.setPasswordEncoder(passwordEncoder());

        return authProvider;
    }
}
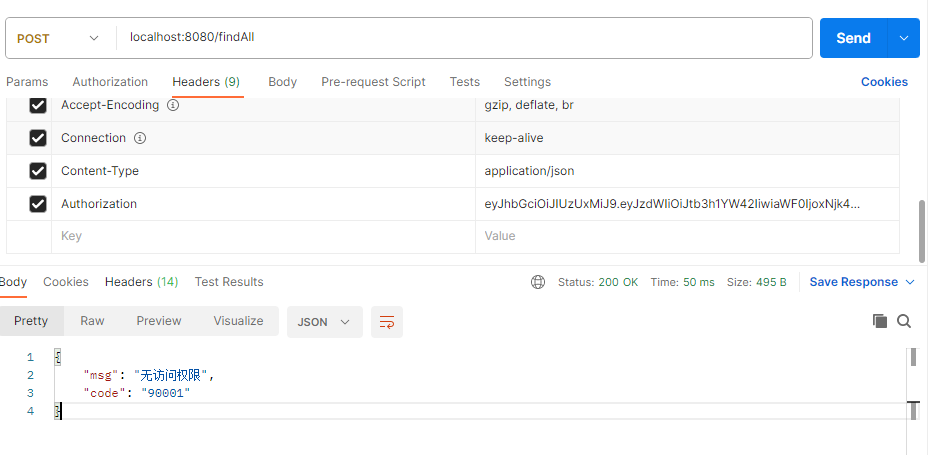
我们可以来看下效果,没有登录的情况下访问接口
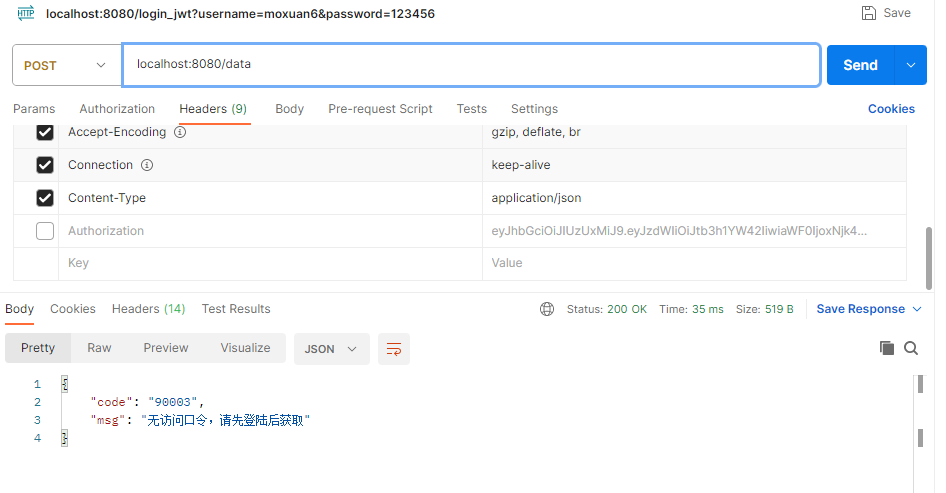
紧接着测试登录
此处为了模拟登录->赋权->查询权限效果,我们先访问Login获取token
然后访问findAll请求资源,在请求头中添加token
去数据库给对应的用户添加/findAll 权限
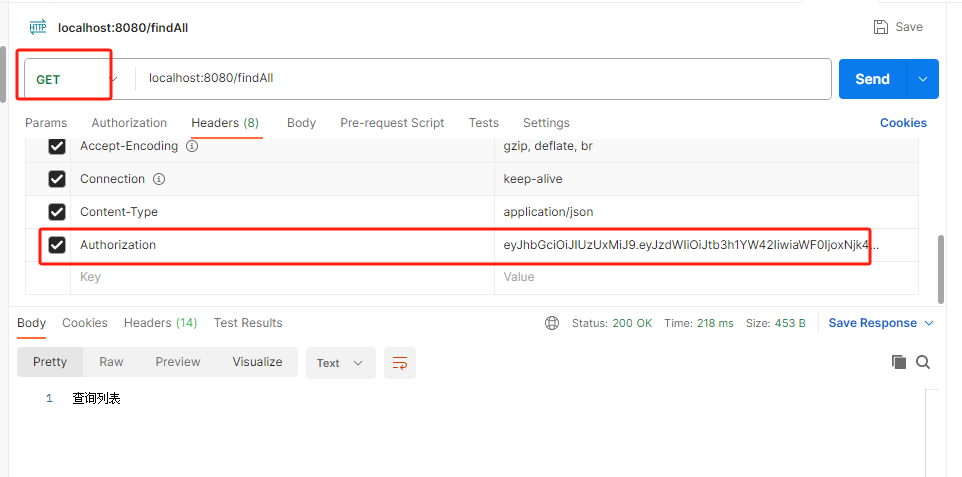
紧接着去访问findAll,但是需要注意两点:
- 请求头中依然要带前面登录时获取的TOKEN
- 发送请求时,请求方式必须是GET,因为数据库中资源存的是GET请求,我们要保持一致
🌿 完整代码
🍁 POM依赖
<dependencies>
  <dependency>
    <groupId>org.springframework.boot</groupId>
    <artifactId>spring-boot-starter-data-redis</artifactId>
  </dependency>

  <dependency>
    <groupId>org.springframework.boot</groupId>
    <artifactId>spring-boot-starter-thymeleaf</artifactId>
  </dependency>
  <dependency>
    <groupId>org.springframework.boot</groupId>
    <artifactId>spring-boot-starter-web</artifactId>
  </dependency>
  <dependency>
    <groupId>org.mybatis.spring.boot</groupId>
    <artifactId>mybatis-spring-boot-starter</artifactId>
    <version>2.3.1</version>
  </dependency>


  <dependency>
    <groupId>org.springframework.boot</groupId>
    <artifactId>spring-boot-devtools</artifactId>
    <scope>runtime</scope>
    <optional>true</optional>
  </dependency>
  <dependency>
    <groupId>com.mysql</groupId>
    <artifactId>mysql-connector-j</artifactId>
    <scope>runtime</scope>
  </dependency>
  <dependency>
    <groupId>org.projectlombok</groupId>
    <artifactId>lombok</artifactId>
    <optional>true</optional>
  </dependency>
  <dependency>
    <groupId>org.springframework.boot</groupId>
    <artifactId>spring-boot-starter-test</artifactId>
    <scope>test</scope>
  </dependency>
  <dependency>
    <groupId>org.mybatis.spring.boot</groupId>
    <artifactId>mybatis-spring-boot-starter-test</artifactId>
    <version>2.3.1</version>
    <scope>test</scope>
  </dependency>
  <dependency>
    <groupId>org.springframework.security</groupId>
    <artifactId>spring-security-test</artifactId>
    <scope>test</scope>
  </dependency>

  <dependency>
    <groupId>com.baomidou</groupId>
    <artifactId>mybatis-plus-boot-starter</artifactId>
    <version>3.4.1</version>
  </dependency>

  <dependency>
    <groupId>com.alibaba</groupId>
    <artifactId>druid-spring-boot-starter</artifactId>
    <version>1.2.16</version>
  </dependency>
  <dependency>
    <groupId>org.springframework.boot</groupId>
    <artifactId>spring-boot-starter-security</artifactId>
  </dependency>
  <dependency>
    <groupId>io.jsonwebtoken</groupId>
    <artifactId>jjwt</artifactId>
    <version>0.9.1</version>
  </dependency>

  <dependency>
    <groupId>org.apache.commons</groupId>
    <artifactId>commons-lang3</artifactId>
    <version>3.8.1</version>
  </dependency>
  <dependency>
    <groupId>javax.xml.bind</groupId>
    <artifactId>jaxb-api</artifactId>
    <version>2.3.1</version>
  </dependency>

  <dependency>
    <groupId>com.alibaba</groupId>
    <artifactId>fastjson</artifactId>
    <version>1.2.56</version>
  </dependency>
  </dependencies>
🍁 配置文件
spring.datasource.password=123456
spring.datasource.url=jdbc:mysql://localhost:3306/study?useSSL=false
spring.datasource.type=com.alibaba.druid.pool.DruidDataSource

mybatis-plus.configuration.log-impl=org.apache.ibatis.logging.stdout.StdOutImpl
mybatis-plus.type-aliases-package=com.moxuan.security_03_jwt.entity
mybatis-plus.mapper-locations=classpath*:mappers/*.xml
#数据库表主键id配置为自增策略
mybatis-plus.global-config.db-config.id-type=auto

# 解决启动时报循环依赖的问题
spring.main.allow-circular-references=true

# 配置自定义的授权白名单
sys.whiteUrl=/login_jwt , /register
🍁 实体类
- 访问资源类:Resource.java
package com.moxuan.security_03_jwt.entity;

import com.baomidou.mybatisplus.annotation.TableName;
import lombok.AllArgsConstructor;
import lombok.Data;
import lombok.NoArgsConstructor;

/**
 * 访问资源
 */
@Data
@AllArgsConstructor
@NoArgsConstructor
@TableName("t_res")
public class Resource {
    private Integer id;
    private String name;
    private String path;
}
- 用户实体类:UserEntity .java
用户实体类,最好不用User来命名,和Security中内置的User区分开
package com.moxuan.security_03_jwt.entity;

import com.baomidou.mybatisplus.annotation.TableField;
import com.baomidou.mybatisplus.annotation.TableName;
import lombok.AllArgsConstructor;
import lombok.Data;
import lombok.NoArgsConstructor;

@TableName("user")
@Data
@NoArgsConstructor
@AllArgsConstructor
public class UserEntity {
    private Integer id;
    private String username;
    private String password;
    private String email;
    // 非数据库字段,用来保存生成的token
    @TableField(exist = false)
    private String token;

}
- 用户和权限对应关系类:UserDetail.java
该类就是一个用户实体对象,和当前用户所具备的权限对应关系类
package com.moxuan.security_03_jwt.entity;

import lombok.Data;
import org.springframework.security.core.GrantedAuthority;
import org.springframework.security.core.userdetails.User;

import java.util.Collection;

/**
 * 继承security中的User
 * 用来后续为实体对象userEntity分配权限
 */
public class UserDetail extends User {
    /**
     * 我们自己的用户实体对象,要调取用户信息时直接获取这个实体对象。
     */
    private UserEntity userEntity;


    public UserDetail(UserEntity userEntity, Collection<? extends GrantedAuthority> authorities) {
        super(userEntity.getUsername(), userEntity.getPassword(), authorities);
        this.userEntity = userEntity;
    }

    public UserEntity getUserEntity() {
        return userEntity;
    }

    public void setUserEntity(UserEntity userEntity) {
        this.userEntity = userEntity;
    }
}
🍁 工具类
- JWT 的工具类,封装了生成Token和解析Token的方法
package com.moxuan.security_03_jwt.util;

import io.jsonwebtoken.Claims;
import io.jsonwebtoken.JwtException;
import io.jsonwebtoken.Jwts;
import io.jsonwebtoken.SignatureAlgorithm;
import org.apache.commons.lang3.StringUtils;
import org.springframework.stereotype.Component;

import java.time.Duration;
import java.util.Date;

@Component
public final class JwtManager {
    /**
     * 这个秘钥是防止JWT被篡改的关键,随便写什么都好,但决不能泄露
     */

    private final static String secretKey = "moxuan";
    /**
     * 过期时间目前设置成2天,这个配置随业务需求而定
     */
    private final static Duration expiration = Duration.ofHours(2);

    /**
     * 生成JWT
     *
     * @param userName 用户名
     * @return JWT
     */
    public static String generate(String userName) {
        // 过期时间
        Date expiryDate = new Date(System.currentTimeMillis() + expiration.toMillis());

        return Jwts.builder()
                .setSubject(userName) // 将userName放进JWT
                .setIssuedAt(new Date()) // 设置JWT签发时间
                .setExpiration(expiryDate)  // 设置过期时间
                .signWith(SignatureAlgorithm.HS512, secretKey) // 设置加密算法和秘钥
                .compact();
    }

    /**
     * 解析JWT
     *
     * @param token JWT字符串
     * @return 解析成功返回Claims对象,解析失败返回null
     */
    public static Claims parse(String token) {

        System.out.println("s-token:"+token);
        // 如果是空字符串直接返回null
        if (StringUtils.isEmpty(token)) {
            return null;
        }

        // 这个Claims对象包含了许多属性,比如签发时间、过期时间以及存放的数据等
        Claims claims = null;
        // 解析失败了会抛出异常,所以我们要捕捉一下。token过期、token非法都会导致解析失败
        try {
            claims = Jwts.parser()
                    .setSigningKey(secretKey) // 设置秘钥
                    .parseClaimsJws(token)
                    .getBody();
            System.out.println(claims+"(((((((((99");
        } catch (JwtException e) {
            // 这里应该用日志输出,为了演示方便就直接打印了
            System.err.println("解析失败!");
        }
        return claims;
    }

}- 返回状态码与状态消息对应枚举类:ReturnCode.java
将项目中可能会返回给前端的状态码以及消息封装成枚举,固定下来
package com.moxuan.security_03_jwt.util;

import java.util.HashMap;
import java.util.Map;

/**
 *
 * 返回码
 */
public enum ReturnCode {

    /*********************************************全局ReturnCode(请勿改动)*********************************************/
    SUCCESS("0000", "成功完成操作"),

    BUSSINESS_EXCEPTION("10000", "业务系统异常"),
    NO_RESULT("10001", "查询无结果"),
    MULTI_RESULT("10002", "查询结果不唯一"),
	EXPORT_EXCEL_ERROR("10004", "导出Excel异常"),

	USER_NOT_LOGIN("90000", "用户未登录"),
	ACCESS_FORBIDDEN("90001","无访问权限"),
	AUTHENTICATION_FAILURE("90002","认证失败"),
	TOKEN_FORBIDDEN("90003","无访问口令,请先登陆后获取"),
	TOKEN_EXPIRE("90004","Token失效,需要重新登陆"),
	TOKEN_ERROR("90005","Token创建出错,请联系管理员"),
    USER_LOGIN_ERROR("90006","账号或者密码错误"),


	SYSTEM_ERROR("99999", "系统繁忙,请稍后再试.");

    /**
     * 返回码
     */
    private String code;

    /**
     * 返回信息
     */
    private String msg;

    ReturnCode(String code, String msg) {
        this.code = code;
        this.msg = msg;
    }

    public String code() {
        return this.code;
    }

    public String msg() {
        return this.msg;
    }

	public Map<String, String> toMap() {
		Map<String, String> map = new HashMap<>();
		map.put("msg", this.msg);
		map.put("code", this.code);
		return map;
	}
}
- 封装返回给前端的统一数据格式:Result.java
package com.moxuan.security_03_jwt.util;

import lombok.AllArgsConstructor;
import lombok.Data;
import lombok.NoArgsConstructor;

/**
 * 封装结果的工具类
 */
@Data
@NoArgsConstructor
@AllArgsConstructor
public class Result {

    private String Code;
    private Object data;// 数据源
    private String msg;


    public static Result sendResult(ReturnCode returnCode) {
        Result result = new Result();
        result.setCode(returnCode.code());
        result.setMsg(returnCode.msg());
        return result;
    }


    public static Result sendResult(ReturnCode returnCode,Object data){
        Result result = sendResult(returnCode);
        result.setData(data);
        return result;
    }
}
🍁 dao接口
- 操作资源表的dao接口
涉及到多表的关联查询,这里我们采用mybatis+MP的方式
package com.moxuan.security_03_jwt.dao;

import com.baomidou.mybatisplus.core.mapper.BaseMapper;
import com.moxuan.security_03_jwt.entity.Resource;
import org.apache.ibatis.annotations.Mapper;

import java.util.Set;

@Mapper
public interface ResourceMapper extends BaseMapper<Resource> {
    Set<Resource> findAll();

    Set<Integer> getIdsByUserId(Integer userId);
}
- 操作用户的dao接口
package com.moxuan.security_03_jwt.dao;

import com.baomidou.mybatisplus.core.mapper.BaseMapper;
import com.moxuan.security_03_jwt.entity.UserEntity;
import org.apache.ibatis.annotations.Mapper;

@Mapper
public interface UserMapper extends BaseMapper<UserEntity> {
}
- Mybatis的映射文件:
<?xml version="1.0" encoding="UTF-8" ?>
<!DOCTYPE mapper
        PUBLIC "-//mybatis.org//DTD Mapper 3.0//EN"
        "http://mybatis.org/dtd/mybatis-3-mapper.dtd">
<mapper namespace="com.moxuan.security_03_jwt.dao.ResourceMapper">

    <select id="getIdsByUserId"  resultType="java.lang.Integer">
        SELECT
            rr.res_id
        FROM
            t_user_role ur
                INNER JOIN t_role_res rr ON ur.role_id = rr.role_id
        WHERE
            ur.user_id = #{userId}
    </select>

    <select id="findAll" resultType="resource">
        select * from t_res
    </select>
</mapper>
🍁 异常处理类
- 自定义授权失败时触发的异常,需要实现AccessDeniedHandler接口
package com.moxuan.security_03_jwt.exception;

import com.alibaba.fastjson.JSON;
import com.moxuan.security_03_jwt.util.Result;
import com.moxuan.security_03_jwt.util.ReturnCode;
import org.springframework.security.access.AccessDeniedException;
import org.springframework.security.web.access.AccessDeniedHandler;

import javax.servlet.ServletException;
import javax.servlet.http.HttpServletRequest;
import javax.servlet.http.HttpServletResponse;
import java.io.IOException;
import java.io.PrintWriter;

public class MyAccessDeniedHandle implements AccessDeniedHandler {
    @Override
    public void handle(HttpServletRequest request, HttpServletResponse response, AccessDeniedException accessDeniedException) throws IOException, ServletException {
        response.setContentType("application/json;charset=utf-8");
        PrintWriter out = response.getWriter();

        String result = JSON.toJSONString(
                Result.sendResult(ReturnCode.ACCESS_FORBIDDEN));
        out.write(result);
        out.flush();
        out.close();
    }
}- 自定义登录认证失败时触发的异常,需要实现AuthenticationEntryPoint 接口
package com.moxuan.security_03_jwt.exception;

import com.alibaba.fastjson.JSON;
import com.moxuan.security_03_jwt.util.Result;
import com.moxuan.security_03_jwt.util.ReturnCode;
import org.springframework.security.core.AuthenticationException;
import org.springframework.security.web.AuthenticationEntryPoint;

import javax.servlet.ServletException;
import javax.servlet.http.HttpServletRequest;
import javax.servlet.http.HttpServletResponse;
import java.io.IOException;
import java.io.PrintWriter;

public class MyEntryPoint implements AuthenticationEntryPoint {
    @Override
    public void commence(HttpServletRequest request, HttpServletResponse response, AuthenticationException authException) throws IOException, ServletException {
        response.setContentType("application/json;charset=utf-8");
        PrintWriter out = response.getWriter();

        // 提示先登录
        out.write(JSON.toJSONString(
            Result.sendResult(ReturnCode.TOKEN_FORBIDDEN)));
        out.flush();
        out.close();
    }
}
🍁 service业务层
- 访问资源业务层,负责查询用户拥有访问资源权限
package com.moxuan.security_03_jwt.service.impl;

import com.moxuan.security_03_jwt.dao.ResourceMapper;
import com.moxuan.security_03_jwt.entity.Resource;
import com.moxuan.security_03_jwt.service.ResourceService;
import org.springframework.beans.factory.annotation.Autowired;
import org.springframework.stereotype.Service;

import java.util.Set;

@Service
public class ResourceServiceImpl implements ResourceService {
    @Autowired
    private ResourceMapper resourceMapper;

    @Override
    public Set<Resource> findAllResource() {
        return resourceMapper.findAll();
    }

    @Override
    public Set<Integer> getIdsByUserId(Integer userId) {
        return resourceMapper.getIdsByUserId(userId);
    }
}
- 用户 业务层,主要提供以下几个功能
-
- 登录认证的根据用户名查询用户
- 登录业务逻辑处理
- 注册业务逻辑处理
package com.moxuan.security_03_jwt.service.impl;

import com.baomidou.mybatisplus.core.conditions.query.QueryWrapper;

import com.moxuan.security_03_jwt.dao.UserMapper;
import com.moxuan.security_03_jwt.entity.UserDetail;
import com.moxuan.security_03_jwt.entity.UserEntity;
import com.moxuan.security_03_jwt.service.ResourceService;
import com.moxuan.security_03_jwt.service.UserService;
import com.moxuan.security_03_jwt.util.JwtManager;
import com.moxuan.security_03_jwt.util.Result;
import com.moxuan.security_03_jwt.util.ReturnCode;
import org.springframework.beans.factory.annotation.Autowired;
import org.springframework.security.core.authority.SimpleGrantedAuthority;
import org.springframework.security.core.userdetails.UserDetails;
import org.springframework.security.core.userdetails.UserDetailsService;
import org.springframework.security.core.userdetails.UsernameNotFoundException;
import org.springframework.security.crypto.password.PasswordEncoder;
import org.springframework.stereotype.Service;

import java.util.Set;
import java.util.stream.Collectors;

@Service
public class UserServiceImpl implements UserService, UserDetailsService {
    @Autowired
    private UserMapper userMapper;

    @Autowired
    private PasswordEncoder passwordEncoder;

    @Autowired
    private JwtManager jwtManager;

    @Autowired
    private ResourceService resourceService;


    @Override
    public void save(UserEntity userEntity) {
        userMapper.insert(userEntity);
    }


    /**
     * 根据用户名查找用户
     */
    @Override
    public UserDetails loadUserByUsername(String username) throws UsernameNotFoundException {
        QueryWrapper<UserEntity> queryWrapper  = new QueryWrapper<UserEntity>();
        queryWrapper.lambda().eq(UserEntity::getUsername,username);
        // 从数据库中查询出用户实体对象
        UserEntity user = userMapper.selectOne(queryWrapper);
        // 若没查询到一定要抛出该异常,这样才能被Spring Security的错误处理器处理
        if (user == null) {
            throw new UsernameNotFoundException("没有找到该用户");
        }
        // 先将该用户所拥有的资源id全部查询出来,再转换成`SimpleGrantedAuthority`权限对象
        Set<SimpleGrantedAuthority> authorities = resourceService.getIdsByUserId(user.getId())
                .stream()
                .map(String::valueOf)
                .map(SimpleGrantedAuthority::new)
                .collect(Collectors.toSet());
        // 将权限列表传入
        return new UserDetail(user, authorities);

    }
    @Override
    public Result login_jwt(String username, String password) throws Exception {
        // 根据用户名查询出用户实体对象
        QueryWrapper<UserEntity> queryWrapper  = new QueryWrapper<UserEntity>();
        queryWrapper.lambda().eq(UserEntity::getUsername,username);
        // 从数据库中查询出用户实体对象
        UserEntity user = userMapper.selectOne(queryWrapper);
        System.out.println("user:----->"+user);
        // 若没有查到用户 或者 密码校验失败则抛出自定义异常
        if (user == null || !passwordEncoder.matches(
                password, user.getPassword())) {
            return Result.sendResult(ReturnCode.USER_LOGIN_ERROR);
        }
        //返回给前端的vo对象
        user.setToken(jwtManager.generate(user.getUsername()));
        return Result.sendResult(ReturnCode.SUCCESS,user);

    }
}
🍁 过滤器类
- 登录认证过滤器
package com.moxuan.security_03_jwt.config;

import com.moxuan.security_03_jwt.service.impl.UserServiceImpl;
import com.moxuan.security_03_jwt.util.JwtManager;
import io.jsonwebtoken.Claims;
import org.springframework.beans.factory.annotation.Autowired;
import org.springframework.security.authentication.UsernamePasswordAuthenticationToken;
import org.springframework.security.core.Authentication;
import org.springframework.security.core.context.SecurityContextHolder;
import org.springframework.security.core.userdetails.UserDetails;
import org.springframework.stereotype.Component;
import org.springframework.web.filter.OncePerRequestFilter;

import javax.servlet.FilterChain;
import javax.servlet.ServletException;
import javax.servlet.http.HttpServletRequest;
import javax.servlet.http.HttpServletResponse;
import java.io.IOException;

@Component
public class LoginFilter extends OncePerRequestFilter {
    @Autowired
    private JwtManager jwtManager;
    @Autowired
    private UserServiceImpl userService;

    @Override
    protected void doFilterInternal(HttpServletRequest request, HttpServletResponse response, FilterChain chain) throws ServletException, IOException {

        // 从请求头中获取token字符串并解析
        Claims claims = jwtManager.parse(request.getHeader("Authorization"));
//        System.out.println("!!!!"+claims.getSubject());
        if (claims != null) {
            // 从`JWT`中提取出之前存储好的用户名
            String username = claims.getSubject();
            // 查询出用户对象
            UserDetails user = userService.loadUserByUsername(username);
            System.out.println("用户对象:"+user);
            // 手动组装一个认证对象
            Authentication authentication = new UsernamePasswordAuthenticationToken(user, user.getPassword(), user.getAuthorities());
            // 将认证对象放到上下文中
            SecurityContextHolder.getContext().setAuthentication(authentication);
        }
        chain.doFilter(request, response);
    }
}
- 授权认证过滤器
package com.moxuan.security_03_jwt.config;

import org.springframework.beans.factory.annotation.Autowired;
import org.springframework.security.access.AccessDecisionManager;
import org.springframework.security.access.SecurityMetadataSource;
import org.springframework.security.access.intercept.AbstractSecurityInterceptor;
import org.springframework.security.access.intercept.InterceptorStatusToken;
import org.springframework.security.web.FilterInvocation;
import org.springframework.stereotype.Component;

import javax.servlet.*;
import java.io.IOException;

@Component
public class AuthFilter extends AbstractSecurityInterceptor implements Filter {
    @Autowired
    private MySecurityMetadataSource mySecurityMetadataSource;

    @Override
    public SecurityMetadataSource obtainSecurityMetadataSource() {
        // 将我们自定义的SecurityMetadataSource给返回
        return this.mySecurityMetadataSource;
    }

    @Override
    @Autowired
    public void setAccessDecisionManager(AccessDecisionManager accessDecisionManager) {
        // 将我们自定义的AccessDecisionManager给注入
        super.setAccessDecisionManager(accessDecisionManager);
    }

    @Override
    public void doFilter(ServletRequest request, ServletResponse response, FilterChain chain) throws IOException, ServletException {
        // 下面的就是按照父类写法写的
        FilterInvocation fi = new FilterInvocation(request, response, chain);
        InterceptorStatusToken token = super.beforeInvocation(fi);
        try {
            // 执行下一个拦截器
            fi.getChain().doFilter(fi.getRequest(), fi.getResponse());
        }  finally {
            // 请求之后的处理
            super.afterInvocation(token, null);
        }
    }

    @Override
    public Class<?> getSecureObjectClass() {
        return FilterInvocation.class;
    }

    @Override
    public void init(FilterConfig filterConfig) {}

    @Override
    public void destroy() {}
}
🍁 Security核心接口实现
- 实现鉴权规则接口
-
- 规定哪些请求可以跳过授权认证
- 规定授权认证的比较规则
package com.moxuan.security_03_jwt.config;

import com.moxuan.security_03_jwt.entity.Resource;
import com.moxuan.security_03_jwt.service.ResourceService;
import org.apache.commons.lang3.ArrayUtils;
import org.springframework.beans.factory.annotation.Autowired;
import org.springframework.beans.factory.annotation.Value;
import org.springframework.security.access.ConfigAttribute;
import org.springframework.security.access.SecurityConfig;
import org.springframework.security.access.SecurityMetadataSource;
import org.springframework.security.web.FilterInvocation;
import org.springframework.security.web.util.matcher.AntPathRequestMatcher;
import org.springframework.stereotype.Component;

import javax.servlet.http.HttpServletRequest;
import java.util.*;

@Component
public class MySecurityMetadataSource implements SecurityMetadataSource {
    @Autowired
    private ResourceService resourceService;

    /**
     * 授权检测白名单
     *  配置到白名单的请求可以跳过授权认证
     * **/
    @Value("${sys.whiteUrl}")
    private String[] whiteUrls;

    @Override
    public Collection<ConfigAttribute> getAttributes(Object object) throws IllegalArgumentException {
        //获取全部接口全部资源
        Set<Resource> rs = resourceService.findAllResource();
        //SpringSecurity封装的requests请求信息
        FilterInvocation filterInvocation = (FilterInvocation) object;
        HttpServletRequest request = filterInvocation.getRequest();
        //1.当前请求对象
        String requestURI = request.getRequestURI();
        Collection<ConfigAttribute> collection = new LinkedList<>();
        //白名单放行,不用验证授权
        if(ArrayUtils.contains(whiteUrls, requestURI)){
            return null;
        }
        //遍历资源,和当前请求进行匹配
        //此处在设计的时候关注自己的数据库数据设计: 请求方式:/api/accout/,后期可以自己灵活设计
        for(Resource r:rs){
            //拆分
            String[] message = r.getPath().split(":");
            //验证请求方式和地址
            if(request.getMethod().equals(message[0]) && request.getServletPath().equals(message[1])){
                //返回资源id(一个鉴权规则对象SercurityConfig,其实他是ConfigAttribute的一个实现)
                return Collections.singletonList(new SecurityConfig(r.getId().toString()));
            }
        }
        // 如果查询出来没有权限的话,也就是权限列表为空
        // 需要给一个默认的权限,否则无法触发AccessDecisionManager
        //  切记!!!切记!!!!
        if(collection.size()<1){
            return Collections.singletonList(new SecurityConfig("ROLE_NO_USER"));
        }
        return null;


    }

    @Override
    public Collection<ConfigAttribute> getAllConfigAttributes() {
        return null;
    }

    @Override
    public boolean supports(Class<?> clazz) {
        return true; //!!!
    }
}
- 实现授权组件:用户的权限和授权规则中的权限进行匹配
-
- 如果匹配,就权限认证成功
- 如果匹配失败,就会进入权限认证失败的异常中
package com.moxuan.security_03_jwt.config;

import io.jsonwebtoken.lang.Collections;
import org.springframework.security.access.AccessDecisionManager;
import org.springframework.security.access.AccessDeniedException;
import org.springframework.security.access.ConfigAttribute;
import org.springframework.security.authentication.InsufficientAuthenticationException;
import org.springframework.security.core.Authentication;
import org.springframework.security.core.GrantedAuthority;
import org.springframework.stereotype.Component;

import java.util.Collection;
import java.util.Objects;

/**
 * 授权组件
 */
@Component
public class MyDecisionManager implements AccessDecisionManager {

    @Override
    public void decide(Authentication authentication, Object object, Collection<ConfigAttribute> configAttributes) {
        // 如果授权规则为空则代表此URL无需授权就能访问
        if (Collections.isEmpty(configAttributes)) {
            return;
        }
        System.out.println(authentication.getAuthorities()+":"+configAttributes+"****************");
        // 判断授权规则和当前用户所属权限是否匹配
        for (ConfigAttribute ca : configAttributes) {
            for (GrantedAuthority authority : authentication.getAuthorities()) {

                // 如果匹配上了,代表当前登录用户是有该权限的,直接结束方法
                if (Objects.equals(authority.getAuthority(), ca.getAttribute())) {
                    return;
                }
            }
        }

        // 走到这里就代表没有权限,必须要抛出异常,否则错误处理器捕捉不到
        throw new AccessDeniedException("没有相关权限");
    }

    @Override
    public boolean supports(ConfigAttribute attribute) {
        return true;
    }

    @Override
    public boolean supports(Class<?> clazz) {
        return true;
    }
}
🍁 security 核心配置类
主要配置一些登录认证需要放行的请求接口,以及登录认证和授权认证需要执行的过滤器,以及各自认证失败时需要执行的异常处理。
package com.moxuan.security_03_jwt.config;


import com.moxuan.security_03_jwt.exception.MyAccessDeniedHandle;
import com.moxuan.security_03_jwt.exception.MyEntryPoint;
import com.moxuan.security_03_jwt.service.impl.UserServiceImpl;
import org.springframework.beans.factory.annotation.Autowired;
import org.springframework.boot.autoconfigure.condition.ConditionalOnMissingBean;
import org.springframework.context.annotation.Bean;
import org.springframework.context.annotation.Configuration;
import org.springframework.security.authentication.AuthenticationManager;
import org.springframework.security.authentication.dao.DaoAuthenticationProvider;
import org.springframework.security.config.BeanIds;
import org.springframework.security.config.annotation.authentication.configuration.AuthenticationConfiguration;
import org.springframework.security.config.annotation.method.configuration.EnableGlobalMethodSecurity;
import org.springframework.security.config.annotation.web.builders.HttpSecurity;
import org.springframework.security.config.annotation.web.configuration.EnableWebSecurity;
import org.springframework.security.config.annotation.web.configuration.WebSecurityCustomizer;
import org.springframework.security.config.http.SessionCreationPolicy;
import org.springframework.security.crypto.bcrypt.BCryptPasswordEncoder;
import org.springframework.security.crypto.password.PasswordEncoder;
import org.springframework.security.web.SecurityFilterChain;
import org.springframework.security.web.access.intercept.FilterSecurityInterceptor;
import org.springframework.security.web.authentication.UsernamePasswordAuthenticationFilter;
import org.springframework.web.cors.CorsUtils;

@Configuration
@EnableWebSecurity
@EnableGlobalMethodSecurity(securedEnabled = true)
public class SecurityConfig {

    @Autowired
    private UserServiceImpl userService;

    @Autowired
    private LoginFilter loginFilter;

    @Autowired
    private  AuthFilter authFilter;


    /**
     * 配置过滤器链(在这里面配置需要放行的资源)
     * @param http
     * @return
     * @throws Exception
     */
    @Bean
    public SecurityFilterChain filterChain(HttpSecurity http) throws Exception {

        // 关闭csrf和frameOptions,如果不关闭会影响前端请求接口(这里不展开细讲了,感兴趣的自行了解)
        http.csrf().disable();
        http.headers().frameOptions().disable();
        // 开启跨域以便前端调用接口
        http.cors();

        // 这是配置的关键,决定哪些接口开启防护,哪些接口绕过防护
        http
                .csrf().disable()
                .sessionManagement().sessionCreationPolicy(SessionCreationPolicy.STATELESS)
                .and()
                .authorizeRequests()
                .antMatchers("/login_jwt", "/register","/static/**","/templates/**").permitAll()
                .anyRequest().authenticated()
                // 指定认证错误处理器
                .and().exceptionHandling().authenticationEntryPoint(new MyEntryPoint()).accessDeniedHandler(new MyAccessDeniedHandle());

        http.headers().frameOptions().sameOrigin();
        //禁用session,使用jwt方式
        http.sessionManagement().sessionCreationPolicy(SessionCreationPolicy.STATELESS);
// 将我们自定义的认证过滤器插入到默认的认证过滤器之前
        http.addFilterBefore(loginFilter, UsernamePasswordAuthenticationFilter.class);
        http.addFilterBefore(authFilter,FilterSecurityInterceptor.class);
        return http.build();

    }

    /**
     * 配置全局的某些通用事物,例如静态资源等
     * @return
     */
    @Bean
    public WebSecurityCustomizer securityCustomizer() {
        return (web) -> web.ignoring().antMatchers("/static/**","/templates/**");
    }

    /**
     * 认证管理器,登录的时候用户名和账号等参数会传给 authenticationManager
     */
    @Bean(name = BeanIds.AUTHENTICATION_MANAGER)
    public AuthenticationManager authenticationManager(AuthenticationConfiguration authenticationConfiguration) throws Exception {

        return authenticationConfiguration.getAuthenticationManager();
    }


    /**
     * 密码加密器
     * @return
     */
    @Bean
    @ConditionalOnMissingBean
    public PasswordEncoder passwordEncoder() {
        return new BCryptPasswordEncoder();
    }

    /**
     * 配置具体处理业务的业务层和密码加密器
     * 这样在登录时,输入的密码会自动进行加密
     * @return
     */
    @Bean
    public DaoAuthenticationProvider authenticationProvider() {
        DaoAuthenticationProvider authProvider = new DaoAuthenticationProvider();

        authProvider.setUserDetailsService(userService);
        authProvider.setPasswordEncoder(passwordEncoder());

        return authProvider;
    }
}
🍁 控制器
package com.moxuan.security_03_jwt.controller;


import com.moxuan.security_03_jwt.entity.UserEntity;
import com.moxuan.security_03_jwt.service.impl.UserServiceImpl;
import com.moxuan.security_03_jwt.util.Result;
import org.springframework.beans.factory.annotation.Autowired;
import org.springframework.security.authentication.AuthenticationManager;
import org.springframework.security.authentication.UsernamePasswordAuthenticationToken;
import org.springframework.security.core.Authentication;
import org.springframework.security.core.context.SecurityContextHolder;
import org.springframework.security.crypto.password.PasswordEncoder;
import org.springframework.web.bind.annotation.RequestMapping;
import org.springframework.web.bind.annotation.RequestParam;
import org.springframework.web.bind.annotation.RestController;

@RestController
public class LoginController {

    @Autowired
    private AuthenticationManager authenticationManager;

    @Autowired
    private PasswordEncoder passwordEncoder;

    @Autowired
    private UserServiceImpl userService;

    //jwt方式登录
    @RequestMapping("/login_jwt")
    public Result login_jwt(@RequestParam String username, @RequestParam String password) throws Exception {
        return userService.login_jwt(username,password);
    }

    @RequestMapping("/register")
    public String register(@RequestParam String username,@RequestParam String password) {
        UserEntity user = new UserEntity();
        // 调用加密器将前端传递过来的密码进行加密
        user.setUsername(username);
        user.setPassword(passwordEncoder.encode(password));
        // 将用户实体对象添加到数据库
        userService.save(user);
        return "注册成功";
    }


    @RequestMapping("/findAll")
    public String findAll(){
        return "查询列表";
    }


}
🍁 启动类
package com.moxuan.security_03_jwt;

import org.mybatis.spring.annotation.MapperScan;
import org.springframework.boot.SpringApplication;
import org.springframework.boot.autoconfigure.SpringBootApplication;

@SpringBootApplication
@MapperScan("com.moxuan.security_03_jwt.dao")
public class Security03JwtApplication {

    public static void main(String[] args) {
        SpringApplication.run(Security03JwtApplication.class, args);
    }

}


