微服务开发中想将Spring-Cloud-Gateway网关聚合knife4j,形成一个统一入口方便查阅的开发辅助接口文档,并且将Swagger抽取成一个公共模块,那么我们可以参考以下的做法
约定:
Java Version:11.0.24
Spring Boot:2.7.18
knife4j:4.4.0
Swagger公共模块抽取
依赖
<dependencies>
    <!-- SpringBoot Web (支持构建Web应用程序,包括Spring MVC和内嵌的Servlet容器) -->
    <dependency>
        <groupId>org.springframework.boot</groupId>
        <artifactId>spring-boot-starter-web</artifactId>
    </dependency>

    <!-- Knife4j API 小刀注解依赖 -->
    <dependency>
        <groupId>com.github.xiaoymin</groupId>
        <artifactId>knife4j-openapi2-spring-boot-starter</artifactId>
    </dependency>

    <dependency>
        <groupId>com.github.xiaoymin</groupId>
        <artifactId>swagger-bootstrap-ui</artifactId>
        <version>1.9.6</version>
    </dependency>

    <!-- SpringBoot Actuator (支持集成Actuator,用于监控和管理应用程序) -->
    <dependency>
        <groupId>org.springframework.boot</groupId>
        <artifactId>spring-boot-starter-actuator</artifactId>
    </dependency>

    <!-- Java Bean Validation API -->
    <dependency>
        <groupId>javax.validation</groupId>
        <artifactId>validation-api</artifactId>
        <version>2.0.1.Final</version>
    </dependency>

    <!-- Lombok 辅助器 -->
    <dependency>
        <groupId>org.projectlombok</groupId>
        <artifactId>lombok</artifactId>
        <optional>true</optional>
    </dependency>
</dependencies>
定义配置Swagger Properties
package com.if010.common.swagger.properties;

import lombok.*;
import org.springframework.boot.context.properties.ConfigurationProperties;

import java.io.Serializable;

/**
 * Swagger Properties配置信息实体类
 * @author Kim同学
 */

@Data
@NoArgsConstructor
@ToString
@ConfigurationProperties(prefix = "swagger")
public class SwaggerConfigProperties implements Serializable {

    //配置 API (com.xxx.controller) 扫描路径
    public String controllerPath;

    //配置 API 文档标题
    public String title;

    //配置 API 版本信息
    public String version;

    //配置 API 文档描述
    public String description;

    //配置 API 文档许可 描述 或 协议
    public String license;

    //配置 API 文档许可 描述 或 协议 的 URL
    public String licenseUrl;

    //配置 API 文档 联系人 信息
    public String contactName;

    //配置 API 文档 联系人 主页 URL
    public String contactUrl;

    //配置 API 文档 联系人 邮箱
    public String contactEmail;
}
定义配置Swagger Config
package com.if010.common.swagger.config;

import com.github.xiaoymin.knife4j.spring.annotations.EnableKnife4j;
import com.if010.common.swagger.properties.SwaggerConfigProperties;
import lombok.extern.slf4j.Slf4j;
import org.springframework.beans.factory.annotation.Autowired;
import org.springframework.boot.actuate.autoconfigure.endpoint.web.CorsEndpointProperties;
import org.springframework.boot.actuate.autoconfigure.endpoint.web.WebEndpointProperties;
import org.springframework.boot.actuate.autoconfigure.web.server.ManagementPortType;
import org.springframework.boot.actuate.endpoint.ExposableEndpoint;
import org.springframework.boot.actuate.endpoint.web.*;
import org.springframework.boot.actuate.endpoint.web.annotation.ControllerEndpointsSupplier;
import org.springframework.boot.actuate.endpoint.web.annotation.ServletEndpointsSupplier;
import org.springframework.boot.actuate.endpoint.web.servlet.WebMvcEndpointHandlerMapping;
import org.springframework.boot.autoconfigure.condition.ConditionalOnClass;
import org.springframework.boot.context.properties.EnableConfigurationProperties;
import org.springframework.context.annotation.Bean;
import org.springframework.context.annotation.Configuration;
import org.springframework.context.annotation.Import;
import org.springframework.core.env.Environment;
import org.springframework.util.StringUtils;
import springfox.bean.validators.configuration.BeanValidatorPluginsConfiguration;
import springfox.documentation.builders.ApiInfoBuilder;
import springfox.documentation.builders.PathSelectors;
import springfox.documentation.builders.RequestHandlerSelectors;
import springfox.documentation.service.ApiInfo;
import springfox.documentation.service.Contact;
import springfox.documentation.spi.DocumentationType;
import springfox.documentation.spring.web.plugins.Docket;
import springfox.documentation.swagger2.annotations.EnableSwagger2WebMvc;

import java.util.ArrayList;
import java.util.Collection;
import java.util.List;

/**
 * Swagger 配置类
 * @author Kim同学
 */

@Slf4j
@Configuration
@EnableSwagger2WebMvc
@EnableKnife4j
@ConditionalOnClass({Docket.class, ApiInfoBuilder.class})
@EnableConfigurationProperties(SwaggerConfigProperties.class)
@Import(BeanValidatorPluginsConfiguration.class)
public class SwaggerConfig {

    @Autowired
    SwaggerConfigProperties swaggerConfigProperties;

    private ApiInfo apiInfoBuilder() {
        ApiInfo apiInfoBuild = new ApiInfoBuilder()
                // api文档名称
                .title(swaggerConfigProperties.getTitle())
                // api文档描述
                .description(swaggerConfigProperties.getDescription())
                // api文档版本
                .version(swaggerConfigProperties.getVersion())
                // api作者信息
                .contact(
                        new Contact(
                            swaggerConfigProperties.getContactName(),
                            swaggerConfigProperties.getContactUrl(),
                            swaggerConfigProperties.getContactEmail()
                        )
                )
                // api文档许信息
                .license(swaggerConfigProperties.getLicense())
                // api文档许信息链接
                .licenseUrl(swaggerConfigProperties.getLicenseUrl())
                .build();
        return apiInfoBuild;
    }

    @Bean(value = "defaultApi2")
    @ConditionalOnClass(SwaggerConfigProperties.class)
    public Docket defaultApi2() {
        log.info("swaggerInfo:{}", swaggerConfigProperties.getControllerPath());

        // 构建API文档  文档类型为swagger2
        return new Docket(DocumentationType.SWAGGER_2).select()
            // 配置 API 扫描路径 以及 过滤规则(any代表所有路径)
            .apis(RequestHandlerSelectors.basePackage(swaggerConfigProperties.getControllerPath())).paths(PathSelectors.any())
            // 配置 API 的基本信息
            .build().apiInfo(apiInfoBuilder());
    }

    /**
     * 增加如下配置可解决Spring Boot 6.x 与Swagger 3.0.0 不兼容问题
     **/
    @Bean
    public WebMvcEndpointHandlerMapping webEndpointServletHandlerMapping(WebEndpointsSupplier webEndpointsSupplier,
                                                                         ServletEndpointsSupplier servletEndpointsSupplier,
                                                                         ControllerEndpointsSupplier controllerEndpointsSupplier,
                                                                         EndpointMediaTypes endpointMediaTypes,
                                                                         CorsEndpointProperties corsProperties,
                                                                         WebEndpointProperties webEndpointProperties,
                                                                         Environment environment) {
        List<ExposableEndpoint<?>> allEndpoints = new ArrayList();
        Collection<ExposableWebEndpoint> webEndpoints = webEndpointsSupplier.getEndpoints();
        allEndpoints.addAll(webEndpoints);
        allEndpoints.addAll(servletEndpointsSupplier.getEndpoints());
        allEndpoints.addAll(controllerEndpointsSupplier.getEndpoints());
        String basePath = webEndpointProperties.getBasePath();
        EndpointMapping endpointMapping = new EndpointMapping(basePath);
        boolean shouldRegisterLinksMapping = this.shouldRegisterLinksMapping(webEndpointProperties, environment, basePath);
        return new WebMvcEndpointHandlerMapping(endpointMapping, webEndpoints, endpointMediaTypes, corsProperties.toCorsConfiguration(),
                new EndpointLinksResolver(allEndpoints, basePath), shouldRegisterLinksMapping, null);
    }

    private boolean shouldRegisterLinksMapping(WebEndpointProperties webEndpointProperties, Environment environment, String basePath) {
        return webEndpointProperties.getDiscovery().isEnabled() && (StringUtils.hasText(basePath) || ManagementPortType.get(environment).equals(ManagementPortType.DIFFERENT));
    }
}
因为是starter模块,可能他人的项目目录和starter模块的目录不一致,导致加载不到SwaggerConfig类,我们需要使用spring.factories把SwaggerConfig类装载到Spring容器,在resources/META-INF/spring添加org.springframework.boot.autoconfigure.AutoConfiguration.imports文件
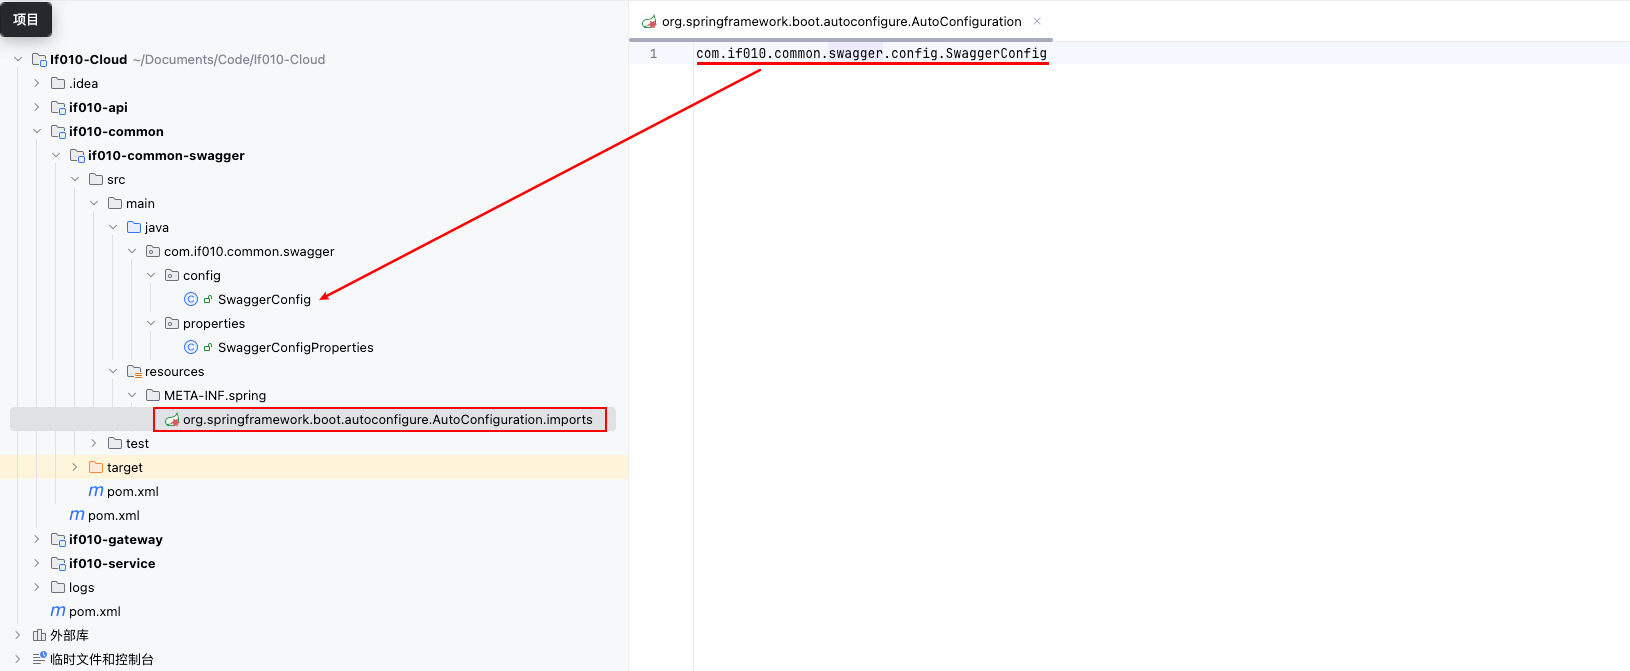
到目前为止,Swagger的抽取工作就已经算是全部完成了,接下来我们就可以在业务模块中引入进行测试使用了
引用
首先我们需要将Swagger公共依赖添加到业务模块的pom文件当中
<dependencies>
    <!-- If010 Common Swagger -->
    <dependency>
        <groupId>com.if010</groupId>
        <artifactId>if010-common-swagger</artifactId>
    </dependency>
</dependencies>
接下来,在application.yml定义Swagger的配置信息
swagger:
  # 配置 API 扫描路径
  controllerPath: com.if010.system.controller
  # 配置 API 文档标题
  title: 系统管理模块接口文档
  # 配置 API 版本信息
  version: 1.0.0
  # 配置 API 文档描述
  description: 系统管理模块
  # 配置 API 文档许可 描述
  license: Copyright © 2018 If010工作室™
  # 配置 API 文档许可 描述 URL
  licenseUrl: https://if010.com
  # 配置 API 文档 联系人
  contact-name: Kim同学
  # 配置 API 文档 联系人 主页 URL
  contact-url: www.if010.com
  # 配置 API 文档 联系人 邮箱
  contact-email: kim@if010.com
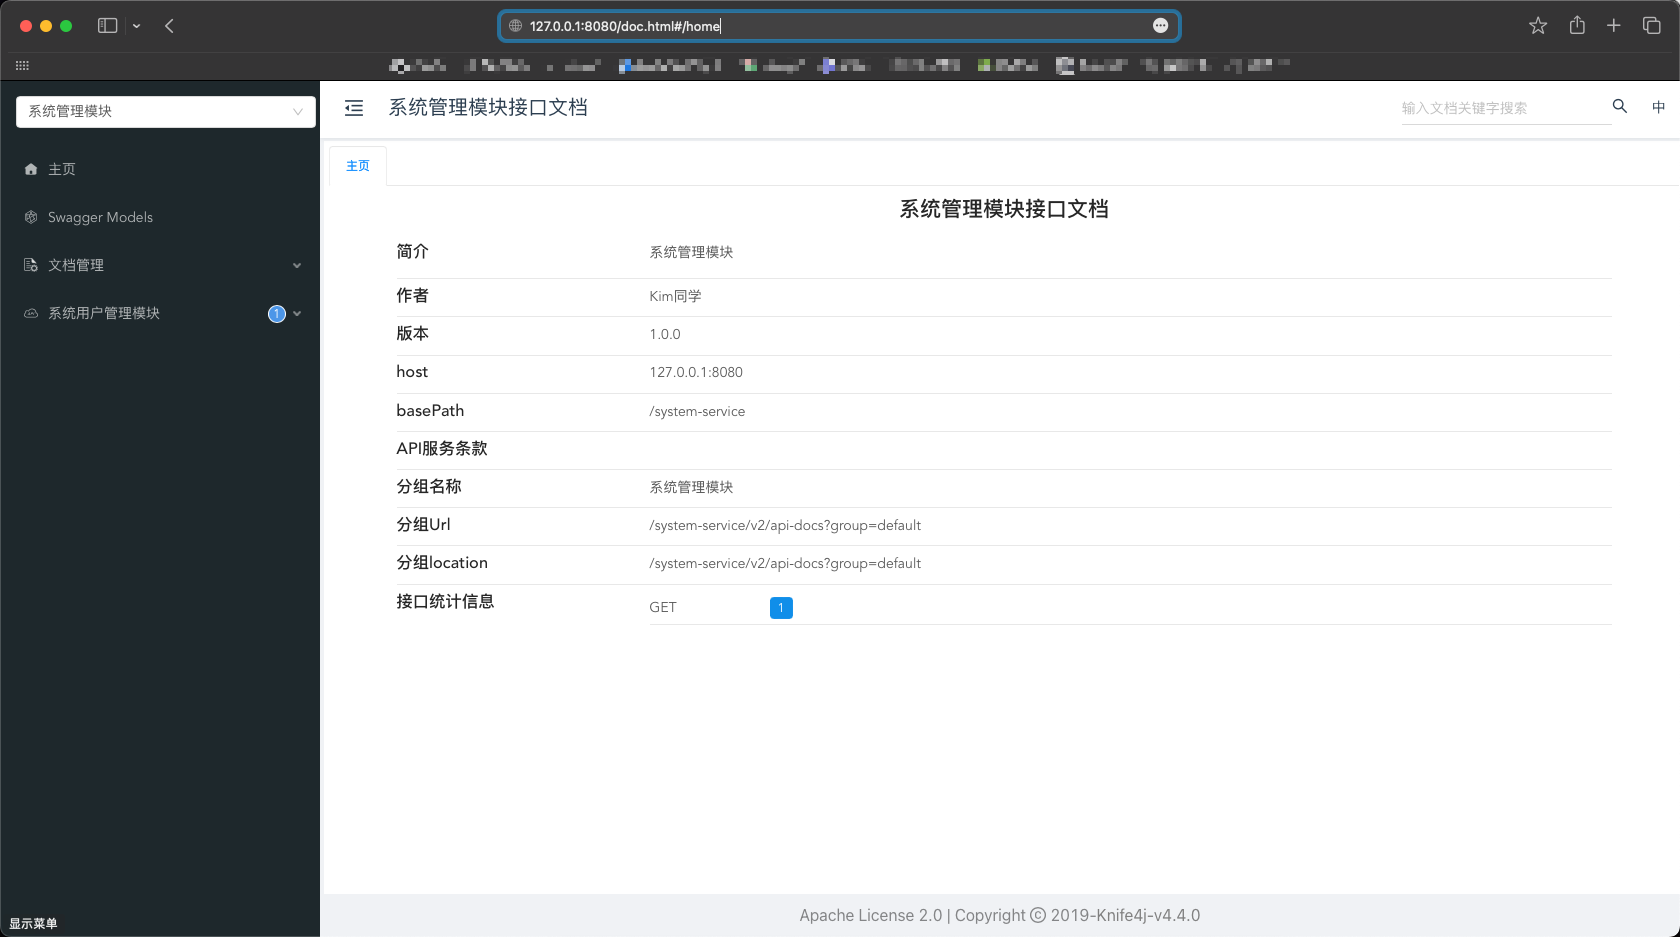
到此结束,紧接着我们就可以启动业务服务模块,访问:http://{service.host}:{service.port}/doc.html,看看效果啦~~
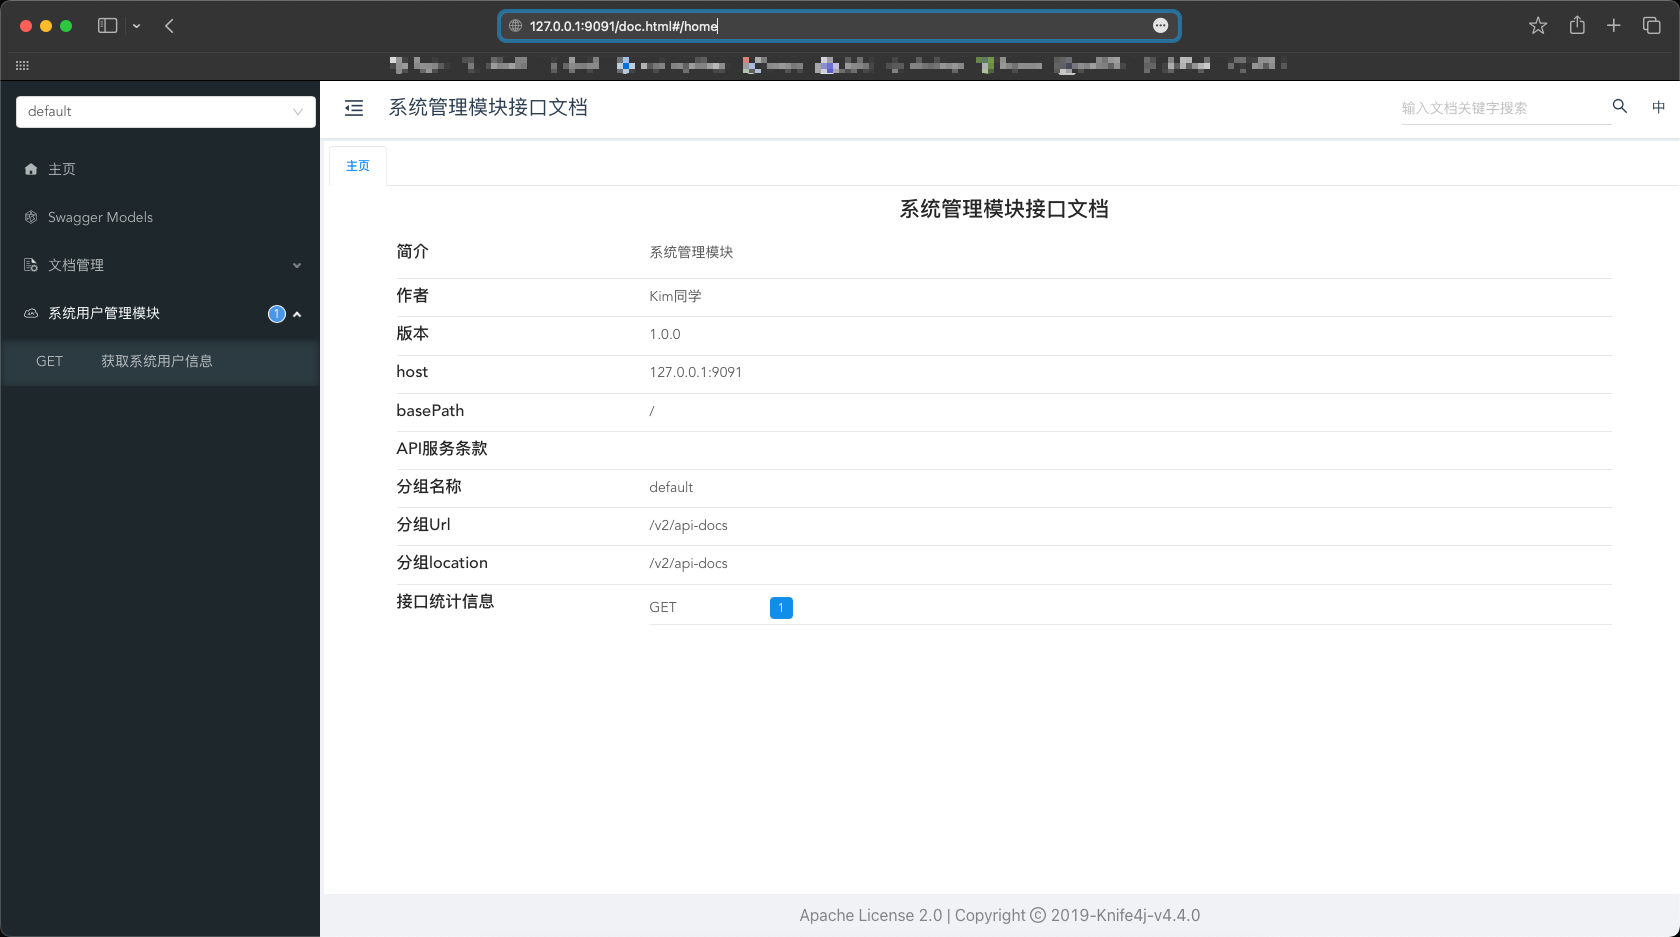
网关聚合knife4j
依赖
<dependencies>
    # 网关所需要的依赖这里就不进行展示啦,给你们节省一点流量
    .....

    <!-- Knife4j API 小刀注解依赖 -->
    <dependency>
        <groupId>com.github.xiaoymin</groupId>
        <artifactId>knife4j-gateway-spring-boot-starter</artifactId>
    </dependency>
</dependencies>
定义application.yml文件
spring:
  application:
    # 应用名称
    name: if010-gateway
  profiles:
    # 环境配置
    active: dev
  cloud:
    # Nacos注册中心配置
    nacos:
      # Nacos的认证登录用户账户
      username: admin
      # Nacos的认证登录用户密码
      password: 123456
      discovery:
        # 服务注册地址
        server-addr: 127.0.0.1:8848
      config:
        # 配置中心地址
        server-addr: 127.0.0.1:8848
        # 配置文件格式
        file-extension: yml
        # 共享配置
        shared-configs:
          - application-${spring.profiles.active}.${spring.cloud.nacos.config.file-extension}
          - application-${spring.profiles.active}-nacos.${spring.cloud.nacos.config.file-extension}
          - ${spring.application.name}-${spring.profiles.active}.${spring.cloud.nacos.config.file-extension}
        # 超时时间
        timeout: 3000
    # 路由配置
    gateway:
      routes:
        - id: system-service
          uri: lb://if010-system
          predicates:
            - Path=/system-service/**
          filters:
            # StripPrefix 是 url 过滤器,1表示请求转发给后端业务服务时,去掉上面Path里从左往右的第1个路径,即system-service
            - StripPrefix=1

# knife4j的网关聚合配置 文档地址:http://{gateway.host}:{gateway.port}/doc.html
knife4j:
  # 聚合swagger文档
  gateway:
    # 是否开启Knife4j网关聚合功能(生产环境不建议开启)
    enabled: true
    # 排序规则(tag/operation排序自4.2.0版本新增)
    # 取值:alpha-默认排序规则,官方swagger-ui默认实现,order-Knife4j提供的增强排序规则,开发者可扩展x-order,根据数值来自定义排序
    tags-sorter: order
    operations-sorter: order
    # 指定聚合的策略(默认手动配置(manual),服务发现(discover))
    strategy: manual
    discover:
      # 是否开启服务发现模式的配置
      enabled: false
      # 指定版本号(swagger2|openapi3)
      version: swagger2
      # 需要排除的微服务(eg:网关服务)
      excluded-services:
        - if010-gateway
      # Swagger2个性化配置
      swagger2:
        url: /v2/api-docs?group=default
    # 个性化定制的部分子服务分组情况
    routes:
      - name: 系统管理模块
        # 服务名
        service-name: system-service
        # 真实子服务访问url地址-提供OpenAPI的文档
        url: /system-service/v2/api-docs?group=default
        # 路由前缀,兼容OpenAPI3规范在聚合时丢失contextPath属性的异常情况,由开发者自己配置contextPath,Knife4j的前端Ui做兼容处理,与url属性独立不冲突,仅OpenAPI3规范聚合需要,OpenAPI2规范不需要设置此属性,默认为(apiPathPrefix)
        context-path: /
        # 排序
        order: 1
到此为止,网关聚合knife4j工作就结束了,操作不涉及代码,全都是配置相关,因为个人严重的洁癖问题discover自动发现并没有开启,想省事偷懒的可以开起来,可以大大减少手动配置的工作
访问:http://{gateway.host}:{gateway.port}/doc.html,看看效果啦~~
