缓冲流
缓冲流,也叫高效流,是对4个基本的`FileXxx` 流的增强,所以也是4个流,按照数据类型分类:
字节缓冲流:`BufferedInputStream`,`BufferedOutputStream`
字符缓冲流:`BufferedReader`,`BufferedWriter`
缓冲流的基本原理,是在创建流对象时,会创建一个内置的默认大小的缓冲区数组,通过缓冲区读写,减少系统IO次数,从而提高读写的效率。
概念图

字节缓冲流


练习
利用字节缓冲流拷贝文件
        BufferedInputStream bis = new BufferedInputStream(new FileInputStream("a.txt"));
        BufferedOutputStream bos = new BufferedOutputStream(new FileOutputStream("b.txt"));

        int b;
        while((b = bis.read()) != -1){
            bos.write(b);
        }
        bis.close();
        bos.close();
BufferedInputStream bis = new BufferedInputStream(new FileInputStream("a.txt")); BufferedOutputStream bos = new BufferedOutputStream(new FileOutputStream("b2.txt")); int length; byte[] bytes = new byte[1024]; while ((length = bis.read(bytes)) != -1) { bos.write(bytes, 0, length); } bis.close(); bos.close();
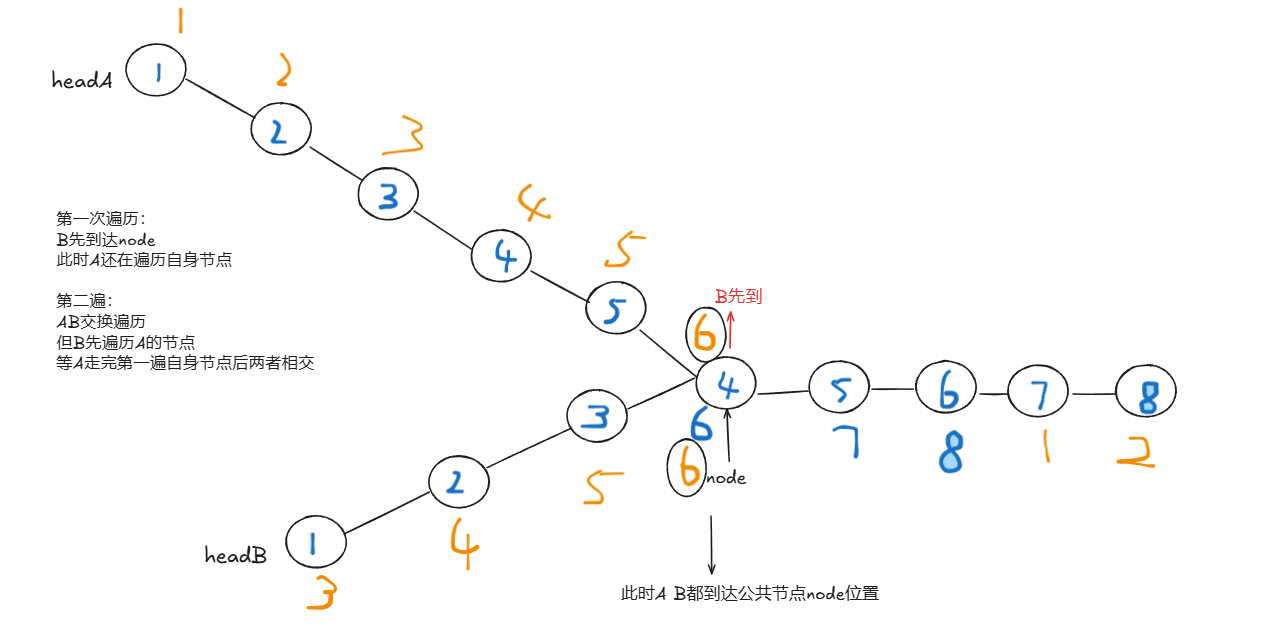
字节缓冲流提高效率的原理

缓冲输入流和输出流的缓冲区是不一样的

在内存中传递数据效率远远大于在磁盘中传递数据效率

字符缓冲流
之前学的基本字符流中,已经存在了缓冲区,所以现在学的字符缓冲流效率提升不是很明显
学习目的:字符缓冲流中有两个简洁好用的方法


`readLine`方法演示,代码如下
public class BufferedReaderDemo {
    public static void main(String[] args) throws IOException {
      	 // 创建流对象
        BufferedReader br = new BufferedReader(new FileReader("in.txt"));
		// 定义字符串,保存读取的一行文字
        String line  = null;
      	// 循环读取,读取到最后返回null
        while ((line = br.readLine())!=null) {
            System.out.print(line);
            System.out.println("------");
        }
		// 释放资源
        br.close();
    }
}
注意:
readline方法在读取的时候,一次读一整行,遇到回车换行结束 // 但是他不会把回车换行读到内存当中
`newLine`方法演示,代码如下:
public class BufferedWriterDemo throws IOException {
    public static void main(String[] args) throws IOException  {
      	// 创建流对象
		BufferedWriter bw = new BufferedWriter(new FileWriter("out.txt"));
      	// 写出数据
        bw.write("黑马");
      	// 写出换行
        bw.newLine();
        bw.write("程序");
        bw.newLine();
        bw.write("员");
        bw.newLine();
		// 释放资源
        bw.close();
    }
}
写入效果:
黑马
程序
员
综合案例
练习:拷贝文件
(四种方式拷贝文件,统计用时)
字节流的基本流:一次读写一个字节
public class BufferedDemo {
    public static void main(String[] args) throws FileNotFoundException {
        // 记录开始时间
      	long start = System.currentTimeMillis();
		// 创建流对象
        try (
        	FileInputStream fis = new FileInputStream("jdk9.exe");
        	FileOutputStream fos = new FileOutputStream("copy.exe")
        ){
        	// 读写数据
            int b;
            while ((b = fis.read()) != -1) {
                fos.write(b);
            }
        } catch (IOException e) {
            e.printStackTrace();
        }
		// 记录结束时间
        long end = System.currentTimeMillis();
        System.out.println("普通流复制时间:"+(end - start)+" 毫秒");
    }
}

十几分钟过去了...
字节流的基本流:一次读写一个字节数组
public class BufferedDemo {
    public static void main(String[] args) throws FileNotFoundException {
        // 记录开始时间
      	long start = System.currentTimeMillis();
		// 创建流对象
        try (
        	FileInputStream fis = new FileInputStream("jdk9.exe");
        	FileOutputStream fos = new FileOutputStream("copy.exe")
        ){
        	// 读写数据
            int len;
            byte[] bytes=new byte[1024];
            while ((len = fis.read()) != -1) {
                fos.write(bytes,0,len);
            }
        } catch (IOException e) {
            e.printStackTrace();
        }
		// 记录结束时间
        long end = System.currentTimeMillis();
        System.out.println("普通流复制时间:"+(end - start)+" 毫秒");
    }
}

一分钟过去了...
字节缓冲流:一次读写一个字节
public class BufferedDemo {
    public static void main(String[] args) throws FileNotFoundException {
        // 记录开始时间
      	long start = System.currentTimeMillis();
		// 创建流对象
        try (
        	BufferedInputStream bis = new BufferedInputStream(new FileInputStream("jdk9.exe"));
	     BufferedOutputStream bos = new BufferedOutputStream(new FileOutputStream("copy.exe"));
        ){
        // 读写数据
            int b;
            while ((b = bis.read()) != -1) {
                bos.write(b);
            }
        } catch (IOException e) {
            e.printStackTrace();
        }
		// 记录结束时间
        long end = System.currentTimeMillis();
        System.out.println("缓冲流复制时间:"+(end - start)+" 毫秒");
    }
}

缓冲流复制时间:8016 毫秒
字节缓冲流:一次读写一个字节数组
public class BufferedDemo {
    public static void main(String[] args) throws FileNotFoundException {
      	// 记录开始时间
        long start = System.currentTimeMillis();
		// 创建流对象
        try (
			BufferedInputStream bis = new BufferedInputStream(new FileInputStream("jdk9.exe"));
		 BufferedOutputStream bos = new BufferedOutputStream(new FileOutputStream("copy.exe"));
        ){
          	// 读写数据
            int len;
            byte[] bytes = new byte[8*1024];
            while ((len = bis.read(bytes)) != -1) {
                bos.write(bytes, 0 , len);
            }
        } catch (IOException e) {
            e.printStackTrace();
        }
		// 记录结束时间
        long end = System.currentTimeMillis();
        System.out.println("缓冲流使用数组复制时间:"+(end - start)+" 毫秒");
    }
}
缓冲流使用数组复制时间:666 毫秒
练习:修改文本顺序
把《出师表》的文章内容恢复正常顺序
public class test {
    public static void main(String[] args) throws IOException {
        //读取
        BufferedReader br = new BufferedReader(new FileReader("csb.txt"));
        String line;

        ArrayList<String> list = new ArrayList<>();
        while ((line = br.readLine()) != null) {
            list.add(line);

        }
        br.close();

        //排序
        Collections.sort(list, new Comparator<String>() {
            @Override
            public int compare(String o1, String o2) {
                int i1=Integer.parseInt(o1.split("\\.")[0]);
                int i2 = Integer.parseInt(o2.split("\\.")[0]);
                return i1-i2;
            }
        });

        //写入
        BufferedWriter bw = new BufferedWriter(new FileWriter("csb.txt"));
        for (String s : list) {
            bw.write(s);
            bw.newLine();
        }
        bw.close();
    }
}
练习:软件运行次数
实现一个验证程序运行次数的小程序,要求如下:
1、当程序运行超过3次时给出文本提示:本软件只能免费使用3次,欢迎您注册会 员后继续使用
2、程序运行演示如下:e
第一次运行控制台输出:欢迎使用本软件,第一次使用免费~
第二次运行控制台输出:欢迎使用本软件,第二次使用免费~
第三次运行控制台输出:欢迎使用本软件,第三次使用免费~
第四次及以后运行控制台输出:本软件只能免费使用3次,欢迎您注册会 员后继续使用
        //1.把文件中的数字读取到内存中
        //原则:
        //IO:随用随创建
        //    什么时候不用什么时候关闭
        BufferedReader br = new BufferedReader(new FileReader("myio\\count.txt"));
        String line = br.readLine();
        br.close();

        System.out.println(line);//null
        int count = Integer.parseInt(line);
        //表示当前软件又运行了一次
        count++;//1
        //2.判断
        if(count <= 3){
            System.out.println("欢迎使用本软件,第"+count+"次使用免费~");
        }else{
            System.out.println("本软件只能免费使用3次,欢迎您注册会员后继续使用~");
        }
        BufferedWriter bw = new BufferedWriter(new FileWriter("myio\\count.txt"));
        //3.把当前自增之后的count写出到文件当中
        bw.write(count + ""); //97 + ""
        bw.close();
转换流

转换流是一种处理流,它提供了字节流和字符流之间的转换。
转换流主要用于处理不同编码方式的文本文件,可以通过指定编码方式实现字节与字符的转换。

字符编码和字符集
字符编码
计算机中储存的信息都是用二进制数表示的,而我们在屏幕上看到的数字、英文、标点符号、汉字等字符是二进制数转换之后的结果。按照某种规则,将字符存储到计算机中,称为编码。反之,将存储在计算机中的二进制数按照某种规则解析显示出来,称为解码。比如说,按照A规则存储,同样按照A规则解析,那么就能显示正确的文本符号。反之,按照A规则存储,再按照B规则解析,就会导致乱码现象。
编码:字符(能看懂的)--字节(看不懂的)
解码:字节(看不懂的)-->字符(能看懂的)
字符集 Charset:
也叫编码表。是一个系统支持的所有字符的集合,包括各国家文字、标点符号、图形符号、数字等。
计算机要准确的存储和识别各种字符集符号,需要进行字符编码,一套字符集必然至少有一套字符编码。常见字符集有ASCII字符集、GBK字符集、Unicode字符集等。
可见,当指定了编码,它所对应的字符集自然就指定了,所以编码才是我们最终要关心的。
ASCII字符集:
ASCII(American Standard Code for Information Interchange,美国信息交换标准代码)是基于拉丁字母的一套电脑编码系统,用于显示现代英语,主要包括控制字符(回车键、退格、换行键等)和可显示字符(英文大小写字符、阿拉伯数字和西文符号)。
基本的ASCII字符集,使用7位(bits)表示一个字符,共128字符。ASCII的扩展字符集使用8位(bits)表示一个字符,共256字符,方便支持欧洲常用字符。
ISO-8859-1字符集:
拉丁码表,别名Latin-1,用于显示欧洲使用的语言,包括荷兰、丹麦、德语、意大利语、西班牙语等。
ISO-8859-1使用单字节编码,兼容ASCII编码。
GBxxx字符集:
GB就是国标的意思,是为了显示中文而设计的一套字符集。
GB2312:
简体中文码表。一个小于127的字符的意义与原来相同。但两个大于127的字符连在一起时,就表示一个汉字,这样大约可以组合了包含7000多个简体汉字,此外数学符号、罗马希腊的字母、日文的假名们都编进去了,连在ASCII里本来就有的数字、标点、字母都统统重新编了两个字节长的编码,这就是常说的"全角"字符,而原来在127号以下的那些就叫"半角"字符了。
GBK:
最常用的中文码表。是在GB2312标准基础上的扩展规范,使用了双字节编码方案,共收录了21003个汉字,完全兼容GB2312标准,同时支持繁体汉字以及日韩汉字等。
GB18030:
最新的中文码表。收录汉字70244个,采用多字节编码,每个字可以由1个、2个或4个字节组成。支持中国国内少数民族的文字,同时支持繁体汉字以及日韩汉字等。
Unicode字符集:
Unicode编码系统为表达任意语言的任意字符而设计,是业界的一种标准,也称为统一码、标准万国码。它最多使用4个字节的数字来表达每个字母、符号,或者文字。有三种编码方案,UTF-8、UTF-16和UTF-32。最为常用的UTF-8编码。
UTF-8编码,可以用来表示Unicode标准中任何字符,它是电子邮件、网页及其他存储或传送文字的应用中,优先采用的编码。互联网工程工作小组(IETF)要求所有互联网协议都必须支持UTF-8编码。所以,我们开发Web应用,也要使用UTF-8编码。它使用一至四个字节为每个字符编码,编码规则:
1. 128个US-ASCII字符,只需一个字节编码。
2. 拉丁文等字符,需要二个字节编码。
3. 大部分常用字(含中文),使用三个字节编码。
4. 其他极少使用的Unicode辅助字符,使用四字节编码。
InputStreamReader类
转换流java.io.InputStreamReader,是Reader的子类,是从字节流到字符流的桥梁。它读取字节,并使用指定的字符集将其解码为字符。它的字符集可以由名称指定,也可以接受平台的默认字符集。
构造方法:
InputStreamReader(InputStream in): 创建一个使用默认字符集的字符流。
InputStreamReader(InputStream in, String charsetName): 创建一个指定字符集的字符流。
InputStreamReader isr = new InputStreamReader(new FileInputStream("in.txt"));
InputStreamReader isr2 = new InputStreamReader(new FileInputStream("in.txt") , "GBK");
指定编码读取(淘汰)
public class ReaderDemo2 {
    public static void main(String[] args) throws IOException {
      	// 定义文件路径,文件为gbk编码
        String FileName = "E:\\file_gbk.txt";
      	// 创建流对象,默认UTF8编码
        InputStreamReader isr = new InputStreamReader(new FileInputStream(FileName));
      	// 创建流对象,指定GBK编码
        InputStreamReader isr2 = new InputStreamReader(new FileInputStream(FileName) , "GBK");
		// 定义变量,保存字符
        int read;
      	// 使用默认编码字符流读取,乱码
        while ((read = isr.read()) != -1) {
            System.out.print((char)read); // ��Һ�
        }
        isr.close();

      	// 使用指定编码字符流读取,正常解析
        while ((read = isr2.read()) != -1) {
            System.out.print((char)read);// 大家好
        }
        isr2.close();
    }
}
现在使用的
        FileReader fileReader=new FileReader("a.txt", Charset.forName("utf-8"));
        int read;
        // 使用默认编码字符流读取,乱码
        while ((read = fileReader.read()) != -1) {
            System.out.print((char)read);
        }
        fileReader.close();
OutputStreamWriter类
转换流java.io.OutputStreamWriter,是Writer的子类,是从字符流到字节流的桥梁。使用指定的字符集将字符编码为字节。它的字符集可以由名称指定,也可以接受平台的默认字符集。
构造方法:
OutputStreamWriter(OutputStream in): 创建一个使用默认字符集的字符流。
OutputStreamWriter(OutputStream in, String charsetName): 创建一个指定字符集的字符流。
OutputStreamWriter isr = new OutputStreamWriter(new FileOutputStream("out.txt"));
OutputStreamWriter isr2 = new OutputStreamWriter(new FileOutputStream("out.txt") , "GBK");
指定编码写出 (淘汰)
public class OutputDemo {
    public static void main(String[] args) throws IOException {
      	// 定义文件路径
        String FileName = "E:\\out.txt";
      	// 创建流对象,默认UTF8编码
        OutputStreamWriter osw = new OutputStreamWriter(new FileOutputStream(FileName));
        // 写出数据
      	osw.write("你好"); // 保存为6个字节
        osw.close();

		// 定义文件路径
		String FileName2 = "E:\\out2.txt";
     	// 创建流对象,指定GBK编码
        OutputStreamWriter osw2 = new OutputStreamWriter(new FileOutputStream(FileName2),"GBK");
        // 写出数据
      	osw2.write("你好");// 保存为4个字节
        osw2.close();
    }
}
现在使用的
        FileWriter fileWriter =new FileWriter("a.txt",Charset.forName("utf-8"));
        fileWriter.write("你好");
        fileWriter.close();
练习:
将本地文件中的GBK文件,转成UTF-8
        FileReader fileReader = new FileReader("a.txt",Charset.forName("utf-8"));
        FileWriter fileWriter = new FileWriter("e.txt",Charset.forName("gbk"));
        int len;
        while ((len = fileReader.read()) != -1){
            fileWriter.write(len);
        }
        fileReader.close();
        fileWriter.close();
转换流综合案例
利用字节流读取文本文件中的数据,每次读一整行,而且不能出现乱码
        FileInputStream fis = new FileInputStream("a.txt");
        InputStreamReader isr = new InputStreamReader(fis);
        BufferedReader br = new BufferedReader(isr);
        String line ;
        while ((line =br.readLine())!= null) {
            System.out.println(line);
        }
        br.close();
序列化流和反序列化流

序列化流
一个对象要想序列化,必须满足两个条件:
该类必须实现`java.io.Serializable ` 接口,`Serializable` 是一个标记接口,不实现此接口的类将不会使任何状态序列化或反序列化,会抛出`NotSerializableException` 。
该类的所有属性必须是可序列化的。如果有一个属性不需要可序列化的,则该属性必须注明是瞬态的,使用`transient` 关键字修饰。

代码实现:
定义类
/*
 * Serializable接口里面是没有抽象方法,为标记型接口
 * 一旦实现了这个接口,那么就表示当前的Student类可以被序列化
 * 理解:
 *      一个物品的合格证
 */
public class Student implements Serializable {
    String Name;
    int age;

    public Student() {
    }

    public Student(String Name, int age) {
        this.Name = Name;
        this.age = age;
    }

    /**
     * 获取
     * @return Name
     */
    public String getName() {
        return Name;
    }

    /**
     * 设置
     * @param Name
     */
    public void setName(String Name) {
        this.Name = Name;
    }

    /**
     * 获取
     * @return age
     */
    public int getAge() {
        return age;
    }

    /**
     * 设置
     * @param age
     */
    public void setAge(int age) {
        this.age = age;
    }

    public String toString() {
        return "Student{Name = " + Name + ", age = " + age + "}";
    }
}

测试类
public class test {
    public static void main(String[] args) throws IOException {
        //创建对象
        Student stu =new Student("张三", 23);
        //创建序列化流的对象/对象操作输出流
        ObjectOutputStream oos = new ObjectOutputStream(new FileOutputStream("e.txt"));

        //写出数据
        oos.writeObject(stu);

        //释放资源
        oos.close();
    }
}
反序列化流

代码实现:
        //创建学生对象
        Student stu = new Student("张三", 23);
        //创建序列化流的对象/对象操作输出流
        ObjectOutputStream oos = new ObjectOutputStream(new FileOutputStream("e.txt"));
        //写出数据
        oos.writeObject(stu);
        //创建序列化流的对象/对象操作输出流
        ObjectInputStream ois = new ObjectInputStream(new FileInputStream("e.txt"));
        //写出数据
        Object o = ois.readObject();

        //打印资源
        System.out.println(o);
        //释放资源
        oos.close();
        ois.close();
序列化流和反序列化流的小细节


综合案例:用对象流读写多个对象
需求:
将多个自定义对象序列化到文件中,但是由于对象的个数不确定,反序列化流该如何读取呢?
定义类
public class Student implements Serializable {


    @Serial
    private static final long serialVersionUID = 6138113465965306484L;
    private String name;
    private int age;
    private String address;

    public Student() {
    }

    public Student(String name, int age, String address) {
        this.name = name;
        this.age = age;
        this.address = address;
    }


    public String toString() {
        return "Student{name = " + name + ", age = " + age + ", address = " + address + "}";
    }
}


写数据
public class test {
    public static void main(String[] args) throws IOException {
        Student s1 = new Student("John", 20, "Mathematics");
        Student s2= new Student("Jane", 22, "Physics");
        Student s3= new Student("Mike", 21, "Chemistry");

        ObjectOutputStream out = new ObjectOutputStream(new FileOutputStream("a.txt"));

        ArrayList<Student> students = new ArrayList<>();
        Collections.addAll(students, s1, s2, s3);
        out.writeObject(students);
        out.close();
    }
}
读数据
public class test2 {
    public static void main(String[] args) throws IOException, ClassNotFoundException {
        ObjectInputStream ois = new ObjectInputStream(new FileInputStream("a.txt"));

        ArrayList<Student> list = (ArrayList<Student>) ois.readObject();
        list.forEach(System.out::println);

        ois.close();
    }
}
注意:
我们通常用Arraylist集合来存储这些对象数据,因为Arraylist集合也实现了servalizable接口
打印流


字节打印流


代码演示:
        //创建字节打印流的对象
        PrintStream ps = new PrintStream("a.txt");
        //写出数据
        ps.println(97);//写出+自动刷新+换行
        ps.print("hello world");
        ps.printf("%s移动%s阿强","java","java");

        //释放资源
        ps.close();

字符打印流


代码演示:
        //创建字节打印流的对象
        PrintWriter pw = new PrintWriter(new FileWriter("a.txt"),true);

        //写数据
        pw.println("hello");
        pw.print("world");
        pw.printf("%s移动%s阿强","java","java");

        //释放资源
        pw.close();

解压缩流和压缩流

解压缩流

代码演示:
public class ZipStreamDemo1 {
    public static void main(String[] args) throws IOException {

        //1.创建一个File表示要解压的压缩包
        File src = new File("D:\\aaa.zip");
        //2.创建一个File表示解压的目的地
        File dest = new File("D:\\");

        //调用方法
        unzip(src,dest);

    }

    //定义一个方法用来解压
    public static void unzip(File src,File dest) throws IOException {
        //解压的本质:把压缩包里面的每一个文件或者文件夹读取出来,按照层级拷贝到目的地当中
        //创建一个解压缩流用来读取压缩包中的数据
        ZipInputStream zip = new ZipInputStream(new FileInputStream(src));
        //要先获取到压缩包里面的每一个zipentry对象
        //表示当前在压缩包中获取到的文件或者文件夹
        ZipEntry entry;
        while((entry = zip.getNextEntry()) != null){
            System.out.println(entry);
            if(entry.isDirectory()){
                //文件夹:需要在目的地dest处创建一个同样的文件夹
                File file = new File(dest,entry.toString());
                file.mkdirs();
            }else{
                //文件:需要读取到压缩包中的文件,并把他存放到目的地dest文件夹中(按照层级目录进行存放)
                FileOutputStream fos = new FileOutputStream(new File(dest,entry.toString()));
                int b;
                while((b = zip.read()) != -1){
                    //写到目的地
                    fos.write(b);
                }
                fos.close();
                //表示在压缩包中的一个文件处理完毕了。
                zip.closeEntry();
            }
        }
        zip.close();
    }
}
压缩流

压缩单个文件
代码演示:
public class ZipStreamDemo2 {
    public static void main(String[] args) throws IOException {
        /*
         *   压缩流
         *      需求:
         *          把D:\\a.txt打包成一个压缩包
         * */
        //1.创建File对象表示要压缩的文件
        File src = new File("D:\\a.txt");
        //2.创建File对象表示压缩包的位置
        File dest = new File("D:\\");
        //3.调用方法用来压缩
        toZip(src,dest);
    }

    /*
    *   作用:压缩
    *   参数一:表示要压缩的文件
    *   参数二:表示压缩包的位置
    * */
    public static void toZip(File src,File dest) throws IOException {
        //1.创建压缩流关联压缩包
        ZipOutputStream zos = new ZipOutputStream(new FileOutputStream(new File(dest,"a.zip")));
        //2.创建ZipEntry对象,表示压缩包里面的每一个文件和文件夹
        //参数:压缩包里面的路径
        ZipEntry entry = new ZipEntry("aaa\\bbb\\a.txt");
        //3.把ZipEntry对象放到压缩包当中
        zos.putNextEntry(entry);
        //4.把src文件中的数据写到压缩包当中
        FileInputStream fis = new FileInputStream(src);
        int b;
        while((b = fis.read()) != -1){
            zos.write(b);
        }
        zos.closeEntry();
        zos.close();
    }
}
压缩文件夹
代码演示:
public class ZipStreamDemo3 {
    public static void main(String[] args) throws IOException {
        /*
         *   压缩流
         *      需求:
         *          把D:\\aaa文件夹压缩成一个压缩包
         * */
        //1.创建File对象表示要压缩的文件夹
        File src = new File("D:\\aaa");
        //2.创建File对象表示压缩包放在哪里(压缩包的父级路径)
        File destParent = src.getParentFile();//D:\\
        //3.创建File对象表示压缩包的路径
        File dest = new File(destParent,src.getName() + ".zip");
        //4.创建压缩流关联压缩包
        ZipOutputStream zos = new ZipOutputStream(new FileOutputStream(dest));
        //5.获取src里面的每一个文件,变成ZipEntry对象,放入到压缩包当中
        toZip(src,zos,src.getName());//aaa
        //6.释放资源
        zos.close();
    }

    /*
    *   作用:获取src里面的每一个文件,变成ZipEntry对象,放入到压缩包当中
    *   参数一:数据源
    *   参数二:压缩流
    *   参数三:压缩包内部的路径
    * */
    public static void toZip(File src,ZipOutputStream zos,String name) throws IOException {
        //1.进入src文件夹
        File[] files = src.listFiles();
        //2.遍历数组
        for (File file : files) {
            if(file.isFile()){
                //3.判断-文件,变成ZipEntry对象,放入到压缩包当中
                ZipEntry entry = new ZipEntry(name + "\\" + file.getName());//aaa\\no1\\a.txt
                zos.putNextEntry(entry);
                //读取文件中的数据,写到压缩包
                FileInputStream fis = new FileInputStream(file);
                int b;
                while((b = fis.read()) != -1){
                    zos.write(b);
                }
                fis.close();
                zos.closeEntry();
            }else{
                //4.判断-文件夹,递归
                toZip(file,zos,name + "\\" + file.getName());
                //     no1            aaa   \\   no1
            }
        }
    }
}
Commons-io


工具包(hutool)
介绍:
Commons是国人开发的开源工具包,里面有很多帮助我们提高开发效率的API
使用方式:
1,新建lib文件夹
2,把第三方jar包粘贴到文件夹中
3,右键点击add as a library


![[uni-app]小兔鲜-07订单+支付](https://img-blog.csdnimg.cn/img_convert/e4461d360b70e1b4878c7ecc32a3c9a9.png)