import math
import os
import random
import torch
import dltools
from matplotlib import pyplot as plt
#读取数据集
def read_ptb():
"""将PTB数据集加载到文本行的列表中"""
with open('./ptb/ptb.train.txt') as f:
raw_text = f.read()
return [line.split() for line in raw_text.split('\n')]
sentences = read_ptb()
print(f'# sentences数:{len(sentences)}')# sentences数:42069
#构建词表,并把频次低于10的词元替换为<unk>
vocab = dltools.Vocab(sentences, min_freq=10)
print(f'# vocab_size: {len(vocab)}')
#向下采样
def subsample(sentences, vocab):
#排除未知词元‘<unk>’,对sentences进行处理
sentences = [[token for token in line if vocab[token] != vocab.unk] for line in sentences]
#对排除unk的sentences进行tokens计数 (未去重)
counter = dltools.count_corpus(sentences)
#聚合
num_tokens = sum(counter.values())
#若在下采样期间保留词元, 则返回True
def keep(token):
return (random.uniform(0, 1) < math.sqrt(1e-4 / (counter[token] / num_tokens)))
#降低冠词等无意义词的频次, 词频低越容易保留
return ([[token for token in line if keep(token)] for line in sentences], counter)
subsampled, counter = subsample(sentences, vocab)#画出下采样之后的图, 采取下采样前后的20条数据
before = [len(x) for x in sentences[:20]]
after = [len(x) for x in subsampled[:20]]
x = range(len(before))
plt.bar(x, height=before, width=0.4, alpha=0.8, color='red', label='before')
#[i + 0.4 for i in x] 是X轴刻度
plt.bar([i + 0.4 for i in x], height=after, width=0.4, color='green', label='after')
plt.xlabel('tokens per sentences')
plt.ylabel('count')
plt.legend(['before', 'after'])
plt.show()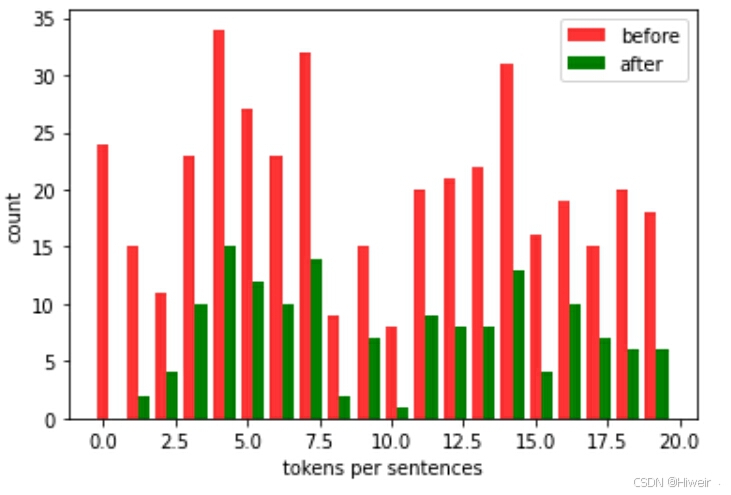
def compare_counts(token):
    return (f'"{token}"的数量:' f'之前={sum([l.count(token) for l in sentences])}, '
            f'之后={sum([l.count(token) for l in subsampled])}')

compare_counts('the')
'"the"的数量:之前=50770, 之后=2000'
compare_counts('publishing')'"publishing"的数量:之前=64, 之后=64'
#将词元映射到他们在语料库中的索引
corpus = [vocab[line] for line in subsampled]
corpus[:3]
[[], [71, 2115], [5277, 3054, 1580, 95]]
#中心词和上下文词的提取
def get_centers_and_contetxs(corpus, max_window_size):
    """返回skip_gram模型中的中心词和上下文词"""
    centers, contexts = [], []
    for line in corpus:
        #要形成“中心词——上下文词对”, 每个句子至少需要有2个词
        if len(line) < 2:
            continue
        centers += line #把满足条件的line放于中心词列表中
        for idx, i in enumerate(range(len(line))):   #上下文窗口的中间token的索引为i
            window_size = random.randint(1, max_window_size)
            print('中心词 {} 的窗口大小:{}'.format(idx, window_size))
            indices = list(range(max(0, i - window_size), min(len(line), i + window_size + 1)))
            #从上下文词中排除中心词
            indices.remove(i)
            contexts.append([line[x] for x in indices])
    return centers, contexts
#假设数据
tiny_dataset = [list(range(7)), list(range(7,10))]
print('数据集', tiny_dataset)
#表示解压函数,用于将打包的元组解压回原来的序列
for center, context in zip(*get_centers_and_contetxs(tiny_dataset, 2)):
print('中心词:',center, '的上下文词是:', context)数据集 [[0, 1, 2, 3, 4, 5, 6], [7, 8, 9]] 中心词 0 的窗口大小:1 中心词 1 的窗口大小:2 中心词 2 的窗口大小:2 中心词 3 的窗口大小:1 中心词 4 的窗口大小:2 中心词 5 的窗口大小:2 中心词 6 的窗口大小:2 中心词 0 的窗口大小:2 中心词 1 的窗口大小:1 中心词 2 的窗口大小:1 中心词 0 的上下文词是 [1] 中心词 1 的上下文词是 [0, 2, 3] 中心词 2 的上下文词是 [0, 1, 3, 4] 中心词 3 的上下文词是 [2, 4] 中心词 4 的上下文词是 [2, 3, 5, 6] 中心词 5 的上下文词是 [3, 4, 6] 中心词 6 的上下文词是 [4, 5] 中心词 7 的上下文词是 [8, 9] 中心词 8 的上下文词是 [7, 9] 中心词 9 的上下文词是 [8]
#在PTB上进行中心词和背景词提取
#max_window_size=5  业界常用到的数值,效果比较好
all_centers, all_contexts = get_centers_and_contetxs(corpus, 5)
'“中心词-上下文词对”的数量:{}'.format( sum([len(contexts) for contexts in all_contexts]))
'“中心词-上下文词对”的数量:1499666'
#负采样_按权重抽取
class RandomGenerator:
    """根据n个采样权重在{1,2,,3,...n}中随机抽取"""
    def __init__(self, sampling_weights):
        #Exclude 排除
        self.population = list(range(1, len(sampling_weights) + 1))  #对采样数据的编号
        self.sampling_weights = sampling_weights
        self.candidates = []  #采样结果
        self.i = 0

    def draw(self):
        if self.i == len(self.candidates):
            #缓存k个随机采样的结果    # population:集群。 weights:相对权重。 cum_weights:累加权重。 k:选取次数
            self.candidates = random.choices(self.population, self.sampling_weights, k=10000)  #k最大值=10000(采样数量)
            self.i = 0
        self.i += 1
        return self.candidates[self.i - 1]
#假设数据验证
generator = RandomGenerator([2, 3, 4])
[generator.draw() for _ in range(10)][2, 1, 1, 2, 1, 1, 3, 2, 3, 2]
#返回负采样中的噪声词
def get_negatives(all_contetxs, vocab, counter, K):
    #索引为1,2,....(索引0是此表中排除的未知标记)
    sampling_weights = [counter[vocab.to_tokens(i)]**0.75 for i in range(1, len(vocab))]
    all_negatives, generator = [], RandomGenerator(sampling_weights)
    for contexts in all_contetxs:  #遍历背景词
        negatives = []
        while len(negatives) < len(contexts) * K:
            neg = generator.draw()
            #噪声词不能是上下文词
            if neg not in contexts:
                negatives.append(neg)
        all_negatives.append(negatives)
    return all_negatives

all_negatives = get_negatives(all_contexts, vocab, counter, 5)
# 小批量操作
def batchify(data):
    """返回带有负采样的跳元模型的小批量样本"""
    max_len = max(len(c) + len(n) for _, c, n in data)
    centers, contexts_negatives, masks, labels = [], [], [], []
    for center, context, negative in data:
        cur_len = len(context) + len(negative)
        centers += [center]
        contexts_negatives += \
            [context + negative + [0] * (max_len - cur_len)]
        masks += [[1] * cur_len + [0] * (max_len - cur_len)]
        labels += [[1] * len(context) + [0] * (max_len - len(context))]
    return (torch.tensor(centers).reshape((-1, 1)), torch.tensor(
        contexts_negatives), torch.tensor(masks), torch.tensor(labels))
#小批量的例子
x_1 = (1, [2, 2], [3, 3, 3, 3])
x_2 = (1, [2, 2, 2], [3, 3])
batch = batchify((x_1, x_2))
names = ['centers', 'contexts_negative', 'masks', 'labels']
for name, data in zip(names, batch):
print(name, '=', data)
centers = tensor([[1],
        [1]])
contexts_negative = tensor([[2, 2, 3, 3, 3, 3],
        [2, 2, 2, 3, 3, 0]])
masks = tensor([[1, 1, 1, 1, 1, 1],
        [1, 1, 1, 1, 1, 0]])
labels = tensor([[1, 1, 0, 0, 0, 0],
        [1, 1, 1, 0, 0, 0]])
#整合后的数据加载处理模块
def load_data_ptb(batch_size, max_window_size, num_noise_words):
    """下载PTB数据集, 然后将其加载到内存中"""
    #加载PTB数据集
    sentences = read_ptb()
    #获取词汇表
    vocab = dltools.Vocab(sentences, min_freq=10)
    #下采样
    subsampled, counter = subsample(sentences, vocab)
    #语料库
    corpus = [vocab[line] for line in subsampled]
    #获取中心词与背景词
    all_centers, all_contexts = get_centers_and_contetxs(corpus, max_window_size)
    #获取噪声词
    get_negatives(all_contetxs, vocab, counter, num_noise_words)

    class PTBDataset(torch.utils.data.Dataset):
        def __init__(self, centers, contexts, negatives):
            assert len(centers) == len(contexts) == len(negatives)
            self.centers = centers
            self.contexts = contexts
            self.negatives = negatives

        def __getitem__(self, index):
            return (self.centers[index], self.contexts[index],
                    self.negatives[index])

        def __len__(self):
            return len(self.centers)


    dataset = PTBDataset(all_centers, all_contexts, all_negatives)

    data_iter = torch.utils.data.DataLoader(dataset, batch_size, shuffle=True, collate_fn = batchify)
    return data_iter, vocab
data_iter, vocab = load_data_ptb(5, 5, 5)
for batch in data_iter:
for name, data in zip(names, batch):
print(name, 'shape:', data.shape)
breakcenters shape: torch.Size([5, 1]) contexts_negatives shape: torch.Size([5, 48]) masks shape: torch.Size([5, 48]) labels shape: torch.Size([5, 48])
batch
(tensor([[1259],
         [ 627],
         [5679],
         [   3],
         [ 960]]),
 tensor([[1983, 1136, 1186,   15, 3216, 5351,  512,  321, 2208, 1396,   60,  782,
            63,  929,  149,  105,  305,    7,   74,   11, 1530,    1, 5893, 2668,
             0,    0,    0,    0,    0,    0,    0,    0,    0,    0,    0,    0,
             0,    0,    0,    0,    0,    0,    0,    0,    0,    0,    0,    0],
         [ 298, 1960, 1098, 1288,    6, 1689, 4808,  981, 2040, 3887,  385,   59,
          2167, 4424,   91, 4159,   65, 1271, 3621, 6020,  585, 1426, 5097,  335,
            18,  770, 5317, 1408, 5828, 3321,  836,  529, 1772,  365, 6718,  269,
           101,  209, 1450,    1,   47,  834,    8,    2,  979,   28, 4029,  471],
         [6034,    2, 4028,  829, 1042, 5340,    0,    0,    0,    0,    0,    0,
             0,    0,    0,    0,    0,    0,    0,    0,    0,    0,    0,    0,
             0,    0,    0,    0,    0,    0,    0,    0,    0,    0,    0,    0,
             0,    0,    0,    0,    0,    0,    0,    0,    0,    0,    0,    0],
         [ 678,  582, 5033, 4220,  959,  280,  124,  397,  211,  787, 2795,  383,
            18,   16, 1293, 1212, 2149, 2627,  623,    8, 4467,  155, 3932, 1447,
          5595,   27,   15,   81,  283, 2631,  410,  938,    4,  344, 5204,  233,
           149,    2, 4933, 5675,   62,  182,   18, 1186,  227, 2429, 2349,   31],
         [ 128, 1332, 3790, 1370,  950,  119, 1369, 1328, 1007, 2831,  782,  374,
           723,   13,   14,   76,  618,    1,  821,  143, 2317, 5730,  978,  753,
           839, 2055,  160,   12,  377,    4,    0,    0,    0,    0,    0,    0,
             0,    0,    0,    0,    0,    0,    0,    0,    0,    0,    0,    0]]),
 tensor([[1, 1, 1, 1, 1, 1, 1, 1, 1, 1, 1, 1, 1, 1, 1, 1, 1, 1, 1, 1, 1, 1, 1, 1,
          0, 0, 0, 0, 0, 0, 0, 0, 0, 0, 0, 0, 0, 0, 0, 0, 0, 0, 0, 0, 0, 0, 0, 0],
         [1, 1, 1, 1, 1, 1, 1, 1, 1, 1, 1, 1, 1, 1, 1, 1, 1, 1, 1, 1, 1, 1, 1, 1,
          1, 1, 1, 1, 1, 1, 1, 1, 1, 1, 1, 1, 1, 1, 1, 1, 1, 1, 1, 1, 1, 1, 1, 1],
         [1, 1, 1, 1, 1, 1, 0, 0, 0, 0, 0, 0, 0, 0, 0, 0, 0, 0, 0, 0, 0, 0, 0, 0,
          0, 0, 0, 0, 0, 0, 0, 0, 0, 0, 0, 0, 0, 0, 0, 0, 0, 0, 0, 0, 0, 0, 0, 0],
         [1, 1, 1, 1, 1, 1, 1, 1, 1, 1, 1, 1, 1, 1, 1, 1, 1, 1, 1, 1, 1, 1, 1, 1,
          1, 1, 1, 1, 1, 1, 1, 1, 1, 1, 1, 1, 1, 1, 1, 1, 1, 1, 1, 1, 1, 1, 1, 1],
         [1, 1, 1, 1, 1, 1, 1, 1, 1, 1, 1, 1, 1, 1, 1, 1, 1, 1, 1, 1, 1, 1, 1, 1,
          1, 1, 1, 1, 1, 1, 0, 0, 0, 0, 0, 0, 0, 0, 0, 0, 0, 0, 0, 0, 0, 0, 0, 0]]),
 tensor([[1, 1, 1, 1, 0, 0, 0, 0, 0, 0, 0, 0, 0, 0, 0, 0, 0, 0, 0, 0, 0, 0, 0, 0,
          0, 0, 0, 0, 0, 0, 0, 0, 0, 0, 0, 0, 0, 0, 0, 0, 0, 0, 0, 0, 0, 0, 0, 0],
         [1, 1, 1, 1, 1, 1, 1, 1, 0, 0, 0, 0, 0, 0, 0, 0, 0, 0, 0, 0, 0, 0, 0, 0,
          0, 0, 0, 0, 0, 0, 0, 0, 0, 0, 0, 0, 0, 0, 0, 0, 0, 0, 0, 0, 0, 0, 0, 0],
         [1, 0, 0, 0, 0, 0, 0, 0, 0, 0, 0, 0, 0, 0, 0, 0, 0, 0, 0, 0, 0, 0, 0, 0,
          0, 0, 0, 0, 0, 0, 0, 0, 0, 0, 0, 0, 0, 0, 0, 0, 0, 0, 0, 0, 0, 0, 0, 0],
         [1, 1, 1, 1, 1, 1, 1, 1, 0, 0, 0, 0, 0, 0, 0, 0, 0, 0, 0, 0, 0, 0, 0, 0,
          0, 0, 0, 0, 0, 0, 0, 0, 0, 0, 0, 0, 0, 0, 0, 0, 0, 0, 0, 0, 0, 0, 0, 0],
         [1, 1, 1, 1, 1, 0, 0, 0, 0, 0, 0, 0, 0, 0, 0, 0, 0, 0, 0, 0, 0, 0, 0, 0,
          0, 0, 0, 0, 0, 0, 0, 0, 0, 0, 0, 0, 0, 0, 0, 0, 0, 0, 0, 0, 0, 0, 0, 0]]))