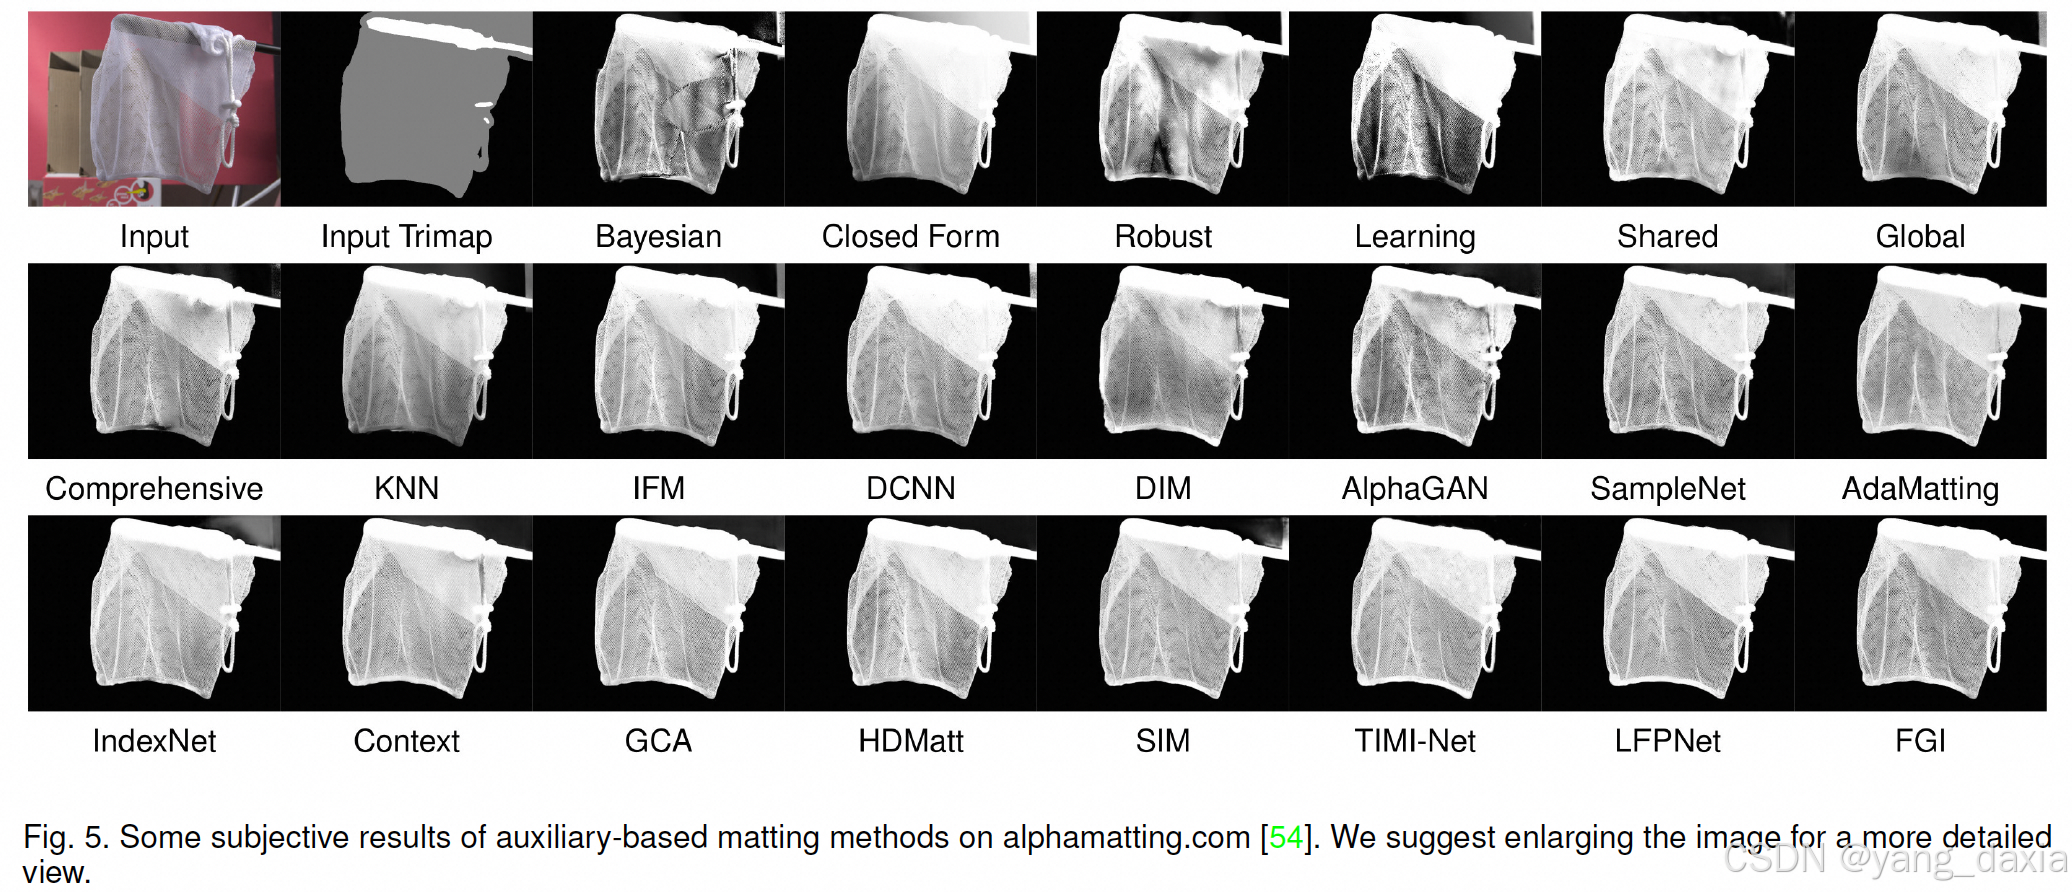
用法 图 文 视频还没写好,后期补上,因为基于微博本身的ui框架,所以有的样式会有一些问题,可能跟普通写法有一点不同,但是修改一点就可以
//自己做的假数据
<template>
  <wbx-view style="" @click="losingFocus">
    <wbx-view
      :style="{
        transform: transformNum,
        transition: 'transform 0.3s',
      }"
    >
      <wbx-list
        class="scroller"
        style="
          width: 100vw;
          height: 90vh;
          box-sizing: border-box;
          box-sizing: border-box;
          background-color: #f6f6f8;
        "
      >
        <wbx-cell v-for="(item, index) in dataSource" :key="index">
          <!-- 文本消息类型 -->
          <text-message
            v-if="item.type == 'text'"
            :dataSource="item"
          ></text-message>
          <!-- 图片消息类型 -->
          <pic-message
            v-if="item.type == 'pic'"
            :dataSource="item"
          ></pic-message>
          <!-- <video-message
            v-if="item.type == 'video'"
            :dataSource="item"
          ></video-message> -->
        </wbx-cell>
      </wbx-list>
      <wbx-view
        style="
          height: 10vh;
          background-color: #fff;
          display: flex;
          flex-direction: row;
          justify-content: center;
          align-items: center;
        "
        ><wbx-image
          style="width: 30px; height: 30px; margin-right: 20px"
          mode="aspectFit"
          src="res/login.png"
        />
        <wbx-textarea
          style="border: 1px solid #000; width: 200px; height: 40px"
          maxlength="100"
          placeholder="最多能输入100个字"
          returnkeytype="send"
          v-wbox-model:input.value.domProps="textareaValue"
          @keyboardheightchange="keyboardChangesTextarea"
          v-wbox-model:focus.focus="textareaFocused"
        ></wbx-textarea>
        <wbx-image
          style="width: 30px; height: 30px; margin-left: 20px"
          mode="aspectFit"
          src="res/login.png"
        />
        <wbx-image
          style="width: 30px; height: 30px; margin-left: 20px"
          mode="aspectFit"
          src="res/login.png"
        />
      </wbx-view>
    </wbx-view>
  </wbx-view>
</template>

<script>
import textMessage from "./messageType/text-message/index.vue";
import picMessage from "./messageType/pic-message/index.vue";
import videoMessage from "./messageType/video-message/index.vue";
/**
 * @type WBXAppOption
 */
const pageOptions = {
  components: {
    textMessage,
    picMessage,
    videoMessage,
  },
  data() {
    return {
      dataSource: [
        {
          id: 1,
          title: "我我我",
          time: "2023-04-03 10:39:00",
          pirce: 128,
          sendMessage: true,
          type: "pic",
          coverPicUrl:
            "https://img0.baidu.com/it/u=3693498673,388481603&fm=253&fmt=auto&app=120&f=JPEG?w=500&h=1082",
        },
        {
          id: 1,
          title: "你快瞅瞅好看不!",
          time: "2023-04-03 10:39:00",
          pirce: 128,
          sendMessage: true,
          type: "text",
          coverPicUrl: "",
        },
        {
          id: 1,
          title: "我觉的不咋地!啥玩应儿啊,还没我的好看呢!",
          time: "2023-04-03 10:39:00",
          pirce: 128,
          sendMessage: false,
          type: "text",
          coverPicUrl: "",
        },
        {
          id: 1,
          title: "我我我我嚄我我我我",
          time: "2023-04-03 10:39:00",
          pirce: 128,
          sendMessage: false,
          type: "pic",
          coverPicUrl:
            "https://vimimg-int-alicdn.softsugar.com/VME/int/users/687254816/figure/USNWXGCH/tmp_0d67a505007700275e7860e69904cfb3.jpg?auth_key=1724601600-0-0-d091d25b4081283ccd771125050e362d",
        },
        {
          id: 1,
          title: "你快拉到吧你,老弟啊你不懂欣赏!",
          time: "2023-04-03 10:39:00",
          pirce: 128,
          sendMessage: true,
          type: "text",
          coverPicUrl: "",
        },
        {
          id: 1,
          title: "我我我我我我我我",
          time: "2023-04-03 10:39:00",
          pirce: 128,
          sendMessage: true,
          type: "pic",
          coverPicUrl:
            "https://vimimg-int-alicdn.softsugar.com/VME/int/users/687254816/figure/NUBOVIEU/tmp_f37d3589f0ae36025d0dc6bae84c34c4.jpg?auth_key=1724601600-0-0-94c9964f5c3c2a8773919a964d24284f",
        },
        {
          id: 1,
          title: "这也不好看啊,什么审美",
          time: "2023-04-03 10:39:00",
          pirce: 128,
          sendMessage: false,
          type: "text",
          coverPicUrl: "",
        },
        {
          id: 1,
          title: "这也不好看啊,什么审美",
          time: "2023-04-03 10:39:00",
          pirce: 128,
          sendMessage: false,
          type: "pic",
          coverPicUrl:
            "https://img2.baidu.com/it/u=1718761759,369021576&fm=253&fmt=auto&app=120&f=JPEG?w=500&h=1083",
        },
        {
          id: 1,
          title: "这也不好看啊,什么审美",
          time: "2023-04-03 10:39:00",
          pirce: 128,
          sendMessage: false,
          type: "video",
          coverVideoUrl: {
            oid: "3911557709",
            src: "res/2.mp4",
          },
          coverPicUrl:
            "https://img0.baidu.com/it/u=3693498673,388481603&fm=253&fmt=auto&app=120&f=JPEG?w=500&h=1082",
        },
        {
          id: 1,
          title: "这也不好看啊,什么审美",
          time: "2023-04-03 10:39:00",
          pirce: 128,
          sendMessage: false,
          type: "video",
          coverVideoUrl: {
            oid: "3911557708",
            src: "res/video.mp4",
          },
          coverPicUrl:
            "https://img0.baidu.com/it/u=3693498673,388481603&fm=253&fmt=auto&app=120&f=JPEG?w=500&h=1082",
        },
      ],
      transformNum: "translateY(0)",
      loadinging: false,
      showLoading: false,
      refreshing: false,
      showLoadMore: true,
      textareaValue: "",
      textareaFocused: false,
    };
  },
  methods: {
    losingFocus() {
      this.textareaFocused = false;
    },
    keyboardChangesTextarea(e) {
      const { height, isShow } = e.detail;
      this.transformNum = isShow
        ? `translateY(-${height - 40}px)`
        : "translateY(0)";
    },
  },
  wbox: {
    onLoad() {},
    onShow() {
      // 页面显示/切入前台时触发
    },
    onHide() {
      // 页面隐藏时触发
    },
    onUnload() {
      // 页面退出时触发
    },
  },
  mounted() {},
};
export default pageOptions;
</script>

<style>
.scroller {
}
</style>
文本类型的组件:
//文本的组件
<template>
  <wbx-view>
    <!-- 左边 -->
    <wbx-view
      v-if="dataSource.sendMessage == false"
      style="
        margin-top: 20px;
        margin-bottom: 20px;
        margin-left: 10px;
        display: flex;
        justify-content: flex-start;
        flex-direction: row;
      "
    >
      <wbx-image
        style="width: 40px; height: 40px;border-radius: 5px;"
        mode="aspectFit"
        src="res/login.png"
      />
      <wbx-view>
        <wbx-view
          style="
            margin-left: 10px;
            display: flex;
            flex-wrap: wrap;
            border-radius: 5px;
            background-color: pink;
          "
        >
          <wbx-text
            style="max-width: 55vw; margin: 10px 10px; display: inline-block"
            >{{ dataSource.title }}</wbx-text
          >
        </wbx-view>
      </wbx-view>
    </wbx-view>
    <!-- 右边 -->
    <wbx-view
      v-if="dataSource.sendMessage == true"
      style="
        margin-top: 20px;
        margin-bottom: 20px;
        margin-right: 10px;
        display: flex;
        justify-content: flex-end;
        flex-direction: row;
      "
    >
      <wbx-view style="position: relative">
        <wbx-view
          style="
            position: relative;
            margin-right: 10px;
            display: flex;
            flex-wrap: wrap;
            background-color: pink;
            border-radius: 5px;
          "
        >
          <wbx-text
            style="max-width: 55vw; margin: 10px 10px; display: inline-block"
            >{{ dataSource.title }}</wbx-text
          >
        </wbx-view>
        <!-- 箭头位置 -->
        <!-- <wbx-view
                style="
                  background-color: red;
                  position: absolute;
                  right: 0;
                  top: 10px;
                  width: 10px;
                  height: 10px;
                  border-top: 100px solid transparent;
                  border-right: 100px solid transparent;
                  border-left: 100px solid transparent;
                  border-bottom: 100px solid red;
                "
              >
              </wbx-view> -->
      </wbx-view>

      <wbx-image
        style="width: 40px; height: 40px;border-radius: 5px;"
        mode="aspectFit"
        src="res/login.png"
      />
    </wbx-view>
  </wbx-view>
</template>

<script>
/**
 * @type WBXAppOption
 */
const pageOptions = {
  props: {
    dataSource: {
      type: Object,
      required: true,
    },
  },
  data() {
    return {};
  },
  methods: {
  },
  wbox: {
    onLoad() {
    },
    onShow() {
      // 页面显示/切入前台时触发
    },
    onHide() {
      // 页面隐藏时触发
    },
    onUnload() {
      // 页面退出时触发
    },
  },
  mounted() {},
};
export default pageOptions;
</script>

<style></style>
图文类型的组件
<template>
  <wbx-view>
    <!-- 左边 -->
    <wbx-view
      v-if="dataSource.sendMessage == false"
      style="
        margin-top: 20px;
        margin-bottom: 20px;
        margin-left: 10px;
        display: flex;
        justify-content: flex-start;
        flex-direction: row;
        align-items: flex-start;
      "
    >
      <wbx-image
        style="width: 40px; height: 40px; flex-shrink: 0; border-radius: 5px"
        mode="aspectFit"
        src="res/login.png"
      />
      <wbx-image
        @load="loadFn"
        @click="preview(dataSource.coverPicUrl)"
        style="margin-left: 10px; border-radius: 5px"
        :style="{ height: heightImg, width: widthImg }"
        mode="aspectFill"
        :src="dataSource.coverPicUrl"
      />
    </wbx-view>

    <!-- 右边 -->
    <wbx-view
      v-if="dataSource.sendMessage == true"
      style="
        margin-top: 20px;
        margin-bottom: 20px;
        margin-right: 10px;
        display: flex;
        justify-content: flex-end;
        flex-direction: row;
        align-items: flex-start;
      "
    >
      <wbx-view style="margin-right: 10px">
        <wbx-image
          @load="loadFn"
          @click="preview(dataSource.coverPicUrl)"
          style="margin-left: 10px; border-radius: 5px"
          :style="{ height: heightImg, width: widthImg }"
          mode="aspectFill"
          :src="dataSource.coverPicUrl"
        />
      </wbx-view>
      <wbx-image
        style="width: 40px; height: 40px; flex-shrink: 0; border-radius: 5px"
        mode="aspectFit"
        src="res/login.png"
      />
    </wbx-view>
  </wbx-view>
</template>

<script>
/**
 * @type WBXAppOption
 */
const pageOptions = {
  props: {
    dataSource: {
      type: Object,
      required: true,
    },
  },
  data() {
    return {
      heightImg: "",
      widthImg: "",
      imgList: [],
    };
  },
  methods: {
    resizeImage(originalWidth, originalHeight, maxWidth, maxHeight) {
      let ratio = Math.min(
        maxWidth / originalWidth,
        maxHeight / originalHeight
      );
      return {
        width: originalWidth * ratio + "px",
        height: originalHeight * ratio + "px",
      };
    },
    loadFn(e) {
      const { height, width } = e.detail;
      const maxWidth = 200; // 设定图片容器的最大宽度
      const maxHeight = 200; // 设定图片容器的最大高度
      const { width: resizedWidth, height: resizedHeight } = this.resizeImage(
        width,
        height,
        maxWidth,
        maxHeight
      );
      this.widthImg = resizedWidth;
      this.heightImg = resizedHeight;
    },
    preview(coverPicUrl) {
      const coverPicUrls = this.$parent.dataSource.map(
        (item) => item.coverPicUrl
      );
      let coverPicUrlIndex = this.$parent.dataSource.findIndex(
        (item) => item.coverPicUrl === this.dataSource.coverPicUrl
      );
      let imglist = this.$parent.dataSource
        .filter((item) => item.coverPicUrl !== "" && item.type === "pic")
        .map((item) => item.coverPicUrl);
      let index = imglist.indexOf(coverPicUrls[coverPicUrlIndex]);
      wbx.previewImage({
        urls: imglist,
        index,
        success: function (res) {
          console.log("---- previewImage success: " + JSON.stringify(res));
        },
        failure: function (res) {
          console.log(
            "---- previewImage failure: " + JSON.stringify(res.errMsg)
          );
        },
        complete: function (res) {
          console.log("---- previewImage complete: " + JSON.stringify(res));
        },
      });
    },
  },
  wbox: {
    onLoad() {},
    onShow() {
      // 页面显示/切入前台时触发
    },
    onHide() {
      // 页面隐藏时触发
    },
    onUnload() {
      // 页面退出时触发
    },
  },
  mounted() {},
};
export default pageOptions;
</script>

<style></style>