这是我的第356篇原创文章。
一、引言
使用 Flask 在 10 分钟内将您自己训练的模型或预训练的模型(VGG、ResNet、Densenet)部署到网络应用程序中。以图像分类模型为例,本地直接部署和本地使用docker部署两种方式实现。
二、实现过程
2.1 准备模型
这里我们使用tf.keras.applications.MobileNetV2 作为基础模型,MobileNet V2模型由Google开发,此模型已基于 ImageNet 数据集进行预训练,ImageNet 数据集是一个包含 140 万个图像和 1000 个类的大型数据集。ImageNet 是一个研究训练数据集,具有各种各样的类别,例如 jackfruit 和 syringe。此知识库将帮助我们对特定数据集中的猫和狗进行分类。
实例化一个已预加载基于 ImageNet 训练的权重的 MobileNet V2 模型:
from keras.applications.mobilenet_v2 import MobileNetV2
model = MobileNetV2(weights='imagenet')
print('Model loaded. Check http://127.0.0.1:5000/')
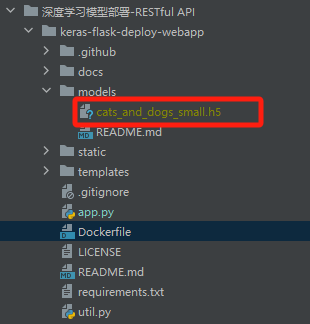
当然,你也可以用你自己训练好的模型,训练好的模型放在项目的models文件夹下面:

然后采用下面的代码进行加载模型:
MODEL_PATH = 'models/cats_and_dogs_small.h5'
model = load_model(MODEL_PATH)
model._make_predict_function()          # Necessary
print('Model loaded. Start serving...')
2.2 本地部署
app.py:
import os
import sys

# Flask
from flask import Flask, redirect, url_for, request, render_template, Response, jsonify, redirect
from werkzeug.utils import secure_filename
from gevent.pywsgi import WSGIServer

# TensorFlow and tf.keras
import tensorflow as tf
from tensorflow import keras

from keras.applications.imagenet_utils import preprocess_input, decode_predictions
from keras.models import load_model
from keras.preprocessing import image

# Some utilites
import numpy as np
from util import base64_to_pil


# Declare a flask app
app = Flask(__name__)


# You can use pretrained model from Keras
# Check https://keras.io/applications/
# or https://www.tensorflow.org/api_docs/python/tf/keras/applications

from keras.applications.mobilenet_v2 import MobileNetV2
model = MobileNetV2(weights='imagenet')
print('Model loaded. Check http://127.0.0.1:5000/')


# Model saved with Keras model.save()
# MODEL_PATH = 'models/cats_and_dogs_small.h5'

# Load your own trained model
# model = load_model(MODEL_PATH)
# model._make_predict_function()          # Necessary
# print('Model loaded. Start serving...')


def model_predict(img, model):
    img = img.resize((224, 224))

    # Preprocessing the image
    x = image.image_utils.img_to_array(img)
    # x = np.true_divide(x, 255)
    x = np.expand_dims(x, axis=0)

    # Be careful how your trained model deals with the input
    # otherwise, it won't make correct prediction!
    x = preprocess_input(x, mode='tf')

    preds = model.predict(x)
    return preds


@app.route('/', methods=['GET'])
def index():
    # Main page
    return render_template('index.html')


@app.route('/predict', methods=['GET', 'POST'])
def predict():
    if request.method == 'POST':
        # Get the image from post request
        img = base64_to_pil(request.json)

        # Save the image to ./uploads
        # img.save("./uploads/image.png")

        # Make prediction
        preds = model_predict(img, model)

        # Process your result for human
        pred_proba = "{:.3f}".format(np.amax(preds))    # Max probability
        pred_class = decode_predictions(preds, top=1)   # ImageNet Decode

        result = str(pred_class[0][0][1])               # Convert to string
        result = result.replace('_', ' ').capitalize()

        # Serialize the result, you can add additional fields
        return jsonify(result=result, probability=pred_proba)

    return None


if __name__ == '__main__':
    # app.run(port=5002, threaded=False)

    # Serve the app with gevent
    http_server = WSGIServer(('0.0.0.0', 5000), app)
    http_server.serve_forever()
2.2 docker部署
编写dockerfile:
FROM python:3.9.0

COPY . D:/workspace/github_proj/Data-Miscellany-Forum/src/深度学习模型部署-RESTfulAPI/keras-flask-deploy-webapp
WORKDIR D:/workspace/github_proj/Data-Miscellany-Forum/src/深度学习模型部署-RESTfulAPI/keras-flask-deploy-webapp
# Install dependencies
RUN pip install -r requirements.txt
# Run the application on port 5000
EXPOSE 5000
CMD ["python", "app.py"]
创建镜像:
docker build -t keras_flask_app .
启动容器:
docker run -it --rm -p 5000:5000 keras_flask_app
三、小结
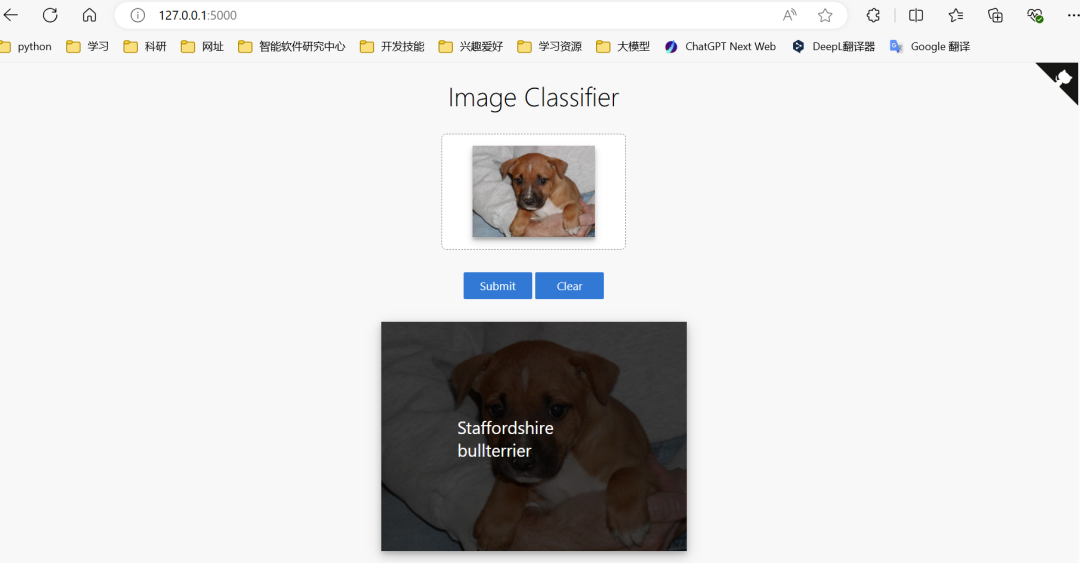
打开浏览器,输入127.0.0.1:5000,导入一张图片进行分类预测:

作者简介:
读研期间发表6篇SCI数据挖掘相关论文,现在某研究院从事数据算法相关科研工作,结合自身科研实践经历不定期分享关于Python、机器学习、深度学习、人工智能系列基础知识与应用案例。致力于只做原创,以最简单的方式理解和学习,关注我一起交流成长。需要数据集和源码的小伙伴可以关注底部公众号添加作者微信。


