背景
此前写过关于代理模式的文章,参考:代理模式
动态代理功能:生成一个Proxy代理类,Proxy代理类实现了业务接口,而通过调用Proxy代理类实现的业务接口,实际上会触发代理类的invoke增强处理方法。
责任链功能:可以动态地组合处理者,增加或删除处理者,而不需要修改客户端代码;可以灵活地处理请求,每个处理者可以选择处理请求或将请求传递给下一个处理者。
MybatisAutoConfiguration
这是最初的Mybatis的自动加载类。
org.mybatis.spring.boot.autoconfigure.MybatisAutoConfiguration


@org.springframework.context.annotation.Configuration
@ConditionalOnClass({ SqlSessionFactory.class, SqlSessionFactoryBean.class })
@ConditionalOnSingleCandidate(DataSource.class)
@EnableConfigurationProperties(MybatisProperties.class)
@AutoConfigureAfter({ DataSourceAutoConfiguration.class, MybatisLanguageDriverAutoConfiguration.class })
public class MybatisAutoConfiguration implements InitializingBean {


    private final Interceptor[] interceptors;


    public MybatisAutoConfiguration(MybatisProperties properties, ObjectProvider<Interceptor[]> interceptorsProvider,
        ObjectProvider<TypeHandler[]> typeHandlersProvider, ObjectProvider<LanguageDriver[]> languageDriversProvider,
        ResourceLoader resourceLoader, ObjectProvider<DatabaseIdProvider> databaseIdProvider,
        ObjectProvider<List<ConfigurationCustomizer>> configurationCustomizersProvider) {
      this.properties = properties;
      // 【1】
      this.interceptors = interceptorsProvider.getIfAvailable();
      ......
    }


    @Bean
    @ConditionalOnMissingBean
    public SqlSessionFactory sqlSessionFactory(DataSource dataSource) throws Exception {
          SqlSessionFactoryBean factory = new SqlSessionFactoryBean();
          factory.setDataSource(dataSource);
          factory.setVfs(SpringBootVFS.class);
          if (StringUtils.hasText(this.properties.getConfigLocation())) {
            factory.setConfigLocation(this.resourceLoader.getResource(this.properties.getConfigLocation()));
          }
          applyConfiguration(factory);
          if (this.properties.getConfigurationProperties() != null) {
            factory.setConfigurationProperties(this.properties.getConfigurationProperties());
          }
          // 【2】
          if (!ObjectUtils.isEmpty(this.interceptors)) {
            factory.setPlugins(this.interceptors);
          }
          ......
          return factory.getObject();
    }


}
代码分析:
【1】interceptorsProvider.getIfAvailable();获取Interceptor接口的所有的bean,并加载到内存interceptors里
【2】构造SqlSessionFactoryBean,会用到内存的interceptors,填充拦截器bean到SqlSessionFactoryBean里面。
SqlSessionFactoryBean#afterPropertiesSet:初始化完成后执行
因为SqlSessionFactoryBean实现了InitializingBean接口,必然有一个afterPropertiesSet()的实现方法:
public class SqlSessionFactoryBean implements FactoryBean<SqlSessionFactory>, InitializingBean, ApplicationListener<ApplicationEvent> {
  @Override
  public void afterPropertiesSet() throws Exception {
    notNull(dataSource, "Property 'dataSource' is required");
    notNull(sqlSessionFactoryBuilder, "Property 'sqlSessionFactoryBuilder' is required");
    state((configuration == null && configLocation == null) || !(configuration != null && configLocation != null),
        "Property 'configuration' and 'configLocation' can not specified with together");
      // 【3】
    this.sqlSessionFactory = buildSqlSessionFactory();
  }
}
代码分析:
【3】这里会构造一个sqlSessionFactory,并调用了buildSqlSessionFactory()
SqlSessionFactoryBean#buildSqlSessionFactory:构造SqlSessionFactory
里面通过遍历SqlSessionFactoryBean的interceptors,逐个把拦截器加载到SqlSessionFactory的interceptorChain里面。
protected SqlSessionFactory buildSqlSessionFactory() throws Exception {
    ......
    // 【4】
    if (!isEmpty(this.plugins)) {
      Stream.of(this.plugins).forEach(plugin -> {
        targetConfiguration.addInterceptor(plugin);
        LOGGER.debug(() -> "Registered plugin: '" + plugin + "'");
      });
    }
    // 【5】
    return this.sqlSessionFactoryBuilder.build(targetConfiguration);
}
代码分析:
【4】逐个把拦截器加载到targetConfiguration对象的interceptorChain里面(也就是拦截器责任链了)。
【5】最终通过sqlSessionFactoryBuilder建造者模式,完成一个对象创建:new DefaultSqlSessionFactory(config)
DefaultSqlSessionFactory#构造器
public class DefaultSqlSessionFactory implements SqlSessionFactory {


  private final Configuration configuration;


  public DefaultSqlSessionFactory(Configuration configuration) {
    this.configuration = configuration;
  }
}
到此,完成Mybatis的插件bean的类加载和插件责任链的初始化。
上述的实现逻辑,,拆分到了只包含部分逻辑的、功能单一的Handler处理类里,开发人员可以按照业务需求将多个Handler对象组合成一条责任链,实现请求的处理。
那么Mybatis插件什么时候发挥作用呢?
自然是每个sqlSession创建时,在返回Executor对象前,会对执行器进行一个pluginAll的插件处理。
我们发起一次请求,最终会映射打开一个session会话:http://localhost:8891/user_select?id=2
最终debug到下面源码。
DefaultSqlSessionFactory#openSessionFromDataSource
最终debug到:org.apache.ibatis.session.defaults.DefaultSqlSessionFactory#openSessionFromDataSource
public class DefaultSqlSessionFactory implements SqlSessionFactory {


    private final Configuration configuration;


    private SqlSession openSessionFromDataSource(ExecutorType execType, TransactionIsolationLevel level, boolean autoCommit) {
      Transaction tx = null;
      try {
        // 【1】
        final Environment environment = configuration.getEnvironment();
        final TransactionFactory transactionFactory = getTransactionFactoryFromEnvironment(environment);
        // 【2】
        tx = transactionFactory.newTransaction(environment.getDataSource(), level, autoCommit);
        // 【3】
        final Executor executor = configuration.newExecutor(tx, execType);
        // 【4】
        return new DefaultSqlSession(configuration, executor, autoCommit);
      } catch (Exception e) {
        closeTransaction(tx); // may have fetched a connection so lets call close()
        throw ExceptionFactory.wrapException("Error opening session.  Cause: " + e, e);
      } finally {
        ErrorContext.instance().reset();
      }
    }
}
源码分析:
【1】获取环境变量
【2】创建新事务
【3】创建一个新的Executor执行器(非常关键)
【4】返回新构造的DefaultSqlSession
configuration#newExecutor:非常关键
public class Configuration {
    public Executor newExecutor(Transaction transaction, ExecutorType executorType) {
      executorType = executorType == null ? defaultExecutorType : executorType;
      executorType = executorType == null ? ExecutorType.SIMPLE : executorType;
      Executor executor;
      if (ExecutorType.BATCH == executorType) {
        executor = new BatchExecutor(this, transaction);
      } else if (ExecutorType.REUSE == executorType) {
        executor = new ReuseExecutor(this, transaction);
      } else {
        executor = new SimpleExecutor(this, transaction);
      }
      if (cacheEnabled) {
        executor = new CachingExecutor(executor);
      }
      executor = (Executor) interceptorChain.pluginAll(executor);
      return executor;
    }
}
interceptorChain.pluginAll(executor)
public class InterceptorChain {


  private final List<Interceptor> interceptors = new ArrayList<>();


  public Object pluginAll(Object target) {
    for (Interceptor interceptor : interceptors) {
      target = interceptor.plugin(target);
    }
    return target;
  }


 }
最终返回的是一个动态代理了Plugin类的自动生产对象。
Interceptor#plugin
public interface Interceptor {


  Object intercept(Invocation invocation) throws Throwable;


  default Object plugin(Object target) {
    // 【1】
    return Plugin.wrap(target, this);
  }


  default void setProperties(Properties properties) {
    // NOP
  }
}
此处的 Plugin.wrap(target, this) 是一个静态方法,本质是对插件进行
动态代理,最终返回的是一个动态代理了Plugin类的自动生产对象。
org.apache.ibatis.plugin.Plugin#wrap
org.apache.ibatis.plugin.Plugin#wrap


public static Object wrap(Object target, Interceptor interceptor) {
      Map<Class<?>, Set<Method>> signatureMap = getSignatureMap(interceptor);
      Class<?> type = target.getClass();
      Class<?>[] interfaces = getAllInterfaces(type, signatureMap);
      if (interfaces.length > 0) {
        return Proxy.newProxyInstance(
            type.getClassLoader(),
            interfaces,
            new Plugin(target, interceptor, signatureMap));
      }
      return target;
}
源码分析:

最核心的部分,就是Proxy.newProxyInstance
target:Executor执行器
Interceptor:拦截器
signatureMap:拦截签名
new 了一个Plugin类
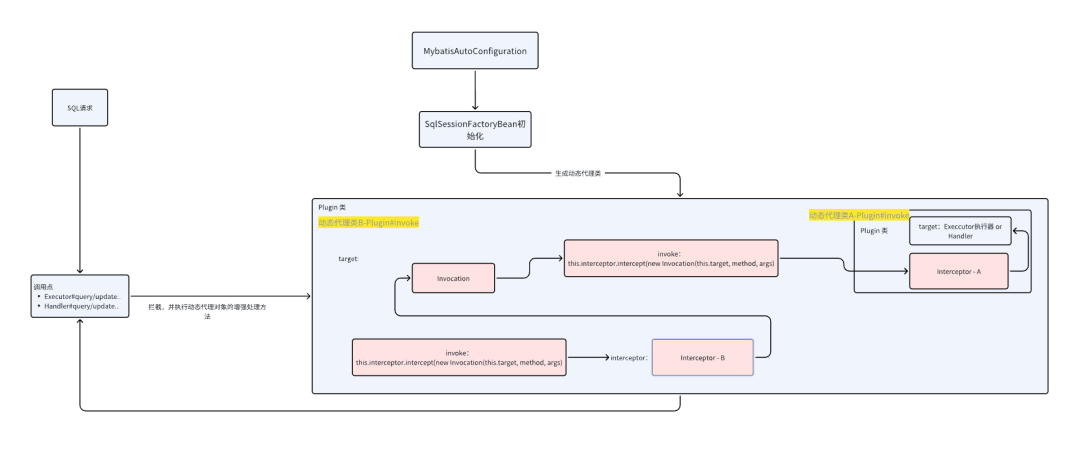
构造对Plugin类的动态代理,会自动生成一个代理类A#Plugin,最终执行的还是Plugin类的invoke方法
于是wrap最终返回的是一个动态代理了Plugin类的自动生产对象。
代理器是Plugin,被代理类是target(Executor或Handler),
至此,我们分析了完成代理模式的应用部分,下面是责任链模式的应用。
执行SQL时机:SqlSessionInterceptor
也是一个动态代理,
org.mybatis.spring.SqlSessionTemplate.SqlSessionInterceptor#invoke

最终执行的逻辑,是调用sqlSession去接args参数,这个反射执行的方法是:
SqlSession.selectOne(java.lang.String,java.lang.Object)而selectOne最终调用了
DefaultSqlSession#selectList(java.lang.String, java.lang.Object, org.apache.ibatis.session.RowBounds)@Override
public <E> List<E> selectList(String statement, Object parameter, RowBounds rowBounds) {
try {
MappedStatement ms = configuration.getMappedStatement(statement);
return executor.query(ms, wrapCollection(parameter), rowBounds, Executor.NO_RESULT_HANDLER);
} catch (Exception e) {
throw ExceptionFactory.wrapException("Error querying database. Cause: " + e, e);
} finally {
ErrorContext.instance().reset();
}
}源码分析:
executor.query:是最终的Executor执行器query方法逻辑。还记得上面一个步骤吗?自动生成一个代理类A#Plugin,它实现了对Executor的增强处理,这块增强处理逻辑要回到Plugin#invoke方法:
@Override
public Object invoke(Object proxy, Method method, Object[] args) throws Throwable {
  try {
    Set<Method> methods = signatureMap.get(method.getDeclaringClass());
    if (methods != null && methods.contains(method)) {
      return interceptor.intercept(new Invocation(target, method, args));
    }
    return method.invoke(target, args);
  } catch (Exception e) {
    throw ExceptionUtil.unwrapThrowable(e);
  }
}
这里会根据signatureMap的调用点,来判断是否执行interceptor的拦截逻辑。
而这里的拦截逻辑,就是我们实现好的,Interceptor拦截器类的intercept方法啦。
new好的Invocation,实际就是调用点。
通过InterceptorChain拦截器链,对Executor进行增强
总结

从图中可以知道,Mybatis的拦截器链运用了动态代理和责任链模式:
其实就是代理对象再次生成代理对象,特殊的是代理对象的target属性
另外配合Invocation类中的proceed方法形成责任链路的调用,这样就可以在我们执行sql的前后,做一些特殊的自定义的事情了。


