文章目录
- Excel基础
- Easy Excel
- 导出会员数据
- 导入会员数据
- 前端代码:
- 代码解析
- 总结
- 组件简介
- 详细解释
- 总结
用来操作excel文件的。
银行网银系统导出交易明细数据、各种业务系统导出excel报表数据、批量导入业务数据。
Excel基础
- **工作簿 workbook
**就是一个文件 - 工作表 sheet
属于工作簿 - 行 row
属于工作表 - 单元格 cell属于行,如C2,表示第二行第三列
Easy Excel
官网地址: 对于操作excel十分的方便。
关于Easyexcel | Easy Excel 官网 (alibaba.com)
<dependency>
    <groupId>cn.afterturn</groupId>
    <artifactId>easypoi-spring-boot-starter</artifactId>
    <version>4.4.0</version>
</dependency>

根据excel表格编写导出的实体类。
在实体类的每一个属性上面添加注解@Excel, name是excel的列名,orderNum表示在第几列,下标从0开始。
width表示列的宽度,有些列数据比较多长度会比较大。
@Data
@AllArgsConstructor
@NoArgsConstructor
public class SpMemberVO {

    @Excel(name = "用户名", orderNum = "0", width = 20)
    @ApiModelProperty(value = "用户名")
    private String username;

    @Excel(name = "邮箱", orderNum = "1", width = 30)
    @ApiModelProperty(value = "邮箱")
    private String email;

    @Excel(name = "性别", orderNum = "2", width = 15)
    @ApiModelProperty(value = "性别")
    private String gender;
    @Excel(name = "QQ号", orderNum = "3", width = 10)
    @ApiModelProperty(value = "qq")
    private String qq;
    @Excel(name = "手机", orderNum = "4", width = 25)
    @ApiModelProperty(value = "手机")
    private String phone;
    @Excel(name = "学历", orderNum = "5", width = 10)
    @ApiModelProperty(value = "学历")
    private String education;
    @Excel(name = "爱好", orderNum = "6", width = 10)
    @ApiModelProperty(value = "爱好")
    private String hobby;
    @Excel(name = "简介", orderNum = "7", width = 30)
    @ApiModelProperty(value = "简介")
    private String introduce;

}
导出会员数据
controller层代码
@ApiOperation("导出会员信息")
@GetMapping("/export")
public void export(@RequestParam(defaultValue = "1")Integer pageNum, @RequestParam(defaultValue = "5") Integer pageSize, Member member, HttpServletResponse resp) throws IOException {
    //导出所有的选学生新信息
    Workbook workbook = memberService.export(pageNum, pageSize, member);
    // 设置响应内容
    resp.setContentType("application/vnd.ms-excel");
    //设置响应头                                                           //如果需要中文 就要这样编写
    resp.setHeader("Content-Disposition", "attachment;filename=" + new String("会员信息表.xlsx".getBytes("utf-8"), "iso8859-1"));
                     //将workbook写入到响应流中去
    workbook.write(resp.getOutputStream());

}
这个方法虽然没有显式的返回值,但是它通过 HttpServletResponse 对象将数据直接写入了响应流
,这使得它能够将内容发送到前端。
service层代码:
@Override
public Workbook export(Integer pageNum, Integer pageSize, Member member) {
    PageHelper.startPage(pageNum, pageSize); //开启分页
    List<SpMemberVO> memberList = memberMapper.selectByPage(member); //分页查找
     //设置导出数据 第一个参数 标题 第二个参数 页表标题
    ExportParams exportParams = new ExportParams("会员信息", "会员信息表");
                  //调用工具类生成book 返回book
    Workbook book = ExcelExportUtil.exportExcel(exportParams, SpMemberVO.class, memberList);
    return book;
}
导入会员数据
@ApiOperation("导入会员信息")
@PostMapping("/import")
public Result importExcel(@RequestParam("file") MultipartFile file) throws IOException {
    System.out.println(file.getSize());
    memberService.importFile(file.getInputStream());
    return Result.success();
}

@RequestParam("file") MultipartFile file 是在 Spring MVC 中用来处理文件上传的参数定义。它的作用是将 HTTP 请求中上传的文件绑定到控制器方法的参数 file 上。下面是详细解释:

MultipartFile 是 Spring 提供的一个接口,用于封装上传的文件。它包含了一些常用的方法,例如 getOriginalFilename()(获取文件的原始名称)、getBytes()(获取文件的字节内容)、getInputStream()(获取文件的输入流)等。
通过将 MultipartFile 作为方法参数,Spring MVC 可以自动处理多部分表单数据,将上传的文件封装为 MultipartFile 对象,并传递给方法供其使用。

对于传过来的file可以使用下面的方法
getOriginalFilename(): 返回上传文件的原始文件名。
getBytes(): 以字节数组的形式返回文件内容。
getInputStream(): 获取文件内容的输入流,用于更复杂的文件处理操作。
transferTo(File dest): 将上传的文件直接保存到指定的文件路径。
serive层代码
@SneakyThrows
@Override
public void importFile(InputStream inputStream){
System.out.println(inputStream);
ImportParams params = new ImportParams();
params.setTitleRows(1);  //导入的数据 设置标题
params.setHeadRows(1);    //设置最上面一栏                          //这边读取的是vo中的配置
List<SpMemberVO> list = ExcelImportUtil.importExcel(inputStream, SpMemberVO.class, params);
//导入的数据和实际的数据有差别的,通过stream流进行转换
List<Member> collect = list.stream().map(item -> {
    Member member = new Member();
    BeanUtils.copyProperties(item, member);
    member.setPassword(PwdUtil.encrypt(MemberConstant.DEFAULT_PASSWORD));
    member.setCreateTime(new Date());
    member.setUpdateTime(new Date());
    member.setIsDeleted(MemberConstant.NO_DELETED);
    return member;
}).collect(Collectors.toList());
//进行批量的插入
memberMapper.insertBatch(collect);
}
批量插入的mapper.xml代码
<insert id="insertBatch" parameterType="Member">
  INSERT INTO sp_member (username, password, email, gender, qq, phone, education, hobby, introduce, create_time, update_time, is_deleted)
  VALUES
  <!-- 通过foreach标签  -->
  <foreach collection="list" item="item" separator=",">
    (#{item.username}, #{item.password}, #{item.email}, #{item.gender}, #{item.qq}, #{item.phone}, #{item.education}, #{item.hobby}, #{item.introduce}, #{item.createTime}, #{item.updateTime}, #{item.isDeleted})
  </foreach>

</insert>
验证:


前端代码:
// 导出
  async exportMember(type) {
    console.log(type)
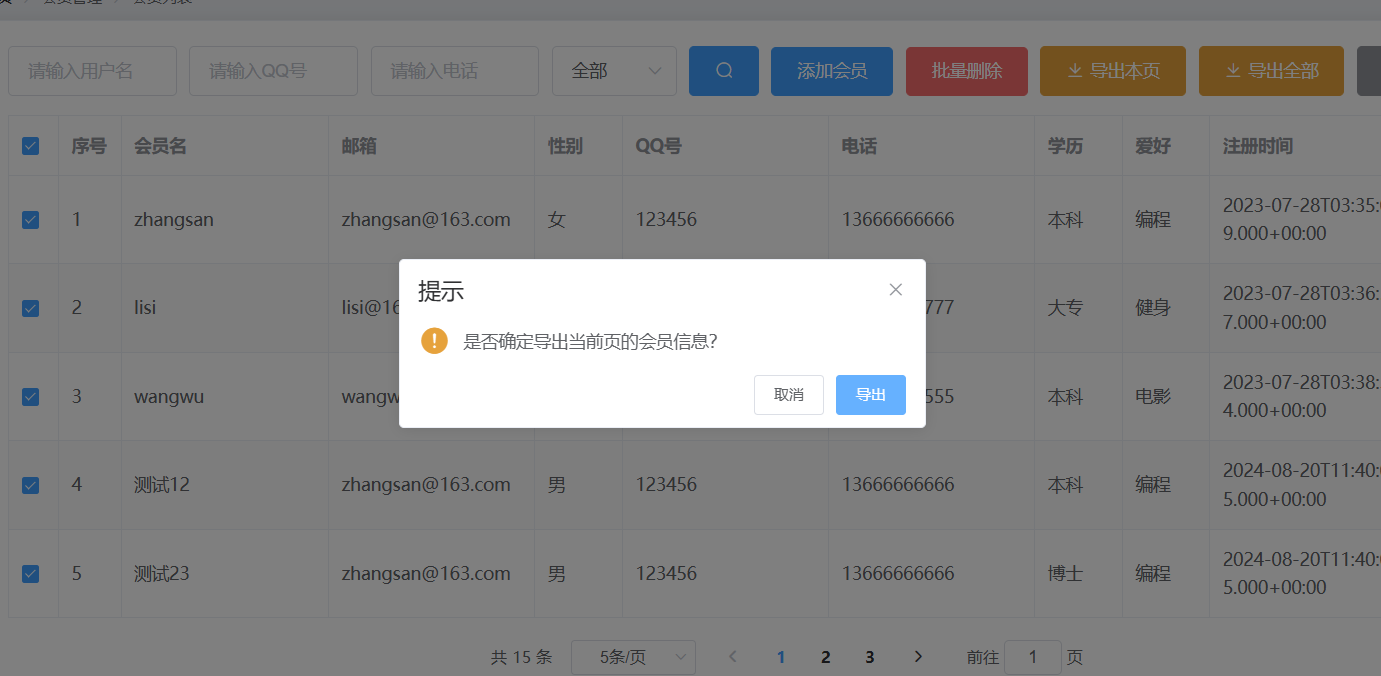
    let tip = type ? '是否确定导出全部的会员信息?' : '是否确定导出当前页的会员信息?'
    this.$confirm(tip, '提示', {
      confirmButtonText: '导出',
      cancelButtonText: '取消',
      type: 'warning',
    })
      .then(async () => {
        // 要传递的参数
        let params = { ...this.queryInfo }
        // 是否是导出全部匹配数据
        if (type) {
          params.pageNum = 1
          params.pageSize = this.total
        }
        // 导出
        const res = await this.$http.get(`members/export`, {
          params,
          responseType: 'blob',
        })
        const file = new Blob([res.data], {
          type: 'application/vnd.ms-excel',
        })
        const url = URL.createObjectURL(file)
        const a = document.createElement('a')
        a.href = url
        a.download = 'member.xlsx'
        a.click()
        // 释放临时的a
        URL.revokeObjectURL(url)
      })
      .catch(() => {
        this.$message({
          type: 'info',
          message: '已取消导出',
        })
      })
  },
这段代码是一个 Vue.js 组件的方法,exportMember(type),用于导出会员信息。它根据用户选择导出全部会员数据或仅导出当前页的数据。下面是对代码的详细解释:
代码解析
- 方法签名与参数:
async exportMember(type):这是一个异步方法,type参数用于指示导出类型。如果type为true,则导出全部会员信息;如果为false,则仅导出当前页的会员信息。
- 确认导出提示:
let tip = type ? '是否确定导出全部的会员信息?' : '是否确定导出当前页的会员信息?'
this.$confirm(tip, '提示', {
  confirmButtonText: '导出',
  cancelButtonText: '取消',
  type: 'warning',
})
- 根据
type的值,设置不同的提示信息,让用户确认他们要导出的数据范围。 - 使用 Vue.js 的
this.$confirm方法显示一个确认对话框,用户可以选择继续导出或取消。
- 确认后的处理逻辑:
then(async () => {...}):如果用户点击了“导出”,执行这个块中的逻辑。
- 设置请求参数:
let params = { ...this.queryInfo }
if (type) {
  params.pageNum = 1
  params.pageSize = this.total
}
params是请求参数对象,通常包含查询条件和分页信息。- 如果
type为true(导出全部),则将pageNum设置为1,将pageSize设置为总记录数,意味着请求所有数据。
- 发起导出请求:
const res = await this.$http.get(`members/export`, {
  params,
  responseType: 'blob',//指定格式
})
- 使用
this.$http.get发起 GET 请求,传递查询参数params。 responseType: 'blob'指定返回的数据类型为blob,即二进制文件数据。
- 处理文件下载:
const file = new Blob([res.data], {
  type: 'application/vnd.ms-excel',
})
const url = URL.createObjectURL(file)
const a = document.createElement('a')
a.href = url
a.download = 'member.xlsx'
a.click()
URL.revokeObjectURL(url)
- 使用
Blob将返回的二进制数据创建为一个文件对象。 URL.createObjectURL(file)创建一个指向Blob对象的临时 URL。- 创建一个隐藏的
<a>标签,通过设置href属性为刚创建的 URL,并设置download属性为member.xlsx,触发文件下载。 - 下载完成后,通过
URL.revokeObjectURL(url)释放临时 URL 以节省内存。
- 取消导出:
.catch(() => {
  this.$message({
    type: 'info',
    message: '已取消导出',
  })
})
- 如果用户点击“取消”,或者导出操作失败,则执行这个块,提示用户导出已取消。
总结
这段代码实现了一个文件导出功能,通过用户的选择导出全部会员数据或当前页的数据。它使用了 Vue.js 的 this.$confirm 方法来提示用户确认操作,并通过 axios 发起 HTTP 请求以获取文件数据,再使用 Blob 和动态创建的 <a> 标签完成文件下载。这种方法常用于处理从后端导出 Excel 文件或其他二进制文件的场景。
导入
<!-- 导入 -->
<el-upload :action="importUrl" :headers="importHearders" :show-file-list="false" accept=".xls, .xlsx"
  :before-upload="beforeUpload" :on-success="importSuccess" style="display: inline-block; margin-left: 10px">
  <el-button type="info" icon="el-icon-upload">导入</el-button>
</el-upload>
这段代码是一个使用 Element UI 构建的文件上传组件,主要用于上传 Excel 文件(.xls 或 .xlsx 格式)。以下是对各个部分的详细解释:
组件简介
<el-upload> 是 Element UI 提供的上传组件,能够处理文件的上传,并提供丰富的配置选项来定制上传行为。
详细解释
:action="importUrl"::action是el-upload组件的一个属性,用于指定文件上传的 URL。这里通过importUrl绑定了一个动态的上传接口地址。- 在实际开发中,
importUrl通常是一个包含服务器上传接口的变量,用户选择文件后,文件将被上传到这个 URL 对应的服务器端处理接口。
:headers="importHearders"::headers属性用于设置上传请求的 HTTP 头信息。- 这里
importHearders绑定了一个包含头信息的对象变量,可以用于设置如Authorization令牌等,用于身份验证或其他用途。
importHearders: {  //拿到存储在本地的token信息
        Authorization: JSON.parse(localStorage.getItem('userInfo')).token,
      },
:show-file-list="false"::show-file-list控制是否显示上传文件的列表。- 设为
false表示不显示文件上传列表,这样用户不会看到已经上传的文件名等信息。
accept=".xls, .xlsx":accept属性用于限制用户可以选择的文件类型。- 这里设置为
".xls, .xlsx",表示只能选择 Excel 文件,这样确保用户上传的文件格式是符合预期的。
:before-upload="beforeUpload":
beforeUpload(file) {
  // 这里可以进行文件验证,例如大小、类型等
  return true; // 或者返回一个 Promise
}
:before-upload是一个钩子函数,绑定到beforeUpload方法。- 这个函数会在文件上传之前执行,通常用于验证文件类型、大小等。通过返回
false可以阻止文件上传,返回Promise则可以控制异步验证逻辑。
:on-success="importSuccess":
importSuccess(response, file, fileList) {
  // 处理上传成功后的逻辑
}
:on-success是一个钩子函数,绑定到importSuccess方法。- 当文件上传成功后,这个方法会被调用,通常用于处理成功上传后的逻辑,例如通知用户上传成功或处理返回的数据。
<el-button>:- 这个按钮是上传组件的触发器,点击按钮将会打开文件选择框。
type="info"设置按钮的样式为info颜色,icon="el-icon-upload"设置按钮图标为上传图标,按钮的文本是“导入”。
style="display: inline-block; margin-left: 10px":- 内联样式,用于调整按钮的布局和外观。
display: inline-block使按钮与其他元素在同一行显示,margin-left: 10px给按钮左侧增加了 10 像素的间距。
- 内联样式,用于调整按钮的布局和外观。
总结
这段代码定义了一个用于导入 Excel 文件的上传按钮,使用了 Element UI 的 el-upload 组件。用户点击按钮后,可以选择一个 .xls 或 .xlsx 文件上传。上传过程可以通过 beforeUpload 方法进行前置检查,通过 importSuccess 方法处理上传成功后的响应。所有配置(如上传地址、请求头等)都可以通过绑定的 Vue.js 数据动态控制。
// 导入成功的回调
importSuccess(res) {
  // console.log(res)
  if (res.status != 200) {
    return this.$message.error('导入失败,请确认会员名唯一')
  }
  this.$message.success('导入成功')
  this.getMemberList()
},
// 导入前的钩子
beforeUpload(file) {
  const fileSuffix = file.name.substring(file.name.lastIndexOf('.') + 1)

  const whiteList = ['xls', 'xlsx']


  //校验导出的格式
  if (whiteList.indexOf(fileSuffix) === -1) {
    this.$message.error('上传文件只能是 xls、xlsx格式')
    return false
  }


  //校验文件的大小  不能大于10MB
  const isLt10M = file.size / 1024 / 1024 < 10

  if (!isLt10M) {
    this.$message.error('上传文件大小不能超过 10MB')
    return false
  }
},


