以微信 小程序开发工具给的示例代码为例:
主页代码:

index.wxml
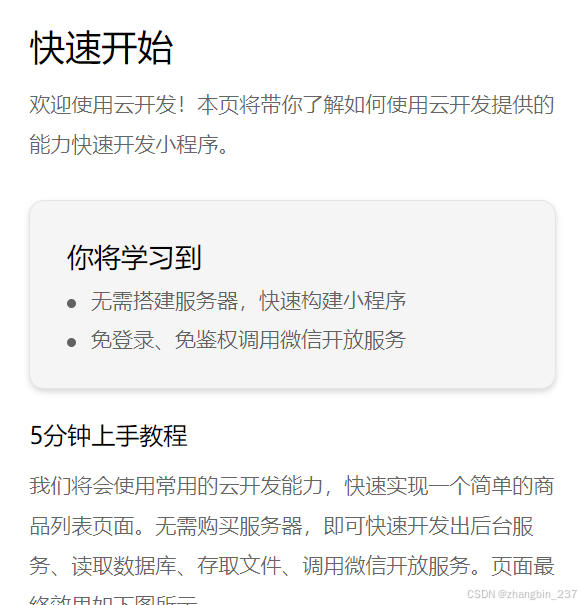
这个文件是一个微信小程序页面的 WXML 结构,主要功能是展示一个快速开始教程的步骤和内容。
源代码:
<!--index.wxml-->
<view class="container">
  <view class="main">
    <view class="title font_title_1">快速开始</view>
    <view class="sub_title">
      欢迎使用云开发!本页将带你了解如何使用云开发提供的能力快速开发小程序。
    </view>
    <view class="ability_container">
      <view class="ability_title">你将学习到</view>
      <view class="ability_item" wx:for="{{ knowledgePoints }}" wx:for-item="point" wx:key="id">
        {{ point.title }}
      </view>
    </view>

    <view class="title font_title_2">5分钟上手教程</view>
    <view class="sub_title">
      我们将会使用常用的云开发能力,快速实现一个简单的商品列表页面。无需购买服务器,即可快速开发出后台服务、读取数据库、存取文件、调用微信开放服务。页面最终效果如下图所示。
    </view>
    <view class="image_container">
      <image src="../../images/list-database.png" mode="widthFix" />
    </view>

    <view class="btn-view-demo-page with-margin" bind:tap="gotoGoodsListPage">查看页面</view>

    <view class="seperator" />
    <view class="step_container" wx:for="{{ steps }}" wx:key="id" wx:for-item="step">
      <view id="step_{{ step.id }}" data-step="{{ step.id }}" class="step_title">
        <view class="step_id_container">
          <view class="step_id_mark">NO.</view>
          <view class="step_id_content">0{{ step.id }}</view>
        </view>
        <view class="font_title_2">{{ step.title }}</view>
      </view>
      <view class="step_content">
        <block wx:for="{{ step.contents }}" wx:for-item="item" wx:key="index">
          <view wx:if="{{ item.type === 'text' }}" class="text_zone">
            <rich-text nodes="<p style='line-height: 26px;'>{{ item.content }}</p>" />
          </view>
          <view wx:if="{{ item.type === 'code' }}" class="code_zone">
            <image class="btn-copy" data-code="{{ item.content }}" bind:tap="copyCode" src="../../images/icons/copy.png" />
            <rich-text nodes="<pre style='overflow: scroll;'>{{ item.content }}</pre>" />
          </view>
          <view wx:if="{{ item.type === 'image' }}" class="image_zone">
            <image src="../../images/{{ item.content }}" mode="widthFix" />
          </view>
        </block>
      </view>
      <view wx:if="{{ step.showJumpButton }}" class="btn-view-demo-page" bind:tap="gotoGoodsListPage">查看页面</view>
      <view class="seperator" />
    </view>

    <view class="bottom-tip">
      至此,我们完成了一个带分享功能的小程序,利用了云开发的云函数、云数据库、云存储等能力,无需服务器即可快速完成较为复杂的功能。
    </view>
    <view  class="bottom-tip">此外,云开发还提供了云模板、云后台、云托管等更多高级能力,可点击下方按钮前往查看。</view>
    <view class="button" bind:tap="discoverCloud">探索云开发更多功能</view>
  </view>
</view>
1、<view class="container">创建一个容器视图,用于包裹整个页面内容。
2、<view class="main">:创建一个主要内容区域的视图。
3、<view class="title font_title_1">快速开始</view>一个只包含“快速开始”的视图

4、<view class="sub_title">
欢迎使用云开发!本页将带你了解如何使用云开发提供的能力快速开发小程序。
</view>
一个包含文本的视图

5、<view class="ability_container"> 创建一个容器视图,用于展示知识点列表。
6、<view class="ability_title">你将学习到</view> 创建一个容器视图,用于展示知识点列表。

7、<view class="ability_item" wx:for="{{ knowledgePoints }}" wx:for-item="point" wx:key="id"> 使用 wx:for 指令循环渲染知识点列表,每个知识点使用 ability_item 类样式。
8、{{ point.title }}标题类型
9、<view class="title font_title_2">5分钟上手教程</view> 创建一个容器视图,文本标题“5分钟上手教程”
10、<view class="sub_title">
我们将会使用常用的云开发能力,快速实现一个简单的商品列表页面。无需购买服务器,即可快速开发出后台服务、读取数据库、存取文件、调用微信开放服务。页面最终效果如下图所示。
</view>
文本容器视图,用于呈现文本
11、<view class="image_container">
<image src="../../images/list-database.png" mode="widthFix" />
</view>
容器视图,用于呈现图片
12、<view class="btn-view-demo-page with-margin" bind:tap="gotoGoodsListPage">查看页面</view>
容器视图,呈现按钮,链接到goodslist的page界面
13、<view class="step_container" wx:for="{{ steps }}" wx:key="id" wx:for-item="step"> 容器视图,使用 wx:for 指令循环渲染步骤列表、展示步骤标题。
14、<view id="step_{{ step.id }}" data-step="{{ step.id }}" class="step_title"> 容器视图,每个id对应不同步骤的区域
15、<view class="step_id_container">
<view class="step_id_mark">NO.</view>
<view class="step_id_content">0{{ step.id }}</view>
</view>
每个区域的标题部分
16、<view class="font_title_2">{{ step.title }}</view> 容器视图,对应每部分的标题:
17、
      <view class="step_content">
        <block wx:for="{{ step.contents }}" wx:for-item="item" wx:key="index">
          <view wx:if="{{ item.type === 'text' }}" class="text_zone">
            <rich-text nodes="<p style='line-height: 26px;'>{{ item.content }}</p>" />
          </view>
          <view wx:if="{{ item.type === 'code' }}" class="code_zone">
            <image class="btn-copy" data-code="{{ item.content }}" bind:tap="copyCode" src="../../images/icons/copy.png" />
            <rich-text nodes="<pre style='overflow: scroll;'>{{ item.content }}</pre>" />
          </view>
          <view wx:if="{{ item.type === 'image' }}" class="image_zone">
            <image src="../../images/{{ item.content }}" mode="widthFix" />
          </view>
        </block>
      </view>
不同部分的代码部分,用于展示不同步骤的内容
18、<view wx:if="{{ step.showJumpButton }}" class="btn-view-demo-page" bind:tap="gotoGoodsListPage">查看页面</view>
<view class="seperator" />
视图内容,按钮链接,对应最终的页面内容
19、<view class="bottom-tip">
至此,我们完成了一个带分享功能的小程序,利用了云开发的云函数、云数据库、云存储等能力,无需服务器即可快速完成较为复杂的功能。
</view>
<view class="bottom-tip">此外,云开发还提供了云模板、云后台、云托管等更多高级能力,可点击下方按钮前往查看。</view>
文本内容
20、<view class="button" bind:tap="discoverCloud">探索云开发更多功能</view> 链接对应其他页面
constants.js
/**
 * 快速开始教程知识点
 */
const QuickStartPoints = [
  { id: '1', title: '无需搭建服务器,快速构建小程序' },
  { id: '2', title: '免登录、免鉴权调用微信开放服务' },
];

function highlightText(content) {
  return `<span> \`${content}\` </span>`;
}

/**
 * 快速开始教程步骤
 */
const QuickStartSteps = [
  {
    id: '1',
    title: '创建列表页面并初始化数据',
    contents: [
      {
        type: 'text',
        content: `编辑教程内置的页面${highlightText('miniprogram/pages/goods-list/index.js')},在${highlightText('Page')}的${highlightText('data')}配置项中添加初始化数据${highlightText('goodsList')},代码如下所示。该页面将用于展示商品列表。`,
      },
      {
        type: 'code',
        content: `
Page({
  data: {
    goodsList: [{
      _id: '1',
      title: '商品1',
      price: 1,
    }],
  },
})
        `,
      },
      {
        type: 'text',
        content: '保存文件,查看页面,可以看到列表渲染出初始数据。',
      },
      {
        type: 'image',
        content: 'list-init.png',
      }
    ],
    showJumpButton: true,
  },
  {
    id: '2',
    title: '实现并部署一个后台接口',
    contents: [
      {
        type: 'text',
        content: `编辑教程内置的后台接口文件${highlightText('cloudfunctions/quickstartFunctions/fetchGoodsList/index.js')},使用下面代码覆盖文件内容,返回一些模拟的商品列表数据。`,
      },
      {
        type: 'code',
        content: `
const cloud = require('wx-server-sdk');
cloud.init({ env: cloud.DYNAMIC_CURRENT_ENV });
exports.main = async (event, context) => {
  return {
    dataList: [
      { _id: '1', title: '微信气泡徽章', price: 1800 },
      { _id: '2', title: '微信地球鼠标垫', price: 5800 },
      { _id: '3', title: '微信黄脸大贴纸', price: 500 }
    ],
  }
};
        `
      },
      {
        type: 'text',
        content: `保存文件后,在${highlightText('cloudfunctions/quickstartFunctions')}目录右键,选择【上传并部署-云端安装依赖】,等待进度完成,即完成后端接口的开发与部署。`,
      },
      {
        type: 'image',
        content: 'function_deploy.png',
      },
      {
        type: 'text',
        content: `注:新用户部署时会提示创建云开发环境。<span style="color: red;">新用户可免费开通云开发环境并试用。</span>`,
      },
      {
        type: 'image',
        content: 'create_env.png',
      },
      {
        type: 'text',
        content: `新用户开通环境后在${highlightText('cloudfunctions')}目录右键,选择当前环境为新建的环境。`,
      },
      {
        type: 'image',
        content: 'env-select.png',
      },
    ],
    showJumpButton: false,
  },
  {
    id: '3',
    title: '小程序端调用后台接口',
    contents: [
      {
        type: 'text',
        content: `编辑列表页${highlightText('miniprogram/pages/goods-list/index.js')},在 Page 下新增一个方法${highlightText('fetchGoodsList')},用于调用后端接口,并在 Page 的${highlightText('onLoad')}生命周期调用该方法:`,
      },
      {
        type: 'code',
        content: `
async fetchGoodsList() {
  this.setData({ isLoading: true });
  const res = await wx.cloud.callFunction({
    name: 'quickstartFunctions',
    data: { type: 'fetchGoodsList' },
  });
  const goodsList = res?.result?.dataList || [];
  this.setData({
    isLoading: false,
    goodsList
  });
},
        `
      },
      {
        type: 'code',
        content: `
onLoad() {
  this.fetchGoodsList();
},
        `,
      },
      {
        type: 'text',
        content: `保存文件后,查看列表页,可以看到调用后台接口获取到了模拟数据并正确显示。`,
      },
      {
        type: 'image',
        content: 'list-scf.png',
      }
    ],
    showJumpButton: true,
  },
  {
    id: '4',
    title: '从数据库中读取真实数据',
    contents: [
      {
        type: 'text',
        content: '前面步骤中,后台接口返回的是模拟数据,实际开发中,我们需要利用数据库实现持久存储,下面我们来通过云开发数据库能力实现这个效果。',
      },
      {
        type: 'text',
        content: `点击开发者工具顶部的【云开发】按钮,打开云开发控制台,选中【数据库】,新增一个商品集合命名${highlightText('goods')},并添加若干条记录。注:本示例中,集合中的记录请保证具有${highlightText('title')}和${highlightText('price')}字段。`,
      },
      {
        type: 'image',
        content: 'scf-enter.png',
      },
      {
        type: 'image',
        content: 'database_add.png',
      },
      {
        type: 'text',
        content: `编辑后台接口代码${highlightText('cloudfunctions/quickstartFunctions/fetchGoodsList/index.js')},用下面代码覆盖文件内容,用于读取数据库中数据:`,
      },
      {
        type: 'code',
        content: `
const cloud = require('wx-server-sdk');
cloud.init({ env: cloud.DYNAMIC_CURRENT_ENV });

const db = cloud.database();

exports.main = async (event, context) => {
  const result = await db.collection('goods')
    .skip(0)
    .limit(10)
    .get();
  return {
    dataList: result?.data,
  };
};
        `,
      },
      {
        type: 'text',
        content: `保存文件后,在${highlightText('cloudfunctions/quickstartFunctions')}目录右键,选择【上传并部署-云端安装依赖】,重新部署后台接口。`,
      },
      {
        type: 'text',
        content: '查看页面,可以看到正确获取数据库中的数据并显示在列表中。',
      },
      {
        type: 'image',
        content: 'list-database.png',
      }
    ],
    showJumpButton: true,
  },
  {
    id: '5',
    title: '调用开放接口生成小程序码',
    contents: [
      {
        type: 'text',
        content: '实际小程序开发中,我们通常会对小程序进行传播分享。下面我们利用免鉴权的云调用能力实现小程序码。',
      },
      {
        type: 'text',
        content: `编辑教程内置的接口文件${highlightText('cloudfunctions/quickstartFunctions/genMpQrcode/index.js')},用以下代码覆盖文件内容。该接口用于生成小程序码图片并上传到云存储保存。`,
      },
      {
        type: 'code',
        content: `
const cloud = require('wx-server-sdk');

cloud.init({ env: cloud.DYNAMIC_CURRENT_ENV });

exports.main = async (event, context) => {
  const pagePath = event.pagePath;
  // 获取小程序二维码的buffer
  const resp = await cloud.openapi.wxacode.get({
    path: pagePath,
  });
  const { buffer } = resp;
  // 将图片上传云存储空间
  const upload = await cloud.uploadFile({
    cloudPath: String(pagePath).replaceAll('/', '_') + '.png',
    fileContent: buffer
  });
  return upload.fileID;
};
        `,
      },
      {
        type: 'text',
        content: `保存文件后,在${highlightText('cloudfunctions/quickstartFunctions')}目录右键,选择【上传并部署-云端安装依赖】,部署该接口。`,
      },
      {
        type: 'text',
        content: `编辑商品列表页${highlightText('miniprogram/pages/goods-list/index.js')},在 Page 配置中新增一个方法${highlightText('generateMPCode')},用于调用接口获取小程序码:`,
      },
      {
        type: 'code',
        content: `
async generateMPCode() {
  wx.showLoading();
  const resp = await wx.cloud.callFunction({
    name: 'quickstartFunctions',
    data: {
      type: 'genMpQrcode',
      pagePath: 'pages/goods-list/index',
    }
  });
  this.setData({ codeModalVisible: true, codeImageSrc: resp?.result });
  wx.hideLoading();
},
        `
      },
      {
        type: 'text',
        content: `保存文件后,在商品列表页点击【分享】按钮,会调用${highlightText('generateMPCode')}方法获取小程序码并弹框显示。`,
      },
      {
        type: 'image',
        content: 'list-share.png',
      }
    ],
    showJumpButton: true,
  },
];

module.exports = {
  QuickStartPoints,
  QuickStartSteps,
}
这个文件定义了快速开始教程的知识点列表和步骤列表的数据结构,以及一个用于高亮显示文本的辅助函数。其他文件可以通过引入这个文件来获取这些数据,用于渲染页面内容。
1、const QuickStartPoints = [
{ id: '1', title: '无需搭建服务器,快速构建小程序' },
{ id: '2', title: '免登录、免鉴权调用微信开放服务' },
];
学习内容部分的文档,及对应的id、title
2、function highlightText(content) {
return `<span> \`${content}\` </span>`;
}
高亮文本的方法,供后续调用
3、
const QuickStartSteps = [
  {
    id: '1',
    title: '创建列表页面并初始化数据',
    contents: [
      {
        type: 'text',
        content: `编辑教程内置的页面${highlightText('miniprogram/pages/goods-list/index.js')},在${highlightText('Page')}的${highlightText('data')}配置项中添加初始化数据${highlightText('goodsList')},代码如下所示。该页面将用于展示商品列表。`,
      },
      {
        type: 'code',
        content: `
Page({
  data: {
    goodsList: [{
      _id: '1',
      title: '商品1',
      price: 1,
    }],
  },
})
        `,
      },
      {
        type: 'text',
        content: '保存文件,查看页面,可以看到列表渲染出初始数据。',
      },
      {
        type: 'image',
        content: 'list-init.png',
      }
    ],
    showJumpButton: true,
  },
  {
    id: '2',
    title: '实现并部署一个后台接口',
    contents: [
      {
        type: 'text',
        content: `编辑教程内置的后台接口文件${highlightText('cloudfunctions/quickstartFunctions/fetchGoodsList/index.js')},使用下面代码覆盖文件内容,返回一些模拟的商品列表数据。`,
      },
      {
        type: 'code',
        content: `
const cloud = require('wx-server-sdk');
cloud.init({ env: cloud.DYNAMIC_CURRENT_ENV });
exports.main = async (event, context) => {
  return {
    dataList: [
      { _id: '1', title: '微信气泡徽章', price: 1800 },
      { _id: '2', title: '微信地球鼠标垫', price: 5800 },
      { _id: '3', title: '微信黄脸大贴纸', price: 500 }
    ],
  }
};
        `
      },
      {
        type: 'text',
        content: `保存文件后,在${highlightText('cloudfunctions/quickstartFunctions')}目录右键,选择【上传并部署-云端安装依赖】,等待进度完成,即完成后端接口的开发与部署。`,
      },
      {
        type: 'image',
        content: 'function_deploy.png',
      },
      {
        type: 'text',
        content: `注:新用户部署时会提示创建云开发环境。<span style="color: red;">新用户可免费开通云开发环境并试用。</span>`,
      },
      {
        type: 'image',
        content: 'create_env.png',
      },
      {
        type: 'text',
        content: `新用户开通环境后在${highlightText('cloudfunctions')}目录右键,选择当前环境为新建的环境。`,
      },
      {
        type: 'image',
        content: 'env-select.png',
      },
    ],
    showJumpButton: false,
  },
  {
    id: '3',
    title: '小程序端调用后台接口',
    contents: [
      {
        type: 'text',
        content: `编辑列表页${highlightText('miniprogram/pages/goods-list/index.js')},在 Page 下新增一个方法${highlightText('fetchGoodsList')},用于调用后端接口,并在 Page 的${highlightText('onLoad')}生命周期调用该方法:`,
      },
      {
        type: 'code',
        content: `
async fetchGoodsList() {
  this.setData({ isLoading: true });
  const res = await wx.cloud.callFunction({
    name: 'quickstartFunctions',
    data: { type: 'fetchGoodsList' },
  });
  const goodsList = res?.result?.dataList || [];
  this.setData({
    isLoading: false,
    goodsList
  });
},
        `
      },
      {
        type: 'code',
        content: `
onLoad() {
  this.fetchGoodsList();
},
        `,
      },
      {
        type: 'text',
        content: `保存文件后,查看列表页,可以看到调用后台接口获取到了模拟数据并正确显示。`,
      },
      {
        type: 'image',
        content: 'list-scf.png',
      }
    ],
    showJumpButton: true,
  },
  {
    id: '4',
    title: '从数据库中读取真实数据',
    contents: [
      {
        type: 'text',
        content: '前面步骤中,后台接口返回的是模拟数据,实际开发中,我们需要利用数据库实现持久存储,下面我们来通过云开发数据库能力实现这个效果。',
      },
      {
        type: 'text',
        content: `点击开发者工具顶部的【云开发】按钮,打开云开发控制台,选中【数据库】,新增一个商品集合命名${highlightText('goods')},并添加若干条记录。注:本示例中,集合中的记录请保证具有${highlightText('title')}和${highlightText('price')}字段。`,
      },
      {
        type: 'image',
        content: 'scf-enter.png',
      },
      {
        type: 'image',
        content: 'database_add.png',
      },
      {
        type: 'text',
        content: `编辑后台接口代码${highlightText('cloudfunctions/quickstartFunctions/fetchGoodsList/index.js')},用下面代码覆盖文件内容,用于读取数据库中数据:`,
      },
      {
        type: 'code',
        content: `
const cloud = require('wx-server-sdk');
cloud.init({ env: cloud.DYNAMIC_CURRENT_ENV });

const db = cloud.database();

exports.main = async (event, context) => {
  const result = await db.collection('goods')
    .skip(0)
    .limit(10)
    .get();
  return {
    dataList: result?.data,
  };
};
        `,
      },
      {
        type: 'text',
        content: `保存文件后,在${highlightText('cloudfunctions/quickstartFunctions')}目录右键,选择【上传并部署-云端安装依赖】,重新部署后台接口。`,
      },
      {
        type: 'text',
        content: '查看页面,可以看到正确获取数据库中的数据并显示在列表中。',
      },
      {
        type: 'image',
        content: 'list-database.png',
      }
    ],
    showJumpButton: true,
  },
  {
    id: '5',
    title: '调用开放接口生成小程序码',
    contents: [
      {
        type: 'text',
        content: '实际小程序开发中,我们通常会对小程序进行传播分享。下面我们利用免鉴权的云调用能力实现小程序码。',
      },
      {
        type: 'text',
        content: `编辑教程内置的接口文件${highlightText('cloudfunctions/quickstartFunctions/genMpQrcode/index.js')},用以下代码覆盖文件内容。该接口用于生成小程序码图片并上传到云存储保存。`,
      },
      {
        type: 'code',
        content: `
const cloud = require('wx-server-sdk');

cloud.init({ env: cloud.DYNAMIC_CURRENT_ENV });

exports.main = async (event, context) => {
  const pagePath = event.pagePath;
  // 获取小程序二维码的buffer
  const resp = await cloud.openapi.wxacode.get({
    path: pagePath,
  });
  const { buffer } = resp;
  // 将图片上传云存储空间
  const upload = await cloud.uploadFile({
    cloudPath: String(pagePath).replaceAll('/', '_') + '.png',
    fileContent: buffer
  });
  return upload.fileID;
};
        `,
      },
      {
        type: 'text',
        content: `保存文件后,在${highlightText('cloudfunctions/quickstartFunctions')}目录右键,选择【上传并部署-云端安装依赖】,部署该接口。`,
      },
      {
        type: 'text',
        content: `编辑商品列表页${highlightText('miniprogram/pages/goods-list/index.js')},在 Page 配置中新增一个方法${highlightText('generateMPCode')},用于调用接口获取小程序码:`,
      },
      {
        type: 'code',
        content: `
async generateMPCode() {
  wx.showLoading();
  const resp = await wx.cloud.callFunction({
    name: 'quickstartFunctions',
    data: {
      type: 'genMpQrcode',
      pagePath: 'pages/goods-list/index',
    }
  });
  this.setData({ codeModalVisible: true, codeImageSrc: resp?.result });
  wx.hideLoading();
},
        `
      },
      {
        type: 'text',
        content: `保存文件后,在商品列表页点击【分享】按钮,会调用${highlightText('generateMPCode')}方法获取小程序码并弹框显示。`,
      },
      {
        type: 'image',
        content: 'list-share.png',
      }
    ],
    showJumpButton: true,
  },
];
文本、代码、id等内容,是在index.wxml中各步骤的内容,可以调用。
3、module.exports = {
QuickStartPoints,
QuickStartSteps,
}
导出 QuickStartPoints 和 QuickStartSteps 两个常量,供其他文件引用。
index.js
这个文件主要定义了页面的初始数据、事件处理函数和页面跳转函数,用于实现快速开始教程的交互逻辑。
const { envList } = require("../../envList");
const { QuickStartPoints, QuickStartSteps } = require("./constants");

Page({
  data: {
    knowledgePoints: QuickStartPoints,
    steps: QuickStartSteps,
  },

  copyCode(e) {
    const code = e.target?.dataset?.code || '';
    wx.setClipboardData({
      data: code,
      success: () => {
        wx.showToast({
          title: '已复制',
        })
      },
      fail: (err) => {
        console.error('复制失败-----', err);
      }
    })
  },

  discoverCloud() {
    wx.switchTab({
      url: '/pages/examples/index',
    })
  },

  gotoGoodsListPage() {
    wx.navigateTo({
      url: '/pages/goods-list/index',
    })
  },
});
1、const { envList } = require("../../envList"); 引入环境配置文件,用于获取当前环境的相关信息。
2、const { QuickStartPoints, QuickStartSteps } = require("./constants"); 引入常量文件,用于获取快速开始教程的知识点和步骤数据。
3、data: {
knowledgePoints: QuickStartPoints,
steps: QuickStartSteps,
}, 初始化页面的数据,包括知识点列表和步骤列表
4、copyCode(e) {...}: 定义一个事件处理函数,用于复制代码到剪贴板。
5、const code = e.target?.dataset?.code || ''; 从事件对象中获取要复制的代码内容
6、wx.setClipboardData({。。。}) 调用微信小程序API,将代码复制到剪贴板
7、success: () => {
wx.showToast({
title: '已复制',
})
},
fail: (err) => {
console.error('复制失败-----', err);
}
如果复制成功,展示提示框;如果复制失败,打印错误日志。
8、discoverCloud() {
wx.switchTab({
url: '/pages/examples/index',
})
},
定义一个函数,用于跳转到实例页面,函数内调用微信小程序API,切换到指定的标签页面
9、gotoGoodsListPage() {
wx.navigateTo({
url: '/pages/goods-list/index',
})
},
定义一个函数,用于跳转到实例页面,函数内调用微信小程序API,导航到指定的标签页面
index.wxss
这个文件定义了页面的布局、字体、颜色等,与wxml结构文件和JavaScript逻辑文件配合,构成一个完整的微信小程序页面
/**index.wxss**/

page {
  /* padding-top: 54rpx; */
  padding-bottom: 60rpx;
  background-color: #fff;
}

.container {
  width: 100%;
  height: 100%;
  align-items: center;
}

.main {
  width: 90%;
  display: flex;
  flex-direction: column;
  font-family: PingFang SC;
}

.image_container {
  margin-top: 48rpx;
  display: flex;
  justify-content: center;
}

.title {
  margin-bottom: 20rpx;
  margin-top: 40rpx;
}

.sub_title {
  font-size: 28rpx;
  color: rgba(0, 0, 0, 0.6);
  line-height: 52rpx;
}

/* 一级标题字体 */
.font_title_1 {
  font-weight: 500;
  color: #000;
  font-size: 48rpx;
}

/* 二级标题字体 */
.font_title_2 {
  color: #000;
  font-size: 32rpx;
  font-weight: 500;
  font-family: "PingFang SC";
}

/* 内容字体 */
.font_content {
  font-size: 32rpx;
  color: rgba(0, 0, 0, 0.6);
  line-height: 52rpx;
}

.seperator {
  border-top: 2rpx solid #dcdcdc;
  margin-top: 60rpx;
  margin-bottom: 60rpx;
}

.ability_container {
  border: 2rpx solid #e5e5e5;
  padding: 48rpx;
  box-sizing: border-box;
  border-radius: 20rpx;
  background-color: #f5f5f5;
  display: flex;
  flex-direction: column;
  gap: 16rpx;
  box-shadow: 0 2px 4px rgba(0, 0, 0, 0.15);
  margin-top: 48rpx;
}

.ability_title {
  font-size: 36rpx;
  font-weight: 500;
  color: #000;
}

.ability_item {
  color: rgba(0, 0, 0, 0.6);
  font-size: 28rpx;
}

.ability_item::before {
  content: "";
  display: inline-block;
  width: 12rpx;
  height: 12rpx;
  border-radius: 50%;
  background-color: rgba(0, 0, 0, 0.6);
  margin-right: 12rpx;
}

.step_container {
  box-sizing: border-box;
  border-radius: 10rpx;
  display: flex;
  flex-direction: column;
}

.step_title,
.step_content {
  padding: 8rpx;
  background-color: #fff;
}

.step_title {
  display: flex;
  align-items: center;
  gap: 16rpx;
}

.step_id_container {
  display: flex;
  font-size: 28rpx;
  align-items: center;
  height: 36rpx;
  line-height: 36rpx;
  font-weight: 400;
}

.step_id_mark {
  background-color: rgba(0, 0, 0, 0.5);
  border-radius: 2px 0px 0px 2px;
  color: #fff;
  height: 40rpx;
  line-height: 40rpx;
  width: 70rpx;
  text-align: center;
}

.step_id_content {
  width: 50rpx;
  text-align: center;
  background-color: #fff;
  color: rgba(0, 0, 0, 0.5);
  border: 1px solid rgba(0, 0, 0, 0.5);
  border-left: none;
  box-sizing: border-box;
  border-radius: 0px 2px 2px 0px;
}

.step_content {
  background-color: #fff;
  color: #666;
  font-size: 28rpx;
  word-break: break-all;
}

.text_zone {
  margin-top: 20rpx;
  margin-bottom: 48rpx;
  color: rgba(0, 0, 0, 0.6);
}

.code_zone {
  background-color: #0E190E;
  color: rgba(255, 255, 255, 0.7);
  border-radius: 12rpx;
  padding: 0rpx 32rpx;
  box-shadow: 0 6px 8px rgba(0, 0, 0, 0.15);
  position: relative;
  margin-bottom: 48rpx;
}

.image_zone {
  display: flex;
  justify-content: center;
  margin-bottom: 48rpx;
}

.btn-copy {
  border-radius: 12rpx;
  height: 40rpx;
  width: 40rpx;
  position: absolute;
  right: 20rpx;
  bottom: 20rpx;
}

.bottom-tip {
  margin-top: 10rpx;
  color: rgba(0, 0, 0, 0.9);
  font-size: 28rpx;
  line-height: 52rpx;
}

.button {
  width: 70%;
  text-align: center;
  margin: 40rpx auto 0 auto;
  color: white;
  border-radius: 5px;
  height: 80rpx;
  line-height: 80rpx;
  background-color: #07c160;
}

.btn-view-demo-page {
  width: 100%;
  text-align: center;
  color: white;
  border-radius: 5px;
  font-size: 26rpx;
  padding: 16rpx 0rpx;
  box-sizing: border-box;
  border: 1px solid #07c160;
  color: #07c160;
  font-size: 32rpx;
}

.with-margin {
  margin-top: 48rpx;
}
1、/**index.wxss**/ 这是一个CSS注释,标识该文件是index的样式文件
2、page {
/* padding-top: 54rpx; */
padding-bottom: 60rpx;
background-color: #fff;
}
选择器,定义了整个页面的样式,页面底部内边距为60rpx,北京颜色为白色。
3、.container {
width: 100%;
height: 100%;
align-items: center;
}
选择器,定义了页面容器的样式,宽度和高度占满了整个页面,且子元素在容器内水平居中位置。
4、.main {
width: 90%;
display: flex;
flex-direction: column;
font-family: PingFang SC;
}
选择器,定义了主要内容区域的样式,宽度占90%,flex布局,子元素垂直排列,字体为PingFang SC
5、.image_container {
margin-top: 48rpx;
display: flex;
justify-content: center;
}
选择器,定义了图片区域的样式,头部内边距为60rpx,flex布局,居中。


![NSSCTF联系记录:[SWPUCTF 2021 新生赛]crypto7](https://i-blog.csdnimg.cn/direct/809514a5596f487aabf571fa9ce0b1db.png)

![[C语言]-基础知识点梳理-文件管理](https://i-blog.csdnimg.cn/direct/fc4697f8861348ac8820fbf6d9cb10b0.png)