目录
1 kickstart图形化生成脚本工具
1.1 安装apache
1.2 创建挂载镜像软链接
1.3 图形生成自动化脚本选项
1.4 修改生成的自动化脚本
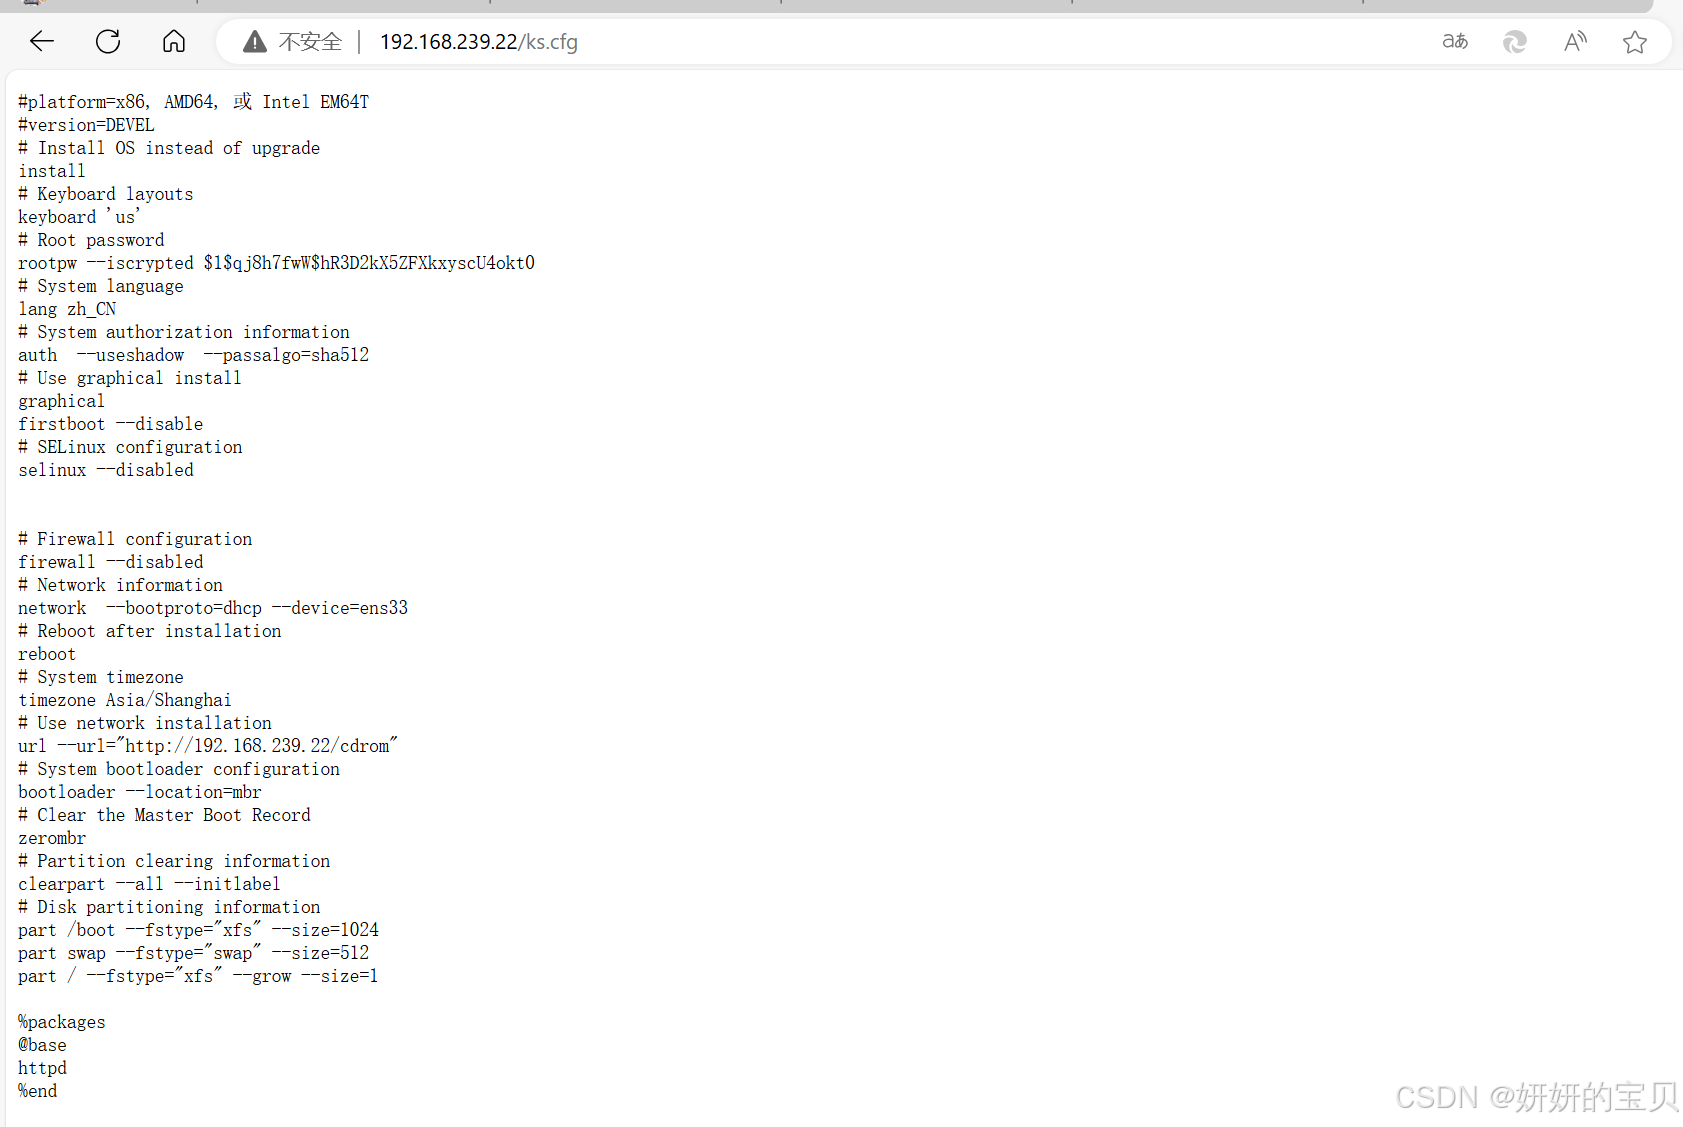
1.5 将脚本放至网站根目录
2 安装系统
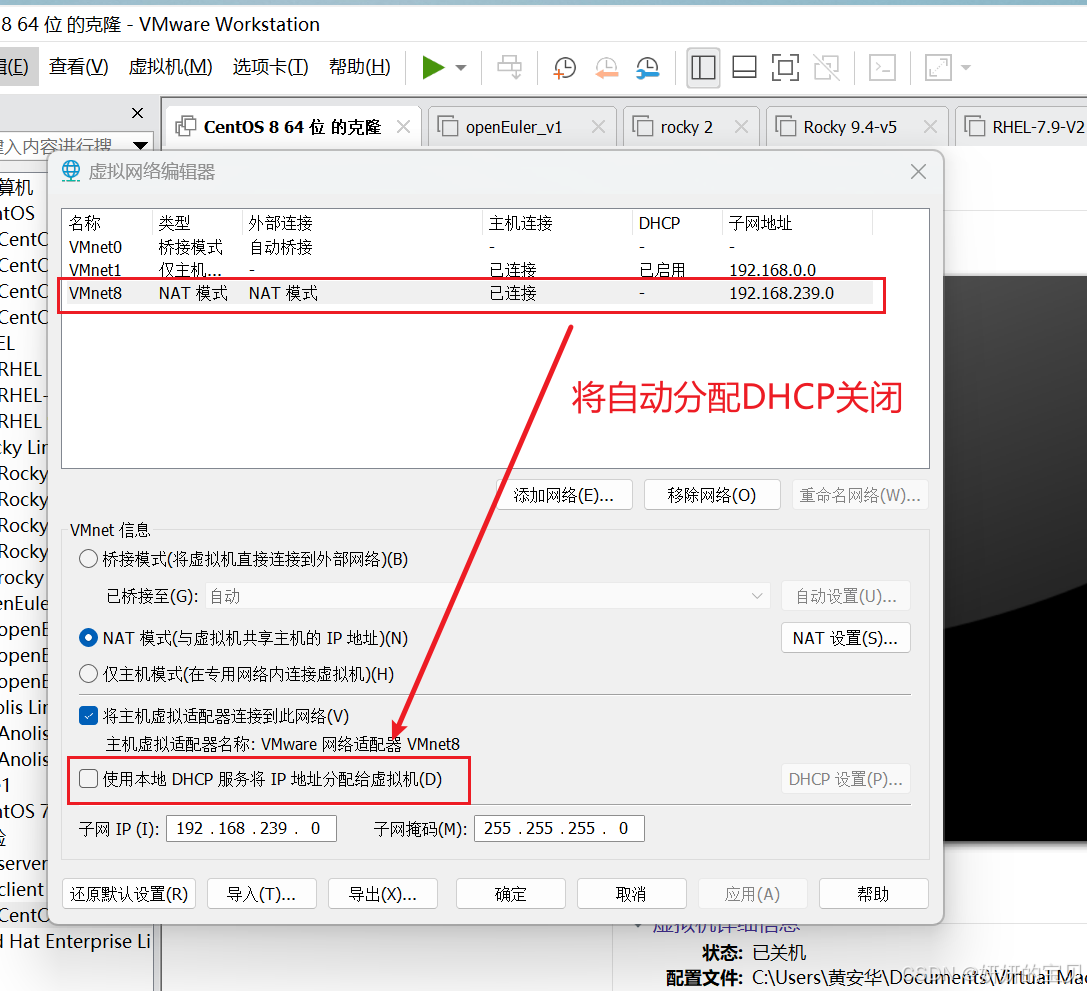
2.1 关闭DHCP自动分配
2.2 下载配置DHCP服务
2.3 重启DHCP服务
2.4 使用pxe方法安装系统(网卡安装)
2.5 安装syslinux
2.5.1 查看帮助文档
2.5.2 以下为翻译
2.5.3 安装tftp服务
2.5.4 pxelinux.0 文件的作用
2.5.5 pxe 过程原理
3 网络安装系统
3.1 删除光驱
3.2 进入BIOS
3.2.1 修改网卡安装优先级
3.3 安装完成再次进入BIOS
3.3.1 修改网卡安装优先级
3.4 验证是否安装成功
1 kickstart图形化生成脚本工具
在 rhel7 系统中提供图形的 kickstart 制作方式在 rhel8 中已经把图形的工具取消 , 并添加到 rhn 网络中在 rhel8 中如果无法通过 rhn 网络制作 kickstart , 可以使用模板生成在已经装好的 rhel8 中 , / root / anaconda - ks.cfg 就是安装当前系统时回答的所有问题的答案生成的 kickstart , 此文件为 kickstart 模板
# 下载图形化生成脚本工具

[root@www ~]# yum install system-config-kickstart


# 打开图形化工具--注意:需在图形化管理界面才能打开

[root@www ~]# system-config-kickstart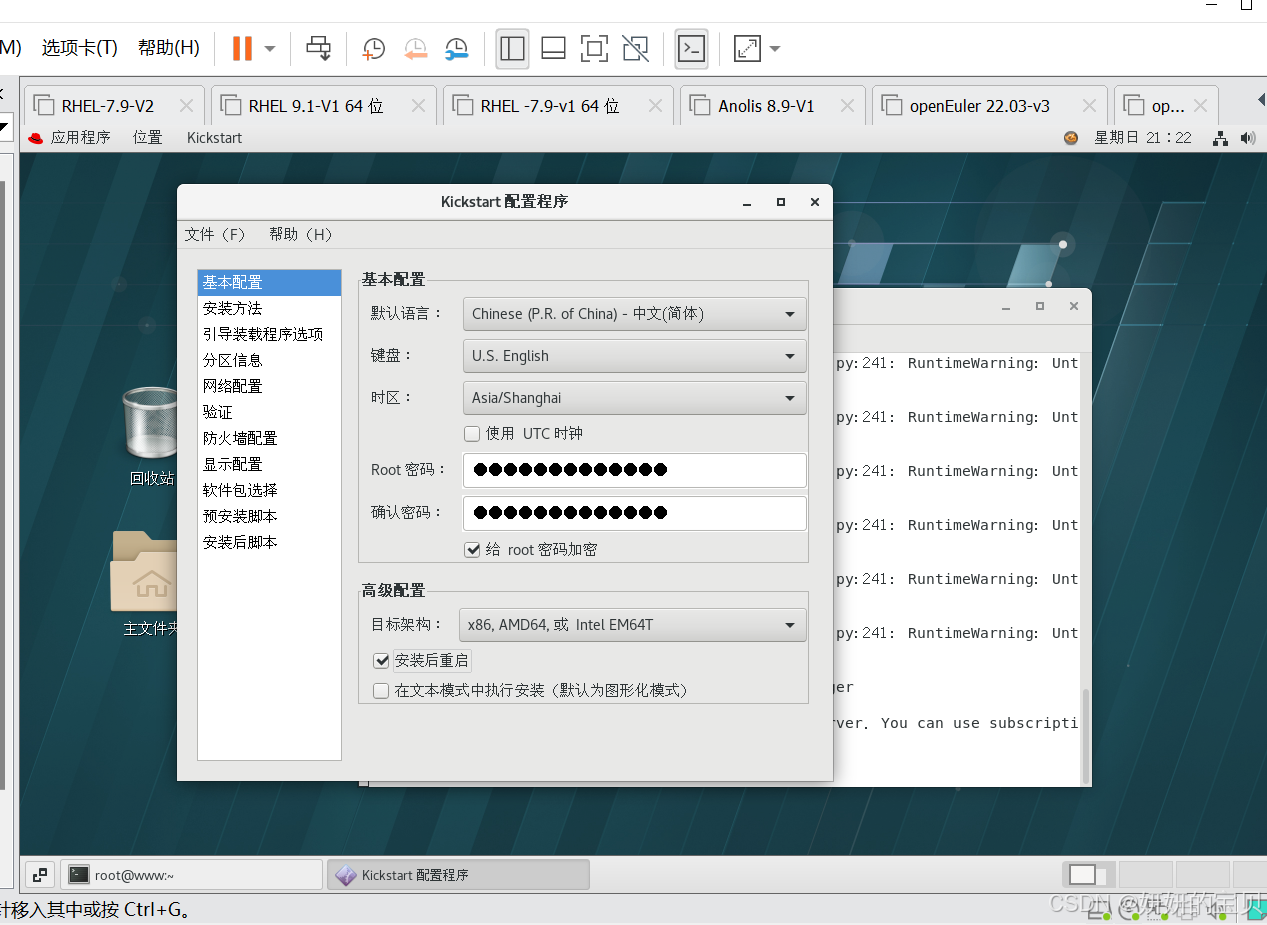
1.1 安装apache
# 下面开始安装apache服务器并配置

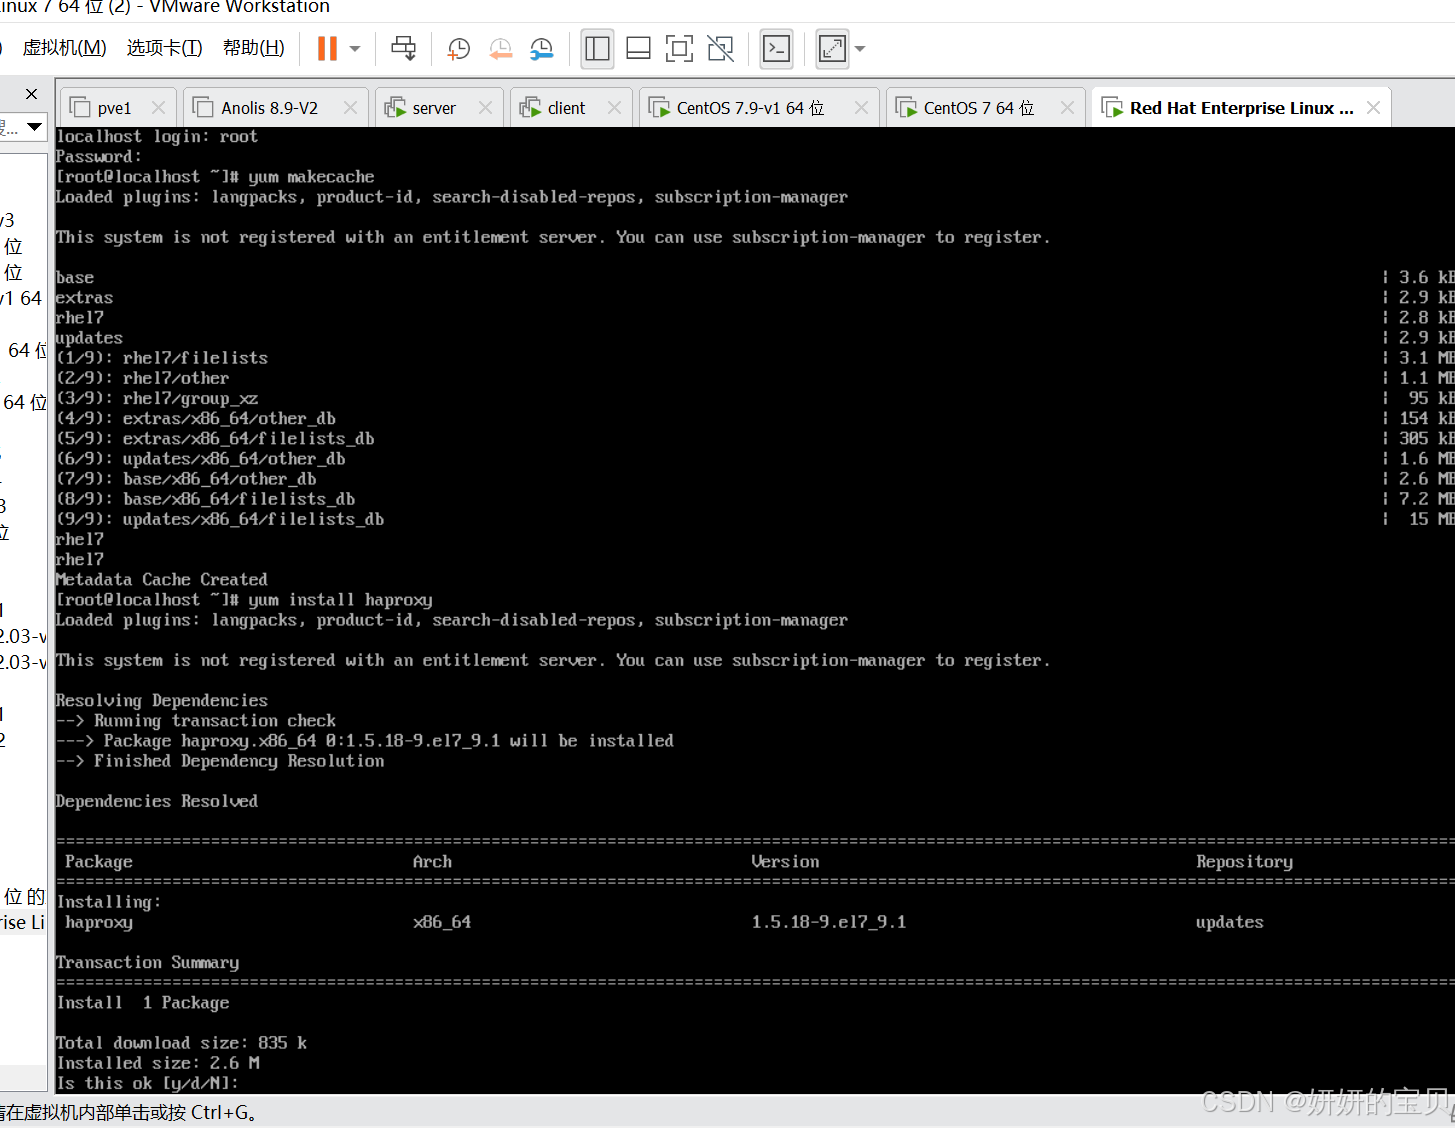
[root@www ~]# yum install httpd

[root@www ~]# systemctl enable --now httpd

# 查看服务是否运行

[root@www ~]# systemctl status httpd.service 
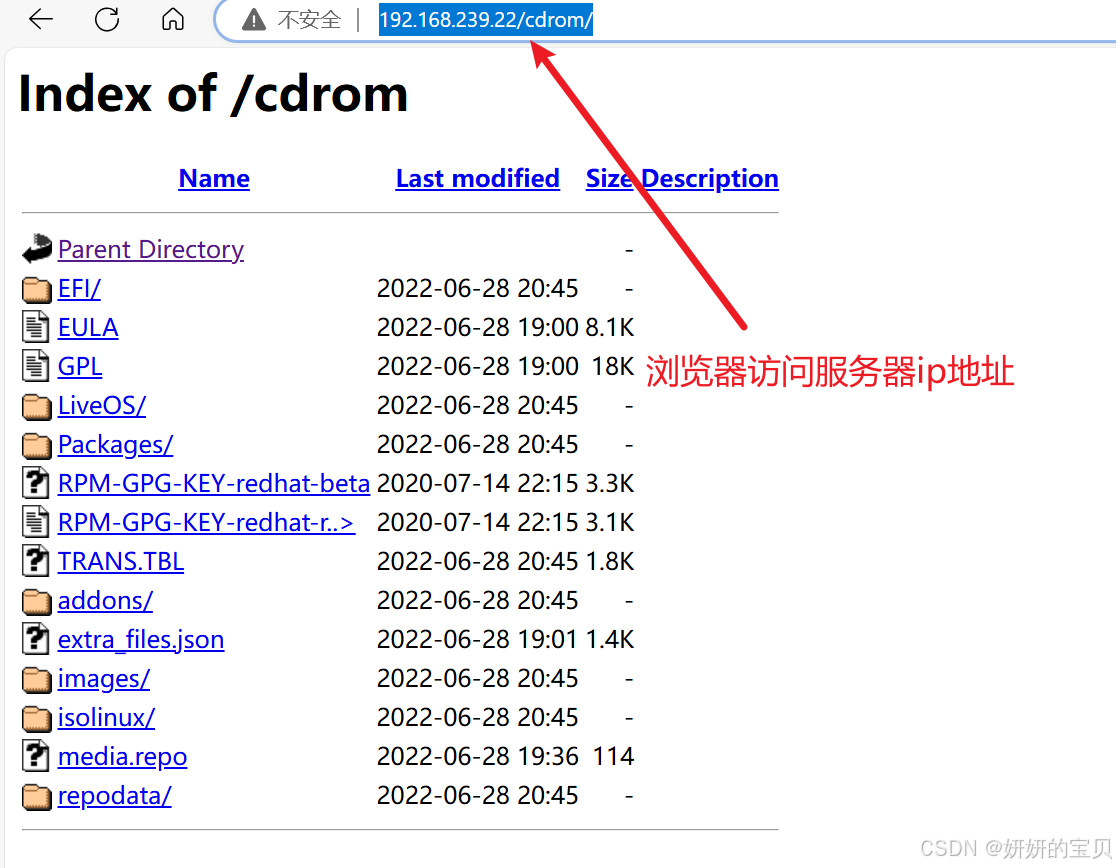
1.2 创建挂载镜像软链接
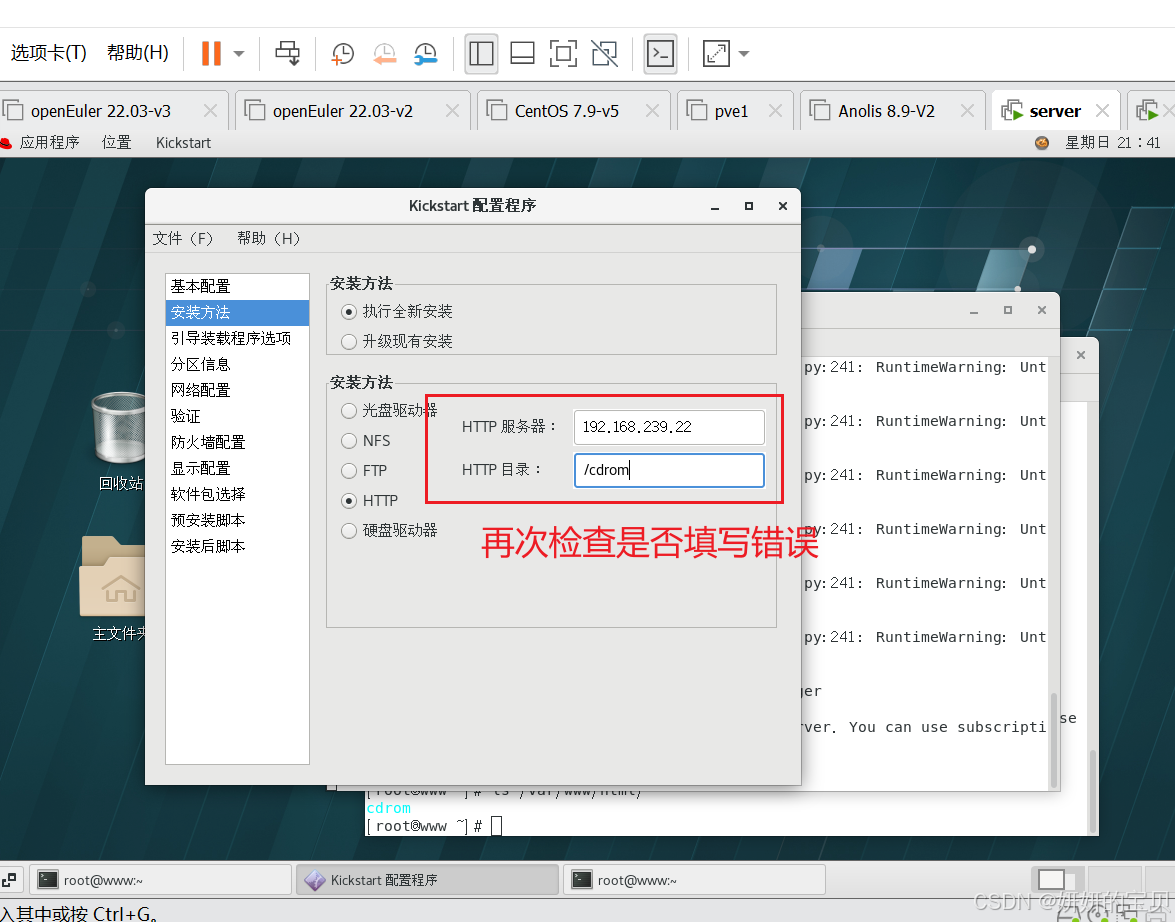
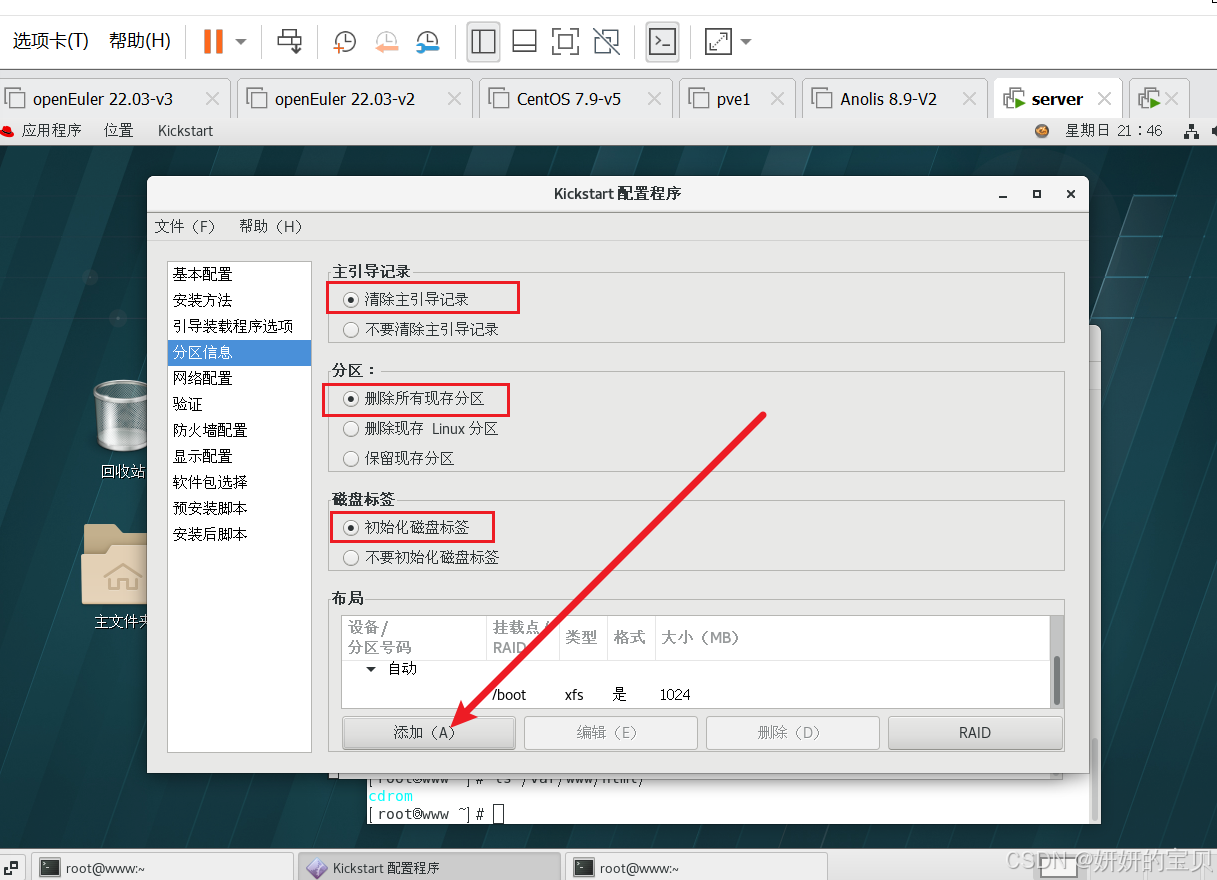
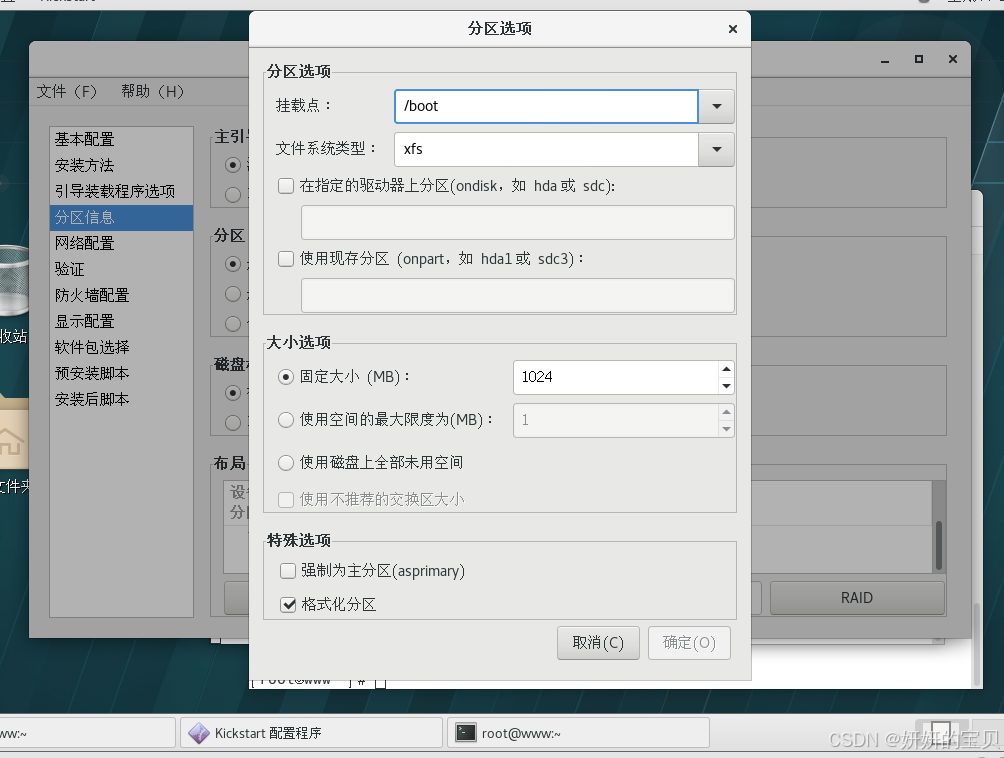
1.3 图形生成自动化脚本选项
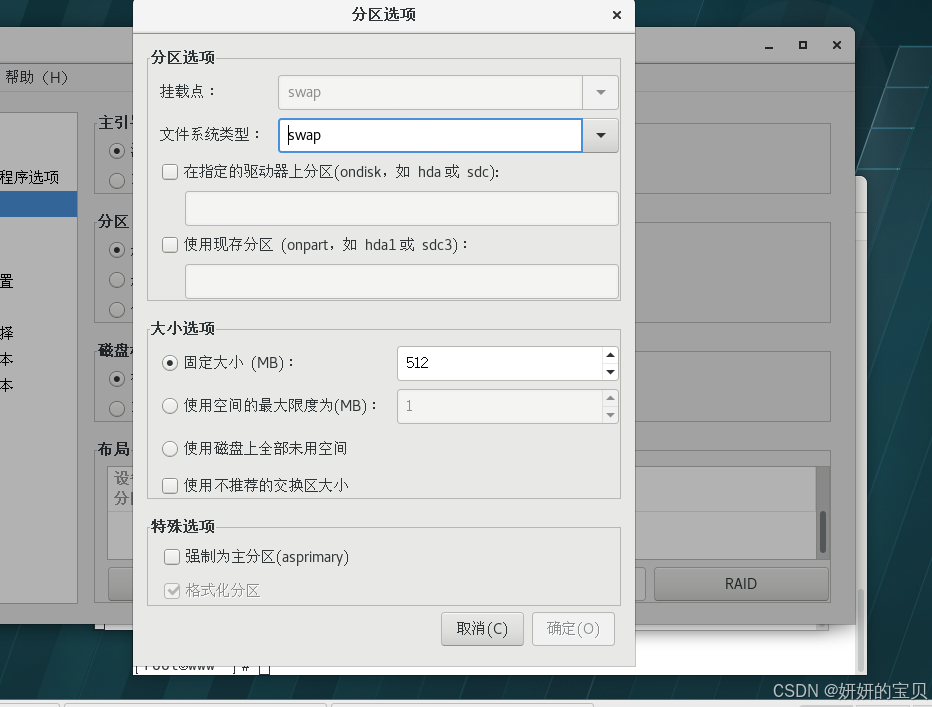
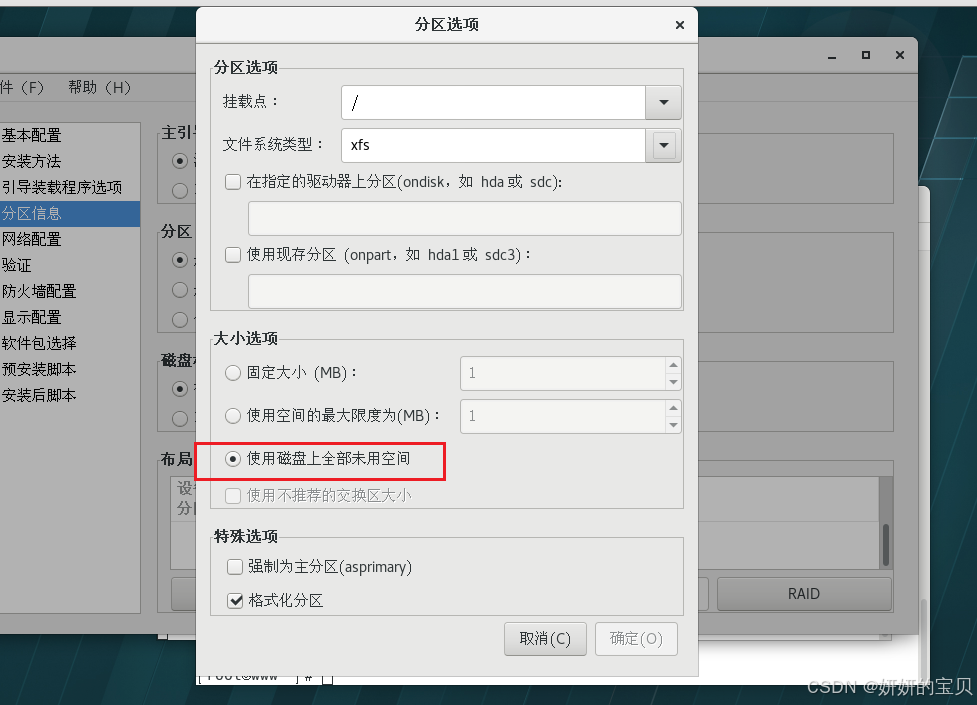
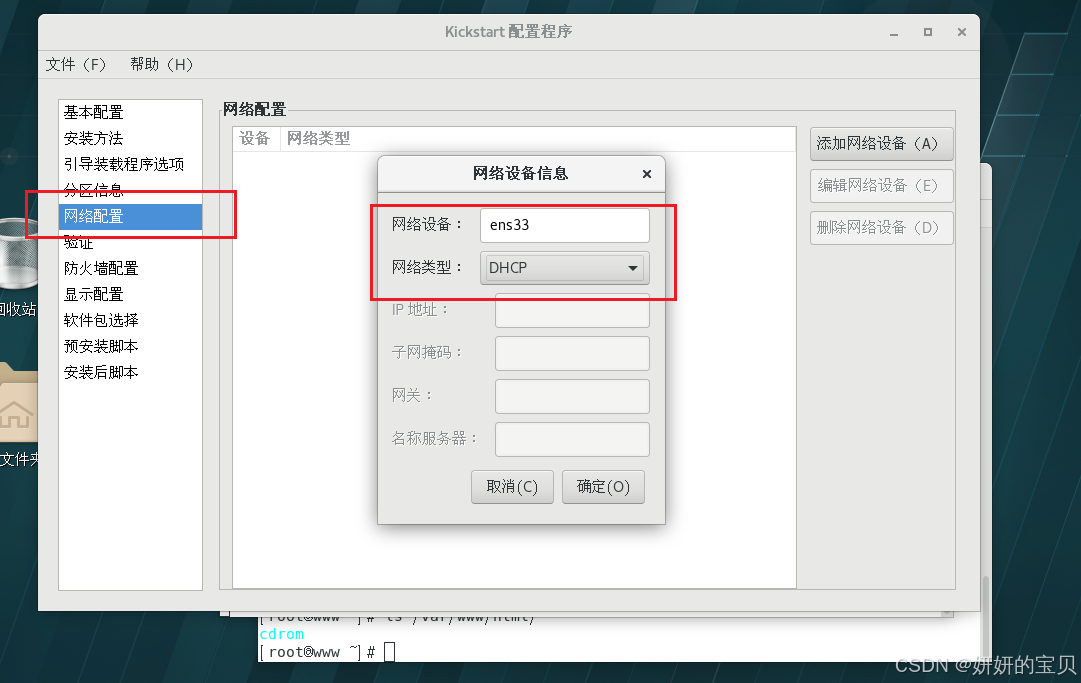
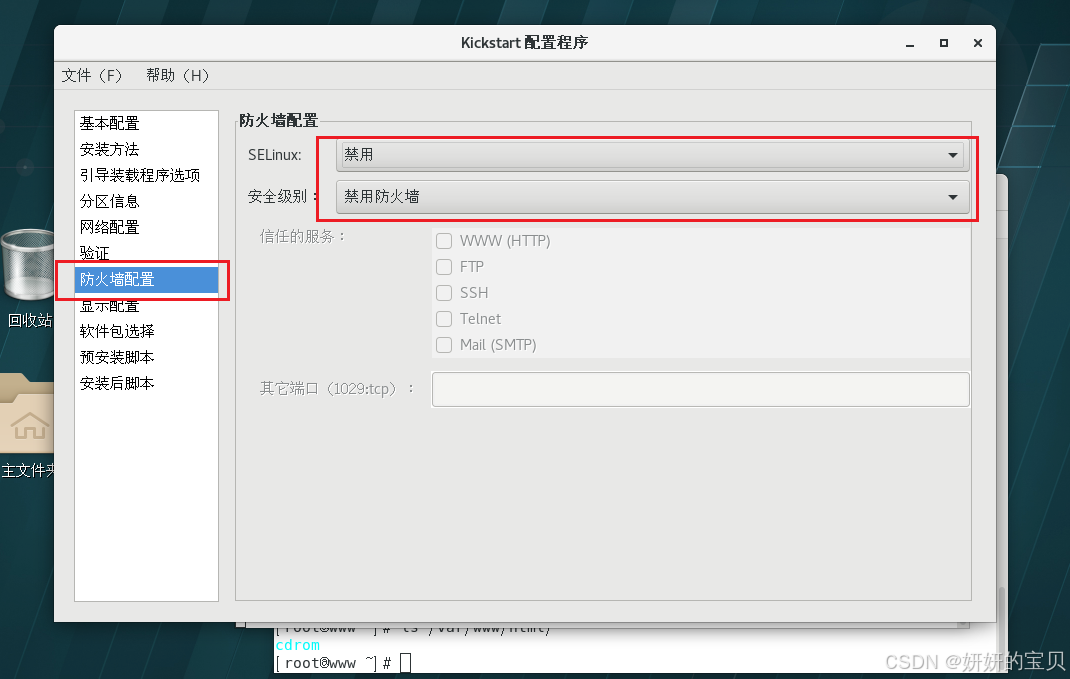
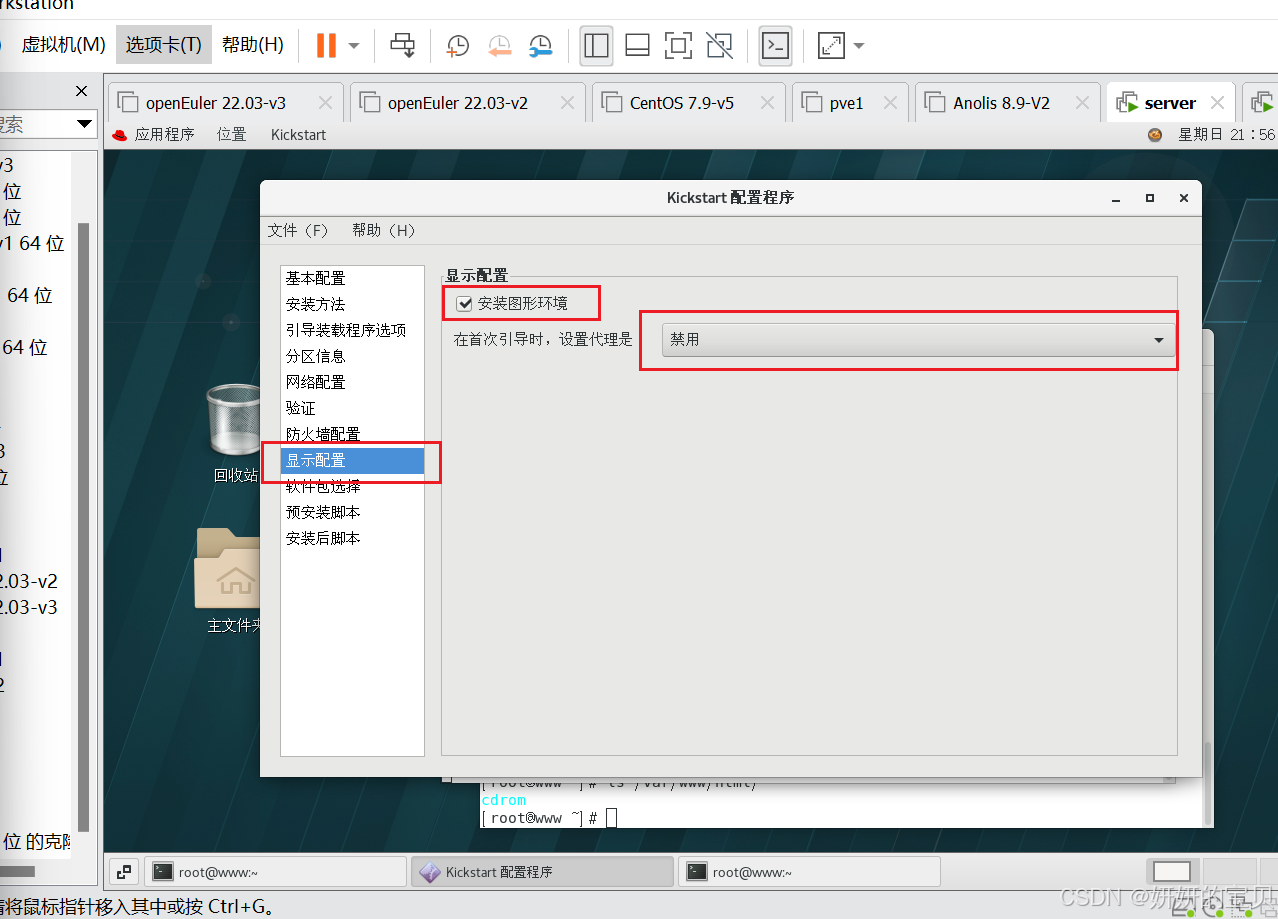
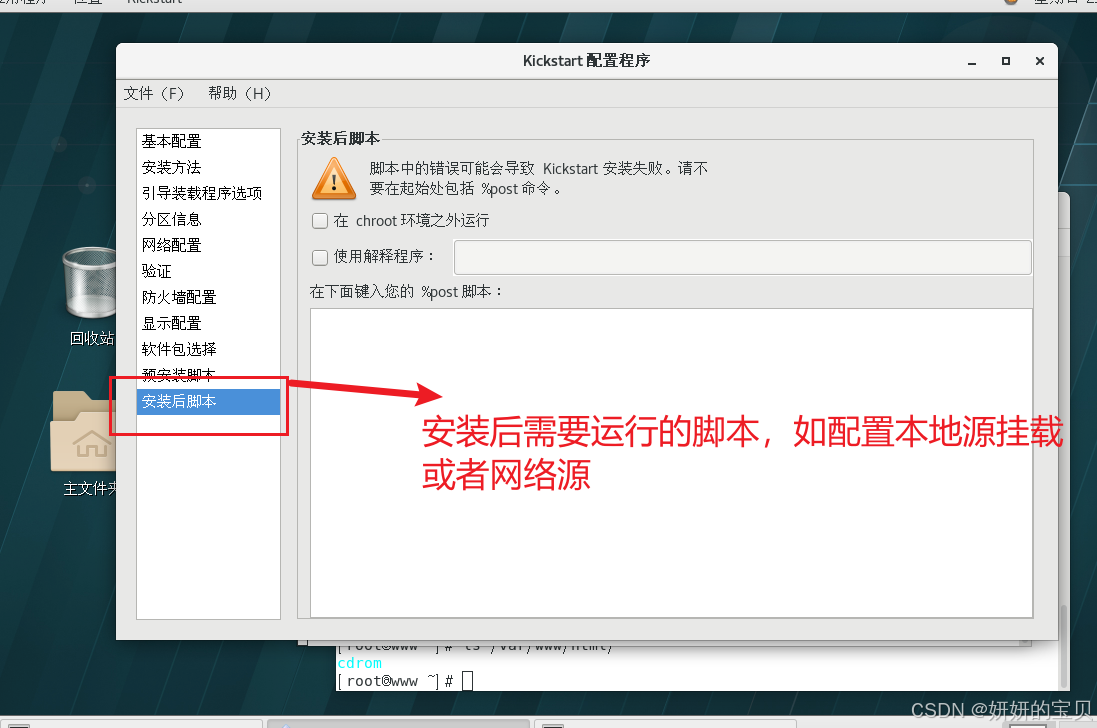
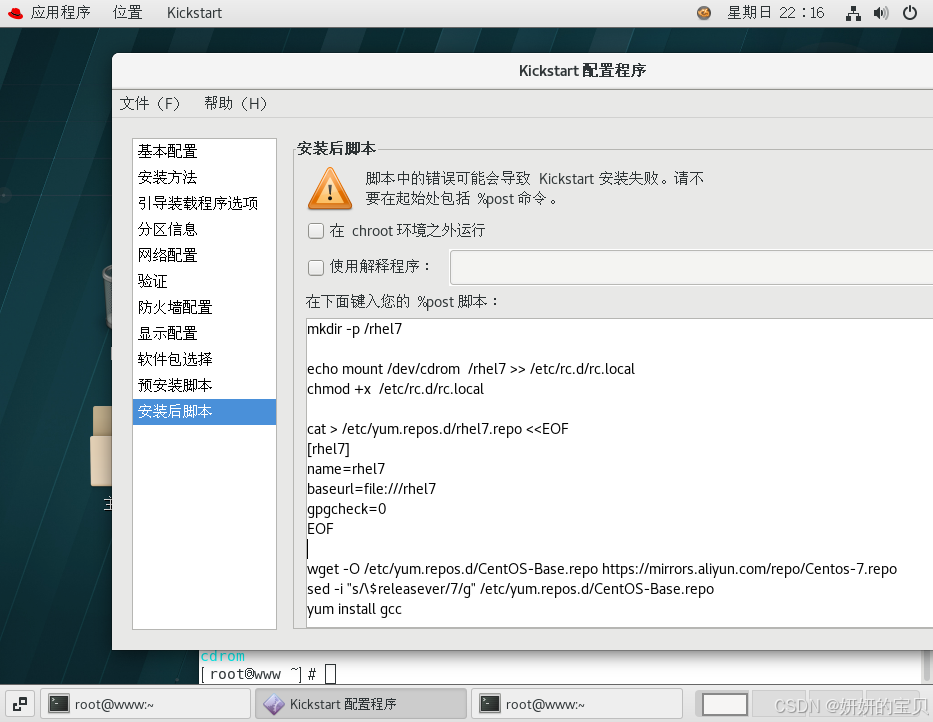
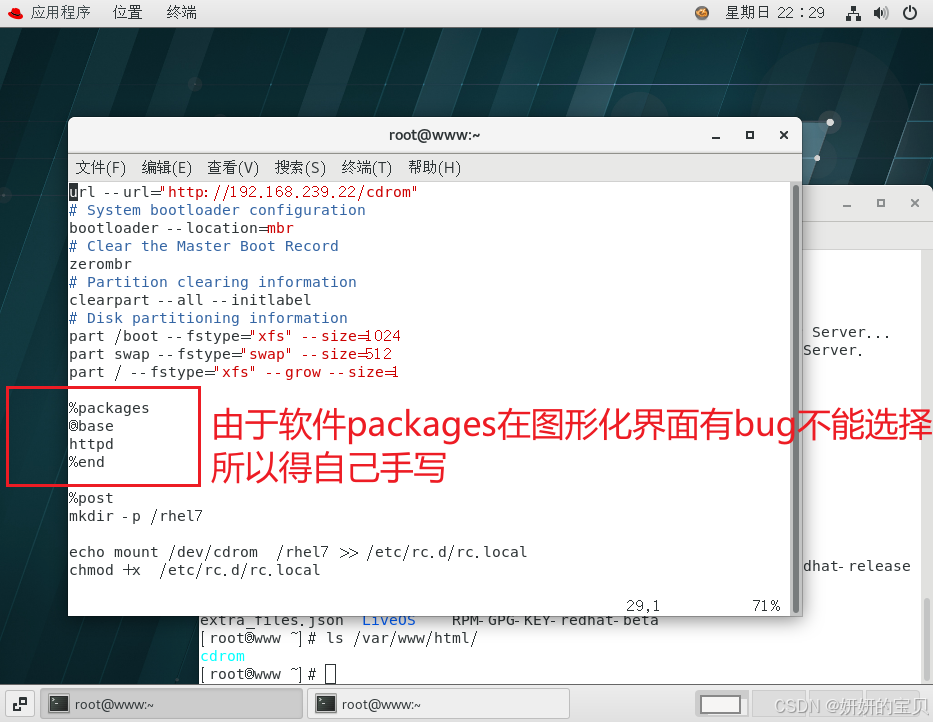
1.4 修改生成的自动化脚本
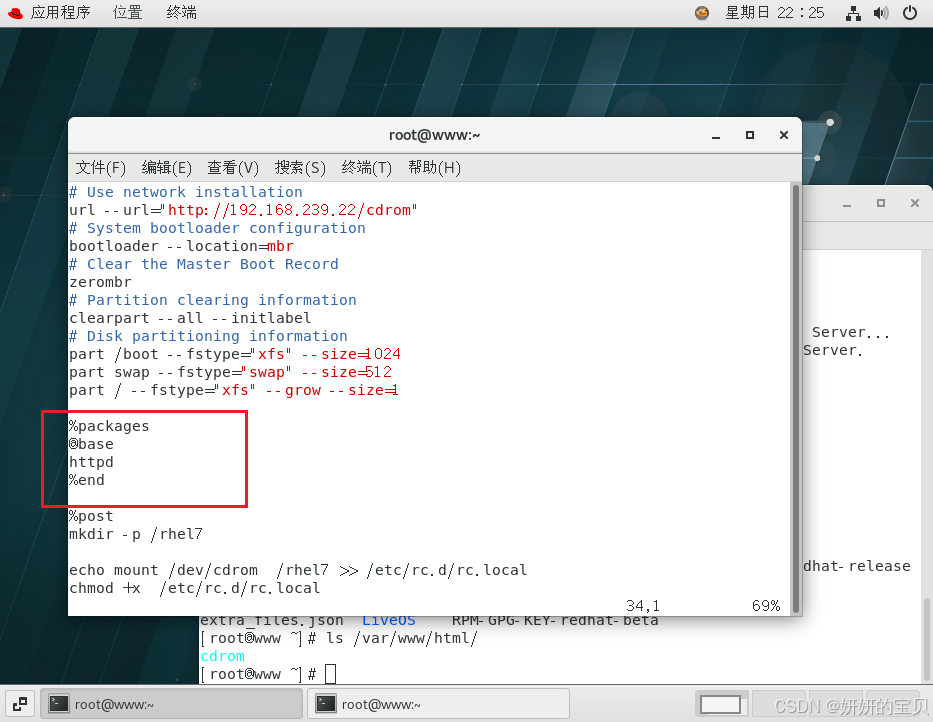
1.5 将脚本放至网站根目录
2 安装系统
2.1 关闭DHCP自动分配
2.2 下载配置DHCP服务
# 服务端配置dhcp服务

[root@www ~]# yum install dhcp

# 查看dhcp 服务的配置文件
[root@www ~]# rpm -qc dhcp
/etc/dhcp/dhcpd.conf
/etc/dhcp/dhcpd6.conf
/etc/openldap/schema/dhcp.schema
/etc/sysconfig/dhcpd
/var/lib/dhcpd/dhcpd.leases
/var/lib/dhcpd/dhcpd6.leases

# 使用cat查看dhcp服务的配置文件
[root@www ~]# cat /etc/dhcp/dhcpd.conf
发现只有几行,并且只有注释内容为:
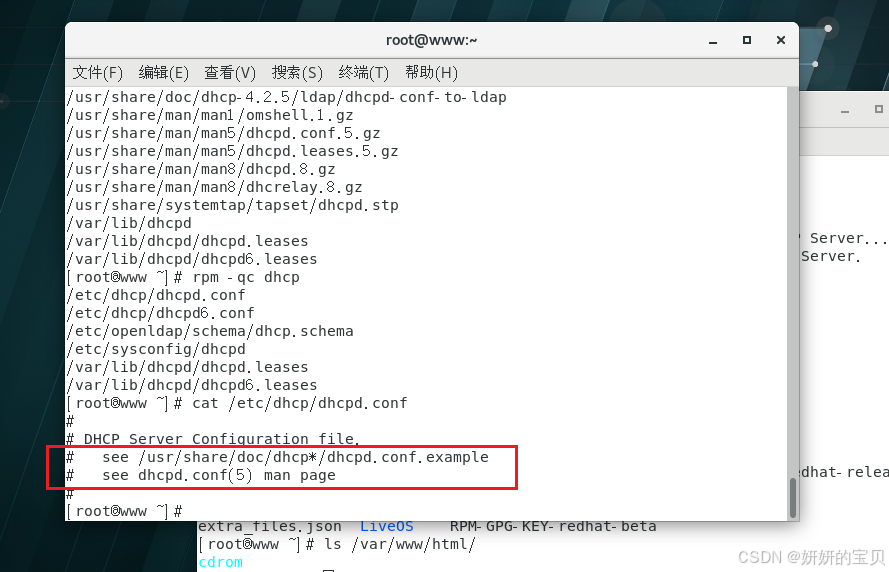
[root@www ~]# \cp -f /usr/share/doc/dhcp*/dhcpd.conf.example /etc/dhcp/dhcpd.conf

# \cp是用于复制文件的命令。在这里,\是为了防止shell对命令进行解释,确保cp命令被正确传递给shell执行。-f选项表示强制覆盖目标文件,如果目标文件已经存在。

[root@www ~]# vim /etc/dhcp/dhcpd.conf 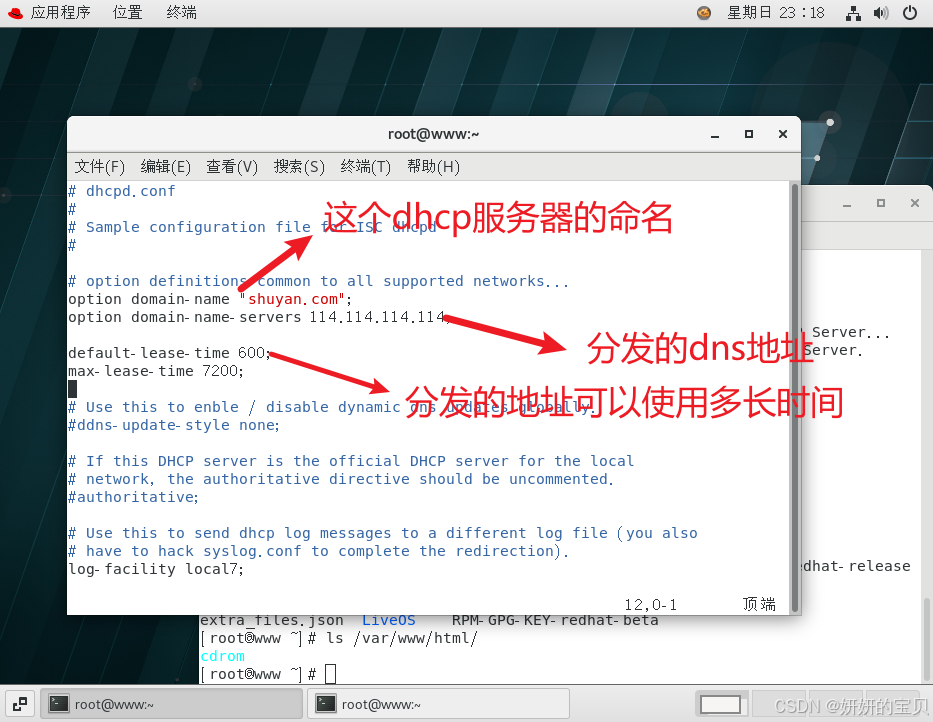
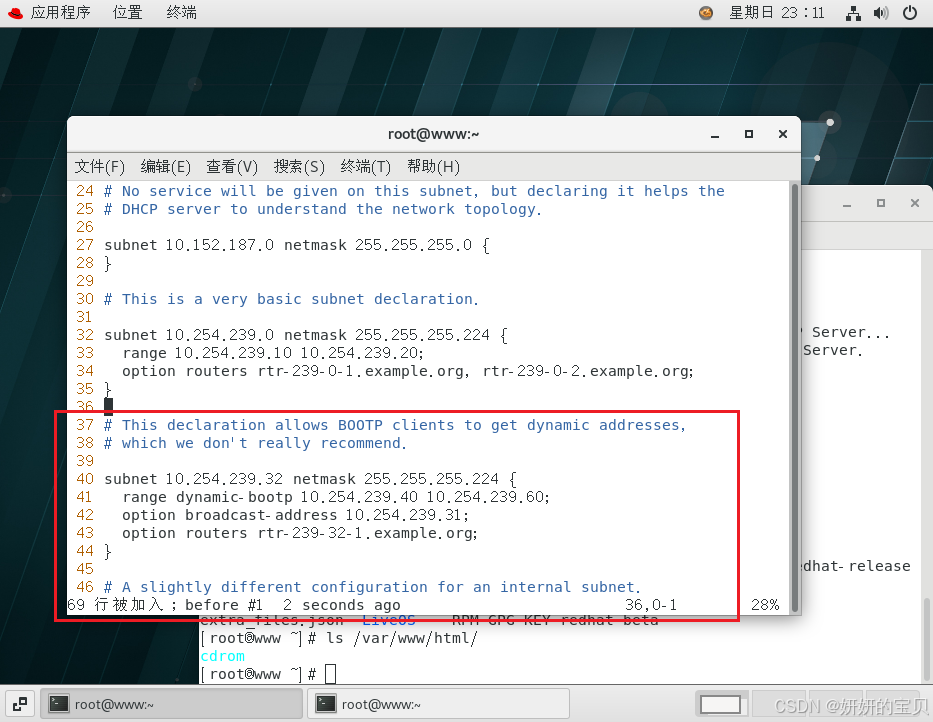
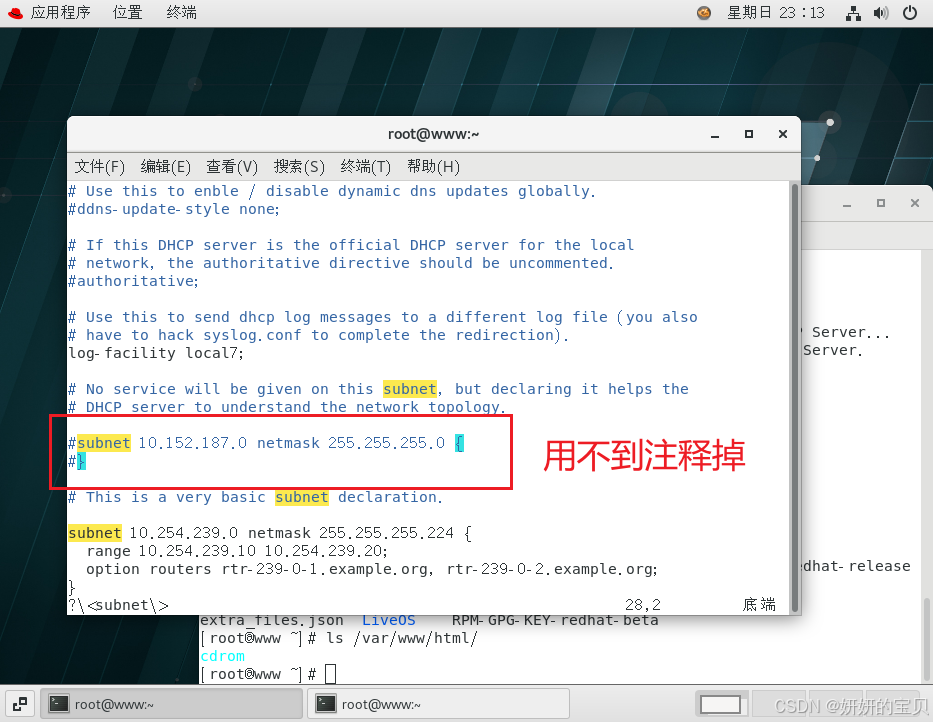
修改需要的参数
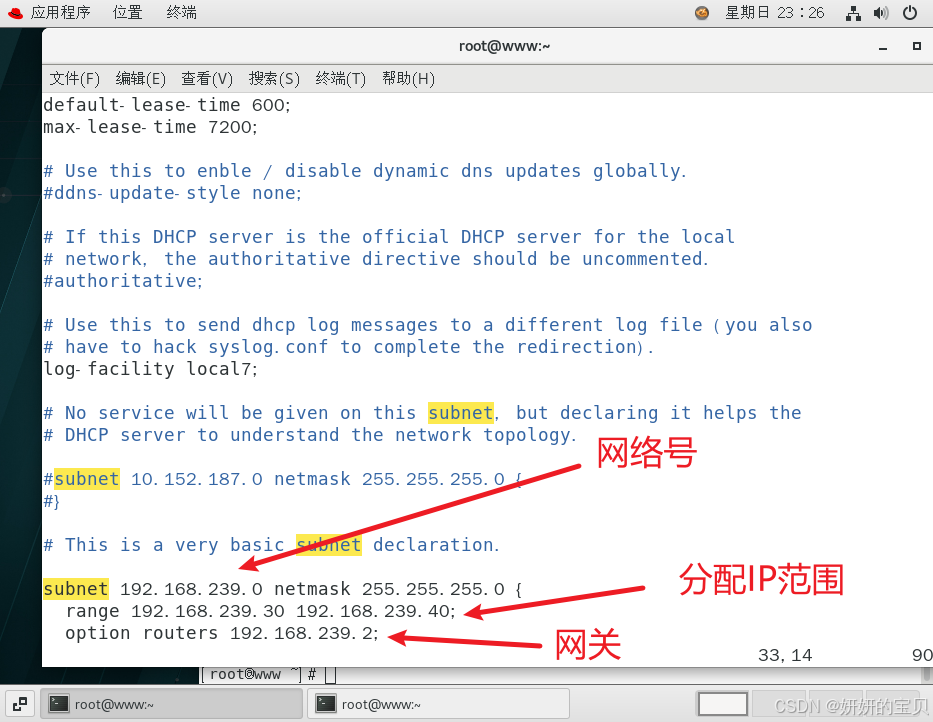
2.3 重启DHCP服务
# 重启dhcp服务

[root@www ~]# systemctl restart dhcpd
2.4 使用pxe方法安装系统(网卡安装)
# PXE的方式安装系统(网卡安装系统)

# 介绍一下安装系统需要使用到的iso光盘文件

[root@www ~]# cd /mnt/cdrom/isolinux/

[root@www isolinux]# ls
boot.cat  grub.conf   isolinux.bin  memtest     TRANS.TBL    vesamenu.c32
boot.msg  initrd.img  isolinux.cfg  splash.png  upgrade.img  vmlinuz
boot.cat:这个文件通常用于引导加载程序,但在现代的isolinux环境中并不常见。它可能是一个遗留文件或者是特定配置的一部分。
grub.conf:这是GRUB(GRand Unified Bootloader)的配置文件。GRUB是一个常见的多操作系统启动加载程序,用于选择要启动的操作系统。
isolinux.bin:这是isolinux引导加载程序的二进制文件。isolinux是一个用于CD/DVD启动的引导加载程序。
isolinux.cfg:这是isolinux的配置文件,包含了启动菜单和其他配置信息,用于控制isolinux的行为。
memtest:这个文件或目录可能包含内存测试工具,通常用于在安装操作系统之前检查硬件。
splash.png:这是一个图形文件,通常用于显示启动时的图形界面,比如启动画面。
TRANS.TBL:这是isolinux使用的字符转换表文件,用于处理非ASCII字符。
upgrade.img:这个文件可能是用于系统升级的映像文件,或者是一个特定用途的映像文件。
vesamenu.c32:这是isolinux的图形菜单驱动程序,用于显示图形化的启动菜单。
vmlinuz:这是Linux内核的压缩映像文件。它通常包含在启动映像中,用于引导Linux系统。
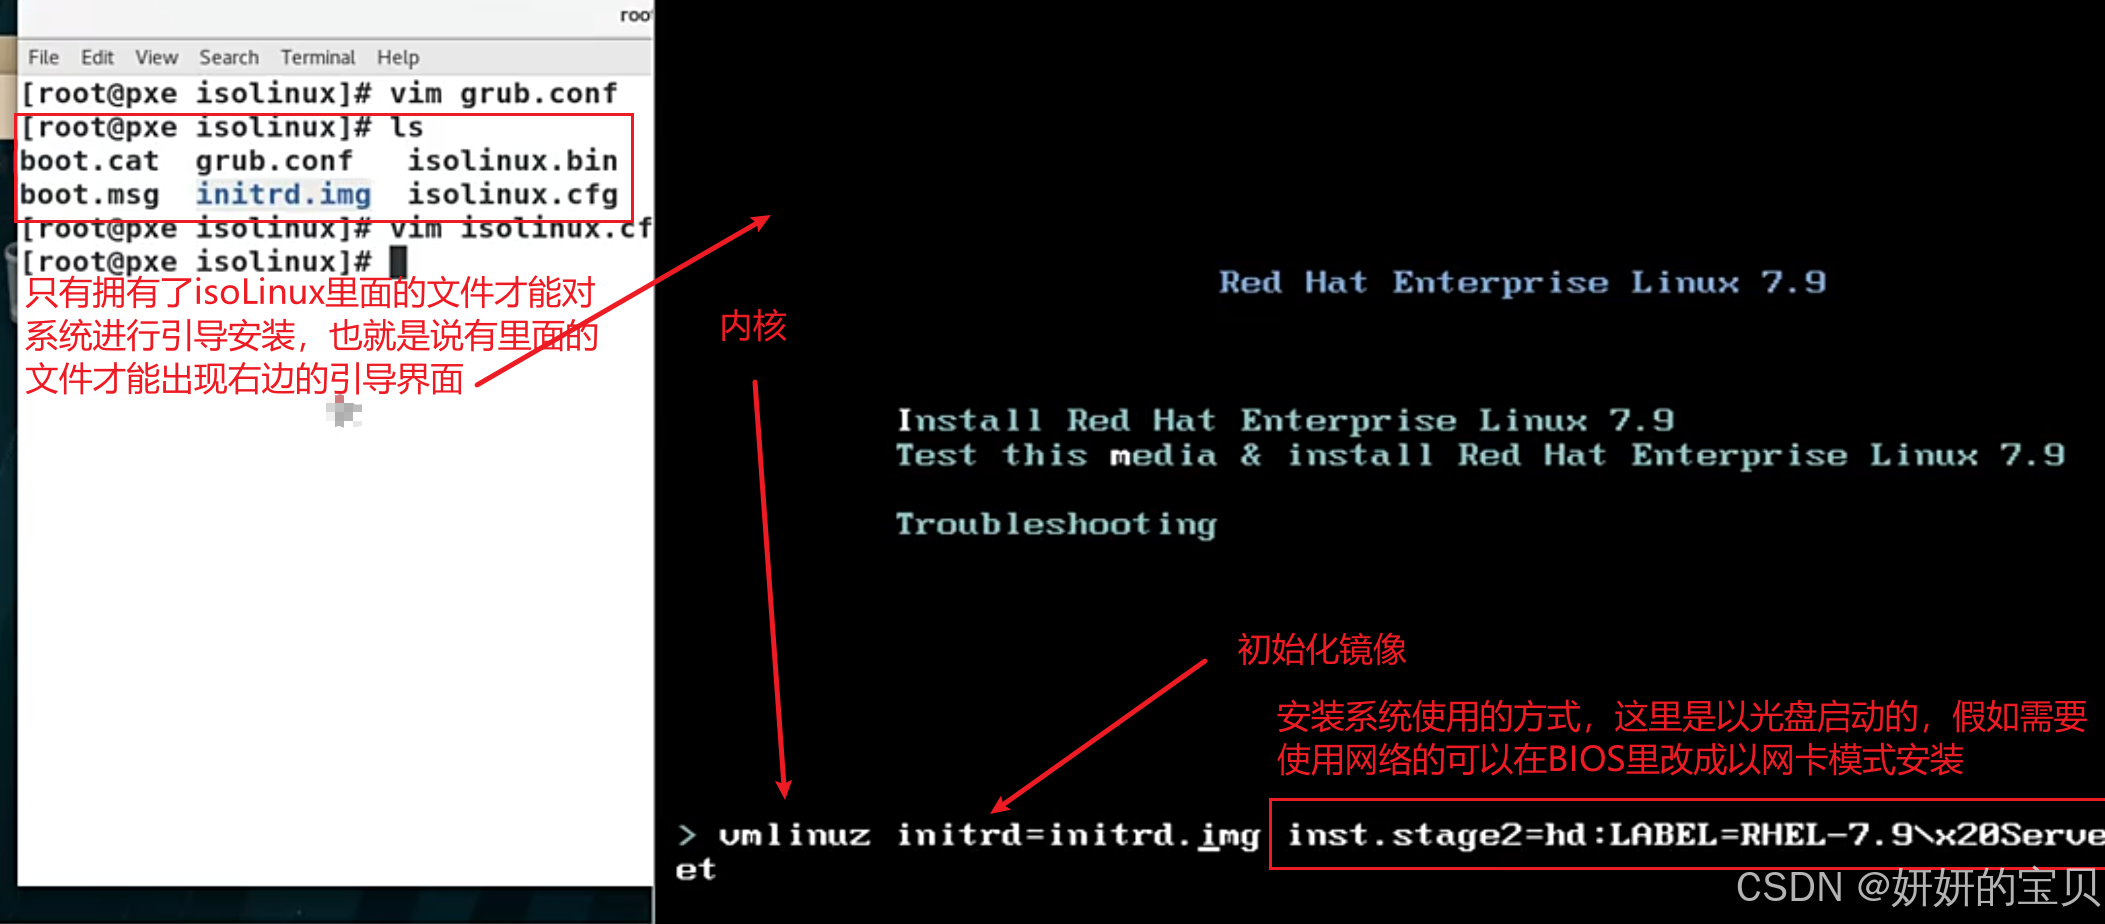
initrd.img:
initrd提供了一个临时的环境,允许内核在挂载实际的根文件系统之前执行一些任务。这些任务可能包括加载必要的模块,设置网络连接,以及挂载真正的根文件系统。
在安装系统的时候会默认指定内核,和初始化镜像
vmlinuz 和initrd.img
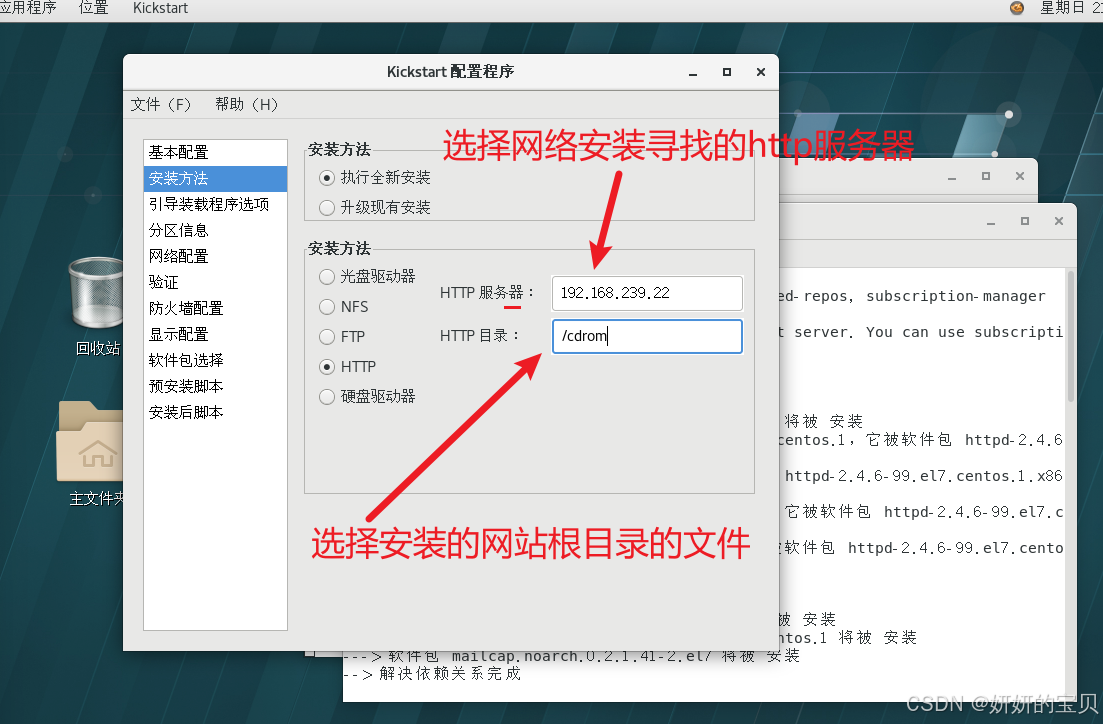
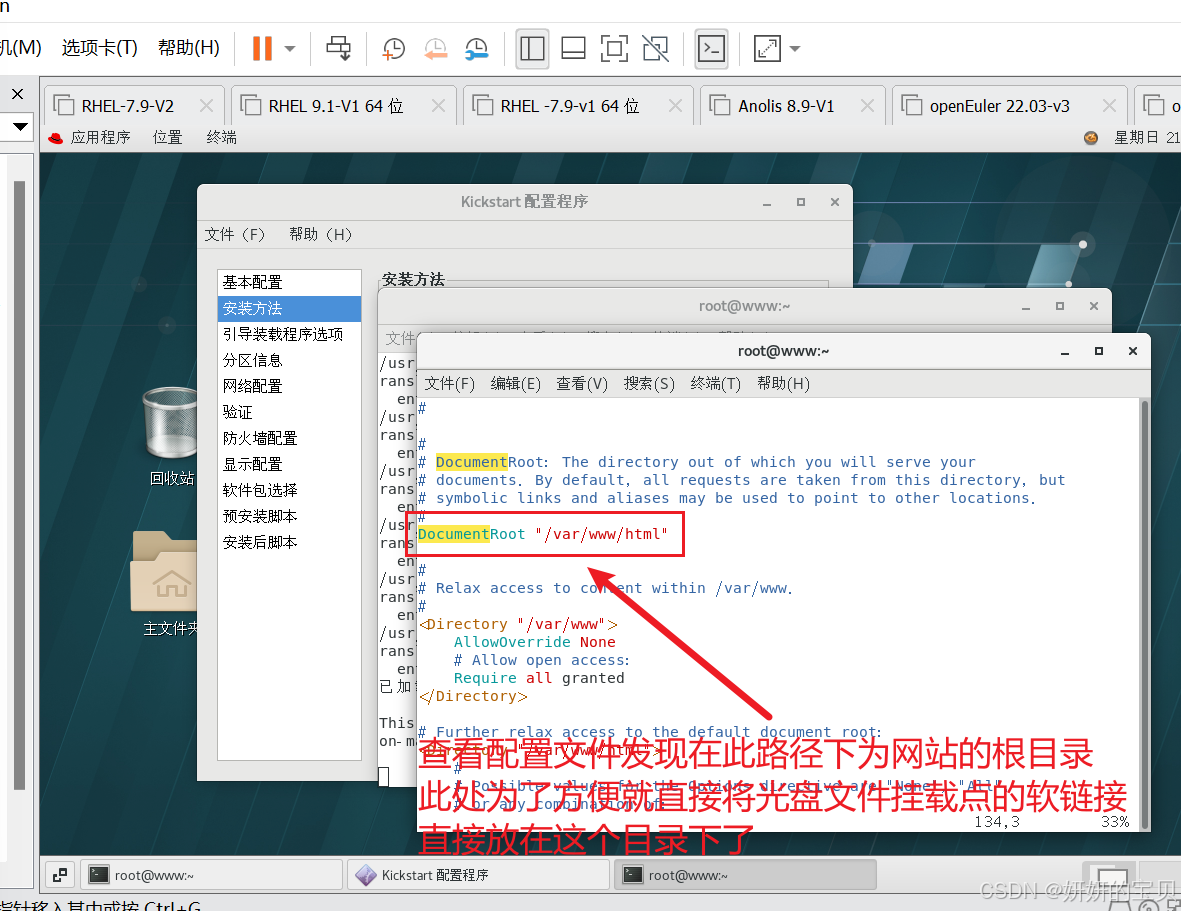
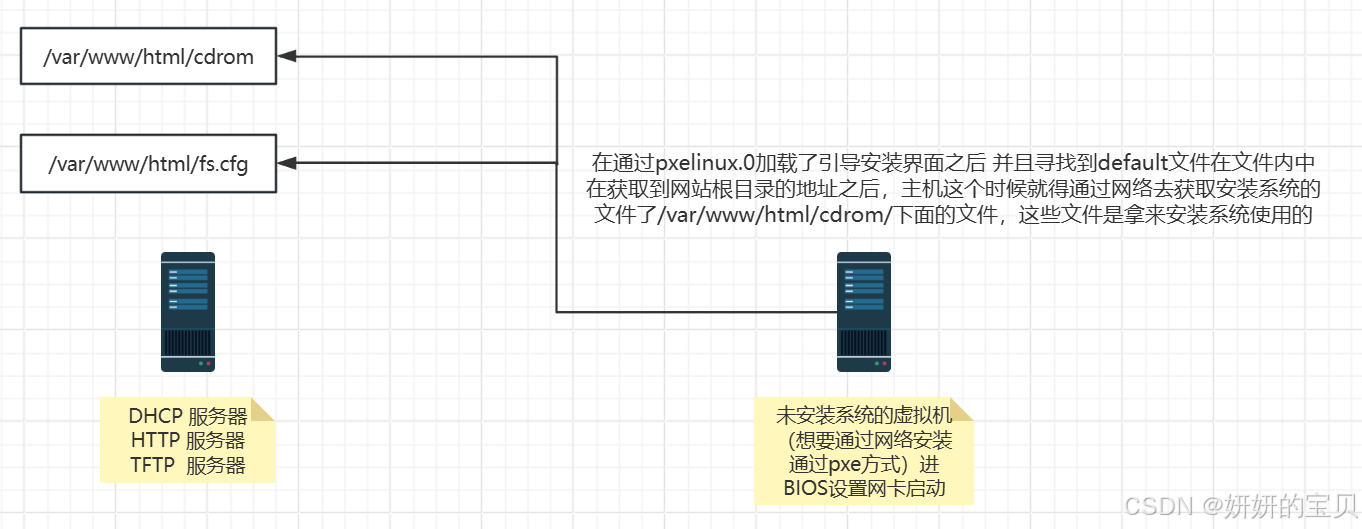
所以假如需要通过网络安装的话首先需要找到/isolinux 这一个目录在哪里,所以之前做的http服务的目的就是将自己磁盘上挂载的镜像创建软链接到网站根目录之下为的就是想让别人能通过网络能访问得到
以下即为网卡引导的过程(PXE体系)
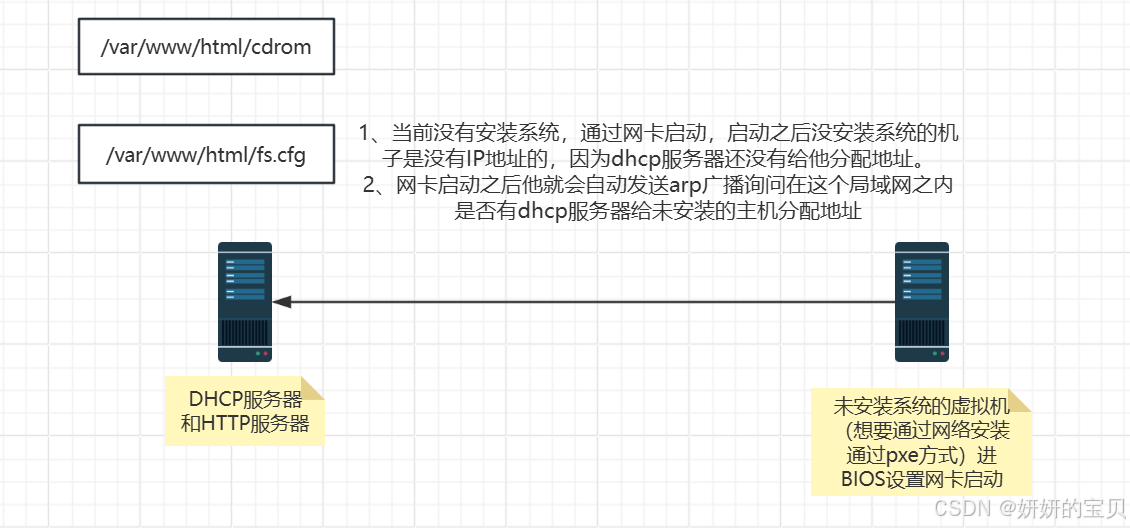
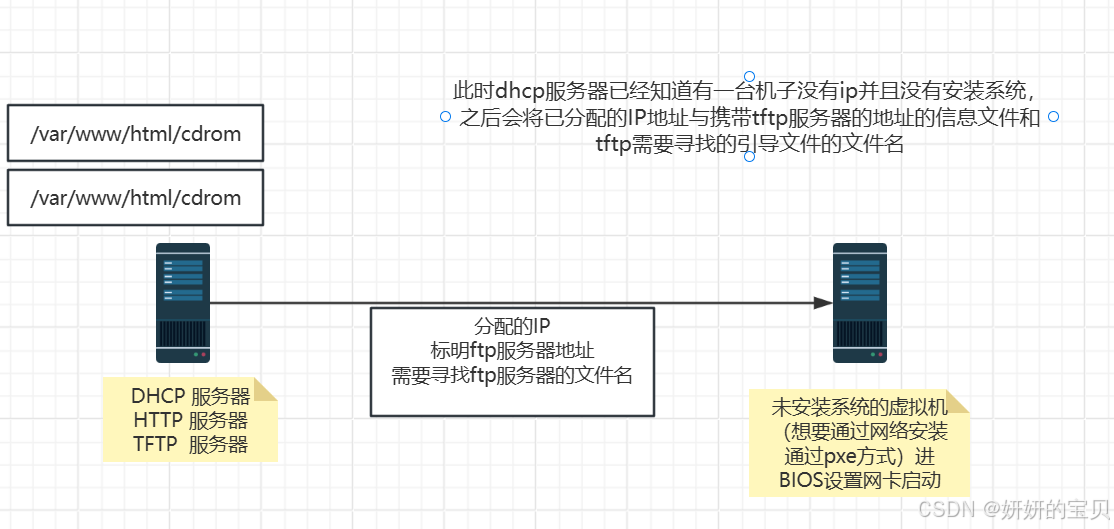
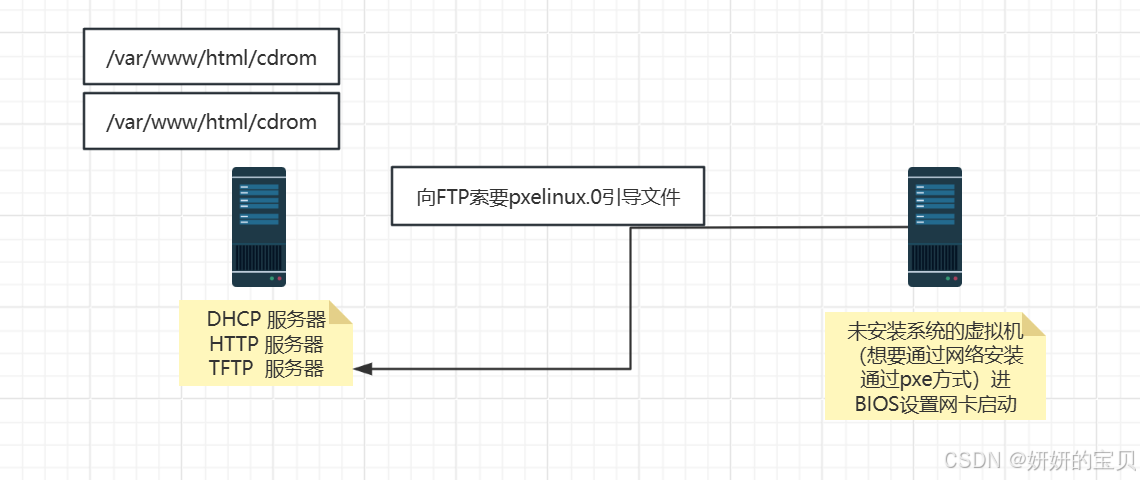
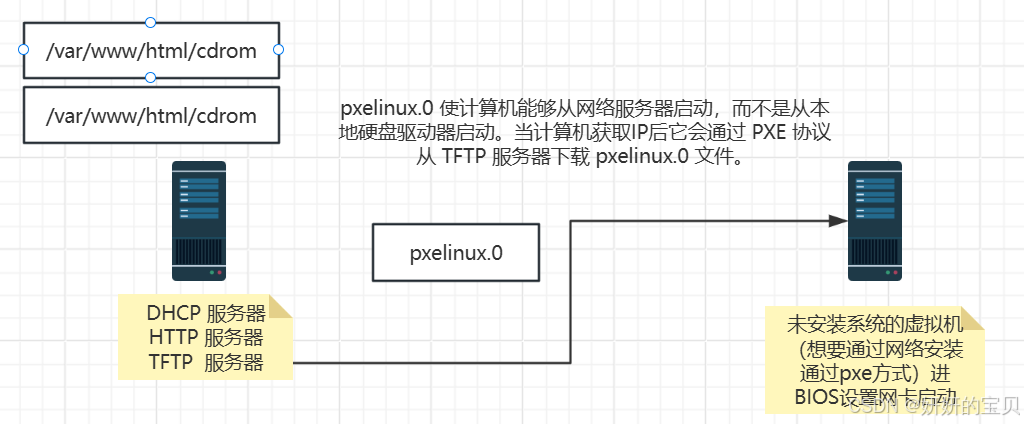
2.5 安装syslinux
要使用这一体系首先得使用syslinux软件
[root@www ~]# yum install syslinux -y
使用rpm -qd syslinux 查询一下帮助文档
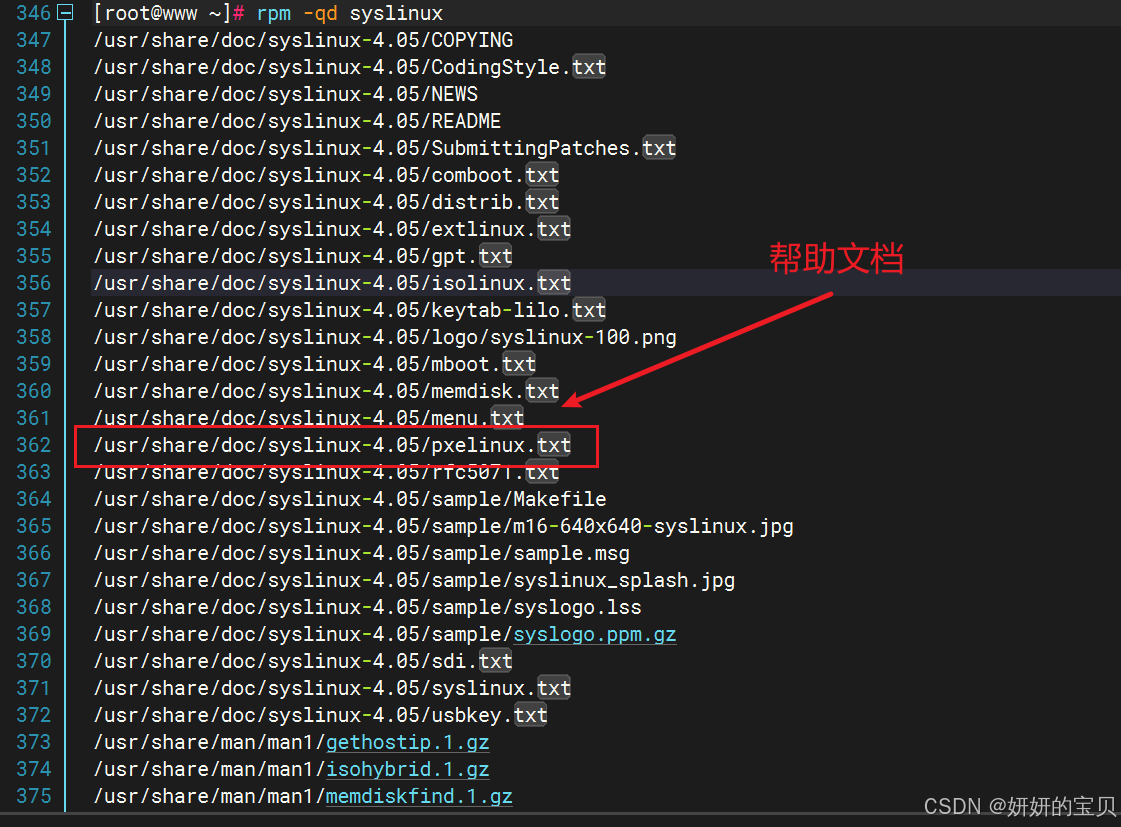
2.5.1 查看帮助文档
[root@www ~]# cat /usr/share/doc/syslinux-4.05/pxelinux.txt
                               PXELINUX

    A bootloader for Linux using the PXE network booting protocol

       Copyright 1994-2008 H. Peter Anvin - All Rights Reserved

This program is provided under the terms of the GNU General Public
License, version 2 or, at your option, any later version.  There is no
warranty, neither expressed nor implied, to the function of this
program.  Please see the included file COPYING for details.

----------------------------------------------------------------------

PXELINUX is a Syslinux derivative, for booting Linux off a network
server, using a network ROM conforming to the Intel PXE (Pre-Execution
Environment) specification.  PXELINUX is *not* a program that is
intended to be flashed or burned into a PROM on the network card; if
you want that, check out Etherboot (http://www.etherboot.org/).
Etherboot 5.4 or later can also be used to create a PXE-compliant boot
PROM for many network cards.


    ++++ HOW TO CONFIGURE PXELINUX ++++

PXELINUX operates in many ways like SYSLINUX.  If you are not familiar
with SYSLINUX, read syslinux.txt first, since this documentation only
explains the differences.

On the TFTP server, create the directory "/tftpboot", and copy the
following files to it:

        pxelinux.0              - from the Syslinux distribution

        any kernel or initrd images you want to boot

Finally, create the directory "/tftpboot/pxelinux.cfg".  The
configuration file (equivalent of syslinux.cfg -- see syslinux.txt for
the options here) will live in this directory.  Because more than one
system may be booted from the same server, the configuration file name
depends on the IP address of the booting machine.  PXELINUX will
search for its config file on the boot server in the following way:

  First, it will search for the config file using the client UUID, if
  one is provided by the PXE stack (note, some BIOSes don't have a
  valid UUID, and you might end up with something like all 1's.)  This is
  in the standard UUID format using lower case hexadecimal digits, e.g.
  b8945908-d6a6-41a9-611d-74a6ab80b83d.

  Next, it will search for the config file using the hardware type
  (using its ARP type code) and address, all in lower case hexadecimal
  with dash separators; for example, for an Ethernet (ARP type 1)
  with address 88:99:AA:BB:CC:DD it would search for the filename
  01-88-99-aa-bb-cc-dd.

  Next, it will search for the config file using its own IP address
  in upper case hexadecimal, e.g. 192.0.2.91 -> C000025B
  (you can use the included progam "gethostip" to compute the
  hexadecimal IP address for any host.)

  If that file is not found, it will remove one hex digit and try
  again.  Ultimately, it will try looking for a file named "default"
  (in lower case).

  As an example, if the boot file name is /mybootdir/pxelinux.0, the
  UUID is b8945908-d6a6-41a9-611d-74a6ab80b83d, the Ethernet MAC
  address is 88:99:AA:BB:CC:DD and the IP address 192.0.2.91, it will
  try:

        /mybootdir/pxelinux.cfg/b8945908-d6a6-41a9-611d-74a6ab80b83d
        /mybootdir/pxelinux.cfg/01-88-99-aa-bb-cc-dd
        /mybootdir/pxelinux.cfg/C000025B
        /mybootdir/pxelinux.cfg/C000025
        /mybootdir/pxelinux.cfg/C00002
        /mybootdir/pxelinux.cfg/C0000
        /mybootdir/pxelinux.cfg/C000
        /mybootdir/pxelinux.cfg/C00
        /mybootdir/pxelinux.cfg/C0
        /mybootdir/pxelinux.cfg/C
        /mybootdir/pxelinux.cfg/default
2.5.2 以下为翻译
如何配置 PXELINUX
PXELINUX 在许多方面类似于 SYSLINUX。如果您不熟悉 SYSLINUX,请首先阅读
syslinux.txt,因为这份文档仅解释两者之间的差异。在 TFTP 服务器上,创建目录
/tftpboot,并将以下文件复制到该目录:
pxelinux.0—— 来自 Syslinux 发行版- 任何您想要引导的内核或 initrd 映像文件
最后,创建目录
/tftpboot/pxelinux.cfg。配置文件(相当于syslinux.cfg—— 请参阅syslinux.txt以了解其中的选项)将位于此目录中。因为可能有多个系统从同一服务器引导,所以配置文件的名称取决于引导机器的 IP 地址。PXELINUX 将按以下方式搜索其配置文件:
首先,如果 PXE 栈提供了客户端的 UUID,则使用该 UUID 来搜索配置文件(注意:某些 BIOS 不具备有效的 UUID,你可能会得到类似全部为 1 的值)。这是使用小写字母的十六进制数字的标准 UUID 格式,例如
b8945908-d6a6-41a9-611d-74a6ab80b83d。接下来,使用硬件类型(根据其 ARP 类型代码)和地址来搜索配置文件,全部使用小写字母的十六进制数字,并用短划线分隔;例如,对于 ARP 类型为 1 的以太网(Ethernet)设备,其 MAC 地址为
88:99:AA:BB:CC:DD,则会搜索名为01-88-99-aa-bb-cc-dd的文件。然后,使用其自身的 IP 地址的大写字母十六进制形式来搜索配置文件,例如 IP 地址
192.0.2.91对应的文件名为C000025B(您可以使用随附的程序gethostip来计算任何主机的十六进制 IP 地址)。如果找不到该文件,将移除一个十六进制数字并再次尝试。最终,它会尝试查找名为
default的文件(使用小写字母)。作为一个示例,如果引导文件名为
/mybootdir/pxelinux.0,UUID 为b8945908-d6a6-41a9-611d-74a6ab80b83d,以太网 MAC 地址为88:99:AA:BB:CC:DD,且 IP 地址为192.0.2.91,它将依次尝试以下路径:
/mybootdir/pxelinux.cfg/b8945908-d6a6-41a9-611d-74a6ab80b83d/mybootdir/pxelinux.cfg/01-88-99-aa-bb-cc-dd/mybootdir/pxelinux.cfg/C000025B/mybootdir/pxelinux.cfg/C000025/mybootdir/pxelinux.cfg/C00002/mybootdir/pxelinux.cfg/C0000/mybootdir/pxelinux.cfg/C000/mybootdir/pxelinux.cfg/C00/mybootdir/pxelinux.cfg/C0/mybootdir/pxelinux.cfg/C/mybootdir/pxelinux.cfg/default请注意,所有文件名引用都是相对于
pxelinux.0所在目录的相对路径。PXELINUX 通常要求文件名(包括任何相对路径)长度不超过 127 个字符。
从帮助文档知道了,要想通过网络正确引导主机安装系统首先得安装tftp
2.5.3 安装tftp服务
[root@www ~]# yum install tftp-server -y
使用rpm -ql 查看产生的文件
/var/lib/tftpboot --ftp数据目录
并能发现安装ftp 的时候已经自动将文件目录给创建好了,所以需要创建pxelinux.cfg 目录
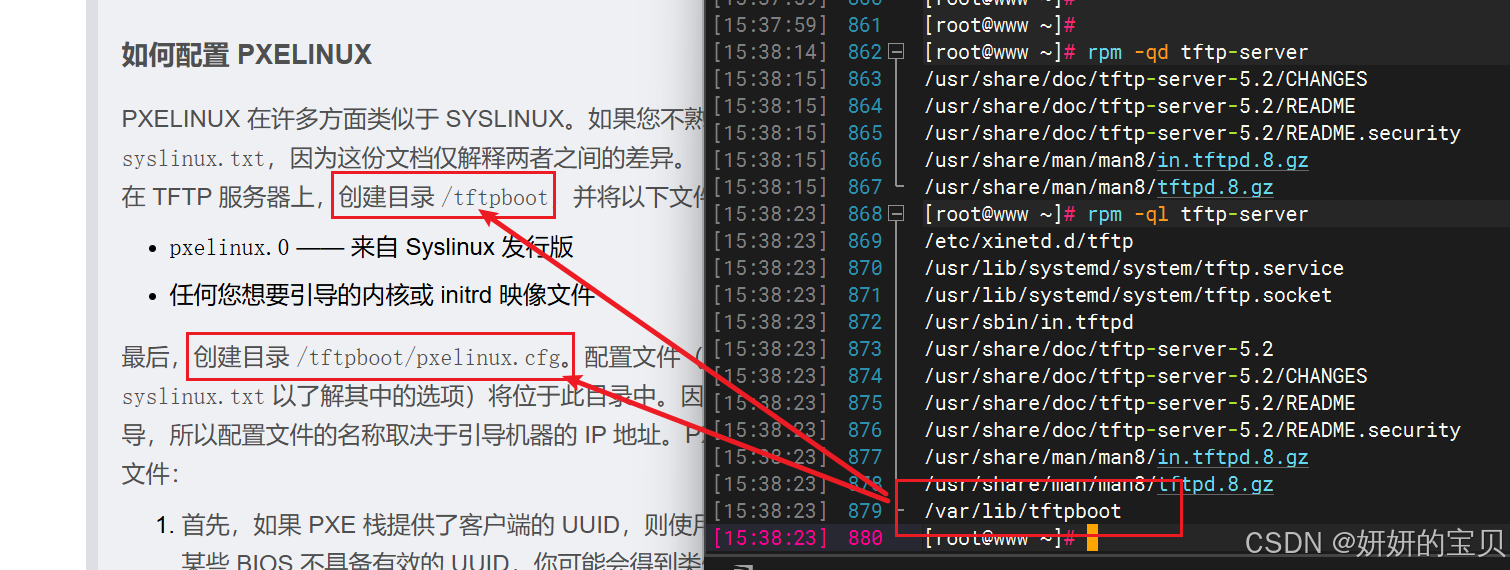
# 按照说明创建pxelinux.cfg 目录

[root@www ~]# mkdir -p /var/lib/tftpboot/pxelinux.cfg

[root@www ~]# cd /var/lib/tftpboot/pxelinux.cfg/

# 启动tftp服务设置开机自启

[root@www pxelinux.cfg]# systemctl enable --now tftp

[root@www tftpboot]# cp /usr/share/syslinux/pxelinux.0 /var/lib/tftpboot/假如说要通过网络装机的话,需要运用到ftp,在ftp有一个共享的目录,其中在这个目录下得包含挂载目录中的isolinux-- 在此目录下的文件正好是装系统所需要的
2.5.4 pxelinux.0 文件的作用
网络启动:
pxelinux.0使计算机能够从网络服务器启动,而不是从本地硬盘驱动器启动。- 当计算机启动时,它会通过 PXE 协议从 TFTP 服务器下载
pxelinux.0文件。配置文件解析:
pxelinux.0会根据 PXELINUX 的配置文件来确定要加载的内核和 initrd 映像。- 配置文件位于
/tftpboot/pxelinux.cfg/目录下的default文件加载内核和 initrd 映像:
- 根据配置文件中的指令,
pxelinux.0会从 TFTP 服务器下载安装配置 文件主页面内容如(isolinux.cfg)内核文件(例如vmlinuz)和 initrd 映像(例如initrd.img)。- 下载完成后,
pxelinux.0会将内核和 initrd 映像传递给 CPU 以启动操作系统。
# 将isolinux下的所有文件移动到共享目录之下

[root@www pxelinux.cfg]# cp /mnt/cdrom/isolinux/* /var/lib/tftpboot/

[root@www tftpboot]# cp /var/lib/tftpboot/isolinux.cfg /var/lib/tftpboot/pxelinux.cfg/default 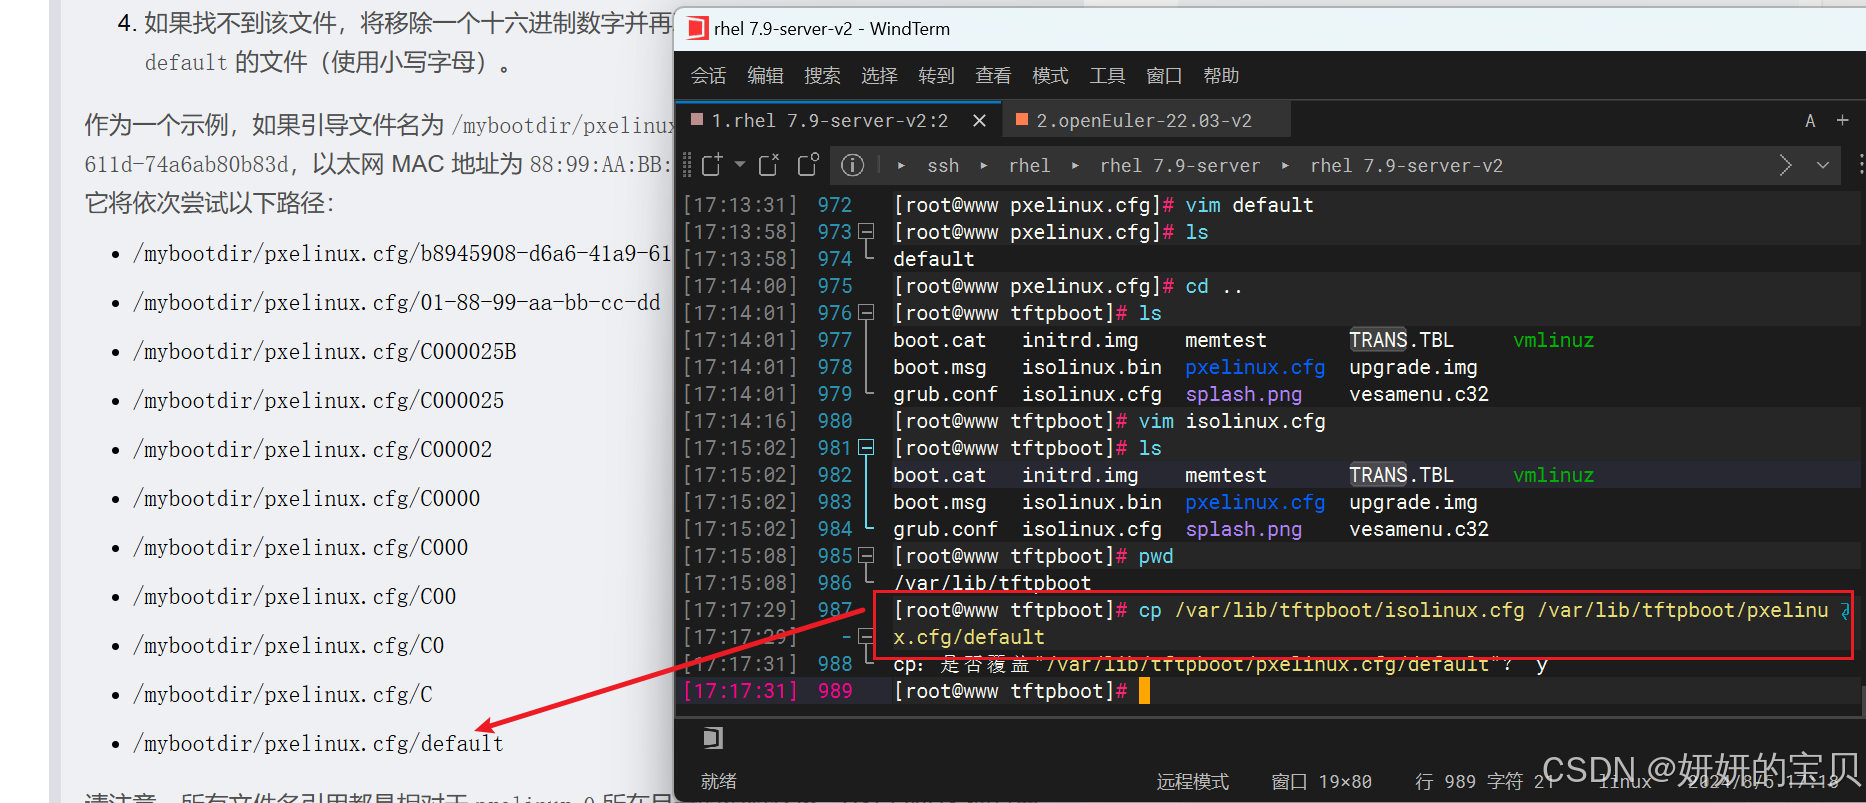
2.5.5 pxe 过程原理
但问题来了,pxelinux.0这个文件主机到底是通过什么方式获取的,服务端又是怎么给予主机的?
在上面的说明也讲到了,服务器是通过DHCP发放IP的之后通过tftp将pxelinux.0这个引导文件一起发送给主机。所以需要配置DHCP服务,增加配置。
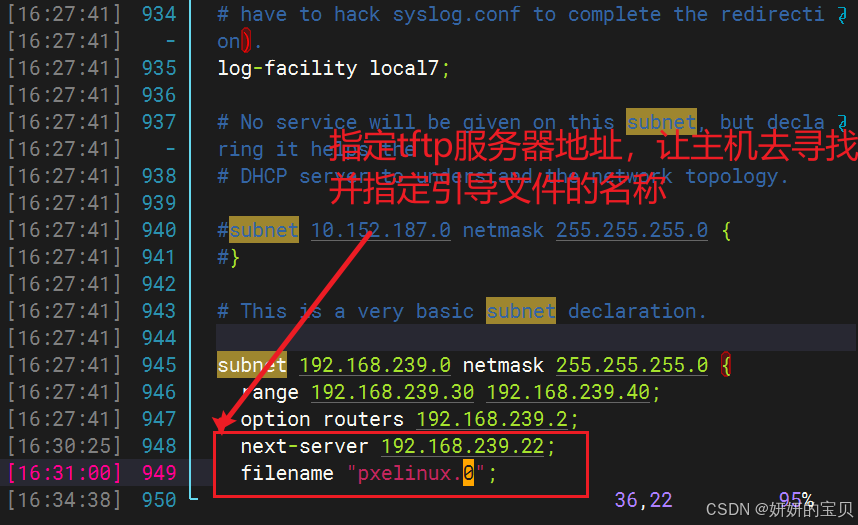
[root@www pxelinux.cfg]# systemctl restart httpd.service --重启dhcp服务
在dhcp里面增加了配置指定tftp的服务器地址与引导文件名称之后,得到引导文件,引导文件pxelinux.0就会去寻找tftp服务器中的default文件,也就是/var/lib/tftpboot/pxelinux.cfg/default 文件,default 这个配置文件就会去加载/var/lib/tftpboot/ 下面的所有文件比如说图片内核什么的 ,才会显示如下的界面

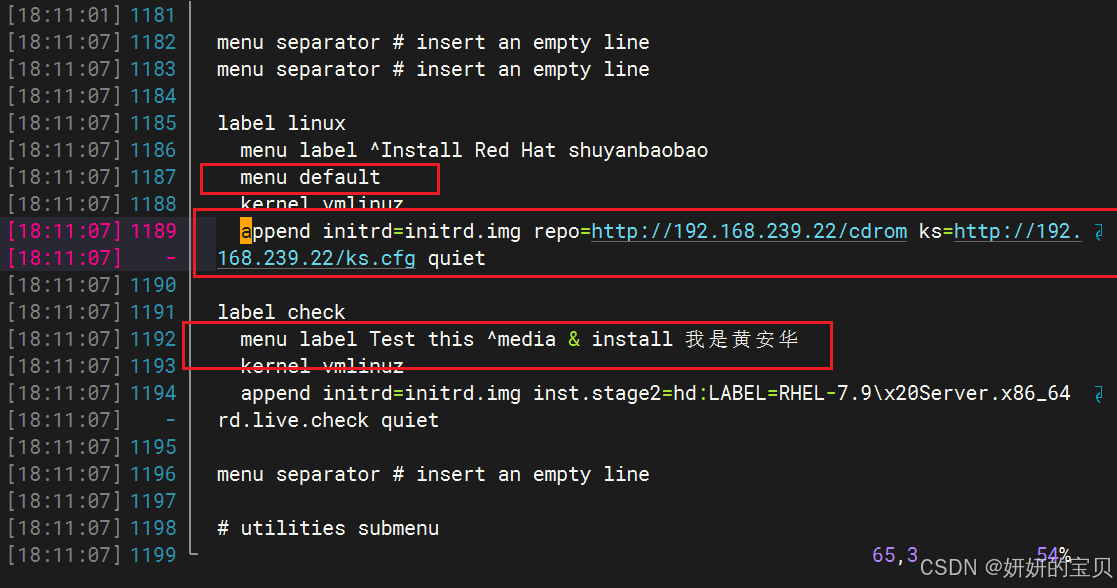
由于default文件是由isolinux下的isolinux.cfg 复制而来的,里面包含的参数指定是指定使用光盘来安装的,需要指定网络安装所以需要将配置文件修改
[root@www pxelinux.cfg]# vim /var/lib/tftpboot/pxelinux.cfg/default
3 网络安装系统
创建新的虚拟机
3.1 删除光驱
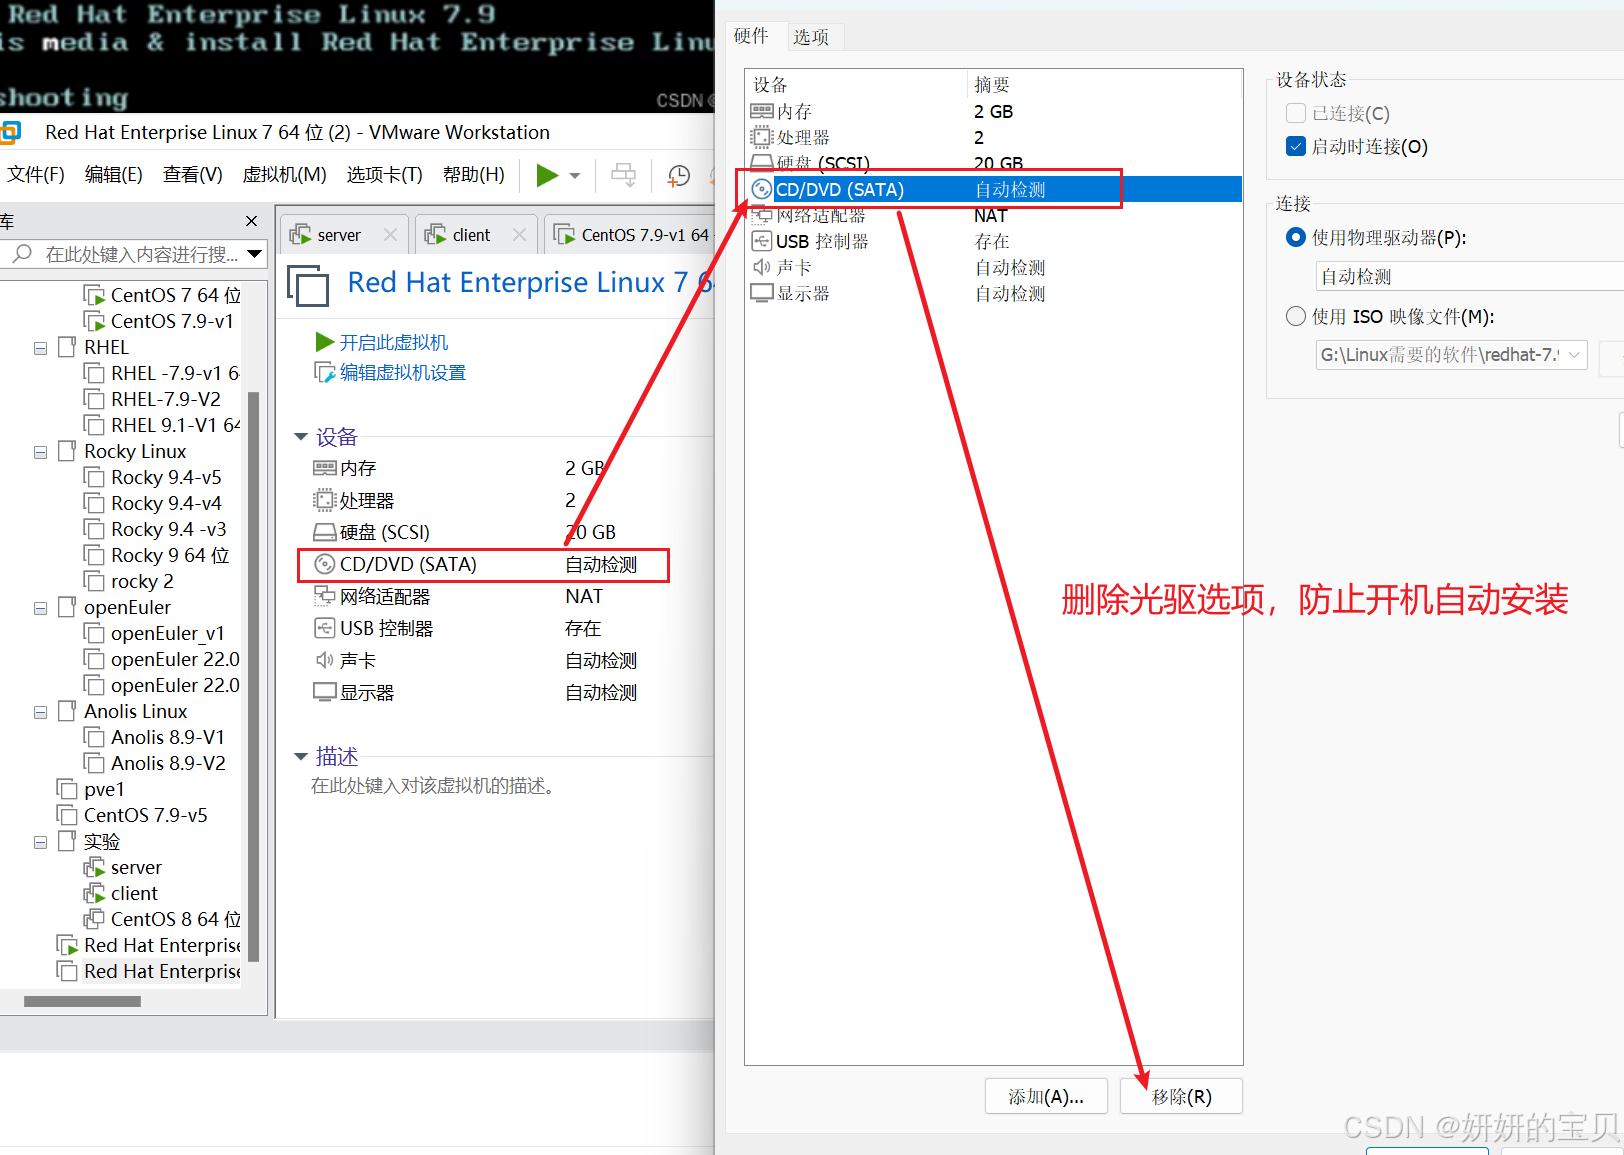
3.2 进入BIOS
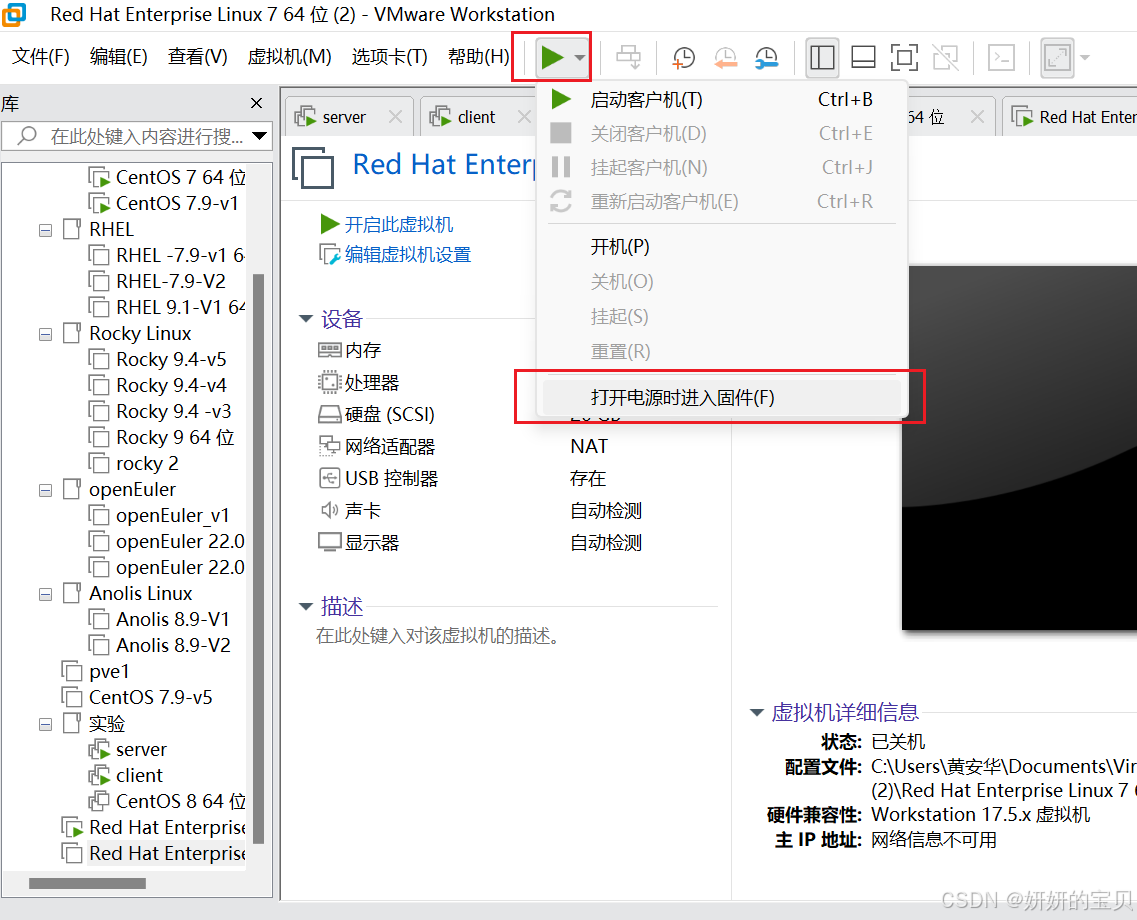
回到vmware创建一台新的虚拟机不给他加镜像进入BIOS
3.2.1 修改网卡安装优先级
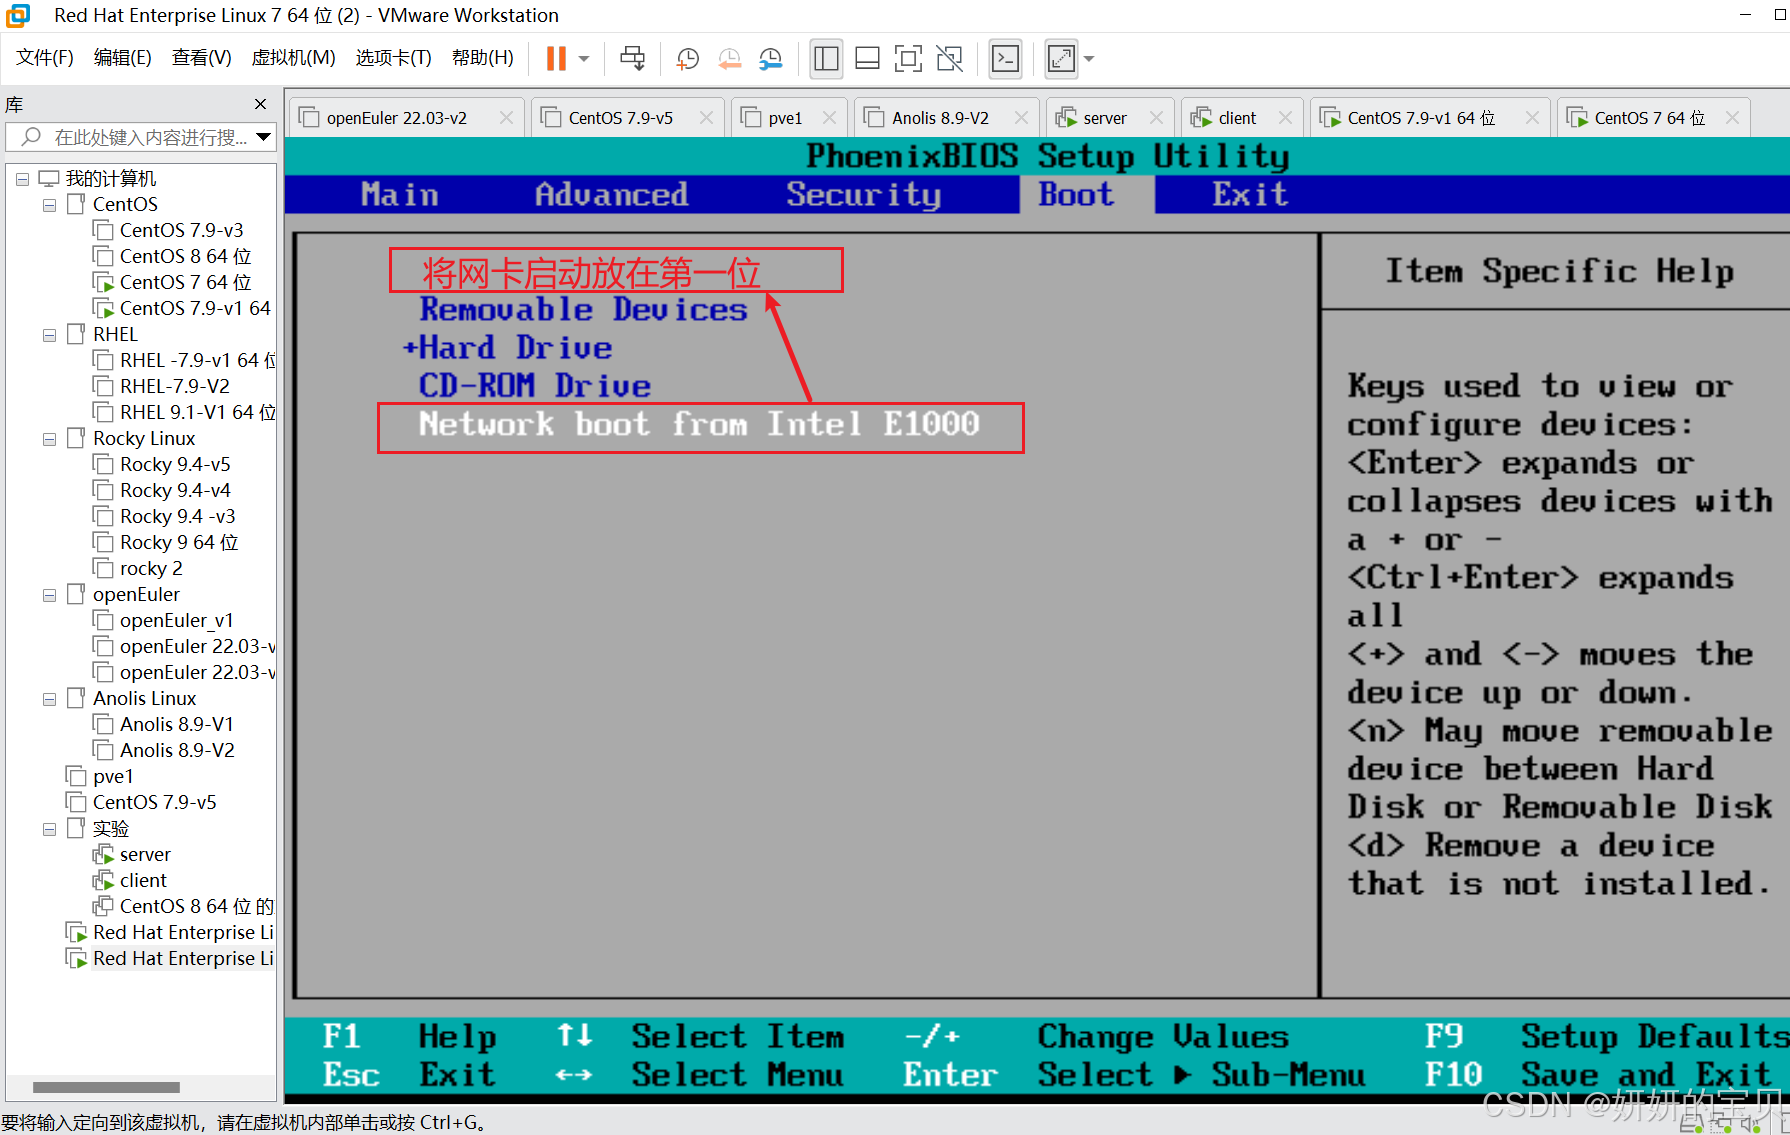
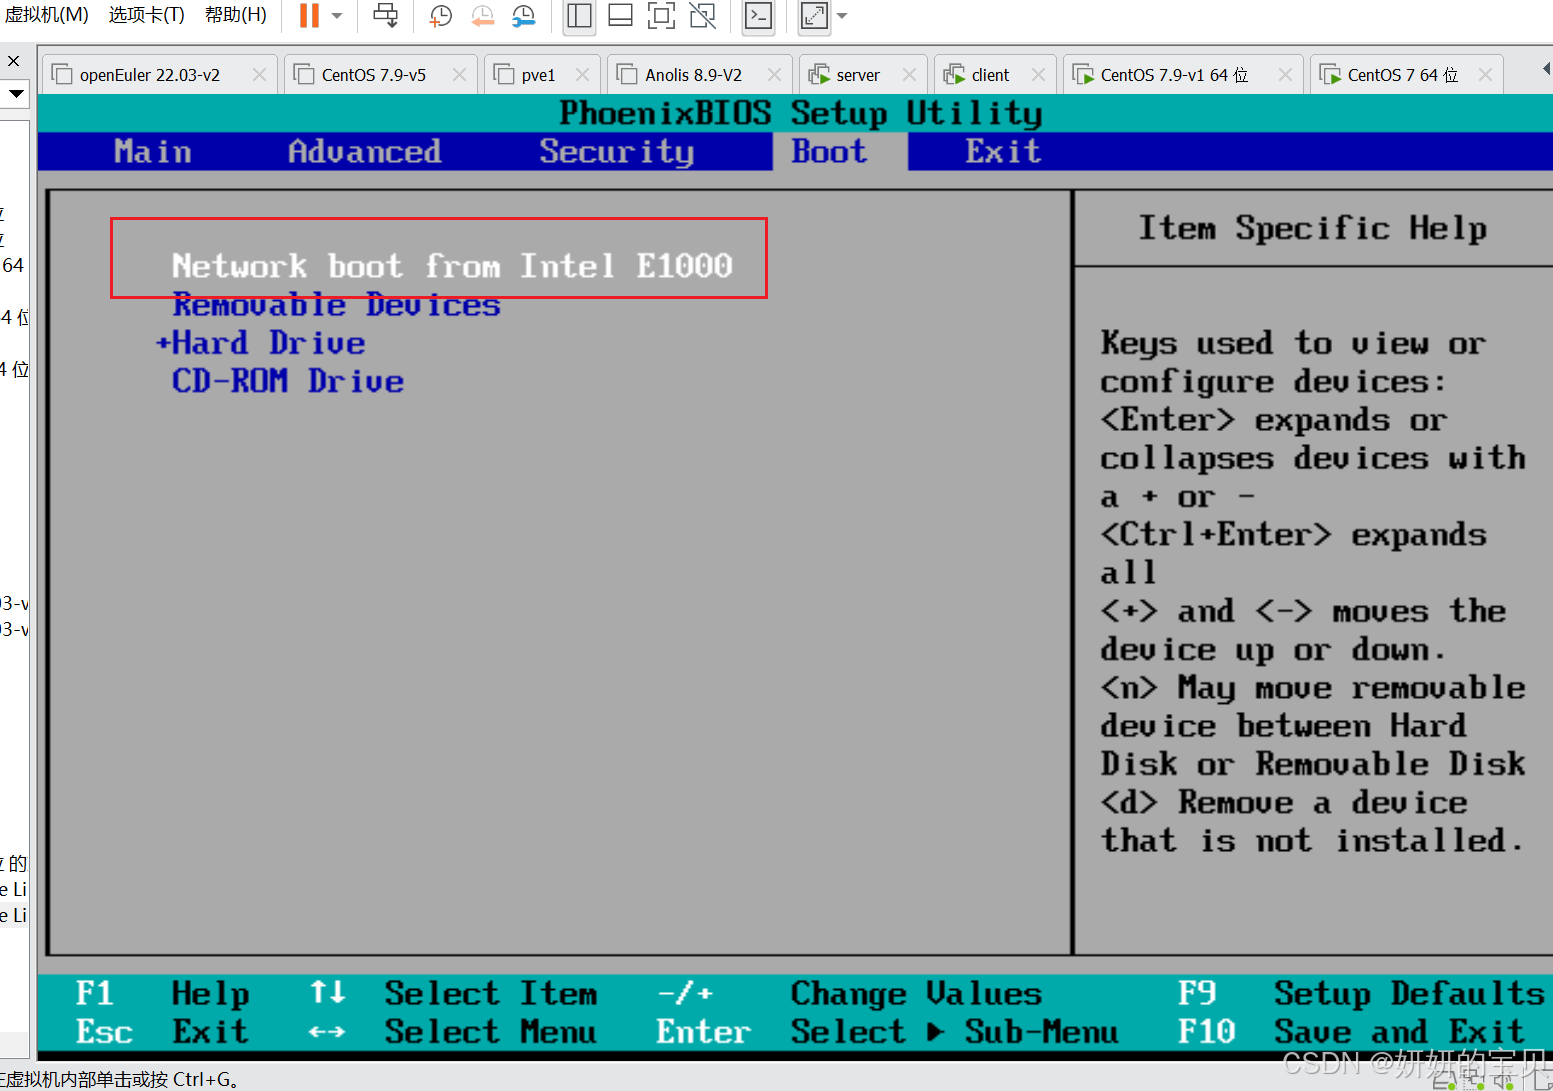
将网卡放在第一位,按键盘shift 和 + 建往上移动
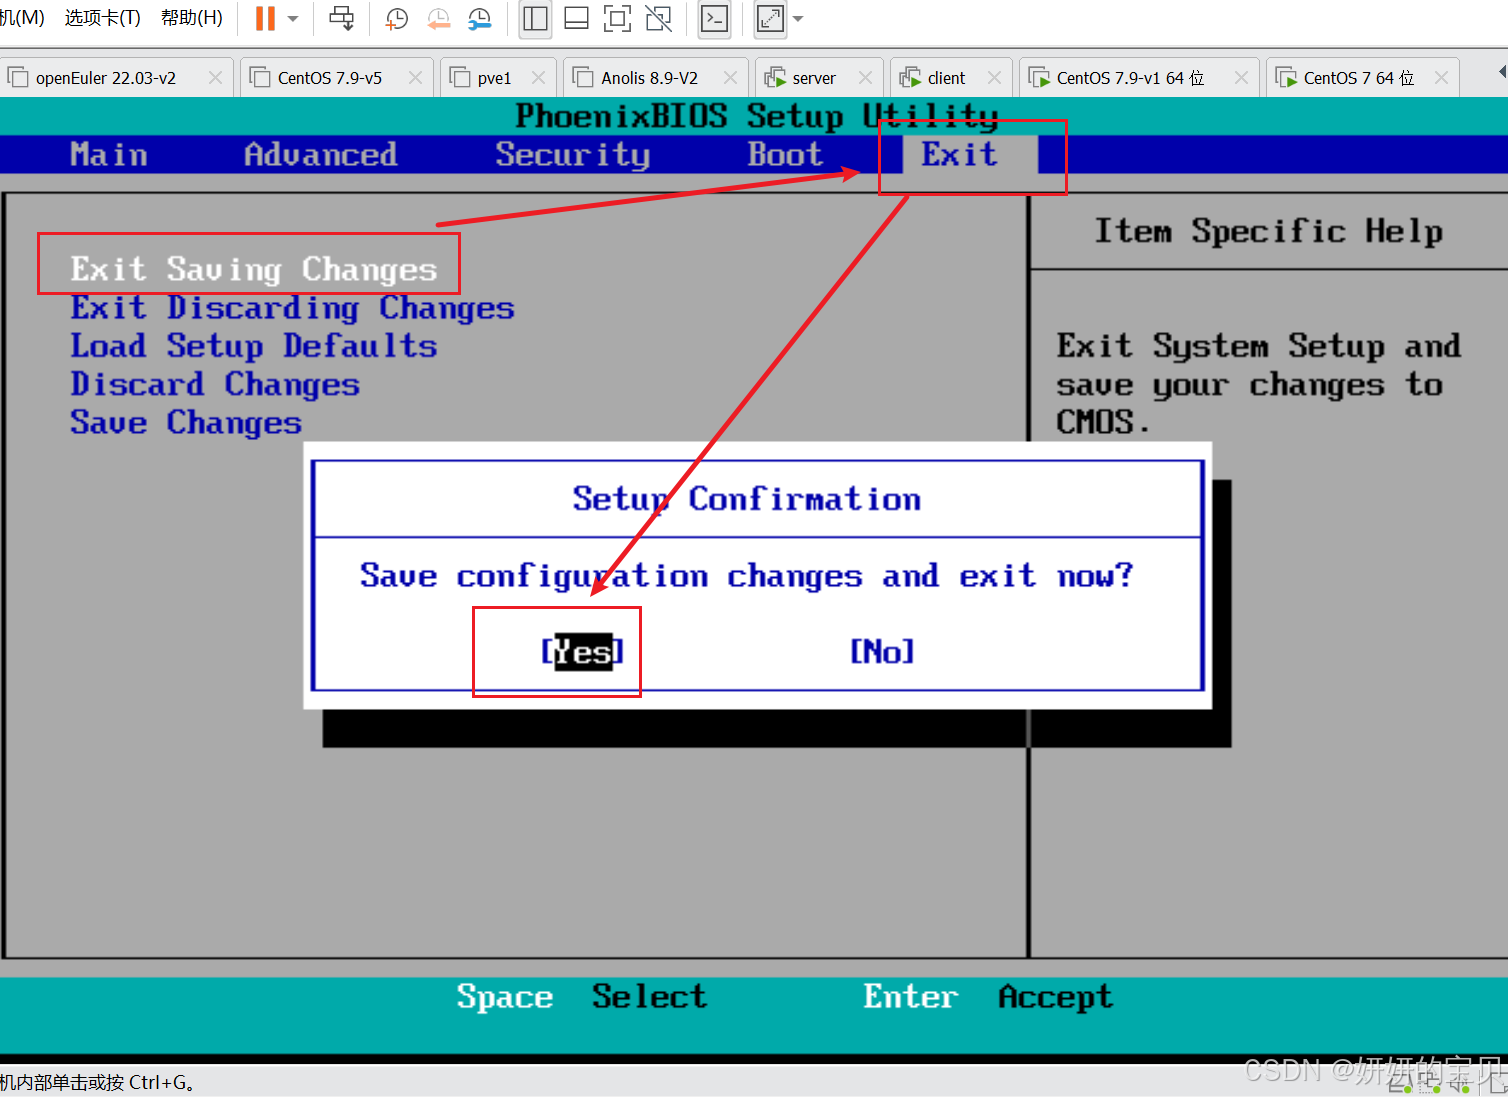
回车保存退出
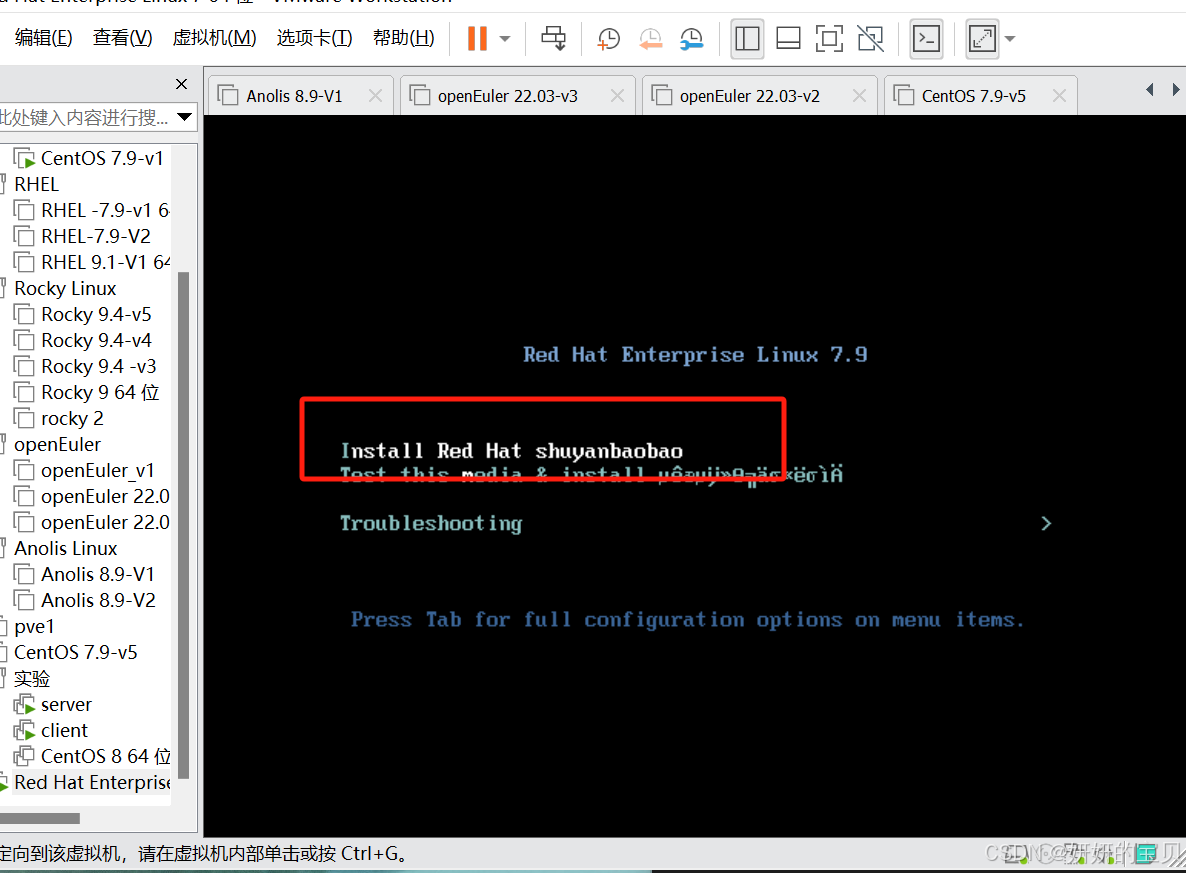
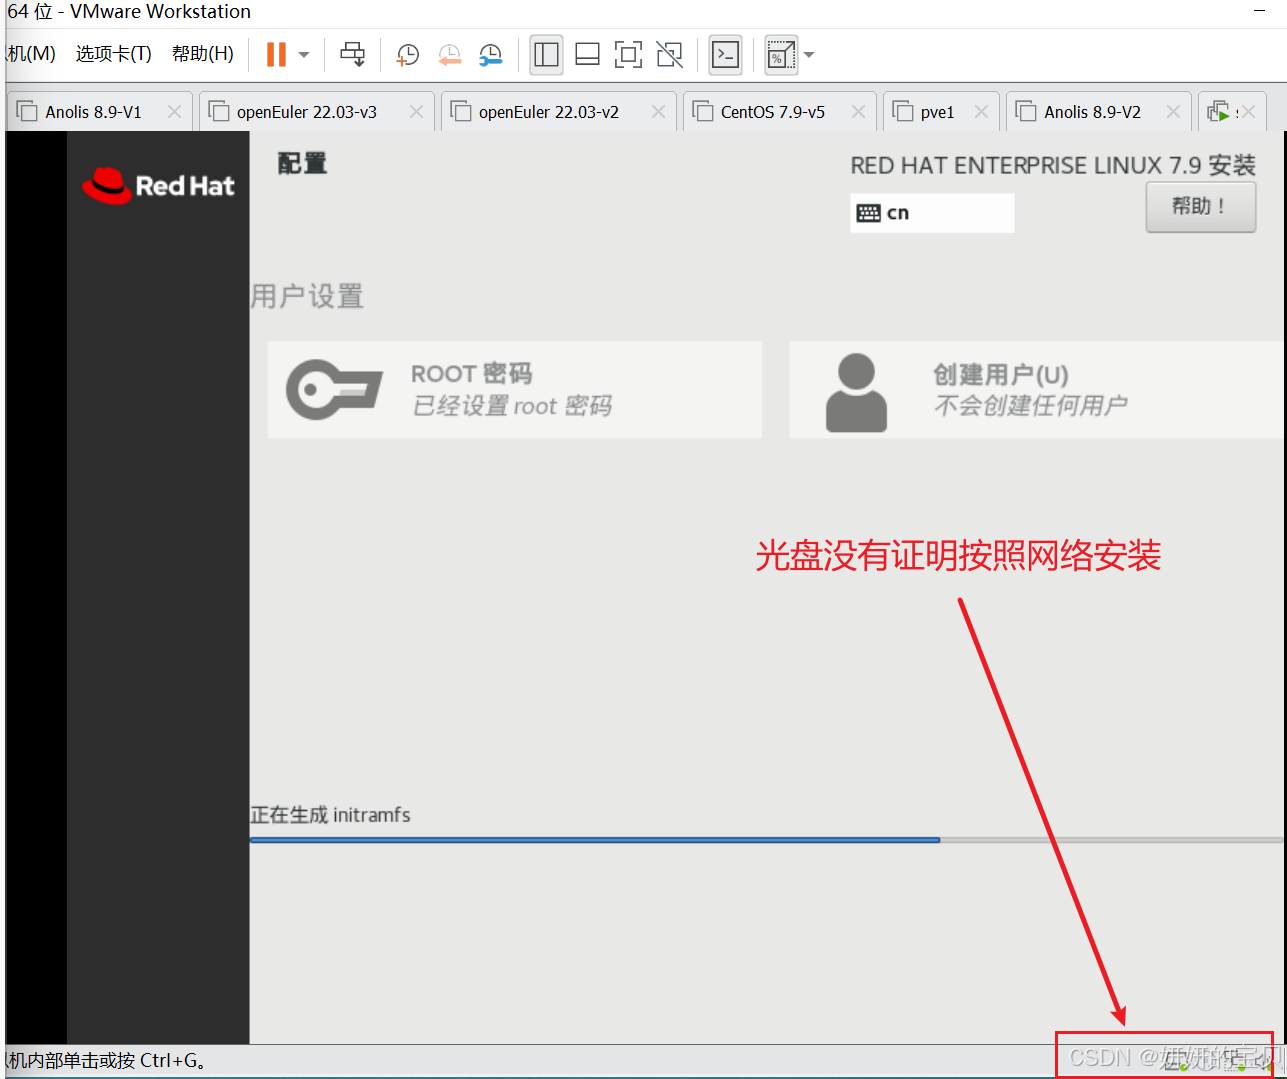
3.3 安装完成再次进入BIOS
在引导界面千万别安装
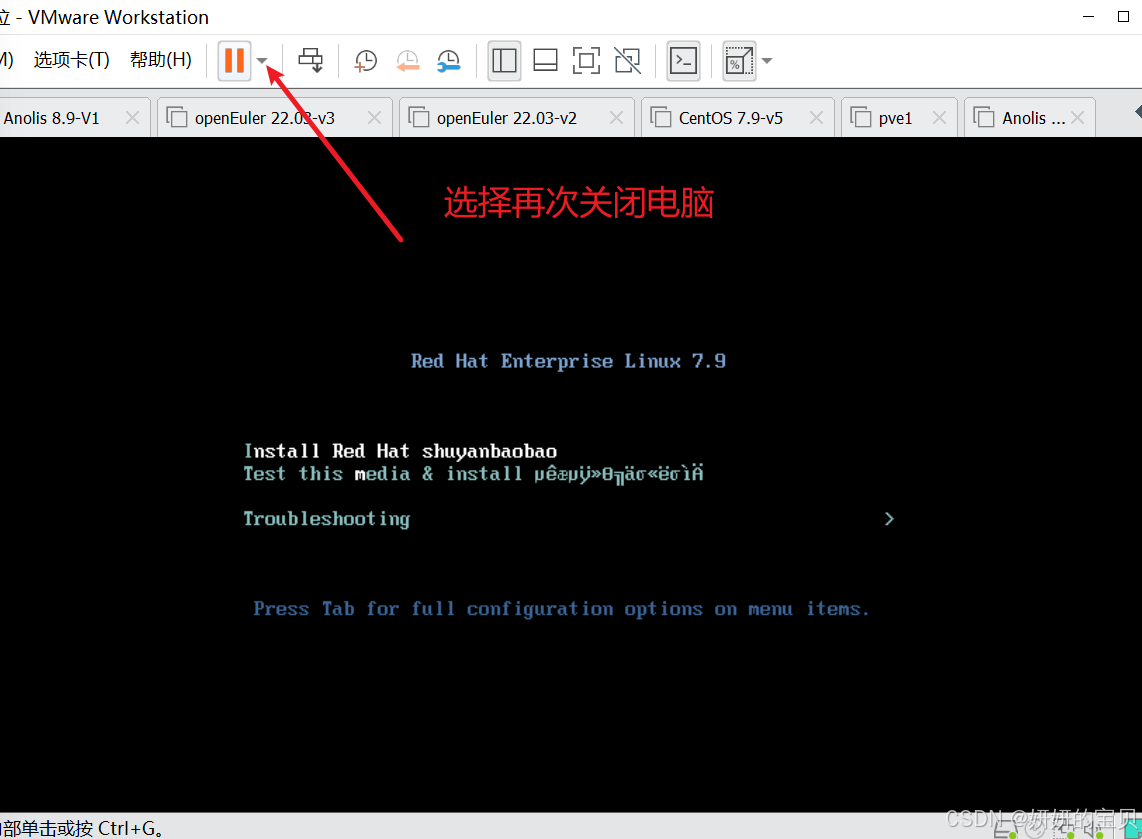
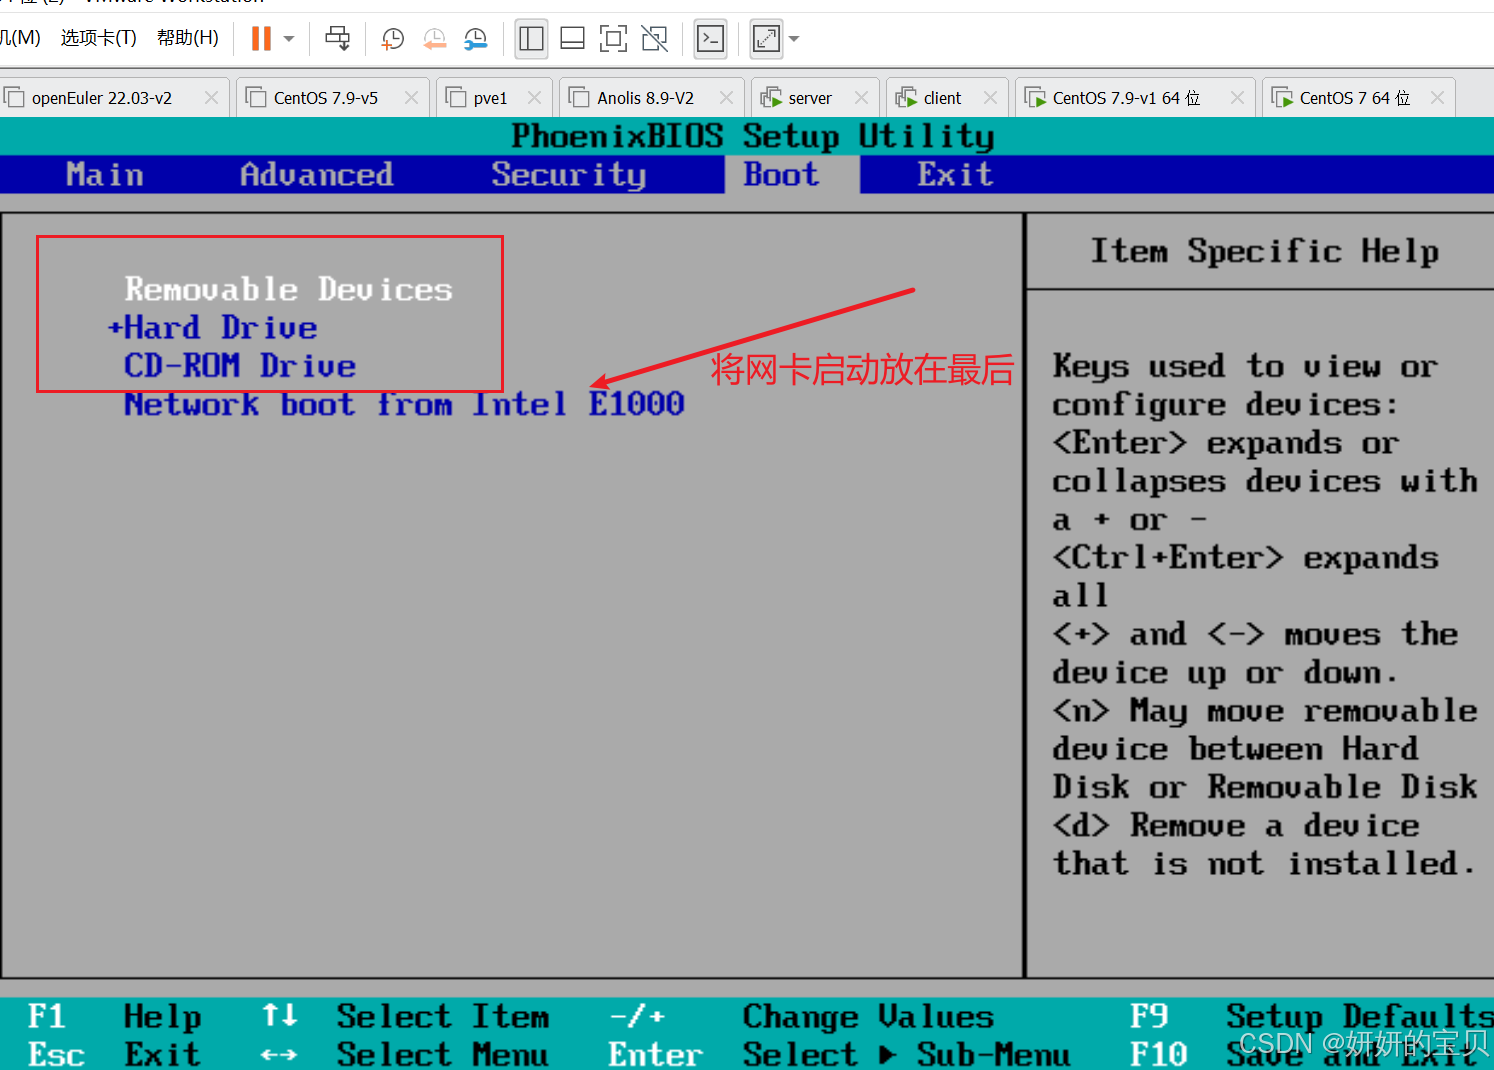
再次进入BIOS将网卡调回去,保存并退出
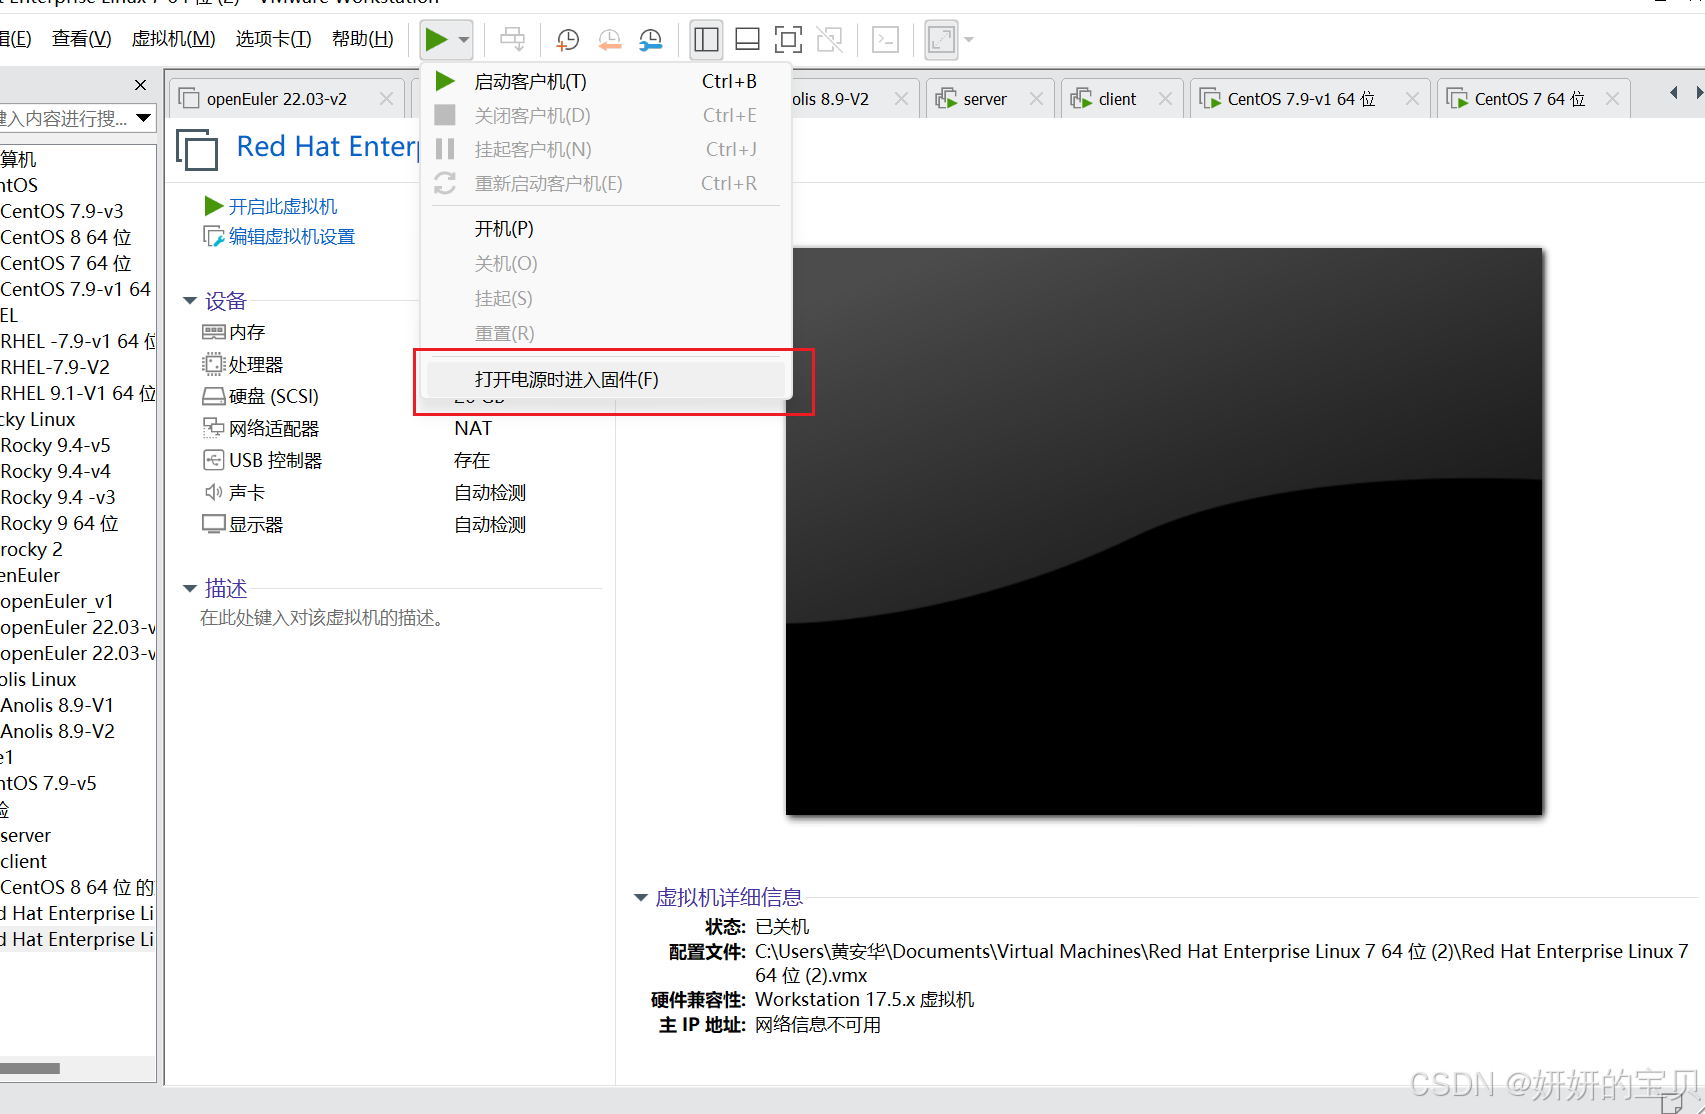
3.3.1 修改网卡安装优先级
3.4 验证是否安装成功
安装好系统开启验证发现没有问题即安装成功
