背景需求:
✂️自制教具分享✂️蔬菜切切乐(剪纸) - 小红书 (xiaohongshu.com)![]() https://www.xiaohongshu.com/explore/65bf6809000000001100fa53?app_platform=android&ignoreEngage=true&app_version=8.46.0&share_from_user_hidden=true&xsec_source=app_share&type=normal&xsec_token=CB_Ij8DE9ljRqsEPu16HLt-ouz2dPScv_B4xJTuWWDmq8=&author_share=1&xhsshare=WeixinSession&shareRedId=ODszMTs4Nk82NzUyOTgwNjg3OTlHS0xC&apptime=1722585691&share_id=d02fdbd57f4342cb92275c6c4497f94d
https://www.xiaohongshu.com/explore/65bf6809000000001100fa53?app_platform=android&ignoreEngage=true&app_version=8.46.0&share_from_user_hidden=true&xsec_source=app_share&type=normal&xsec_token=CB_Ij8DE9ljRqsEPu16HLt-ouz2dPScv_B4xJTuWWDmq8=&author_share=1&xhsshare=WeixinSession&shareRedId=ODszMTs4Nk82NzUyOTgwNjg3OTlHS0xC&apptime=1722585691&share_id=d02fdbd57f4342cb92275c6c4497f94d


我也想做这款个别化学习材料
星火讯飞下载长条形的蔬菜

下载后筛选一下,保留好看的

把一些不好看的、超过边缘的图案剔除

首先把要制作虚线的图片放在第一个文件内


图片的背景色并不都是白色

复制一个修图文件

用PS把,每个图片的背景填充为白色(255,255,255)

现在修改过的图片都是白色背景了


第一步代码:切割虚线
'''
蔬菜切切切(一),添加10条虚线
星火讯飞、阿夏
2024年8月2日
'''
from PIL import Image, ImageDraw

import os
from PIL import Image

path = r'C:\Users\jg2yXRZ\OneDrive\桌面\长条蔬菜'
old_path=path+r'\01图片背景修图'
new_path=path+r'\02虚线'
os.makedirs(new_path,exist_ok=True)

image_list = [os.path.join(root, file) for root, dirs, files in os.walk(old_path) for file in files if file.lower().endswith(('.png', '.jpg', '.jpeg'))]

print(image_list)
n=1
for b in image_list:
    # 打开图像文件
    image = Image.open(b)
    # 创建一个绘图对象
    draw = ImageDraw.Draw(image)

    # 计算方块的位置和大小
    block_width = 1280
    block_height = 30
    canvas_width, canvas_height = image.size
    block_x = (canvas_width - block_width) // 2

    df=10
    block_y_list = []
    for i in range(1, df+1):
        block_y = canvas_height // 10 * i
        block_y_list.append(block_y)

    for block_y in block_y_list:
        # 设置浅灰色(半透明)
        gray = (255, 255, 255, 128)

        # 在指定位置绘制方块
        draw.rectangle([(block_x, block_y), (block_x + block_width, block_y + block_height)], fill=gray)

        # 设置虚线的颜色、间隔和粗细
        dash_color = (0, 0, 0)  # 黑色虚线
        dash_length = 30 # 增加虚线的长度
        gap_length = 30 # 虚线的间隙长度
        line_width = 10  # 设置虚线的粗细

        # 计算虚线的起始和结束坐标
        start_x = block_x
        end_x = block_x + block_width
        start_y = block_y + block_height // 2
        end_y = start_y

        # 画横向虚线
        for x in range(start_x, end_x, dash_length + gap_length):
            draw.line([(x, start_y), (min(x + dash_length, end_x), start_y)], fill=dash_color, width=line_width)

    # 保存修改后的图片
    image.save(new_path + fr"\{b[-9:]}")
    # image.save(new_path + fr"\{n:02d}.png")
    n+=1

# import shutil
# shutil.rmtree(new_path)
在长条9:16图上10等分虚线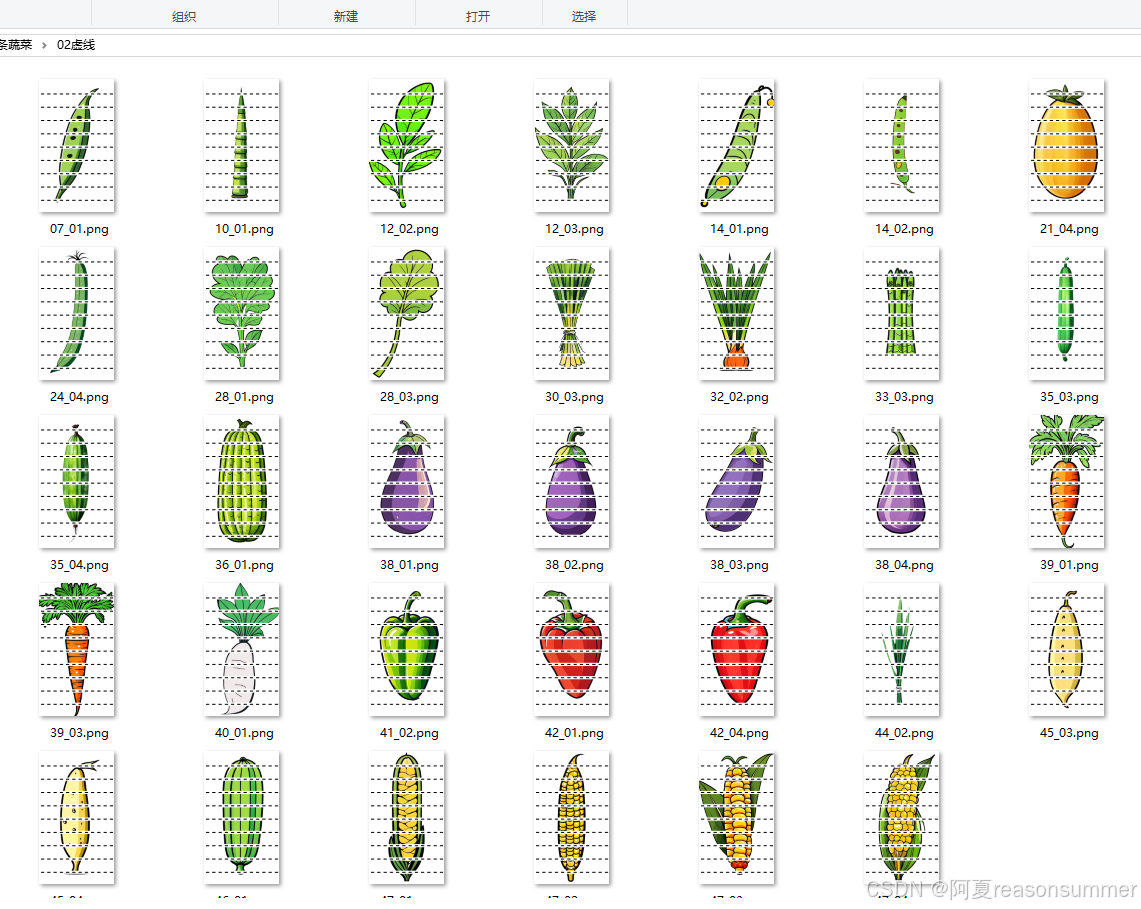


但是我只希望蔬菜图案部分有虚线,白色背景不需要虚线.

所有需要对修改过的PS图片进行提取,
“打开一张已存在的图片,保留里面的白色,把非白色部分变成透明色,另存为png图片”

第二个代码:提取白色背景,制作透明png
'''
蔬菜切切切(二),提取白色透明图层
星火讯飞、阿夏
2024年8月2日
'''

from PIL import Image
import os

def get_rgb_at_coordinates(image_path, coordinates):
    image = Image.open(image_path)
    r, g, b = image.getpixel(coordinates)
    return r, g, b

def process_images_in_folder(folder_path):
    for file_name in os.listdir(folder_path):
        if file_name.lower().endswith(('.png', '.jpg', '.jpeg')):
            image_path = os.path.join(folder_path, file_name)
            r, g, b = get_rgb_at_coordinates(image_path, (710, 1270))
            print(f"Image: {file_name}, Coordinates (710, 1270), RGB: ({r}, {g}, {b})")

            # 打开图片并转换为RGBA模式
            image = Image.open(image_path).convert("RGBA")
            width, height = image.size

            # 遍历图片的每个像素点
            for x in range(width):
                for y in range(height):
                    # 获取当前像素点的RGB值
                    current_r, current_g, current_b, current_a = image.getpixel((x, y))
                    # 如果当前像素点的RGB值与指定坐标点的RGB值不同,则将其透明度设置为0(透明)
                    if (current_r, current_g, current_b) != (r, g, b):
                        image.putpixel((x, y), (current_r, current_g, current_b, 0))

            # 保存处理后的图片为PNG格式
            output_path = os.path.join(new_path, f"{file_name}")
            image.save(output_path, "PNG")

path=r'C:\Users\jg2yXRZ\OneDrive\桌面\长条蔬菜'
folder_path = path+r'\01图片背景修图'
new_path=path+r'\03白色'
os.makedirs(new_path,exist_ok=True)
process_images_in_folder(folder_path)

第三步:把白色透明图片覆盖在虚线图片上
'''
蔬菜切切切(三),透明图层覆盖在虚线图上
星火讯飞、阿夏
2024年8月2日
'''
import os
from PIL import Image

path = r'C:\Users\jg2yXRZ\OneDrive\桌面\长条蔬菜'
folder1 = path + r'\02虚线'
folder2 = path + r'\03白色'
folder3 = path + r'\04合并'

if not os.path.exists(folder3):
    os.makedirs(folder3)

image_files1 = sorted(os.listdir(folder1))
image_files2 = sorted(os.listdir(folder2))

for image_file1, image_file2 in zip(image_files1, image_files2):
    image1_path = os.path.join(folder1, image_file1)
    image2_path = os.path.join(folder2, image_file2)

    image1 = Image.open(image1_path).convert('RGBA')
    image2 = Image.open(image2_path).convert('RGBA')

    combined_image = Image.alpha_composite(image1, image2)

    combined_image.save(os.path.join(folder3, f'{image_file1}'))


第4步,合并制作pdf学具
'''
蔬菜切切切(四),3张一个A4 PDF
星火讯飞、阿夏
2024年8月2日
'''

import os,time
import shutil
from docx import Document
from docx.shared import Cm
from PIL import Image
from PyPDF2 import PdfFileMerger, PdfFileReader

from PIL import Image, ImageDraw, ImageFont
import os,random

print('----1、蔬菜图片左上右下加扑克牌数字------------')
path = r'C:\Users\jg2yXRZ\OneDrive\桌面\长条蔬菜'
image_folder = path + r'\04合并'

image_files = [f for f in os.listdir(image_folder) if f.endswith('.jpg') or f.endswith('.png')]

# 将图片拆成6个一组
grouped_files = [image_files[i:i + 3] for i in range(0, len(image_files), 6)]
print(len(grouped_files))

# 创建临时文件夹
new_folder = path+r'\零时文件夹'
os.makedirs(new_folder, exist_ok=True)


# 处理每一组图片
for group_index, group in enumerate(grouped_files):
    # 创建新的Word文档
    doc = Document(path+r'\蔬菜.docx')
    # print(group)

    # 遍历每个单元格,并插入图片
    for cell_index, image_file in enumerate(group):
        # 计算图片长宽(单位:厘米)

        # 插入图片到单元格
        table = doc.tables[0]
        cell = table.cell(int(cell_index / 3), cell_index % 3)
        # 如果第一行有4个格子,两个数字都写4
        cell_paragraph = cell.paragraphs[0]
        cell_paragraph.clear()
        run = cell_paragraph.add_run()
        run.add_picture(os.path.join(image_folder, image_file), width=Cm(9.42), height=Cm(19.54))

    # 保存Word文档
    doc.save(os.path.join(new_folder, f'{group_index + 1:03d}.docx'))
    time.sleep(3)


# 将10个docx转为PDF
import os
from docx2pdf import convert
from PyPDF2 import PdfFileMerger

pdf_output_path = path+fr'\\01长条蔬菜切切切{int(len(grouped_files))}张共{len(image_files)}图.pdf'

# 将所有DOCX文件转换为PDF
for docx_file in os.listdir(new_folder):
    if docx_file.endswith('.docx'):
        docx_path = os.path.join(new_folder, docx_file)
        convert(docx_path, docx_path.replace('.docx', '.pdf'))


# 合并零时文件里所有PDF文件
merger = PdfFileMerger()
for pdf_file in os.listdir(new_folder):
    if pdf_file.endswith('.pdf'):
        pdf_path = os.path.join(new_folder, pdf_file)
        merger.append(pdf_path)
time.sleep(2)

# 保存合并后的PDF文件
merger.write(pdf_output_path)
merger.close()


# 删除输出文件夹

shutil.rmtree(new_folder)
shutil.rmtree(image_folder )
# shutil.rmtree(new)
time.sleep(2)
其他说明:
如果发现最后,白色背景没有覆盖背景,说明,修图时没有把背景颜色都改成白色(255,255,255),需要到ps里面重新统一背景颜色。


