目录
普罗米修斯监控架构介绍
Prometheus 监控架构
1. 数据抓取(Scraping)
2. 时序数据库(TSDB)
3. 数据模型
4. PromQL 查询语言
5. 告警(Alerting)
6. Alertmanager
7. 可视化(Visualization)
典型的 Prometheus 监控架构
工作流程
优点
部署安装
配置管理脚本
使用说明:
启动alertmanager
启动node_exporter
PromQL简单了解
1. 查询所有时间序列的当前值
2. 查询某个指标的最新值
3. 查询某个指标的某个时间范围的平均值
4. 查询某个指标的某个时间范围的最大值
5. 查询 CPU 使用率
6. 使用 count 聚合函数计算数量
安装grafana工具
监控告警
扩展
续下篇:Prometheus-v2.45.0 + 钉钉告警-CSDN博客
普罗米修斯监控架构介绍
普罗米修斯(Prometheus)是一款开源的系统监控和报警工具,最初由SoundCloud开发,现在是CNCF(云原生计算基金会)的一部分。它主要用于收集和存储时序数据,通过查询语言PromQL进行查询和分析,并能与多种告警和可视化工具集成。
官方网站: https://prometheus.io/download/
中文文档网站:序言 · Prometheus 中文文档
https://prometheus.fuckcloudnative.io/
Introduction · Prometheus中文技术文档
Prometheus 监控架构
1. 数据抓取(Scraping)
Prometheus 定期从配置的目标(targets)中抓取指标数据。每个目标是一个HTTP端点,提供实时的监控数据。这些数据通常是以键值对的形式返回的。
2. 时序数据库(TSDB)
抓取的数据被存储在本地的时序数据库中。Prometheus 的存储系统是专门为高效写入和查询时间序列数据而设计的。数据按时间顺序存储,并且支持高效的压缩和检索。
3. 数据模型
Prometheus 使用多维数据模型(dimensional data model),每条时间序列数据(metric)由一个度量名(metric name)和一组标签(labels)唯一标识。标签是键值对,可以用来区分相同度量名下的不同实例。
4. PromQL 查询语言
Prometheus 提供了一种功能强大的查询语言PromQL,用于实时查询时序数据。PromQL 支持丰富的查询操作,包括聚合、过滤和数学运算等。
5. 告警(Alerting)
Prometheus 允许用户定义告警规则,这些规则会在指定条件满足时触发。告警规则是用PromQL定义的,可以基于实时数据生成告警。告警触发后会被发送到Alertmanager进行处理。
6. Alertmanager
Alertmanager 是 Prometheus 的告警管理组件,负责接收、去重、分组和路由告警通知。它还可以将告警发送到各种通知渠道,如电子邮件、Slack、PagerDuty等。
7. 可视化(Visualization)
Prometheus 自带一个简单的网页UI,用于查看和查询数据。然而,更强大和广泛使用的可视化工具是Grafana。Grafana 可以连接Prometheus,提供丰富的图表和仪表盘,用于展示监控数据。
典型的 Prometheus 监控架构
-
Prometheus Server
- 负责抓取和存储时序数据。
- 处理查询请求,并执行PromQL查询。
-
Exporter
- 各种服务或应用程序的监控数据导出工具(如Node Exporter、MySQL Exporter等)。
- 提供HTTP端点,供Prometheus抓取数据。
-
Pushgateway
- 用于临时性批量任务的监控数据推送。
- 允许短期任务主动将数据推送到Prometheus。
-
Alertmanager
- 管理和处理告警。
- 支持告警去重、分组和路由,集成多种通知渠道。
-
Grafana
- 可视化工具,用于展示Prometheus数据。
- 支持丰富的图表类型和自定义仪表盘。
工作流程
- 数据抓取:Prometheus 定期从配置的目标(通常是Exporter提供的HTTP端点)中抓取监控数据。
- 数据存储:抓取的数据被存储在Prometheus的本地时序数据库中。
- 数据查询:用户可以通过Prometheus的网页UI或Grafana使用PromQL查询数据。
- 告警触发:Prometheus根据定义的告警规则评估数据,当条件满足时触发告警。
- 告警处理:告警被发送到Alertmanager进行处理,并通知相关人员或系统。
- 数据可视化:通过Grafana等工具,用户可以将数据展示在仪表盘上,实现实时监控和分析。
优点
- 高效的数据存储和查询:专为时序数据设计的存储系统,支持高效的压缩和检索。
- 强大的查询语言:PromQL 提供了强大的查询和分析能力。
- 灵活的告警系统:支持复杂的告警规则和多种通知方式。
- 易于扩展和集成:支持多种Exporter和可视化工具,易于集成到现有系统中。
部署安装
https://prometheus.io/docs/instrumenting/exporters/
本文软件包链接:https://pan.baidu.com/s/1b3AzJBNtIt1PfjNi1eE7fg?pwd=jcj8
提取码:jcj8
上传如下四个工具压缩包到/opt/目录中
[root@localhost ~]# cd /opt && ll
total 247532
-rw-r--r-- 1 root root  29717412 Apr 24 00:04 alertmanager-0.26.0.linux-amd64.tar.gz
-rw-r--r-- 1 root root 122184924 Jul 19 04:56 grafana-enterprise-11.1.0-1.x86_64.rpm
-rw-r--r-- 1 root root  10368103 Apr 24 00:04 node_exporter-1.6.1.linux-amd64.tar.gz
-rw-r--r-- 1 root root  91189594 Apr 24 00:04 prometheus-2.45.0.linux-amd64.tar.gz
解压 Prometheus 安装包
[root@localhost opt]# tar -xf prometheus-2.45.0.linux-amd64.tar.gz解压后改个给目录改个短点的名字方便,并进入 prometheus 目录
[root@localhost prometheus]# ll
total 227312
-rw-r--r-- 1 1001 docker     11357 Jun 23  2023 LICENSE
-rw-r--r-- 1 1001 docker      3773 Jun 23  2023 NOTICE
drwxr-xr-x 2 1001 docker        38 Jun 23  2023 console_libraries
drwxr-xr-x 2 1001 docker       173 Jun 23  2023 consoles
-rwxr-xr-x 1 1001 docker 119846310 Jun 23  2023 prometheus
-rw-r--r-- 1 1001 docker       934 Jun 23  2023 prometheus.yml
-rwxr-xr-x 1 1001 docker 112896008 Jun 23  2023 promtool

解释:
LICENSE:包含 Prometheus 项目的开源许可证信息。通常是 Apache License 2.0 或类似的许可证。
NOTICE:包含与 Prometheus 相关的法律通知和版权声明。
console_libraries:这个目录包含一些 JavaScript 库,用于支持 Prometheus 控制台模板的功能。
consoles:这个目录包含多个 HTML 模板文件,这些模板用于生成 Prometheus 的控制台视图。控制台视图可以在 Prometheus 的 Web UI 中用于展示各种监控数据。
prometheus:Prometheus 的主可执行文件。运行这个文件会启动 Prometheus 服务器,开始抓取和存储监控数据。
prometheus.yml:Prometheus 的主要配置文件。定义了抓取配置(scrape configuration)、告警规则(alerting rules)、告警管理配置(alertmanager configuration)等。是 Prometheus 运作的核心文件。
promtool:Prometheus 提供的一个命令行工具,用于检查配置文件的语法、执行查询、检查告警规则等。对于调试和管理 Prometheus 非常有用。
注意:
prometheus端口默认是9090,如果在你的rocky_linux9.4系统上,9090端口已经被占用,需将其关闭,如果是系统自带的会启动9090端口,在rocky中一般是其web管理页面的服务端口,执行下述命令,将其关掉
# 禁用并立即停止 Cockpit 服务和相关的 socket
systemctl disable --now cockpit cockpit.socket
启动 Prometheus 服务
[root@localhost prometheus]# ./prometheus

# 使用nohup ./prometheus & 命令可后端运行,并会在当前目录生成nohup.out存储日志,而原本prometheus是没有日志的。
访问ip+端口,例如我这里访问:http://192.168.226.29:9090/

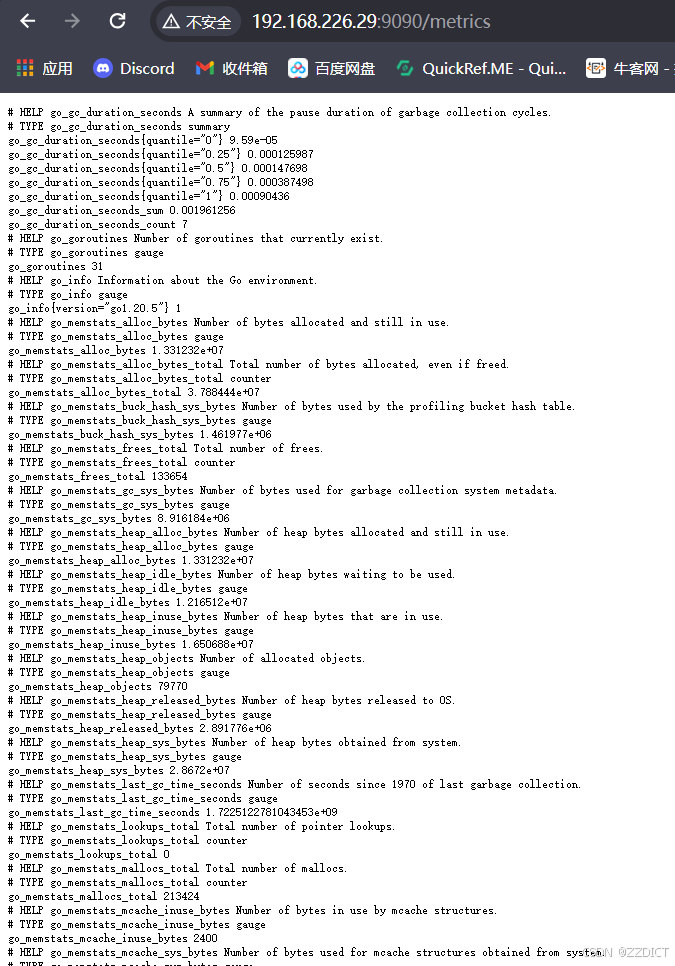
http://192.168.226.29:9090/metrics
这个路径会显示 Prometheus 自身的监控指标(metrics)。这些指标包含了 Prometheus 自身的性能和健康状况信息,并且以文本格式展示。
配置管理脚本
[root@localhost prometheus]# vim /usr/local/bin/prometheus.sh
#!/bin/bash
# **********************************************************
# * File Name     : prometheus.sh
# * Author        : zzdict
# * Email         : zzdict@gmail.com / elk_deer@foxmail.com
# * Create time   : 2024-08-01 15:12
# * Description   : prometheus管理脚本
# **********************************************************
# Prometheus 的安装路径
PROMETHEUS_PATH="/opt/prometheus"
PROMETHEUS_BINARY="$PROMETHEUS_PATH/prometheus"
PROMETHEUS_CONFIG="$PROMETHEUS_PATH/prometheus.yml"
PROMETHEUS_PID_FILE="$PROMETHEUS_PATH/prometheus.pid"

start() {
    if [ -f "$PROMETHEUS_PID_FILE" ]; then
        echo "Prometheus 已经在运行。"
        return
    fi

    echo "启动 Prometheus..."
    nohup "$PROMETHEUS_BINARY" --config.file="$PROMETHEUS_CONFIG" > "$PROMETHEUS_PATH/prometheus.log" 2>&1 &
    echo $! > "$PROMETHEUS_PID_FILE"
    echo "Prometheus 启动成功。"
}

stop() {
    if [ ! -f "$PROMETHEUS_PID_FILE" ]; then
        echo "Prometheus 没有运行。"
        return
    fi

    echo "停止 Prometheus..."
    PID=$(cat "$PROMETHEUS_PID_FILE")
    kill "$PID"
    rm -f "$PROMETHEUS_PID_FILE"
    echo "Prometheus 停止成功。"
}

restart() {
    echo "重启 Prometheus..."
    stop
    start
}

status() {
    if [ -f "$PROMETHEUS_PID_FILE" ]; then
        echo "Prometheus 正在运行。"
    else
        echo "Prometheus 没有运行。"
    fi
}

case "$1" in
    start)
        start
        ;;
    stop)
        stop
        ;;
    restart)
        restart
        ;;
    status)
        status
        ;;
    *)
        echo "用法: $0 {start|stop|restart|status}"
        exit 1
        ;;
esac
加上执行权限
[root@localhost prometheus]# chmod +x /usr/local/bin/prometheus.sh
创建符号链接
[root@localhost prometheus]# ln -s /usr/local/bin/prometheus.sh /usr/local/bin/prometheus使用说明:
- prometheus
start:启动 Prometheus,如果已经运行则输出提示信息。 - prometheus
stop:停止 Prometheus,如果没有运行则输出提示信息。 - prometheus
restart:重启 Prometheus,先停止再启动。 - prometheus
status:检查 Prometheus 的运行状态。
本文配置systemd管理方式示例见:自定义的 systemd 服务启动方式-CSDN博客
启动alertmanager
[root@localhost opt]# cd /opt
[root@localhost opt]# tar -xf alertmanager-0.26.0.linux-amd64.tar.gz
[root@localhost opt]# mv alertmanager-0.26.0.linux-amd64 alertmanager
[root@localhost alertmanager]# ll
total 62504
-rw-r--r-- 1 3434 3434 11357 Aug 24 2023 LICENSE
-rw-r--r-- 1 3434 3434 457 Aug 24 2023 NOTICE
-rwxr-xr-x 1 3434 3434 35410965 Aug 24 2023 alertmanager
-rw-r--r-- 1 3434 3434 356 Aug 24 2023 alertmanager.yml
-rwxr-xr-x 1 3434 3434 28566971 Aug 24 2023 amtool
解释:
LICENSE:许可证文件,包含软件的许可证信息和条款,通常用来说明使用和分发软件的法律条款。
NOTICE:通知文件,通常包含有关软件的额外版权信息、贡献者声明、以及其他法律声明。
alertmanager:主执行文件,Alertmanager 的可执行程序。用于启动 Alertmanager 服务,该服务负责处理来自 Prometheus 的警报并执行相应的通知和静默操作。
alertmanager.yml:配置文件,用于配置 Alertmanager 的行为,包括警报路由、接收器和静默规则。你需要根据你的环境配置这个文件,以确保 Alertmanager 能够正确处理和通知警报。
amtool:工具程序,提供了一个命令行工具用于与 Alertmanager 进行交互,例如检查和管理警报。这个工具可以用来验证 Alertmanager 的配置和状态。启动alertmanager
[root@localhost alertmanager]# ./alertmanager

# 后端运行的命令 nohup ./alertmanager &
alertmanager会使用9093和9094端口,可新开一个终端查看
[root@localhost alertmanager]# ss -tnlp
State          Recv-Q         Send-Q                 Local Address:Port                 Peer Address:Port        Process
LISTEN         0              128                          0.0.0.0:22                        0.0.0.0:*            users:(("sshd",pid=819,fd=3))
LISTEN         0              128                             [::]:22                           [::]:*            users:(("sshd",pid=819,fd=4))
LISTEN         0              4096                               *:9093                            *:*            users:(("alertmanager",pid=6146,fd=8))
LISTEN         0              4096                               *:9094                            *:*            users:(("alertmanager",pid=6146,fd=3))
LISTEN         0              4096                               *:9090                            *:*            users:(("prometheus",pid=6110,fd=7))
配置prometheus中prometheus.yml文件连接alertmanager通信

重启prometheus
[root@localhost alertmanager]# prometheus restart
 注: 如果起不了服务,注意配置格式与参数,打不开网页建议清理缓存后重新访问或者换个浏览器打开
启动node_exporter
[root@localhost alertmanager]# cd /opt
[root@localhost opt]# tar -xf node_exporter-1.6.1.linux-amd64.tar.gz
[root@localhost opt]# mv node_exporter-1.6.1.linux-amd64 node_exporter

[root@localhost opt]# cd node_exporter
# 后台启动
[root@localhost node_exporter]# nohup ./node_exporter &
同理,将 node_exporter-1.6.1.linux-amd64 给另一台虚拟机192.168.226.28拷贝过去并依照上述运行node_exporter 这个主机运行node_exporter后就暂时不用操作了。
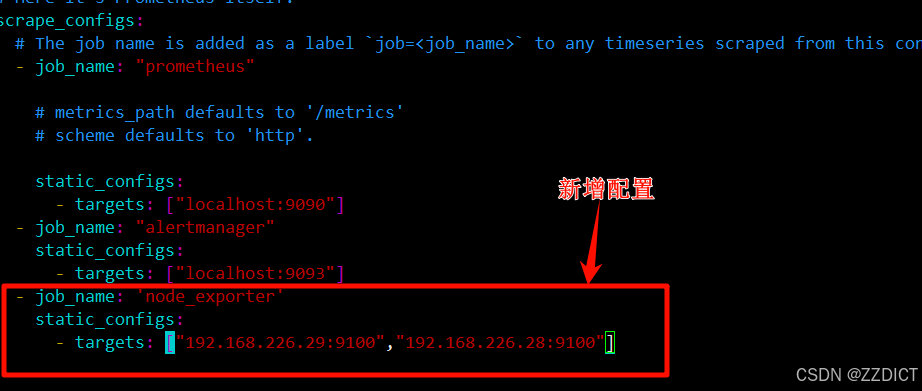
配置prometheus中prometheus.yml文件采集两台虚拟机的node_exporter数据
现在是在prometheus的主机中配置
[root@localhost node_exporter]# vim /opt/prometheus/prometheus.yml
  - job_name: 'node_exporter'
    static_configs:
      - targets: ["192.168.226.29:9100","192.168.226.28:9100"]
重启prometheus
[root@localhost node_exporter]# prometheus restart


PromQL简单了解
查询页面在prometheus的web页面的Graph中

Prometheus 查询语言(PromQL)用于从 Prometheus 中检索和处理时间序列数据。以下是一些常见的 PromQL 查询示例:
1. 查询所有时间序列的当前值
up说明:这个查询会显示所有被 Prometheus 监控的目标的状态(1 表示正常,0 表示异常)。
2. 查询某个指标的最新值
node_cpu_seconds_total
说明:这会显示 node_cpu_seconds_total 指标的所有时间序列的最新值。
3. 查询某个指标的某个时间范围的平均值
avg_over_time(node_cpu_seconds_total[5m])
说明:计算过去 5 分钟内 node_cpu_seconds_total 指标的平均值。
4. 查询某个指标的某个时间范围的最大值
max_over_time(node_cpu_seconds_total[1h])
说明:计算过去 1 小时内 node_cpu_seconds_total 指标的最大值。
5. 查询 CPU 使用率
100 - (avg(irate(node_cpu_seconds_total{mode="idle"}[5m])) * 100)
说明:计算 CPU 使用率,假设 node_cpu_seconds_total 指标中 mode 标签为 "idle" 的时间序列表示 CPU 空闲时间。
6. 使用 count 聚合函数计算数量
count(node_filesystem_free_bytes) by (instance)
说明:计算每个 instance 的 node_filesystem_free_bytes 指标的时间序列数量。
安装grafana工具
Grafana 起源于 2014 年,由 Torkel Ödegaard 创建。他最初开发 Grafana 是为了填补当时可用的可视化工具中的一些空白,特别是在对时序数据的可视化方面。Grafana 起初是作为对 Graphite(一种流行的时序数据库)数据的可视化工具开发的,但很快它的功能和支持的后端数据源扩展到了包括 Prometheus、InfluxDB、Elasticsearch 和 MySQL 等在内的多种数据源。
Grafana 的主要目的是提供一个强大且灵活的仪表盘和可视化平台,用于监控和分析来自不同数据源的数据。它的用户界面允许用户创建复杂的图表、表格和警报,使得对实时和历史数据的分析更加直观和易于操作。
Grafana 是用 Go 语言(也称为 Golang)编写的。Grafana 是一个开源的数据可视化和监控平台,用于创建交互式仪表板,支持多种数据源(如 Prometheus、InfluxDB、Elasticsearch 等)的数据查询和展示。
[root@localhost node_exporter]# cd /opt
[root@localhost opt]# yum localinstall -y grafana-enterprise-11.1.0-1.x86_64.rpm
启动grafana
[root@localhost opt]# systemctl enable --now grafana-server
默认用户名:admin 密码密码:admin 登录后需要修改密码

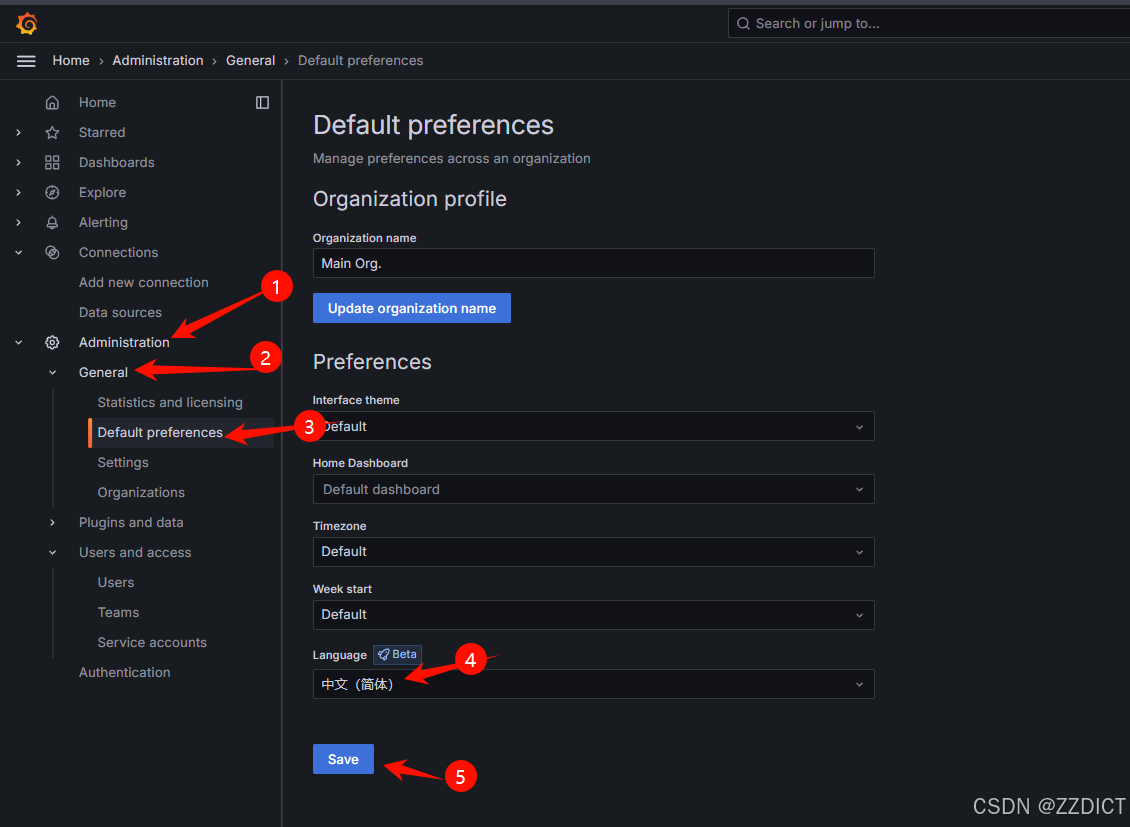
设置中文
添加prometheus数据源


设置数据源链接地址,填入后,下滑底部点击保存。


来到官方网站:https://grafana.com/grafana/dashboards/
选择一款 prometheus 模板


拷贝这个仪表板ID使用,如果担心后期该模板下架,可以下在该仪表板json文件
导入仪表板


 起名并选择数据源,然后导入即可。
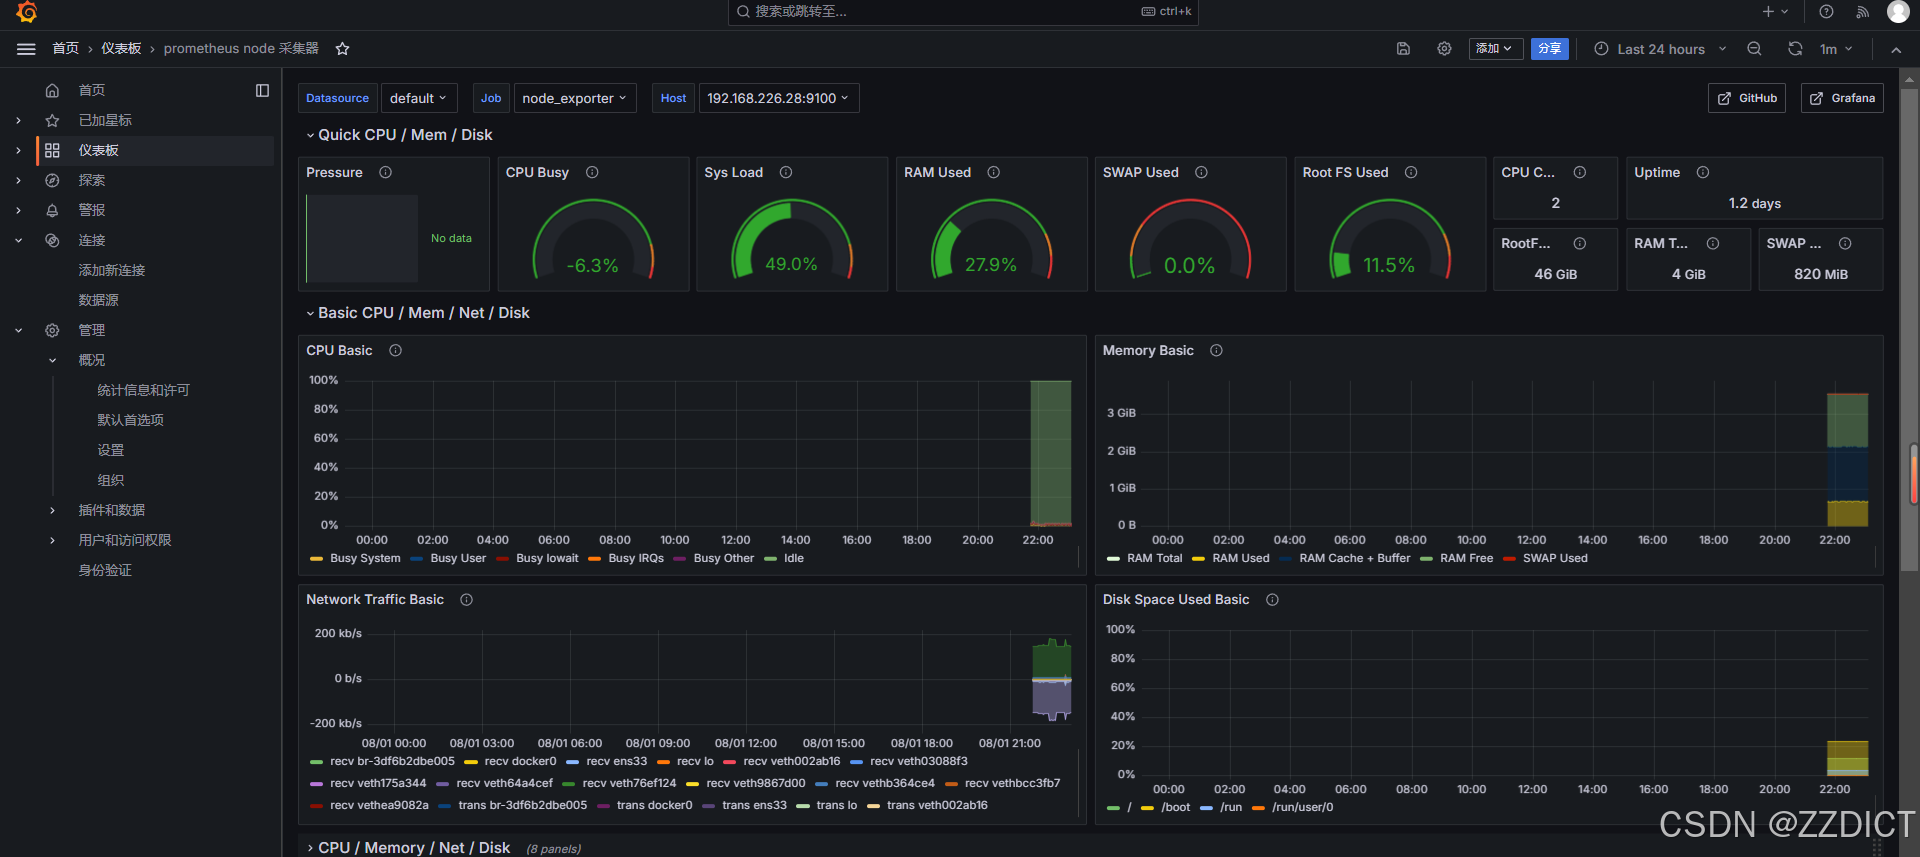
导入后仪表板展示如下:
监控告警
[root@localhost ~]# cd /opt/alertmanager
[root@localhost alertmanager]# vim alertmanager.yml
# 定义邮件通知模板的路径,可以是模板文件的目录,支持通配符 *.tmpl
global:
  resolve_timeout: 5m
  smtp_from: '2578515263@qq.com' # 发件⼈,显示在邮件页面,显示是谁发的
  smtp_smarthost: 'smtp.qq.com:465' # 邮箱服务器的POP3/SMTP 主机配置 smtp.163.com 或
  smtp_auth_username: '2578515263@qq.com' # ⽤⼾名,真实发件人
  smtp_auth_password: 'ktqayhvipnklojhq' # 授权码
  smtp_require_tls: false

templates:
  - /opt/alertmanager/tmpl/*.tmpl   #定义邮件模板的路径

# 设置路由规则,指定如何分组和发送警报
route:
  group_by: ['alertname']      # 根据警报名称进行分组,确保同一类型的警报被归为一组
  group_wait: 30s             # 当一个警报组内的警报发生后,等待 30 秒,以便将它们一起发送
  group_interval: 5m          # 每 5 分钟发送一次警报组
  repeat_interval: 1h         # 如果警报仍然处于活动状态,每小时重复发送一次
  receiver: 'email-notifications'  # 默认使用 'email-notifications' 接收者来发送警报通知

# 定义接收者配置,包括电子邮件通知设置
receivers:
# 优先使用这里的配置规则,如果没有则去global里的设置
  - name: 'email-notifications'  # 接收者名称,用于路由规则中的指定
    email_configs:
      - to: 'zzdict@gmail.com'   # 收件人的电子邮件地址
        from: '2578515263@qq.com' # 发件人的电子邮件地址
        smarthost: 'smtp.qq.com:25'  # SMTP 服务器地址和端口
        auth_username: '2578515263@qq.com'  # SMTP 服务器的用户名
        auth_password: 'ktqayhvipnklojhq'    # SMTP 服务器的密码
        html: '{{ template "email.html" . }}'  # 使用指定的邮件模板

# 定义抑制规则,用于控制警报的触发和抑制
inhibit_rules:
 - source_match:
     severity: 'critical'  # 匹配来自严重性为 'critical' 的警报
   target_match:
     severity: 'warning'  # 匹配目标严重性为 'warning' 的警报
   equal: ['alertname', 'dev', 'instance']  # 仅当警报名称、标签 'dev' 和 'instance' 均匹配时抑制
创建邮件模板的目录存放
[root@localhost alertmanager]# mkdir ./tmpl/
[root@localhost alertmanager]# vim ./tmpl/email.tmpl
{{ define "email.html" }}
<!DOCTYPE html>
<html>
<head>
    <style>
        table {
            border-collapse: collapse;
            width: 80%;
            margin: 20px auto;
        }

        th, td {
            border: 1px solid #ddd;
            padding: 8px;
            text-align: left;
        }

        th {
            background-color: #f2f2f2;
        }

        h1 {
            text-align: center;
        }

        .alert-details {
            margin-top: 20px;
        }

        .alert-item {
            border: 1px solid #ddd;
            padding: 10px;
            margin-bottom: 10px;
            background-color: #f9f9f9;
        }
    </style>
</head>
<body>
    <h1>监控报警通知</h1>
    <table>
        <tr>
            <th>告警状态</th>
            <th>告警级别</th>
            <th>告警类型</th>
            <th>告警应用</th>
            <th>告警主机</th>
            <th>告警详情</th>
            <th>触发阀值</th>
            <th>告警时间</th>
        </tr>
        {{ range $i, $alert := .Alerts }}
        <tr>
            <td>{{ .Status }}</td>
            <td>{{ $alert.Labels.severity }}</td>
            <td>{{ $alert.Labels.alertname }}</td>
            <td>{{ $alert.Annotations.summary }}</td>
            <td>{{ $alert.Labels.instance }}</td>
            <td>{{ $alert.Annotations.description }}</td>
            <td>{{ $alert.Annotations.value }}</td>
            <td>{{ $alert.StartsAt.Format "2006-01-02 15:04:05" }}</td>
        </tr>
        {{ end }}
    </table>
</body>
</html>
{{ end }}
重启alertmanager
[root@localhost alertmanager]# pkill alertmanager
[root@localhost alertmanager]# nohup ./alertmanager &
设置监控项
[root@localhost alertmanager]# cd /opt/prometheus
# 创建规则文件存放目录
[root@localhost prometheus]# mkdir ./rules/

[root@localhost prometheus]# vim prometheus.yml
rule_files:
  - "/opt/prometheus/rules/disk.yml"
改动位置见图
告警规则配置
[root@localhost prometheus]# vim ./rules/disk.yml
groups:
  - name: 'disk-usage-alerts'
    # 这是告警组的名称
    rules:
      - alert: DiskSpaceUsageHigh
        # 这是告警规则的名称
        expr: 100 - (node_filesystem_avail_bytes / node_filesystem_size_bytes * 100) > 50
        # 告警表达式检查磁盘使用率是否超过50%
        for: 5m
        # 如果条件持续5分钟,则触发告警
        labels:
          severity: 'warning'
          # 为告警添加标签,指定严重性为“警告”
        annotations:
          summary: '磁盘使用率过高 {{ $labels.instance }}'
          # 摘要注释,描述告警的内容,包括实例名称
重启prometheus
[root@localhost prometheus]# prometheus restart
这里已经捕获到一个满足告警条件的指标,在等待配置的规则,在规则中定义了持续五分钟就会触发告警。
 等待规则中定义的五分钟后,即收到邮件告警,刷新看监控web网页

扩展
遇到下图报错,需要把服务器的时间同步一下,刷新网页即可。
systemctl restart chronyd




![【重磅推出】★全部CFA FRM CAIA ESG原創資料整理[2024版+2025版更新中]](https://i-blog.csdnimg.cn/direct/306d5fb420634612ae21d495a0495bea.jpeg#pic_center)


