目录
一、用法精讲
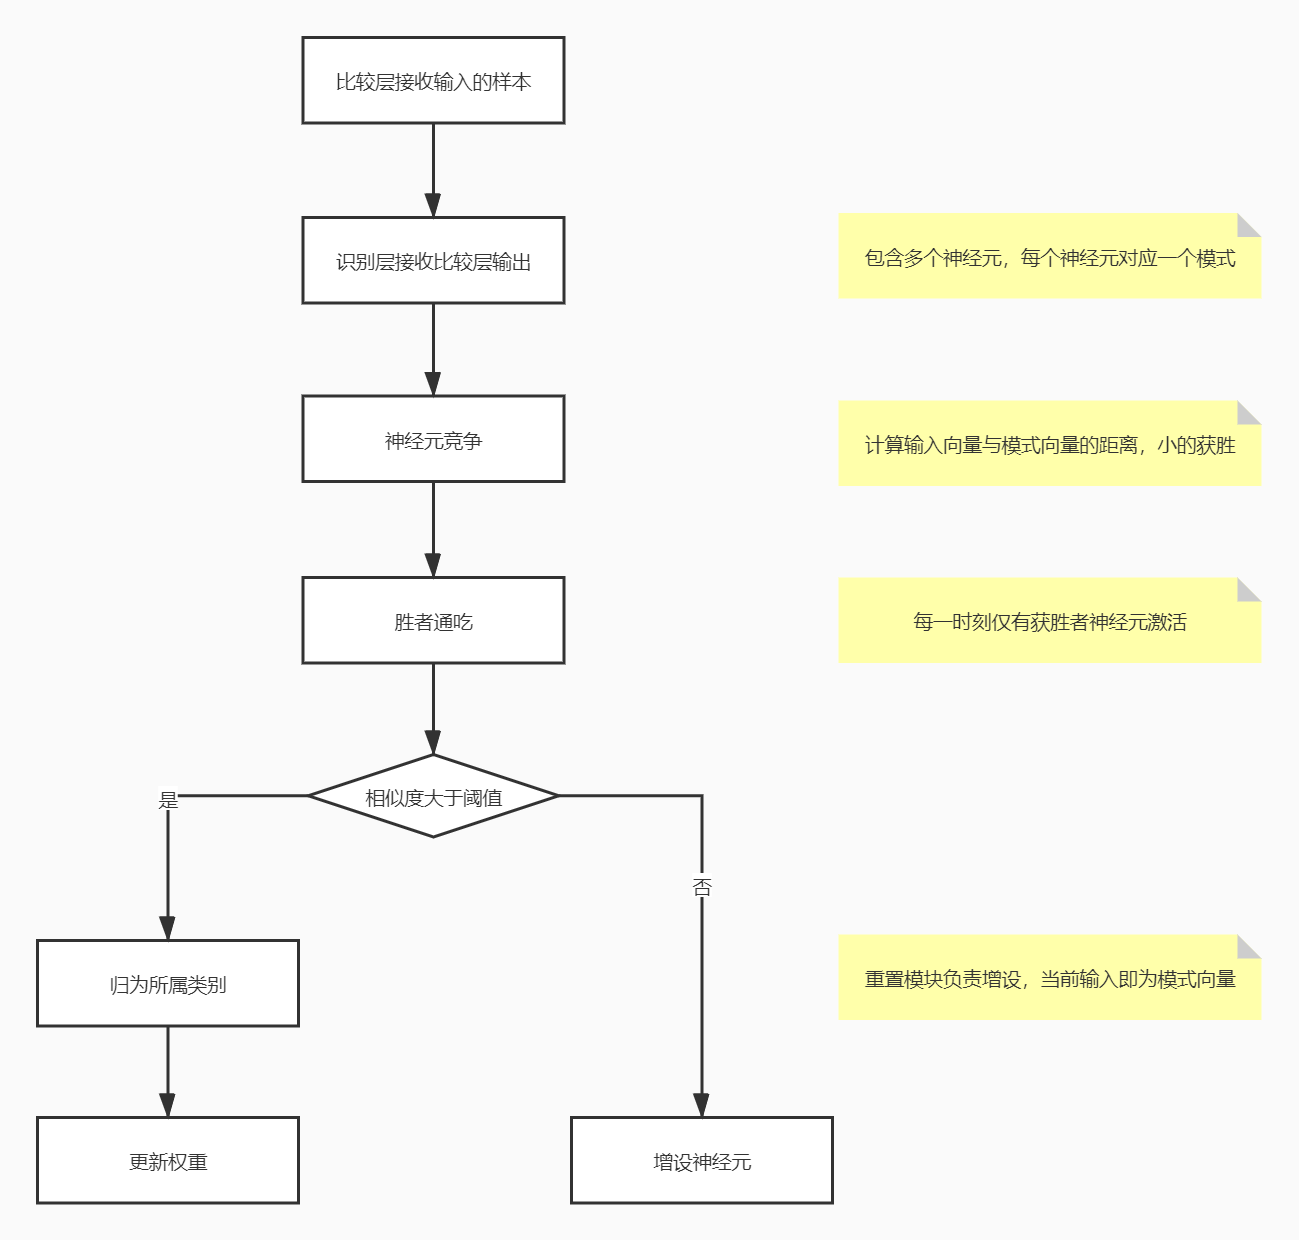
206、pandas.Series.reset_index方法
206-1、语法
206-2、参数
206-3、功能
206-4、返回值
206-5、说明
206-6、用法
206-6-1、数据准备
206-6-2、代码示例
206-6-3、结果输出
207、pandas.Series.sample方法
207-1、语法
207-2、参数
207-3、功能
207-4、返回值
207-5、说明
207-6、用法
207-6-1、数据准备
207-6-2、代码示例
207-6-3、结果输出
208、pandas.Series.set_axis方法
208-1、语法
208-2、参数
208-3、功能
208-4、返回值
208-5、说明
208-6、用法
208-6-1、数据准备
208-6-2、代码示例
208-6-3、结果输出
209、pandas.Series.take方法
209-1、语法
209-2、参数
209-3、功能
209-4、返回值
209-5、说明
209-6、用法
209-6-1、数据准备
209-6-2、代码示例
209-6-3、结果输出
210、pandas.Series.tail方法
210-1、语法
210-2、参数
210-3、功能
210-4、返回值
210-5、说明
210-6、用法
210-6-1、数据准备
210-6-2、代码示例
210-6-3、结果输出
二、推荐阅读
1、Python筑基之旅
2、Python函数之旅
3、Python算法之旅
4、Python魔法之旅
5、博客个人主页


一、用法精讲
206、pandas.Series.reset_index方法
206-1、语法
# 206、pandas.Series.reset_index方法
pandas.Series.reset_index(level=None, *, drop=False, name=_NoDefault.no_default, inplace=False, allow_duplicates=False)
Generate a new DataFrame or Series with the index reset.

This is useful when the index needs to be treated as a column, or when the index is meaningless and needs to be reset to the default before another operation.

Parameters:
levelint, str, tuple, or list, default optional
For a Series with a MultiIndex, only remove the specified levels from the index. Removes all levels by default.

dropbool, default False
Just reset the index, without inserting it as a column in the new DataFrame.

nameobject, optional
The name to use for the column containing the original Series values. Uses self.name by default. This argument is ignored when drop is True.

inplacebool, default False
Modify the Series in place (do not create a new object).

allow_duplicatesbool, default False
Allow duplicate column labels to be created.

New in version 1.5.0.

Returns:
Series or DataFrame or None
When drop is False (the default), a DataFrame is returned. The newly created columns will come first in the DataFrame, followed by the original Series values. When drop is True, a Series is returned. In either case, if inplace=True, no value is returned.
206-2、参数
206-2-1、level(可选,默认值为None):用于指定要重置的索引级别,如果索引是多级索引(MultiIndex),可以通过此参数指定要重置的级别,可以是单个级别名称或级别名称的列表。如果为None,则重置所有级别。
206-2-2、drop(可选,默认值为False):如果为False,则会将当前索引作为列插入到Series中;如果为True,则不会插入索引列。
206-2-3、name(可选):用于设置新列的名称(如果drop=False),如果没有指定名称,默认会使用索引名称。
206-2-4、inplace(可选,默认值为False):如果为True,则在原地修改Series对象,而不是返回新的对象。
206-2-5、allow_duplicates(可选,默认值为False):该参数控制是否允许新列中出现重复值,如果为False且新列名已存在,会引发错误。
206-3、功能
用于重置Series的索引,使其回到默认的整数索引;同时,可以选择将现有的索引变为数据列的一部分。
206-4、返回值
返回一个新的Series对象(如果inplace=False),其索引被重置为默认的整数索引,如果drop=False,则原索引被添加为新列。
206-5、说明
使用场景:
206-5-1、数据清理和准备:在数据分析的过程中,数据的索引可能会变得不一致或者不再有用,使用reset_index可以将索引重置为默认的整数索引,使数据更整齐、便于操作。例如,当索引是某些数据处理步骤的副产品时,可以使用reset_index来消除不需要的索引。
206-5-2、合并数据:在合并或连接数据时,通常需要统一索引格式,如果两个数据集的索引不同,可以使用reset_index将它们重置为相同的格式,然后进行合并操作。
206-5-3、数据转换:在某些情况下,索引本身也可能包含有价值的信息,通过将索引重置为默认整数索引并将原索引添加为列,可以方便地访问和分析原索引中的数据。
206-5-4、数据透视表:在创建数据透视表后,索引可能是多级索引,使用reset_index可以将多级索引展开为列,便于进一步的分析和操作。
206-5-5、结果展示:在展示分析结果时,默认的整数索引可能比复杂的索引更易于理解,使用reset_index可以使数据更容易解释和展示给最终用户。
206-6、用法
206-6-1、数据准备
无206-6-2、代码示例
# 206、pandas.Series.reset_index方法
# 206-1、数据清理
import pandas as pd
# 销售数据
sales = pd.Series([150, 200, 100], index=['prod_1', 'prod_2', 'prod_3'])
print("原始销售数据:")
print(sales)
# 重置索引
sales_clean = sales.reset_index(drop=True)
print("\n重置索引后的销售数据:")
print(sales_clean)

# 206-2、合并数据
import pandas as pd
# 销售数据
sales = pd.Series([150, 200, 100], index=['prod_1', 'prod_2', 'prod_3'])
# 商品描述数据
products = pd.DataFrame({'product_id': ['prod_1', 'prod_2', 'prod_3'], 'description': ['Product 1', 'Product 2', 'Product 3']})
# 重置销售数据的索引
sales_reset = sales.reset_index()
sales_reset.columns = ['product_id', 'sales']
# 合并数据
merged_data = pd.merge(sales_reset, products, on='product_id')
print("\n合并后的数据:")
print(merged_data)

# 206-3、数据转换
import pandas as pd
# 时间序列数据
date_range = pd.date_range(start='2024-01-01', periods=3, freq='D')
sales = pd.Series([150, 200, 100], index=date_range)
print("原始时间序列数据:")
print(sales)
# 重置索引
sales_reset = sales.reset_index()
sales_reset.columns = ['date', 'sales']
print("\n重置索引后的时间序列数据:")
print(sales_reset)

# 206-4、数据透视表
import pandas as pd
# 创建数据透视表
data = {
    'Category': ['A', 'A', 'B', 'B'],
    'Sub-Category': ['X', 'Y', 'X', 'Y'],
    'Sales': [100, 200, 150, 300]
}
df = pd.DataFrame(data)
pivot_table = df.pivot_table(values='Sales', index=['Category', 'Sub-Category'])
print("原始数据透视表:")
print(pivot_table)
# 重置索引
pivot_table_reset = pivot_table.reset_index()
print("\n重置索引后的数据透视表:")
print(pivot_table_reset)

# 206-5、结果展示
import pandas as pd
# 分析结果数据
data = {
    'Metric': ['Accuracy', 'Precision', 'Recall'],
    'Value': [0.95, 0.92, 0.88]
}
results = pd.Series(data['Value'], index=data['Metric'])
print("原始分析结果数据:")
print(results)
# 重置索引
results_reset = results.reset_index()
results_reset.columns = ['Metric', 'Value']
print("\n重置索引后的分析结果数据:")
print(results_reset)
206-6-3、结果输出
# 206、pandas.Series.reset_index方法
# 206-1、数据清理
# 原始销售数据:
# prod_1    150
# prod_2    200
# prod_3    100
# dtype: int64
#
# 重置索引后的销售数据:
# 0    150
# 1    200
# 2    100
# dtype: int64

# 206-2、合并数据
# 合并后的数据:
#   product_id  sales description
# 0     prod_1    150   Product 1
# 1     prod_2    200   Product 2
# 2     prod_3    100   Product 3

# 206-3、数据转换
# 原始时间序列数据:
# 2024-01-01    150
# 2024-01-02    200
# 2024-01-03    100
# Freq: D, dtype: int64
#
# 重置索引后的时间序列数据:
#         date  sales
# 0 2024-01-01    150
# 1 2024-01-02    200
# 2 2024-01-03    100

# 206-4、数据透视表
# 原始数据透视表:
#                        Sales
# Category Sub-Category
# A        X             100.0
#          Y             200.0
# B        X             150.0
#          Y             300.0
#
# 重置索引后的数据透视表:
#   Category Sub-Category  Sales
# 0        A            X  100.0
# 1        A            Y  200.0
# 2        B            X  150.0
# 3        B            Y  300.0

# 206-5、结果展示
# 原始分析结果数据:
# Accuracy     0.95
# Precision    0.92
# Recall       0.88
# dtype: float64
#
# 重置索引后的分析结果数据:
#       Metric  Value
# 0   Accuracy   0.95
# 1  Precision   0.92
# 2 Recall 0.88207、pandas.Series.sample方法
207-1、语法
# 207、pandas.Series.sample方法
pandas.Series.sample(n=None, frac=None, replace=False, weights=None, random_state=None, axis=None, ignore_index=False)
Return a random sample of items from an axis of object.

You can use random_state for reproducibility.

Parameters:
nint, optional
Number of items from axis to return. Cannot be used with frac. Default = 1 if frac = None.

fracfloat, optional
Fraction of axis items to return. Cannot be used with n.

replacebool, default False
Allow or disallow sampling of the same row more than once.

weightsstr or ndarray-like, optional
Default ‘None’ results in equal probability weighting. If passed a Series, will align with target object on index. Index values in weights not found in sampled object will be ignored and index values in sampled object not in weights will be assigned weights of zero. If called on a DataFrame, will accept the name of a column when axis = 0. Unless weights are a Series, weights must be same length as axis being sampled. If weights do not sum to 1, they will be normalized to sum to 1. Missing values in the weights column will be treated as zero. Infinite values not allowed.

random_stateint, array-like, BitGenerator, np.random.RandomState, np.random.Generator, optional
If int, array-like, or BitGenerator, seed for random number generator. If np.random.RandomState or np.random.Generator, use as given.

Changed in version 1.4.0: np.random.Generator objects now accepted

axis{0 or ‘index’, 1 or ‘columns’, None}, default None
Axis to sample. Accepts axis number or name. Default is stat axis for given data type. For Series this parameter is unused and defaults to None.

ignore_indexbool, default False
If True, the resulting index will be labeled 0, 1, …, n - 1.

New in version 1.3.0.

Returns:
Series or DataFrame
A new object of same type as caller containing n items randomly sampled from the caller object.
207-2、参数
207-2-1、n(可选,默认值为None):整数,表示要抽取的样本数量,n和frac参数不能同时指定。
207-2-2、frac(可选,默认值为None):浮点数,表示要抽取的样本比例。例如,frac=0.5表示抽取50%的样本,n和frac参数不能同时指定。
207-2-3、replace(可选,默认值为False):布尔值,是否在抽样时进行替换。如果replace=True,则允许重复抽取相同的样本。
207-2-4、weights(可选,默认值为None):字符串或类数组,表示样本的权重。如果是字符串,则表示Series对象中的列名;如果是array-like,则应与Series的长度相同,权重影响抽样时每个样本被选中的概率。
207-2-5、random_state(可选,默认值为None):整数,表示随机数生成器的种子,用于保证结果的可重复性。
207-2-6、axis(可选,默认值为None):整数,对于Series对象,唯一有效值为0。
207-2-7、ignore_index(可选,默认值为False):布尔值,是否忽略原始索引,返回的样本会重新生成索引。
207-3、功能
用于从一个Series对象中随机抽取指定数量或者比例的样本,该方法非常适合数据分析过程中需要进行随机抽样的场景,例如对大数据集进行抽样以进行快速分析。
207-4、返回值
返回一个Series对象,其中包含从原始Series中抽取的样本。
207-5、说明
使用场景:
207-5-1、数据探索和预处理:在处理大规模数据集时,直接操作整个数据集可能会非常耗时,通过抽取一个小样本,可以快速进行数据探索、可视化和预处理。
207-5-2、模型训练和测试:在机器学习模型的开发过程中,通常需要将数据集分为训练集和测试集,使用sample方法可以随机抽取数据集的一部分作为训练集或测试集,确保模型评估的公平性。
207-5-3、数据平衡:当处理不平衡数据集时,可以通过有放回抽样(replace=True)来平衡数据。例如,在分类问题中,某些类别的数据可能明显少于其他类别,可以通过重复抽样少数类别的数据来平衡数据集。
207-5-4、数据验证和A/B测试:在业务分析中,常常需要进行数据验证和A/B测试,通过抽样的方法可以构建对照组和实验组,进行实验设计和效果评估。
207-5-5、大数据处理:在处理大数据集时,通过抽样可以减少计算量,加快数据处理速度。例如,计算统计特征、训练模型等。
207-5-6、数据可视化:为了确保可视化的效果和计算效率,可以对数据进行抽样,尤其是当数据量非常大时。
207-5-7、测试和调试:在编写和测试数据处理代码时,使用小样本可以快速验证代码逻辑和功能,避免在整个数据集上测试时的高时间成本。
207-6、用法
207-6-1、数据准备
无207-6-2、代码示例
# 207、pandas.Series.sample方法
# 207-1、数据探索和预处理
import pandas as pd
# 创建一个大型Series
large_series = pd.Series(range(10000))
# 从Series中抽取10%的样本进行快速探索
sample = large_series.sample(frac=0.1)
# 打印样本数据
print(sample.head())

# 207-2、模型训练和测试
import pandas as pd
from sklearn.model_selection import train_test_split
# 创建一个 DataFrame
data = pd.DataFrame({
    'feature': range(1000),
    'target': [0]*500 + [1]*500
})
# 抽取80%的数据作为训练集,20%的数据作为测试集
train_sample = data.sample(frac=0.8, random_state=42)
test_sample = data.drop(train_sample.index)
# 打印训练集和测试集大小
print("训练集大小:", train_sample.shape)
print("测试集大小:", test_sample.shape)

# 207-3、数据平衡
import pandas as pd
# 创建不平衡数据集
majority_class_data = pd.DataFrame({'feature': range(900), 'target': 0})
minority_class_data = pd.DataFrame({'feature': range(100), 'target': 1})
# 对少数类别进行有放回抽样,使其数量与多数类别相同
minority_class_sample = minority_class_data.sample(n=len(majority_class_data), replace=True, random_state=42)
balanced_data = pd.concat([majority_class_data, minority_class_sample])
# 打印平衡后的数据集类别分布
print(balanced_data['target'].value_counts())

# 207-4、数据验证和A/B测试
import pandas as pd
# 创建用户数据
users = pd.DataFrame({'user_id': range(1000)})
# 抽取一部分用户进行A/B测试
control_group = users.sample(frac=0.5, random_state=42)
experiment_group = users.drop(control_group.index)
# 打印对照组和实验组大小
print("对照组大小:", control_group.shape)
print("实验组大小:", experiment_group.shape)

# 207-5、大数据处理
import pandas as pd
# 创建一个大型DataFrame
large_data = pd.DataFrame({
    'feature1': range(100000),
    'feature2': range(100000, 200000)
})
# 从数据集中抽取1%的样本进行特征工程
feature_sample = large_data.sample(frac=0.01, random_state=42)
# 打印样本数据大小
print("样本数据大小:", feature_sample.shape)

# 207-6、数据可视化
import pandas as pd
import matplotlib.pyplot as plt
# 创建一个DataFrame
data = pd.DataFrame({
    'x': range(10000),
    'y': range(10000, 20000)
})

# 抽取5%的数据用于绘制散点图
scatter_sample = data.sample(frac=0.05, random_state=42)
# 绘制散点图
plt.scatter(scatter_sample['x'], scatter_sample['y'])
plt.xlabel('X Axis')
plt.ylabel('Y Axis')
plt.title('Scatter Plot Sample')
plt.show()

# 207-7、测试和调试
import pandas as pd
# 创建一个DataFrame
data = pd.DataFrame({
    'feature': range(1000),
    'target': [0]*500 + [1]*500
})
# 抽取100个样本用于测试代码逻辑
test_sample = data.sample(n=100, random_state=42)
# 打印样本数据
print(test_sample.head())
207-6-3、结果输出
# 207、pandas.Series.sample方法
# 207-1、数据探索和预处理
# 类似于下列这种:
# 7341    7341
# 2988    2988
# 7346    7346
# 208      208
# 3074    3074
# dtype: int64

# 207-2、模型训练和测试
# 训练集大小: (800, 2)
# 测试集大小: (200, 2)

# 207-3、数据平衡
# target
# 0    900
# 1    900
# Name: count, dtype: int64

# 207-4、数据验证和A/B测试
# 对照组大小: (500, 1)
# 实验组大小: (500, 1)

# 207-5、大数据处理
# 样本数据大小: (1000, 2)

# 207-6、数据可视化
# 见图1

# 207-7、测试和调试
#      feature  target
# 521      521       1
# 737      737       1
# 740      740       1
# 660      660       1
# 411      411       0
图1:

208、pandas.Series.set_axis方法
208-1、语法
# 208、pandas.Series.set_axis方法
pandas.Series.set_axis(labels, *, axis=0, copy=None)
Assign desired index to given axis.

Indexes for row labels can be changed by assigning a list-like or Index.

Parameters:
labelslist-like, Index
The values for the new index.

axis{0 or ‘index’}, default 0
The axis to update. The value 0 identifies the rows. For Series this parameter is unused and defaults to 0.

copybool, default True
Whether to make a copy of the underlying data.

Note

The copy keyword will change behavior in pandas 3.0. Copy-on-Write will be enabled by default, which means that all methods with a copy keyword will use a lazy copy mechanism to defer the copy and ignore the copy keyword. The copy keyword will be removed in a future version of pandas.

You can already get the future behavior and improvements through enabling copy on write pd.options.mode.copy_on_write = True

Returns:
Series
An object of type Series.
208-2、参数
208-2-1、labels(必须):指定的新标签,可以是列表或其他类似数组的对象,其长度必须与指定轴的长度一致。
208-2-2、axis(可选,默认值为0):指定要修改标签的轴。对于Series,只有一个轴,即0或"index";对于DataFrame,可以是0或"index"以及1或"columns"。
208-2-3、copy(可选,默认值为None):是否复制底层数据,如果为True,则会复制数据;如果为False,则不会复制数据;默认情况下,会根据情况自动决定是否复制数据。
208-3、功能
用于设置Series的索引或DataFrame的索引和列标签,该方法可以在不修改原对象的情况下返回一个新的对象,也可以直接修改原对象。
208-4、返回值
返回一个带有新标签的对象(Series或DataFrame),如果inplace=True则修改原对象并返回None。
208-5、说明
无
208-6、用法
208-6-1、数据准备
无208-6-2、代码示例
# 208、pandas.Series.set_axis方法
# 208-1、重命名索引或列标签
import pandas as pd
# 创建一个DataFrame
df = pd.DataFrame({
    'A': [1, 2, 3],
    'B': [4, 5, 6]
}, index=['a', 'b', 'c'])
# 重命名列标签
df = df.set_axis(['Col1', 'Col2'], axis=1)
print(df, end='\n\n')

# 208-2、数据合并后的调整
import pandas as pd
# 创建两个DataFrame
df1 = pd.DataFrame({'A': [1, 2, 3]}, index=['a', 'b', 'c'])
df2 = pd.DataFrame({'B': [4, 5, 6]}, index=['a', 'b', 'c'])
# 合并DataFrame
df_combined = pd.concat([df1, df2], axis=1)
# 设置新列标签
df_combined = df_combined.set_axis(['Col1', 'Col2'], axis=1)
print(df_combined, end='\n\n')

# 208-3、统一标签格式
import pandas as pd
# 创建一个DataFrame
df = pd.DataFrame({
    'a': [1, 2, 3],
    'b': [4, 5, 6]
}, index=['one', 'two', 'three'])
print(df)
# 统一列标签为大写
df = df.set_axis(['A', 'B'], axis=1)
print(df, end='\n\n')

# 208-4、临时修改标签进行特定操作
import pandas as pd
# 创建一个Series
s = pd.Series([1, 2, 3], index=['a', 'b', 'c'])
# 临时修改索引标签
new_s = s.set_axis(['x', 'y', 'z'], axis=0)
print(new_s)
# 进行操作后,恢复原始标签
print(s)
208-6-3、结果输出
# 208、pandas.Series.set_axis方法
# 208-1、重命名索引或列标签
#    Col1  Col2
# a     1     4
# b     2     5
# c     3     6

# 208-2、数据合并后的调整
#    Col1  Col2
# a     1     4
# b     2     5
# c     3     6

# 208-3、统一标签格式
#        a  b
# one    1  4
# two    2  5
# three  3  6
#        A  B
# one    1  4
# two    2  5
# three  3  6

# 208-4、临时修改标签进行特定操作
# x    1
# y    2
# z    3
# dtype: int64
# a    1
# b    2
# c    3
# dtype: int64209、pandas.Series.take方法
209-1、语法
# 209、pandas.Series.take方法
pandas.Series.take(indices, axis=0, **kwargs)
Return the elements in the given positional indices along an axis.

This means that we are not indexing according to actual values in the index attribute of the object. We are indexing according to the actual position of the element in the object.

Parameters:
indices
array-like
An array of ints indicating which positions to take.

axis
{0 or ‘index’, 1 or ‘columns’, None}, default 0
The axis on which to select elements. 0 means that we are selecting rows, 1 means that we are selecting columns. For Series this parameter is unused and defaults to 0.

**kwargs
For compatibility with numpy.take(). Has no effect on the output.

Returns:
same type as caller
An array-like containing the elements taken from the object.
209-2、参数
209-2-1、indices(必须):一个位置索引数组,指定要从系列中提取的元素的索引,可以是整数数组或列表,表示需要提取的元素的位置。
209-2-2、axis(可选,默认值为0):指定沿哪个轴进行选择,对于Series,只有一个轴0(索引)。
209-2-3、**kwargs(可选):其他关键字参数,用于功能扩展。
209-3、功能
用于从Series中根据位置索引提取元素,类似于NumPy数组的take方法。
209-4、返回值
返回一个新的Series对象,其中包含从原系列中根据提供的索引提取的数据。
209-5、说明
使用场景:
209-5-1、性能优化:当你需要从Series中频繁地提取特定位置的元素时,take方法比通过标签或其他方式更高效,因为它直接使用底层的NumPy函数。
209-5-2、位置索引:在某些情况下,你可能只知道要提取元素的位置,而不是标签。例如,从预处理后的数据中按位置抽取样本数据。
209-5-3、数据重排序:take可以用于对数据重新排序。例如,你有一个Series,希望根据特定顺序重新排列其元素。
209-5-4、随机抽样:在数据分析和机器学习中,经常需要对数据进行随机抽样,你可以生成随机位置索引,并使用take方法从Series中抽取对应的样本。
209-5-5、数据子集选择:当你只需要从Series中提取特定位置的一部分数据进行进一步处理时,take方法可以提供简洁且高效的解决方案。
209-6、用法
209-6-1、数据准备
无209-6-2、代码示例
# 209、pandas.Series.take方法
# 209-1、性能优化
import pandas as pd
s = pd.Series(range(10000))
# 通过位置索引提取前10个元素
subset = s.take(range(10))
print(subset, end='\n\n')

# 209-2、位置索引
import pandas as pd
s = pd.Series([100, 200, 300, 400, 500])
# 只知道位置索引,不知道标签
subset = s.take([1, 3])
print(subset, end='\n\n')

# 209-3、数据重排序
import pandas as pd
s = pd.Series([1, 2, 3, 4, 5], index=['a', 'b', 'c', 'd', 'e'])
# 根据新顺序提取数据
reordered_s = s.take([4, 2, 0, 3, 1])
print(reordered_s, end='\n\n')

# 209-4、随机抽样
import pandas as pd
import numpy as np
s = pd.Series(range(100))
# 生成随机索引
random_indices = np.random.choice(s.index, size=10, replace=False)
random_sample = s.take(random_indices)
print(random_sample, end='\n\n')

# 209-5、数据子集选择
import pandas as pd
s = pd.Series([10, 20, 30, 40, 50])
# 提取特定位置的子集
subset = s.take([0, 2, 4])
print(subset)
209-6-3、结果输出
# 209、pandas.Series.take方法
# 209-1、性能优化
# 0    0
# 1    1
# 2    2
# 3    3
# 4    4
# 5    5
# 6    6
# 7    7
# 8    8
# 9    9
# dtype: int64

# 209-2、位置索引
# 1    200
# 3    400
# dtype: int64

# 209-3、数据重排序
# e    5
# c    3
# a    1
# d    4
# b    2
# dtype: int64

# 209-4、随机抽样
# 22    22
# 36    36
# 27    27
# 62    62
# 84    84
# 34    34
# 23    23
# 45    45
# 8      8
# 10    10
# dtype: int64

# 209-5、数据子集选择
# 0    10
# 2    30
# 4    50
# dtype: int64210、pandas.Series.tail方法
210-1、语法
# 210、pandas.Series.tail方法
pandas.Series.tail(n=5)
Return the last n rows.

This function returns last n rows from the object based on position. It is useful for quickly verifying data, for example, after sorting or appending rows.

For negative values of n, this function returns all rows except the first |n| rows, equivalent to df[|n|:].

If n is larger than the number of rows, this function returns all rows.

Parameters:
n
int, default 5
Number of rows to select.

Returns:
type of caller
The last n rows of the caller object.
210-2、参数
210-2-1、n(可选,默认值为5):表示要返回的最后几行的数量。如果n是正数,则返回最后n行;如果n是负数,则返回除了最后n行之外的所有行;如果n为零,则返回空的Series。
210-3、功能
用于获取Series末尾的若干行数据,主要用于快速查看数据的末端部分,尤其是在处理大数据集时,非常方便。
210-4、返回值
返回一个pandas.Series对象,包含原Series中最后n个元素,返回的Series保持原来的索引和数据类型。
210-5、说明
无
210-6、用法
210-6-1、数据准备
无210-6-2、代码示例
# 210、pandas.Series.tail方法
# 210-1、返回最后5行数据
import pandas as pd
s = pd.Series([10, 20, 30, 40, 50, 60, 70, 80])
result = s.tail(5)
print(result, end='\n\n')

# 210-2、返回除最后2行之外的所有数据
import pandas as pd
s = pd.Series([10, 20, 30, 40, 50, 60, 70, 80])
result = s.tail(-2)
print(result)
210-6-3、结果输出
# 210、pandas.Series.tail方法
# 210-1、返回最后5行数据
# 3    40
# 4    50
# 5    60
# 6    70
# 7    80
# dtype: int64

# 210-2、返回除最后2行之外的所有数据
# 2    30
# 3    40
# 4    50
# 5    60
# 6    70
# 7    80
# dtype: int64