文章目录
- ANativeWindow 介绍
- `ANativeWindow` 的主要功能和特点
- `ANativeWindow` 的常用函数
- 工作流程原理图
- 通过ANativeWindow渲染RGB纯色示例
- 播放RTSP流工作流程图
- 关键步骤解析
- 自定义SurfaceView组件
- native 层解码渲染
- 效果展示
- 注意事项
这篇文章涉及到jni层,以及Ffmpeg编解码原理,不了解相关观念的,可以先看相关技术介绍
传送门:
JNI入门_Trump. yang的博客-CSDN博客
音视频开发_Trump. yang的博客-CSDN博客
ANativeWindow 介绍
ANativeWindow 是 Android NDK 中的一个类,用于在 Native 层处理和渲染窗口。它提供了一组函数,用于在本地代码中直接操作 Android 视图系统,以便更高效地进行图像和视频渲染。ANativeWindow 通常与 Surface、SurfaceView 和 SurfaceTexture 等一起使用。
ANativeWindow 的主要功能和特点
-
窗口抽象层:
ANativeWindow提供了一个窗口抽象层,使得本地代码能够直接操作窗口的像素数据。它可以从 Java 层的Surface对象获取,并用于渲染图像或视频。 -
锁定和解锁缓冲区:
通过ANativeWindow_lock和ANativeWindow_unlockAndPost函数,开发者可以锁定窗口的缓冲区进行像素操作,完成后解锁并提交缓冲区进行显示。 -
设置缓冲区属性:
可以使用ANativeWindow_setBuffersGeometry来设置缓冲区的大小和像素格式,以适应不同的渲染需求。 -
高效渲染:
直接在 Native 层操作窗口的缓冲区,可以减少数据传输和转换的开销,提高渲染性能。
ANativeWindow 的常用函数
-
获取
ANativeWindow对象:
从 Java 层的Surface对象获取ANativeWindow对象。ANativeWindow* ANativeWindow_fromSurface(JNIEnv* env, jobject surface); -
设置缓冲区属性:
设置缓冲区的大小和像素格式。int ANativeWindow_setBuffersGeometry(ANativeWindow* window, int width, int height, int format); -
锁定缓冲区:
锁定窗口的缓冲区以进行像素操作。int ANativeWindow_lock(ANativeWindow* window, ANativeWindow_Buffer* outBuffer, ARect* inOutDirtyBounds); -
解锁缓冲区并提交:
解锁并提交缓冲区,显示内容。int ANativeWindow_unlockAndPost(ANativeWindow* window); -
释放
ANativeWindow对象:
释放ANativeWindow对象以释放资源。void ANativeWindow_release(ANativeWindow* window);
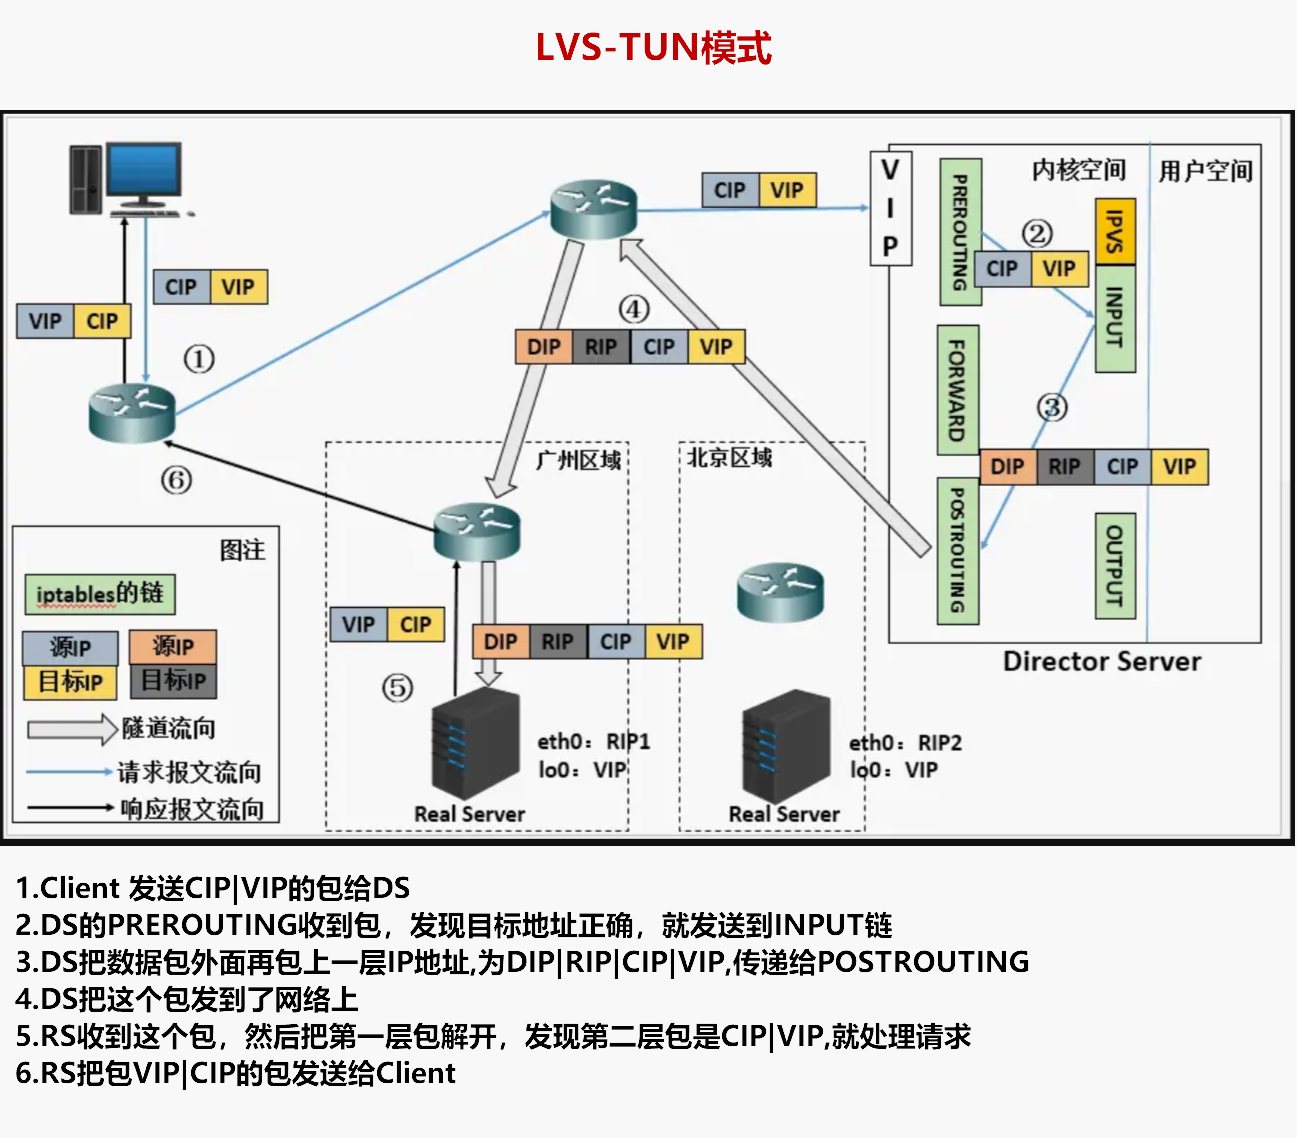
工作流程原理图

通过ANativeWindow渲染RGB纯色示例
ANativeWindow通常和SurfaceView一块使用,首先自定义一个SurfaceView组件
public class RtspPlayerView extends SurfaceView implements SurfaceHolder.Callback {
    private SurfaceHolder holder;
    public RtspPlayerView(Context context, AttributeSet attrs) {
        super(context, attrs);
        init();
    }
    public RtspPlayerView(Context context, AttributeSet attrs, int defStyleAttr) {
        super(context, attrs, defStyleAttr);
        init();
    }
    private void init() {
        holder = getHolder();
        holder.addCallback(this);
        holder.setFormat(PixelFormat.RGBA_8888);  //设置像素格式
    }

    @Override
    public void surfaceCreated(SurfaceHolder holder) {
        Log.i("RtspPlayerView", "Surface 创建成功");
        //传入 RGB数据给Native层
        String bufferedImage = rgb2Hex(255, 255, 0);
        String substring = String.valueOf(bufferedImage).substring(3);
        int color = Integer.parseInt(substring,16);
        drawToSurface(holder.getSurface(),color);
    }
    public void play(String uri) {
        this.url = uri;
    }

    @Override
    public void surfaceChanged(SurfaceHolder holder, int format, int width, int height) {
        Log.i("RtspPlayerView", "Surface 大小或格式变化");
    }

    @Override
    public void surfaceDestroyed(SurfaceHolder holder) {
        Log.i("RtspPlayerView", "Surface 销毁");

    }

    public static String  rgb2Hex(int r,int g,int b){
        return String.format("0xFF%02X%02X%02X", r,g,b);
    }

    public static native void drawToSurface(Surface surface, int color);

}
在自定义组件中 声明一个jni接口,以便于和native层的ANativeWindow交互,注意的是需要向native传递Surface对象的引用和RGB值
public static native void drawToSurface(Surface surface, int color);
在native层实现C++代码, 较为简单
extern "C"
JNIEXPORT void JNICALL
Java_com_marxist_firstjni_player_RtspPlayerView_drawToSurface(JNIEnv *env, jclass clazz,
        jobject surface, jint color) {
    ANativeWindow_Buffer nwBuffer;

    LOGI("ANativeWindow_fromSurface ");
    ANativeWindow *mANativeWindow = ANativeWindow_fromSurface(env, surface);

    if (mANativeWindow == NULL) {
        LOGE("ANativeWindow_fromSurface error");
        return;
    }

    LOGI("ANativeWindow_lock ");
    if (0 != ANativeWindow_lock(mANativeWindow, &nwBuffer, 0)) {
        LOGE("ANativeWindow_lock error");
        return;
    }

    LOGI("ANativeWindow_lock nwBuffer->format ");
    if (nwBuffer.format == WINDOW_FORMAT_RGBA_8888) {
        LOGI("nwBuffer->format == WINDOW_FORMAT_RGBA_8888 ");
        for (int i = 0; i < nwBuffer.height * nwBuffer.width; i++) {
            *((int*)nwBuffer.bits + i) = color;
        }
    }
    LOGI("ANativeWindow_unlockAndPost ");
    if (0 != ANativeWindow_unlockAndPost(mANativeWindow)) {
        LOGE("ANativeWindow_unlockAndPost error");
        return;
    }

    ANativeWindow_release(mANativeWindow);
    LOGI("ANativeWindow_release ");
}
运行效果:中间那块就是Surfaceview 展示了RGB颜色

播放RTSP流工作流程图

关键步骤解析
自定义SurfaceView组件
与加载纯色RGB基本一致,只有jni接口不同
package com.marxist.firstjni.player;

import android.content.Context;
import android.graphics.PixelFormat;
import android.util.AttributeSet;
import android.util.Log;
import android.view.Surface;
import android.view.SurfaceHolder;
import android.view.SurfaceView;

public class RtspPlayerView extends SurfaceView implements SurfaceHolder.Callback {

    private SurfaceHolder holder;
    private String url;

    public RtspPlayerView(Context context, AttributeSet attrs) {
        super(context, attrs);
        init();
    }

    public RtspPlayerView(Context context, AttributeSet attrs, int defStyleAttr) {
        super(context, attrs, defStyleAttr);
        init();
    }

    private void init() {
        holder = getHolder();
        holder.addCallback(this);
        holder.setFormat(PixelFormat.RGBA_8888);

        Log.i("RtspPlayerView", "我被初始化了");
    }

    @Override
    public void surfaceCreated(SurfaceHolder holder) {
        Log.i("RtspPlayerView", "Surface 创建成功");
//        decodeVideo("rtsp://192.168.31.165:8554/test",getHolder().getSurface());

        //传入 RGB数据给Native层
//        String bufferedImage = rgb2Hex(255, 255, 0);
//        String substring = String.valueOf(bufferedImage).substring(3);
//        int color = Integer.parseInt(substring,16);
//
//        drawToSurface(holder.getSurface(),color);

//
        if (url != null && !url.isEmpty()) {
            new Thread(new Runnable() {
                @Override
                public void run() {
                    decodeVideo(url, holder.getSurface());
                }
            }).start();
        }
    }
    public void play(String uri) {
        this.url = uri;
    }

    @Override
    public void surfaceChanged(SurfaceHolder holder, int format, int width, int height) {
        Log.i("RtspPlayerView", "Surface 大小或格式变化");
    }

    @Override
    public void surfaceDestroyed(SurfaceHolder holder) {
        Log.i("RtspPlayerView", "Surface 销毁");

    }
    private native void decodeVideo(String rtspUrl, Surface surface);
    public static String  rgb2Hex(int r,int g,int b){
        return String.format("0xFF%02X%02X%02X", r,g,b);
    }

    public static native void drawToSurface(Surface surface, int color);

}
native 层解码渲染
extern "C"
JNIEXPORT void JNICALL
Java_com_marxist_firstjni_player_RtspPlayerView_decodeVideo(JNIEnv *env, jobject thiz,
                                                         jstring rtspUrl, jobject surface) {
    const char *uri = env->GetStringUTFChars(rtspUrl, 0);

    // 解码视频,解码音频类似,解码的流程类似,把之前的代码拷过来
    avformat_network_init();
    AVFormatContext *pFormatContext = NULL;
    int formatOpenInputRes = 0;
    int formatFindStreamInfoRes = 0;
    int audioStramIndex = -1;
    AVCodecParameters *pCodecParameters;
    AVCodec *pCodec = NULL;
    AVCodecContext *pCodecContext = NULL;
    int codecParametersToContextRes = -1;
    int codecOpenRes = -1;
    int index = 0;
    AVPacket *pPacket = NULL;
    AVFrame *pFrame = NULL;
    formatOpenInputRes = avformat_open_input(&pFormatContext, uri, NULL, NULL);

    if(formatOpenInputRes<0){
        LOGE("open url error : %s", av_err2str(formatOpenInputRes));
        return;
    }


    formatFindStreamInfoRes = avformat_find_stream_info(pFormatContext, NULL);


    // 查找视频流的 index
    audioStramIndex = av_find_best_stream(pFormatContext, AVMediaType::AVMEDIA_TYPE_VIDEO, -1, -1,
                                          NULL, 0);


    // 查找解码
    pCodecParameters = pFormatContext->streams[audioStramIndex]->codecpar;
    pCodec = avcodec_find_decoder(pCodecParameters->codec_id);

    // 打开解码器
    pCodecContext = avcodec_alloc_context3(pCodec);
    codecParametersToContextRes = avcodec_parameters_to_context(pCodecContext, pCodecParameters);
    codecOpenRes = avcodec_open2(pCodecContext, pCodec, NULL);
    // 1. 获取窗体
    ANativeWindow *pNativeWindow = ANativeWindow_fromSurface(env, surface);
    if(pNativeWindow == NULL){
        LOGE("获取窗体失败");
        return ;
    }
    // 2. 设置缓存区的数据
    ANativeWindow_setBuffersGeometry(pNativeWindow, pCodecContext->width, pCodecContext->height,WINDOW_FORMAT_RGBA_8888);
    // Window 缓冲区的 Buffer
    ANativeWindow_Buffer outBuffer;
    // 3.初始化转换上下文
    SwsContext *pSwsContext = sws_getContext(pCodecContext->width, pCodecContext->height,
                                             pCodecContext->pix_fmt, pCodecContext->width, pCodecContext->height,
                                             AV_PIX_FMT_RGBA, SWS_BILINEAR, NULL, NULL, NULL);
    AVFrame *pRgbaFrame = av_frame_alloc();
    int frameSize = av_image_get_buffer_size(AV_PIX_FMT_RGBA, pCodecContext->width,
                                             pCodecContext->height, 1);
    uint8_t *frameBuffer = (uint8_t *) malloc(frameSize);
    av_image_fill_arrays(pRgbaFrame->data, pRgbaFrame->linesize, frameBuffer, AV_PIX_FMT_RGBA,
                         pCodecContext->width, pCodecContext->height, 1);

    pPacket = av_packet_alloc();
    pFrame = av_frame_alloc();
    while (av_read_frame(pFormatContext, pPacket) >= 0) {
        if (pPacket->stream_index == audioStramIndex) {
            // Packet 包,压缩的数据,解码成 数据
            int codecSendPacketRes = avcodec_send_packet(pCodecContext, pPacket);
            if (codecSendPacketRes == 0) {
                int codecReceiveFrameRes = avcodec_receive_frame(pCodecContext, pFrame);
                if (codecReceiveFrameRes == 0) {
                    // AVPacket -> AVFrame
                    index++;
                    LOGE("解码第 %d 帧", index);
                    // 假设拿到了转换后的 RGBA 的 data 数据,如何渲染,把数据推到缓冲区
                    sws_scale(pSwsContext, (const uint8_t *const *) pFrame->data, pFrame->linesize,
                              0, pCodecContext->height, pRgbaFrame->data, pRgbaFrame->linesize);
                    // 把数据推到缓冲区
                    if (ANativeWindow_lock(pNativeWindow, &outBuffer, NULL) < 0) {
                        // Handle error
                        LOGE("ANativeWindow_lock is ERROR");
                    }
// Data copy
                    memcpy(outBuffer.bits, frameBuffer, frameSize);
                    if (ANativeWindow_unlockAndPost(pNativeWindow) < 0) {
                        // Handle error
                        LOGE("ANativeWindow_unlockAndPost is ERROR");
                    }
                }
            }
        }
        // 解引用
        av_packet_unref(pPacket);
        av_frame_unref(pFrame);
    }

    // 1. 解引用数据 data , 2. 销毁 pPacket 结构体内存  3. pPacket = NULL
    av_packet_free(&pPacket);
    av_frame_free(&pFrame);

    __av_resources_destroy:
    if (pCodecContext != NULL) {
        avcodec_close(pCodecContext);
        avcodec_free_context(&pCodecContext);
        pCodecContext = NULL;
    }

    if (pFormatContext != NULL) {
        avformat_close_input(&pFormatContext);
        avformat_free_context(pFormatContext);
        pFormatContext = NULL;
    }
    avformat_network_deinit();

    env->ReleaseStringUTFChars(rtspUrl, uri);
}
在解码之前先创建ANativeWindow对象,设置缓冲区,设置像素格式 一般解码出来的都是yuv 因此要转为RGB,设置转换上下文
// 1. 获取窗体
ANativeWindow *pNativeWindow = ANativeWindow_fromSurface(env, surface);
if(pNativeWindow == NULL){
    LOGE("获取窗体失败");
    return ;
}
// 2. 设置缓存区的数据
ANativeWindow_setBuffersGeometry(pNativeWindow, pCodecContext->width, pCodecContext->height,WINDOW_FORMAT_RGBA_8888);
// Window 缓冲区的 Buffer
ANativeWindow_Buffer outBuffer;
// 3.初始化转换上下文
SwsContext *pSwsContext = sws_getContext(pCodecContext->width, pCodecContext->height,
                                         pCodecContext->pix_fmt, pCodecContext->width, pCodecContext->height,
                                         AV_PIX_FMT_RGBA, SWS_BILINEAR, NULL, NULL, NULL);
在解码之后
  // 假设拿到了转换后的 RGBA 的 data 数据,如何渲染,把数据推到缓冲区
                    sws_scale(pSwsContext, (const uint8_t *const *) pFrame->data, pFrame->linesize,
                              0, pCodecContext->height, pRgbaFrame->data, pRgbaFrame->linesize);
                    // 把数据推到缓冲区
                    if (ANativeWindow_lock(pNativeWindow, &outBuffer, NULL) < 0) {
                        // Handle error
                        LOGE("ANativeWindow_lock is ERROR");
                    }
// Data copy
                    memcpy(outBuffer.bits, frameBuffer, frameSize);
                    if (ANativeWindow_unlockAndPost(pNativeWindow) < 0) {
                        // Handle error
                        LOGE("ANativeWindow_unlockAndPost is ERROR");
                    }
往缓冲区里传递转化好的RGB数据
锁定缓冲区,提交数据,交给Surface展示
效果展示

FFmpeg原生操作延迟果然很低,经测试,局域网能到140ms左右,之前调用第三方库,300ms左右
注意事项
-
如果闪退,发现ANativeWindow对象为空,说明Surface对象还没有创建完毕,一定要等SurfaceView 创建完毕再进行其他操作。
-
如果发现解码成功,SurfaceView无法显示,缓冲区操作也正常的话,说明SurfaceView显示被堵塞了,一定要放入到子线程中进行展示
-
上述代码也可以改成本地文件路径进行解码播放,只需要改动url即可,支持网络也支持本地
参考文章:
https://blog.csdn.net/cjzjolly/article/details/140448984
https://www.jianshu.com/p/e6f2fe8c6afd
https://blog.csdn.net/qq_45396088/article/details/124123280