文章目录
- 基本介绍
- 接收参数相关注解应用实例
- @PathVariable
- @RequestHeader
- @RequestParam
- @CookieValue
- @RequestBody
- @RequestAttribute
- @SessionAttribute
- 复杂参数
- 基本介绍
- 应用实例
- 自定义对象参数-自动封装
- 基本介绍
- 应用实例

⬅️ 上一篇: springboot系列八: springboot静态资源访问,Rest风格请求处理
🎉 欢迎来到 springboot系列九: 接收参数相关注解 🎉
在本篇文章中,我们将探讨 Spring Boot 中接收参数的相关注解。通过学习这些注解,您可以更灵活地处理客户端传递的参数,从而提高开发效率。
🔧 本篇需要用到的项目:
基本介绍
1.SpringBoot 接收客户端提交数据 / 参数会使用到相关注解.
2.详细学习 @PathVariable, @RequestHeader, @ModelAttribute, @RequestParam, @CookieValue, @RequestBody
接收参数相关注解应用实例
●需求:
演示各种方式提交数据/参数给服务器, 服务器如何使用注解接收
@PathVariable
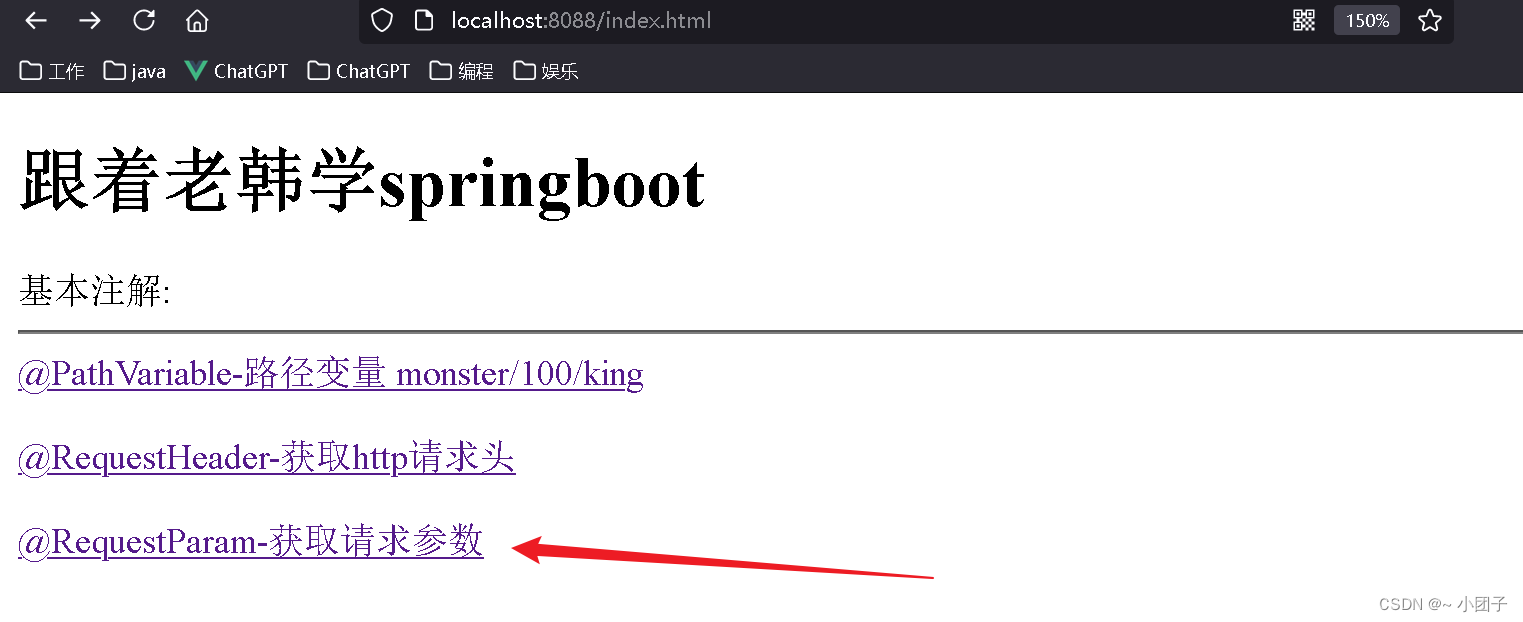
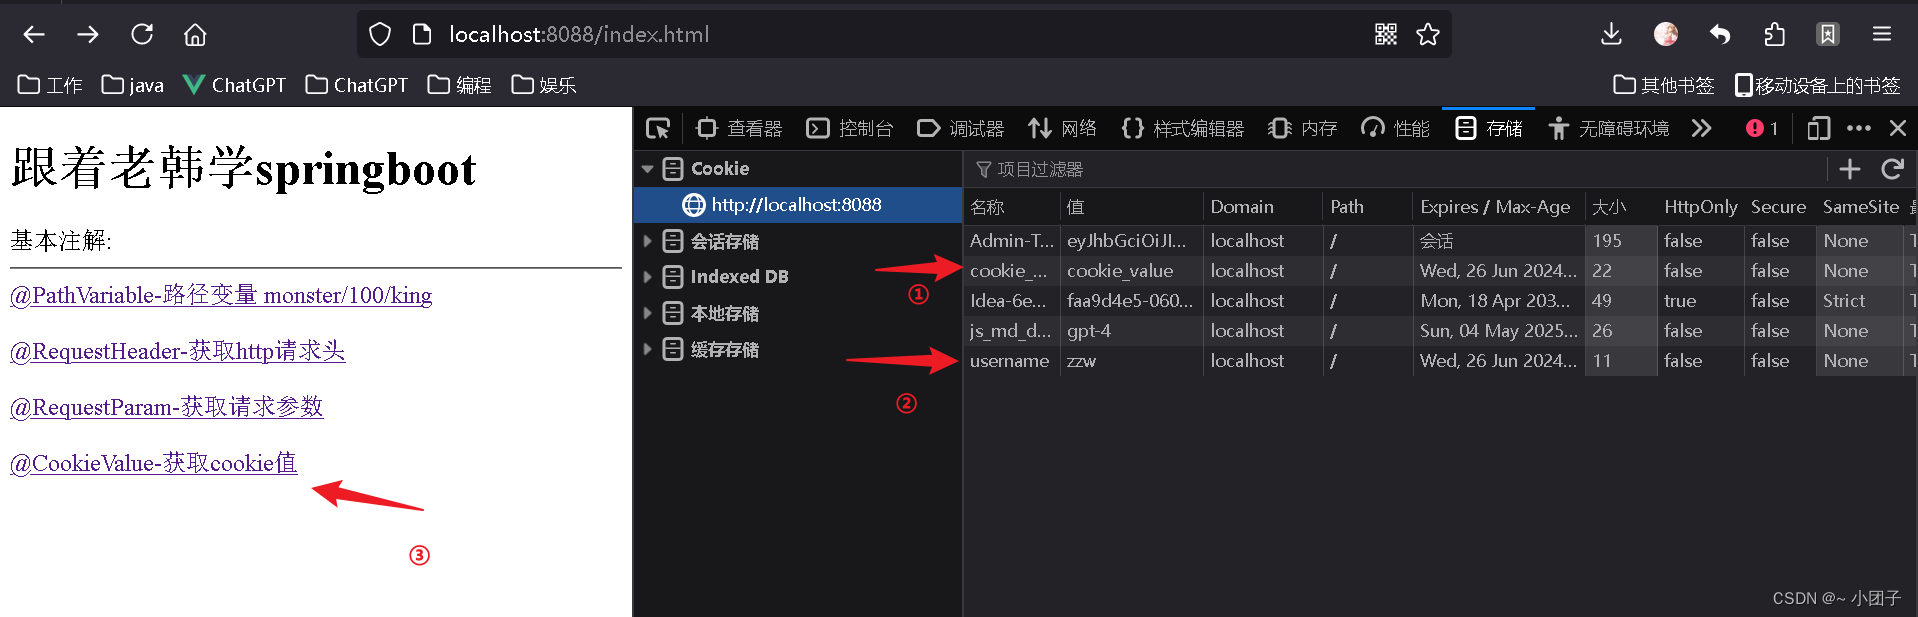
1.创建src/main/resources/public/index.html
JavaWeb系列十: web工程路径专题
<h1>跟着老韩学springboot</h1>
基本注解:
<hr/>
<!--
    1. web工程路径知识:
    2. / 会解析成 http://localhost:8080
    3. /monster/100/king => http://localhost:8080/monster/100/king
    4. 如果不带 /, 会以当前路径为基础拼接
/-->
<a href="/monster/100/king">@PathVariable-路径变量 monster/100/king</a><br/><br/>
</body>
2.创建src/main/java/com/zzw/springboot/controller/ParameterController.java
url占位符回顾
@RestController
public class ParameterController {

    /**
     * 1./monster/{id}/{name} 构成完整请求路径
     * 2.{id} {name} 就是占位变量
     * 3.@PathVariable("name"): 这里 name 和 {name} 命名保持一致
     * 4.String name_ 这里自定义, 这里韩老师故意这么写
     * 5.@PathVariable Map<String, String> map 把所有传递的值传入map
     * 6.可以看下@pathVariable源码
     * @return
     */
    @GetMapping("/monster/{id}/{name}")
    public String pathVariable(@PathVariable("id") Integer id,
                               @PathVariable("name") String name,
                               @PathVariable Map<String, String> map) {
        System.out.println("id = " + id + "\nname = " + name + "\nmap = " + map);
        return "success";
    }
}
3.测试 http://localhost:8088/monster/100/king


@RequestHeader
需求: 演示@RequestHeader使用.
1.修改src/main/resources/public/index.html
<a href="/requestHeader">@RequestHeader-获取http请求头</a><br/><br/>
2.修改ParameterController.java
JavaWeb系列八: WEB 开发通信协议(HTTP协议)
/**
 * 1. @RequestHeader("Cookie") 获取http请求头的 cookie信息
 * 2. @RequestHeader Map<String, String> header 获取到http请求的所有信息
 */
@GetMapping("/requestHeader")
public String requestHeader(@RequestHeader("Host") String host,
                            @RequestHeader Map<String, String> header) {
    System.out.println("host = " + host + "\nheader = " + header);
    return "success";
}
3.测试


@RequestParam
需求: 演示@RequestParam使用.
1.修改src/main/resources/public/index.html
<a href="/hi?name=赵志伟&fruit=apple&fruit=pear&address=上海&id=3">@RequestParam-获取请求参数</a><br/><br/>
2.修改ParameterController.java
SpringMVC系列五: SpringMVC映射请求数据
/**
 * 如果我们希望将所有的请求参数的值都获取到, 可以通过
 * @RequestParam Map<String, String> params
 */
@GetMapping("/hi")
public String hi(@RequestParam(value = "name") String username,
                 @RequestParam(value = "fruit") List<String> fruits,
                 @RequestParam Map<String, String> params) {
    System.out.println("username = " + username + "\nfruits = "
            + fruits + "\nparams = " + params);
    return "success";
}
3.测试

@CookieValue
需求: 演示@CookieValue使用.
1.修改src/main/resources/public/index.html
<a href="/cookie">@CookieValue-获取cookie值</a>
2.修改ParameterController.java
JavaWeb系列十一: Web 开发会话技术(Cookie, Session)
/**
* 因为我们的浏览器目前没有cookie, 我们可以自己设置cookie
* 如果要测试, 可以先写一个方法, 在浏览器创建对应的cookie
* 说明:
* 1. value = "cookie_key" 表示接收名字为 cookie_key的cookie
* 2. 如果浏览器携带来对应的cookie, 那么后面的参数是String, 则接收到的是对应的value
* 3. 后面的参数是Cookie, 则接收到的是封装好的对应的cookie
*/
@GetMapping("/cookie")
public String cookie(@CookieValue(value = "cookie_key") String cookie_value,
@CookieValue(value = "username") Cookie cookie,
HttpServletRequest request) {
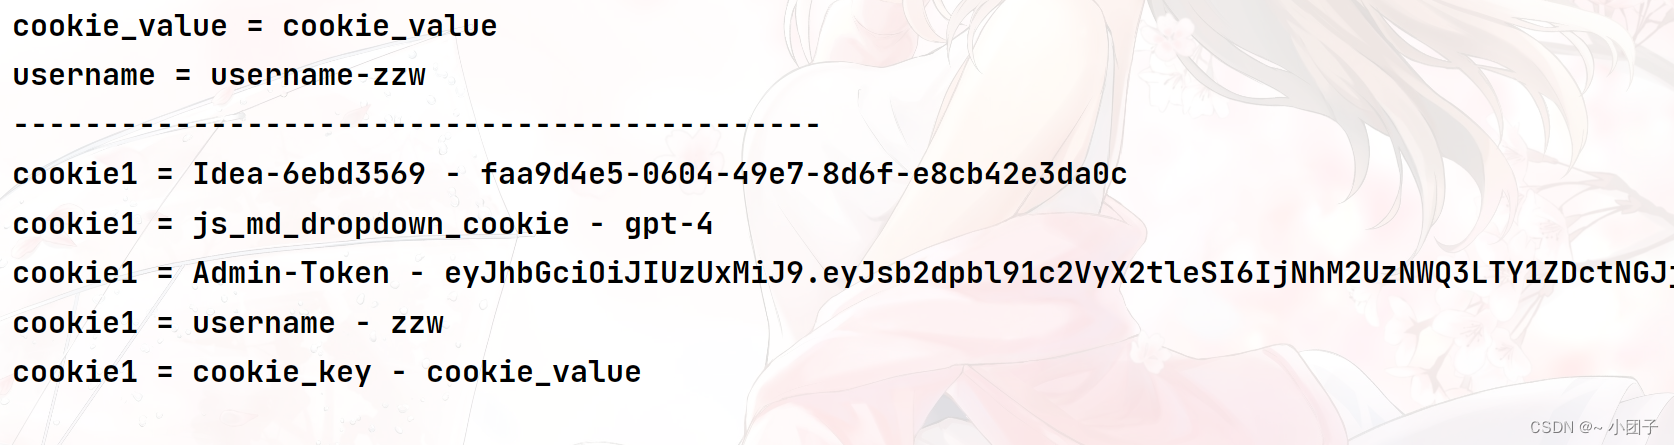
System.out.println("cookie_value = " + cookie_value
+ "\nusername = " + cookie.getName() + "-" + cookie.getValue());
Cookie[] cookies = request.getCookies();
for (Cookie cookie1 : cookies) {
System.out.println("cookie1 = " + cookie1.getName() + "-" + cookie1.getValue());
}
return "success";
}
3.测试
@RequestBody
需求: 演示@RequestBody使用.
1.修改src/main/resources/public/index.html
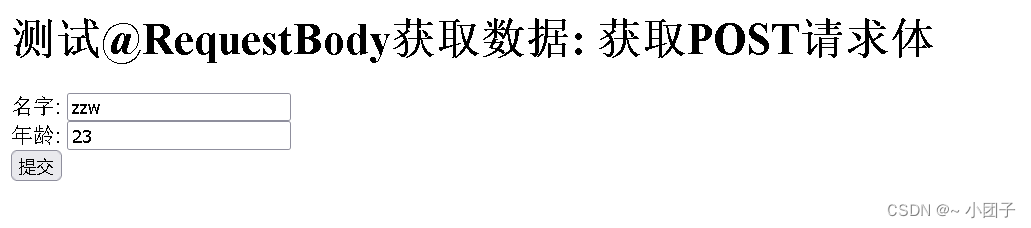
<h1>测试@RequestBody获取数据: 获取POST请求体</h1>
<form action="/save" method="post">
    名字: <input type="text" name="name"><br/>
    年龄: <input type="text" name="age"><br/>
    <input type="submit" value="提交"/>
</form>
2.修改ParameterController.java
SpringMVC系列十: 中文乱码处理与JSON处理
/**
 * @RequestBody 是整体取出Post请求内容
 */
@PostMapping("/save")
public String postMethod(@RequestBody String content) {
    System.out.println("content = " + content);//content = name=zzw&age=23
    return "sucess";
}
3.测试
content = name=zzw&age=123
@RequestAttribute
需求: 演示@RequestAttribute使用. 获取request域的属性.
1.修改src/main/resources/public/index.html
<a href="/login">@RequestAttribute-获取request域属性</a>
2.创建RequestController.java
SpringMVC系列十: 中文乱码处理与JSON处理
@Controller
public class RequestController {
    @RequestMapping("/login")
    public String login(HttpServletRequest request) {
        request.setAttribute("user", "赵志伟");//向request域中添加的数据
        return "forward:/ok";//请求转发到 /ok
    }

    @GetMapping("/ok")
    @ResponseBody
    public String ok(@RequestAttribute(value = "user", required = false) String username,
                     HttpServletRequest request) {
        //获取到request域中的数据
        System.out.println("username--" + username);
        System.out.println("通过servlet api 获取 username-" + request.getAttribute("user"));
        return "success"; //返回字符串, 不用视图解析器
    }
}
3.测试…
@SessionAttribute
需求: 演示@SessionAttribute使用. 获取session域的属性.
1.修改src/main/resources/public/index.html
<a href="/login">@SessionAttribute-获取session域属性</a>
2.创建RequestController.java
JavaWeb系列十一: Web 开发会话技术(Cookie, Session)
@Controller
public class RequestController {
    @RequestMapping("/login")
    public String login(HttpServletRequest request, HttpSession session) {
        request.setAttribute("user", "赵志伟");//向request域中添加的数据
        session.setAttribute("mobile", "黑莓");//向session域中添加的数据
        return "forward:/ok";//请求转发到 /ok
    }

    @GetMapping("/ok")
    @ResponseBody
    public String ok(@RequestAttribute(value = "user", required = false) String username,
                     HttpServletRequest request,
                     @SessionAttribute(value = "mobile", required = false) String mobile,
                     HttpSession session) {
        //获取到request域中的数据
        System.out.println("username--" + username);
        System.out.println("通过servlet api 获取 username-" + request.getAttribute("user"));

        //获取session域中的数据
        System.out.println("mobile--" + mobile);
        System.out.println("通过HttpSession 获取 mobile-" + session.getAttribute("mobile"));
        return "success"; //返回字符串, 不用视图解析器
    }
}
3.测试…
复杂参数
基本介绍
1.在开发中, SpringBoot在相应客户端请求时, 也支持复杂参数
2.Map, Model, Errors/BindingResult, RedirectAttributes, ServletResponse, SessionStatus, UriComponentsBuilder, ServletUriComponentBuilder, HttpSession.
3.Map, Model,数据会被放在request域, 到时Debug一下.
4.RedirectAttribute 重定向携带数据
应用实例
说明: 演示复杂参数的使用.
重点: Map, Model, ServletResponse
●代码实现
1.修改src/main/java/com/zzw/springboot/controller/RequestController.java
SpringMVC系列六: 模型数据
//响应一个注册请求
@GetMapping("/register")
public String register(Map<String, Object> map,
Model model,
HttpServletRequest request) {
//如果一个注册请求, 会将注册数据封装到map或者model
//map中的数据和model中的数据, 会被放入到request域中
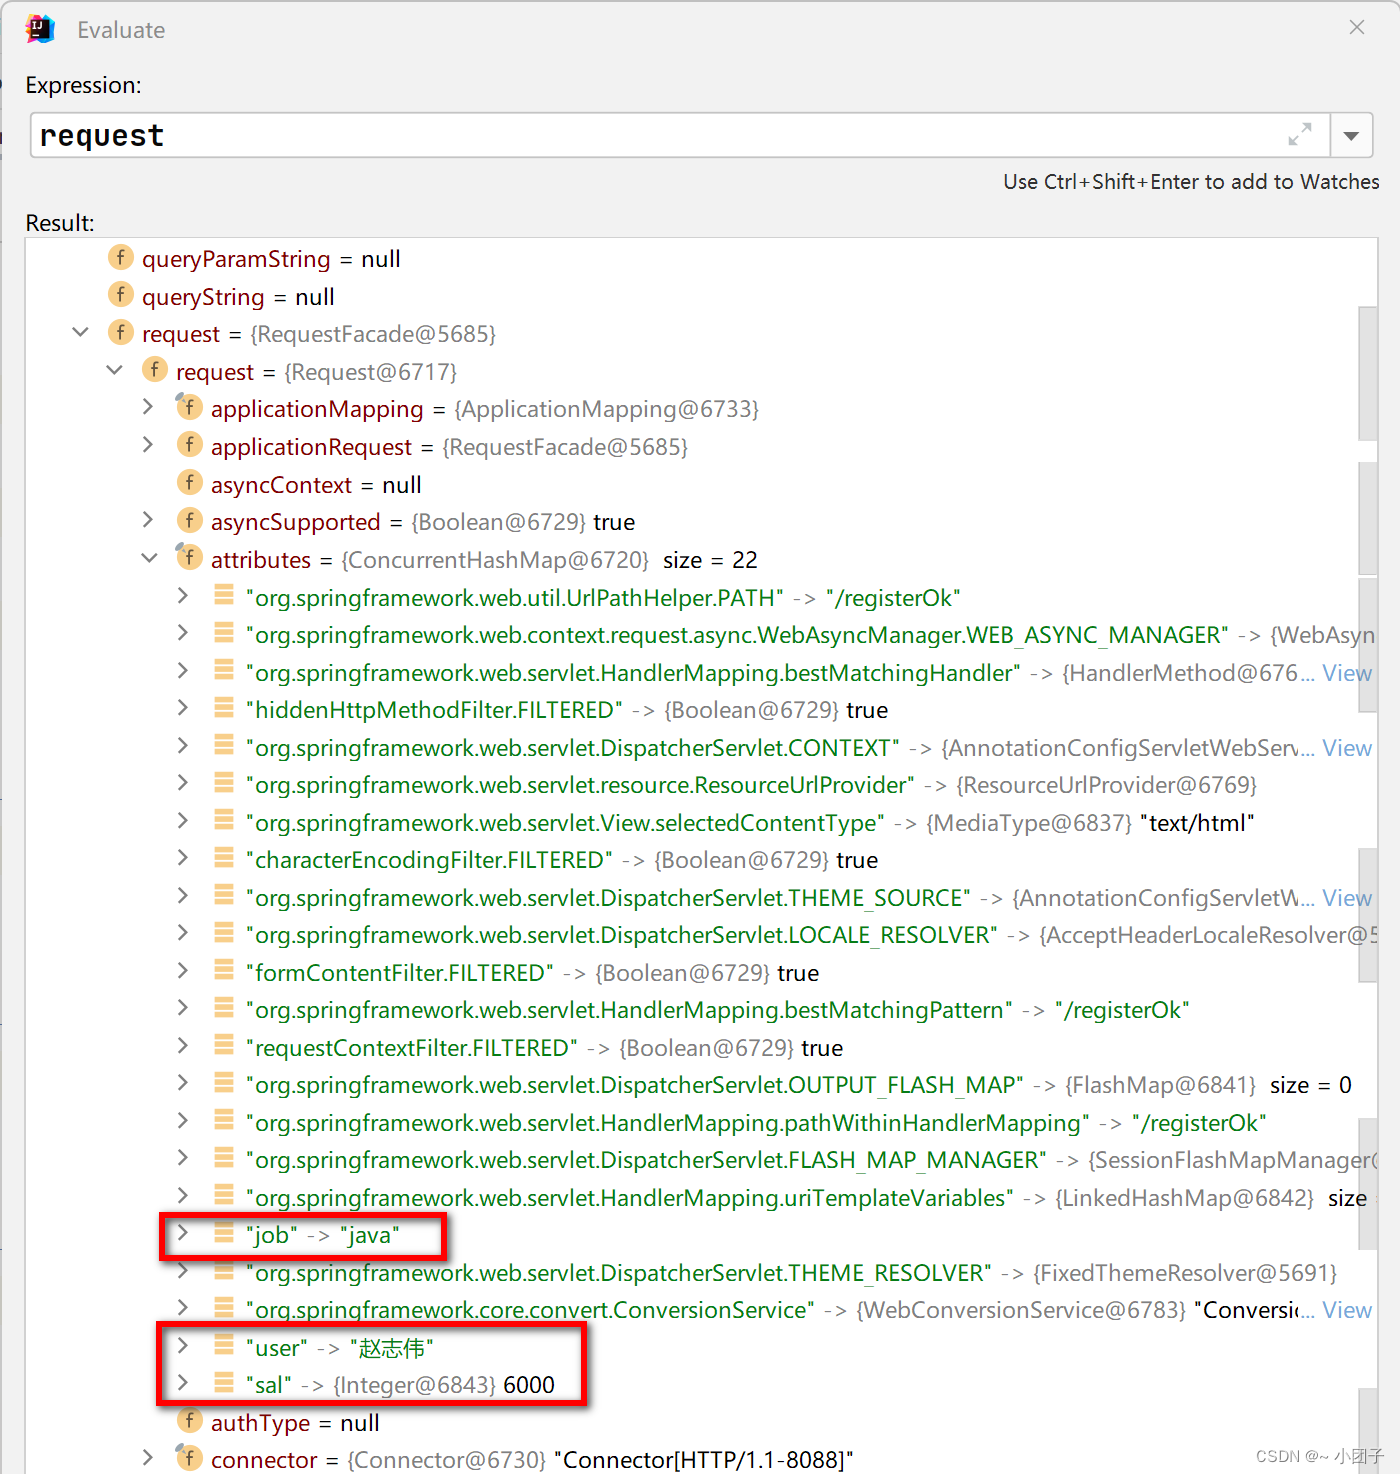
map.put("user", "赵志伟");
map.put("job", "java");
model.addAttribute("sal", 6000);
//一会我们再测试response使用
//请求转发
return "forward:/registerOk";
}
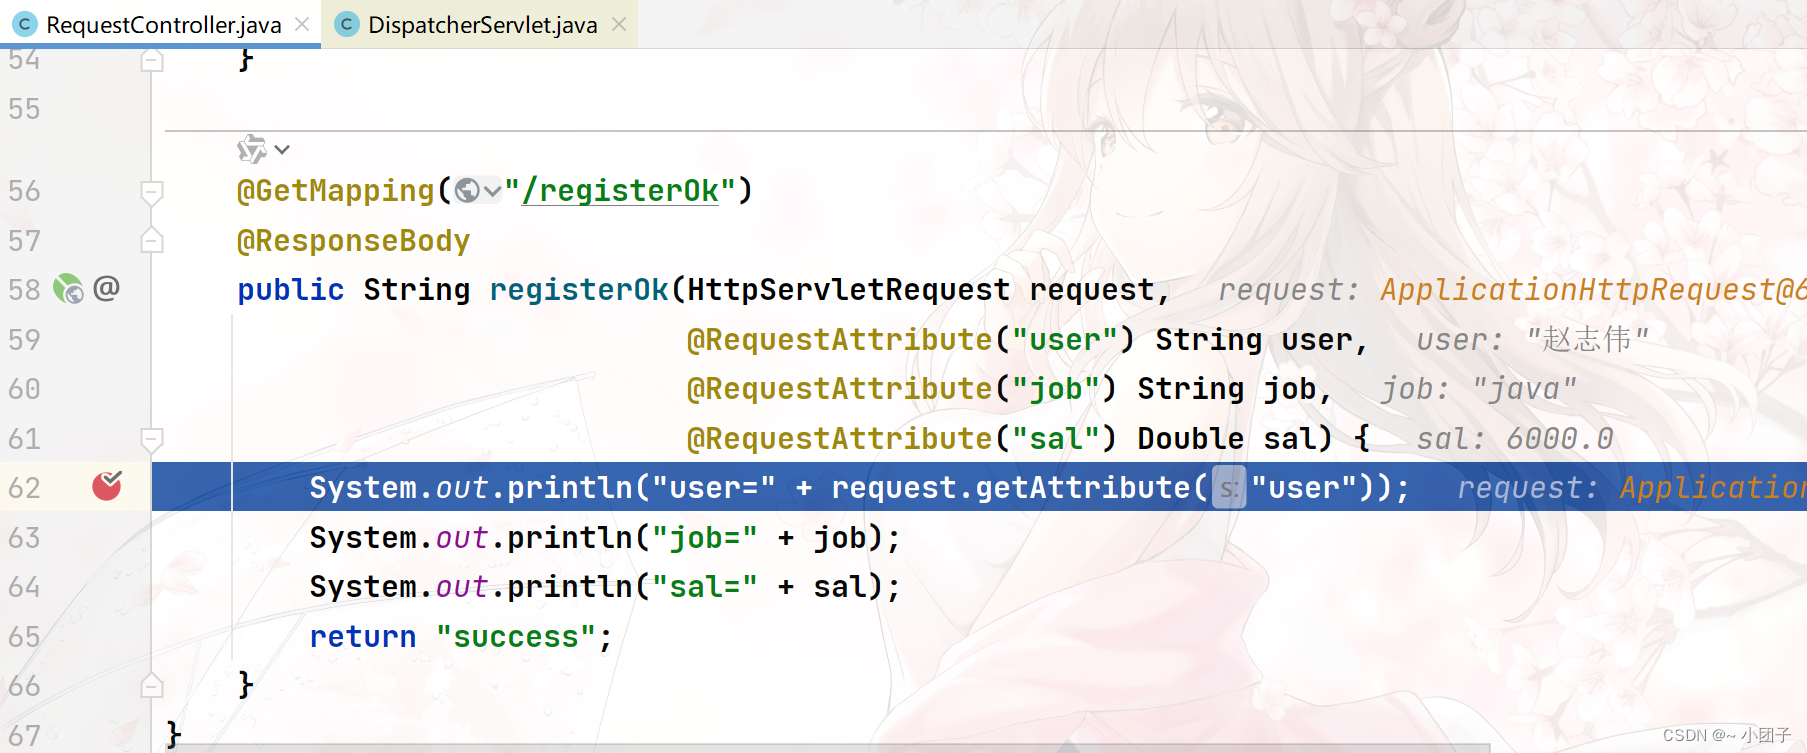
@GetMapping("/registerOk")
@ResponseBody
public String registerOk(HttpServletRequest request,
@RequestAttribute("user") String user,
@RequestAttribute("job") String job,
@RequestAttribute("sal") Double sal) {
System.out.println("user=" + request.getAttribute("user"));
System.out.println("job=" + job);
System.out.println("sal=" + sal);
return "success";
}
2.浏览器输入 http://localhost:8088/register , 打断点测试
SpringMVC系列十三: SpringMVC执行流程 - 源码分析

进入目标方法
剖析 request 对象
3.继续修改 register()方法
JavaWeb系列十一: Web 开发会话技术(Cookie, Session)
//响应一个注册请求
@GetMapping("/register")
public String register(Map<String, Object> map,
                       Model model,
                       HttpServletRequest request,
                       HttpServletResponse response) throws UnsupportedEncodingException {
    //如果一个注册请求, 会将注册数据封装到map或者model
    //map中的数据和model中的数据, 会被放入到request域中
    map.put("user", "赵志伟");
    map.put("job", "java");
    model.addAttribute("sal", 6000);
    //一会我们再测试response使用
    //演示创建cookie, 并通过response 添加到浏览器/客户端
    Cookie cookie = new Cookie("email", "978964140@qq.com");
    response.addCookie(cookie);

    //请求转发
    return "forward:/registerOk";
}
4.测试

自定义对象参数-自动封装
基本介绍
1.在开发中, SpringBoot在响应客户端/浏览器请求时, 也支持自定义对象参数
2.完成自动类型转换与格式化
3.支持级联封装
应用实例
●需求说明:
演示自定义对象参数使用,完成自动封装,类型转换。
●代码实现
1.创建public/save.html
<!DOCTYPE html>
<html lang="en">
<head>
    <meta charset="UTF-8">
    <title>添加妖怪</title>
</head>
<body>
<form action="?" method="?">
    编号: <input name="" value=""><br/>
    姓名: <input name="" value=""><br/>
    年龄: <input name="" value=""><br/>
    婚否: <input name="" value=""><br/>
    生日: <input name="" value=""><br/>
    坐骑名称: <input name="" value=""><br/>
    坐骑价格: <input name="" value=""><br/>
    <input type="submit" value="保存"/>
</form>
</body>
</html>
2.创建src/main/java/com/zzw/springboot/bean/Car.java
@Data
public class Car {
    private String name;
    private Double price;
}
3.创建src/main/java/com/zzw/springboot/bean/Monster.java
@Data
public class Monster {
    private Integer id;
    private String name;
    private Integer age;
    private Boolean maritalStatus;
    private Date birthday;
    private Car car;
}
4.修改ParameterController.java
//处理添加monster的方法
@PostMapping("/saveMonster")
public String saveMonster(Monster monster) {
    System.out.println("monster = " + monster);
    return "success";
}
5.回填public/save.html
<form action="saveMonster" method="post">
    编号: <input name="id" value="100"><br/>
    姓名: <input name="name" value="张三"><br/>
    年龄: <input name="age" value="30"><br/>
    婚否: <input name="maritalStatus" value="未婚"><br/>
    生日: <input name="birthday" value="1994-01-01"><br/>
    <input type="submit" value="保存"/>
</form>
6.自动封装需要用到自定义转换器. 接下来, 继续学习自定义转换器.
🔜 下一篇预告: springboot系列十: 自定义转换器,处理JSON,内容协商
📚 目录导航 📚
- springboot系列一: springboot初步入门
- springboot系列二: sprintboot依赖管理
- springboot系列三: sprintboot自动配置
- springboot系列四: sprintboot容器功能
- springboot系列五: springboot底层机制实现 上
- springboot系列六: springboot底层机制实现 下
- springboot系列七: Lombok注解,Spring Initializr,yaml语法
- springboot系列八: springboot静态资源访问,Rest风格请求处理
- springboot系列九: 接收参数相关注解
- springboot系列十: 自定义转换器,处理JSON,内容协商
💬 读者互动 💬
在学习 Spring Boot 接收参数相关注解的过程中,您有哪些新的发现或疑问?欢迎在评论区留言,让我们一起讨论吧!😊