1--完整代码
SD_Inpainting
2--简单代码
import PIL
import torch
import numpy as np
from PIL import Image
from tqdm import tqdm
import torchvision
from diffusers import AutoencoderKL, UNet2DConditionModel, DDIMScheduler
from transformers import CLIPTextModel, CLIPTokenizer
# 预处理mask
def preprocess_mask(mask):
mask = mask.convert("L") # 转换为灰度图: L = R * 299/1000 + G * 587/1000+ B * 114/1000。
w, h = mask.size # 512, 512
w, h = map(lambda x: x - x % 32, (w, h)) # resize to integer multiple of 32
mask = mask.resize((w // 8, h // 8), resample = PIL.Image.NEAREST) # 64, 64
mask = np.array(mask).astype(np.float32) / 255.0 # 归一化 64, 64
mask = np.tile(mask, (4, 1, 1)) # 4, 64, 64
mask = mask[None].transpose(0, 1, 2, 3)
mask = 1 - mask # repaint white, keep black # mask图中,mask的部分变为0
mask = torch.from_numpy(mask)
return mask
# 预处理image
def preprocess(image):
w, h = image.size
w, h = map(lambda x: x - x % 32, (w, h)) # resize to integer multiple of 32
image = image.resize((w, h), resample=PIL.Image.LANCZOS)
image = np.array(image).astype(np.float32) / 255.0
image = image[None].transpose(0, 3, 1, 2)
image = torch.from_numpy(image)
return 2.0 * image - 1.0
if __name__ == "__main__":
model_id = "runwayml/stable-diffusion-v1-5" # online download
# model_id = "/mnt/dolphinfs/hdd_pool/docker/user/hadoop-waimai-aigc/liujinfu/All_test/test0714/huggingface.co/runwayml/stable-diffusion-v1-5" # local path
# 读取输入图像和输入mask
input_image = Image.open("./images/overture-creations-5sI6fQgYIuo.png").resize((512, 512))
input_mask = Image.open("./images/overture-creations-5sI6fQgYIuo_mask.png").resize((512, 512))
# 1. 加载autoencoder
vae = AutoencoderKL.from_pretrained(model_id, subfolder = "vae")
# 2. 加载tokenizer和text encoder
tokenizer = CLIPTokenizer.from_pretrained(model_id, subfolder = "tokenizer")
text_encoder = CLIPTextModel.from_pretrained(model_id, subfolder = "text_encoder")
# 3. 加载扩散模型UNet
unet = UNet2DConditionModel.from_pretrained(model_id, subfolder = "unet")
# 4. 定义noise scheduler
noise_scheduler = DDIMScheduler(
num_train_timesteps = 1000,
beta_start = 0.00085,
beta_end = 0.012,
beta_schedule = "scaled_linear",
clip_sample = False, # don't clip sample, the x0 in stable diffusion not in range [-1, 1]
set_alpha_to_one = False,
)
# 将模型复制到GPU上
device = "cuda"
vae.to(device, dtype = torch.float16)
text_encoder.to(device, dtype = torch.float16)
unet = unet.to(device, dtype = torch.float16)
# 设置prompt和超参数
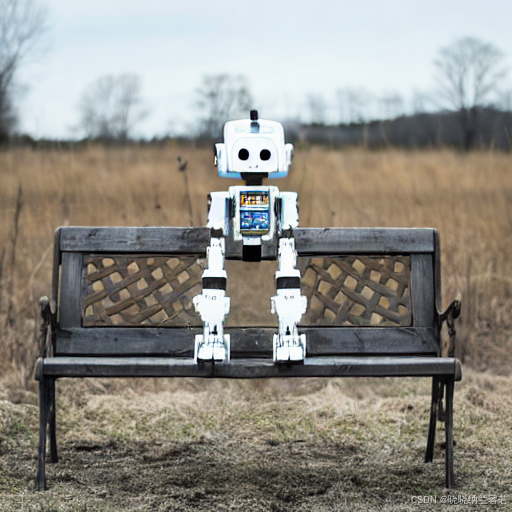
prompt = "a mecha robot sitting on a bench"
negative_prompt = ""
strength = 0.75
guidance_scale = 7.5
batch_size = 1
num_inference_steps = 50
generator = torch.Generator(device).manual_seed(0)
with torch.no_grad():
# get prompt text_embeddings
text_input = tokenizer(prompt, padding = "max_length",
max_length = tokenizer.model_max_length,
truncation = True,
return_tensors = "pt")
text_embeddings = text_encoder(text_input.input_ids.to(device))[0]
# get unconditional text embeddings
max_length = text_input.input_ids.shape[-1]
uncond_input = tokenizer(
[negative_prompt] * batch_size, padding = "max_length", max_length = max_length, return_tensors = "pt"
)
uncond_embeddings = text_encoder(uncond_input.input_ids.to(device))[0]
# concat batch
text_embeddings = torch.cat([uncond_embeddings, text_embeddings])
# 设置采样步数
noise_scheduler.set_timesteps(num_inference_steps, device = device)
# 根据strength计算timesteps
init_timestep = min(int(num_inference_steps * strength), num_inference_steps)
t_start = max(num_inference_steps - init_timestep, 0)
timesteps = noise_scheduler.timesteps[t_start:]
# 预处理init_image
init_input = preprocess(input_image)
init_latents = vae.encode(init_input.to(device, dtype=torch.float16)).latent_dist.sample(generator)
init_latents = 0.18215 * init_latents
init_latents = torch.cat([init_latents] * batch_size, dim=0)
init_latents_orig = init_latents
# 处理mask
mask_image = preprocess_mask(input_mask)
mask_image = mask_image.to(device=device, dtype=init_latents.dtype)
mask = torch.cat([mask_image] * batch_size)
# 给init_latents加噪音
noise = torch.randn(init_latents.shape, generator = generator, device = device, dtype = init_latents.dtype)
init_latents = noise_scheduler.add_noise(init_latents, noise, timesteps[:1])
latents = init_latents # 作为初始latents
# Do denoise steps
for t in tqdm(timesteps):
# 这里latens扩展2份,是为了同时计算unconditional prediction
latent_model_input = torch.cat([latents] * 2)
latent_model_input = noise_scheduler.scale_model_input(latent_model_input, t) # for DDIM, do nothing
# 预测噪音
noise_pred = unet(latent_model_input, t, encoder_hidden_states=text_embeddings).sample
# Classifier Free Guidance
noise_pred_uncond, noise_pred_text = noise_pred.chunk(2)
noise_pred = noise_pred_uncond + guidance_scale * (noise_pred_text - noise_pred_uncond)
# x_t -> x_t-1
latents = noise_scheduler.step(noise_pred, t, latents).prev_sample
# 将unmask区域替换原始图像的nosiy latents
init_latents_proper = noise_scheduler.add_noise(init_latents_orig, noise, torch.tensor([t]))
# mask的部分数值为0
# 因此init_latents_proper * mask为保留原始latents(不mask)
# 而latents * (1 - mask)为用生成的latents替换mask的部分
latents = (init_latents_proper * mask) + (latents * (1 - mask))
# 注意要对latents进行scale
latents = 1 / 0.18215 * latents
image = vae.decode(latents).sample
# 转成pillow
img = (image / 2 + 0.5).clamp(0, 1).detach().cpu()
img = torchvision.transforms.ToPILImage()(img.squeeze())
img.save("./outputs/output.png")
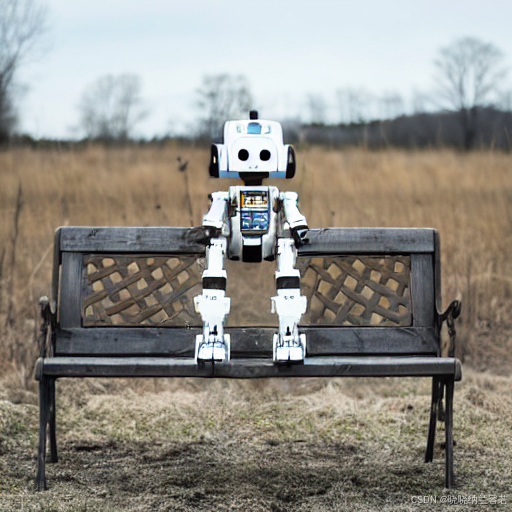
print("All Done!")运行结果:
3--基于Diffuser进行调用
import torch
import torchvision
from PIL import Image
from diffusers import StableDiffusionInpaintPipelineLegacy
if __name__ == "__main__":
# load inpainting pipeline
model_id = "runwayml/stable-diffusion-v1-5"
# model_id = "/mnt/dolphinfs/hdd_pool/docker/user/hadoop-waimai-aigc/liujinfu/All_test/test0714/huggingface.co/runwayml/stable-diffusion-v1-5" # local path
pipe = StableDiffusionInpaintPipelineLegacy.from_pretrained(model_id, torch_dtype = torch.float16).to("cuda")
# load input image and input mask
input_image = Image.open("./images/overture-creations-5sI6fQgYIuo.png").resize((512, 512))
input_mask = Image.open("./images/overture-creations-5sI6fQgYIuo_mask.png").resize((512, 512))
# run inference
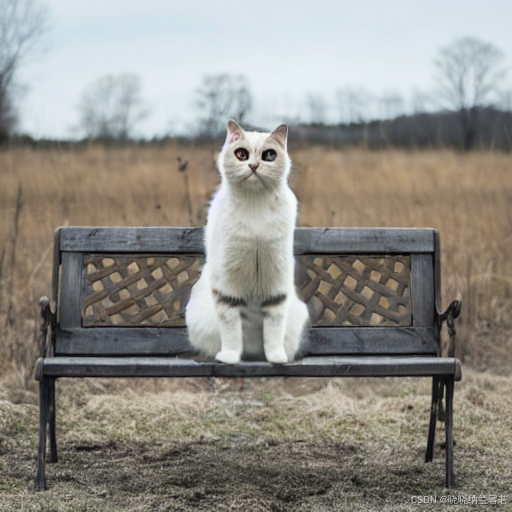
prompt = ["a mecha robot sitting on a bench", "a cat sitting on a bench"]
generator = torch.Generator("cuda").manual_seed(0)
with torch.autocast("cuda"):
images = pipe(
prompt = prompt,
image = input_image,
mask_image = input_mask,
num_inference_steps = 50,
strength = 0.75,
guidance_scale = 7.5,
num_images_per_prompt = 1,
generator = generator
).images
# 转成pillow
for idx, image in enumerate(images):
image.save("./outputs/output_{:d}.png".format(idx))
print("All Done!")运行结果: