3D Rotating Monkey Head — Kivy 2.3.0 documentation
KIVY 3D Rotating Monkey Head
kivy 3D 旋转猴子头

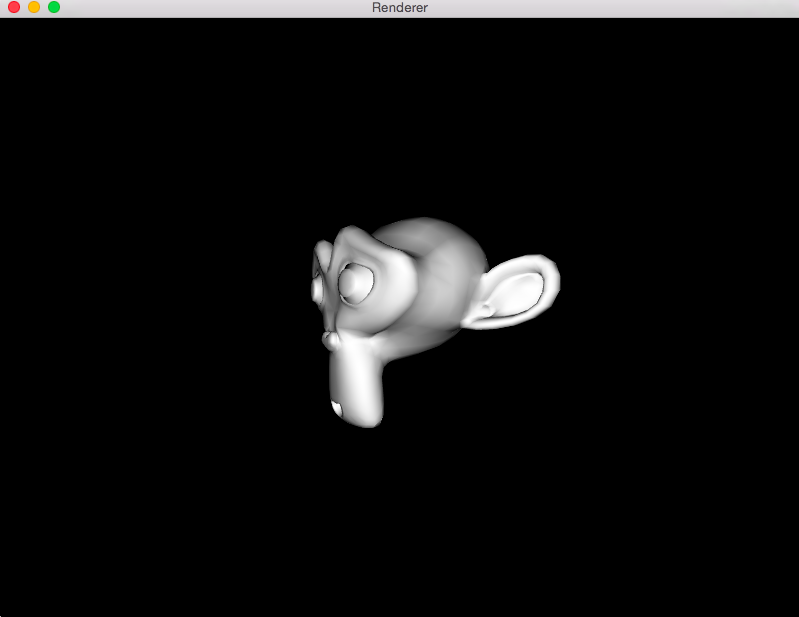
This example demonstrates using OpenGL to display a rotating monkey head. This includes loading a Blender OBJ file, shaders written in OpenGL’s Shading Language (GLSL), and using scheduled callbacks.
这个例子展示了如何使用OpenGL来显示一个旋转的猴子头部。这包括加载一个来自Blender的OBJ文件、使用OpenGL着色语言(GLSL)编写的着色器,以及使用计划好的回调函数。
The monkey.obj file is an OBJ file output from the Blender free 3D creation software. The file is text, listing vertices and faces and is loaded using a class in the file objloader.py. The file simple.glsl is a simple vertex and fragment shader written in GLSL.
monkey.obj文件是一个OBJ格式的文件,这个文件是由免费的3D创作软件Blender输出的。该文件是文本格式的,列出了顶点和面,并通过objloader.py文件中的一个类来加载。simple.glsl文件是一个简单的顶点和片元着色器,使用GLSL编写。
具体来说:
OBJ文件:OBJ文件是一种标准的3D模型文件格式,它定义了物体的几何体,包括顶点、面、纹理坐标等信息。在这个例子中,
monkey.obj文件包含了猴子头部的几何信息,用于在OpenGL环境中渲染。Blender:Blender是一款开源的3D图形软件,支持从建模、动画、材质、渲染、到音频处理、视频编辑等一系列的3D创作流程。用户可以在Blender中创建3D模型,并将其导出为OBJ等格式,供其他软件使用。
objloader.py:这是一个Python脚本文件,其中定义了一个类,用于加载和解析OBJ文件。它读取文件中的顶点、面等数据,并将这些数据转换为OpenGL可以使用的格式。
GLSL(OpenGL Shading Language):GLSL是一种用于OpenGL的高级着色语言,它允许开发者编写用于图形渲染的顶点和片元着色器。在这个例子中,
simple.glsl文件包含了两个着色器程序:一个顶点着色器和一个片元着色器。顶点着色器处理顶点的变换,而片元着色器则负责计算每个像素的颜色。OpenGL:OpenGL是一个跨语言、跨平台的编程接口,用于渲染2D、3D矢量图形。它广泛用于CAD、虚拟现实、科学可视化程序和电子游戏开发等领域。在这个例子中,OpenGL被用来渲染加载的猴子头部模型,并使其旋转。
回调函数:在OpenGL程序中,回调函数通常用于处理如窗口大小改变、键盘输入或定时器事件等异步事件。在这个例子中,回调函数可能被用来更新猴子头部的旋转角度,并在每次渲染循环中重新绘制它。
File 3Drendering/main.py
'''
3D Rotating Monkey Head
========================

This example demonstrates using OpenGL to display a rotating monkey head. This
includes loading a Blender OBJ file, shaders written in OpenGL's Shading
Language (GLSL), and using scheduled callbacks.

The monkey.obj file is an OBJ file output from the Blender free 3D creation
software. The file is text, listing vertices and faces and is loaded
using a class in the file objloader.py. The file simple.glsl is
a simple vertex and fragment shader written in GLSL.
'''

from kivy.app import App
from kivy.clock import Clock
from kivy.core.window import Window
from kivy.uix.widget import Widget
from kivy.resources import resource_find
from kivy.graphics.transformation import Matrix
from kivy.graphics.opengl import glEnable, glDisable, GL_DEPTH_TEST
from kivy.graphics import RenderContext, Callback, PushMatrix, PopMatrix, \
    Color, Translate, Rotate, Mesh, UpdateNormalMatrix
from objloader import ObjFile


class Renderer(Widget):
    def __init__(self, **kwargs):
        self.canvas = RenderContext(compute_normal_mat=True)
        self.canvas.shader.source = resource_find('simple.glsl')
        self.scene = ObjFile(resource_find("monkey.obj"))
        super(Renderer, self).__init__(**kwargs)
        with self.canvas:
            self.cb = Callback(self.setup_gl_context)
            PushMatrix()
            self.setup_scene()
            PopMatrix()
            self.cb = Callback(self.reset_gl_context)
        Clock.schedule_interval(self.update_glsl, 1 / 60.)

    def setup_gl_context(self, *args):
        glEnable(GL_DEPTH_TEST)

    def reset_gl_context(self, *args):
        glDisable(GL_DEPTH_TEST)

    def update_glsl(self, delta):
        asp = self.width / float(self.height)
        proj = Matrix().view_clip(-asp, asp, -1, 1, 1, 100, 1)
        self.canvas['projection_mat'] = proj
        self.canvas['diffuse_light'] = (1.0, 1.0, 0.8)
        self.canvas['ambient_light'] = (0.1, 0.1, 0.1)
        self.rot.angle += delta * 100

    def setup_scene(self):
        Color(1, 1, 1, 1)
        PushMatrix()
        Translate(0, 0, -3)
        self.rot = Rotate(1, 0, 1, 0)
        m = list(self.scene.objects.values())[0]
        UpdateNormalMatrix()
        self.mesh = Mesh(
            vertices=m.vertices,
            indices=m.indices,
            fmt=m.vertex_format,
            mode='triangles',
        )
        PopMatrix()


class RendererApp(App):
    def build(self):
        return Renderer()


if __name__ == "__main__":
    RendererApp().run()
File 3Drendering/objloader.py
class MeshData(object):
    def __init__(self, **kwargs):
        self.name = kwargs.get("name")
        self.vertex_format = [
            (b'v_pos', 3, 'float'),
            (b'v_normal', 3, 'float'),
            (b'v_tc0', 2, 'float')]
        self.vertices = []
        self.indices = []

    def calculate_normals(self):
        for i in range(len(self.indices) / (3)):
            fi = i * 3
            v1i = self.indices[fi]
            v2i = self.indices[fi + 1]
            v3i = self.indices[fi + 2]

            vs = self.vertices
            p1 = [vs[v1i + c] for c in range(3)]
            p2 = [vs[v2i + c] for c in range(3)]
            p3 = [vs[v3i + c] for c in range(3)]

            u, v = [0, 0, 0], [0, 0, 0]
            for j in range(3):
                v[j] = p2[j] - p1[j]
                u[j] = p3[j] - p1[j]

            n = [0, 0, 0]
            n[0] = u[1] * v[2] - u[2] * v[1]
            n[1] = u[2] * v[0] - u[0] * v[2]
            n[2] = u[0] * v[1] - u[1] * v[0]

            for k in range(3):
                self.vertices[v1i + 3 + k] = n[k]
                self.vertices[v2i + 3 + k] = n[k]
                self.vertices[v3i + 3 + k] = n[k]


class ObjFile:
    def finish_object(self):
        if self._current_object is None:
            return

        mesh = MeshData()
        idx = 0
        for f in self.faces:
            verts = f[0]
            norms = f[1]
            tcs = f[2]
            for i in range(3):
                # get normal components
                n = (0.0, 0.0, 0.0)
                if norms[i] != -1:
                    n = self.normals[norms[i] - 1]

                # get texture coordinate components
                t = (0.0, 0.0)
                if tcs[i] != -1:
                    t = self.texcoords[tcs[i] - 1]

                # get vertex components
                v = self.vertices[verts[i] - 1]

                data = [v[0], v[1], v[2], n[0], n[1], n[2], t[0], t[1]]
                mesh.vertices.extend(data)

            tri = [idx, idx + 1, idx + 2]
            mesh.indices.extend(tri)
            idx += 3

        self.objects[self._current_object] = mesh
        # mesh.calculate_normals()
        self.faces = []

    def __init__(self, filename, swapyz=False):
        """Loads a Wavefront OBJ file. """
        self.objects = {}
        self.vertices = []
        self.normals = []
        self.texcoords = []
        self.faces = []

        self._current_object = None

        material = None
        for line in open(filename, "r"):
            if line.startswith('#'):
                continue
            if line.startswith('s'):
                continue
            values = line.split()
            if not values:
                continue
            if values[0] == 'o':
                self.finish_object()
                self._current_object = values[1]
            # elif values[0] == 'mtllib':
            #    self.mtl = MTL(values[1])
            # elif values[0] in ('usemtl', 'usemat'):
            #    material = values[1]
            if values[0] == 'v':
                v = list(map(float, values[1:4]))
                if swapyz:
                    v = v[0], v[2], v[1]
                self.vertices.append(v)
            elif values[0] == 'vn':
                v = list(map(float, values[1:4]))
                if swapyz:
                    v = v[0], v[2], v[1]
                self.normals.append(v)
            elif values[0] == 'vt':
                self.texcoords.append(list(map(float, values[1:3])))
            elif values[0] == 'f':
                face = []
                texcoords = []
                norms = []
                for v in values[1:]:
                    w = v.split('/')
                    face.append(int(w[0]))
                    if len(w) >= 2 and len(w[1]) > 0:
                        texcoords.append(int(w[1]))
                    else:
                        texcoords.append(-1)
                    if len(w) >= 3 and len(w[2]) > 0:
                        norms.append(int(w[2]))
                    else:
                        norms.append(-1)
                self.faces.append((face, norms, texcoords, material))
        self.finish_object()


def MTL(filename):
    contents = {}
    mtl = None
    return
    for line in open(filename, "r"):
        if line.startswith('#'):
            continue
        values = line.split()
        if not values:
            continue
        if values[0] == 'newmtl':
            mtl = contents[values[1]] = {}
        elif mtl is None:
            raise ValueError("mtl file doesn't start with newmtl stmt")
        mtl[values[0]] = values[1:]
    return contents
File 3Drendering/simple.glsl
/* simple.glsl

simple diffuse lighting based on laberts cosine law; see e.g.:
    http://en.wikipedia.org/wiki/Lambertian_reflectance
    http://en.wikipedia.org/wiki/Lambert%27s_cosine_law
*/
---VERTEX SHADER-------------------------------------------------------
#ifdef GL_ES
    precision highp float;
#endif

attribute vec3  v_pos;
attribute vec3  v_normal;

uniform mat4 modelview_mat;
uniform mat4 projection_mat;

varying vec4 normal_vec;
varying vec4 vertex_pos;

void main (void) {
    //compute vertex position in eye_space and normalize normal vector
    vec4 pos = modelview_mat * vec4(v_pos,1.0);
    vertex_pos = pos;
    normal_vec = vec4(v_normal,0.0);
    gl_Position = projection_mat * pos;
}


---FRAGMENT SHADER-----------------------------------------------------
#ifdef GL_ES
    precision highp float;
#endif

varying vec4 normal_vec;
varying vec4 vertex_pos;

uniform mat4 normal_mat;

void main (void){
    //correct normal, and compute light vector (assume light at the eye)
    vec4 v_normal = normalize( normal_mat * normal_vec ) ;
    vec4 v_light = normalize( vec4(0,0,0,1) - vertex_pos );
    //reflectance based on lamberts law of cosine
    float theta = clamp(dot(v_normal, v_light), 0.0, 1.0);
    gl_FragColor = vec4(theta, theta, theta, 1.0);
}


