1.思路
1.1 样式
样式为常驻前台的一个小窗口,小窗口上有三到四个按钮,为一级功能,是当前工作内容的常用功能窗口,有十个二级窗口,为选中窗口时的扩展选项,有若干后台功能,可选中至前台
可最小化至窗口栏,最小化按钮在窗口底部
窗口为无边框
1.2具体功能
1.设置代办
复制一段文本后添加代办
2.复制填表
2.功能细节
1.窗口名称:Me.Text = "工作助手"
2.常驻前台Me.TopMost = True
3.无边框Me.FormBorderStyle = FormBorderStyle.None
4.窗体圆角
引用:Imports System.Drawing.Drawing2D
    Call 窗体圆角(Me, 20)
    Sub 窗体圆角(form As Form, rgnRadius As Integer)
        Dim bs As GraphicsPath = New GraphicsPath
        bs.AddLine(rgnRadius, 0, Me.Width - rgnRadius * 2, 0)
        bs.AddArc(Me.Width - rgnRadius * 2, 0, rgnRadius * 2, rgnRadius * 2, 270, 90)
        bs.AddLine(Me.Width, rgnRadius, Me.Width, Me.Height - rgnRadius * 2)
        bs.AddArc(Me.Width - rgnRadius * 2, Me.Height - rgnRadius * 2, rgnRadius * 2, rgnRadius * 2, 0, 90)
        bs.AddLine(Me.Width - rgnRadius * 2, Me.Height, rgnRadius, Me.Height)
        bs.AddArc(0, Me.Height - rgnRadius * 2, rgnRadius * 2, rgnRadius * 2, 90, 90)
        bs.AddLine(0, Me.Height - rgnRadius * 2, 0, rgnRadius * 2)
        bs.AddArc(0, 0, rgnRadius * 2, rgnRadius * 2, 180, 90)
        bs.CloseFigure()
        Me.Region = New Region(bs)
    End Sub
可是用画图法制作的窗体圆角有很明显的锯齿,不符合商业化需求
使用双缓冲
默认情况下,标准Windows 窗体控件是双缓冲的。
可以通过两种方法对窗体和所创作的控件启用默认双缓冲。
一种方法是将DoubleBuffered属性设置为true,另一种方法是通过调用SetStyle方法将OptimizedDoubleBuffer标志设置为true。两种方法都将为窗体或控件启用默认双缓冲并提供无闪烁的图形呈现。建议仅对已为其编写所有呈现代码的自定义控件调用SetStyle方法。Public Sub New()
InitializeComponent()
SetStyle(ControlStyles.UserPaint, True)
SetStyle(ControlStyles.AllPaintingInWmPaint, True)
SetStyle(ControlStyles.OptimizedDoubleBuffer, True)
End Sub
最后尝试了双重绘,但是又出现黑角
Imports System.Drawing.Drawing2D
Imports System.Runtime.InteropServices

Public Class Form1
    Public Sub New()
        ' 此调用是设计器所必需的。
        InitializeComponent()
        SetStyle(ControlStyles.UserPaint, True)
        SetStyle(ControlStyles.AllPaintingInWmPaint, True)
        SetStyle(ControlStyles.OptimizedDoubleBuffer, True)
        Me.Text = "工作助手"
        Me.TopMost = True
        Me.FormBorderStyle = FormBorderStyle.None
        'Call 窗体圆角(Me, 20)

    End Sub
    Protected Overrides Sub OnPaintBackground(e As PaintEventArgs)
        ' 不调用基类的OnPaintBackground,避免背景被画出
    End Sub
    Protected Overrides Sub OnPaint(e As PaintEventArgs)
        Dim g As Graphics = e.Graphics
        g.SmoothingMode = Drawing2D.SmoothingMode.AntiAlias
        g.CompositingQuality = Drawing2D.CompositingQuality.HighQuality
        g.InterpolationMode = Drawing2D.InterpolationMode.HighQualityBicubic
        '绘制圆角矩形
        Dim rect As New Rectangle(0, 0, Me.Width, Me.Height)
        Dim path As New Drawing2D.GraphicsPath()
        Dim ar As Integer
        ar = 50
        path.AddArc(rect.X, rect.Y, ar, ar, 180, 90)
        path.AddArc(rect.X + rect.Width - ar, rect.Y, ar, ar, 270, 90)
        path.AddArc(rect.X + rect.Width - ar, rect.Y + rect.Height - ar, ar, ar, 0, 90)
        path.AddArc(rect.X, rect.Y + rect.Height - ar, ar, ar, 90, 90)
        path.CloseFigure()
        g.FillPath(Brushes.White, path)
        MyBase.OnPaint(e)
    End Sub

    Sub 窗体圆角(form As Form, rgnRadius As Integer)
        Dim bs As GraphicsPath = New GraphicsPath
        bs.AddLine(rgnRadius, 0, Me.Width - rgnRadius * 2, 0)
        bs.AddArc(Me.Width - rgnRadius * 2, 0, rgnRadius * 2, rgnRadius * 2, 270, 90)
        bs.AddLine(Me.Width, rgnRadius, Me.Width, Me.Height - rgnRadius * 2)
        bs.AddArc(Me.Width - rgnRadius * 2, Me.Height - rgnRadius * 2, rgnRadius * 2, rgnRadius * 2, 0, 90)
        bs.AddLine(Me.Width - rgnRadius * 2, Me.Height, rgnRadius, Me.Height)
        bs.AddArc(0, Me.Height - rgnRadius * 2, rgnRadius * 2, rgnRadius * 2, 90, 90)
        bs.AddLine(0, Me.Height - rgnRadius * 2, 0, rgnRadius * 2)
        bs.AddArc(0, 0, rgnRadius * 2, rgnRadius * 2, 180, 90)
        bs.CloseFigure()
        Me.Region = New Region(bs)
    End Sub

End Class
最后尝试了使用WPF窗体,完美解决圆角问题
<Window x:Class="MainWindow"
        xmlns="http://schemas.microsoft.com/winfx/2006/xaml/presentation"
        xmlns:x="http://schemas.microsoft.com/winfx/2006/xaml"
        xmlns:d="http://schemas.microsoft.com/expression/blend/2008"
        xmlns:mc="http://schemas.openxmlformats.org/markup-compatibility/2006"
        xmlns:local="clr-namespace:工作助手WPF"
        mc:Ignorable="d"
        Title="MainWindow" Height="300" Width="200"
        WindowStyle="None"
        ResizeMode="NoResize"
        AllowsTransparency="True"
        Background="Transparent">
    <Grid SnapsToDevicePixels="True">
        <Border Background="White" BorderThickness="1" CornerRadius="10">
            <Button Content="Button" Margin="49,57,49,204"/>
        </Border>
    </Grid>
</Window>
5.设置icon
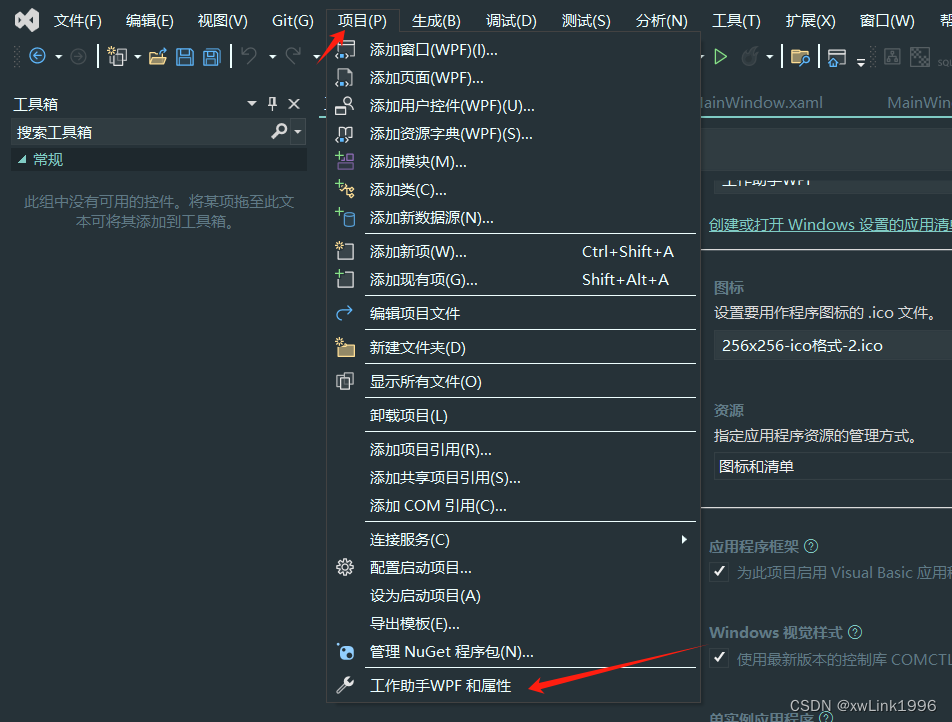
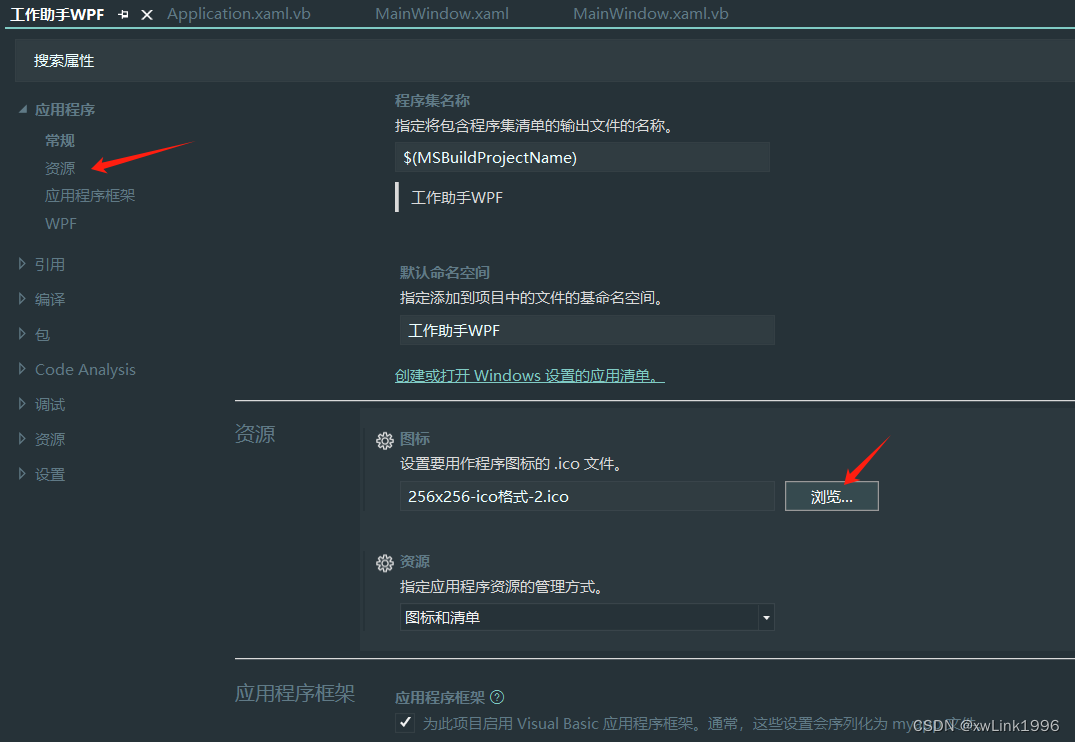
6.设置窗口初始位置,右下角
        Dim screenWidth As Integer = SystemParameters.PrimaryScreenWidth
        Dim screenHeight As Integer = SystemParameters.PrimaryScreenHeight
        Dim workHeight As Integer = SystemParameters.WorkArea.Height
        'MsgBox("--" & screenWidth & "--" & screenHeight & "--" & workHeight)
        Me.Left = screenWidth - Me.Width
        Me.Top = workHeight - Me.Height
7.设置类似qq的吸附效果,这里附上完整代码
Imports System.Timers.Timer
Imports System.Windows.Forms

Class MainWindow
    'Inherits Window
    Public Sub New()
        InitializeComponent()
        ' 设置窗口的初始位置贴紧任务栏
        'Me.WindowStartupLocation = WindowStartupLocation.CenterScreen '显示在屏幕中心
        'Me.WindowStartupLocation = WindowStartupLocation.Manual '在指定位置显示
        Dim screenWidth As Integer = SystemParameters.PrimaryScreenWidth
        Dim screenHeight As Integer = SystemParameters.PrimaryScreenHeight
        Dim workHeight As Integer = SystemParameters.WorkArea.Height
        'MsgBox("--" & screenWidth & "--" & screenHeight & "--" & workHeight)
        Me.Left = screenWidth - Me.Width
        Me.Top = workHeight - Me.Height
    End Sub
    '''
    Protected Overrides Sub OnMouseLeftButtonDown(ByVal e As MouseButtonEventArgs) ' 拖动窗体
        MyBase.OnMouseLeftButtonDown(e)
        Me.DragMove()
    End Sub
    Private hh As Boolean = False
    Private tt As Boolean = False
    Private timer As New Timer

    Private Sub MainWindow_Loaded(sender As Object, e As System.Windows.RoutedEventArgs) Handles Me.Loaded
        timer.Enabled = True
        AddHandler timer.Tick, AddressOf timertick
    End Sub

    Private Sub timertick()
        If hh = True Then
            If System.Windows.Forms.Cursor.Position.X >= clien()(0) - 5 And (System.Windows.Forms.Cursor.Position.Y >= Me.Top And System.Windows.Forms.Cursor.Position.Y <= Me.Top + Me.Height) Then
                Me.Left = clien()(0) - Me.Width
            End If
        End If
        If tt = True Then
            If System.Windows.Forms.Cursor.Position.Y <= 1 And (System.Windows.Forms.Cursor.Position.X >= Me.Left And System.Windows.Forms.Cursor.Position.X <= Me.Left + Me.Width) Then
                Me.Top = 1
            End If
        End If
    End Sub
    Private Sub MainWindow_MouseEnter(sender As Object, e As System.Windows.Input.MouseEventArgs) Handles Me.MouseEnter
        If hh = True Then
            Me.Left = clien()(0) - Me.Width
            hh = False
        End If
        If tt = True Then
            Me.Top = 1
            tt = False
        End If
    End Sub
    Function clien()
        Return {System.Windows.Forms.Screen.FromPoint(New System.Drawing.Point).Bounds.Width, System.Windows.Forms.Screen.FromPoint(New System.Drawing.Point).Bounds.Height}
    End Function

    Private Sub MainWindow_MouseLeave(sender As Object, e As System.Windows.Input.MouseEventArgs) Handles Me.MouseLeave
        If Me.Top <= 1 And Me.Left + Me.Width >= clien()(0) Then
            Me.Top = -Me.Height + 5
            Me.Left = clien()(0) - Me.Width
            tt = True
        Else
            hidden()
            shhtop()
        End If
    End Sub
    Sub hidden()
        If Me.Left + Me.Width >= clien()(0) Then
            Me.Left = clien()(0) - 5
            hh = True
        End If
    End Sub
    Sub shhtop()
        If Me.Top <= 1 Then
            Me.Top = -Me.Height + 5
            tt = True
        End If
    End Sub

    Sub btn_upload_Click()

    End Sub
    Sub btn_close_Click()

    End Sub
End Class
问题一:其中System.Windows.Forms引用不到
解决方案
<UseWindowsForms>true</UseWindowsForms>放置的位置是,【项目名】.csproj文件,在Visual Studio 2022 里双击项目名可以打开这个文件。
 <PropertyGroup>
    <OutputType>WinExe</OutputType>
    <TargetFramework>net6.0-windows</TargetFramework>
    <Nullable>enable</Nullable>
    <UseWPF>true</UseWPF>
    <AssemblyVersion>1.0.1</AssemblyVersion>
    <FileVersion>1.0.1.0</FileVersion>
    <UseWindowsForms>true</UseWindowsForms>
  </PropertyGroup>
问题二:当鼠标停在屏幕顶部时,窗口会不停闪烁,因为窗口没有完全隐藏,鼠标反复进出窗口,所以将-Me.Height + 0,做成临界值,使窗口不再闪烁
问题三:由于电脑有缩放,导致对鼠标的位置判断有问题,有偏移,所以要先获取电脑缩放比
(System.Windows.Forms.Cursor.Position.X / 1.25 >= Me.Left And System.Windows.Forms.Cursor.Position.X / 1.25 <= Me.Left + Me.Width)
我的电脑缩放比试125%,所以这里要除以1.25
8.调试:Debug.WriteLine("hello")
3.打包exe
3.1.vs能生成exe,但是debug中的其他文件也要拷贝给客户才能运行,就是要复制一个文件包,对于小程序不方便。以下方法可以通过rar压缩软件制作exe文件,但是如果进行了最后一步,给压缩包自定义图标,在其他电脑上运行会报毒,但是不改图标,程序又是压缩包的图标,不够专业。所以本人不想使用此方式。
https://www.cnblogs.com/cmblogs/p/9782855.html
3.2打包成独立的exe,依据以下博客
VS 程序打包成一个独立的exe - Enigma Virtual Box-CSDN博客
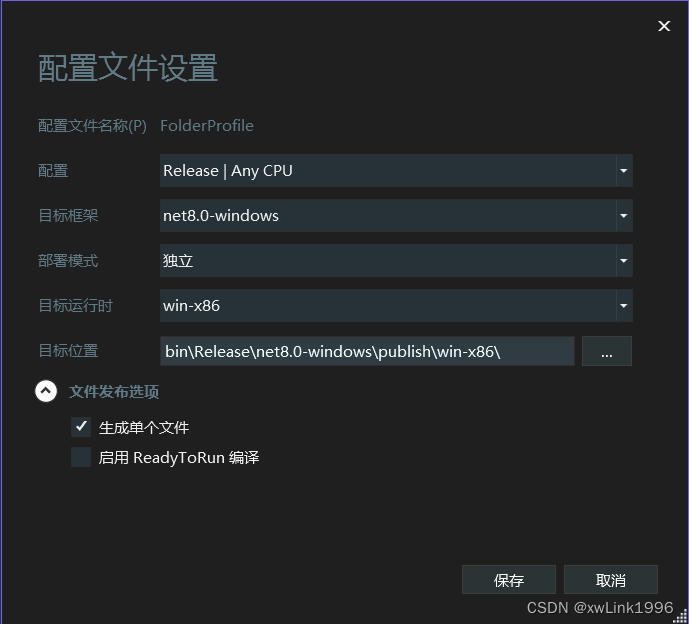
3.3.vs2022生成单exe文件和不需安装.NET DESKTOP runtime 运行的方法
部署模式选独立,文件发布模式勾选生成单个文件,整个打包,不需要电脑安装.net。
如果用依赖框架的形式安装,点击程序运行时会自动跳转安装,也挺快的。
3.4之前能正常运行,重新打开后InitializeComponent()报错,解决办法,删除项目目录中obj文件夹,重新打开项目。
继续写的话就太长,留在下一节了。
最后附一下当前的成效吧,能自动吸附隐藏在上边框。

