一、前言
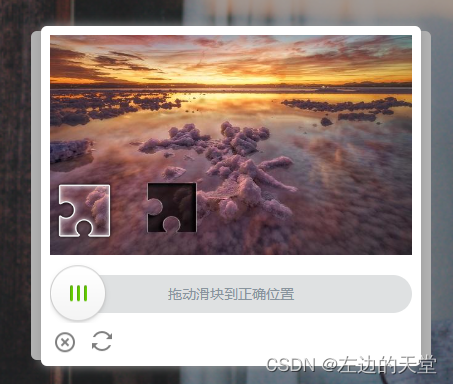
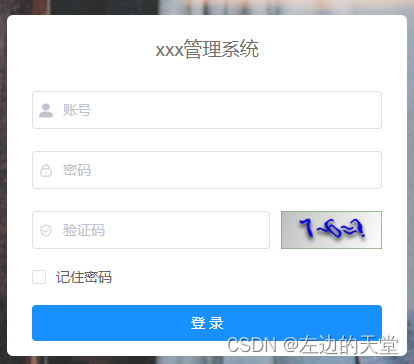
ruoyi项目默认的验证码是这样的
今天来尝试增加滑块验证码,我们用到的是tianai-captcha。
文档地址:http://doc.captcha.tianai.cloud/
源码地址:https://gitee.com/tianai/tianai-captcha
下面来看具体的步骤。
二、后端
在gateway中引入依赖
<dependency>
    <groupId>cloud.tianai.captcha</groupId>
    <artifactId>tianai-captcha-springboot-starter</artifactId>
    <version>1.4.1</version>
</dependency>
并增加相应的配置
# 客户端验证码
captcha:
  cache:
    enabled: true
    cache-size: 20
  # 二次验证
  secondary:
    enabled: false
  # 是否初始化默认资源
  init-default-resource: false
在gateway中新增加一个SliderCaptchaHandler处理类
import cloud.tianai.captcha.spring.application.ImageCaptchaApplication;
import cloud.tianai.captcha.spring.vo.CaptchaResponse;
import cloud.tianai.captcha.spring.vo.ImageCaptchaVO;
import com.iinplus.common.core.exception.CaptchaException;
import org.springframework.http.HttpStatus;
import org.springframework.stereotype.Component;
import org.springframework.web.reactive.function.BodyInserters;
import org.springframework.web.reactive.function.server.HandlerFunction;
import org.springframework.web.reactive.function.server.ServerRequest;
import org.springframework.web.reactive.function.server.ServerResponse;
import reactor.core.publisher.Mono;

import javax.annotation.Resource;

/**
 * 验证码获取
 */
@Component
public class SliderCaptchaHandler implements HandlerFunction<ServerResponse> {
    @Resource
    private ImageCaptchaApplication sca;

    @Override
    public Mono<ServerResponse> handle(ServerRequest serverRequest) {
        CaptchaResponse<ImageCaptchaVO> res;
        try {
            // 1.生成滑块验证码(该数据返回给前端用于展示验证码数据)
            res = sca.generateCaptcha();
        } catch (CaptchaException e) {
            return Mono.error(e);
        }
        return ServerResponse.status(HttpStatus.OK).body(BodyInserters.fromValue(res));
    }
}
在RouterFunctionConfiguration中新增一个路由
@Resource
private SliderCaptchaHandler sliderCaptchaHandler;

@Bean
public RouterFunction routerFunc() {
    return RouterFunctions.route(
         RequestPredicates.GET("/captcha")
         .and(RequestPredicates.accept(MediaType.TEXT_PLAIN)),
         sliderCaptchaHandler);
}
新增一个filter类,用来验证图形验证码。
import cloud.tianai.captcha.common.response.ApiResponse;
import cloud.tianai.captcha.spring.application.ImageCaptchaApplication;
import cloud.tianai.captcha.validator.common.model.dto.ImageCaptchaTrack;
import com.alibaba.fastjson2.JSON;
import com.alibaba.fastjson2.JSONObject;
import com.iinplus.common.core.exception.CaptchaException;
import com.iinplus.common.core.utils.ServletUtils;
import com.iinplus.common.core.utils.StringUtils;
import com.iinplus.gateway.config.properties.CaptchaProperties;
import org.springframework.cloud.gateway.filter.GatewayFilter;
import org.springframework.cloud.gateway.filter.factory.AbstractGatewayFilterFactory;
import org.springframework.core.io.buffer.DataBuffer;
import org.springframework.core.io.buffer.DataBufferUtils;
import org.springframework.http.server.reactive.ServerHttpRequest;
import org.springframework.stereotype.Component;
import reactor.core.publisher.Flux;

import javax.annotation.Resource;
import java.nio.CharBuffer;
import java.nio.charset.StandardCharsets;
import java.util.Arrays;
import java.util.List;
import java.util.concurrent.atomic.AtomicReference;

/**
 * 验证码过滤器
 */
@Component
public class ValidateCaptchaFilter extends AbstractGatewayFilterFactory<Object> {
    private final static String[] VALIDATE_URL = new String[]{"/system/login"};
    @Resource
    private ImageCaptchaApplication sca;
    @Resource
    private CaptchaProperties captchaProperties;

    private static final String TRACK = "sliderCaptchaTrack";
    private static final String UUID = "id";

    @Override
    public GatewayFilter apply(Object config) {
        return (exchange, chain) -> {
            ServerHttpRequest request = exchange.getRequest();

            // 非登录/注册请求或验证码关闭,不处理
            List<String> list = Arrays.asList(VALIDATE_URL);
            // 请求地址
            String url = request.getURI().getPath();
            if (!StringUtils.matches(url, list) || !captchaProperties.getEnabled()) {
                return chain.filter(exchange);
            }

            try {
                String rspStr = resolveBodyFromRequest(request);
                if (StringUtils.isEmpty(rspStr)) {
                    throw new CaptchaException("验证码不能为空");
                }
                JSONObject obj = JSON.parseObject(rspStr);
                if (!obj.containsKey(UUID) || !obj.containsKey(TRACK)) {
                    throw new CaptchaException("验证码不能为空");
                }
                String id = obj.getString(UUID);
                ImageCaptchaTrack sliderCaptchaTrack = obj.getObject(TRACK, ImageCaptchaTrack.class);
                ApiResponse<?> match = sca.matching(id, sliderCaptchaTrack);
                if (!match.isSuccess()) {
                    throw new CaptchaException(match.getMsg());
                }
            } catch (Exception e) {
                e.printStackTrace();
                return ServletUtils.webFluxResponseWriter(exchange.getResponse(), e.getMessage());
            }
            return chain.filter(exchange);
        };
    }

    private String resolveBodyFromRequest(ServerHttpRequest serverHttpRequest) {
        // 获取请求体
        Flux<DataBuffer> body = serverHttpRequest.getBody();
        AtomicReference<String> bodyRef = new AtomicReference<>();
        body.subscribe(buffer -> {
            CharBuffer charBuffer = StandardCharsets.UTF_8.decode(buffer.asByteBuffer());
            DataBufferUtils.release(buffer);
            bodyRef.set(charBuffer.toString());
        });
        return bodyRef.get();
    }
}
注意:其中/system/login为登录验证的路径,需要在网关中配置,并且需要加入白名单。
如果需要修改图形验证码默认的背景图
import cloud.tianai.captcha.common.constant.CaptchaTypeConstant;
import cloud.tianai.captcha.generator.common.constant.SliderCaptchaConstant;
import cloud.tianai.captcha.resource.common.model.dto.Resource;
import cloud.tianai.captcha.resource.common.model.dto.ResourceMap;
import cloud.tianai.captcha.resource.impl.DefaultResourceStore;
import cloud.tianai.captcha.resource.impl.provider.ClassPathResourceProvider;
import org.springframework.stereotype.Component;
import static cloud.tianai.captcha.generator.impl.StandardSliderImageCaptchaGenerator.DEFAULT_SLIDER_IMAGE_TEMPLATE_PATH;
/**
* 自定义背景图片
*/
@Component
public class ResourceStore extends DefaultResourceStore {
public ResourceStore() {
// 滑块验证码 模板 (系统内置)
ResourceMap template1 = new ResourceMap("default", 4);
template1.put(SliderCaptchaConstant.TEMPLATE_ACTIVE_IMAGE_NAME, new Resource(ClassPathResourceProvider.NAME, DEFAULT_SLIDER_IMAGE_TEMPLATE_PATH.concat("/1/active.png")));
template1.put(SliderCaptchaConstant.TEMPLATE_FIXED_IMAGE_NAME, new Resource(ClassPathResourceProvider.NAME, DEFAULT_SLIDER_IMAGE_TEMPLATE_PATH.concat("/1/fixed.png")));
ResourceMap template2 = new ResourceMap("default", 4);
template2.put(SliderCaptchaConstant.TEMPLATE_ACTIVE_IMAGE_NAME, new Resource(ClassPathResourceProvider.NAME, DEFAULT_SLIDER_IMAGE_TEMPLATE_PATH.concat("/2/active.png")));
template2.put(SliderCaptchaConstant.TEMPLATE_FIXED_IMAGE_NAME, new Resource(ClassPathResourceProvider.NAME, DEFAULT_SLIDER_IMAGE_TEMPLATE_PATH.concat("/2/fixed.png")));
// 1. 添加一些模板
addTemplate(CaptchaTypeConstant.SLIDER, template1);
addTemplate(CaptchaTypeConstant.SLIDER, template2);
// 2. 添加自定义背景图片
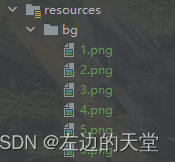
addResource(CaptchaTypeConstant.SLIDER, new Resource("classpath", "bg/1.png", "default"));
addResource(CaptchaTypeConstant.SLIDER, new Resource("classpath", "bg/2.png", "default"));
addResource(CaptchaTypeConstant.SLIDER, new Resource("classpath", "bg/3.png", "default"));
addResource(CaptchaTypeConstant.SLIDER, new Resource("classpath", "bg/4.png", "default"));
addResource(CaptchaTypeConstant.SLIDER, new Resource("classpath", "bg/5.png", "default"));
addResource(CaptchaTypeConstant.SLIDER, new Resource("classpath", "bg/6.png", "default"));
}
}
图片的路径如下
网关配置增加filters,把ValidateCaptchaFilter加上才生效
spring:
  cloud:
    gateway:
      discovery:
        ... ...
      routes:
        # 系统模块
        - id: system
          uri: lb://system
          predicates:
            - Path=/system/**
          filters:
            # 验证码处理
            - ValidateCaptchaFilter
            - StripPrefix=1
system模块的登录验证
/**
 * 系统用户登录
 */
@RestController
public class TokenController {
    @Autowired
    private SysLoginService sysLoginService;

    @PostMapping("login")
    public RpcResult<?> login(@RequestBody @Validated LoginBody form) {
        LoginUser userInfo = sysLoginService.login(form);
        ... ...
        return RpcResult.success(rspMap);
    }
}
import lombok.Data;
import javax.validation.constraints.NotBlank;

@Data
public class LoginBody {
    @NotBlank(message = "用户名不能为空")
    private String username;

    @NotBlank(message = "密码不能为空")
    private String password;
}
三、前端
在components下增加一个组件SliderCaptcha
<template>
  <div class="slider rotate">
    <div class="content">
      <div class="bg-img-div">
        <img :src="captcha.backgroundImage" id="imgId" alt/>
        <canvas id="canvasId" ref="canvas"></canvas>
      </div>
      <div class="rotate-img-div" :style="rotateImgDiv">
        <img :src="captcha.templateImage" alt/>
      </div>
    </div>
    <div class="slider-move">
      <div class="slider-move-track">
        拖动滑块到正确位置
      </div>
      <div class="slider-move-btn" :style="sliderMoveBtn" @mousedown="down" @touchstart="down"></div>
    </div>
    <div class="bottom">
      <div class="close-btn" @click="close()"></div>
      <div class="refresh-btn" @click="refreshCaptcha"></div>
    </div>
  </div>
</template>

<script>
export default {
  name: "Slider",
  props: {
    captcha: {
      type: Object
    },
  },
  data() {
    return {
      currentCaptchaConfig: {},
      sliderMoveBtn: "",
      rotateImgDiv: "",
      checkParam: {}
    }
  },
  mounted() {
    this.initCaptcha();
  },
  methods: {
    refreshCaptcha() {
      this.$emit("init");
      this.initCaptcha();
    },
    initCaptcha() {
      this.sliderMoveBtn = "background-position: -5px 11.79625%; transform: translate(0, 0)";
      this.rotateImgDiv = "transform: translate(0, 0)";

      this.currentCaptchaConfig = {};

      let bgImageWidth = this.$refs.canvas.offsetWidth;
      let bgImageHeight = this.$refs.canvas.offsetHeight;

      this.checkParam = {
        bgImageWidth: bgImageWidth,
        bgImageHeight: bgImageHeight,
        startSlidingTime: new Date(),
        endSlidingTime: undefined,
        trackList: [],
      }
    },
    down(event) {
      let targetTouches = event.originalEvent ? event.originalEvent.targetTouches : event.targetTouches;
      let startX = event.pageX;
      let startY = event.pageY;
      if (startX === undefined) {
        startX = Math.round(targetTouches[0].pageX);
        startY = Math.round(targetTouches[0].pageY);
      }
      this.currentCaptchaConfig.startX = startX;
      this.currentCaptchaConfig.startY = startY;

      const pageX = this.currentCaptchaConfig.startX;
      const pageY = this.currentCaptchaConfig.startY;
      const startSlidingTime = this.checkParam.startSlidingTime;
      const trackList = this.checkParam.trackList;
      trackList.push({
        x: pageX - startX,
        y: pageY - startY,
        type: "down",
        t: (new Date().getTime() - startSlidingTime.getTime())
      });

      // pc
      window.addEventListener("mousemove", this.move);
      window.addEventListener("mouseup", this.up);

      // 手机端
      window.addEventListener("touchmove", this.move, false);
      window.addEventListener("touchend", this.up, false);

      this.sliderMoveBtn = `background-position:-5px 31.0092%`;
    },
    move(event) {
      if (event instanceof TouchEvent) {
        event = event.touches[0];
      }
      let pageX = Math.round(event.pageX);
      let pageY = Math.round(event.pageY);
      const startX = this.currentCaptchaConfig.startX;
      const startY = this.currentCaptchaConfig.startY;
      const startSlidingTime = this.checkParam.startSlidingTime;
      const end = 305;
      const trackList = this.checkParam.trackList;
      let moveX = pageX - startX;
      const track = {
        x: pageX - startX,
        y: pageY - startY,
        type: "move",
        t: (new Date().getTime() - startSlidingTime.getTime())
      };
      trackList.push(track);
      if (moveX < 0) {
        moveX = 0;
      } else if (moveX > end + 5) {
        moveX = end;
      }

      this.sliderMoveBtn = `transform:translate(${moveX}px, 0)`;
      this.rotateImgDiv = `transform:translate(${moveX}px, 0);`;
    },
    up(event) {
      window.removeEventListener("mousemove", this.move);
      window.removeEventListener("mouseup", this.up);

      // 手机端
      window.removeEventListener("touchmove", this.move);
      window.removeEventListener("touchend", this.up);
      if (event instanceof TouchEvent) {
        event = event.changedTouches[0];
      }
      let pageX = Math.round(event.pageX);
      let pageY = Math.round(event.pageY);
      const startX = this.currentCaptchaConfig.startX;
      const startY = this.currentCaptchaConfig.startY;
      const startSlidingTime = this.checkParam.startSlidingTime;
      const trackList = this.checkParam.trackList;

      const track = {
        x: pageX - startX,
        y: pageY - startY,
        type: "up",
        t: (new Date().getTime() - startSlidingTime.getTime())
      }
      trackList.push(track);

      this.checkParam.endSlidingTime = new Date();
      // 校验
      this.checkCaptcha()
    },
    close() {
      this.$emit("close");
    },
    checkCaptcha() {
      //this.checkParam = {};
      this.$emit("checkParam", this.checkParam)
      this.$emit("login");
    }
  },
}
</script>
<style scoped>
.slider {
  background-color: #fff;
  width: 380px;
  height: 340px;
  z-index: 999;
  box-sizing: border-box;
  padding: 9px;
  border-radius: 6px;
  box-shadow: 0 0 11px 0 #999999;
}

.slider .content {
  width: 100%;
  height: 160px;
  position: relative;
}

.bg-img-div {
  width: 100%;
  height: 100%;
  position: absolute;
  transform: translate(0px, 0px);
}

.bg-img-div img {
  width: 100%;
}

.bg-img-div canvas {
  width: 100%;
  position: absolute;
  left: 0;
  top: 0;
}

.slider .slider-move {
  height: 60px;
  width: 100%;
  margin: 0;
  position: relative;
  top: 80px
}

.slider .bottom {
  height: 25px;
  width: 100%;
  margin: 65px 10px 10px 0;
}

.refresh-btn, .close-btn, .slider-move-btn {
  background: url(../../assets/images/sprite.1.2.4.png) no-repeat;
}

.refresh-btn, .close-btn {
  display: inline-block;
}

.slider-move .slider-move-track {
  line-height: 38px;
  font-size: 14px;
  text-align: center;
  white-space: nowrap;
  color: #88949d;
  -moz-user-select: none;
  -webkit-user-select: none;
  user-select: none;

  border-radius: 50px;
  background: #dfe1e2;
  width: 100%;
}

.slider {
  user-select: none;
}

.slider-move .slider-move-btn {
  transform: translate(0, 0);
  background-position: -5px 11.79625%;
  position: absolute;
  top: -12px;
  left: 0;
  width: 100%;
  height: 100%;
}

.slider-move-btn:hover, .close-btn:hover, .refresh-btn:hover {
  cursor: pointer
}

.bottom .close-btn {
  width: 25px;
  height: 25px;
  background-position: 0 44.86874%;
  margin: 10px 10px 10px 5px;
  float: left;
}

.bottom .refresh-btn {
  width: 25px;
  height: 25px;
  background-position: 0 81.38425%;
  margin: 7px 10px 10px 2px;
  float: left;
}

.rotate-img-div {
  height: 140%;
  position: absolute;
  transform: translate(0, 0);
}

.rotate-img-div img {
  height: 100%;
}
</style>
修改登录和获取验证码的方法
// 登录方法
export function login(data) {
  return request({
    url: '/system/login',
    headers: {
      isToken: false
    },
    method: 'post',
    data: data
  })
}
// 获取验证码
export function captcha() {
  return request({
    url: '/captcha',
    headers: {
      isToken: false
    },
    method: 'get',
    timeout: 20000
  })
}
修改login.vue页面
<template>
  <div class="login">
    <el-form ref="loginForm" :model="loginForm" :rules="loginRules" class="login-form">
      <h3 class="title">xxxx管理系统</h3>
      <el-form-item prop="username">
        <el-input
          v-model="loginForm.username"
          type="text"
          auto-complete="off"
          placeholder="账号"
        >
          <svg-icon slot="prefix" icon-class="user" class="el-input__icon input-icon" />
        </el-input>
      </el-form-item>
      <el-form-item prop="password">
        <el-input
          v-model="loginForm.password"
          type="password"
          auto-complete="off"
          placeholder="密码"
        >
          <svg-icon slot="prefix" icon-class="password" class="el-input__icon input-icon" />
        </el-input>
      </el-form-item>
      <!--注释掉原来的验证码-->
	  <!--
	  <el-form-item prop="code" v-if="captchaEnabled" style="margin: 10px 0">
        <el-input
          v-model="loginForm.code"
          auto-complete="off"
          placeholder="验证码"
          style="width: 68%"
          @keyup.enter.native="handleLogin"
        >
          <svg-icon slot="prefix" icon-class="validCode" class="el-input__icon input-icon" />
        </el-input>
        <div class="login-code">
          <img :src="codeUrl" @click="getCode" class="login-code-img"/>
        </div>
      </el-form-item>
      -->
      <el-form-item style="width:100%; margin: 10px 0">
        <el-checkbox v-model="loginForm.rememberMe">记住密码</el-checkbox>
      </el-form-item>
      <el-form-item style="width:100%;margin-bottom: 10px">
        <el-button
          :loading="loading"
          size="medium"
          type="primary"
          style="width:100%;"
          @click.native.prevent="initCaptcha"
        >
          <span v-if="!loading">登 录</span>
          <span v-else>登 录 中...</span>
        </el-button>
      </el-form-item>
    </el-form>
    <!-- 滑块验证码,通过show来控制显示遮蔽层-->
    <div v-if="show" class="mask">
      <SliderCaptcha
          v-if="captchaVisible"
          ref="sliderCaptcha"
          :captcha="captcha"
          @init="initCaptcha"
          @close="hideCaptcha"
          @login="handleLogin"
      />
    </div>
    <!--  底部  -->
    <div class="el-login-footer">
      <span>Copyright © xxx All Rights Reserved.</span>
    </div>
  </div>
</template>

<script>
import {captcha} from '@/api/login'
import Cookies from "js-cookie";
import {decrypt, encrypt} from '@/utils/jsencrypt'
import SliderCaptcha from '@/components/SliderCaptcha'

export default {
  name: "Login",
  components: {
    SliderCaptcha
  },
  data() {
    return {
      // codeUrl: "",
      show: false,
      captcha: {},
      captchaVisible: false,
      loginForm: {
        username: undefined,
        password: undefined,
        rememberMe: false,
        //code: "",
        //uuid: "",
        // 增加下面两个属性
        ImageCaptchaTrack: {},
        id: ''
      },
      loginRules: {
        username: [
          { required: true, trigger: "blur", message: "请输入您的账号" }
        ],
        password: [
          { required: true, trigger: "blur", message: "请输入您的密码" }
        ],
        // 不再需要这个验证
        // code: [{ required: true, trigger: "change", message: "请输入验证码" }]
      },
      loading: false,
      // 验证码开关
      captchaEnabled: true,
      redirect: undefined
    };
  },
  watch: {
    $route: {
      handler: function(route) {
        this.redirect = route.query && route.query.redirect;
      },
      immediate: true
    }
  },
  created() {
    //this.getCode();
    this.getCookie();
  },
  methods: {
    //注释原先的获取验证码方法
    /*getCode() {
      getCodeImg().then(res => {
        this.captchaEnabled = res.captchaEnabled === undefined ? true : res.captchaEnabled;
        if (this.captchaEnabled) {
          this.codeUrl = "data:image/gif;base64," + res.img;
          this.loginForm.uuid = res.uuid;
        }
      });
    },*/
    getCookie() {
      const username = Cookies.get("username");
      const password = Cookies.get("password");
      const rememberMe = Cookies.get('rememberMe')
      this.loginForm = {
        username: username === undefined ? this.loginForm.username : username,
        password: password === undefined ? this.loginForm.password : decrypt(password),
        rememberMe: rememberMe === undefined ? false : Boolean(rememberMe)
      };
    },
    hideCaptcha() {
      this.captchaVisible = false
      this.show = false;
    },
    // 获取图形验证码
    initCaptcha() {
      this.$refs.loginForm.validate(valid => {
        if (valid) {
          captcha().then(res => {
            if (res) {
              this.captcha = res["captcha"];
              this.loginForm.id = res["id"];
              this.captchaVisible = true
              this.show = true;
            }
          })
        }
      })
    },
    // 登录方法
    handleLogin() {
      this.$refs.loginForm.validate(valid => {
        if (valid) {
          this.loading = true;
          if (this.loginForm.rememberMe) {
            Cookies.set("username", this.loginForm.username, { expires: 30 });
            Cookies.set("password", encrypt(this.loginForm.password), { expires: 30 });
            Cookies.set('rememberMe', this.loginForm.rememberMe, { expires: 30 });
          } else {
            Cookies.remove("username");
            Cookies.remove("password");
            Cookies.remove('rememberMe');
          }
		  // 从子组件获取值
          this.loginForm.sliderCaptchaTrack = this.$refs.sliderCaptcha.checkParam
          this.$store.dispatch("Login", this.loginForm).then(() => {
            // console.info("this.redirect", this.redirect)
            this.$router.push({ path: this.redirect || "/" }).catch(()=>{});
          }).catch(() => {
            this.loading = false;
            //调用子组件的刷新图形验证码的方法
            this.$refs.sliderCaptcha.refreshCaptcha()
          });
        }
      });
    }
  }
};
</script>

<style rel="stylesheet/scss" lang="scss">
<!--新增遮蔽层,其他省略-->
.mask {
  box-sizing: border-box;
  position: fixed;
  top: 0;
  left: 0;
  bottom: 0;
  right: 0;
  z-index: 1001;
  background: rgba(0, 0, 0, 0.3);
  transition: all 0.5s;
  display: flex;
  flex-direction: column;
  justify-content: center;
  align-items: center;
}
</style>
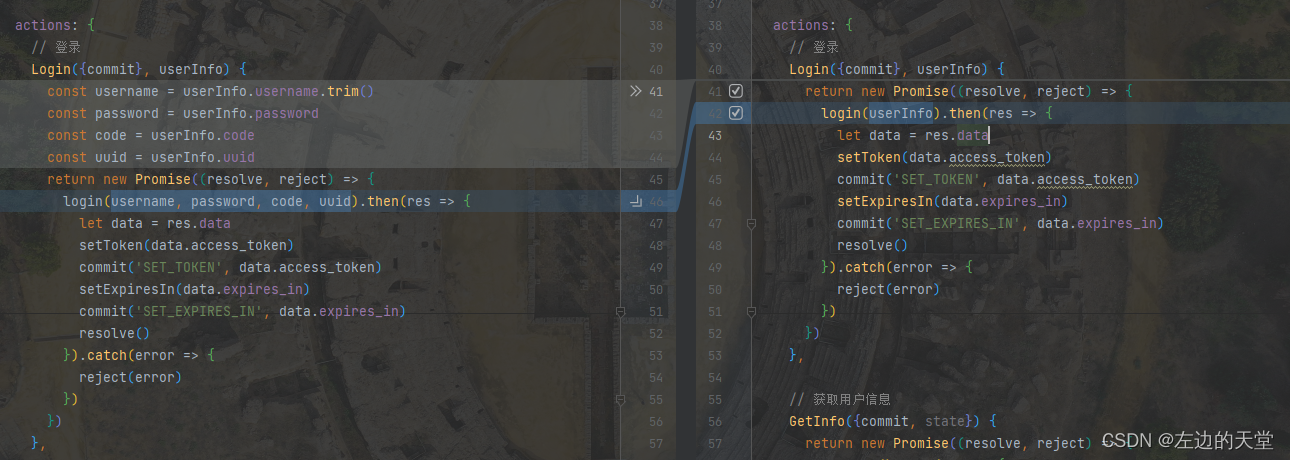
最后this.$store.dispatch("Login", this.loginForm)调用的Login也需要修改一下,在user.js里面。
最终效果

点击【登录】按钮