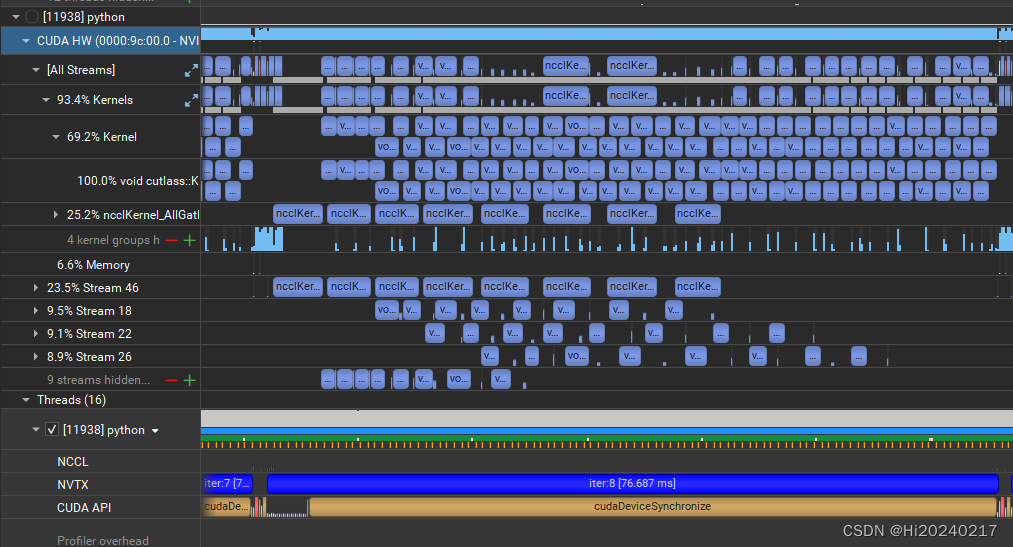
将数据切分成N份,采用NCCL异步通信,让all_gather+matmul尽量Overlap
- 一.测试数据
- 二.测试环境
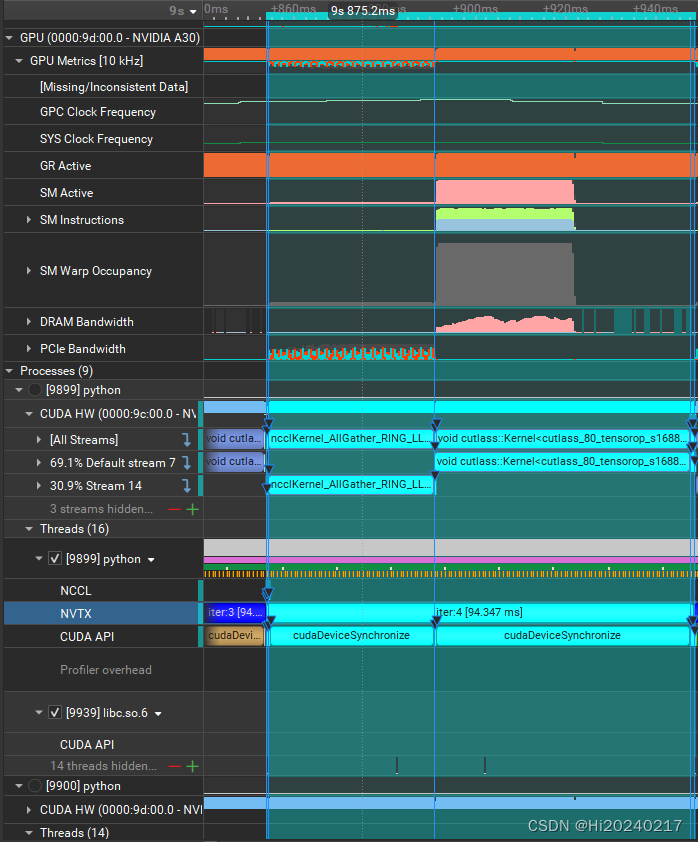
- 三.普通实现
- 四.分块实现
本文演示了如何将数据切分成N份,采用NCCL异步通信,让all_gather+matmul尽量Overlap
一.测试数据
- 1.测试规模:8192*8192 world_size=2
- 2.单算子:all_gather:0.03508s matmul:0.05689s e2e:0.09197s。matmul耗时最长
- 3.按输入和权值切分成8份,async_op=True。e2e:0.75ms
- 4.e2e耗时从91ms缩短到75ms 缩短了17%。耗时为纯matmul算子的:1.34倍
二.测试环境
docker run --gpus all --shm-size=32g -ti -e NVIDIA_VISIBLE_DEVICES=all \
        --privileged --net=host -v $PWD:/home \
        -w /home --name all_gather_mm \
        nvcr.io/nvidia/pytorch:23.07-py3 /bin/bash
三.普通实现
tee all_gather_mm_native.py <<-'EOF'
import os
import torch
import torch.distributed as dist
from torch.distributed import ReduceOp
import time
import numpy as np
from torch.profiler import profile
import nvtx

dev_type="cuda"
dist.init_process_group(backend='nccl')

torch.manual_seed(1)
world_size = torch.distributed.get_world_size()
rank = torch.distributed.get_rank()
local_rank=int(os.environ['LOCAL_RANK'])
torch.cuda.set_device(local_rank)
device = torch.device(dev_type,local_rank)
shape=(8192,8192)

input_tensor=torch.rand((shape[0],shape[1]),dtype=torch.float).to(device)
weight=torch.rand((shape[1],8192),dtype=torch.float).to(device)
all_gather_buffer=torch.zeros((shape[0]*world_size,shape[1]),dtype=torch.float).to(device)

for i in range(10):
    with nvtx.annotate(f"iter:{i}", color="blue"):
        dist.barrier()
        t0=time.time()
        torch.distributed._all_gather_base(all_gather_buffer, input_tensor)
        dist.barrier()
        torch.cuda.synchronize()
        t1=time.time()
        output = torch.matmul(all_gather_buffer, weight)
        torch.cuda.synchronize()
        t2=time.time()
        if rank==0:
            print(f"iter:{i} all_gather:{t1-t0:.5f} matmul:{t2-t1:.5f} e2e:{t2-t0:.5f} data:{output.mean()}")
EOF
export NCCL_DEBUG=error
export NCCL_IB_DISABLE=1
export CUDA_VISIBLE_DEVICES="1,3"
torchrun -m --nnodes=1 --nproc_per_node=2 all_gather_mm_native

nsys profile --stats=true -o all_gather_mm_native.nsys-rep -f true -t cuda,nvtx --gpu-metrics-device=1,3 \
        torchrun -m --nnodes=1 --nproc_per_node=2 all_gather_mm_native
输出
iter:0 all_gather:0.03809 matmul:0.84971 e2e:0.88780 data:2047.62548828125
iter:1 all_gather:0.03327 matmul:0.06595 e2e:0.09922 data:2047.62548828125
iter:2 all_gather:0.03720 matmul:0.06082 e2e:0.09802 data:2047.62548828125
iter:3 all_gather:0.03682 matmul:0.05644 e2e:0.09326 data:2047.62548828125
iter:4 all_gather:0.03382 matmul:0.05648 e2e:0.09030 data:2047.62548828125
iter:5 all_gather:0.03404 matmul:0.05635 e2e:0.09039 data:2047.62548828125
iter:6 all_gather:0.03657 matmul:0.05701 e2e:0.09359 data:2047.62548828125
iter:7 all_gather:0.03840 matmul:0.05695 e2e:0.09535 data:2047.62548828125
iter:8 all_gather:0.03721 matmul:0.05685 e2e:0.09406 data:2047.62548828125
iter:9 all_gather:0.03508 matmul:0.05689 e2e:0.09197 data:2047.62548828125
四.分块实现
tee all_gather_mm_tiling.py <<-'EOF'
import os
import torch
import torch.distributed as dist
from torch.distributed import ReduceOp
import time
import numpy as np
import nvtx

# 分几块
num_blocks = 8

dev_type="cuda"
dist.init_process_group(backend='nccl')

torch.manual_seed(1)
world_size = torch.distributed.get_world_size()
rank = torch.distributed.get_rank()
local_rank=int(os.environ['LOCAL_RANK'])
torch.cuda.set_device(local_rank)
device = torch.device(dev_type,local_rank)

streams = [torch.cuda.Stream(device=device) for _ in range(num_blocks)]

def all_gather_matmul(rank, world_size, input, weight,gathered_buffer,output_buffer, num_blocks, device):
    input_chunk_size = input.size(0) // num_blocks  # 每块的大小
    weight_chunk_size = weight.size(1) // num_blocks
    handles = []
    for i in range(num_blocks):
        with torch.cuda.stream(streams[i]):
            # 划分块并进行 all_gather
            input_chunk = input[i * input_chunk_size: (i + 1) * input_chunk_size]
            gather_start_idx = i * input_chunk_size * world_size  # 起始索引
            handle = dist.all_gather_into_tensor(gathered_buffer[gather_start_idx:gather_start_idx + input_chunk_size * world_size], input_chunk, async_op=True)
            handles.append((handle, gather_start_idx))
    outputs = torch.zeros_like(output_buffer)
    for i in range(num_blocks):
        with torch.cuda.stream(streams[i]):
            handle, gather_start_idx = handles[i]
            handle.wait()  # 等待通信完成
            # 直接在通信结果上进行矩阵乘法
            gathered_input = gathered_buffer[gather_start_idx:gather_start_idx + input_chunk_size * world_size]
            for j in range(num_blocks):
                weight_chunk = weight[:, j * weight_chunk_size: (j + 1) * weight_chunk_size]
                output_chunk = outputs[i * input_chunk_size * world_size: (i + 1) * input_chunk_size * world_size, j * weight_chunk_size: (j + 1) * weight_chunk_size]
                # 进行局部矩阵相乘
                output_chunk.add_(torch.matmul(gathered_input, weight_chunk))
    torch.cuda.synchronize(device)
    return outputs

# 初始化
input = torch.rand((8192, 8192),dtype=torch.float).to(device)
weight = torch.rand((8192, 8192),dtype=torch.float).to(device)
all_gather_buffer = torch.zeros((8192 * world_size, 8192),dtype=torch.float).to(device)

for i in range(10):
    output = torch.zeros(input.size(0) * world_size, weight.size(1),dtype=torch.float,device=device)
    dist.barrier()
    t0=time.time()
    with nvtx.annotate(f"iter:{i}", color="blue"):
        output = all_gather_matmul(rank, world_size, input, weight,all_gather_buffer,output,num_blocks,device)
    torch.cuda.synchronize()
    t1=time.time()
    if rank == 0:
        print(f"iter:{i} e2e:{t1-t0:.5f} data:{output.mean()}")
EOF

export NCCL_DEBUG=error
export NCCL_IB_DISABLE=1
torchrun -m --nnodes=1 --nproc_per_node=2 all_gather_mm_tiling

nsys profile --stats=true -o all_gather_mm_tiling.nsys-rep -f true -t cuda,nvtx --gpu-metrics-device=1,3 \
        torchrun -m --nnodes=1 --nproc_per_node=2 all_gather_mm_tiling
输出
iter:0 e2e:0.13553 data:2047.62548828125
iter:1 e2e:0.07687 data:2047.62548828125
iter:2 e2e:0.07717 data:2047.62548828125
iter:3 e2e:0.07645 data:2047.62548828125
iter:4 e2e:0.07724 data:2047.62548828125
iter:5 e2e:0.07586 data:2047.62548828125
iter:6 e2e:0.07587 data:2047.62548828125
iter:7 e2e:0.07589 data:2047.62548828125
iter:8 e2e:0.07626 data:2047.62548828125
iter:9 e2e:0.07549 data:2047.62548828125
