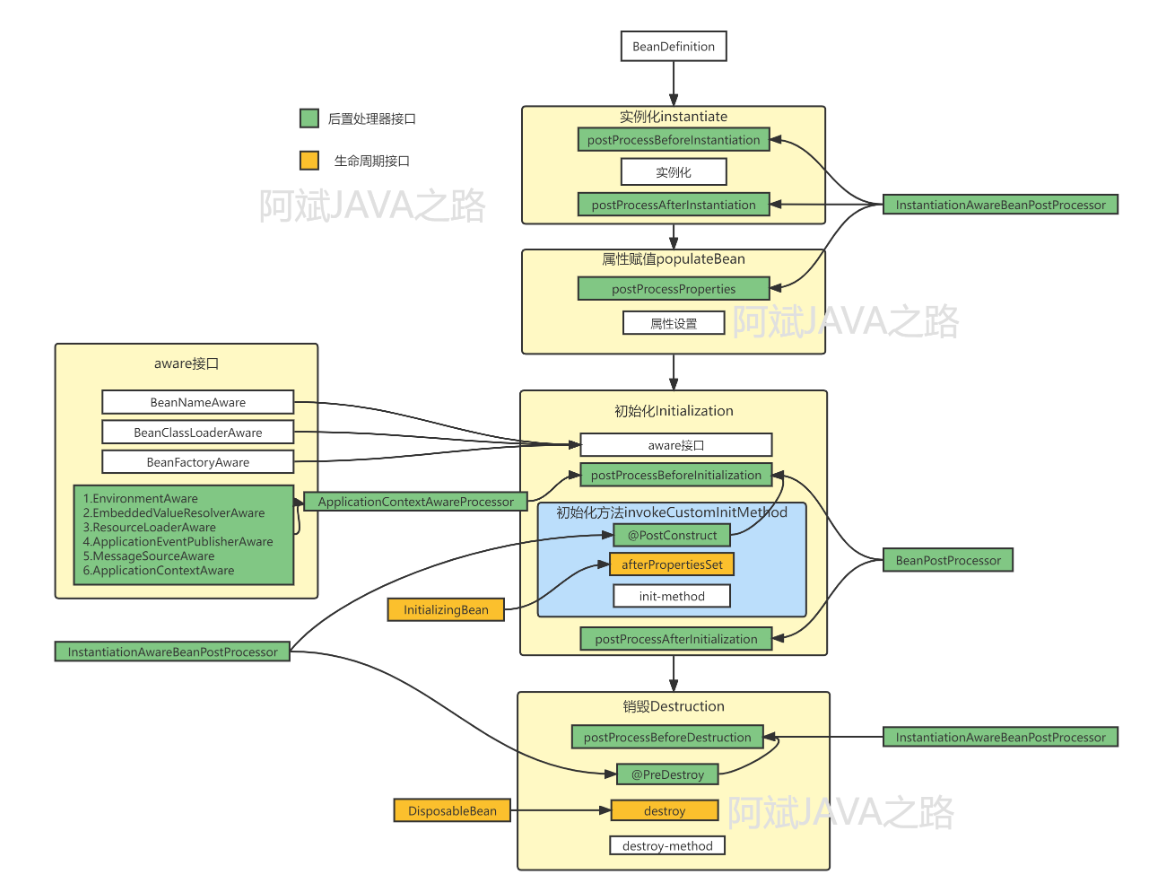
下图是我搜索“Spring Bean生命周期”找到的图片,来自文章——Spring Bean的生命周期
[ ](https://img2022.cnblogs.com/blog/1942408/202207/1942408-20220713150530777-1198523052.png)
下面,我们从AbstractAutowireCapableBeanFactory的源码中来分析这张图的各个阶段到底是怎么执行的。BeanFactory的基本源码解读在Spring BeanFactory接口分析&源码解读这篇文章中,如果读本篇文章稍显吃力,可以先去看看上面那篇。
我们所用到的BeanFactory,ApplicationContext基本都继承了
AbstractAutowireCapableBeanFactory,它是一个具有自动装载能力的BeanFactory,它可以响应@Autowire注解,所以,单独分析这个类不是没用的,而且很有必要。同时,由于Spring的BeanFactory层次结构中大量的使用了模板模式,所以我们可能在这个类的父子类中跳入跳出。
Bean生命周期简单描述#
我们先不看那些繁杂的生命周期方法回调,只看核心的部分,也就是图中四个大的黄色块
- 根据BeanDefinition创建Bean,这个过程称为实例化
- 填充Bean的属性
- 这时,Bean已经创建完毕并可以投入使用,这时需要调用Bean的初始化方法(如果用户指定了的话),这个过程称为初始化
- Bean被销毁
所以,可以将Bean的创建归纳为:
- 实例化
- 设置属性
- 初始化
- 销毁
虽然上面我们把大部分的繁杂的生命周期Hook给屏蔽了,总结出了四个核心的过程,但是这些Hook给了Spring框架带来了无尽的灵活性,所以也是非常重要的。但它们太容易让人眼花了,所以在继续之前,我们有必要先介绍一下那些东西都是什么,是用来解决什么问题的。
BeanPostProcessor接口#
BeanPostProcessor接口有如下方法:
public interface BeanPostProcessor {

	@Nullable
	default Object postProcessBeforeInitialization(Object bean, String beanName) throws BeansException {
		return bean;
	}

	@Nullable
	default Object postProcessAfterInitialization(Object bean, String beanName) throws BeansException {
		return bean;
	}

}
从方法名上看,xxxxBeforeInitialization,xxxAfterInitialization,意思是在初始化阶段前后做一些事,它的参数中,有实际创建出来的Bean和Bean的名字,该方法默认情况下返回原始的bean,也可以返回该bean的某种代理,实际上AOP就是通过这个接口来实现bean代理的返回的。
所以,BeanPostProcessor实际关心的是Bean的初始化阶段。
ConfigurableBeanFactory接口的addBeanPostProcessor方法可以向BeanFactory中注册BeanPostProcessor
InstantiationAwareBeanPostProcessor#
首先,它继承BeanPostProcessor,所以它是一个BeanPostProcessor。但是从名字来看,InstantiationAware表示它更关心对于Bean的实例化阶段的感知,而不是初始化阶段,它发生在初始化阶段前面。
它的方法如下:
public interface InstantiationAwareBeanPostProcessor extends BeanPostProcessor {

	@Nullable
	default Object postProcessBeforeInstantiation(Class<?> beanClass, String beanName) throws BeansException {
		return null;
	}

	default boolean postProcessAfterInstantiation(Object bean, String beanName) throws BeansException {
		return true;
	}

	@Nullable
	default PropertyValues postProcessProperties(PropertyValues pvs, Object bean, String beanName)
			throws BeansException {

		return null;
	}

    // 省略一个过时方法...
}
首先,xxxBeforeInstantiation、xxxAfterInstantiation是很容易和之前的两个搞混的,不过以Instantiation结尾代表着它们关心的是Bean实例化的前后,在实例化前,该方法同样允许返回一个代替该Bean的对象,不过这次由于Bean还没有实际创建出来,所以它的参数中没有Bean对象,而是该Bean的Class对象。而在实例化后,它允许返回一个布尔值来指定是否该对该Bean的属性进行设置(true设置,false跳过)。
Aware生命周期感知接口#
Aware接口里啥也没有,有方法的是它的子接口
public interface Aware { }
Aware被一个想要感知到框架中的某种信息的Bean实现,比如一个Bean可能对创建它的Bean工厂感兴趣,那么它可以实现这个接口:
public interface BeanFactoryAware extends Aware {

	void setBeanFactory(BeanFactory beanFactory) throws BeansException;

}
Bean工厂会在该Bean的初始化阶段检测该Bean是否实现了这个接口,如果实现了就调用它的setBeanFactory方法将工厂设置进去。
请注意,Aware被Bean实现,作用于单个Bean,BeanPostProcessor被注册到Bean工厂中,作用于工厂中的每个Bean。
实例化Bean&属性设置#
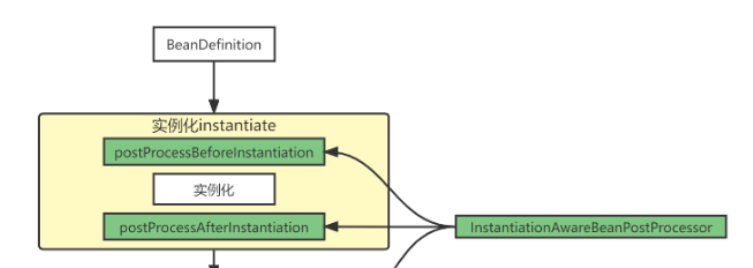
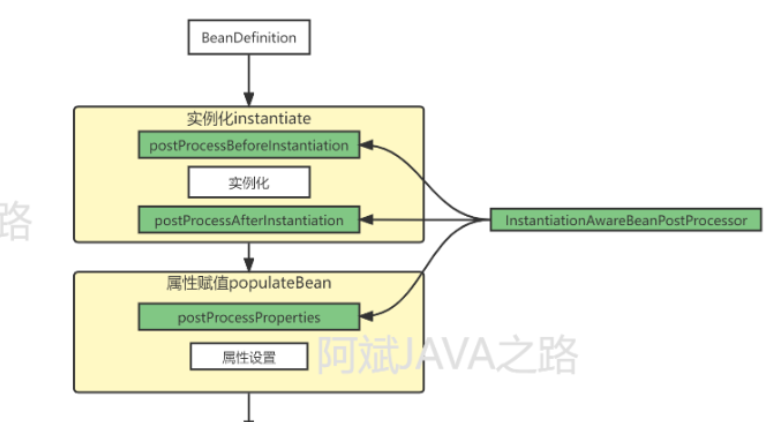
这图里所描述的是,创建Bean时先从BeanDefinition开始,然后实例化Bean,在实例化前后,InstantiationAwareBeanPostProcessor会被调用。
[ ](https://img2022.cnblogs.com/blog/1942408/202207/1942408-20220714070547565-11459168.png)
下面从doGetBean方法开始(getBean方法实际调用的方法,它已经是AbstractBeanFactory中的方法了),看下面的代码需要注意,Spring中Bean的作用域可以分为Singleton、Prototype和其它,其中Singleton和Prototype是Spring框架原生支持的,其它作用域需要自行扩展,比如SpringWebMVC扩展了Session等作用域。所以你看下面的代码时也要在脑袋里把它们分成Singleton、Prototype和其它作用域,要不然你可能就被这很长很长的代码搞迷糊了:
protected <T> T doGetBean(
        String name, @Nullable Class<T> requiredType, @Nullable Object[] args, boolean typeCheckOnly)
        throws BeansException {

    String beanName = transformedBeanName(name);
    Object beanInstance;
    // ...

        try {
            // 根据BeanName获取BeanDefinition
            // MergedBeanDefinition是将它和它的祖先Bean整合,这里可以先忽略,就当作普通的BeanDefinition
            RootBeanDefinition mbd = getMergedLocalBeanDefinition(beanName);
            checkMergedBeanDefinition(mbd, beanName, args);

            // 如果是Singleton,按Singleton的方法创建
            if (mbd.isSingleton()) {
                sharedInstance = getSingleton(beanName, () -> {
                    try {
                        // [+] 实际创建Bean
                        return createBean(beanName, mbd, args);
                    }
                    catch (BeansException ex) {}
                });
                beanInstance = getObjectForBeanInstance(sharedInstance, name, beanName, mbd);
            }
            // 如果是Prototype,按Prototype的方法创建
            else if (mbd.isPrototype()) {
                Object prototypeInstance = null;
                try {
                    beforePrototypeCreation(beanName);
                    // [+] 实际创建Bean
                    prototypeInstance = createBean(beanName, mbd, args);
                }
                finally {
                    afterPrototypeCreation(beanName);
                }
                beanInstance = getObjectForBeanInstance(prototypeInstance, name, beanName, mbd);
            }
            // 如果是其它作用域,那么就放到其它作用域中创建
            // 这里的逻辑和Singleton很像,在Singleton创建中
            // Bean放到SingletonBeanRegistry中管理,而这个
            // 放到对应的作用域中管理
            else {
                String scopeName = mbd.getScope();
                Scope scope = this.scopes.get(scopeName);
                try {
                    Object scopedInstance = scope.get(beanName, () -> {
                        beforePrototypeCreation(beanName);
                        try {
                            // [+] 实际创建Bean
                            return createBean(beanName, mbd, args);
                        }
                        finally {
                            afterPrototypeCreation(beanName);
                        }
                    });
                    beanInstance = getObjectForBeanInstance(scopedInstance, name, beanName, mbd);
                }
                catch (IllegalStateException ex) {}
            }
        }
        catch (BeansException ex) {}
    }

    return adaptBeanInstance(name, beanInstance, requiredType);
}
所以,不管是哪个作用域,它们都调用了createBean来创建Bean,AbstractBeanFactory中并没有实现这个方法,createBean是AbstractAutowireCapableBeanFactory抽象类实现的:
@Override
protected Object createBean(String beanName, RootBeanDefinition mbd, @Nullable Object[] args)
        throws BeanCreationException {

    RootBeanDefinition mbdToUse = mbd;

    try {
        // 在Bean实例化之前,让一些关心实例化阶段的BeanPostProcessor得到执行
        Object bean = resolveBeforeInstantiation(beanName, mbdToUse);
        // 如果返回的bean不是null,那么结束整个阶段,直接返回这个值作为bean
        if (bean != null) {
            return bean;
        }
    }
    catch (Throwable ex) {}

    try {
        // 实例化Bean
        Object beanInstance = doCreateBean(beanName, mbdToUse, args);
        return beanInstance;
    }
    catch (BeanCreationException | ImplicitlyAppearedSingletonException ex) {}

    catch (Throwable ex) {}
}
所以,resolveBeforeInstantiation方法应该就是查找那些InstantiationAwareBeanPostProcessor,然后调用它们。
InstantiationAwareBeanPostProcessor的before hook#
protected Object resolveBeforeInstantiation(String beanName, RootBeanDefinition mbd) {
    Object bean = null;
    if (!Boolean.FALSE.equals(mbd.beforeInstantiationResolved)) {
        if (!mbd.isSynthetic() && hasInstantiationAwareBeanPostProcessors()) {
            Class<?> targetType = determineTargetType(beanName, mbd);
            if (targetType != null) {
                // 应用BeanPostProcessor的beforeInstantiation
                bean = applyBeanPostProcessorsBeforeInstantiation(targetType, beanName);
                if (bean != null) {
                    // 调用BeanPostProcessors的初始化后方法,注意是初始化后不是实例化后
                    // 前提是before方法返回了一个对象
                    bean = applyBeanPostProcessorsAfterInitialization(bean, beanName);
                }
            }
        }
        mbd.beforeInstantiationResolved = (bean != null);
    }
    return bean;
}
我们可以看到,这个方法的代码非常简单,虽然还没写明,但是99%就是调用所有的InstantiationAwareBeanPostProcessor了,两个apply应该就是做这个工作的。我们不妨点进去看一个:
@Nullable
protected Object applyBeanPostProcessorsBeforeInstantiation(Class<?> beanClass, String beanName) {
    for (InstantiationAwareBeanPostProcessor bp : getBeanPostProcessorCache().instantiationAware) {
        Object result = bp.postProcessBeforeInstantiation(beanClass, beanName);
        if (result != null) {
            return result;
        }
    }
    return null;
}
这不就是对所有的InstantiationAwareBeanPostProcessor进行遍历调用吗,取第一个返回结果的Processor的结果。大家说,这里用到了什么设计模式??
InstantiationAwareBeanPostProcessor before hook的使用#
下面,我们自己创建一个实现类,它的功能就是打印所有进来的Bean名字和类型:
public class MyInstantiationProcessor implements InstantiationAwareBeanPostProcessor {
    @Override
    public Object postProcessBeforeInstantiation(Class<?> beanClass, String beanName) throws BeansException {
        System.out.println("[+] > MyInstantiationProcessor before bean instantiation : " + beanName + " => " + beanClass.getName());
        return null;
    }
}
下面,我们把它设置到BeanFactory中,然后尝试获取Bean:
factory.addBeanPostProcessor(new MyInstantiationProcessor());
Workbench workbench = factory.getBean(Workbench.class);
System.out.println(workbench);
输出:
[+] > MyInstantiationProcessor before bean instantiation : workbench => top.yudoge.springserials.basic.beanfactory.beans.Workbench
[+] > MyInstantiationProcessor before bean instantiation : person => top.yudoge.springserials.basic.beanfactory.beans.Person
Workbench(operator=Person(name=Yudoge))
因为Workbench对象依赖Person对象,所以引起了两个对象的连锁创建,最后一行我们得到了Workbench对象。
下面我们尝试让BeanPostProcessor针对Person类返回一个另外的Bean,而不是null:
public class MyInstantiationProcessor implements InstantiationAwareBeanPostProcessor {
    @Override
    public Object postProcessBeforeInstantiation(Class<?> beanClass, String beanName) throws BeansException {
        System.out.println("[+] > MyInstantiationProcessor before bean instantiation : " + beanName + " => " + beanClass.getName());

        if (beanClass.getName().equals(Person.class.getName())) {
            return new Person("我是MyInstantiationProcessor返回的Person");
        }
        return null;
    }
}
运行:
[+] > MyInstantiationProcessor before bean instantiation : workbench => top.yudoge.springserials.basic.beanfactory.beans.Workbench
[+] > MyInstantiationProcessor before bean instantiation : person => top.yudoge.springserials.basic.beanfactory.beans.Person
Workbench(operator=Person(name=我是MyInstantiationProcessor返回的Person))
成功的返回了我们创建出来的Person。
对目前的InstantiationAwareBeanPostProcessor的before阶段做一个总结:
- BeanFactory会在创建Bean之前调用所有这种Processor的before方法
- 如果在before中返回了一个对象,那么这个对象就会代替原来的Bean,并且该bean的初始化后(不是实例化后)方法会被立即调用
- 否则,就是before中返回null,这时进入正常的Bean创建流程
这个总结只是
AbstractAutowireCapableBeanFactory中的实现方式,是否有其它BeanFactory以其它方式实现,暂不明确
实际实例化Bean#
所以,当InstantiationAwareBeanPostProcessor没有返回一个替代对象时,进入正常的Bean创建流程,开始实例化Bean。
回到AbstractAutowireBeanFactory的createBean方法:
@Override
protected Object createBean(String beanName, RootBeanDefinition mbd, @Nullable Object[] args)
        throws BeanCreationException {

    RootBeanDefinition mbdToUse = mbd;

    try {
        Object bean = resolveBeforeInstantiation(beanName, mbdToUse);
        if (bean != null) {
            return bean;
        }
    }
    catch (Throwable ex) { }

    try {
        // 创建Bean
        Object beanInstance = doCreateBean(beanName, mbdToUse, args);
        return beanInstance;
    }
    catch (BeanCreationException | ImplicitlyAppearedSingletonException ex) {
        throw ex;
    }
    catch (Throwable ex) {}
}
这个doCreateBean方法就是用来实际实例化Bean的:
protected Object doCreateBean(String beanName, RootBeanDefinition mbd, @Nullable Object[] args)
        throws BeanCreationException {

    BeanWrapper instanceWrapper = null;
    // 如果是Singleton,从缓存中拿原来的Bean
    if (mbd.isSingleton()) {
        instanceWrapper = this.factoryBeanInstanceCache.remove(beanName);
    }
    if (instanceWrapper == null) {
        // 实例化Bean
        instanceWrapper = createBeanInstance(beanName, mbd, args);
    }
    // 从BeanWrapper中拿出实际的Bean对象
    Object bean = instanceWrapper.getWrappedInstance();

    // ...
}
向populateBean方法中试探——InstantiationAwareBeanPostProcessor的after方法#
doCreateBean方法里有这样两行:
populateBean(beanName, mbd, instanceWrapper);
exposedObject = initializeBean(beanName, exposedObject, mbd);
很明显,它们代表了Bean生命周期的属性设置阶段和初始化阶段,但是到目前为止,我们还没有看到InstantiationAwareBeanPostProcessor的除了before以外的另两个方法被调用。虽然populateBean方法名看起来就是设置Bean属性了,但我们也只能往下看,没准InstantiationAwareBeanPostProcessor的另外两个方法在这个populateBean设置属性之前被调用了呢?
protected void populateBean(String beanName, RootBeanDefinition mbd, @Nullable BeanWrapper bw) {
    // 调用所有InstantiationAwareBeanPostProcessor的BeanPostProcessor
    if (!mbd.isSynthetic() && hasInstantiationAwareBeanPostProcessors()) {
        for (InstantiationAwareBeanPostProcessor bp : getBeanPostProcessorCache().instantiationAware) {
            if (!bp.postProcessAfterInstantiation(bw.getWrappedInstance(), beanName)) {
                return;
            }
        }
    }

    // ...
}
我日尼玛,果然啊!!!进来就开始调用InstantiationAwareBeanPostProcessor的after方法
所以,做个小总结:
- 对于那些
InstantiationAwareBeanPostProcessor没有拦截(before实例化方法返回null的)的Bean,InstantiationAwareBeanPostProcessor的after实例化方法也会被调用 - 而对于那些before实例化方法没有返回null的,这个after实例化方法不会走,直接调用了after初始化方法,也就是说把实例化到初始化中间的过程都跳过了
InstantiationAwareBeanPostProcessor的postProcessProperties方法#
protected void populateBean(String beanName, RootBeanDefinition mbd, @Nullable BeanWrapper bw) {
    // 调用after实例化方法
    if (!mbd.isSynthetic() && hasInstantiationAwareBeanPostProcessors()) {
        for (InstantiationAwareBeanPostProcessor bp : getBeanPostProcessorCache().instantiationAware) {
            if (!bp.postProcessAfterInstantiation(bw.getWrappedInstance(), beanName)) {
                return;
            }
        }
    }

    // 获取所有属性
    PropertyValues pvs = (mbd.hasPropertyValues() ? mbd.getPropertyValues() : null);

    // 自动注入,自动注入是针对pvs的,而不是bean本身
    int resolvedAutowireMode = mbd.getResolvedAutowireMode();
    if (resolvedAutowireMode == AUTOWIRE_BY_NAME || resolvedAutowireMode == AUTOWIRE_BY_TYPE) {
        MutablePropertyValues newPvs = new MutablePropertyValues(pvs);
        // Add property values based on autowire by name if applicable.
        if (resolvedAutowireMode == AUTOWIRE_BY_NAME) {
            autowireByName(beanName, mbd, bw, newPvs);
        }
        // Add property values based on autowire by type if applicable.
        if (resolvedAutowireMode == AUTOWIRE_BY_TYPE) {
            autowireByType(beanName, mbd, bw, newPvs);
        }
        pvs = newPvs;
    }

    // 对于所有的InstantiationAwareBeanPostProcessor,调用它们的属性设置方法
    boolean hasInstAwareBpps = hasInstantiationAwareBeanPostProcessors();
    boolean needsDepCheck = (mbd.getDependencyCheck() != AbstractBeanDefinition.DEPENDENCY_CHECK_NONE);

    PropertyDescriptor[] filteredPds = null;
    if (hasInstAwareBpps) {
        if (pvs == null) {
            pvs = mbd.getPropertyValues();
        }
        // 对于所有InstantiationAwareBeanPostProcessor,调用它的postProcessProperties方法
        for (InstantiationAwareBeanPostProcessor bp : getBeanPostProcessorCache().instantiationAware) {
            PropertyValues pvsToUse = bp.postProcessProperties(pvs, bw.getWrappedInstance(), beanName);
            // 如果该方法返回的新pvs为null,那么再调用postProcessPropertyValues
            if (pvsToUse == null) {
                // 该方法默认返回初始pvs
                pvsToUse = bp.postProcessPropertyValues(pvs, filteredPds, bw.getWrappedInstance(), beanName);
                if (pvsToUse == null) {
                    return;
                }
            }
            // 让pvs等于两次BeanProcessor方法调用后返回的pvs
            pvs = pvsToUse;
        }
    }

    // 实际设置Bean属性
    if (pvs != null) {
        applyPropertyValues(beanName, mbd, bw, pvs);
    }
}
在这里,我们可以看到,BeanFactory并没有实际设置属性,而是先用一个pvs数据结构来保存所有待设置的属性,自动注入时也操作的是pvs。这给了InstantiationAwareBeanPostProcessor可以对属性值进行二次修改的能力。
InstantiationAwareBeanPostProcessor的两个与属性相关的方法都可以返回新的pvs,你可以对原始pvs进行改动。而postProcessProperties方法默认返回null,就是不改动,postProcessPropertyValues方法默认返回原始pvs,也是不改动。
稍后,BeanFactory会把pvs应用到Bean中。
postProcessProperties方法的实战#
这里,我们检测如果pvs中有名为operator的属性要设置,我们就创建一个新的pvs,并覆盖它的operator属性,并返回它,否则我们返回null,也就是不覆盖属性:
@Override
public PropertyValues postProcessProperties(PropertyValues pvs, Object bean, String beanName) throws BeansException {
    if (pvs.contains("operator")) {
        MutablePropertyValues clonedPvs = new MutablePropertyValues(pvs);
        clonedPvs.addPropertyValue("operator", new Person("修改了pvs之后的person"));
        return clonedPvs;
    }
    return null;
}
结果,由于autowire阶段Person已经被创建了,所以结果中person的实例化阶段也被打印了:
[+] > MyInstantiationProcessor before bean instantiation : workbench => top.yudoge.springserials.basic.beanfactory.beans.Workbench
[+] > MyInstantiationProcessor before bean instantiation : person => top.yudoge.springserials.basic.beanfactory.beans.Person
Workbench(operator=Person(name=修改了pvs之后的person))
由于我不了解直接修改原始pvs会不会有副作用,所以我选择了克隆一个对象
这两个阶段最后的总结#
回到这个图上
[ ](https://img2022.cnblogs.com/blog/1942408/202207/1942408-20220714093022016-553637072.png)
- 从BeanDefinition创建实例化Bean
- 实例化之前如果有
InstantiationAwareBeanPostProcessor,调用before实例化方法 - 如果并没有一个实例化BeanPostProcessor接管Bean创建,那么进入正常实例化阶段
- 实例化Bean
- 调用
InstantiationAwareBeanPostProcessor的after实例化方法 - 对pvs进行设置
- 调用
InstantiationAwareBeanPostProcessor的postProcessProperties方法对pvs进行修改 - 实际的Bean属性设置
初始化阶段#
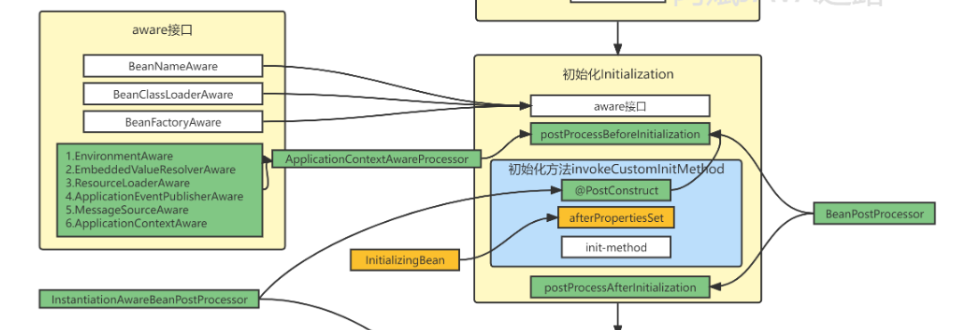
看起来挺复杂的,其实很简单:
[ ](https://img2022.cnblogs.com/blog/1942408/202207/1942408-20220714093605425-922272355.png)
主要分为几个阶段:
- Aware接口的回调
- BeanPostProcessor的before初始化回调
- 各种初始化方法的回调
- BeanPostProcessor的after初始化回调
所以,初始化阶段其实没做任何实际的事,只是对各种生命周期方法和Bean感知方法进行回调,通知它们Bean已经初始化了。或者也可以理解为,初始化阶段做的最主要的工作就是调用Bean的aware感知方法和初始化方法
// doCreateBean
// 属性设置阶段
populateBean(beanName, mbd, instanceWrapper);
// 初始化阶段
exposedObject = initializeBean(beanName, exposedObject, mbd);
进入initalizeBean,可以看到里面的代码正对应着图中的每一步:
protected Object initializeBean(String beanName, Object bean, @Nullable RootBeanDefinition mbd) {

    // 调用感知方法
    invokeAwareMethods(beanName, bean);

    // 调用BeanPostProcessor的before初始化方法
    Object wrappedBean = bean;
    if (mbd == null || !mbd.isSynthetic()) {
        wrappedBean = applyBeanPostProcessorsBeforeInitialization(wrappedBean, beanName);
    }

    // 调用自定义初始化方法
    try {
        invokeInitMethods(beanName, wrappedBean, mbd);
    }

    // 调用BeanPostProcessor的after初始化方法
    catch (Throwable ex) {}
    if (mbd == null || !mbd.isSynthetic()) {
        wrappedBean = applyBeanPostProcessorsAfterInitialization(wrappedBean, beanName);
    }

    return wrappedBean;
}
Aware感知方法的调用#
进入invokeAwareMethod方法,里面对BeanNameAware、BeanClassLoaderAware、BeanFactoryAware做了检测,并调用了对应的设置方法:
private void invokeAwareMethods(String beanName, Object bean) {
    if (bean instanceof Aware) {
        if (bean instanceof BeanNameAware) {
            ((BeanNameAware) bean).setBeanName(beanName);
        }
        if (bean instanceof BeanClassLoaderAware) {
            ClassLoader bcl = getBeanClassLoader();
            if (bcl != null) {
                ((BeanClassLoaderAware) bean).setBeanClassLoader(bcl);
            }
        }
        if (bean instanceof BeanFactoryAware) {
            ((BeanFactoryAware) bean).setBeanFactory(AbstractAutowireCapableBeanFactory.this);
        }
    }
}
对于BeanFactory,它只支持这些Aware,ApplicationContext会支持更多的Aware。
Aware感知方法的实战#
让Workbench类实现BeanFactoryAware接口并打印出创建它的BeanFactory:
@Data
public class Workbench implements BeanFactoryAware {
    @Autowired
    private Person operator;

    @Override
    public void setBeanFactory(BeanFactory beanFactory) throws BeansException {
        System.out.println("BeanFactory => " + beanFactory);
    }
}
[ ](https://img2022.cnblogs.com/blog/1942408/202207/1942408-20220714095345548-1570724102.png)
需要注意的是,一旦你的Bean实现了某个Aware接口,就证明它要感知到某些框架中的东西,这会让它直接与框架产生耦合。
BeanPostProcessor before初始化的调用#
这里和之前的套路一样,并且before方法可以返回一个包装过的Bean做为代理(默认不包装,这时wrappedBean==bean)
```java
protected Object initializeBean(String beanName, Object bean, @Nullable RootBeanDefinition mbd) {

    invokeAwareMethods(beanName, bean);

    // 进行before初始化调用
	Object wrappedBean = bean;
	if (mbd == null || !mbd.isSynthetic()) {
		wrappedBean = applyBeanPostProcessorsBeforeInitialization(wrappedBean, beanName);
	}

// ...
}
遍历每个BeanPostProcessor,调用before初始化方法:

```java
@Override
public Object applyBeanPostProcessorsBeforeInitialization(Object existingBean, String beanName)
        throws BeansException {

    Object result = existingBean;
    for (BeanPostProcessor processor : getBeanPostProcessors()) {
        Object current = processor.postProcessBeforeInitialization(result, beanName);
        if (current == null) {
            return result;
        }
        result = current;
    }
    return result;
}
没啥好解释的,实际上InstantiationAwareBeanPostProcessor的过程和它差不多,并且比它复杂。
init-method的调用#
// 调用before初始化
Object wrappedBean = bean;
if (mbd == null || !mbd.isSynthetic()) {
    wrappedBean = applyBeanPostProcessorsBeforeInitialization(wrappedBean, beanName);
}

try {
    // 调用init-method
    invokeInitMethods(beanName, wrappedBean, mbd);
}
catch (Throwable ex) {
    throw new BeanCreationException(
            (mbd != null ? mbd.getResourceDescription() : null),
            beanName, "Invocation of init method failed", ex);
}
那么我们来查看invokeInitMethods方法:
protected void invokeInitMethods(String beanName, Object bean, @Nullable RootBeanDefinition mbd)
        throws Throwable {

    // 该Bean是否是initializingBean的实例
    boolean isInitializingBean = (bean instanceof InitializingBean);
    // 如果是,并且有`afterPropertiesSet`方法
    if (isInitializingBean && (mbd == null || !mbd.hasAnyExternallyManagedInitMethod("afterPropertiesSet"))) {
        // 调用afterPropertiesSet方法
        ((InitializingBean) bean).afterPropertiesSet();
    }

    if (mbd != null && bean.getClass() != NullBean.class) {
        // 获取init-method名字
        String initMethodName = mbd.getInitMethodName();
        // 如果`initMethodName`不是空并且`initMethodName`并不和`afterPropertiesSet`同名且不是InitalizingBean(防止重复调用),并且Bean中实际有这个方法
        if (StringUtils.hasLength(initMethodName) &&
                !(isInitializingBean && "afterPropertiesSet".equals(initMethodName)) &&
                !mbd.hasAnyExternallyManagedInitMethod(initMethodName)) {
            // 调用initmethod
            invokeCustomInitMethod(beanName, bean, mbd);
        }
    }
}
所以,BeanFactory先是对于实现了InitializingBean的Bean的afterPropertiesSet进行调用,然后再对用户指定的init-method进行调用。
InitializingBean实战#
@Data
public class Workbench implements InitializingBean {
    @Autowired
    private Person operator;

    @Override
    public void afterPropertiesSet() throws Exception {
        System.out.println("afterPropertiesSet");
    }
}
结果:
afterPropertiesSet
Workbench(operator=Person(name=Yudoge))
init-method实战#
添加init方法
@Data
public class Workbench implements InitializingBean {
    @Autowired
    private Person operator;

    @Override
    public void afterPropertiesSet() throws Exception {
        System.out.println("afterPropertiesSet");
    }

    public void init() {
        System.out.println("init");
    }
}
向BeanDefinition中设置init方法名
// 设置Init方法名
workbenchRbd.setInitMethodName("init");
结果
afterPropertiesSet
init
Workbench(operator=Person(name=Yudoge))
关于@PostConstruct#
貌似BeanFactory并不支持@PostConstruct,它好像是ApplicationContext通过预注册InstantiationAwareBeanPostProcessor实现的。这是我猜的。
BeanPostProcessor.post初始化#
略,因为前面已经讲了够多了,猜也能猜到怎么实现的
初始化阶段总结#
- 调用Aware方法
- 调用BeanPostProcessor的before初始化
- 如果是InitializingBean,调用afterPropertiesSet方法
- 如果有
init-method,调用 - 调用BeanPostProcessor的after初始化
尾声:Bean的销毁阶段#
[ ](https://img2022.cnblogs.com/blog/1942408/202207/1942408-20220714101725253-2112310696.png)
回到doCreateBean方法中,最后,该方法判断了,如果必要的话就将该Bean注册到DisposableBean中:
try {
    registerDisposableBeanIfNecessary(beanName, bean, mbd);
}
catch (BeanDefinitionValidationException ex) {}
我猜其中的逻辑就是看看该Bean是不是DisposableBean的实例,如果是,注册到一个什么表中,方便销毁Bean时调用它的destory方法。
我们先不管,先看BeanFactory中有没有什么destroyBean这种方法。果然,在ConfigurableBeanFactory中定义了这个方法,AbstractBeanFactory把它实现了:
@Override
public void destroyBean(String beanName, Object beanInstance) {
    destroyBean(beanName, beanInstance, getMergedLocalBeanDefinition(beanName));
}

protected void destroyBean(String beanName, Object bean, RootBeanDefinition mbd) {
    new DisposableBeanAdapter(
            bean, beanName, mbd, getBeanPostProcessorCache().destructionAware, getAccessControlContext()).destroy();
}
这里创建了一个什么DisposableBeanAdapter,然后调用了destroy方法,就没干别的了。
DisposableBeanAdapter#
DisposableBeanAdapter的描述如下:
/**
 * 实现了`DisposableBean`和`Runnable`的Adapter,对给定的Bean执行多个销毁步骤:
 *
 *  - DestructionAwareBeanPostProcessors;
 *  - 本身就实现了DisposableBean的Bean
 *  - BeanDefinition中定义的Bean销毁方法
 */
class DisposableBeanAdapter implements DisposableBean, Runnable, Serializable
所以,看起来,整个Bean的销毁步骤都是这哥们儿一个人完成的喽。
[ ](https://img2022.cnblogs.com/blog/1942408/202207/1942408-20220714101725253-2112310696.png)
不过这个图应该画错了,它把DestructionAwareBeanPostProcessors写成了InstantiationAwareBeanPostProcessor。
看看它被调用的构造方法里写了啥:
public DisposableBeanAdapter(Object bean, String beanName, RootBeanDefinition beanDefinition,
        List<DestructionAwareBeanPostProcessor> postProcessors, @Nullable AccessControlContext acc) {

    this.bean = bean;
    this.beanName = beanName;
    this.nonPublicAccessAllowed = beanDefinition.isNonPublicAccessAllowed();
    // 该Bean是不是可调用的DisposableBean
    this.invokeDisposableBean = (bean instanceof DisposableBean &&
            !beanDefinition.hasAnyExternallyManagedDestroyMethod(DESTROY_METHOD_NAME));

    // destroy方法名
    String destroyMethodName = inferDestroyMethodIfNecessary(bean, beanDefinition);

    // 和初始化哪里一样,防止destroy方法名和DisposableBean的方法名一样,重复调用
    if (destroyMethodName != null &&
            !(this.invokeDisposableBean && DESTROY_METHOD_NAME.equals(destroyMethodName)) &&
            !beanDefinition.hasAnyExternallyManagedDestroyMethod(destroyMethodName)) {
        // 如果Bean是一个AutoClosable并且自定义的销毁方法名也是close的话
        this.invokeAutoCloseable = (bean instanceof AutoCloseable && CLOSE_METHOD_NAME.equals(destroyMethodName));

        if (!this.invokeAutoCloseable) {
            // 如果不是,destroyMethodName就使用用户指定的并解析对应方法
            this.destroyMethodName = destroyMethodName;
            Method destroyMethod = determineDestroyMethod(destroyMethodName);
            // 省略一些destroy method参数设置相关的代码
            this.destroyMethod = destroyMethod;
        }
    }
    // 获取beanPostProcessors(filterPostProcessors会过滤掉所有非DestructionAwareBeanPostProcessor的类)
    this.beanPostProcessors = filterPostProcessors(postProcessors, bean);
    this.acc = acc;
}
这里就是做了一些初始化工作,把需要的成员变量都解析出来,方便后面destroy时使用。
然后我们看看destroy方法:
public void destroy() {
    // 调用所有DestructionAwareBeanPostProcessor的postProcessBeforeDestruction
    if (!CollectionUtils.isEmpty(this.beanPostProcessors)) {
        for (DestructionAwareBeanPostProcessor processor : this.beanPostProcessors) {
            processor.postProcessBeforeDestruction(this.bean, this.beanName);
        }
    }

    // 如果是一个disposableBean,调用它的destroy
    if (this.invokeDisposableBean) {
        ((DisposableBean) this.bean).destroy();
    }

    // 如果是AutoCloseable(并且自定义销毁方法名也是close),直接调用close
    if (this.invokeAutoCloseable) {
        ((AutoCloseable) this.bean).close();
    }
    // 否则去调用自定义方法
    else if (this.destroyMethod != null) {
        invokeCustomDestroyMethod(this.destroyMethod);
    }
    // 有可能存在destroyMethod没解析,但是destroyMethodName有了的情况,解析并调用
    else if (this.destroyMethodName != null) {
        Method destroyMethod = determineDestroyMethod(this.destroyMethodName);
        if (destroyMethod != null) {
            invokeCustomDestroyMethod(ClassUtils.getInterfaceMethodIfPossible(destroyMethod, this.bean.getClass()));
        }
    }
}
实战DestructionAwareBeanPostProcessor#
创建DestructionAwareBeanPostProcessor
public class MyDestructionProcessor implements DestructionAwareBeanPostProcessor {
    @Override
    public void postProcessBeforeDestruction(Object bean, String beanName) throws BeansException {
        System.out.println("[+] DestructionProcessor : " + beanName);
    }
}
向工厂中添加BeanPostProcessor,并销毁Bean:
factory.addBeanPostProcessor(new MyDestructionProcessor());
factory.destroyBean("workbench", workbench);
结果:
Workbench(operator=Person(name=Yudoge))
[+] DestructionProcessor : top.yudoge.springserials.basic.beanfactory.beans.Workbench
实战DisposableBean#
让Bean实现DisposableBean
@Data
public class Workbench implements DisposableBean {
    @Autowired
    private Person operator;

    @Override
    public void destroy() throws Exception {
        System.out.println("DisposableBean destroy");
    }
}
结果:
Workbench(operator=Person(name=Yudoge))
[+] DestructionProcessor : top.yudoge.springserials.basic.beanfactory.beans.Workbench
DisposableBean destroy
实战CustomDestroyMethod#
添加自定义销毁方法
@Data
public class Workbench implements DisposableBean {
    @Autowired
    private Person operator;

    @Override
    public void destroy() throws Exception {
        System.out.println("DisposableBean destroy");
    }

    public void customDestroyMethod() {
        System.out.println("Custom destroy method...");
    }
}
在BeanDefinition中定义:
workbenchRbd.setDestroyMethodName("customDestroyMethod");
结果:
Workbench(operator=Person(name=Yudoge))
[+] DestructionProcessor : workbench
DisposableBean destroy
Custom destroy method...
总结#
现在,Bean销毁阶段的逻辑已经全部理解完毕
[ ](https://img2022.cnblogs.com/blog/1942408/202207/1942408-20220714101725253-2112310696.png)
- 调用DestructionAwareBeanPostProcessor的before销毁方法
- 如果实现了DisposableBean,调用它的Destroy方法
- 调用自定义destroy-method方法
- 说明:真正意义上的销毁(从容器中移除bean)是在AbstractApplicationContext.close方法中实现的,在此方法中不仅会将bean从容器中移除,还会调用到我们实现的这些回调相关的方法。
最后的总结#
- 从BeanDefinition获取Bean信息
- 调用
InstantiationAwareBeanPostProcessor的before实例化方法 - 如果它返回一个对象,那么直接进入该对象的初始化后方法
- 否则,它返回null,进入正常的Bean生命周期
- 实例化Bean
- 调用
populateBean,该方法的目的是对Bean属性进行设置 - 调用
InstantiationAwareBeanPostProcessor的after实例化方法,该方法的返回值决定是否跳过属性设置阶段 - 解析该Bean的pvs,自动注入该pvs
- 调用
InstantiationAwareBeanPostProcessor中两个和属性设置有关的方法,允许它们对属性进行动态修改 - 调用
initializingBean进入初始化阶段 - 检测Bean实现了哪些Aware接口,调用它们
- 调用所有
BeanPostProcessor的before初始化方法,该方法可以返回Bean的一个代理 - 如果Bean是
InitializingBean,调用它的afterPropertiesSet方法 - 如果Bean设置了启动方法,调用启动方法
- 调用所有
BeanPostProcessor的after初始化方法,该方法可以返回Bean的一个代理 - 调用
destroyBean进入Bean销毁阶段 - 创建
DisposableBeanAdapter,它负责对Bean的销毁进行生命周期方法的调用 - 调用所有
DestructionAwareBeanPostProcessor的before销毁方法 - 如果是
DisposableBean,调用destroy方法 - 如果设置了
destroy-method,调用它
