系列文章目录
unity工具
文章目录
- 系列文章目录
- 👉前言
- 👉一、模型截图保存
- 👉1-1 模型格式
- 👉1-2 设置图片大小
- 👉1-3 代码如下
- 👉二、截图上传给后端保存
- 👉壁纸分享
- 👉总结
👉前言
有时候会用到给模型制作模型的图片,就是那种每一个模型的样子,展示每一个模型的图片,如果你有现成的UI那就不需要了,如果没有就可以自己制作了,所以写了一个制作图片小工具,方便使用,简单记录一下
大家好,我是心疼你的一切,不定时更新Unity开发技巧,觉得有用记得一键三连哦。
欢迎点赞评论哦.
下面就让我们进入正文吧 !
提示:以下是本篇文章正文内容,下面案例可供参考
👉一、模型截图保存
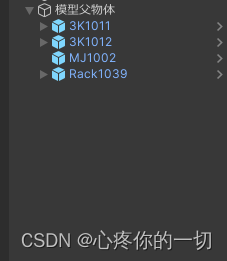
就比如我们的模型有很多很多个,现在又需要每个模型的图片,这时候就可以使用了,自己动手丰衣足食
👉1-1 模型格式
👉1-2 设置图片大小
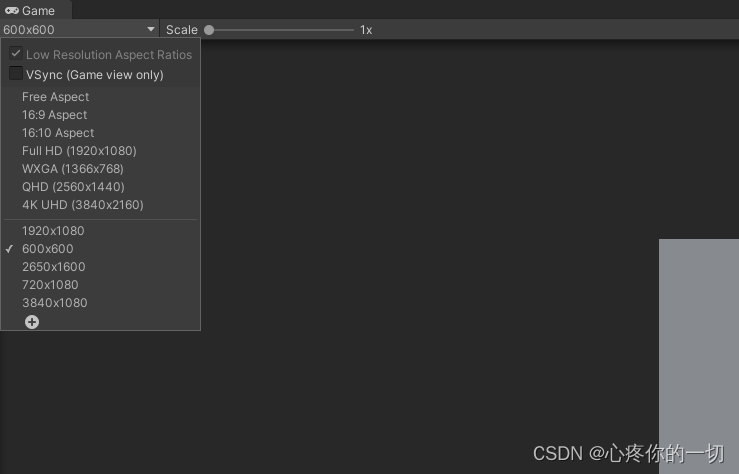
看你需要多大的图片就把game视窗的如下设置 设置一下,我用的是600*600,具体你用多大,看你喜欢多大的
👉1-3 代码如下
代码里原本写了一个自动把所有模型都设置图片的,试验了一下,不是很友好,因为每个模型大小不一样,所以摄像机距离模型的距离也不一样,所以要想要那种模型刚刚好在图片中间的,就不是很友好了,具体解决方法就没有用自动的设置图片,而是选择了手动调摄像机距离,然后截图保存的(如果你的模型要是很多很多的话,建议你还是研究一下根据模型大小来设置相机位置的,如果你研究好了,也可以告诉我,让我学习学习),当然如果有建模的也可以给你渲图,美工也行
代码设置了保存位置和图片格式 如有修改请自行修改即可
using System.Collections;
using System.Collections.Generic;
using UnityEditor;
using UnityEngine;

public class SaveJPG : MonoBehaviour
{
    public GameObject[] gameObjects;
    //string fileName = Application.streamingAssetsPath + "/UI/photo.jpg";
    public Camera camera;
    public Transform fuwutiParent;
    public int jsq = 0;

    private void Start()
    {
        //自动保存图片
        //StartCoroutine(CloneTuPian());
    }
    private void Update()
    {
        #region 半自动保存图片手动对位置
        if (Input.GetKeyDown (KeyCode.Space))
        {
            for (int i = 0; i < fuwutiParent.childCount; i++)
            {
                fuwutiParent.GetChild(jsq).gameObject.SetActive(true);
            }

        }
        if (Input.GetKeyDown (KeyCode.A))
        {
            string str_ = fuwutiParent.GetChild(jsq).name.Split('(')[0].ToString();
            CaptureScreenByRT(str_);
            fuwutiParent.GetChild(jsq).gameObject.SetActive(false);
            jsq++;
            Debug.Log(jsq);
        }
        #endregion
    }

    IEnumerator CloneTuPian()
    {
        while (jsq<gameObjects .Length)
        {
            GameObject obj = Instantiate(gameObjects[jsq]);
            string str_ = obj.transform.name.Split('(')[0].ToString ();
            CaptureScreenByRT(str_);
            Destroy(obj);
            yield return new WaitForSeconds(1f);
            jsq++;
        }
        Debug.Log("生成结束");
    }
    public void CaptureScreenByRT(string fileName)
    {
        Rect rect = new Rect(0, 0, 600, 600);  //设置图片大小
        //Rect rect = new Rect(0, 0, Screen.width , Screen.height);   //全屏的时候用
        // 创建一个RenderTexture对象
        RenderTexture rt = new RenderTexture((int)rect.width, (int)rect.height, 0);
        // 临时设置相关相机的targetTexture为rt, 并手动渲染相关相机
        camera.targetTexture = rt;
        camera.Render();
        // 激活这个rt, 并从中中读取像素。
        RenderTexture.active = rt;
        Texture2D screenShot = new Texture2D((int)rect.width, (int)rect.height, TextureFormat.RGB24, false);
        // 注:这个时候,它是从RenderTexture.active中读取像素
        screenShot.ReadPixels(rect, 0, 0);
        screenShot.Apply();
        // 重置相关参数,以使用camera继续在屏幕上显示
        camera.targetTexture = null;
        RenderTexture.active = null;
        GameObject.Destroy(rt);
        // 最后将这些纹理数据,成一个png图片文件
        byte[] bytes = screenShot.EncodeToPNG();
        string path = Application.streamingAssetsPath + "/UI/房间里设备-20240109/" + fileName.ToLower () + ".jpg";
        System.IO.File.WriteAllBytes(path, bytes);
#if UNITY_EDITOR
        AssetDatabase.Refresh();
#endif
    }


}
👉二、截图上传给后端保存
上传的功能代码如下
using UnityEngine;
using UnityEngine.Networking;
using System.Collections;
using UnityEngine.UI;
/// <summary>
/// 截屏 并发送给后端
/// </summary>
public class ScreenCaptureAndSend : MonoBehaviour
{
    public string serverUrl = "";

    public RawImage rawImage;

    private void Start()
    {
        CaptureAndSend();
    }
    public void CaptureAndSend()
    {
        StartCoroutine(CaptureAndSendCoroutine());
    }

    IEnumerator CaptureAndSendCoroutine()
    {
        // 等待一帧结束
        yield return new WaitForEndOfFrame();

        // 截取屏幕
        byte[] imageBytes = ScreenCapture.CaptureScreenshotAsTexture().EncodeToPNG();

        //这个是测试截屏的内容的,不用的话到时候可以删除了
        DisplayImage(imageBytes);
        //yield return null;
        // 创建POST请求
        UnityWebRequest request = UnityWebRequest.Post(serverUrl, "POST");

        // 将图片数据作为请求的body
        UploadHandlerRaw uploadHandler = new UploadHandlerRaw(imageBytes);
        uploadHandler.contentType = "image/png";
        request.uploadHandler = uploadHandler;

        // 发送请求
        yield return request.SendWebRequest();

        // 处理响应
        if (request.result != UnityWebRequest.Result.Success)
        {
            Debug.LogError("Error sending screenshot: " + request.error);
        }
        else
        {
            Debug.Log("Screenshot sent successfully");
            // 在这里处理后端返回的响应数据
            string response = request.downloadHandler.text;
            Debug.Log("Server response: " + response);
        }
    }

    /// <summary>
    /// 加载图片
    /// </summary>
    /// <param name="bytes"></param>
    void DisplayImage(byte[] bytes)
    {
        Texture2D texture = new Texture2D(1, 1);
        texture.LoadImage(bytes); // 从字节数组加载图片数据
        rawImage.texture = texture; // 将加载的图片设置到RawImage组件
    }

    //获取图片byte[]流赋值到rawImage上面  用来之后获取后端图片给自己功能赋值
    void LoadImage(byte[] bytes,RawImage rawImage)
    {
        Texture2D texture = new Texture2D(1, 1);
        texture.LoadImage(bytes); // 从字节数组加载图片数据
        rawImage.texture = texture; // 将加载的图片设置到RawImage组件
    }
}
具体你跟后端怎么传,就修改代码就好了
👉壁纸分享
以上就是本地截屏保存和上传数据保存的方法,以后如果有更好的,我会继续更新添加,欢迎阅读评论。
下一篇文章有从服务器下载图片,加载到场景里显示的博客
感谢支持!!!
👉总结
本次总结的就是截屏保存的实现,有需要会继续添加新的
如能帮助到你,就帮忙点个赞吧,三连更好哦,谢谢
你的点赞就是对博主的支持,有问题记得留言评论哦!
不定时更新Unity开发技巧,觉得有用记得一键三连哦。么么哒
