本文来源公众号“天才程序员周弈帆”,仅用于学术分享,侵权删,干货满满。
原文链接:Stable Diffusion 解读(四):Diffusers实现源码解读
接上一篇文章[天才程序员周弈帆 | Stable Diffusion 解读(三):原版实现源码解读(篇幅略长,建议收藏!)-CSDN博客],我们来学习Stable Diffusion在Diffusers中的实现。
本文用到的Stable Diffusion版本是v1.5。Diffusers版本是0.25.0。为了提升可读性,本文对源代码做了一定的精简,部分不会运行到的分支会被略过。
1 Diffusers
Diffusers是由Hugging Face维护的一套Diffusion框架。这个库的代码被封装进了一个Python模块里,我们可以在安装了Diffusers的Python环境中用import diffusers随时调用该库。相比之下,Diffusers的代码架构更加清楚,且各类Stable Diffusion的新技术都会及时集成进Diffusers库中。
由于我们已经在上篇文章中学过了Stable Diffusion官方源码,在学习Diffusers代码时,我们只会大致过一过每一段代码是在做什么,而不会赘述Stable Diffusion的原理。
1.1 安装
安装该库时,不需要克隆仓库,只需要直接用pip即可。
pip install --upgrade diffusers[torch]
之后,随便在某个地方创建一个Python脚本文件,输入官方的示例项目代码。
from diffusers import DiffusionPipeline
import torch

pipeline = DiffusionPipeline.from_pretrained("runwayml/stable-diffusion-v1-5", torch_dtype=torch.float16)
pipeline.to("cuda")
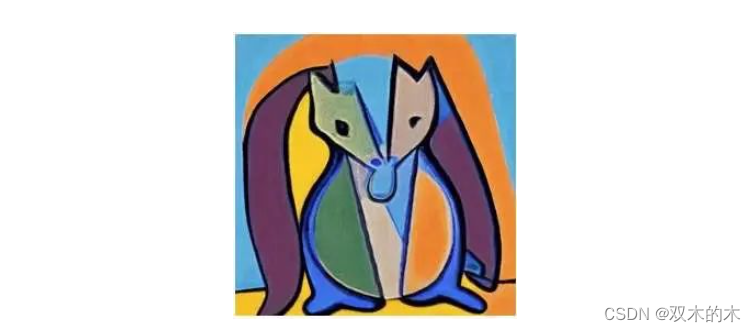
pipeline("An image of a squirrel in Picasso style").images[0].save('output.jpg')
运行代码后,"一幅毕加索风格的松鼠图片"的绘制结果会保存在output.jpg中。我得到的结果如下:
在Diffusers中,from_pretrained函数可以直接从Hugging Face的模型仓库中下载预训练模型。比如,示例代码中from_pretrained("runwayml/stable-diffusion-v1-5", ...)指的就是从模型仓库https://huggingface.co/runwayml/stable-diffusion-v1-5中获取模型。
如果在当前网络下无法从命令行中访问Hugging Face,可以先想办法在网页上访问上面的模型仓库,手动下载v1-5-pruned.ckpt。之后,克隆Diffusers的GitHub仓库,再用Diffusers的工具把Stable Diffusion原版模型文件转换成Diffusers支持的模型格式。
git clone git@github.com:huggingface/diffusers.git
cd diffusers
python scripts/convert_original_stable_diffusion_to_diffusers.py --checkpoint_path <src> --dump_path <dst>
比如,假设你的模型文件存在ckpt/v1-5-pruned.ckpt,你想把输出的Diffusers的模型文件存在ckpt/sd15,则应该输入:
python scripts/convert_original_stable_diffusion_to_diffusers.py --checkpoint_path ckpt/v1-5-pruned.ckpt --dump_path ckpt/sd15
之后修改示例脚本中的路径,就可以成功运行了。
from diffusers import DiffusionPipeline
import torch

pipeline = DiffusionPipeline.from_pretrained("ckpt/sd15", torch_dtype=torch.float16)
pipeline.to("cuda")
pipeline("An image of a squirrel in Picasso style").images[0].save('output.jpg')
对于其他的原版SD checkpoint(比如在civitai上下载的),也可以用同样的方式把它们转换成Diffusers兼容的版本。
1.2 采样
Diffusers使用Pipeline来管理一类图像生成算法。和图像生成相关的模块(如U-Net,DDIM采样器)都是Pipeline的成员变量。打开Diffusers版Stable Diffusion模型的配置文件model_index.json(在 https://huggingface.co/runwayml/stable-diffusion-v1-5/blob/main/model_index.json 网页上直接访问或者在本地的模型文件夹中找到),我们能看到该模型使用的Pipeline:
{
  "_class_name": "StableDiffusionPipeline",
  ...
}
在diffusers/pipelines/stable_diffusion/pipeline_stable_diffusion.py中,我们能找到StableDiffusionPipeline类的定义。所有Pipeline类的代码都非常长,一般我们可以忽略其他部分,只看运行方法__call__里的内容。
def __call__(
    self,
    prompt: Union[str, List[str]] = None,
    height: Optional[int] = None,
    width: Optional[int] = None,
    num_inference_steps: int = 50,
    timesteps: List[int] = None,
    guidance_scale: float = 7.5,
    negative_prompt: Optional[Union[str, List[str]]] = None,
    num_images_per_prompt: Optional[int] = 1,
    eta: float = 0.0,
    ...
):

    # 0. Default height and width to unet
    height = height or self.unet.config.sample_size * self.vae_scale_factor
    width = width or self.unet.config.sample_size * self.vae_scale_factor
    # to deal with lora scaling and other possible forward hooks

    # 1. Check inputs. Raise error if not correct
    self.check_inputs(...)

    # 2. Define call parameters
    batch_size = ...

    device = self._execution_device

    # 3. Encode input prompt


    prompt_embeds, negative_prompt_embeds = self.encode_prompt(...)

    # For classifier free guidance, we need to do two forward passes.
    # Here we concatenate the unconditional and text embeddings into a single batch
    # to avoid doing two forward passes
    if self.do_classifier_free_guidance:
        prompt_embeds = torch.cat([negative_prompt_embeds, prompt_embeds])

    # 4. Prepare timesteps
    timesteps, num_inference_steps = retrieve_timesteps(self.scheduler, num_inference_steps, device, timesteps)

    # 5. Prepare latent variables
    num_channels_latents = self.unet.config.in_channels
    latents = self.prepare_latents(...)

    # 6. Prepare extra step kwargs. TODO: Logic should ideally just be moved out of the pipeline
    ...

    # 7. Denoising loop
    num_warmup_steps = len(timesteps) - num_inference_steps * self.scheduler.order
    self._num_timesteps = len(timesteps)
    with self.progress_bar(total=num_inference_steps) as progress_bar:
        for i, t in enumerate(timesteps):
            # expand the latents if we are doing classifier free guidance
            latent_model_input = torch.cat([latents] * 2) if self.do_classifier_free_guidance else latents
            latent_model_input = self.scheduler.scale_model_input(latent_model_input, t)

            # predict the noise residual
            noise_pred = self.unet(
                latent_model_input,
                t,
                encoder_hidden_states=prompt_embeds,
                ...
            )[0]

            # perform guidance
            if self.do_classifier_free_guidance:
                noise_pred_uncond, noise_pred_text = noise_pred.chunk(2)
                noise_pred = noise_pred_uncond + self.guidance_scale * (noise_pred_text - noise_pred_uncond)

            if self.do_classifier_free_guidance and self.guidance_rescale > 0.0:
                # Based on 3.4. in https://arxiv.org/pdf/2305.08891.pdf
                noise_pred = rescale_noise_cfg(noise_pred, noise_pred_text, guidance_rescale=self.guidance_rescale)

            # compute the previous noisy sample x_t -> x_t-1
            latents = self.scheduler.step(noise_pred, t, latents, **extra_step_kwargs, return_dict=False)[0]


            # call the callback, if provided
            if i == len(timesteps) - 1 or ((i + 1) > num_warmup_steps and (i + 1) % self.scheduler.order == 0):
                progress_bar.update()


    if not output_type == "latent":
        image = self.vae.decode(latents / self.vae.config.scaling_factor, return_dict=False, generator=generator)[
            0
        ]
        image, has_nsfw_concept = self.run_safety_checker(image, device, prompt_embeds.dtype)
    else:
        image = latents
        has_nsfw_concept = None

    ...

    return StableDiffusionPipelineOutput(images=image, nsfw_content_detected=has_nsfw_concept)
虽然这段代码很长,但代码中的关键内容和我们在上篇文章中写的伪代码完全一致。
def ldm_text_to_image(image_shape, text, ddim_steps = 20, eta = 0)
  ddim_scheduler = DDIMScheduler()
  vae = VAE()
  unet = UNet()
  zt = randn(image_shape)
  eta = input()
  T = 1000
  timesteps = ddim_scheduler.get_timesteps(T, ddim_steps) # [1000, 950, 900, ...]

  text_encoder = CLIP()
  c = text_encoder.encode(text)

  for t = timesteps:
    eps = unet(zt, t, c)
    std = ddim_scheduler.get_std(t, eta)
    zt = ddim_scheduler.get_xt_prev(zt, t, eps, std)
  xt = vae.decoder.decode(zt)
  return xt
我们可以对照着上面的伪代码来阅读这个方法。经过Diffusers框架本身的一些前处理后,方法先获取了约束文本的编码。
# 3. Encode input prompt
# c = text_encoder.encode(text)
prompt_embeds, negative_prompt_embeds = self.encode_prompt(...)
方法再从采样器里获取了要用到的时间戳,并随机生成了一个初始噪声。
# Preprocess
...

# 4. Prepare timesteps
# timesteps = ddim_scheduler.get_timesteps(T, ddim_steps)
timesteps, num_inference_steps = retrieve_timesteps(self.scheduler, num_inference_steps, device, timesteps)

# 5. Prepare latent variables
# zt = randn(image_shape)
num_channels_latents = self.unet.config.in_channels
latents = self.prepare_latents(
    ...
)
做完准备后,方法进入去噪循环。循环一开始是用U-Net算出当前应去除的噪声noise_pred。由于加入了CFG,U-Net计算的前后有一些对数据形状处理的代码。
with self.progress_bar(total=num_inference_steps) as progress_bar:
    for i, t in enumerate(timesteps):
        # eps = unet(zt, t, c)

        # expand the latents if we are doing classifier free guidance
        latent_model_input = torch.cat([latents] * 2) if self.do_classifier_free_guidance else latents
        latent_model_input = self.scheduler.scale_model_input(latent_model_input, t)

        # predict the noise residual
        noise_pred = self.unet(
            latent_model_input,
            t,
            encoder_hidden_states=prompt_embeds,
            ...
        )[0]

        # perform guidance
        if self.do_classifier_free_guidance:
            noise_pred_uncond, noise_pred_text = noise_pred.chunk(2)
            noise_pred = noise_pred_uncond + self.guidance_scale * (noise_pred_text - noise_pred_uncond)

        if self.do_classifier_free_guidance and self.guidance_rescale > 0.0:
            # Based on 3.4. in https://arxiv.org/pdf/2305.08891.pdf
            noise_pred = rescale_noise_cfg(noise_pred, noise_pred_text, guidance_rescale=self.guidance_rescale)
有了应去除的噪声,方法会调用扩散模型采样器对当前的噪声图片进行更新。Diffusers把采样的逻辑全部封装进了采样器的step方法里。对于包括DDIM在内的所有采样器,都可以调用这个通用的接口,完成一步采样。eta等采样器参数会通过**extra_step_kwargs传入采样器的step方法里。
# std = ddim_scheduler.get_std(t, eta)
# zt = ddim_scheduler.get_xt_prev(zt, t, eps, std)

# compute the previous noisy sample x_t -> x_t-1
latents = self.scheduler.step(noise_pred, t, latents, **extra_step_kwargs, return_dict=False)[0]
经过若干次循环后,我们得到了隐空间下的生成图片。我们还需要调用VAE把隐空间图片解码成普通图片。代码中的self.vae.decode(latents / self.vae.config.scaling_factor, ...)用于解码图片。
if not output_type == "latent":
    image = self.vae.decode(latents / self.vae.config.scaling_factor, return_dict=False, generator=generator)[
        0
    ]
    image, has_nsfw_concept = self.run_safety_checker(image, device, prompt_embeds.dtype)
else:
    image = latents
    has_nsfw_concept = None

...

return StableDiffusionPipelineOutput(images=image, nsfw_content_detected=has_nsfw_concept)
就这样,我们很快就看完了Diffusers的采样代码。相比之下,Diffusers的封装确实更合理,主要的图像生成逻辑都写在Pipeline类的__call__里,剩余逻辑都封装在VAE、U-Net、采样器等各自的类里。
1.3 U-Net
接下来我们来看Diffusers中的U-Net实现。还是打开模型配置文件model_index.json,我们可以找到U-Net的类名。
{
  ...
  "unet": [
    "diffusers",
    "UNet2DConditionModel"
  ],
  ...
}
在diffusers/models/unet_2d_condition.py文件中,我们可以找到类UNet2DConditionModel。由于Diffusers集成了非常多新特性,整个文件就像一锅大杂烩一样,掺杂着各种功能的实现代码。不过,这份U-Net的实现还是基于原版Stable Diffusion的U-Net进行开发的,原版代码的每一部分都能在这份代码里找到对应。在阅读代码时,我们可以跳过无关的功能,只看我们在Stable Diffusion官方仓库中见过的部分。
先看初始化函数的主要内容。初始化函数依然主要包括time_proj, time_embedding, down_blocks, mid_block, up_blocks, conv_in, conv_out这几个模块。
class UNet2DConditionModel(ModelMixin, ConfigMixin, UNet2DConditionLoadersMixin):
    def __init__(...):
        ...
        self.conv_in = nn.Conv2d(
            in_channels, block_out_channels[0], kernel_size=conv_in_kernel, padding=conv_in_padding
        )
        ...
        elif time_embedding_type == "positional":
            self.time_proj = Timesteps(block_out_channels[0], flip_sin_to_cos, freq_shift)
        ...
        self.time_embedding = TimestepEmbedding(...)
        self.down_blocks = nn.ModuleList([])
        self.up_blocks = nn.ModuleList([])
        for i, down_block_type in enumerate(down_block_types):
            ...
            down_block = get_down_block(...)

        if mid_block_type == ...
            self.mid_block = ...

        for i, up_block_type in enumerate(up_block_types):
            up_block = get_up_block(...)

        self.conv_out = nn.Conv2d(...)
其中,较为重要的down_blocks, mid_block, up_blocks都是根据模块类名称来创建的。我们可以在Diffusers的Stable Diffusion模型文件夹的U-Net的配置文件unet/config.json中找到对应的模块类名称。
{
    ...
    "down_block_types": [
    "CrossAttnDownBlock2D",
    "CrossAttnDownBlock2D",
    "CrossAttnDownBlock2D",
    "DownBlock2D"
  ],
  "mid_block_type": "UNetMidBlock2DCrossAttn",
  "up_block_types": [
    "UpBlock2D",
    "CrossAttnUpBlock2D",
    "CrossAttnUpBlock2D",
    "CrossAttnUpBlock2D"
  ],
  ...
}
在diffusers/models/unet_2d_blocks.py中,我们可以找到这几个模块类的定义。和原版代码一样,这几个模块的核心组件都是残差块和Transformer块。在Diffusers中,残差块叫做ResnetBlock2D,Transformer块叫做Transformer2DModel。这几个类的执行逻辑和原版仓库的也几乎一样。比如CrossAttnDownBlock2D的定义如下:
class CrossAttnDownBlock2D(nn.Module):
    def __init__(...):
        for i in range(num_layers):
            resnets.append(ResnetBlock2D(...))
            if not dual_cross_attention:
                attentions.append(Transformer2DModel(...))
接着我们来看U-Net的forward方法。忽略掉其他功能的实现,该方法的主要内容如下:
def forward(
        self,
        sample: torch.FloatTensor,
        timestep: Union[torch.Tensor, float, int],
        encoder_hidden_states: torch.Tensor,
        ...):

    # 0. center input if necessary
    if self.config.center_input_sample:
        sample = 2 * sample - 1.0

    # 1. time
    timesteps = timestep
    t_emb = self.time_proj(timesteps)
    emb = self.time_embedding(t_emb, timestep_cond)

    # 2. pre-process
    sample = self.conv_in(sample)

    # 3. down
    down_block_res_samples = (sample,)
    for downsample_block in self.down_blocks:
        sample, res_samples = downsample_block(
            hidden_states=sample,
            temb=emb,
            encoder_hidden_states=encoder_hidden_states,
            ...)
        down_block_res_samples += res_samples
    # 4. mid
    sample = self.mid_block(
            sample,
            emb,
            encoder_hidden_states=encoder_hidden_states,
            ...)

    # 5. up
    for i, upsample_block in enumerate(self.up_blocks):
        res_samples = down_block_res_samples[-len(upsample_block.resnets) :]
        down_block_res_samples = down_block_res_samples[: -len(upsample_block.resnets)]
        sample = upsample_block(
            hidden_states=sample,
            temb=emb,
            res_hidden_states_tuple=res_samples,
            encoder_hidden_states=encoder_hidden_states,
            ...)

     # 6. post-process
    sample = self.conv_out(sample)

    return UNet2DConditionOutput(sample=sample)
该方法和原版仓库的实现差不多,唯一要注意的是栈相关的实现。在方法的下采样计算中,每个downsample_block会返回多个残差输出的元组res_samples,该元组会拼接到栈down_block_res_samples的栈顶。在上采样计算中,代码会根据当前的模块个数,从栈顶一次取出len(upsample_block.resnets)个残差输出。
down_block_res_samples = (sample,)
for downsample_block in self.down_blocks:
    sample, res_samples = downsample_block(...)
    down_block_res_samples += res_samples

for i, upsample_block in enumerate(self.up_blocks):
    res_samples = down_block_res_samples[-len(upsample_block.resnets) :]
    down_block_res_samples = down_block_res_samples[: -len(upsample_block.resnets)]
    sample = upsample_block(...)
现在,我们已经看完了Diffusers中U-Net的主要内容。可以看出,Diffusers的U-Net包含了很多功能,一般情况下是难以自己更改这些代码的。有没有什么办法能方便地修改U-Net的实现呢?由于很多工作都需要修改U-Net的Attention,Diffusers给U-Net添加了几个方法,用于精确地修改每一个Attention模块的实现。我们来学习一个修改Attention模块的示例。
U-Net类的attn_processors属性会返回一个词典,它的key是每个Attention运算类所在位置,比如down_blocks.0.attentions.0.transformer_blocks.0.attn1.processor,它的value是每个Attention运算类的实例。默认情况下,每个Attention运算类都是AttnProcessor,它的实现在diffusers/models/attention_processor.py文件中。
为了修改Attention运算的实现,我们需要构建一个格式一样的词典attn_processor_dict,再调用unet.set_attn_processor(attn_processor_dict),取代原来的attn_processors。假如我们自己实现了另一个Attention运算类MyAttnProcessor,我们可以编写下面的代码来修改Attention的实现:
attn_processor_dict = {}
for k in unet.attn_processors.keys():
    if we_want_to_modify(k):
        attn_processor_dict[k] = MyAttnProcessor()
    else:
        attn_processor_dict[k] = AttnProcessor()

unet.set_attn_processor(attn_processor_dict)
MyAttnProcessor的唯一要求是,它需要实现一个__call__方法,且方法参数与AttnProcessor的一致。除此之外,我们可以自由地实现Attention处理的细节。一般来说,我们可以先把原来AttnProcessor的实现代码复制过去,再对某些细节做修改。
2 总结
在这篇文章中,我们学习了Stable Diffusion的原版实现和Diffusers实现的主要内容:采样算法和U-Net。具体来说,在原版仓库中,采样的实现一部分在主函数中,一部分在DDIM采样器类中。U-Net由一个简明的PyTorch模块类实现,其中比较重要的子模块是残差块和Transformer块。相比之下,Diffusers实现的封装更好,功能更多。Diffusers用一个Pipeline类来维护采样过程。Diffusers的U-Net实现与原版完全相同,且支持更复杂的功能。此外,Diffusers还给U-Net提供了精确修改Attention计算的接口。
不管是哪个Stable Diffusion的框架,都会提供一些相同的原子操作。各种基于Stable Diffusion的应用都应该基于这些原子操作开发,而无需修改这些操作的细节。在学习时,我们应该注意这些操作在不同的框架下的写法是怎么样的。常用的原子操作包括:
-
VAE的解码和编码
-
文本编码器(CLIP)的编码
-
用U-Net预测当前图像应去除的噪声
-
用采样器计算下一去噪迭代的图像
在原版仓库中,相关的实现代码如下:
# VAE的解码和编码
model.decode_first_stage(...)
model.encode_first_stage(...)

# 文本编码器(CLIP)的编码
model.get_learned_conditioning(...)

# 用U-Net预测当前图像应去除的噪声
model.apply_model(...)

# 用采样器计算下一去噪迭代的图像
p_sample_ddim(...)
在Diffusers中,相关的实现代码如下:
# VAE的解码和编码
image = self.vae.decode(latents / self.vae.config.scaling_factor, return_dict=False)[0]
latents = self.vae.encode(image).latent_dist.sample(generator) * self.vae.config.scaling_factor

# 文本编码器(CLIP)的编码
self.encode_prompt(...)

# 用U-Net预测当前图像应去除的噪声
self.unet(..., return_dict=False)[0]

# 用采样器计算下一去噪迭代的图像
self.scheduler.step(..., return_dict=False)[0]
如今zero-shot(无需训练)的Stable Diffusion编辑技术一般只会修改采样算法和Attention计算,需训练的编辑技术有时会在U-Net里加几个模块。只要我们熟悉了普通的Stable Diffusion是怎么样生成图像的,知道原来U-Net的结构是怎么样的,我们在阅读新论文的源码时就可以把这份代码与原来的代码进行对比,只看那些有修改的部分。相信读完了本文后,我们不仅加深了对Stable Diffusion本身的理解,以后学习各种新出的Stable Diffusion编辑技术时也会更加轻松。
THE END !
文章结束,感谢阅读。您的点赞,收藏,评论是我继续更新的动力。大家有推荐的公众号可以评论区留言,共同学习,一起进步。
