第2章 Android常见界面布局
View
View与ViewGroup
View:按钮(Button)、文本框(TextView)和图像视图(ImageView)等
ViewGroup:LinearLayout、RelativeLayout、FrameLayout等都是ViewGroup的具体实现,它们用作不同类型的布局容器。
界面布局的编写方式
RelativeLayout相对布局
使用xml
<?xml version="1.0" encoding="utf-8"?>
<RelativeLayout    xmlns:android="http://schemas.android.com/apk/res/android"
    xmlns:tools="http://schemas.android.com/tools"
    android:layout_width="match_parent"
    android:layout_height="match_parent"
    tools:context=".MainActivity">
    <TextView
        android:layout_width="wrap_content"
        android:layout_height="wrap_content"
        android:text="使用XML布局文件控制UI界面"
        android:textColor="#ff0000"
        android:textSize="18sp"
        android:layout_centerInParent="true"/>
</RelativeLayout>
使用java
RelativeLayout relativeLayout = new RelativeLayout(this);
RelativeLayout.LayoutParams params =  new RelativeLayout.LayoutParams(
                                                                 RelativeLayout.LayoutParams.WRAP_CONTENT,
                                                                 RelativeLayout.LayoutParams.WRAP_CONTENT);
params.addRule(RelativeLayout.CENTER_IN_PARENT);  //设置布局中的控件居中显示
TextView textView = new TextView(this);                       //创建TextView控件
textView.setText("Java 代码实现界面布局");                     //设置TextView的文字内容
textView.setTextColor(Color.RED);                                  //设置TextView的文字颜色
textView.setTextSize(18);                                                //设置TextView的文字大小
relativeLayout.addView(textView, params);                  //添加TextView对象和TextView的布局属性
setContentView(relativeLayout);                                  //设置在Activity中显示RelativeLayout
常见界面布局
布局的通用属性
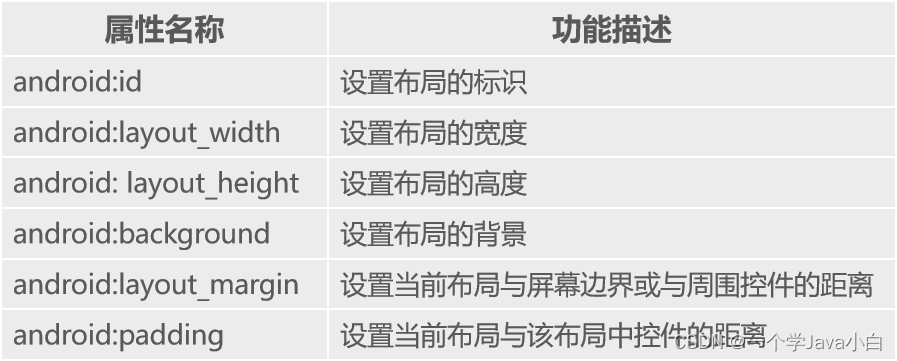
android:id
- 用于设置当前布局的唯一标识。
- 在XML文件中它的属性值是通过“@+id/属性名称”定义
android:layout_width
- 用于设置布局的宽度,其值可以是具体的尺寸,如50dp、30dp等,
- 系统定义的值有fill_parent、match_parent和wrap_content。
RelativeLayout相对布局
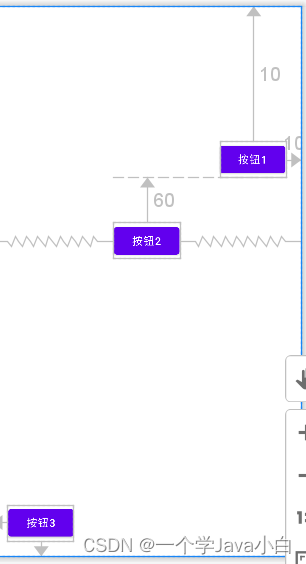
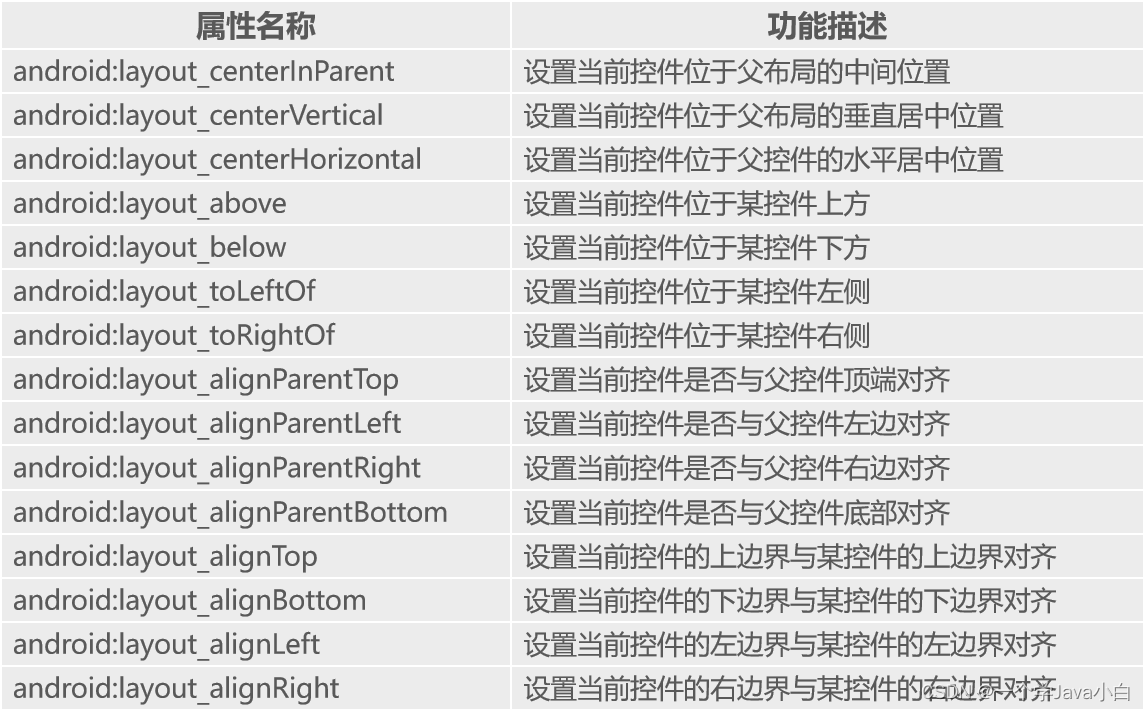
RelativeLayout通过相对定位的方式指定子控件的位置。
<RelativeLayout xmlns:android="http://schemas.android.com/apk/res/android"
    android:layout_width="match_parent"
    android:layout_height="match_parent"
    android:padding="20dp">

    <!-- 按钮1 -->
    <Button
        android:id="@+id/button1"
        android:layout_width="wrap_content"
        android:layout_height="wrap_content"
        android:text="按钮1"
        android:layout_alignParentRight="true"
        android:layout_alignParentTop="true"
        android:layout_marginTop="160dp"/>

    <!-- 按钮2 -->
    <Button
        android:id="@+id/button2"
        android:layout_width="wrap_content"
        android:layout_height="wrap_content"
        android:text="按钮2"
        android:layout_centerHorizontal="true"
        android:layout_below="@id/button1"
        android:layout_marginTop="60dp" />

    <!-- 按钮3 -->
    <Button
        android:id="@+id/button3"
        android:layout_width="wrap_content"
        android:layout_height="wrap_content"
        android:text="按钮3"
        android:layout_alignParentBottom="true"
        android:layout_alignParentLeft="true" />

</RelativeLayout>
控件的属性
LinearLayout 线性布局
指定布局内的子控件水平或垂直排列。
android:orientation属性的可选值为vertical和horizontal。
(1) vertical:从上到下垂直排列。
(2)horizontal:从左到右水平排列。
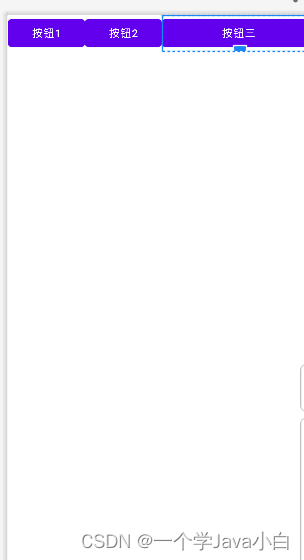
android:layout_weight属性。
(1)该属性被称为权重,通过设置该属性值,可使布局内的控件按照权重比显示大小。
(2)在进行屏幕适配时起到关键作用。
<LinearLayout xmlns:android="http://schemas.android.com/apk/res/android"
    android:layout_width="match_parent"
    android:layout_height="wrap_content"
    android:orientation="horizontal">
<!--layout_width="0dp",不能wrap_content,否则layout_weight将失去作用-->
    <Button
        android:layout_width="0dp"
        android:layout_height="wrap_content"
        android:layout_weight="1"
        android:text="按钮1" />

    <Button
        android:layout_width="0dp"
        android:layout_height="wrap_content"
        android:layout_weight="1"
        android:text="按钮2" />
    <Button
        android:layout_width="0dp"
        android:layout_height="wrap_content"
        android:layout_weight="2"
        android:text="按钮三" />
</LinearLayout>
TableLayout(表格布局)
采用行、列的形式来管理控件,添加TableRow布局或控件来控制表格的行数
ableLayout继承自LinearLayout,因此它完全支持LinearLayout所支持的属性
TableLayout继承自LinearLayout,因此它完全支持LinearLayout所支持的属性
表格布局属性
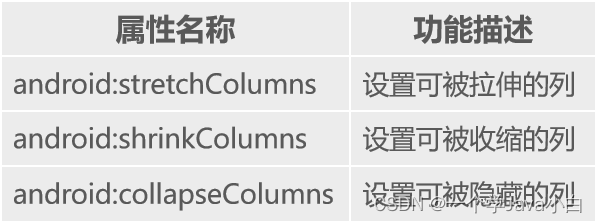
表格布局中控件的常用属性

<TableLayout xmlns:android="http://schemas.android.com/apk/res/android"
       属性 = "属性值">
       <TableRow>
             UI控件
       </TableRow>
        UI控件
        ......
</TableLayout>
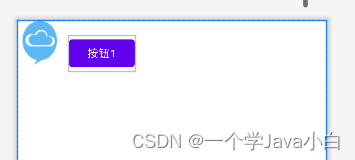
FrameLayout 帧布局
用于在屏幕上创建一块空白区域

<FrameLayout
    xmlns:android="http://schemas.android.com/apk/res/android"
    android:layout_width="match_parent"
    android:layout_height="match_parent"
    android:padding="20dp"
    android:foreground="@drawable/clound"
    android:foregroundGravity="clip_horizontal"
    >
<Button
    android:layout_width="wrap_content"
    android:layout_height="wrap_content"
    android:layout_marginLeft="@android:dimen/app_icon_size"
    android:text="按钮1"></Button>

</FrameLayout >
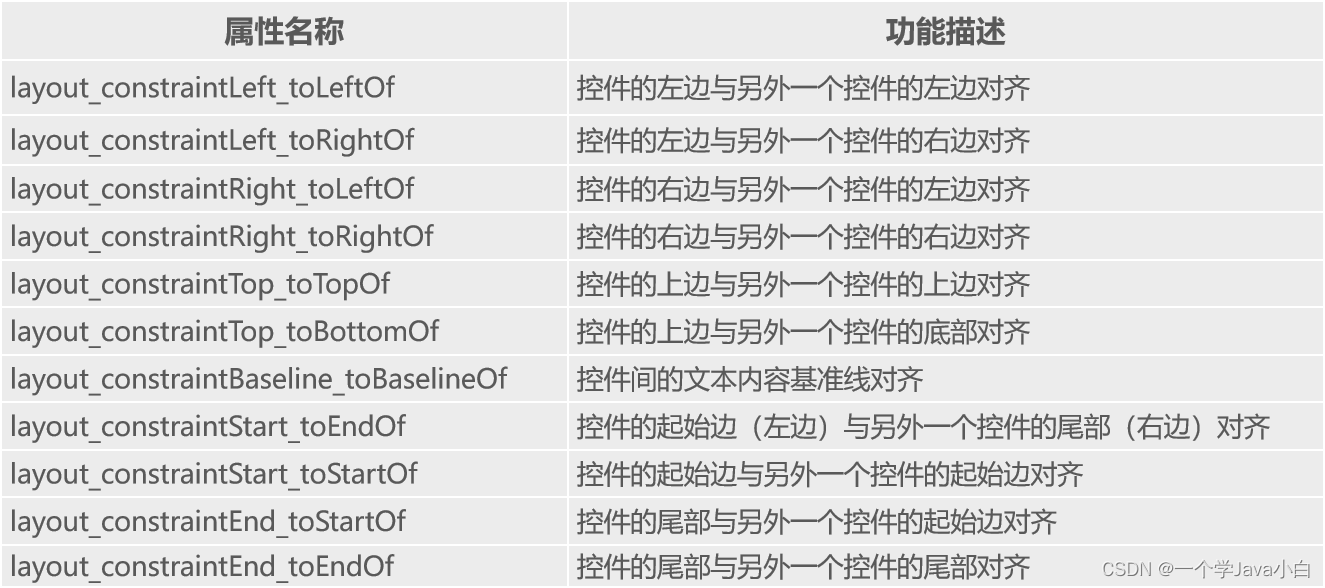
ConstraintLayout(约束布局)
适合使用可视化的方式编写界面布局
相对定位

第3章 Android常见界面控件
简单控件的使用
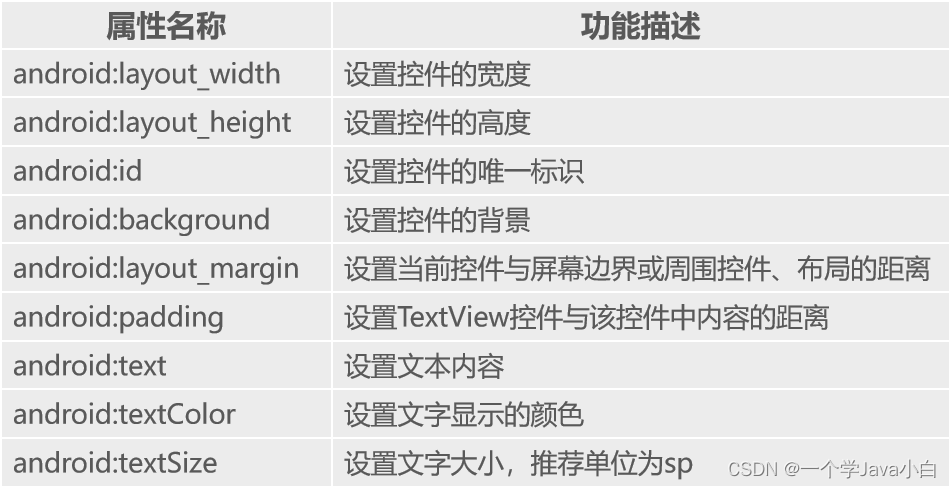
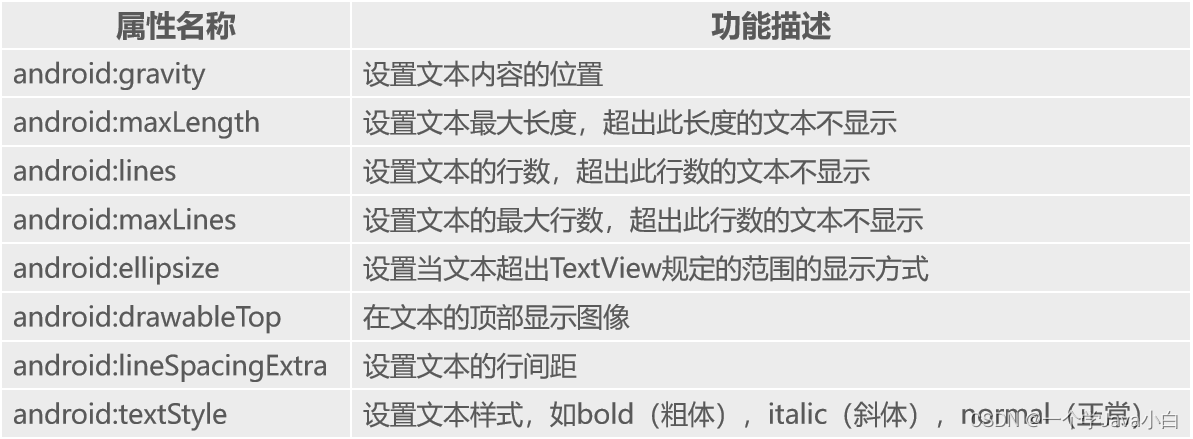
TextView
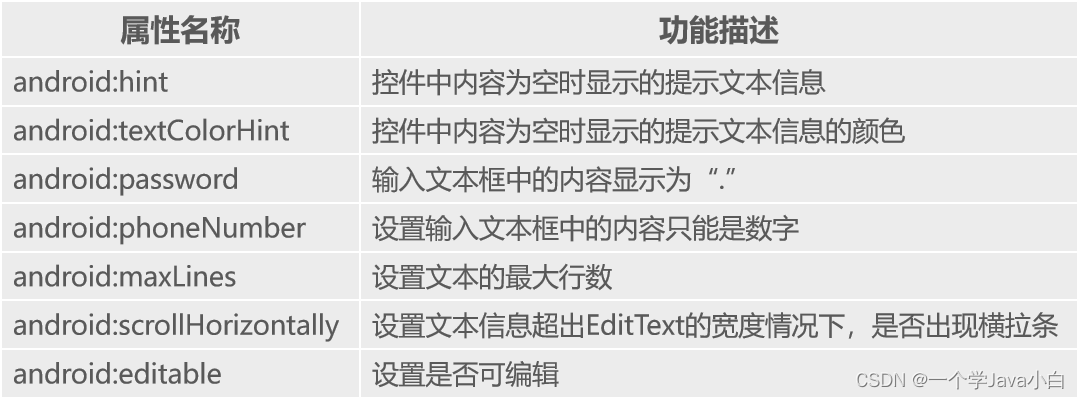
EditText
用于显示编辑框,它是TextView的子类,用户可在此控件中输入信息
Button
表示按钮,它继承自TextView控件,既可以显示文本,又可以显示图片,同时也允许用户通过点击来执行操作
Button控件设置点击事件的方式有三种
通过在布局文件中指定onClick属性的方式设置Button控件的点击事件
<Button
     ......
     android:onClick="click" />
通过使用匿名内部类的方式设置Button控件的点击事件
btn.setOnClickListener(new View.OnClickListener() {
     @Override
     public void onClick(View view) {
          //实现点击事件的代码
     }
});
(3)通过将Activity实现OnClickListener接口的方式设置Button控件的点击事件
public class Activity extends AppCompatActivity implements View.OnClickListener{
     @Override
     protected void onCreate(Bundle savedInstanceState) {
          ......
         btn.setOnClickListener(this);                            // 设置Button控件的点击监听事件
     }
     @Override
     public void onClick(View view) {
          // 实现点击事件的代码
     }
}
界面上Button控件较少:前两种方式;
界面上Button控件较多:第三种方式实现控件的点击事件。
ImageView
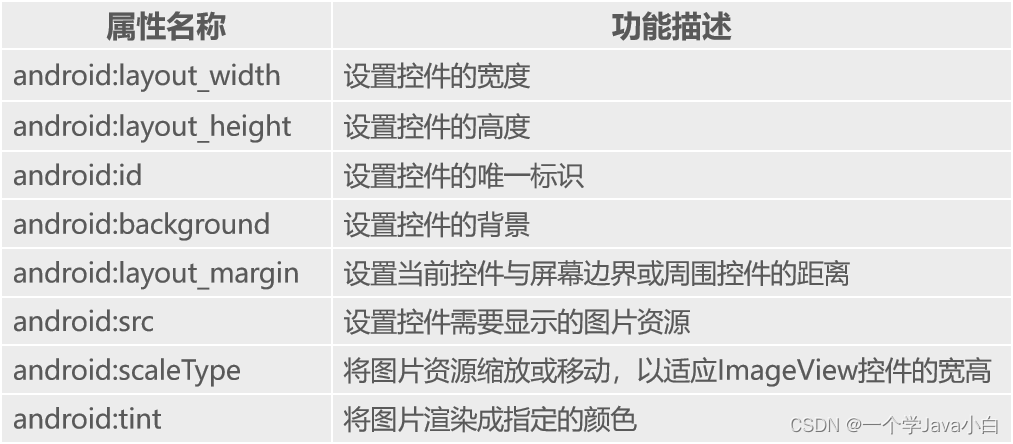
表示图片,它继承自View,可以加载各种图片资源。
RadioButton 单选按钮
表示单选按钮,它是Button的子类。每一个单选按钮都有“选中”和“未选中”两种状态,这两种状态是通过android:checked属性指定的
<RadioGroup
         android:属性名称 ="属性值"
         ......>
	<RadioButton
	       android:属性名称 ="属性值"
                         ...... />
         ......
<RadioGroup/>
CheckBox 复选框
复选框,它是Button的子类,用于实现多选功能。每一个复选框都有“选中”和“未选中”两种状态,这两种状态是通过android:checked属性指定的
Toast 提示信息
轻量级信息提醒机制,用于向用户提示即时消息,它显示在应用程序界面的最上层,显示一段时间后自动消失不会打断当前操作,也不获得焦点
Toast.makeText(Context,Text,Time).show();
关于makeText()方法中参数的相关介绍具体如下:
- Context:表示应用程序环境的信息,即当前组件的上下文环境。
- Text:表示提示的字符串信息。
- Time:表示显示信息的时长,其属性值包括Toast.LENGTH_SHORT和Toast.LENGTH_LONG,分别表示显示较短时间和较长时间。
Toast.makeText(MainActivity.this, "WIFI已断开", Toast.LENGTH_SHORT).show();
列表控件的使用 ListView控件或RecyclerView
ListView
以列表的形式展示数据内容,并且能够根据列表的高度自适应屏幕显示。

<?xml version="1.0" encoding="utf-8"?>
<RelativeLayout
        ......>
       <ListView
            android:id="@+id/lv_list"
            android:layout_width="match_parent"
            android:layout_height="match_parent"
            android:listSelector="#fefefefe"
            android:scrollbars="none">
       </ListView>
</RelativeLayout>
Adapter
数据适配器是数据与视图之间的桥梁,将复杂的数据转换成用户可以接受的方式进行呈现。
- BaseAdapter:基本的适配器
- SimpleAdapter:继承自BaseAdapter(Map)
- ArrayAdapter:也是BaseAdapter的子类(数组)
1、BaseAdapter
BaseAdapter,顾名思义,是基本的适配器。它实际上是一个抽象类,通常在自定义适配器时会继承BaseAdapter,该类拥有四个抽象方法,根据这几个抽象方法对ListView控件进行数据适配。BaseAdapter中的4个抽象方法如下表所示。

2、SimpleAdapter
  public SimpleAdapter(Context context, List<? extends Map<String, ?>> data,int resource,
  String[] from, int[] to);

protected void onCreate(Bundle savedInstanceState) {
        super.onCreate(savedInstanceState);
        setContentView(R.layout.activity_main);

        ListView listView = findViewById(R.id.listView);
        List<Map<String, String>> data = new ArrayList<>();

        HashMap<String, String> item1 = new HashMap<>();
        item1.put("city", "北京");
        item1.put("population", "2154万");
        data.add(item1);

        HashMap<String, String> item2 = new HashMap<>();
        item2.put("city", "上海");
        item2.put("population", "2424万");
        data.add(item2);

        String[] from = {"city", "population"};
        int[] to = {R.id.text1, R.id.text2};

        SimpleAdapter adapter = new SimpleAdapter(
                this,
                data,
                R.layout.custom_list_item,
                from,
                to);

        listView.setAdapter(adapter);
    }
在SimpleAdapter()构造方法中的五个参数的含义如下:
- context:表示上下文对象。
- data:数据集合,data中的每一项对应ListView控件中的条目数据。
- resource:条目布局的资源id。
- from:Map集合中的key值。
- to:条目布局中对应的控件。
3、ArrayAdapter
   public ArrayAdapter(Context context,int resource,int textViewResourceId, List<T> objects);
   ArrayAdapter<String> adapter = new ArrayAdapter<>(
                this,
                android.R.layout.simple_list_item_1,
                cities);
RecyclerView
RecyclerView比ListView更加强大
自定义View
出现不满足需求的情况。此时我们可以通过自定义View的方式实现。
public class Customview extends View{
       public Customview(Context context) {
            super(context);
       }
       public Customview(Context context, AttributeSet attrs) {
            super(context, attrs);
       }
}
自定义View的3种方法
- onMeasure():用于测量尺寸
- onDraw() 绘制图像
- onLayout(): 指定布局中子控件的位置
第4章 程序活动单元Activity
四种主要的应用组件,它们的中文名称分别是:
Activity - 活动
Service - 服务
ContentProvider - 内容提供者
BroadcastReceiver - 广播接收器
Activity是一个负责与用户交互的组件,每个Android应用中都会用Activity来显示界面以及处理界面上一些控件的事件
Activity生命周期的作用
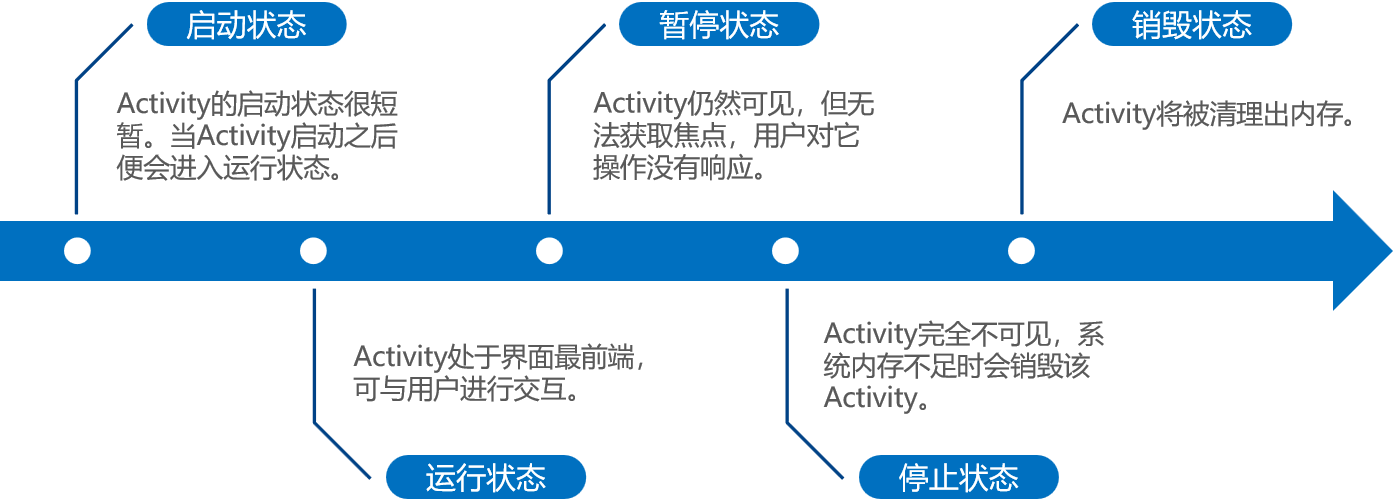
启动状态、运行状态、暂停状态、停止状态和销毁状态
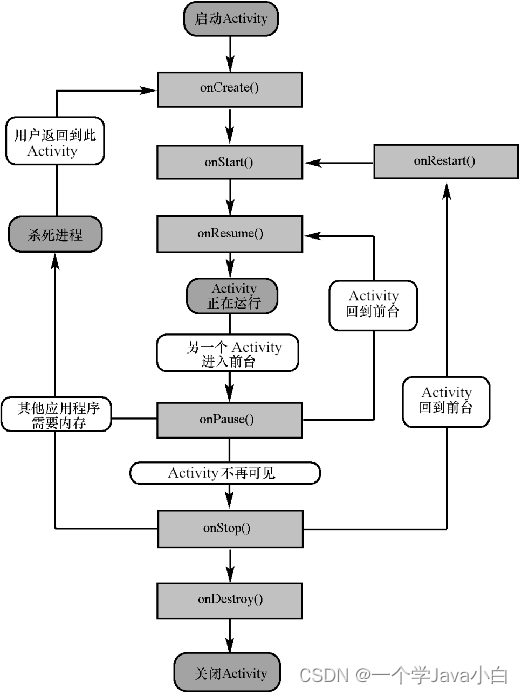
(1)onCreate():Activity创建时调用,通常做一些初始化设置。
(2)onStart():Activity即将可见时调用。
(3)onResume():Activity获取焦点时调用。
(4)onPause():当前Activity被其他Activity覆盖或屏幕锁屏时调用。
(5)onStop():Activity对用户不可见时调用。
(6)onRestart():Activity从停止状态到再次启动时调用。
(7)onDestroy():Activity销毁时调用。
Activity的创建、配置、启动和关闭的方式
创建activity
第一种:New”à“Activity”à“Empty Activity”选项,创建Activity

第二种:New”à“Java class”选项,创建一个SecondActivity类,然后将该类继承AppCompatActivity。
第二种方式创建的Activity需要手动在清单文件中配置创建的Activity。
在AndroidManifest.xml文件的标签中配置SecondActivity
<activity android:name=".SecondActivity" />
Activity的启动和关闭方式
启动
//希望从当前的 MainActivity 跳转到 SecondActivity
Intent intent = new Intent(MainActivity.this,SecondActivity.class);//Intent 是 Android 中用于各个组件之间进行交互的一个重要类
//启动 Activity
startActivity(intent);
Intent和IntentFilter的用法
Activity之间的跳转与数据传递
任务栈和启动模式 Activity的任务栈和四种启动模
Fragment的使用


