Hyper-SD: diffusion实时出图,一步搞定,字节出品
先看效果
Real-Time Generation Demo of Hyper-SD.
Abstract
近来,一系列面向扩散模型(Diffusion Models,DM)的迭代紧凑式传播推断算法陆续出现,以解决其中的复杂性问题。目前,这些算法常常将方法分为两类:一是保持 ODE 流形连续性;二是重写 ODE 流形。然而,这两种方法在压缩后的执行效果中存在显著问题。因此,我们提出了 Hyper-SD 框架,通过有机结合以上两类算法的优点,并将其应用于压缩后模型的学习,从而实现高质量执行。此外,我们引入了人工反馈学习,以提高在低步长情况下的表现和改进该过程中可能发生的损失。同时还使用了分数学习来进一步改善模型在低步长情况下的输出效果。最后我们采用统一 LoRA 框架,将其应用于所有执行过程中的所有步骤。实际上,在不同步长下测试时,Hyper-SDXL 模型都超越了 SDXL-Lightning,并且其在 CLIP Score 和 Aes Score 方面分别提高了 +0.68 以及 +0.51。
Pipeline
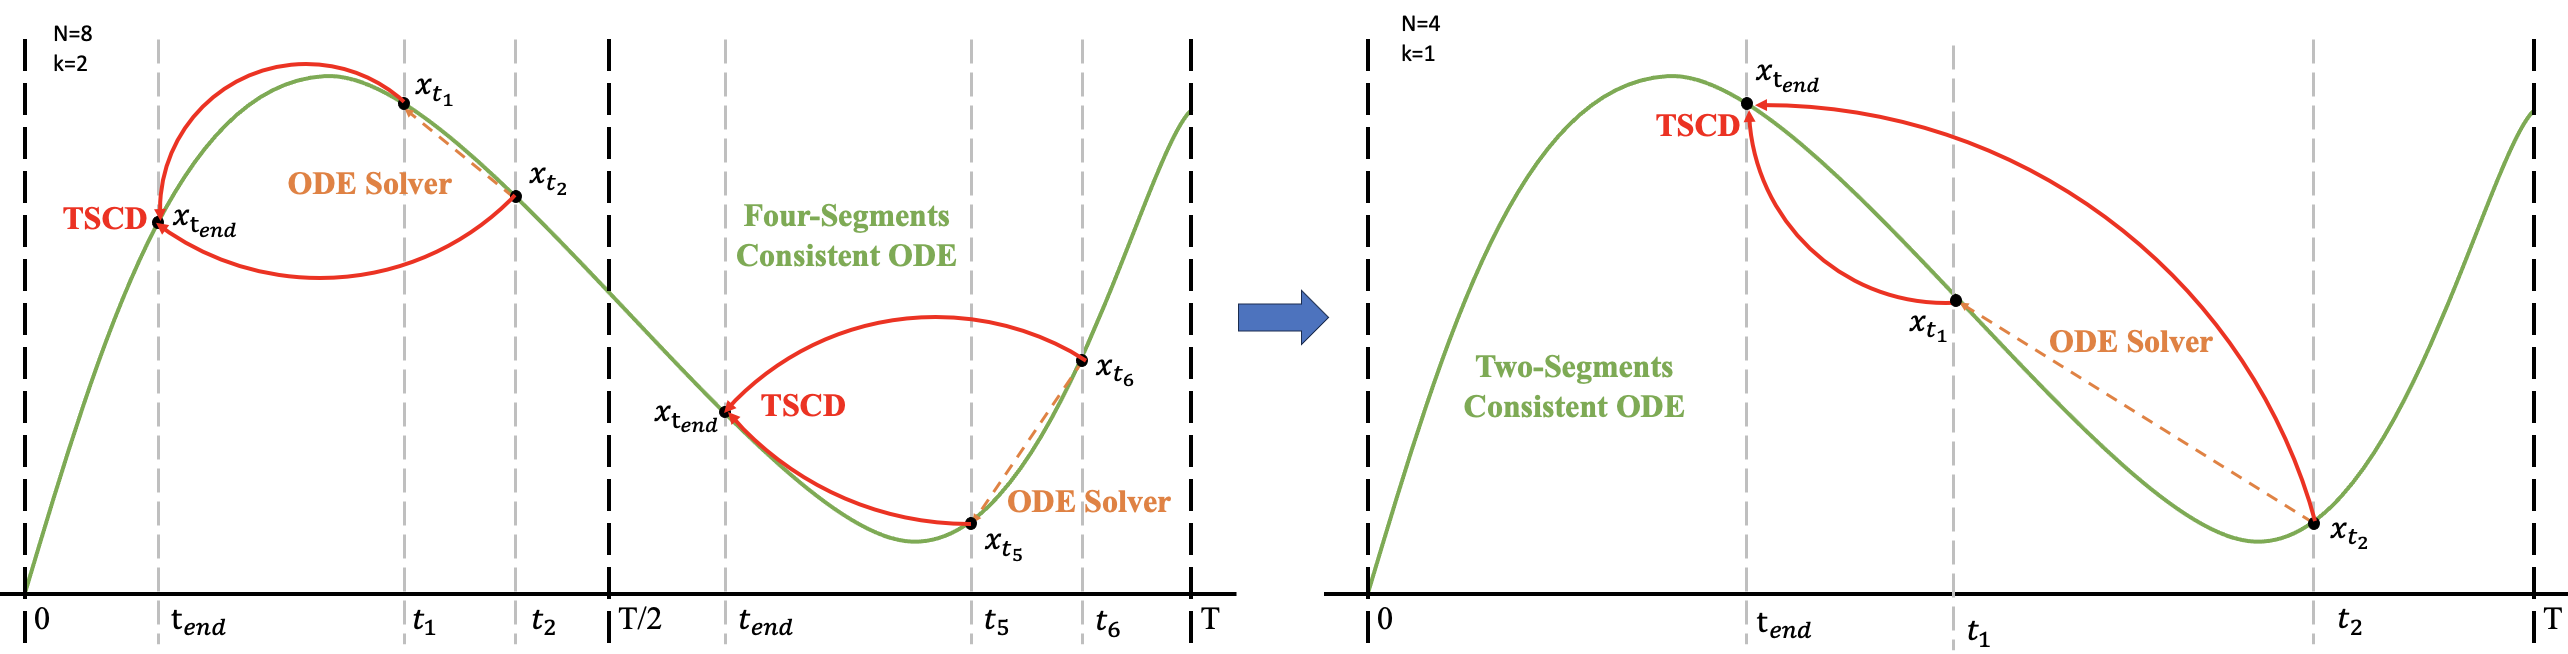
超声速降维算法以两阶段进行连续性极化过程,首先在时间段[0,T/2]和[T/2,T]上分别对其进行二阶段连续性极化过程,得到两个连续性方程,之后将这些连续性方程作为训练全局连续性模型的输入
Experiment
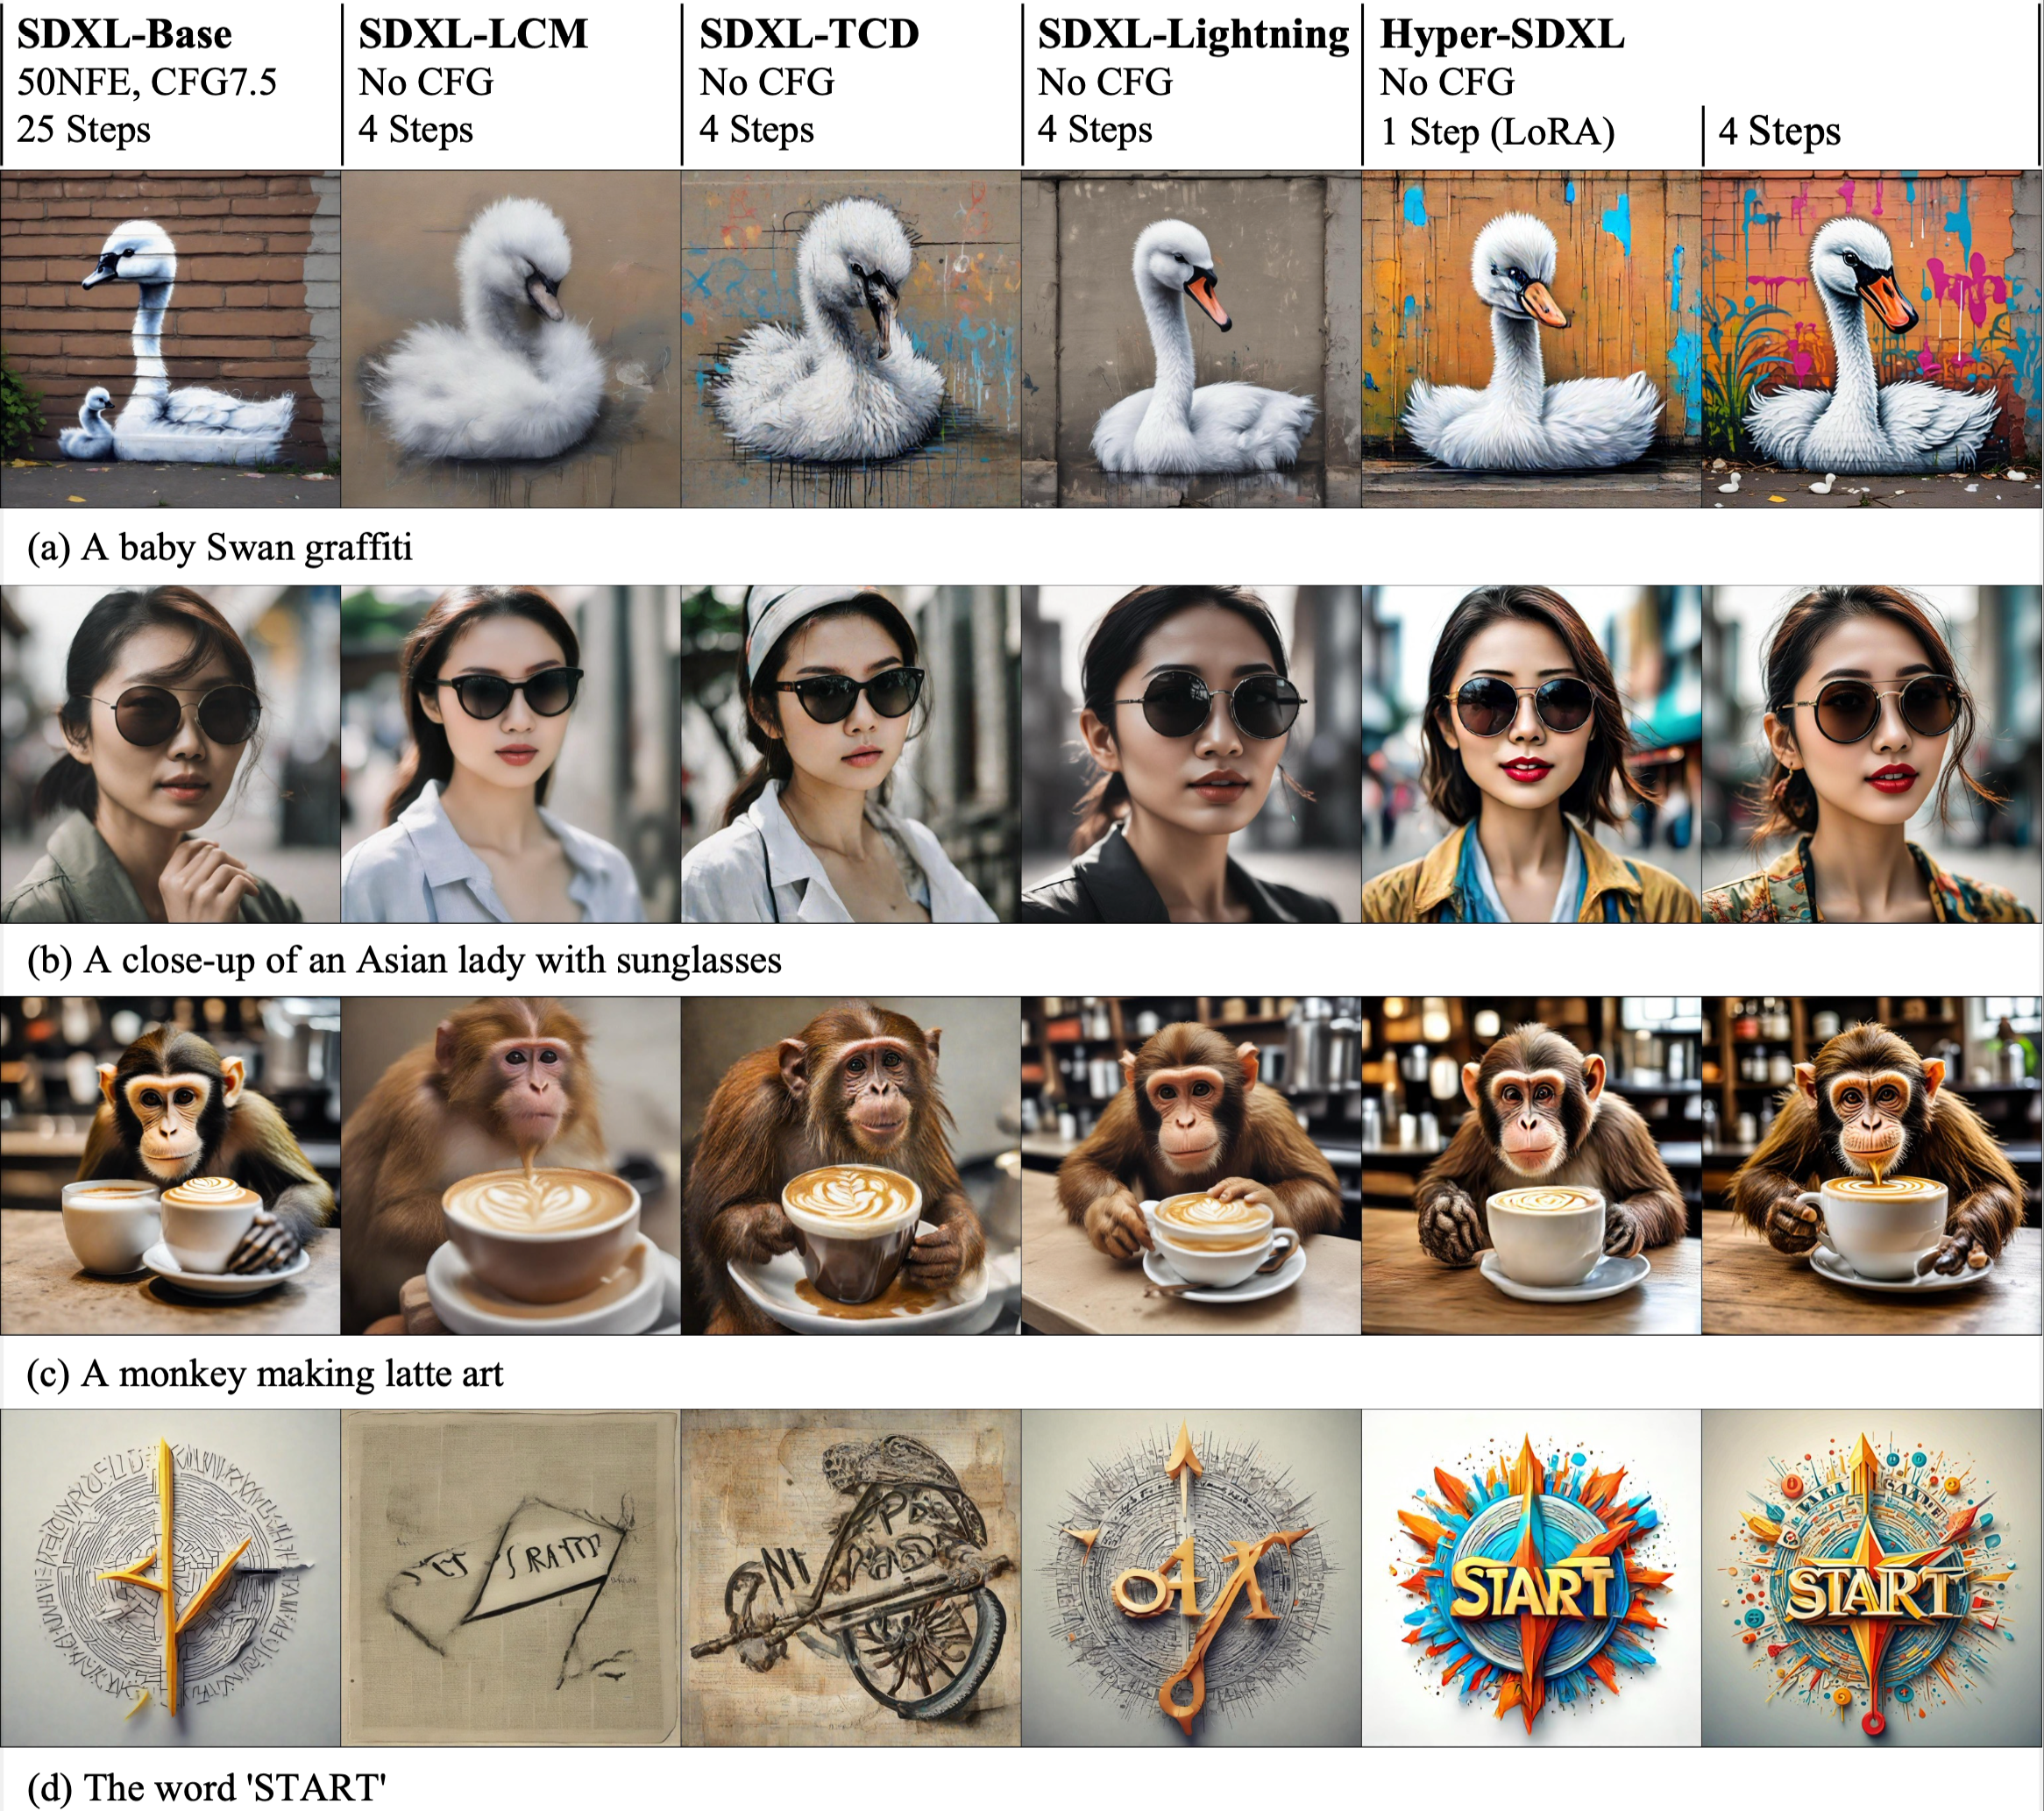
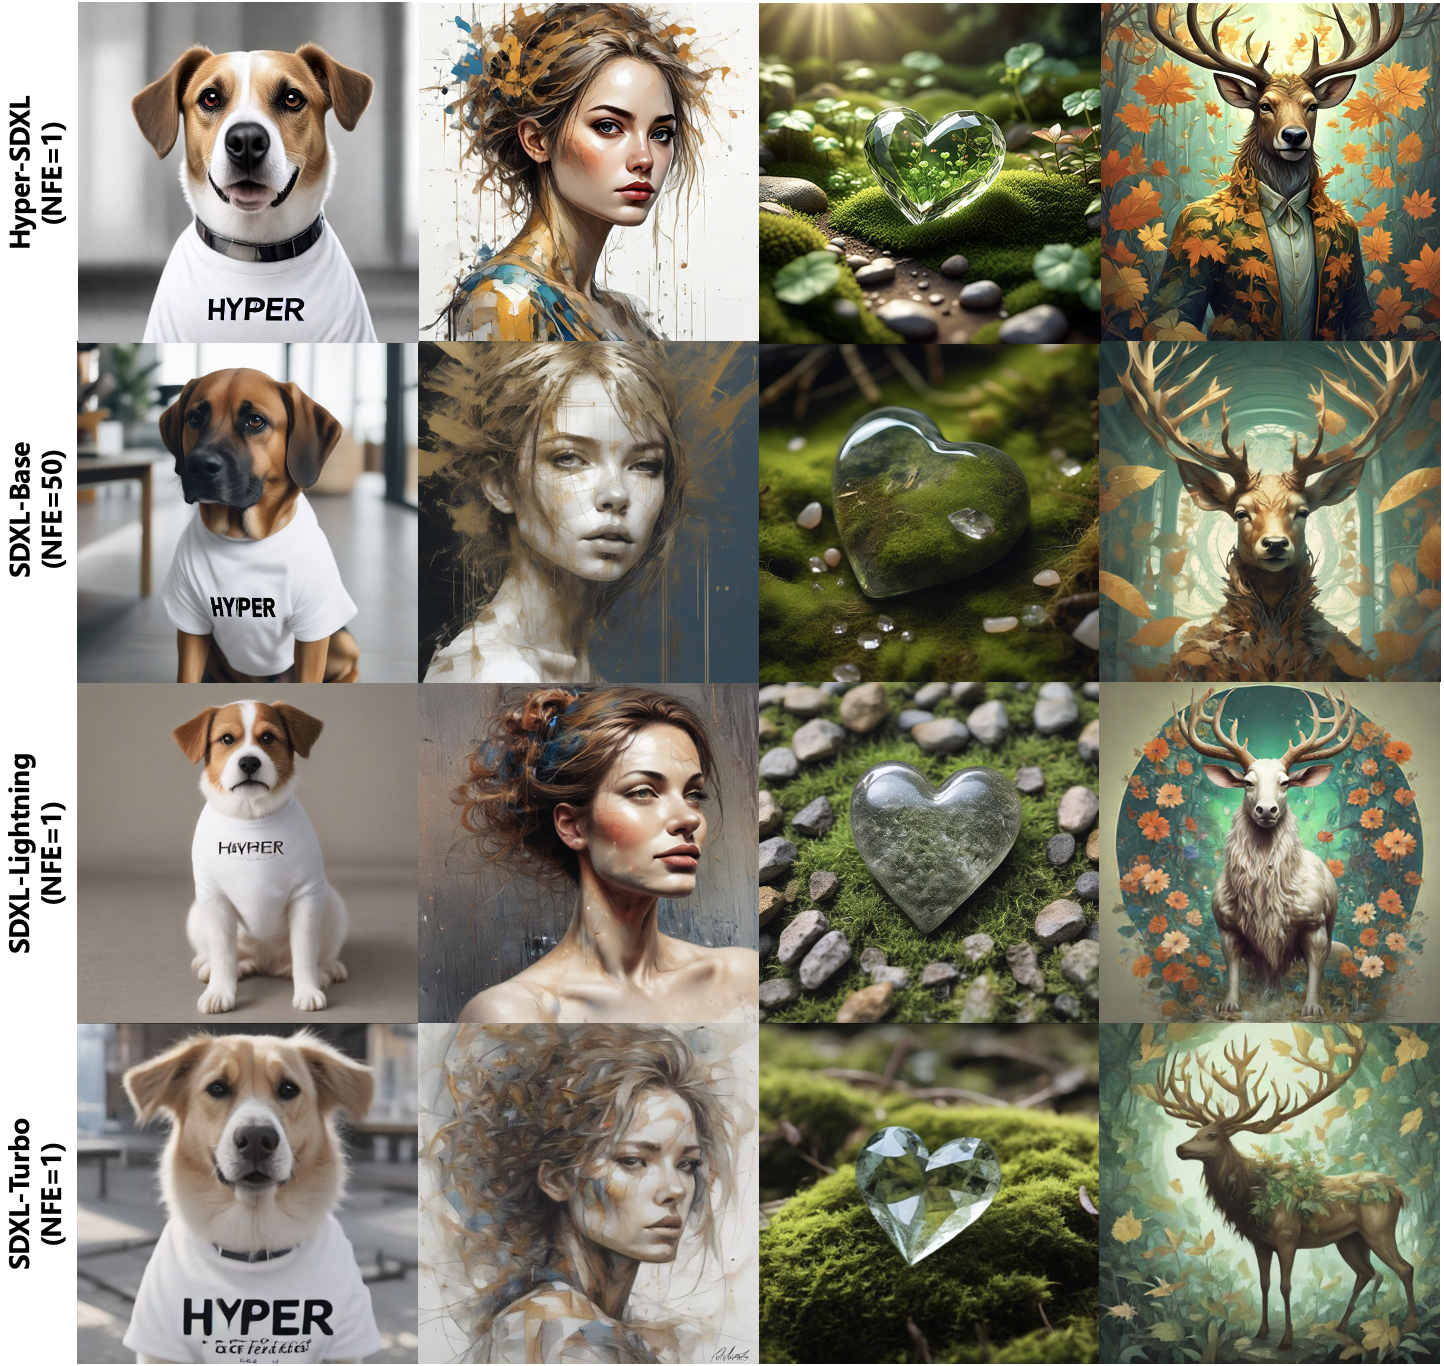
对于基于LoRA的Hyper-SD和其他SDXL架构优化方法进行量化比较。
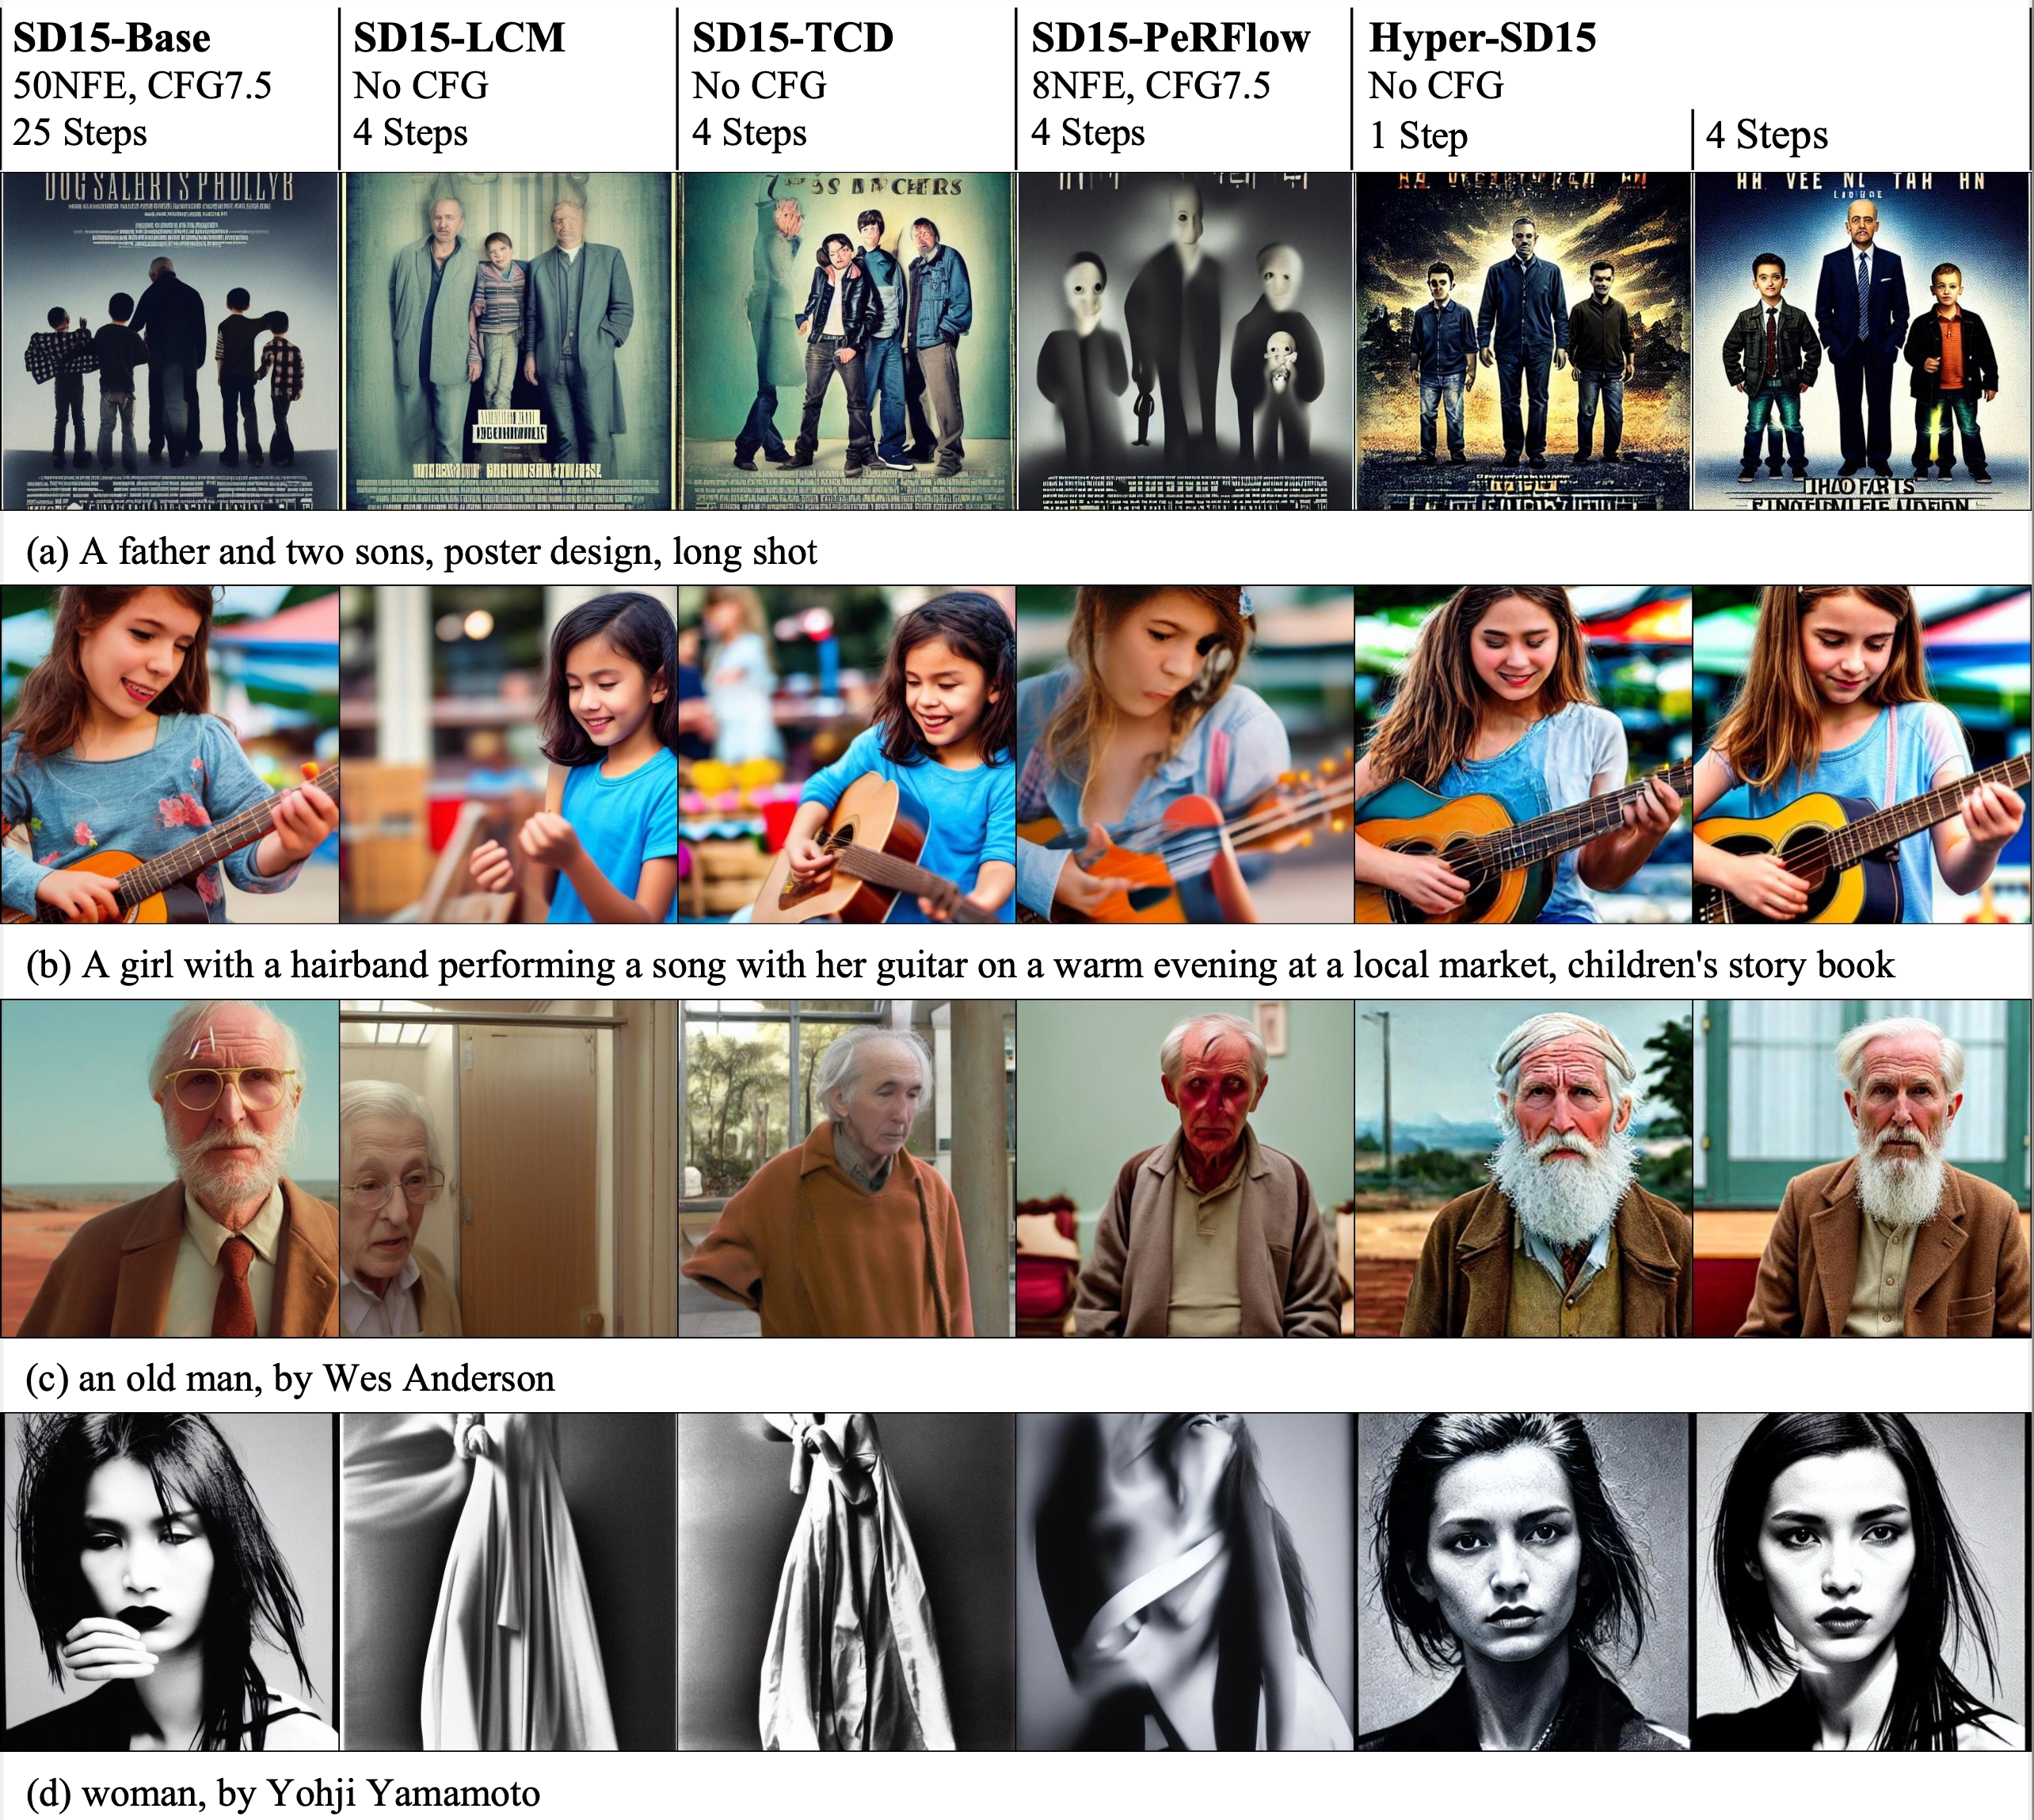
对于 Hyper-SD和其他基于LoRA的加速器架构,包括SD15架构进行了性能比较。
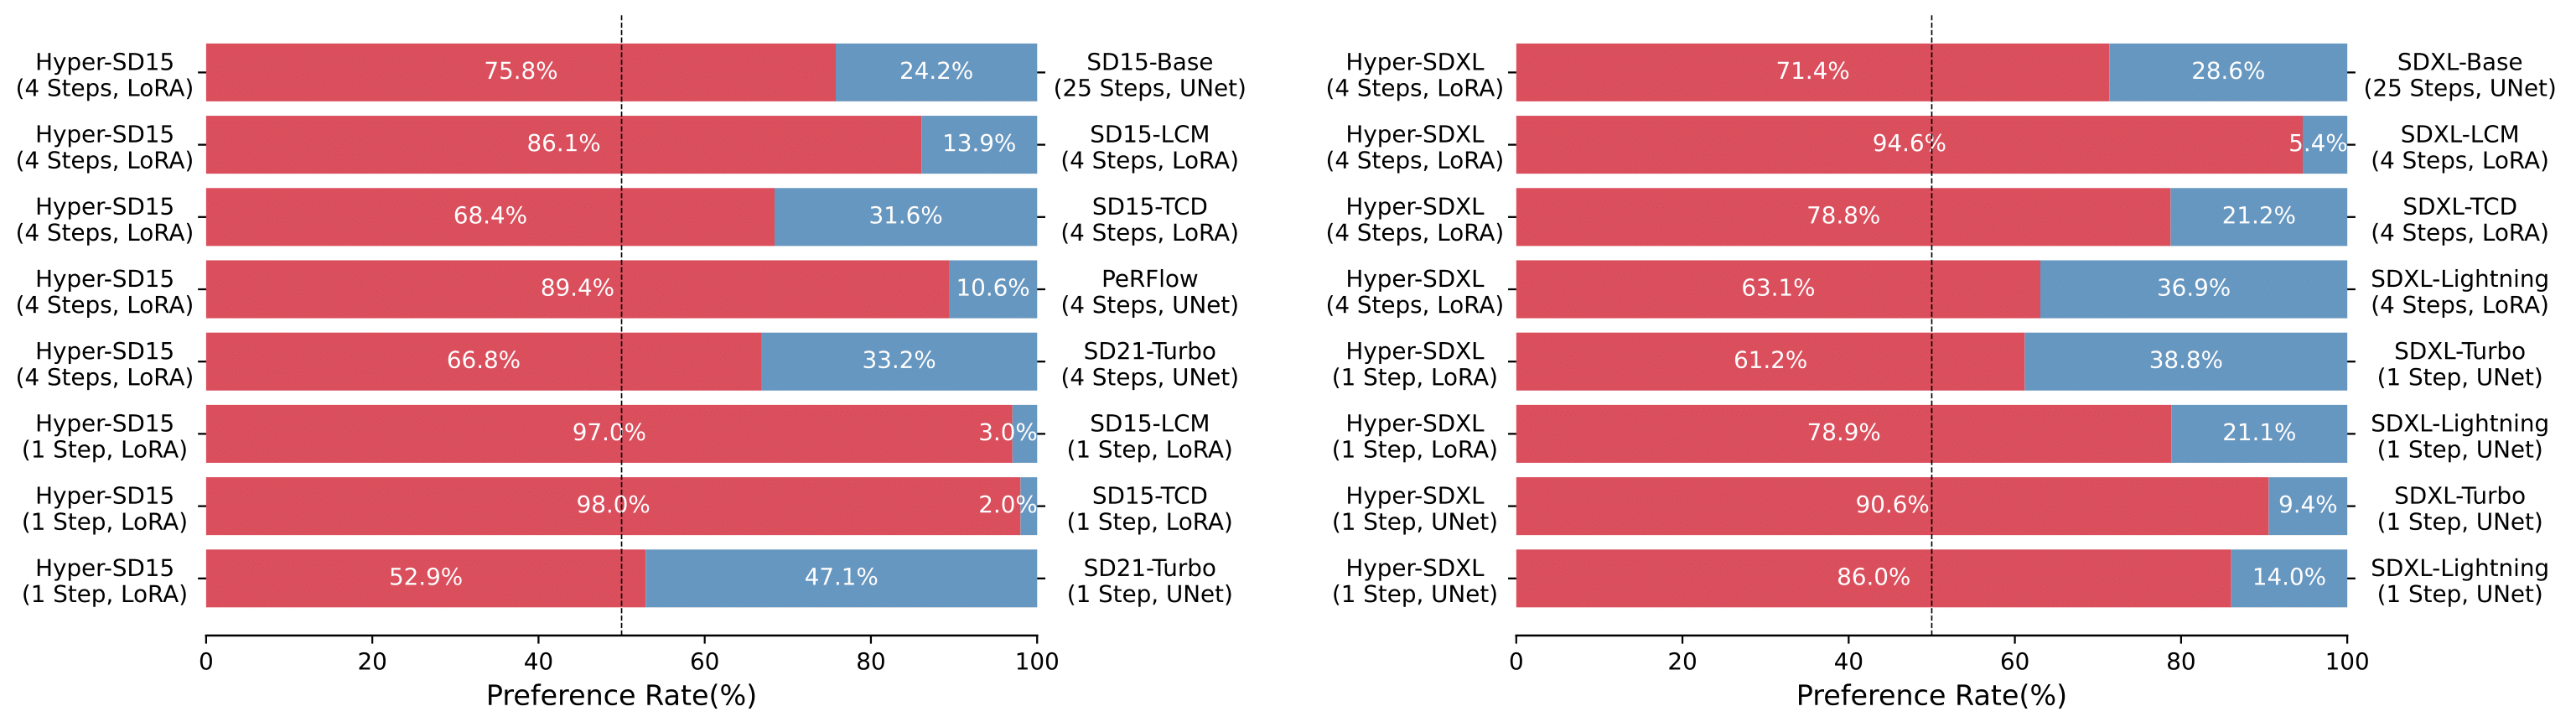
Hyper-SD 比现有优先考虑加速器的方法拥有显著的优势,并在 SD1.5 和 SDXL 架构上得到了更多用户的青睐。

不同尺度的超透明LoRa在应用于不同基础模型时可以产生高质量图像,其步长也是相应变化的。
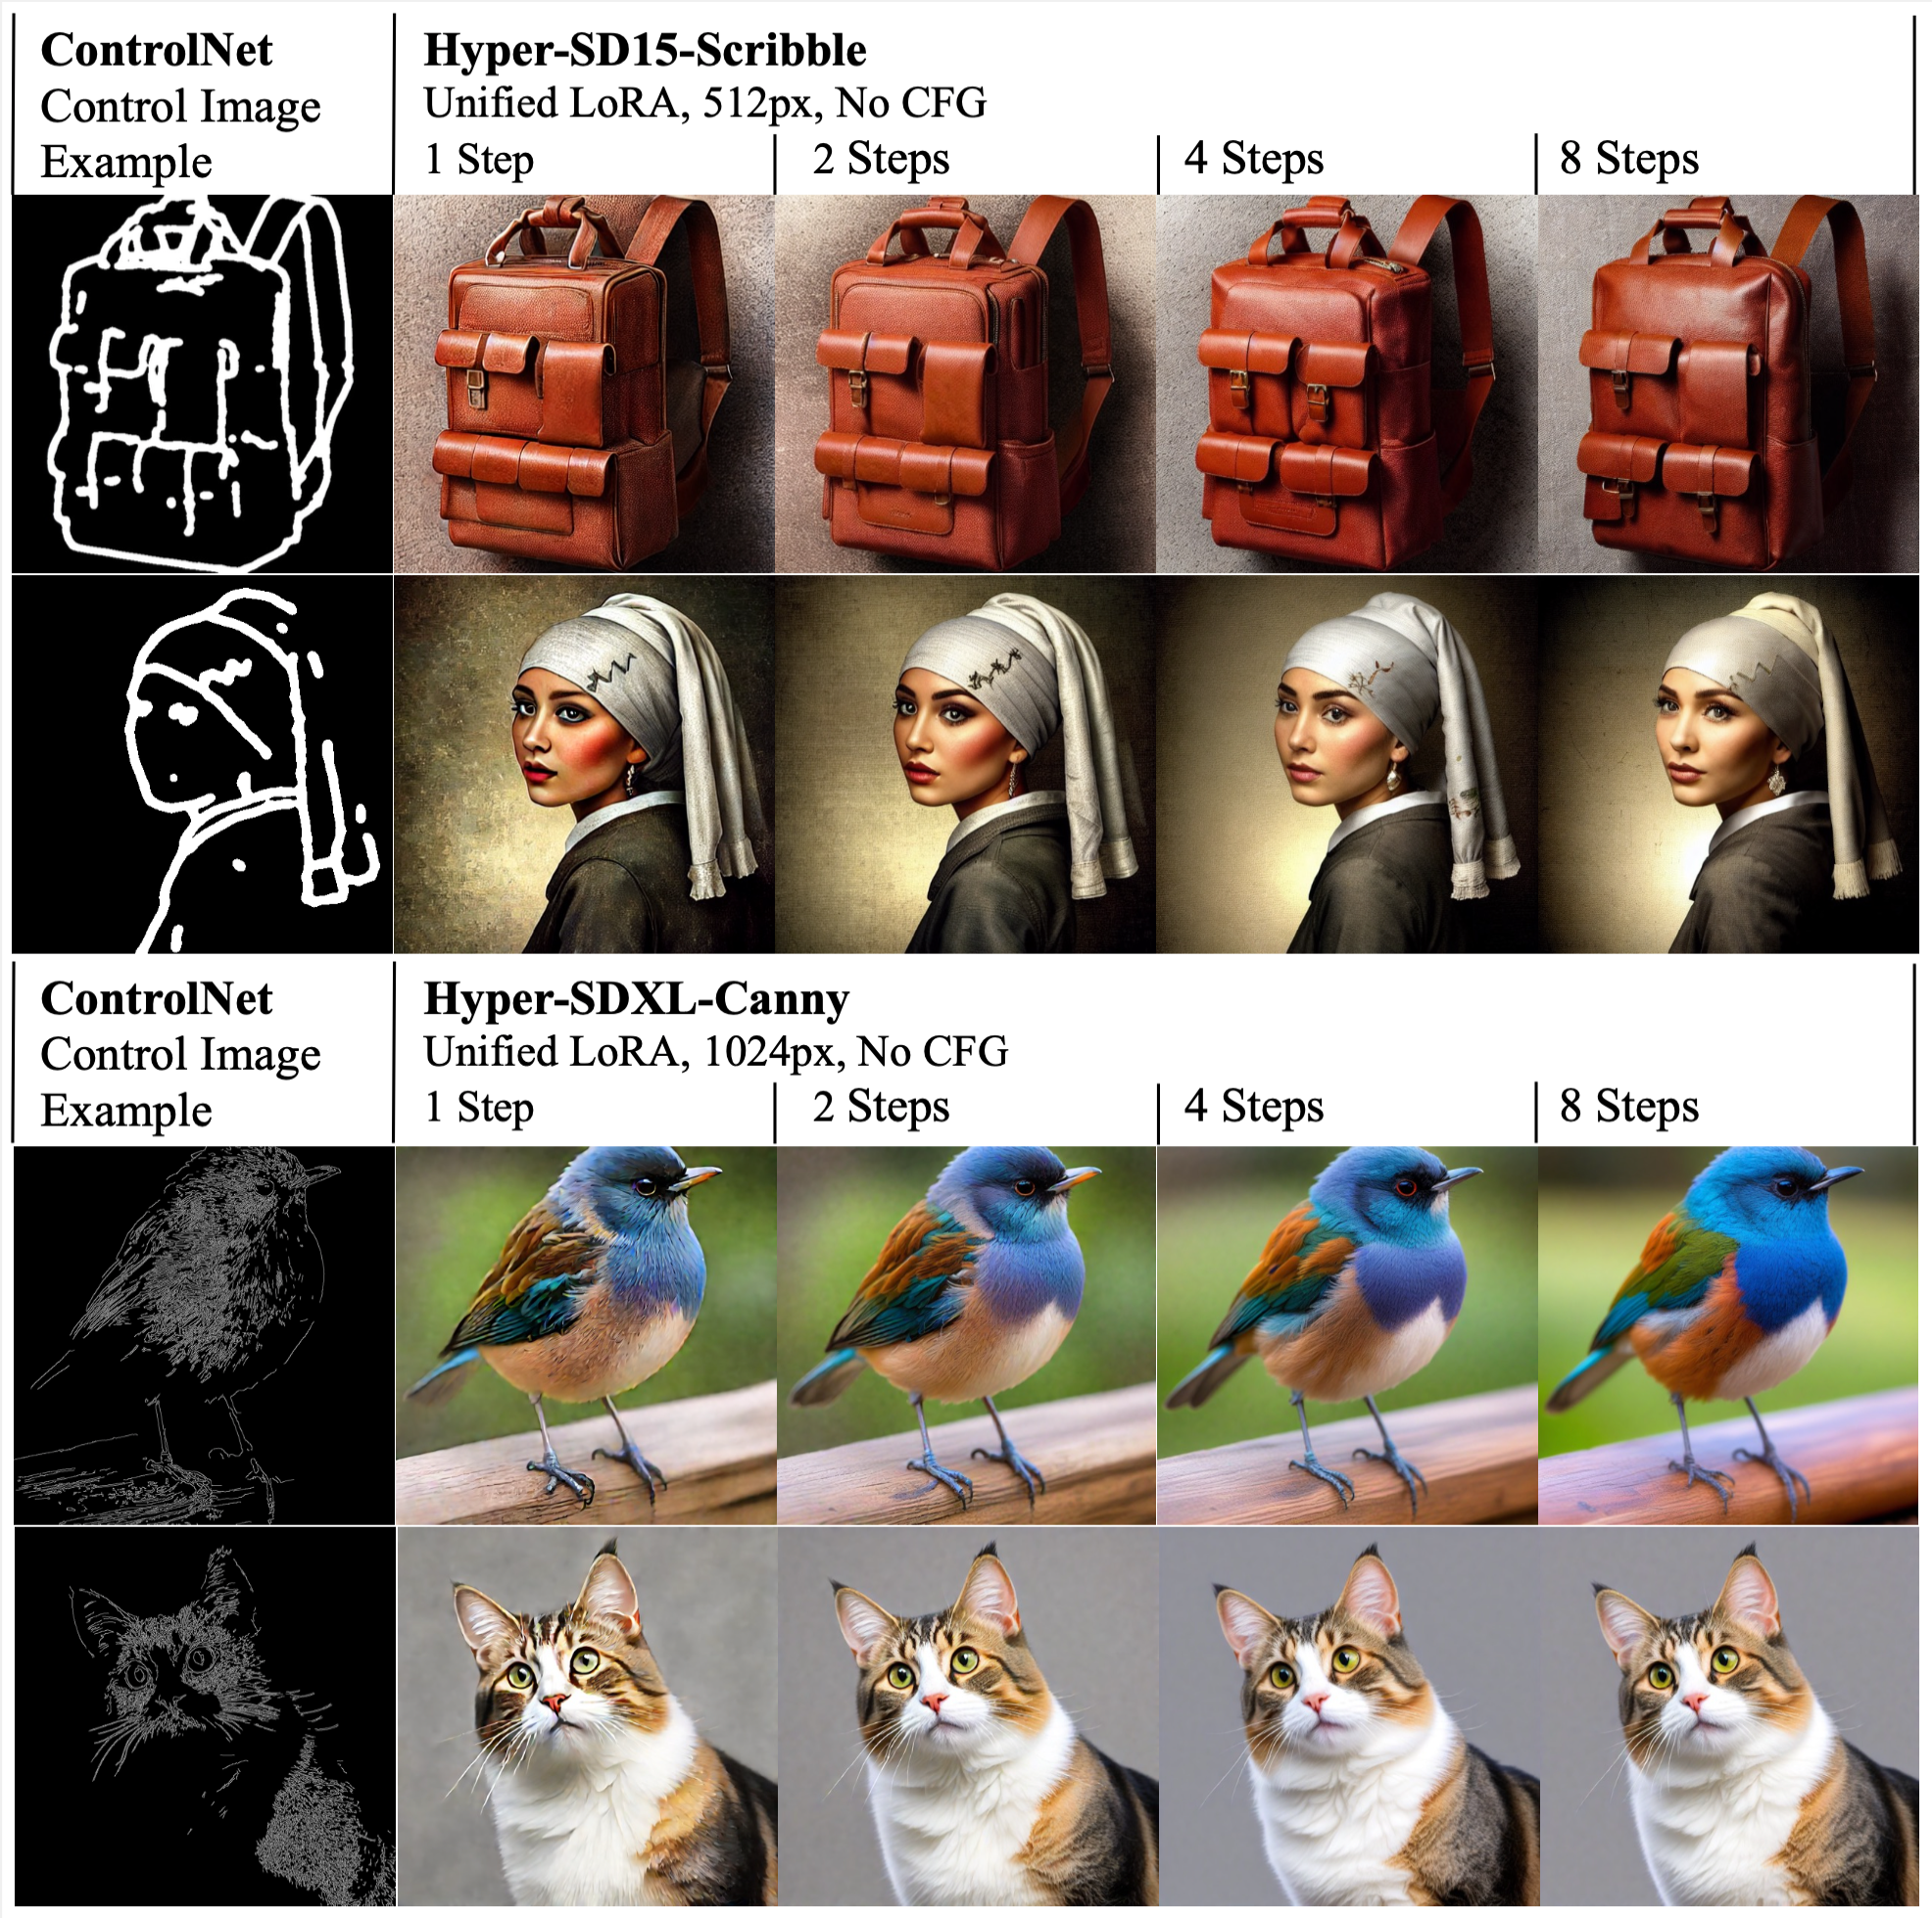
超宽频LoRA通信模式在超高速数字化(Hyper-SD)中的统一应用,与控制网络相容。例子是基于批荡或画笔图像进行的条件性分叉。
权重文件
Hyper-SDXL-Nstep-lora.safetensors: Lora checkpoint, for SDXL-related models.
Hyper-SD15-Nstep-lora.safetensors: Lora checkpoint, for SD1.5-related models.
Hyper-SDXL-1step-unet.safetensors: Unet checkpoint distilled from SDXL-Base.
文生图模式
SDXL-related models
2-Steps, 4-Steps, 8-steps LoRA
使用 2-steps LoRA, 可自行设置其他LoRA.
import torch
from diffusers import DiffusionPipeline, DDIMScheduler
from huggingface_hub import hf_hub_download
base_model_id = "stabilityai/stable-diffusion-xl-base-1.0"
repo_name = "ByteDance/Hyper-SD"
# Take 2-steps lora as an example
ckpt_name = "Hyper-SDXL-2steps-lora.safetensors"
# Load model.
pipe = DiffusionPipeline.from_pretrained(base_model_id, torch_dtype=torch.float16, variant="fp16").to("cuda")
pipe.load_lora_weights(hf_hub_download(repo_name, ckpt_name))
pipe.fuse_lora()
# Ensure ddim scheduler timestep spacing set as trailing !!!
pipe.scheduler = DDIMScheduler.from_config(pipe.scheduler.config, timestep_spacing="trailing")
# lower eta results in more detail
prompt="a photo of a cat"
image=pipe(prompt=prompt, num_inference_steps=2, guidance_scale=0).images[0]
Unified LoRA (support 1 to 8 steps inference)
可以灵活调整推理步数 以及 eta value 达到最佳效果.
import torch
from diffusers import DiffusionPipeline, TCDScheduler
from huggingface_hub import hf_hub_download
base_model_id = "stabilityai/stable-diffusion-xl-base-1.0"
repo_name = "ByteDance/Hyper-SD"
ckpt_name = "Hyper-SDXL-1step-lora.safetensors"
# Load model.
pipe = DiffusionPipeline.from_pretrained(base_model_id, torch_dtype=torch.float16, variant="fp16").to("cuda")
pipe.load_lora_weights(hf_hub_download(repo_name, ckpt_name))
pipe.fuse_lora()
# Use TCD scheduler to achieve better image quality
pipe.scheduler = TCDScheduler.from_config(pipe.scheduler.config)
# Lower eta results in more detail for multi-steps inference
eta=1.0
prompt="a photo of a cat"
image=pipe(prompt=prompt, num_inference_steps=1, guidance_scale=0, eta=eta).images[0]
1-step SDXL Unet
单步推理.
import torch
from diffusers import DiffusionPipeline, UNet2DConditionModel, LCMScheduler
from huggingface_hub import hf_hub_download
from safetensors.torch import load_file
base_model_id = "stabilityai/stable-diffusion-xl-base-1.0"
repo_name = "ByteDance/Hyper-SD"
ckpt_name = "Hyper-SDXL-1step-Unet.safetensors"
# Load model.
unet = UNet2DConditionModel.from_config(base_model_id, subfolder="unet").to("cuda", torch.float16)
unet.load_state_dict(load_file(hf_hub_download(repo_name, ckpt_name), device="cuda"))
pipe = DiffusionPipeline.from_pretrained(base_model_id, unet=unet, torch_dtype=torch.float16, variant="fp16").to("cuda")
# Use LCM scheduler instead of ddim scheduler to support specific timestep number inputs
pipe.scheduler = LCMScheduler.from_config(pipe.scheduler.config)
# Set start timesteps to 800 in the one-step inference to get better results
prompt="a photo of a cat"
image=pipe(prompt=prompt, num_inference_steps=1, guidance_scale=0, timesteps=[800]).images[0]
SD1.5-related models
2-Steps, 4-Steps, 8-steps LoRA
使用 2-steps LoRA
import torch
from diffusers import DiffusionPipeline, DDIMScheduler
from huggingface_hub import hf_hub_download
base_model_id = "runwayml/stable-diffusion-v1-5"
repo_name = "ByteDance/Hyper-SD"
# Take 2-steps lora as an example
ckpt_name = "Hyper-SD15-2steps-lora.safetensors"
# Load model.
pipe = DiffusionPipeline.from_pretrained(base_model_id, torch_dtype=torch.float16, variant="fp16").to("cuda")
pipe.load_lora_weights(hf_hub_download(repo_name, ckpt_name))
pipe.fuse_lora()
# Ensure ddim scheduler timestep spacing set as trailing !!!
pipe.scheduler = DDIMScheduler.from_config(pipe.scheduler.config, timestep_spacing="trailing")
prompt="a photo of a cat"
image=pipe(prompt=prompt, num_inference_steps=2, guidance_scale=0).images[0]
Unified LoRA (support 1 to 8 steps inference)
可以灵活调整推理步数 以及 eta value 达到最佳效果.
import torch
from diffusers import DiffusionPipeline, TCDScheduler
from huggingface_hub import hf_hub_download
base_model_id = "runwayml/stable-diffusion-v1-5"
repo_name = "ByteDance/Hyper-SD"
ckpt_name = "Hyper-SD15-1step-lora.safetensors"
# Load model.
pipe = DiffusionPipeline.from_pretrained(base_model_id, torch_dtype=torch.float16, variant="fp16").to("cuda")
pipe.load_lora_weights(hf_hub_download(repo_name, ckpt_name))
pipe.fuse_lora()
# Use TCD scheduler to achieve better image quality
pipe.scheduler = TCDScheduler.from_config(pipe.scheduler.config)
# Lower eta results in more detail for multi-steps inference
eta=1.0
prompt="a photo of a cat"
image=pipe(prompt=prompt, num_inference_steps=1, guidance_scale=0, eta=eta).images[0]
ControlNet 模式
SDXL-related models
2-Steps, 4-Steps, 8-steps LoRA
使用 Canny Controlnet 以及 2-steps 推理:
import torch
from diffusers.utils import load_image
import numpy as np
import cv2
from PIL import Image
from diffusers import ControlNetModel, StableDiffusionXLControlNetPipeline, AutoencoderKL, DDIMScheduler
from huggingface_hub import hf_hub_download

# Load original image
image = load_image("https://huggingface.co/datasets/hf-internal-testing/diffusers-images/resolve/main/sd_controlnet/hf-logo.png")
image = np.array(image)
# Prepare Canny Control Image
low_threshold = 100
high_threshold = 200
image = cv2.Canny(image, low_threshold, high_threshold)
image = image[:, :, None]
image = np.concatenate([image, image, image], axis=2)
control_image = Image.fromarray(image)
control_image.save("control.png")
control_weight = 0.5  # recommended for good generalization

# Initialize pipeline
controlnet = ControlNetModel.from_pretrained(
   "diffusers/controlnet-canny-sdxl-1.0",
   torch_dtype=torch.float16
)
vae = AutoencoderKL.from_pretrained("madebyollin/sdxl-vae-fp16-fix", torch_dtype=torch.float16)
pipe = StableDiffusionXLControlNetPipeline.from_pretrained("stabilityai/stable-diffusion-xl-base-1.0", controlnet=controlnet, vae=vae, torch_dtype=torch.float16).to("cuda")

pipe.load_lora_weights(hf_hub_download("ByteDance/Hyper-SD", "Hyper-SDXL-2steps-lora.safetensors"))
# Ensure ddim scheduler timestep spacing set as trailing !!!
pipe.scheduler = DDIMScheduler.from_config(pipe.scheduler.config, timestep_spacing="trailing")
pipe.fuse_lora()
image = pipe("A chocolate cookie", num_inference_steps=2, image=control_image, guidance_scale=0, controlnet_conditioning_scale=control_weight).images[0]
image.save('image_out.png')
Unified LoRA (support 1 to 8 steps inference)
使用 Canny Controlnet:
import torch
from diffusers.utils import load_image
import numpy as np
import cv2
from PIL import Image
from diffusers import ControlNetModel, StableDiffusionXLControlNetPipeline, AutoencoderKL, TCDScheduler
from huggingface_hub import hf_hub_download

# Load original image
image = load_image("https://huggingface.co/datasets/hf-internal-testing/diffusers-images/resolve/main/sd_controlnet/hf-logo.png")
image = np.array(image)
# Prepare Canny Control Image
low_threshold = 100
high_threshold = 200
image = cv2.Canny(image, low_threshold, high_threshold)
image = image[:, :, None]
image = np.concatenate([image, image, image], axis=2)
control_image = Image.fromarray(image)
control_image.save("control.png")
control_weight = 0.5  # recommended for good generalization

# Initialize pipeline
controlnet = ControlNetModel.from_pretrained(
   "diffusers/controlnet-canny-sdxl-1.0",
   torch_dtype=torch.float16
)
vae = AutoencoderKL.from_pretrained("madebyollin/sdxl-vae-fp16-fix", torch_dtype=torch.float16)
pipe = StableDiffusionXLControlNetPipeline.from_pretrained(
   "stabilityai/stable-diffusion-xl-base-1.0",
   controlnet=controlnet, vae=vae, torch_dtype=torch.float16).to("cuda")

# Load Hyper-SD15-1step lora
pipe.load_lora_weights(hf_hub_download("ByteDance/Hyper-SD", "Hyper-SDXL-1step-lora.safetensors"))
pipe.fuse_lora()
# Use TCD scheduler to achieve better image quality
pipe.scheduler = TCDScheduler.from_config(pipe.scheduler.config)
# Lower eta results in more detail for multi-steps inference
eta=1.0
image = pipe("A chocolate cookie", num_inference_steps=4, image=control_image, guidance_scale=0, controlnet_conditioning_scale=control_weight, eta=eta).images[0]
image.save('image_out.png')
SD1.5-related models
2-Steps, 4-Steps, 8-steps LoRA
使用 Canny Controlnet 以及 2-steps 推理:
import torch
from diffusers.utils import load_image
import numpy as np
import cv2
from PIL import Image
from diffusers import ControlNetModel, StableDiffusionControlNetPipeline, DDIMScheduler

from huggingface_hub import hf_hub_download

controlnet_checkpoint = "lllyasviel/control_v11p_sd15_canny"

# Load original image
image = load_image("https://huggingface.co/lllyasviel/control_v11p_sd15_canny/resolve/main/images/input.png")
image = np.array(image)
# Prepare Canny Control Image
low_threshold = 100
high_threshold = 200
image = cv2.Canny(image, low_threshold, high_threshold)
image = image[:, :, None]
image = np.concatenate([image, image, image], axis=2)
control_image = Image.fromarray(image)
control_image.save("control.png")

# Initialize pipeline
controlnet = ControlNetModel.from_pretrained(controlnet_checkpoint, torch_dtype=torch.float16)
pipe = StableDiffusionControlNetPipeline.from_pretrained("runwayml/stable-diffusion-v1-5", controlnet=controlnet, torch_dtype=torch.float16).to("cuda")
pipe.load_lora_weights(hf_hub_download("ByteDance/Hyper-SD", "Hyper-SD15-2steps-lora.safetensors"))
pipe.fuse_lora()
# Ensure ddim scheduler timestep spacing set as trailing !!!
pipe.scheduler = DDIMScheduler.from_config(pipe.scheduler.config, timestep_spacing="trailing")
image = pipe("a blue paradise bird in the jungle", num_inference_steps=2, image=control_image, guidance_scale=0).images[0]
image.save('image_out.png')
Unified LoRA (support 1 to 8 steps inference)
使用 Canny Controlnet :
import torch
from diffusers.utils import load_image
import numpy as np
import cv2
from PIL import Image
from diffusers import ControlNetModel, StableDiffusionControlNetPipeline, TCDScheduler
from huggingface_hub import hf_hub_download

controlnet_checkpoint = "lllyasviel/control_v11p_sd15_canny"

# Load original image
image = load_image("https://huggingface.co/lllyasviel/control_v11p_sd15_canny/resolve/main/images/input.png")
image = np.array(image)
# Prepare Canny Control Image
low_threshold = 100
high_threshold = 200
image = cv2.Canny(image, low_threshold, high_threshold)
image = image[:, :, None]
image = np.concatenate([image, image, image], axis=2)
control_image = Image.fromarray(image)
control_image.save("control.png")

# Initialize pipeline
controlnet = ControlNetModel.from_pretrained(controlnet_checkpoint, torch_dtype=torch.float16)
pipe = StableDiffusionControlNetPipeline.from_pretrained("runwayml/stable-diffusion-v1-5", controlnet=controlnet, torch_dtype=torch.float16).to("cuda")
# Load Hyper-SD15-1step lora
pipe.load_lora_weights(hf_hub_download("ByteDance/Hyper-SD", "Hyper-SD15-1step-lora.safetensors"))
pipe.fuse_lora()
# Use TCD scheduler to achieve better image quality
pipe.scheduler = TCDScheduler.from_config(pipe.scheduler.config)
# Lower eta results in more detail for multi-steps inference
eta=1.0
image = pipe("a blue paradise bird in the jungle", num_inference_steps=1, image=control_image, guidance_scale=0, eta=eta).images[0]
image.save('image_out.png')


![[已解决]FinalShell连接CentOS失败:java.net.UnknownHostException: centos](https://img-blog.csdnimg.cn/direct/661aa1cde34c4227a29cbe9f45fdf76b.png)